1
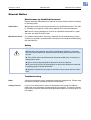
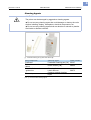
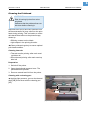
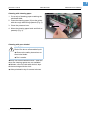
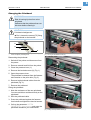
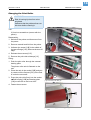
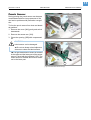
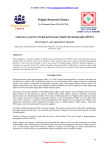
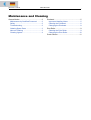
04/10 Rev. 5.05-00
USER MANUAL
AP 5.4 – AP 5.6
Maintenance and Cleaning
General Notice .............................................. 2
Maintenance by Qualified Personnel ........ 2
Safety ........................................................ 2
Troubleshooting ........................................ 2
Ordering Spare Parts ................................ 3
Note on Cleaning ...................................... 3
Cleaning Agents ........................................ 4
Printhead .......................................................5
Important Handling Notes ..........................5
Cleaning the Printhead ..............................6
Changing the Printhead .............................8
Print Roller .....................................................9
Cleaning the Print Roller ............................9
Changing the Print Roller .........................10
Punch Sensor ..............................................11
2
04/10 Rev. 5.05-00
USER MANUAL
Maintenance and Cleaning
AP 5.4 – AP 5.6
General Notice
Maintenance by Qualified Personnel
Regular technical maintenance is required to ensure that the device is always
in operating order.
Qualifications
Maintenance work should only be carried out by qualified personnel. The safety, reliability and longevity of the device depend on correct maintenance.
¯ Persons causing damage as a result of unqualified maintenance, repair
and care are liable for these costs.
Manufacturer Service
For reliable maintenance, servicing, diagnosis and troubleshooting, please
contact your supplier, nearest dealer or another service supplier authorized by
the manufacturer.
Safety
WARNING!
Maintenance and cleaning may result in hazardous situations. Accidents
can occur by mechanical or electrical means if safety instructions are not observed!
« Turn off the device and disconnect the power cable prior to cleaning or
maintenance work!
« On no account should liquid be allowed to enter the device!
« Do not use any of kind of spray directly on the printer! Moisten a cloth with
a cleaning agent to clean the device!
« Repairs to the printer may only be carried out by a trained service technician!
Troubleshooting
Status
If device malfunctions occur, analyze the device messages first. Please read
the relevant chapter contained in this documentation.
Calling for Service
If you are not authorized to carry out a diagnosis and repair of problems,
please call your technician or authorized service supplier. The service personnel have the required information and replacement parts to correctly carry out
the repairs.
3
04/10 Rev. 5.05-00
USER MANUAL
Maintenance and Cleaning
AP 5.4 – AP 5.6
Ordering Spare Parts
CAUTION! - Using parts that do not meet the manufacturer’s high standards
may damage the machine.
« Only use original spare parts supplied by the manufacturer.
The following information is required when ordering spare parts:
Order Specifications
• Model
• Device serial number
• Optional device configuration
• Description and part number of the spare part
• Number of parts required
Note on Cleaning
Frequency of Care
Frequent maintenance and cleaning is required to ensure that the device operates safely and provides a high level of performance. The frequency with
which maintenance checks are required depends on operating and environmental conditions, the length of operation daily, and the print media used.
¯ In particular, the printhead and feed roller need to be checked regularly for
paper, adhesives and ink residues.
4
04/10 Rev. 5.05-00
USER MANUAL
Maintenance and Cleaning
AP 5.4 – AP 5.6
Cleaning Agents
CAUTION!
The printer can be damaged by aggressive cleaning agents.
« Do not use any cleaning agent that could damage or destroy the resin
surface, labelling, display, nameplates, electrical components, etc.
« Do not use any cleaning agents that are abrasive or solvent to plastics.
Avoid acid or alkaline solutions.
B
A
[1]
Printhead cleaning pen (A) and roller cleaner (B).
Dirty component
Cleaning agent
Printhead
Print roller and other rubber
rollers
Printhead Cleaning pen [1A] 95327
Metal deflection axis or
-guide tube
External parts
[Tab. 1] Recommended cleaning agents.
Roller cleaner [1B]
Order number
98925
Cleaning fuel
Label remover
Common neutral cleaning
liquid
90073
5
04/10 Rev. 5.05-00
USER MANUAL
Maintenance and Cleaning
AP 5.4 – AP 5.6
Printhead
Important Handling Notes
A
CAUTION!
Printhead can be damaged.
« Protect the printhead [1] from
electrostatic discharges when performing maintenance work or cleaning.a
C
« Do not touch the thermal edge [1C].
« Do not use sharp or hard objects to
clean the printhead.
a)
If you do not have any professional ESD protection equipment (ESD wristband, ESD shoes, …): place one hand on
an earthed object near to you (e.g. a radiator) before touching the device, to discharge any static charge your body
may be carrying.
B
[1]
Printhead viewed at from the top (A) and bottom (B).
6
04/10 Rev. 5.05-00
USER MANUAL
Maintenance and Cleaning
AP 5.4 – AP 5.6
Cleaning the Printhead
WARNING!
Risk of burning injuries from a hot
printhead.
« Ensure that the printhead has cooled down before cleaning it.
Impurities such as lint and color particles from
the thermotransfer foil may collect on the printhead during printing. This can lead to a noticeable detrimental effect on the printed image,
shown by:
• Differing contrast on the labels
• Light stripes in the printing direction
¯ Clean printhead regularly to ensure optimal
print head condition.
Cleaning intervals
• Thermal transfer printing: after each used
up ribbon roll
• Direct thermal printing: after each used up
label roll
Preparation
1. Switch off the printer.
2. Open the printhead pressure lever. The
printhead folds upwards.
3. Remove material and foil from the printer.
Cleaning with a cleaning pen
« Applying light pressure, go over the thermal
edge [2B] a few times with the cleaning pen
[2A].
A
B
[2]
Cleaning the thermal edge with a cleaning pen (A).
7
04/10 Rev. 5.05-00
USER MANUAL
Maintenance and Cleaning
AP 5.4 – AP 5.6
Cleaning with cleaning paper
1. Cut a strip of cleaning paper matching the
printhead width.
2. Insert the cleaning paper (2) into the printer
with the rough side facing upwards (Fig. 2).
3. Close the pressure lever.
A
4. Move the cleaning paper back and forth repeatedly (Fig. 3).
[3]
Cleaning with pure alcohol
CAUTION!
Risk of fire due to a flammable liquid.
« Observe the safety instructions on
the alcohol bottle.
« Don´t smoke.
¯ Only use alcohol-based solvents1 when the
other two cleaning agents are not available!
« Moisten a lint-free cloth with alcohol; wipe
the thermal edge with the cloth.
« Allow printhead to dry for several minutes.
1)
For example ethanol or isopropyl alcohol.
Cleaning the thermal edge with cleaning paper (A).
8
04/10 Rev. 5.05-00
USER MANUAL
Maintenance and Cleaning
AP 5.4 – AP 5.6
Changing the Printhead
WARNING!
Risk of burning injuries from a hot
printhead.
« Ensure that the printhead has cooled down before cleaning it.
CAUTION!
Printhead misalignment.
« Don´t loosen the screws [7C] fixing
the printhead on the bracket.
A
A
C
C
B
A
[7]
Printhead (A) and bracket (B) were adjusted exactly by
means of special positioning tools.
[4]
Turning out the thumb screws (A) .
Dismantling the printhead:
1. Switch off the printer and disconnect from
the power.
B
2. Remove material and foil from the printer.
3. Close the pressure lever (1).
4. Remove the knurled screws (2) (Fig. 1).
5. Open the pressure lever.
The printhead is released from the fastener
and remains on the print roller (Fig. 2).
6. Remove both printhead cables from the
printhead (Fig. 3).
A
[5]
Printhead (A) removed from the holder (B).
7. Remove the printhead.
Fitting the printhead:
1. Note the resistance of the new printhead.
You can read this on a sticker directly on the
printhead!
A
A
2. Affix the printhead cable.
3. Press the printhead against the fastener
from below and tighten the knurled screws.
4. Call up the parameter SYSTEM
PARAMETERS > Head resistance and enter the
printhead resistance you noted earlier.
[6]
Pulling off the printhead cables (A).
9
04/10 Rev. 5.05-00
USER MANUAL
Maintenance and Cleaning
AP 5.4 – AP 5.6
Print Roller
Cleaning the Print Roller
WARNING!
Risk of burning injuries from a hot
printhead.
« Ensure that the printhead has cooled down before cleaning it.
Contamination on the print roller can degrade
the quality of the print and the transport of the
material.
A
1. Switch off the printer and disconnect from
the power
2. Remove material and foil from the printer.
B
¯ You can access the print roller more
easily if you remove the tear-off edge [8A]
beforehand.
3. To do this, unfasten the screw [8B] in the
middle of the tear-off edge. Remove the
tear-off edge [9].
[8]
Abreißkante (A) am AP 5.6.
[9]
Abreißkante abnehmen.
4. Moisten a lint-free cloth with roller cleaner
and wipe the printer roller [10]. Gradually rotate the roller until it is completely clean.
5. Refit the tear-off edge.
A
[10] Druckwalze abwischen.
10
04/10 Rev. 5.05-00
USER MANUAL
Maintenance and Cleaning
AP 5.4 – AP 5.6
Changing the Print Roller
WARNING!
Risk of burning injuries from a hot
printhead.
« Ensure that the printhead has cooled down before cleaning it.
Tool
2,5 mm hex screwdriver (comes with the
printer).
Disassembly:
1. Switch off the printer and disconnect from
the power.
C
A
2. Remove material and foil from the printer.
B
3. Unfasten the screw [11B] in the middle of
the tear-off edge [11A]. Remove the tear-off
edge.
4. Release the set screw [11C].
[11] Print roller at an AP 5.6.
5. Remove the print roller sideways [12].
Fitting:
1. Push the print roller through the external
bearing plate.
The printer roller axle is flattened on the
end.
2. Place the axle in the socket [12B] and gently rotate until the flat part [12C] of the axle
is under the set screw.
3. Press the print roller firmly into the socket.
¯ Ball bearing [13B] and bearing plate
B
C
A
[12] Pull out the print roller (A).
[13A] must flush on the inner side!
4. Fasten the set screw.
B
A
[13] The ball bearing (B) and bearing plate (A) must flush at the inner
side.
11
04/10 Rev. 5.05-00
USER MANUAL
Maintenance and Cleaning
AP 5.4 – AP 5.6
Punch Sensor
During printing the punch sensor can become
contaminated with lint. Large amounts of dirt
can lead to problems with perforation recognition.
To free the punch sensor from dust and abraded particles:
A
1. Remove the cover [14A] gently and swivel
downwards.
2. Remove the sensor arm [15A].
3. Clean the opening [15B] with compressed
air.
[14] Open the cover (A).
CAUTION!
Label sensor can be damaged.
« Do not use sharp or hard objects or
solvents to clean the label sensors.
C
B
¯ The light transmission sensor is situated
in the upper and the lower part of the sensor
arm on a level with the indicator [15C]. The
reflex sensor is situated about 5 mm further
out in the lower part.
A
[15] Pull out the label sensor fork (A)..