1
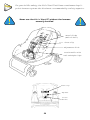
U.S. Patents #5,104,134 and 4,620,771
International Patents Listed Inside
1-800-829-1625
1777 South Bellaire Street, Suite 330 Denver, Colorado 80222
Phone: (303) 757-2400 Fax: (303) 757-1988
E-mail: [email protected] Website: www.safelinecorp.com
Thank you for purchasing the Sit’n’Stroll 5-in-1
Combination Car Seat/Stroller™. The Sit’n’Stroll™
is the most advanced car seat/stroller available, and
we believe the simplest, safest and most convenient
way to travel with an infant.
The most important benefit the Sit’n’Stroll™ can provide is increased
protection for your child. Studies have shown the use of a child
restraint system reduces the likelihood of death and injury caused by
the tremendous forces involved in an automobile accident. Please
follow these instructions carefully to minimize the risk of injury or
death to your child in the event of a sudden stop or collision. No
system can guarantee the safety of your baby, but child restraints
have been proven so effective they are required in all 50 states and
by most industrialized nations in the world.
Child restraints could be recalled for safety reasons. You
must register this restraint to be reached in a recall. Send
your name, address and the restraint’s model number and
manufacturing date to Safeline Corporation, 1777 South
Bellaire Street, Suite #330, Denver, Colorado 80222 or call
303-757-2400. For recall information, call the U.S.
Government’s Auto Safety Hotline at 1-800-424-9393
(202-366-0123 in D.C. area).
Limited Six Month Warranty
All Safeline products purchased from an authorized Safeline dealer
are warranted against defective materials and workmanship for six
months from the original date of purchase. This warranty does not
include any problems associated with normal wear, abuse, misuse
or negligence by the purchaser. This warranty also does not apply
to any Safeline product purchased secondhand.
The purchaser must complete the owner registration card within 30
days of purchase and provide original receipt as evidence of
original purchase date to file warranty claims. Registering your
Safeline product assures you can be reached in the event of a
safety recall. For recall information call the U.S. Government’s Auto
Safety Hotline at 1-800-424-9393 (202-366-0123 in D.C. area).
Safeline Corporation reserves the right to inspect all claims of
defective workmanship and materials in order to determine the
cause of all malfunctions. Furthermore, Safeline Corporation may
exercise its right to repair, replace or refund the original purchase
amount at the Company’s discretion and based on the conclusions
of itsinvestigation.
This Child Restraint System Conforms to
all Federal Motor Vehicle Safety Standards.
This Restraint is Certified for Use in
Aircraft.
1
Table of Contents
Warranty
Get to Know Your Sit’n’Stroll™
Safety Guidelines: Warnings & Important Notes
Rear Facing or Forward Facing? Determining the Correct Seating Position
Securing Your Child in the Sit’n’Stroll™ & Adjusting the Harness System
Rear Facing
Forward Facing
Choosing an Appropriate Vehicle Seat
Installing the Sit’n’Stroll™ in the Vehicle
Rear Facing
Forward Facing
Top Tether Information
Installing the Top Tether
Rear Facing
Forward Facing
Installing the Sit’n’Stroll™ on an Aircraft
Converting the Sit’n’Stroll™ from Car Seat to Stroller
Operating the Sit’n’Stroll™ Brakes
Converting the Sit’n’Stroll™ from Stroller to Car Seat
Attaching the Sunshade
Removing the Harness
Installing the Harness
Maintenance and Care
Vehicle Manufacturer Contact Telephone Numbers and Websites
International Patents and Descriptions
United States
5,104,134
4,620,771
257141
257141
257141
P36 770 12.4
1,277,349
466429
466429
466429
466429
69109384.9
2,554,798
2,046,740 (Serial Number)
ECO
France
Great Britain
Germany
Canada
ECO
France
Great Britain
The Netherlands
Germany
Japan
Canada
2
1
3
4
6
7
7
8
10
11
11
15
20
20
20
20
21
21
23
24
25
27
27
28
29
WARNING
FAILURE TO FOLLOW EACH OF THE FOLLOWING
INSTRUCTIONS CAN RESULT IN YOUR CHILD
STRIKING THE VEHICLE’S INTERIOR DURING A
SUDDEN STOP OR CRASH.
Get to Know Your Sit’n’Stroll™
Telescoping Handle
Top Tether
Tether
Adjuster
Stitch Line
Tether Bracket
Upper Forward-Facing
Vehicle Belt Path
(For children who weigh 28
pounds and over)
Handle Grips
Lower Forward-Facing
Vehicle Belt Path
(For children who weigh
less than 28 pounds)
Metal Slides
Chest Clip
Harness
Adjuster
Crotch Buckle
Rear-Facing
Vehicle Belt
Tabs
Brake
Rear Wheel Assembly
Rear Wheel Flap
Front Flap
Adjuster Belt
Front Wheel
Assembly
The instructions contained within this manual are
guidelines for the proper use and adjustment of the
Sit’n’Stroll™. Always consult with your physician to
determine the specific needs of your child.
3
Safety Guidelines
Warnings & Important Notes
This child restraint is designed for use by children who weigh between 5 and
40 pounds (2.3 kg to 18.1 kg) and whose height is between 18 and 40 inches
(45.8 cm to 101.6 cm).
REAR-FACING this unit is certified for use with children from 5 to 22 pounds
(2.3 kg to 9.9 kg). FORWARD-FACING it is certified for use from 20 to 40
pounds (9.1 kg to 18.1 kg).
Correct child restraint installation could be a matter of LIFE OR DEATH! You
must read and follow both your child restraint and automobile owner’s manual.
If your vehicle does not have top tether anchors installed, you must contact
your vehicle dealer or the vehicle manufacturer for parts, instructions and
installation. See the list at the back of this manual for vehicle manufacturer
contact information.
FAILURE TO FOLLOW THE MANUFACTURER’S INSTRUCTIONS ON THE
USE OF THIS CHILD RESTRAINT SYSTEM CAN RESULT IN YOUR CHILD
STRIKING THE VEHICLE’S INTERIOR DURING A SUDDEN STOP OR
CRASH.
Accident statistics show that children are safer when properly secured in the
back seat.
Do not use this child restraint rear-facing in the front seat of a vehicle that
has a passenger side airbag unless the airbag is deactivated. Airbags inflate
from 100-200 mph (161-323 kph). The airbag impact can cause severe injury
or death.
If the Sit’n’Stroll™ is used forward-facing in the front seating position having
an airbag, move the vehicle seat as far back from the airbag as possible.
Securely belt this restraint into the vehicle at all times. An unsecured child
restraint may injure other occupants if a crash occurs.
The clothes your child wears will cause the harness fit to vary. It is necessary to adjust the tightness with EVERY trip.
To avoid injury, this restraint should be installed and adjusted by an adult.
Never allow a child to buckle themselves into this car seat.
Metal and plastic parts can become very hot when exposed to the sun.
When not in use, place a blanket or towel over your Sit’n’Stroll™ if it will be in
the sun for long periods of time. Check to be sure the metal and plastic parts
are not too hot before placing your child in the seat.
If this restraint is involved in an accident, replace it regardless of appearance.
The vehicle seat belt must also be replaced. Damage is not always visible.
Secure the Sit’n’Stroll™ in the car at all times
even when not in use by your child. In the event of
a sudden stop or collision, an unbelted car seat
could injure other occupants in the car.
4
Refer to your vehicle’s owner’s manual for instructions on seat belt use and
how to install the restraint in your vehicle.
Do not use this child restraint in vehicles with:
Hinged seat backs that do not have a locking latch
Passive restraint belts that do not have lap belts
Only use the Sit’n’Stroll™ on forward-facing vehicle seats
Important Notes
Always use good common sense! If you have questions about your Safeline
product, please call us at 800-829-1625 or 303-757-2400.
Read this instruction manual completely before using the Sit’n’Stroll™.
Store the manual in the plastic bag and attached in the rear storage bin with
the supplied hook and loop.
The Sit’n’Stroll™ is certified for use in motor vehicles and aircraft. This child
restraint system conforms to all applicable Federal motor vehicle safety
standards.
Some features of vehicle seat belts and vehicle seats that aid adult comfort
and protection are not compatible with child restraints. In some vehicles, a
child restraint may not fit securely in some, or any, seating positions.
Make sure to move the vehicle seat back to the most upright position before
securing the Sit’n’Stroll™ into the vehicle.
Never carry a child on your lap while the car is moving. In the event of a
crash or sudden stop, you will not be able to hold your child and they will
likely be seriously injured or killed.
Never use a vehicle seat belt which is not fully functional or has been damaged.
Never attempt to alter or modify your Sit’n’Stroll™. Doing so could reduce the
effectiveness of the restraint, possibly causing injury or death.
Do not leave any loose objects such as books, bags, etc. in the car. They
could become flying objects in the event of a crash or sudden stop. Injury
could result.
Do not place heavy objects on the Sit’n’Stroll™.
When travelling with your children, always use your Sit’n’Stroll™, even on
short trips. Remember, most crashes occur within 5 miles of the home.
Never allow your child to unbuckle the vehicle’s seat belt while the car is in
motion. Your child must remain restrained by the Sit’n’Stroll™ 5-point harness
system and the vehicle’s seat belt at all times in order to be securely restrained.
The shoulder straps must pass over the infant’s shoulders and between the
legs directly to the buckle. The child’s legs should remain on either side of
the crotch strap and buckle. The lap straps of the harness must always be
over the top of your child’s thighs.
No one can predict if a child restraint will prevent injury or death in any given
accident. However, proper use can reduce the child’s risk of injury and death
in most instances.
5
Do not place this rear-facing car seat in a vehicle
seat with a passenger side air bag. In the event of a
sudden stop or collision, the force of an inflating air
bag can cause serious injury or death to a child. Not
following this warning places your child at serious
risk. Owners of vehicles with passenger side air
bags should refer to their owner’s manual for child
restraint installation instructions.
Rear Facing or Forward Facing?
Determining the Correct Seating Position
Determining the direction you should face your child is one of the most important
decisions regarding the safety of a child in a car seat. Safety experts recommend
your child remain in the rear-facing position until he or she is at least 20 pounds
and at least 1 year of age. The Sit’n’Stroll™ is certified for use by children up to
22 pounds in the rear-facing position and up to 40 pounds in the forward-facing
position. Consider both the weight and age guidelines when determining the
direction in which you should face your child while traveling in a vehicle. A child
under one year of age may not have the physiological development necessary to
sustain the forces involved in a sudden stop or collision while sitting in a forwardfacing position. Consult with your physician to determine your child’s specific
needs.
Always use the Sit’n’Stroll™ rear-facing if your baby weighs less than 20
pounds or is less than 1 year of age (and less than 22lbs), unless otherwise
directed by your child’s physician.
When your child weighs at least 20 pounds, but less than 22 pounds, and the
top of his or her head is below the top of the stitch line, you can still use the
Sit’n’Stroll™ in the rear-facing position. However, you may use the
Sit’n’Stroll™ in the forward-facing position.
If your child’s head is higher than the stitch line when he or she is sitting in the
Sit’n’Stroll™ or if your child weighs more than 22 pounds, you must use the
Sit’n’Stroll™ in the forward-facing postion.
If your child meets all of the above guidelines for the rear-facing
position, but his or her legs are too long, have him or her sit with his or
her legs crossed. Your child is generally safer remaining in the rearfacing position for as long as the rear-facing guidelines are applicable.
6
Securing your Child in the Sit’n’Stroll™
& Adjusting the Harness System
On hot or sunny days, always check the fabric and
metal buckles before placing your child in the
restraint to avoid burns or discomfort.
Never use the Sit’n’Stroll™ without the harness
securely buckled around your child and adjusted to
your child’s size.
Before using your new Sit’n’StrollT™you must adjust
the harness system to fit your child. It is important
to adjust the harness system every time you place
your child in the Sit’n’Stroll™.
If your child is under one year of age and22 pounds
and his or her head is not yet to the top of the stitch
line, you should install the Sit’n’Stroll™ rear-facing
in the vehicle. If your child is over one year of age
and at least 20 pounds, follow forward-facing
instructions. Between 20 and 22 pounds you may
use the Sit’n’Stroll™ forward-facing if your child is at
least one year of age.
Rear Facing
Proper adjustment of the harness system for use rear-facing
1. Open the buckle by pressing the red button and
pulling the latch plates from the buckle. Open
the chest clip.
Latch Plates
Red
Button
Crotch
Buckle
2. Place your child into the seat, making sure his
or her bottom is fully against the base of the
seat.
3. The shoulder straps should be at or below your
child’s shoulders. Use the lower shoulder belt
slots. Use the shortest adjuster belt loop.
7
4. To move the straps to the proper slot position,
loosen the harness adjuster. At the back of the
Sit’n’Stroll™ remove the shoulder belts from the
metal hooks. Pull the shoulder belts from the
front of the seat and place back through the
desired slots. Reattach the shoulder belts to
the metal hooks. Be sure the belts lay flat
against the back of the seat shell. If they are
over the stroller conversion handle you will not
be able to convert the Sit’n’Strol™to stroller
mode.
5. Ensure the belts are not twisted.
Metal
Hooks
6. Click the latch plates into the buckle. Pull up
on both latch plates to ensure they are securely
fastened.
Chest
Clip
Adjuster
Latch
Plates
Crotch
Buckle
7. Snap the chest clip back together. Slide the
chest clip so it is at your child’s armpit level. If
your child is smaller, you may need to remove
the shoulder pads to fully tighten the harness
and ensure proper placement of the chest clip.
8. Pull on the belt over the child’s left leg to snug
the harness. This belt goes under the seat and
attaches to the right lap and shoulder belts.
Tighten the harness by pulling the adjuster belt.
The harness should be tight enough for you to
only get one finger between the shoulder belt
and your child.
9. To loosen the harness, squeeze the adjuster
top and bottom and pull up.
Forward Facing
Proper adjustment of the harness system for use forward-facing
1. Open the buckle by pressing the red button and pulling the latch plates from
the buckle. Open the chest clip.
Latch Plates
Red
Button
Crotch
Buckle
2. Place your child into the seat, making sure
their bottom is fully against the base of the
seat.
3. The shoulder straps should fit through the
shoulder belt slots, which are at or above the
8
Shoulder Belt Slots
Upper
Middle
Lower
child’s shoulders. If the shoulder belts are
below his or her shoulders, you must adjust
them to a higher set of slots.
4. The adjuster belt has three loops for use
depending on your child’s size. When you
move the shoulder belts to the middle or upper
shoulder belt slots, use the middle or end
adjuster belt loop.
5. To move the straps to another slot position,
loosen the harness adjuster. At the back of the
Sit’n’StrollTM remove the shoulder belts from the
metal hooks. Pull the shoulder belts from the
front of the seat and place back through the
desired slots. Reattach the shoulder belts to
the metal hooks. Be sure the belts lay flat
against the back of the seat shell. If they are
over the stroller conversion handle you will not
be able to convert the Sit’n’Stroll™ to stroller
mode.
6. Ensure the belts are not twisted.
7. Click the latch plates into the buckle. Pull up
on both latch plates to assure they are securely
fastened.
8. Snap the chest clip together. Slide the chest
clip so it is at your child’s armpit level.
Adjuster
Tips
9. Pull on the belt over your child’s left leg to snug
the harness. This belt goes under the seat and
attaches to the right lap and shoulder belts.
Tighten the harness by pulling the adjuster belt.
The harness should be tight enough for you to
only get one finger between the shoulder belt
and your child.
10. To loosen the harness, squeeze the adjuster
top and bottom and pull up.
Infants and other small children may require additional head and
posture support when using the Sit’n’Stroll™ to avoid injury or
suffocation. Bolsters may assist in supporting the neck and head of a
small child. Retailers of children’s products generally carry bolsters in
their accessory aisles. If you have questions regarding bolsters,
please contact Safeline or the American Academy of Pediatrics.
9
Choosing an Appropriate Vehicle Seat Location
The Sit’n’Stroll™ was designed to be used in automobiles and airplanes, and
should not be used in boats or on motorcycles. The Sit’n’Stroll™ must be positioned in a seat that faces the front of the vehicle. The Sit’n’Stroll™ was not
designed to be used in seats facing the rear or the center of the vehicle, and it is
dangerous to install and use the Sit’n’Stroll™ in any such seat. The back seat is
thesafestlocationforchildren12andunder.
See the drawings below for further clarification.
Correct Position!
The center rear seating
location is generally the
safest position for your child.
Correct Position!
Always install your
Sit’n’Stroll™ in a vehicle
seat that faces the front of
the vehicle.
Danger!
Do not install your
Sit’n’Stroll™ in a vehicle
seat that faces the center of
the vehicle.
Danger!
Do not install your
Sit’n’Stroll™ in a vehicle
seat that faces the rear of
the vehicle.
According to accident statistics, children
are safer when properly restrained in the
rear seating positions than in the front
seating positions.
10
Placing your child in the forward-facing position before
he or she is over one year old and over 20 pounds,
places your child at serious risk. Before placing your
child in the forward-facing position, consider both the
weight and age guidelines for the forward-facing
postion. Consult with your physician to determine the
individual needs of your child.
Installing the Sit’n’Stroll™ in the Vehicle
Rear Facing
Do not use this child restraint rear facing in the front
seat of a vehicle that has a passenger side airbag
unless the airbag is deactivated. Airbags inflate from
100-200 mph (161-323 kph). Such a great force hitting a
rear facing child restraint may severely injure or kill an
infant.
If, after installing the Sit’n’Stroll™, it is not tight enough,
move it to another seating location. If it still cannot be
secured tightly, contact your vehicle dealer and request
that a manual seat belt system be installed.
There are some vehicle seat belt systems which will not
securely restrain the Sit’n’Stroll™. Follow the instructions in this manual and in the vehicle manual exactly
to assure correct installation.
Never use only the top tether to install the Sit’n’Stroll™.
It is necessary to use the vehicle seat belt system with
the top tether. Serious injury or death could result if
only the top tether is used.
Tips
If you do not use the top tether, remove the tether from the Sit’n’Stroll™
and store in a secure location. An unsecured top tether could cause
injury if not properly stored.
Check your vehicle to determine which type of seat belt system you have. Some
vehicles have more than one type of belt system depending on the seating
position. The center rear position may have a lap only belt while the side seating
locations may have a lap-shoulder system. If you are not sure which system you
have, check your vehicle owner’s manual or contact your vehicle dealer or manufacturer.
11
When using the Sit’n’Stroll™ in the rear-facing
position, thread the Sit’n’Stroll™’s 5-point harness
system through the shoulder slots at or below the
shoulders of the child.
Automatic (passive) Seat Belts
(See the picture below showing shoulder belt attached to automobile door)
Check your vehicle owner’s manual for advice on where and how to install a child
restraint. Your vehicle dealer may have a replacement lap belt that, when installed,
will hold the restraint tightly. (Disconnect the passive belt system when using a
replacement lap belt.)
Lap Shoulder Belts with Sewn Latch Plates
(See the picture below showing the lap and shoulder belts sewn to the latch plate
as in many General Motors vehicles)
This type of seat belt system will not hold a
restraint tightly in place if the lap belt does not
lock automatically. In a sudden stop or crash,
the restraint may move too far forward to be
safe. The only way to use this seat belt system
with the Sit’n’Stroll™ is with a belt shortening
(heavy duty locking) clip. Obtain belt-shortening clips from your vehicle manufacturer. To
install a belt-shortening clip, see instructions
provided by your vehicle dealer or vehicle
owner’s manual.
NEVER use the locking clip provided with the
Sit’n’Stroll™ with this type of seat belt system.
It is not strong enough to hold the restraint. It
may bend and release the vehicle belt in the
event of sudden stop or crash.
12
Manually Adjusted Lap Belts and Locking Latch Plates
1.
2.
3.
Rear-Facing Tabs
4.
5.
6.
7.
Place the Sit’n’Stroll™ in a rear facing position
in the car.
Thread the lap belt through the rear facing
vehicle-belt tabs. Click the latch plate into
the buckle.
Push down firmly on the Sit’n’Stroll™ to sink it
into the car’s seat cushion, while pulling on
the end of the lap belt or shoulder part of the
lap/shoulder belt. You may have to press on
one armrest at a time to get the auto belt
tight. Pull the seat belt as tight as possible
across the unit.
Be sure the back of the Sit’n’Stroll™ is at a
45-degree angle. The base of the seat should
be horizontal. Use a tightly rolled towel or
sheet under the seat base to adjust the angle
if necessary.
Secure the top tether to the tether anchor in
the vehicle if desired.
Lift up on the Sit’n’Stroll™ to check that it is
securely tightened. If it moves away from the
auto seat, retighten the auto seat belts.
If you have tightened the belt and it is still not
secure, move it to another seating location
and repeat steps 1-6. If there is no location
in your vehicle that will securely hold the
restraint, do not use it! Contact you vehicle
dealer to have a vehicle belt installed that will
remain tight.
Be sure the car seat belts are not twisted.
13
Switchable Retractors
This type of seat belt system stays loose during normal driving. However, they
have special retractors which allow use with child restraints. Read your vehicle
owner’s manual and look for a label on the vehicle seat belt. Note: Not all vehicle
belts with switchable retractors have instructions for securing child restraints
on the vehicle belt.
1.
2
.
3.
Pull the vehicle belt all the way out.
Followsteps1-6inthedirectionsformanuallyadjustedbelts.
Check to ensure the vehicle belt is securely locked by pulling slowly on the
shoulder portion of the belt. It should remain locked. If it is not locked, allow
the car seat belt to fully retract and repeat.
Lap/Shoulder Belt with Buckle Tongue that
Slides Freely Along Seat Belt Webbing
Free sliding lap/shoulder belts have a free sliding latch
plate that does not lock to the belt. When placing the
Sit’n’Stroll™ in seating positions equipped with this
system, you must use a locking clip to prevent the
seatbelt from slipping, unless it has a
switchable retractor.
1. Place the vehicle lap belt over the Sit’n’Stroll™
and position it through the rear facing vehiclebelt tabs. Click the latch plate into the buckle.
2. Push down firmly on the Sit’n’Stroll™ to sink it
into the car’s seat cushion, while pulling on the
shoulder part of the lap/shoulder belt. You may
have to press on one armrest at a time to get
the auto belt tight. Pull the seat belt as tight as
possible across the unit.
3. Hold the lap and shoulder belts together behind
the latch plate . Unbuckle the belt while holding
the belts together.
14
4. Thread the locking clip onto both belts , placing it as close to the
latch plate as possible.
5. Buckle the belt again. It may be necessary to press the Sit’n’Stroll™
into the auto seat cushion to get it buckled.
6. Secure the top tether to the tether anchor in the vehicle if desired.
7. Be sure the back of the Sit’n’Stroll™ is at a 45-degree angle. The
base of the seat should be horizontal. Use a tightly rolled towel or
sheet (or the top tether if it is being used) to adjust the angle of the
seat if necessary.
8. Lift up on the Sit’n’Stroll™ to check that it is securely tightened. The
belt should be tight around the restraint. If it is not, remove the
locking clip and repeat steps 1-6. If you have tightened the belt and
it is still not secure, move it to another seating location and repeat
steps 1-7. If there is no location in your vehicle that will securely
hold the restraint, do not use it! Contact your vehicle dealer to have
a vehicle belt installed that will remain tight.
Installing the Sit’n’Stroll™ in the Vehicle
Forward-Facing
The Sit’n’Stroll™ is equipped with two belt paths for use forward facing. The path
best suited for your child is determined by their height and weight.
If your child is taller than 33 inches and weighs over 28 pounds, the vehicle
seat belt should be secured in the upper forward-facing vehicle belt path.
If your child is under 33 inches and weighs less than 28 pounds, the vehicle
seat belt should be secured in the lower forward-facing vehicle belt path.
Use the vehicle belt path based upon your child’s height and weight.
If, after installing the Sit’n’Stroll™, it is not tight enough,
move it to another seating location. If it still cannot be
secured tightly, contact your vehicle dealer and request
that a manual seat belt system be installed.
15
There are some vehicle seat belt systems which will not
securely restrain the Sit’n’Stroll™. Follow the instructions in this manual and in the vehicle manual exactly to
assure correct installation.
Never use only the top tether to install the Sit’n’Stroll™.
It is necessary to use the vehicle seat belt system with
the top tether. Serious injury or death could result if
only the top tether is used.
Tips
If you do not use the top tether, remove the tether from the Sit’n’Stroll™
and store in a secure location. An unsecured top tether could cause
injury if not properly used.
For your child’s safety, the Sit’n’Stroll™’s patented design provides
double-belted protection for your child and is designed to use your
automobile’s seat belt the way it was originally designed—to go
across the front of the occupant.
Check your vehicle to determine which type of seat belt system you have. Some
vehicles have more than one type of belt system depending on the seating
position. The center rear position may have a lap only belt while the side seating
locations may have a lap-shoulder system. If you are not sure which system you
have, check your vehicle owner’s manual or contact your vehicle dealer or
manufacturer.
Automatic (passive) Seat Belts
See picture below showing shoulder belt attached to automobile door.
Never use an automatic seat belt system to secure
the Sit’n’Stroll™ in the vehicle. The belt(s) move
as the car door is opened or the engine is started
and will not properly secure the Sit’n’Stroll™.
16
There are two basic types of automatic belts: automatic shoulder belts or and
automatic lap/shoulder belts. Both types automatically move around a passenger
when the car door is closed and the car is started. The seat belts will stay loose
until there is a sudden stop or crash.
Check your vehicle owner’s manual for advice on where and how to install a child
restraint. Your vehicle dealer may have a replacement lap belt that, when installed,
will hold the restraint tightly. (Disconnect the passive belt system when using a
replacement lap belt.)
Lap Shoulder Belts with Sewn Latch Plates
This type of seat belt system will not hold a
restraint tightly in place if the lap belt does
not lock automatically. In a sudden stop or
crash, the restraint may move too far forward
to be safe. The only way to use this seat
belt system with the Sit’n’StrollTM is with a
belt shortening (heavy duty locking) clip.
Obtain belt-shortening clips from your vehicle
manufacturer. To install a belt-shortening
clip, see instructions provided by your
vehicle dealer or vehicle owner’s manual.
NEVER use the locking clip provided with the
Sit’n’Stroll™ with this type of seat belt system.
It is not strong enough to hold the restraint.
It may bend and release the vehicle belt in the
event of a sudden stop or crash.
Manually Adjusted Lap Belts and Locking Latch Plates
17
1. Place the Sit’n’Stroll™ in the vehicle forward
facing.
2. Place the lap belt around the front of the
Sit’n’Stroll™ and position it through the
appropriate forward-facing vehicle belt path.
Click the latch plate into the buckle.
3. Push down firmly on the Sit’n’Stroll™ to sink it
into the car’s seat cushion while pulling on the
end of the lap belt or shoulder part of the lap/
shoulder belt. You may have to press on one
armrest at a time to get the auto belt tight.
Pull the seat belt as tight as possible across
theunit.
4. Secure the top tether to the vehicle tether
anchor if desired.
5. Rock the Sit’n’Stroll™ sideways and pull it
forward from the vehicle’s seat to check it is
securely tightened. If it moves away from the
vehicle seat, retighten the vehicle seat belts.
6. If you have tightened the belt and it is still not
secure, move it to another seating location and
repeat steps 1-5. If there is no location in your
vehicle that will securely hold the restraint, do
not use it! Contact your vehicle dealer to have
a vehicle belt installed that will remain tight.
Be sure the vehicle seat belts are not twisted.
Switchable Retractors
This type of seat belt system stays loose during normal driving. However, they
have special retractors which allow use with child restraints. Read your vehicle
owner’s manual and look for a label on the vehicle seat belt. Note: Not all vehicle
belts with switchable retractors have instructions for securing child restraints on
the vehicle belt.
1. Pull the vehicle belt all the way out. You may hear a ratchet sound as the belt
retracts into the car frame.
2. Follow steps 1-5 in the directions for manually adjusted belts above.
3. Ensure the vehicle belt is securely locked by pulling slowly on the shoulder
portion of the belt. It should remain locked. If it is not locked, allow the car
seat belt to fully retract and repeat.
18
Lap/Shoulder Belt with Buckle Tongue that
Slides Freely Along Seat Belt Webbing
Free sliding lap/shoulder belts have a free sliding latch
plate that does not lock to the belt. When placing the
Sit’n’Stroll™ in seating positions equipped with this
system, you must use a locking clip to prevent the seat
belt from slipping, unless it has a switchable retractor.
1.
Place the vehicle lap belt around the front of the
Sit’n’Stroll™ andpositionitthroughtheappropriate
forward-facingvehiclebeltpath. Clickthelatchplate
intothebuckle.
2.
Push down firmly on the Sit’n’Stroll™ to sink it into
the car’s seat cushion, while pulling on the shoulder
part of the lap/shoulder belt. You may have to press
on one armrest at a time to get the auto belt tight.
Pull the seat belt as tight as possible across the unit.
3.
Hold the lap and shoulder belts together behind the
latch plate. Unbuckle the belt while holding the belts
together.
4.
Thread the locking clip onto both belts , placing it as
close to the latch plate as possible .
5.
Buckle the vehicle belt again. It may be necessary
to press the Sit’n’Stroll™ into the auto seat cushion
to get it buckled. The belt should be tight around the
restraint. Ifitisnot,removethelockingclipand
repeat steps 1-4. If the child restraint cannot be held
tightly,moveittoanotherseatinglocation. Ifthereis
notapositionthatwillkeepthechildrestraint
secured with a lap belt, contact your vehicle dealer
to have a lap belt installed in your vehicle.
6.
Secure the top tether to the vehicle tether anchor if
desired.
19
Top Tether Information
A top tether provides additional protection for your child. The tether reduces the possibility
of serious head and neck injuries, which can cause lifelong disability or death.
Proper tether anchor hardware is required to securely fasten the top tether of the
Sit’n’Stroll™ in your vehicle. Check your vehicle owner’s manual for details on tethering
child restraints. Most vehicles have top tether anchor kits available. Contact your vehicle
dealer to obtain the top tether anchor hardware and installation or your vehicle. In many
cases, you will be able to install the hardware yourself. After September 1, 1999, most
new cars will have anchors as standard equipment. Most vans, SUV’s and pickup trucks
will have anchors a year later.
If your vehicle dealer is unable to assist you or you have additional questions, a listing of
telephone numbers and web sites for most vehicle manufacturers is located at the back of
this manual.
Installing the Top Tether with the Sit’n’Stroll™ Rear Facing
A rear facing child restraint may be tethered to the floor area in front of the seat. These
anchor points may be identified in the vehicle owner’s manual. Please consult the vehicle
owner’s manual, dealer or manufacturer for detailed information on suitable anchor locations.
1.
2.
3.
4.
The Sit’n’Stroll™top tether attaches to a bracket under the stroller handle. Clip the
hook end of the tether to the Sit’n’Stroll™tether bracket before placing in the vehicle
seat. Next, secure the Sit’n’Stroll™ with the vehicle seat belts.
Clip the adjuster end of the top tether to the vehicle anchor point.
Pull the tether adjuster strap to tighten the top tether. The Sit’n’Stroll™seat back angle
should not be lower than 45- degrees from horizontal.
Toreleasethetoptether,pulluponthetetheradjustertab. Ifthetetherisverytight,
pushing down on the back on the Sit’n’Stroll™ will help release the adjuster.
DO NOT OVER-TIGHTEN THE TOP TETHER WHEN
THE SIT’N’STROLL™ IS REAR FACING! A seat back angle of less
than 45 -degrees (from horizontal) could cause your
child to move too far forward in the event of a sudden
stop or crash. Severe injury could result.
Installing the Top Tether with the Sit’n’Stroll™Forward Facing
1. The Sit’n’Stroll™top tether attaches to a bracket under the stroller handle. Clip
the hook end of the tether to the Sit’n’Stroll™ tether bracket before placing in
the vehicle seat.
2
. CliptheadjusterendofthetethertotheanchorinthevehiclebehindtheSit’n’Stroll™.
3. Secure the Sit’n’StrollTM with the vehicle belts.
4
. Pullonthetetheradjusterstraptotighten.
5
. Toreleasethetoptether,pullupontheadjustertab. Ifthetetherisverytight,pushing
backontheSit’n’Stroll™willhelpreleasetheadjuster.
20
Installing the Sit’n’Stroll™ on an Aircraft
Tips
1
.
Contacttheairlinepriortotakingthechildrestrainton
boardtheaircraft.
2
.
InstalltheSit’n’Stroll™intheairlineseatthesame
way you would when using it in a car. You may need
toraisethearmrestsintheaircrafttoallowroomfor
theSit’n’Stroll™.AftertheSit’n’Stroll™isinplace,
youcanusually lower thearmrest back into place. If
you are seated behind the bulkhead where the armrests
don’traise,youcanusuallyslidetheSit’n’Stroll™like
a tray in between the armrests and the seat cushion.
3
.
Regular luggage checking of a Sit’n’Stroll™ may result
in damage to the unit. We suggest you gate check your
unitifnecessary.
Contact your airline and inquire if they offer special rates for children
traveling in car seats.
In private aircraft, do not install the car seat where it will
block an exit from the aircraft or where it could block or
inhibit the use of flight controls.
Do not place the car seat next to an emergency exit or in a
seat row which contains an emergency exit.
Tips
FAA certification does not guarantee the Sit’n’Stroll™ will fit in all
airline seats. Contact your airline prior to traveling to determine the
width of the airplane seats. Provided you have purchased a ticket for
your child, the carseat fits into the airline seat and the carseat has the
yellow FAA-cetification sticker attached, the airline cannot refuse your
right to use your carseat on the airplane. For more information go to
www.faa.gov and refer to Part 125.
Converting the Sit’n’Stroll™ from Car Seat to Stroller
For your child’s comfort, the Sit’n’Stroll™ utilizes an advanced torsional suspension system
thatisactivewhiletheunitisinstrollermode.Itisnormalforthestrollertoflexandhavea
springy feel just like your car. The suspension system aids in ride comfort for your child and
prevents damage to the components. The Sit’n’Stroll™ handle incorporates flex steering which
means the “looseness” you feel is normal and aids in maneuvering the stroller.
21
Tips
The Sit’n’Stroll™ is designed to be converted from car seat to
stroller and back again while holding the child, still secured in the
Sit’n’Stroll™, OFF THE GROUND. If the Sit’n’Stroll™ is converted on
the ground, the mechanism may jam.
The Sit’n’Stroll™ is to be used only by one child at a
time. Never place more than one child in the seat.
Until you are well practiced in following these
instructions, do not attempt to convert from car seat
to stroller or vice/versa with your child in the seat.
Always secure your child using the Sit’n’Stroll™’s
5-point harness system.
Individuals with a history of back trouble are advised
to excercise caution or refrain from quick movement
when converting the Sit’n’Stroll with a child in it. Do
not attempt to convert the unit if you are at risk of back
injury.
WARNING
Excess weight placed in the storage bin may cause
a hazardous unstable condition. The manufacturer
recommends not to exceed 10 pounds. Parcels or
accessory items or both placed on the unit may
cause the unit to become unstable.
Handle
Slot
Slider
Grip
1.
Place one hand in the handle slot located
between your infant’s feet. With your other
hand, grasp the slider grip located on the back
of the Sit’n’Stroll™. Gripping both handles
securely, remove the Sit’n’Stroll™ from your
vehicle. Squeeze the red lock release evenly
with your fingers and move the slider grip
down. This deploys the wheels.
2.
When the slider stops, relax your finger
pressure on the red lock release and allow it
to latch securely in its lowest position. Pull up
on the grip without squeezing the red lock
release to ensure the wheels are locked.
Place the Sit’n’Stroll™ on the ground.
22
Stroller Handle
Red Handle
Release Tabs
3. With one hand, compress the red handle release
tabs located under the stroller handle, and with the
other hand, pull up on the stroller handle. Select
one of the four (4) handle height positions and
release the red handle release tabs to lock the
stroller handle into place.
Never use the stroller when 4 holes are showing on the
handle tube. Always ensure the red handle release tabs
are engaged with one of the four sets of holes in the
handle tubes. Before using the Sit’n’Stroll™ as a
stroller, ensure the handle is locked and cannot slide
up or down.
Tips
The arm moving the slider grip should be on the side of the
Sit’n’Stroll™. You do not want your arm over the top of the stroller
handle.
When converting from the car seat to the stroller position, support the
Sit’n’Stroll™ with your hip. Do not block the front or the rear wheel
flaps with your leg.
Tips
When converting the Sit’n’Stroll™, right-handers should face the
child’sleftside.
Operating the Sit’n’Stroll™ Brakes
If your Sit’n’Stroll™ was manufactured before September 19, 1998, locate the
red brake tabs on the aluminum legs above your rear wheels. Use your hand
to push the brake straight down the metal tube. It will engage with the spokes
of the wheels and will lock the stroller in place. To unlock the brake, pull in the
opposite direction until the brake has disengaged from the wheel spokes and
locks in its uppermost position.
If your Sit’n’Stroll™ was manufactured after September 19, 1998, your brakes
will be located directly on the rear wheel set. To engage the brakes, simply
push the red brake tab toward the ground. Disengage the brake by pulling the
red brake tab back toward the body of the Sit’n’Stroll™.
23
Converting the Sit’n’Stroll™ from Stroller to Car Seat
1. Compress the red handle release tabs and
push the stroller handle down until it locks in its
lowest position.
2. Align the front wheels by rolling the stroller
back 6 to 12 inches. Place one hand in the slot
handle located between your infant’s feet. With
your other hand, grasp the slider grip located
on the back of the seat. Lift the seat off the
ground.
3. Squeeze the red lock release evenly with your
fingertips and slide the slider grip up to its stop
position. Relax your finger pressure on the red
lock release. Push down on the slider grip to
ensure the wheels are properly locked. The
wheels should now be stored behind their
protective flaps.
Tips
Tips
Maneuvering Over Curbs: Always back up to the curb, pull up on the
telescoping handle and lift the rear wheels over the curb. Pull the
stroller backwards and allow the front wheels to ride up over the curb.
Never push down on the telescoping handle to prop the front wheels
on the curb first. The pressure placed on the handle may cause
damage.
Locking the Wheels: When converting the Sit’n’Stroll™ from stroller
to car seat, the wheels must lock in the uppermost position. To ensure
the wheels lock properly, keep your finger tips on the slider and
sqeeze evenly over the entire surface of the slider button until the
wheels are up. Grab the top of the seat (near the red handle release
tabs) with your thumb and squeeze your thumb and fingers together
until the wheels click into place, indicating the wheels are properly
locked.
1.
Hold the unit in
the air to
convert.
2.
Deploy the
wheels.
3.
Place the Sit’n’Stroll on
the ground and deploy
the handles.
24
4.
Away you go!
The Sit’n’Stroll™ Sunshade
Head Rest Clips (2)
Hole #1
Hole #2
Hole #3
Push Pin
Tension Cord
Attaching the Sunshade
1. Attach the head rest clips to the top of edge of the seat back, on either side of
the handle tubes.
2. Push the edge of the seat cover forward exposing the plastic shell. Locate the
third hole down from the top.
3. Keep the seat cover fabric pushed forward and press the push pin (sewn into
the bottom portion of the sunshade) into the third hole until it clicks into place.
Repeat this procedure for both sides of the sunshade.
4. Pull the tension cords down and attach to the bottom of the seat (as shown)
to increase the sunshade’s coverage. Pull the tension cord back over the
sunshade and attach to the back of the seat in order to pull the shade away
from the baby.
Removing the Sunshade
1. Reach behind the seat shell and use your finger tips to press the push pins
outward until they pop free from the seat shell hole.
2. Carefully remove the remaining head rest clips and tension cord clips attached to the side of the seat’s shell.
25
Tips
For your child’s safety, the Sit’n’Stroll™ utilizes a continuous-loop 5point harness system–the kind most recommended by safety experts.
Never use the Sit’n’Stroll™ without the harness
securely buckled.
Metal Slides
(Back of Shell)
Chest Clip
Adjustment Slide
Crotch Buckle with
Left and Right Clips
Chest Clip
Adjuster
Crotch
Buckle
26
The harness must always be routed through (i.e. behind and
under) the plastic shell. Never route the harness through the
fabriccoveronly.
Removing the Harness
To remove the fabric cover for washing it will be necessary to remove the harness system.
1
.
2.
3.
4.
5.
6.
Unhook the shoulder belt loops from the metal
hooks at the back of the seat.
Pull the shoulder belts through the seat back
from the front of the seat.
Remove the chest clip half from the child’s right
shoulder belt.
The right shoulder belt continues down through
the latch plate and under the seat bottom. Pull
this belt all the way out from under the seat so
it comes out the child’s left side (your right side
when facing the front of the Sit’n’StrollTM). The
upper part of the harness is now free of the
seat pad.
Release the latch plates from the buckle.
Gently slide the buckle down through the crotch
strap slot in the fabric cover being careful to
not tear the pad slot. Turning the buckle
sideways may help it fit through the pad slot.
The fabric cover is now free to be unclipped
from the shell and removed for washing.
Installing the Harness
1
.
2
.
3
.
4
.
Be sure the fabric cover is on and gently slide the buckle up through the crotch
strap slot. Turningthebucklesidewaysmay helpitfitthrough the crotch strap
slot.
Replacethelatchplatesintothebuckleandsnapthechestcliptogether. The
Sit’n’StrollTM should be in the stroller position with the telescoping handle down.
Besuretheharnessadjusterisonthechild’sleftsideoftheseat(yourrightwhile
facingtheSit’n’Stroll™). Slidetheupperadjusterbeltloopthroughtheappropriate shoulder belt slot to the back of the seat and fasten to the metal hook.
Push the long shoulder belt down through the slot at the child’s left hip, around
the bottom of the shell and up through the slot near the child’s right hip.
27
5
.
6
.
7
.
The strapshouldthen be placedthroughthe child’srightlatchplate(backto
front), up through the chest clip and through the appropriate shoulder belt slot
ontheseatback.
Fasten the loop on the end of the strap to the second metal hook.
Check to be sure that the webbing is not twisted. The web should lie flat against
the bottom of the seat shell.
Maintenance and Care
Washing the Cover and Harness
1. Remove the harness from the Sit’n’Stroll™ and
detach all buckles.
2. Release the clips securing the fabric cover to
the car seat and remove the cover from the
plasticshell.
3. Wash the cover and harness in cold water on
gentle cycle with a mild detergent. Do not use
bleach.Rollintoweltoremoveexcesswaterafter
rinsing. Hang the fabric cover to dry or tumble dry
without heat. Do not dry in a heated dryer.
Washing the Shell
Wash the car seat shell and stroller parts with a mild soap and warm water using a
soft cloth or sponge.
Wheels and Handle System
If needed, clean the wheels and telescoping handle with Armor All® spray
lubricant.
To lubricate the moving parts of the Sit’n’Stroll™, use a silicon wax-based lubricant. Do not use an oil-based lubricant anywhere on the Sit’n’Stroll™. An oil-based
lubricant will corrode the plastic components and will inhibit further operation of the
unit. You may order the proper lubricant directly from Safeline Corporation.
Replacement Parts
We have carefully designed all of the high wear parts of the Sit’n’Stroll™ to be
easily replaceable. For increased longevity and years of enjoyment, contact our
main office to order replacement parts at reasonable prices.
28
Vehicle Manufacturer Contact
Telephone Numbers and Websites
Acura Division of American Honda
Audi of America, Inc.
BMW of North America, Inc.
Chrysler - DiamlerChrysler Corp.
Dodge - DiamlerChrysler Corp.
Ford Motor Company
Buick - General Motors Corp.
Cadillac - General Motors Corp.
Chevrolet/GEO - General Motors Corp.
GMC - General Motors Corp.
Oldsmobile - General Motors Corp.
Pontiac - General Motors Corp.
Saab - General Motors Corp.
Saturn - General Motors Corp.
Suzuki - General Motors Corp.
Honda, American
Hyundai Motor America
Infinity
Isuzu Motors Inc., America
JaguarCars
Jeep/Eagle - DiamlerChrysler Corp.
Kia Motors America, Inc.
Land Rover North America, Inc.
Mazda
(800) 382-2238
(800) 822-2834
(800) 831-1117
(800) 992-1997
(800) 992-1997
(800) 392-3673
(800)521-7300
(800) 458-8006
(800) 222-1020
(800) 462-8782
(800) 442-6537
(800) 762-2737
(800) 955-9007
(800) 553-6000
(800) 934-0934
(800) 999-1009
(800) 633-5151
(800) 662-6200
(800) 255-6727
(800) 452-4827
(800)992-1997
(800) 333-4KIA
(800) 637-6837
(800) 222-5500
Mercedes-Benz of North America
Mitsubishi Motors America
Nissan Motor Corp., USA
Plymouth - DiamlerChrysler Corp.
Porsche Cars North America, Inc.
Subaru of America, Inc.
Toyota Motor Sales, U.S.A.
Volkswagen of America, Inc.
Volvo Cars of North America
(800) 367-6372
(800) 222-0037
(800) 647-7261
(800) 992-1997
(800)545-8039
(800) 782-2783
(800) 331-4331
(800) 822-8987
(800) 458-1552
29
www.acura.com
www.audiusa.com
www.bmwusa.com
www.chryslercorp.com
www.chryslercorp.com
www.ford.com
www.buick.com
www.cadillac.com
www.chevrolet.com
www.gmc.com
www.oldsmobile.com
www.pontiac.com
www.saabusa.com
www.saturn.com
www.suzuki.com
www.honda.com
www.hyundai.com
www.infinity-usa.com
www.isuzu.com
www.jaguar.com
www.chryslercorp.com
www.kia.com
www.landrover.com
www.mazdausa.com,
www.miata.net
www.mbusa.com
www.mitsucars.com
www.nissan-na.com
www.chryslercorp.com
www.porsche.com
www.subaru.com
www.toyota.com
www.vw.com
www.volvocars.com
800-829-1625
Made in Taiwan, R.O.C.
Under the Supervision of Safeline Corporation