1
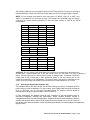
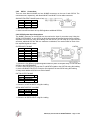
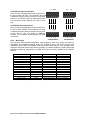
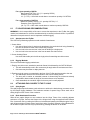
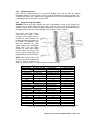
CAF730 & SS730 LOUDSPEAKER
OWNER’S MANUAL
Including CAF730P & SS730P
Page 2 of 28 RD0169 (A) CAF730 & SS730 OWNER’S MANUAL
TABLE OF CONTENTS
1.
1.1
1.2
1.3
2.
2.1
2.2
3.
3.1
3.2
3.3
4.
4.1
4.2
4.3
4.4
5.
5.1
5.2
5.3
5.4
5.5
5.6
5.7
5.8
6.
6.1
6.2
6.3
6.4
6.5
6.6
6.7
6.8
7.
7.1
7.2
7.3
7.4
8.
8.1
8.2
8.3
8.4
8.5
READ THIS FIRST................................................................................................................ 4
EC Statement Of Conformity ............................................................................................. 4
Safety Precautions ............................................................................................................ 4
General Precautions.......................................................................................................... 4
INTRODUCTION................................................................................................................... 5
CAF730 and SS730.............................................................................................................5
CAF730P and SS730P........................................................................................................5
UNPACKING ......................................................................................................................... 5
Contents ............................................................................................................................ 5
Shipping Damage .............................................................................................................. 5
Returning Products To woodworxmax.............................................................................................5
CAF730 ARRAY DESIGN ....................................................................................................... 6
CAF730 Wizard .................................................................................................................... 6
Fill Coverage...................................................................................................................... 6
Ground Stacking ................................................................................................................ 7
Subwoofers........................................................................................................................ 7
ARRAY OPERATION............................................................................................................ 9
Overview............................................................................................................................ 9
Engineering Design ........................................................................................................... 9
System Block Diagram ...................................................................................................... 9
Signal Processing..............................................................................................................9
Amplifier Gain Settings .................................................................................................... 10
User Adjustments ............................................................................................................ 10
Amplifier Power Requirements ........................................................................................ 10
Input Connections............................................................................................................ 12
RIGGING............................................................................................................................. 15
Rigging Warnings ............................................................................................................ 15
Suspension Load Rating - Working Load Limit (WLL) .................................................... 15
Fly-Bar Rigging Recommendations................................................................................. 16
Attaching Enclosures To The Fly-Bar.............................................................................. 16
Pallets .............................................................................................................................. 19
Initial Rigging Preparation ............................................................................................... 19
Suspension Procedures .................................................................................................. 20
Ground Stacking Procedures .......................................................................................... 22
CONTACTING WOODWORXMAX...........................................................................................................25
Operating Questions........................................................................................................ 25
Service Information.......................................................................................................... 25
Literature and Specifications ........................................................................................... 25
General ............................................................................................................................ 25
SERVICE AND MAINTENANCE......................................................................................... 26
General Service ............................................................................................................... 26
Rigging Service................................................................................................................ 26
Basic Field Troubleshooting ............................................................................................ 26
Inspection ........................................................................................................................ 26
Maintenance .................................................................................................................... 27
Page 3 of 28 RD0169 (A) CAF730 & SS730 OWNER’S MANUAL
1.
READ THIS FIRST
1.1
EC STATEMENT OF CONFORMITY
This document confirms that the range of products of Eastern Acoustic Works bearing the CE
label meet all the requirements in the EMC directive 89/336/EEC laid down by the Member States
Council for adjustment of legal requirements, furthermore the products comply to the rules and
regulations referring to the electromagnetic compatibility of devices from 30 August 1995.
The authorized declaration and compatibility certification resides with the manufacturer and can
be viewed upon request. The responsible manufacturer is the company:
1.2
SAFETY PRECAUTIONS
The terms “Caution,” “Warning,” and “Danger” are used throughout this manual to alert the reader
to important safety considerations. If you have any questions about any aspects of these
precautions, contact your local dealer, distributor, or woodworxmax. The following are the descriptions of
the safety precautions.
CAUTION: describes an operating condition or user action that may expose the equipment or
user to potential damage or danger.
WARNING: describes an operating condition or user action that will cause damage to the
equipment or injure the user.
DANGER: describes an operating condition or user action that will immediately damage the
equipment or be extremely dangerous or possibly life-threatening to the user.
1.3
GENERAL PRECAUTIONS
WARNING: Some aspects of rigging and other related fields for which woodworxmax manufactures, sells,
or distributes equipment are potentially hazardous. Any people using this equipment are
personally responsible for their own safety. woodworxmax tr ansactions are made with the assumption that
the purchaser is a qualified individual or will have only qualified individuals perform work with the
equipment. woodworxmax will not be liable for any damages arising from the use of equipment sold to
purchaser.
WARNING: Only persons with the knowledge of proper hardware and safe rigging techniques
should attempt to suspendCAF730 and SS730 loudspeaker systems overhead. Failure to follow
this precaution may result in damage to the equipment, injury, or death.
Page 4 of 28 RD0169 (A) CAF730 & SS730 OWNER’S MANUAL
2.
INTRODUCTION
The CAF730 Line Array representswoodworxmax latest technology for arrayable loudspeakers. The
CAF730 is a small format line array system for venues with listener distances up to about 200 ft /
65 m. The CAF730 Series is designed to providethe highest output possible from a compact line
array format. The Series includes the 3-way, bi-amplifiedCAF730 full-range and the
complementary dual 12 in SS730 subwoofer.
This manual provides information about the design, configuration, and operation of CAF730 Line
Arrays. It is intended to be used in conjunction with the CAF730 WizardWindows®-based
software. Please thoroughly familiarize yourself with this manual. The more you learn and
understand the CAF730 Line Array the easier you will find it to use. This is not so much because of
any inherent complexities, but because it is actually easier to use than most, if not all, array
systems.
2.1 CAF730 AND SS730
The CAF730 and SS730 are physically configured for temporary installation. Rigging information
for this purpose is provided in this manual
2.2 CAF730P AND SS730P
The CAF730P and SS730P are physically config ured for permanent installation. Rigging
information for the CAF730P and SS730P is provided with theCAF730P and SS730P Splay
Brackets Kits. All non-rigging information provided herein applies to the CAF730P and SS730P.
3.
UNPACKING
3.1
CONTENTS
CAF730
(1)
CAF730
loudspeaker
(6)
Quick Release Pins
(1)
Owner’s Manual
SS730
(1)
SS730
loudspeaker
(4)
Quick Release Pins
(1)
Owner’s Manual
3.2
SHIPPING DAMAGE
After unpacking, if the loudspeaker is found to have shipping damage, save the packing materials
for the carrier’s inspection, notify the carrier immediately, and file a shipping damage claim.
Although woodworxmaxwill help in any way possible, it is al ways the responsibility of the receiving party to
file any shipping damage claim. The carrier will help prepare and file this claim.
3.3 RETURNING PRODUCTS TO woodworxmax
If the loudspeaker must be returned to woodworxmax, c ontact thewoodworxmaxService Department for a Retu
Authorization (See Chapter 7). Use the original shipping carton and packing materials. If the
shipping carton is damaged, contact woodworxmaxfor a new carton, for which there will be a small
charge. woodworxmaxwill not be responsible for damage caused by inadequate packing.
RD0169 (A) CAF730 & SS730 OWNER’S MANUAL Page 5 of 28
4. CAF730 ARRAY DESIGN
4.1 CAF730 WIZARD
Use the CAF730 Wizard for designing CAF730 arrays. It can be found in the Downloads/Software
section of the woodworxmax website . The Wizard’s primary function is to determine the
configuration that will provide the best vertical performance for a given application. Various venue
dimensions are entered that allow the Wizard to calculate the resultant array performance. Given
this information, the Wizard works in either of two basic ways, with both displaying the resulting
coverage.
Automatic Mode: The Wizard will select the optimum number of enclosures, enclosure splays,
array aiming angle, and fly-bar pick point. This can also be done for a given inventory of CAF730s
and SS730s. There are variable adjustments for application-specific output levels and for level
consistency for near-to-far listeners.
Manual Mode: This provides complete control over the array’s configuration. The number of
enclosures, enclosure splays, array aiming angle, and fly-bar pick point can be entered manually.
For complete instructions about operating the CAF730 Wizard, click on the About/Help menu when
running the Wizard.
4.1.1 Computer Requirements
The Wizard requires an IBM compatible PC with the Windows® 98, Windows® 98SE, Windows®
2000, Windows® ME, Windows® XP, or Windows NT® operating systems. It is not designed to
work with Windows® 3.x, Windows® 95, or Macintosh® operating systems.
4.1.2
•
•
•
•
•
•
•
•
•
4.2
Wizard Results
Graphical representations of the array and the venue
Aiming splay angle between each pair of enclosures
How to set the enclosure-to-enclosure rigging
On-axis aiming angle for each enclosure as a difference from 0° horizontal
Various angles and throw distances calculated from the venue’s dimensions
Difference between the array beamwidth angle and the needed coverage angles
Height of the array and trim height to the bottom of the array from the floor
Pick Point on the Fly-Bar to achieve the calculated array angle when suspended
Weight of the array
FILL COVERAGE
4.2.1 Up-Fill
Some applications, such as theaters and small arenas, can require up-fill coverage from the
array. In this case, the array is designed to tilt back for up-firing coverage from the topmost
enclosures.
4.2.2 Down-Fill
Many applications require extreme down-fill coverage. In this case, the array is designed to have
enough curvature for the bottom CAF730 to providecoverage almost directly beneath the array.
4.2.3 Horizontal Coverage and Side-Fill Arrays
Regardless of the length of the array, a CAF730 rray
a has a horizontal beamwidth (-6 dB points) of
approximately 110°, with pattern control maintained to a very low frequency.
Page 6 of 28 RD0169 (A) CAF730 & SS730 OWNER’S MANUAL
The horizontal pattern also features “soft shoulders” that provide consistent frequency response
to well beyond the nominal -6 dB points. These soft shoulders can provide up to 150° of “usable”
horizontal coverage, albeit at somewhat reduced level. This off-axis performance also provides
good acoustic integration with side-fill arrays. In some cases, these shoulders may be sufficient
for side-fill purposes.
4.2.4 CAF730 Series as Side-fill Arrays
CAF730 side fill arrays can be hung adjacent to the ma
ins, extending the coverage to over 180° for
wrap-around audience coverage.
4.3
GROUND STACKING
Normally, a ground-stacked CAF730 main array is used where suspension is not possible, too
difficult, or too time consuming. Additional uses are as stage side fills and audience front fill.
Both CAF730s and SS730s may be ground-stacked alone or in combination. In combination,
always stack the CAF730s on top of the SS730s. The recommended minimum and maximum array
quantities are:
Array
Min
CAF730 alone 2 6
SS730 alone 1 4
CAF730 / SS730 2/1 6 / 4
Max
WARNING: Ground-stacked arrays, especially the maximum recommended arrays, requires
assembly by personnel qualified to ensure adequate stability from tip over for the particular
application. See Section 6.8 for correct array assembly. Mechanical assistance will be required to
lift and position enclosures for arrays taller than approximately 5 feet.
4.4
SUBWOOFERS
4.4.1 General Considerations
Although the impressive low frequency performance of CAF730 Series arrays allows them to be
used without subwoofers for some events, subwoofers will normally be used for live musical
performances. The recommended subwoofer is woodworxmax SS730, specifically designed to
complement CAF730 line arrays.
NOTE: Bass performance is often highly program or venue-dependent, as well as subjective as
to quantity and quality. For this reason the type, quantity, and disposition of subwoofers may vary
considerably with the application. The quantity recommendations below are for general purposes,
providing a balanced system for most music applications. Quantities may need to be adjusted up
or down for specific situations.
4.4.2 SS730 Subwoofers
SS730 subwoofers are designed to complement the CAF730 loudspeakers to both extend the low
frequency response and provide more output for the upper low frequencies. The SS730
subwoofers may either be ground stacked, flown as part of a CAF730 array, or flown separately
alongside a CAF730 array.
A general recommendation is to use CAF730s and SS730s in a ratio of three CAF730s to two
SS730s.
4.4.3 Suspending SS730 Subwoofers
The SS730 enclosure rigging is designed to directly couple to a CAF730 Fly-Bar and CAF730
enclosures. As such, the SS730 can be rigged seamlessly with CAF730s.
RD0169 (A) CAF730 & SS730 OWNER’S MANUAL Page 7 of 28
When flown as part of a CAF730 array, the SS730
s should be the uppermost enclosures in the
array. In this application, the SS730s are suspended flat-fronted, with the CAF730s suspended
below in the curvature determined by the CAF730 Wizard.
When flown separately, SS730s should be flown so that the spacing between the line of SS730
enclosures and CAF730 enclosures is about 1 ft /0.3 m. The SS730 should be suspended in a flatfronted configuration.
4.4.4 Other Subwoofers
Other subwoofers, such as thewoodworxmax SSX220, SS600z SS1000z, or BS760, can also be used
with CAF730s. Recommended quantitiesof CAF730 for each subwoofer are:
Model
SSX220
SS600z
BS760
SS1000zR
Subwoofer
CAF730
2
1
1
1
3
2
4
2
4.4.5 Signal Delay on Subwoofers
If SS730s are flown or stacked withCAF730s as configured in the CAF730 Wizard, use the factory
signal delay settings.
For other configurations or subwoofers, it will usually be necessary to determine the signal delay
settings by measurement.
Page 8 of 28 RD0169 (A) CAF730 & SS730 OWNER’S MANUAL
5.
ARRAY OPERATION
5.1
OVERVIEW
The operation of a CAF730 Series system involves:
1. Understanding the principles on which it operates.
2. How to electronically configure it for a specific task.
5.2
ENGINEERING DESIGN
How a CAF730 Array works: Divergence Shading
In almost any venue, there are significant differences in distance from the loudspeaker array to
the nearest and farthest audience members. The idea is to turn up the output level of the array
aimed towards the farthest audience members, and then progressively turn it down for audience
members closer to the array. These differences in distance are accompanied by changes in the
array’s vertical aiming angle.
Rather than use amplifier input levels, the volume controls for a CAF730 array is a combination of
the shape of its curvature and the quantity of CAF730s that make up the array. A shallow curve
means more loudspeakers are facing a given direction, putting more energy within a given
vertical angle. A more radical curvature for the same number of loudspeakers spreads the energy
over a wider vertical angle, reducing the energy at any particular point. Simply put, less curvature
turns the volume up and more curvature turns the volume down.
If you understand this point, you understand how a CAF730 array works. Specifically:
1. More splay at the rear of the enclosures turns the volume up (adds less curvature to the
array)
2. Less splay at the rear of the enclosures turns the volume down (adds more curvature to
the array).
3. More enclosures provide a greater vertical coverage angle.
4. Fewer enclosures provide less vertical coverage angle.
The CAF730 Wizard uses the above variables todetermine the quantity of enclosures and the
variation in curvature along the length of the array that will optimize coverage for the audience
distances and angles the array must address.
5.3
SYSTEM BLOCK DIAGRAM
The block diagram shows the signal flow for a single
CAF730 and SS730. A DSP (Digital Signal Processor)
with three outputs is required. Use the same processor
outputs for additional CAF730s and SS730s.
5.4
SIGNAL PROCESSING
WARNING: Do not under any circumstances use
“generic” or your “favorite” crossover settings. Always
use woodworxmax recommended processor settings. CAF730
array performance, in terms of frequency response,
beamwidth consistency, output level capability, and
wavefront coherency is dependent on the woodworxmax
engineered crossover and other processing settings.
CAF730
SS730
RD0169 (A) CAF730 & SS730 OWNER’S MANUAL Page 9 of 28
5.4.1 Factory Signal Processing Settings
The signal processing adjustments determined by woodworxmax for the CAF730 Series Array should be
fully implemented “as is.” These settings are determined from extensive measurements in typical
venues as well as the theory of curved sources from the acoustical work of physicists Harry Olsen
and Leo Beranak. As such, they will normally provide excellent results in a variety of venues.
The signal processor settings are provided in the CAF730 Wizard. The Wizard can upload settings
to woodworxmax MX8700 Series processors and selected third party DSP processors.
5.4.2 Non-woodworxmax Digital Signal Processors
Even though they can be set to numerically equal values, the actual transfer function (magnitude
and phase) of the processing depends on the particular digital processor. The reason is that
different algorithms can be and are used to implement the same processing functions. The
factory settings were determined using woodworxmax MX8750 Digital Signal Processor. If you will be
using a non-woodworxmax DSP, contact woodworxmax about its compatibility with the woodworxmax factory settings.
5.5
AMPLIFIER GAIN SETTINGS
In order for Divergence Shading to work properly, all amplifiers for all passbands must be set to
the same voltage gain, regardless of their power output ratings. Among other things, equal
amplifier gains are required to maintain array coherence throughout the venue.
NOTE: This does NOT mean the same input sensitivity, but the same input to output voltage
gain. Consult your amplifier manufacturer if this cannot be readily determined. Do not selectively
boost or attenuate loudspeaker levels at the amplifiers in order to achieve consistent SPL at
various distances. This is achieved by adjusting the array curvature as described above.
5.6
USER ADJUSTMENTS
5.6.1 Equalization
woodworxmax recommends that 1/3 octave or careful use of parametric equalization be used to modify
performance to accommodate a particular program, venue characteristics, or personal taste.
5.6.2 Array Measurements
SMAART - The SmaartLive program from SIA Software Company is an ideal tool to use to
measure and optimize aCAF730 array for a particular venue. This is a fast, yet sophisticated,
process that will indicate problem areas due to particular venue characteristics. Usually it is a
matter of applying small amounts of 1/3 octave or parametric equalization to adjust significant
anomalies. A demo version of SmaartLive is available at www.woodbox-tech.com.
5.7
AMPLIFIER POWER REQUIREMENTS
As is true of all professional loudspeaker systems, the performance of the CAF730s and SS730s
depends on amplifiers delivering an adequate supply of clean power. Determining the appropriate
power amplifier wattage for a given loudspeaker and application is a subject of some debate. In
fact, there are three distinct issues regarding amplifier power as discussed in the next sections:
“Power Ratings,” “Selecting an Appropriate Amplifier Size,” and “Operating Limits.”
For more information on selecting amplifiers, please consult woodworxmax Technical Paper on Amplifier
Power, available on the woodworxmax web site; or contact woodworxmax Applications Support Group.
5.7.1 Power Ratings
The CAF730 is a bi-amplified loudspeaker, requiring one LF and one MF/HF amplifier channel. The
SS730 has two drivers (SUB 1 and SUB 2) wired separately to the input connectors. This means
the drivers can be connected in parallel to a single amplifier channel or each can be connected to
a separate amplifier channel.
Page 10 of 28 RD0169 (A) CAF730 & SS730 OWNER’S MANUAL
The following tables list the rms voltage limits for theCAF730 and SS730. Because of their higher
impedance design, multiple CAF730s and SS730s ca
n be powered from single amplifier channels.
NOTE: The rms Voltage Limit listed for each sub-system (LF, MF/HF, SUB 1/2, or SUB 1 and
SUB 2) is the same for any enclosure quantity. The wattages are calculated using the Voltage
Limits and the overall nominal impedance for the each listed quantity of CAF730 and SS730
loudspeakers.
CAF730 Qty Nominal Z
LF
MF/HF
16
700 W
350 W
2
8
1400 W
700 W
3
5.3
2100 W
1050 W
4
4
2800 W
1400 W
5
3.2
3500 W
1750 W
6
2.7
4200 W
2100 W
7
2.3
4900 W
2450 W
8
2
5600 W
2800 W
106 V
75 V
1
rms Voltage Limit:
SS730 Qty
Nominal Z
SUB 1/2 parallel
1
4
1200 W
2
2
2400 W
rms Voltage Limit:
69 V
SS730 Qty
Nominal Z
1
8
600 W
600 W
2
4
1200 W
1200 W
3
2.7
1800 W
1800 W
4
2
2400 W
2400 W
69 V
69 V
rms Voltage Limit:
SUB 1
SUB 1
CAUTION: The rms voltage limits listed above are related to the thermal limits determined from
woodworxmax standard power test. In this test, transd ucers are “exercised” to a point of damage or
failure. The test signal has a 6 dB crest factor (peak to average ratio). A maximum continuous
voltage limit for the loudspeaker is then determined based on the test results and on the
transducer’s application in the loudspeaker. The powers listed in the table are calculated as the
square of the rms voltage limit divided by the sub-system’s nominal impedance (Z) in ohms.
5.7.2 Selecting an Appropriate Amplifier Size
The wattages listed in the above charts are intended primarily as points of comparison with the
power ratings of other loudspeakers. For this purpose, each wattage listed should be considered
as a +/-1 dB range = 0.8 to 1.25 times the wattage listed. For example, 1400 W should be
considered as a range from approximately 1100 W to 1800 W.
In many applications, the wattages listed will NOT correspond to the best amplifier sizes for
optimizing loudspeaker reliability and performance. Proper amplifier selection requires a
considered analysis for the particular application. Amplifiers should be sized according to both the
sound levels required and the type of audio signals that will be reproduced. If you are unsure of
how to determine these parameters, consult a qualified professional or contact woodworxmax Application
Support Group.
RD0169 (A) CAF730 & SS730 OWNER’S MANUAL Page 11 of 28
5.7.3 Selecting an Appropriate Amplifier Size Rule Of Thumb
If a CAF730 Line Array is used for professionally opera ted concert applications, a rule of thumb can
be applied. Where the full output capabilities of the loudspeakers may be needed to achieve
appropriate acoustic output levels, woodworxmax recommends amplifiers with power ratings up to twice
the wattages listed in the above charts. This provides a peak voltage capability of 6 dB above the
specified rms voltage limit. This assumes the audio signals will have a peak to average ratio in
excess of 6 dB, which is usually, but not always, true. Under this condition, the thermal limits are
unlikely to be exceeded. While this rule of thumb is consistent with the woodworxmax testing parameters,
it does NOT guarantee trouble-free operation. That is discussed under “Operating Limits.”
WARNING: The power amplifier sizes recommended by the above rule of thumb are capable of
continuous output levels that can cause damage to or failure of the transducers. Exercise caution
in operation to avoid exceeding the specified maximum rms voltage limits.
In some cases, applying this rule of thumb to the power ratings listed in Section 5.7.1, would
indicate impractical amplifier sizes, such as 11,200 W for the LF section of eight CAF730s. In such
cases, multiple amplifier channels each powering fewer CAF730s would be more practical.
5.7.4 Operating Limits
It is the responsibility of the audio system operator to operate the loudspeakers within their
capabilities. This is the only way to ensure that loudspeakers are not stressed beyond their limits
to the point of damage or failure.
Operation beyond their capabilities usually includes, but is not limited to, one or more of the
following conditions:
Amplifier clipping
Voltage input in excess of the specified rms voltage limit
Peak voltage input in excess of twice the specified voltage limit
Noticeable distortion
Mechanical noise (such as cones bottoming out)
A suitable means for determining these conditions is highly recommended. At a minimum, the
operator should have a meter display calibrated to indicate when the maximum rms voltage limits
will be exceeded. This assumes amplifiers are not being driven into clipping at those limits.
5.8
INPUT CONNECTIONS
5.8.1 CAF730 Input Connections
There are two Neutrik NL4MP connectors on the rear of each CAF730. The connectors mate with
Neutrik NL4FC in-line cable connectors.
CAF730 INPUT NL4 (each of two)
PIN 1PIN 1+
PIN 2PIN 2+
LFLF+
MF/HFMF/HF+
1. Use as the input to the CAF730
2. Use the second connector to loop the LF and MF/HF signals to the next CAF730.
Page 12 of 28 RD0169 (A) CAF730 & SS730 OWNER’S MANUAL
5.8.2 SS730 Connections
There are three Neutrik NL4MP and one NL8MP connectors on the rear of each SS730. The
connectors mate, respectively, with Neutrik NL4FC and NL8FC in-line cable connectors.
SUB INPUT/OUTPUT NL4MP (each of two)
PIN 1- SS730 SUB 1PIN 1+ SS730 SUB 1+
PIN 2- SS730 SUB 2PIN 2+ SS730 SUB 2+
1. Use as the input to the SS730.
2. Use the second connector to loop SUB signals to additional SS730s.
5.8.3 SS730 System Input Connections
The NL8MP connector on the SS730s can be used as the input for an entire array. Using the
SS730 SYSTEM INPUT on one SS730, an NL8 cable carries all amplified signals from the array’s
amplifiers to this SS730. Using NL4 cabling from this SS730, you can loop up to eight CAF730s
and three additional SS730s. With the maximum combination, the nominal load for each of the
four amplified signals is 2 ohms.
CAF730
SYSTEM INPUT NL8MP
PIN 1- SS730 SUB 1PIN 1+ SS730 SUB 1+
PIN 2- SS730 SUB 2PIN 2+ SS730 SUB 2+
PIN 3- CAF730 LFPIN 3+CAF730 LF+
PIN 4- CAF730 MF/HFPIN 4+ CAF730 MF/HF+
1. Connect the four different amplified signals needed to power a complete array of CAF730s and
SS730s to the SYSTEM INPUT.
2. Use the CAF730 OUTPUT to loop the LF and MF/HF signals to the CAF730s using NL4 cabling.
3. Use the SUB INPUT/OUTPUT to loop the Sub signals to the next SS730 using NL4 cabling.
4. Daisy-chain additional SS730s in a similar fashion.
CAF730 OUTPUT NL4MP
PIN 1- CAF730 LFPIN 1+ CAF730 LF+
PIN 2- CAF730 MF/HFPIN 2+ CAF730 MF/HF+
1. Connect to a CAF730 INPUT using NL4 cabling.
SS730 INPUT/OUTPUT 2x NL4MP
PIN 1- SS730 SUB 1PIN 1+ SS730 SUB 1+
PIN 2- SS730 SUB 2PIN 2+ SS730 SUB 2+
1. Connect to an SS730 INPUT using NL4 cabling.
RD0169 (A) CAF730 & SS730 OWNER’S MANUAL Page 13 of 28
LF
5.8.4 CAF730P Input Connections
There are two 4-terminal barrier strip connectors on
the rear of each CAF730P. The connectors are wired
in parallel so that the second connector can be used
to loop LF and MF/HF signals to additionalCAF730s.
The connectors accept stripped wire ends or wire
lugs.
5.8.5 SS730P Input Connections
There are two 4-terminal barrier strip connectors on
the rear of each SS730P. The connectors are wired
in parallel so that the second connector can be used
to loop the LF1 and LF2 signals to additional
SS730s. The connectors accept stripped wire ends
or wire lugs.
MF/HF
LF1
LF2
-- + -- +
-- + -- +
LOOP THRU
LOOP THRU
LF
MF/HF
LF1
-- + -- +
CAF730P INPUT
LF2
-- + -- +
SS730P INPUT
5.8.6 Wire Gauge
The maximum recommended loudspeaker cable lengths for each wire gauge are based on
maintaining an acceptable damping factor and minimizing power loss at the nominal load
impedances listed. While wire gauges smaller than those listed may be used, damping factor
reductions and power losses may become significant. The table includes the overall nominal load
impedances where the subsystems in multiple enclosures are wired in parallel to one amplifier
channel.
Maximum Cable Length
50 ft / 15 m
100 ft / 30 m
200 ft / 60 m
300 ft / 90 m
>300 ft / >90 m
50 ft / 15 m
100 ft / 30 m
200 ft / 60 m
>200 ft / >60 m
50 ft / 15 m
100 ft / 30 m
>100 ft / >30 m
50 ft / 15 m
> 50 ft / > 15 m
Nominal Input Z
16 ohm
16 ohm
16 ohm
16 ohm
16 ohm
8 ohm
8 ohm
8 ohm
8 ohm
4 ohm
4 ohm
4 ohm
2 ohm
2 ohm
AWG
16 AWG
14 AWG
12 AWG
10 AWG
Not recommended
14 AWG
12 AWG
10 AWG
Not recommended
12 AWG
10 AWG
Not recommended
10 AWG
Not recommended
(AWG = American Wire Gauge; MWG = Metric Wire Gauge)
Page 14 of 28 RD0169 (A) CAF730 & SS730 OWNER’S MANUAL
MWG
16 MWG
16 MWG
20 MWG
25 MWG
Not recommended
16 MWG
20 MWG
25 MWG
Not recommended
20 MWG
25 MWG
Not recommended
25 MWG
Not recommended
6.
RIGGING
CAF730 Series arrays are intended to be suspended or ground-stacked. This chapter details how
to physically configure CAF730 Series arrays. The following are the recommended methods for
most situations. Specific situations may require other methods. It is the user’s responsibility to
determine the viability and safety for alternate methods and implement them accordingly.
CAF730 and SS730:The procedures to suspend and ground-stack CAF730s and SS730s are
detailed in this chapter.
CAF730P and SS730P:The procedures to suspend and ground-stack permanently installed
CAF730Ps and SS730Ps are detailed in instructions provided with theCAF730P and SS730 Splay
Bracket Kits. Use those instructions for rigging any CAF730P and SS730P products and their
accessories.
6.1
RIGGING WARNINGS
WARNING: Suspending anything, especially overhead of people, should be done with extreme
caution. Always engage the services of a certified professional who is qualified to determine the
requirements for and to implement overhead rigging. Only persons with the knowledge of proper
hardware and safe rigging techniques should attempt to suspend CAF730 Series arrays overhead.
Failure to follow these precautions may result in damage to the equipment, injury, or death.
DANGER: When suspending or stacking CAF730s and SS
730s, avoid placing any parts of the
body between the enclosures or between an enclosure and the Fly-bar. Always use the integral
handles to lift or position enclosures. Failure to follow this precaution may result in damage to the
equipment, injury, or death.
CAUTION: A CAF730 weighs approximately 77 lb / 35 kg. This, along with the physical size,
means that one person may be able to lift and carry it. However, always use proper lifting
techniques to avoid injury. Use good judgment to determine if you need lifting assistance such as
another person, a back support belt, or mechanical assistance. Because it weighs approximately
111 lb / 51 kg, always use two people or mechanical assistance to lift an SS730.
IMPORTANT RIGGING NOTE: Each Quick Release Pin, used to attach enclosures together, can
be inserted into one of several holes in both the Hinges and Hinge Tubes integral to the
enclosures. The particular holes used set the splay angle between the enclosures and thus their
aiming. Use the correct holes as determined by the CAF730 Wizard or as desired by the user.
IMPORTANT TRANSPORTATION NOTE: To avoid damage to the Quick Release Pin handles
when transporting, always insert the pins from the inside of the Hinge Tubes. This keeps the
Quick Release Pin handles from extending beyond the footprint of the enclosures or Fly-Bar.
6.2
SUSPENSION LOAD RATING - WORKING LOAD LIMIT (WLL)
The Fly-Bar has a WLL for suspending a maximum of eighteen (18) CAF730s or a maximum of
twelve (12) SS730s. The design factor for this rating is 8:1.
CAF730s and SS730s may be flown in the same array. The WLL (Working Load Limit) for any
combination of CAF730s and SS730s is 1500 lb / 680 kg. For such combinations, use these
formulas to determine maximum allowable quantities of each model. In all cases, round the
answer DOWN to the nearest integer. This will keep the total weight of the CAF730/SS730
combination within the specified WLL with at least a 100 lb / 45 kg margin for the weight of
loudspeaker cables, Pull-Bar, or other additional loads.
RD0169 (A) CAF730 & SS730 OWNER’S MANUAL Page 15 of 28
For a given quantity of SS730:
Max quantity CAF730 = 18 - (1.5 x quantity SS730)
Example, given five SS730:
18 - (1.5 x 5) = 10.5 which rounds down to a maximum quantity 10 CAF730s
For a given quantity of CAF730:
Maximum quantity SS730 = (18 - quantity CAF730) / 1.5
Example, given eight CAF730:
(18 - 8) / 1.5 = 6.667 which rounds down to maximum quantity 6 SS730s
6.3
FLY-BAR RIGGING RECOMMENDATIONS
WARNING: It is the responsibility of the user to ensure the attachment to the Fly-Bar, the rigging
method, and attachment to structure are determined by a certified professional who is qualified to
determine the requirements for and to implement overhead rigging.
6.3.1 Attachment to the Fly-Bar
The CAF730 Fly-Bar design permits several methods of attachment.
1. Center Holes:
• Use one of these holes for single point attachment, the particular hole being dictated by
the CAF730 Wizard to result in the correct array tilt angle.
• Use one hole in the rear and one in the front for bridling to a single point.
• Use one hole in the rear and one in the front to attach two chain motors.
2. Corner Hoisting Points:
Use each side-to-side pair to bridle to single points for attaching two chain motors.
6.3.2 Rigging Methods
The two recommended rigging methods are:
1. Employ one chain motor, attached to particular Center Hole dictated by the CAF730 Wizard
• This will automatically result in the correct array tilt angle when all enclosures are flown.
• One motor may be easier to deploy than two.
2. Employ two chain motors, one attached to the front of the Fly-Bar and the second to the rear.
• The attachment can be to the Center Holes or the Corner Hoisting Points.
• The array will be easier to assemble because it allows tilting the enclosures already
suspended to better match the angle of the next enclosure to be attached.
• Once assembled, the overall tilt angle for the array can be easily adjusted.
6.4
ATTACHING ENCLOSURES TO THE FLY-BAR
6.4.1 Splay Angles
The splay angles required between each enclosure to achieve the desired array curvature are set
by the integral rigging hardware. The hardware consists of square Hinge Tubes each with a
sliding Hinge on each corner of the enclosure.
6.4.2 Basic Attachment Procedure
Slide all four captive Hinges on one enclosure into the Hinge Tubes of the vertically adjacent
enclosure or Fly-Bar. Connect the Hinges to the Hinge tubes using the supplied Quick Release
Pins. Insert each Pin by pushing the button on its handle and passing the shaft through a hole in
each Hinge and holes on both sides of each Hinge tube. If properly inserted, a Quick Release Pin
will be locked in place and can only be pulled out by pressing the button on its handle.
Page 16 of 28 RD0169 (A) CAF730 & SS730 OWNER’S MANUAL
6.4.3 Quick Release Pins
Each CAF730 is supplied with six 1.5 inch Quick Release Pins. Four are used for attaching
enclosures together or to the Fly-Bar. Two are used as locking pins for the rear Hinges. See
“Locking Pins” Section 6.4.5. Each SS730 is supplied with four 1.5 inch Quick Release Pins used
for attaching enclosures together or to the Fly-Bar.
6.4.4 Hinge and Hinge Tube Holes
DANGER: Ensure each Quick Release Pin used in assembling an array is fully inserted and
engaged into the Hinge Tubes and Hinge holes. Only use the 1.5 inch Quick Release Pins
supplied or equal. Pins of different lengths or diameter will compromise the structural integrity of
the rigging system and may result in damage to the equipment, injury, or death.
The Hinges and Hinge Tubes,
located on four corners of each
enclosure, have several holes for
inserting the Quick Release Pins
to attach enclosures together or to
the Fly-Bar. The particular holes
used will determine the splay
angles between the loudspeaker
aiming axes. The rear splays
required for these splay angles
and the Hinge and Hinge Tube
Holes to use to achieve them are
designated by theCAF730 Wizard.
NOTE: Each SS730 Hinge Tube
has only one hole for attaching the
Hinge of another enclosure. As
there is no choice of holes, it is neither labeled nor listed in the chart.
1
CAF730 to Fly-Bar
Rear Hinge Hole
Rear Hinge Tube Hole
3
2
CAF730 to CAF730
Front Splay Angle
Rear Hinge Hole
A
B
B
B
B
Front Hinge Tube Hole
Upper
Front Hinge Hole
2
2
2
2
1
1
Upper
Front Hinge Hole
1
Front Hinge Tube Hole
Upper
2
0°
CAF730 to SS7302
-7.2°
-3.0°
0.0°
6.0°
12.0°
Rear Hinge Tube Hole
1
2
3
4
4
Rear Hinge Tube Hole
Front Splay Angle
Front Splay Angle
Front Hinge Hole
2
Rear Hinge Hole
1.5°
3.0°
6.0°
12.0°
18.0°
SS730 to Fly-Bar
1
SS730 to SS730
Upper
Rear Hinge Hole
2
Rear Hinge Hole
1
2
3
4
4
Front Hinge Hole
2
Front Hinge Hole
2
2
2
2
1
NOTES: 1. This positions the top surface of the enclosure so it is parallel to the plane of the CAF730 Fly-Bar.
2. The front splay angle is the between the aiming axes, not the top/bottom enclosure surfaces.
RD0169 (A) CAF730 & SS730 OWNER’S MANUAL Page 17 of 28
CAF730 FLY-BAR HINGE TUBE HOLES
DANGER: Each Hinge Tube on the Fly-Bar has two Quick Release Pin holes. When suspending
CAF730 or SS730s from the Fly-Bar, always use the upper hole for attaching the enclosure
Hinges. The lower hole is not load-rated and is to be used ONLY for attaching ground-stacked
enclosures when using the Fly-Bar inverted as the base of the stack. Failure to follow this warning
may result in damage to the equipment damage, injury, or death.
UPPER HOLES: USE THESE HOLES
FOR SUSPENSION
WARNING: USE LOWER HOLES
ONLY FOR GROUND STACKING
CAF730 AND SS730 HINGE AND HINGE TUBE HOLES
Hole 1
FRONT
Hole 2 HINGE
Hole 1
REAR
HINGE Hole 2
Hole 1
FRONT
Hole 2 HINGE
Hole 1
REAR
HINGE Hole 2
Hole 3
Hole 4
REAR
HINGE
TUBE
Hole A
Hole B
6.4.5 Locking Pins
WARNING: Due to center of gravity issues with a suspended curved array, any open splays
between enclosures may close up unexpectedly either during array assembly or disassembly. To
prevent this occurrence and possible injury that may result, always use locking pins in the rear
Hinges and Hinge Tubes on each enclosure. When ground stacking, creating splays between
enclosures REQUIRES the use of locking pins to create rear splays.
EachCAF730 is supplied with six 1.5 in Quick Release Pins. Two of
these Pins are intended for use as locking pins. Certain array
configurations and array tilts can cause the collapse of any open splays
between CAF730 enclosures. This is more likely to occur the more the
array is curved relative to its length. Locking pins can prevent the
occurrence of splay collapse.
Locking pins are inserted in the Hinge Tubes through the hole in the
part of the Hinge that is captive to that Hinge Tube and below the Hinge
knuckle. This prevents the Hinge from receding into its own Hinge
Tube, which is what happens when the splay between two enclosures
collapses.
Page 18 of 28 RD0169 (A) CAF730 & SS730 OWNER’S MANUAL
HINGE KNUCKLE
(hidden)
LOCKING PIN
HOLE
6.5
PALLETS
6.5.1 CAF730 Face Pallet
The CAF730 Face Pallet is a wheeled pallet that holds twoCAF730s face down. Routing on the
underside of the pallet allows stacking loaded pallets two high. Except for the first enclosure
attached to the Fly-Bar, the enclosures remain on the pallet when attaching them to an array. The
lip around the outside edge helps prevent the enclosures from sliding off the pallet. The pallets
outside dimensions of 30 in x 22.5 in are a standard road case size that fits on small truck ramps
and simplifies truck packing by integrating easily with standard road cases.
6.5.2 SS730 Pallet
The SS730 Pallet is a wheeled pallet that holds two stacked SS730s. Normally the enclosures
stay on the pallet when attaching them to the Fly-Bar or other SS730s for suspension. The lip
around the outside edge helps prevent the enclosures from sliding off the pallet. The pallet’s
outside dimensions of 30 in x 22.5 in are a standard road case size that fits on small truck ramps
and simplifies truck packing by integrating easily with standard road cases.
6.6
INITIAL RIGGING PREPARATION
Proper preparation of the CAF730s, SS730s, and the CAF730 Fly-Bar will make it easier to
assemble, disassemble, and transport suspended or ground-stacked CAF730s and SS730s. This
preparation should be followed as standard procedure for all future uses. It results in everything
being ready for transport or for assembling an array.
6.6.1 Fly-Bar
There is no special preparation for the CAF730 Fly-Bar.
6.6.2 CAF730
Install three of the supplied Quick Release Pins in each of the two rear Hinge Tubes with their
handle ends inwards. Always insert one in the top hole of each Hinge Tube passing through the
top hole of its Hinge. This will lock each hinge in its retracted position. The Quick Release Pins
should always be re-installed in these locations as the loudspeakers are un-rigged. The purpose
for this is that, when rigging, the Quick Release Pins are available where needed to attach
another enclosure.
6.6.3CAF730 Face Pallet
To place two CAF730s on their Pallet, lift each enclosu
re with its top side towards you and the front
facing the floor. Place it face down on the pallet so the enclosure's top is towards the outside of
the pallet. Ensure the front hinges are fully retracted so the enclosure front rests flat on the pallet
platform. When the Pallet is loaded correctly, the bottom sides of the two enclosures should be
facing each other.
6.6.4 SS730
Install the four supplied Quick Release Pins with their handle ends inwards in the top hole of each
of the four Hinge Tubes passing through the top hole of its Hinge. This will lock each hinge in its
retracted position. The Quick Release Pins should always be re-installed in these locations as the
loudspeakers are un-rigged. The purpose for this is that, when rigging, the Quick Release Pins
are available where needed to attach another enclosure.
6.6.5 SS730 Pallet
Place one SS730 or a stack two SS730 enclosures on the pallet oriented right side up. If placing
two SS730s on a Pallet, lock the enclosures together by sliding the Hinges from the lower
enclosure up into the Hinge Tubes of the upper enclosures. Attach each Hinge to the upper
enclosure’s Hinge Tube using the Quick Release Pin from the lower enclosure.
RD0169 (A) CAF730 & SS730 OWNER’S MANUAL Page 19 of 28
6.7
SUSPENSION PROCEDURES
The basic procedure for suspending CAF730s and SS730s or a combination of both is similar.
What varies is how different pallets affect handling of the enclosures when being suspended. In
all cases, it is recommended that CAF730 enclos
ures be attached to an array one at a time. The
SS730 enclosures may be attached two at a time.
IMPORTANT NOTE: Always suspend all SS730s over the CAF730s.
In all cases, reverse each procedure for unrigging the array.
DANGER: Ensure each Quick Release Pin used in assembling an array is fully inserted and
engaged. Use only the 1.5 inch Quick Release Pins supplied or equal. Quick Release Pins of
different lengths or diameter will compromise the structural integrity of the enclosure and Fly-Bar
rigging system and may result in damage to the equipment, injury, or death.
CAUTION: When attaching Hinges to Hinge Tubes, use the correct holes as determined by the
CAF730 Wizard or by the user-desired angles to achieve the desired splay angle. Failure to follow
this instruction can result in poor acoustical performance.
CAUTION: To help prevent personal injury, clear all pallets as soon as they are empty from the
immediate work area.
6.7.1 CAF730s On CAF730 Pallet
1. Move a CAF730 Pallet to the rigging location.
2. Lift a CAF730 enclosure off the pallet and lay it down, positioned so its hinges are on top
and it is directly below the rigging point. The CAF730 may be laid on the floor or on a
standard road case lid at a comfortable working height.
6.7.2 SS730s on SS730 Pallet
1. Move an SS730 Pallet to the rigging location.
6.7.3 Attaching a CAF730 or SS730 to the Fly-Bar
1. Lift the Fly-Bar onto the top of the CAF730 or SS730. Orient the Fly-Bar with its corner
Hinge Tubes to the front of the loudspeakers.
2. Remove the four (SS730) or six (CAF730) Quick Release Pins from the top of the
enclosure’s Hinge Tubes.
3. Slide the enclosure‘s four Hinges up into the four Hinge Tubes on the Fly-Bar. For a
CAF730, align hole 2 of the front Hinges and hol
e 3 of the rear Hinges with the upper hole
in each Fly-Bar Hinge Tube. For an SS730, align hole 1 of each Hinge with the upper
hole in each Fly-Bar Hinge Tube. The result will be the top of the enclosure being parallel
to the plane of the Fly-Bar when suspended.
4. Attach the Hinges to the Hinge Tubes by inserting four of the Quick Release Pins.
(removed in Step 2) through both. Use ONLY the upper hole in the Fly-Bar Hinge Tubes.
5. For a CAF730, insert the remaining two Pins (removed in step 2) into the enclosure’s rear
Hinge Tubes as locking pins. See “Locking Pins” Section 6.4.5.
6. Attach the chain motors or other lifting device to the Fly-Bar, using one of the methods
detailed under “Fly-Bar Rigging Recommendations” Section 6.3.
7. Lift the array to the working height needed for the next applicable procedure in the
following sections.
Page 20 of 28 RD0169 (A) CAF730 & SS730 OWNER’S MANUAL
6.7.4 Attaching SS730s to SS730s Already Suspended
NOTE: SS730s should always be flown tight-packed to each other.
1. Move an SS730 Pallet so its SS730 is positi oned under the bottom SS730 of the array.
2. Remove the four Quick Release Pins from the Hinges of the SS730 on the pallet.
3. Lower the array until the bottom SS730 barely touches the SS730 on the Pallet.
4. Slide the four Hinges of the SS730 on the pallet into the suspended SS730’s Hinge
Tubes. Align Hole 2 of each Hinge with the Hinge Tube Hole.
5. Attach the Hinges to the Hinge Tubes by inserting a Quick Release Pin (removed in Step
2) through both. The result will be tight-packed SS730s.
6. Repeat Steps 1 to 5 for additional SS730s.
6.7.5 Attaching a CAF730 to an SS730 Already Suspended
CAUTION: When attaching Hinges to Hinge Tubes in steps 6 and 9, use the correct holes as
determined by the CAF730 Wizard or by the user
-desired angles to achieve the desired splay
angle. Failure to follow this instruction can result in poor acoustical performance.
1. Move a Pallet with the CAF730 to be attached to the rigging location.
2. Lift the CAF730 enclosure off the pallet and lay it down, positioned so its hinges are on top
and the enclosure is directly below the array. The CAF730 may be laid on the floor or on a
standard road case lid at a comfortable working height.
3. Remove the six Quick Release Pins from the rear Hinges of the CAF730.
4. Lower the array until the bottom SS730 barely touches the front of the CAF730.
5. Slide the two front Hinges of the CAF730 into the suspended SS730’s front Hinge Tubes.
6. Attach the Hinges to the Hinge Tubes by inserting a Quick Release Pin (removed in Step
2) through both.
7. Employing two people, one lifts the rear of the CAF730, rotating it on the attached front
Hinges.
8. The second person slides the two rear Hinges of the CAF730 into the rear Hinge Tubes of
the suspended SS730.
NOTE: It will usually be necessary to nudge the CAF730 enclosure being attached backwards
to line up its Hinges with the Hinge Tubes on the SS730.
9. Attach the Hinges to the Hinge Tubes by inserting a Quick Release Pin (removed in step
8) through both.
10. Insert each a Quick Release Pin (removed in step 2) into each of the enclosure’s rear
Hinge Tubes as a locking pin. See “Locking Pins” Section 6.4.5.
6.7.6 Attaching CAF730s to CAF730s Already Suspended
CAUTION: When attaching Hinges to Hinge Tubes in steps 5 and 10, use the correct holes as
determined by the CAF730 Wizard or by the user-desired angles to achieve the desired splay
angle. Failure to follow this instruction can result in poor acoustical performance.
1. Move a CAF730 Pallet so the top rear Hinges of a CAF730 are below the rear Hinge Tubes
of the bottom CAF730 in the array.
2. Remove the six Quick Release Pins from the rear of the CAF730 on the pallet.
3. Lower the array until the rear Hinge Tubes of the bottom suspended CAF730 are even with
the top of the rear Hinge Tubes of the CAF730 on the pallet.
4. Extend and slide the Hinges of the CAF730 on the pallet into the suspended CAF730’s
Hinge Tubes.
NOTE: Bump the array slightly as needed to line up the enclosures so the Hinges slide easily
into the Hinge Tubes.
RD0169 (A) CAF730 & SS730 OWNER’S MANUAL Page 21 of 28
5. Attach each Hinge to the Hinge Tube by inserting a Quick Release Pin (removed in Step
2) through both.
6. Insert a Quick Release Pin (removed in step 2) into each of the enclosure’s rear Hinge
Tubes as a locking pin. See “Locking Pins” Section 6.4.5.
7. Lift the Array, with the CAF730 attached only by its rear Hinges, to a comfortable working
height for the next step.
8. Employing two people, one lifts the front of the CAF730, rotating it on the attached rear
Hinges.
9. The second person slides the CAF730’s front Hinges into the suspended CAF730’s Hinge
Tubes.
CAUTION: When attaching the front Hinges, the normal configuration is tight packing the
enclosure fronts unless otherwise configured by the Wizard.
NOTE: It will usually be necessary to nudge the CAF730 enclosure being attached backwards
to line up its Hinges with the Hinge Tubes on the suspended enclosure above.
10. Attach each Hinge to the Hinge Tube by inserting a Quick Release Pin (removed in step
7) through both.
11. Repeat Steps 1 to 10 for additional CAF730s.
6.7.7 Setting the Tilt Angle for the Entire Array
Normally, the easiest method is to use a clinometer, such as a simple, bubbletype angle finder (pictured). More sophisticated, albeit more expensive,
electronic clinometers can also be used.
Place the angle finder against one of the rigging tubes on the face of the
uppermost enclosure in the array that can be physically reached. Adjust the
angle of the entire array so that the face of this enclosure is set at its
prescribed aiming angle listed in theCAF730 Wizard on theArray Tab.
6.8
GROUND STACKING PROCEDURES
Up to six CAF730s and up to four SS730s may be ground-stacked. Always stack CAF730s using the
SS730(s) or the CAF730 Fly-Bar as a base for the stack.
DANGER: A ground stack of more than six CAF730 enclosures may shift the center of gravity
making the stack unstable. Failure to follow this warning may result in damage to the equipment
damage, injury, or death.
6.8.1 Stacking With SS730(s) as the Base
IMPORTANT NOTE: If using one or more SS730s as the stacking base, all CAF730 and SS730
enclosures are stacked right side up. Always stack all SS730s underneath the CAF730s.
1. At the desired stacking location, position an SS730 on the floor with the Hinges on the
top, this being the normal orientation for suspension.
Page 22 of 28 RD0169 (A) CAF730 & SS730 OWNER’S MANUAL
6.8.2 Stacking Additional Enclosures (SS730 as the base)
CAUTION: When attaching Hinges to Hinge Tubes in step 5 for an SS730, position the SS730 so
it lies flat on the SS730 below it. In step 5 for a CAF730, use the correct holes as determined by
the CAF730 Wizard or by the user-desired angles to achieve the desired splay angle. Failure to
follow this instruction can result in poor acoustical performance.
1. Lift an SS730 or CAF730 from its pallet and orient it so the Hinges on the enclosure are on
the top, this being the normal orientation for suspension.
2. Lift the enclosure onto the stack mating the alignment pads and recesses between them.
3. Remove the four (SS730) or six (CAF730) Quick Release Pins from the Hinges of the
lower enclosure.
4. Slide the four lower enclosure Hinges up into the Hinge Tubes on the enclosure above it.
5. Attach each Hinge to the Hinge Tube by inserting a Quick Release Pin (removed in Step
4) through both.
6. For a CAF730, use its handles to lift the rear of the enclosure as high as possible and
insert a Quick Release Pin (removed in step 3) into each of the enclosure’s rear Hinge
Tubes as a locking pin. See “Locking Pins” Section 6.4.5.
7. Repeat steps 1 to 6 for additional enclosures.
6.8.3 Stacking With the Fly-Bar as the Base
IMPORTANT NOTE: If using the Fly-Bar as the base, all CAF730 and SS730 enclosures are
stacked upside down.
1. At the desired stacking location, position the CAF730 Fly-Bar on the floor so it is resting on
its leveling feet. This will be upside down from its normal orientation for suspension,
oriented with the corner hinge Tubes towards the audience.
2. Adjust the leveling feet on the Fly-Bar so the Fly-Bar sits level or at the desired angle.
Firmly tighten the nut on each leveling foot against the Fly-Bar pad. Firmly tighten the
second “jam” nut against the first to lock both nuts.
6.8.4 Stacking the First Enclosure (Fly-Bar as the base)
CAUTION: When attaching Hinges to Hinge Tubes in step 4 for an SS730, position the SS730 so
it lies flat on the CAF730 Fly-Bar. In step 4 for a CAF730, use the correct holes as determined by the
CAF730 Wizard or by the user-desired angles toachieve the desired aiming angle. Failure to follow
this instruction can result in poor acoustical performance.
1. Lift an SS730 or CAF730 from its pallet and turn it upside down, so the Hinges on the
enclosure are on the bottom. Position it onto the Fly-Bar so its Hinges line up the Fly-Bar
Hinge Tubes.
2. Remove the four (SS730) or six (CAF730) Quick Release Pins from the Hinges.
3. If they do not drop from gravity, slide the four Hinges of the enclosure down into the
Hinge Tubes on the Fly-Bar.
4. Attach each Hinge to the Hinge Tube by inserting a Quick Release Pin (removed in Step
2). Use what is now the upper hole on the Fly-Bar Hinge Tube.
5. For a CAF730, use its handles to lift the rear of the enclosure as far as possible and insert
a Quick Release Pin (removed in step 2) into each of the enclosure’s rear Hinge Tubes
as a locking pin. See “Locking Pins” Section 6.4.5.
RD0169 (A) CAF730 & SS730 OWNER’S MANUAL Page 23 of 28
6.8.5 Stacking Additional Enclosures (Fly-Bar as the base)
CAUTION: When attaching Hinges to Hinge Tubes in step 5 for an SS730, position the SS730 so
it lies flat on the SS730 below it. In step 5 for a CAF730, use the correct holes as determined by
the CAF730 Wizard or by the user-desired angles to achieve the desired splay angle. Failure to
follow this instruction can result in poor acoustical performance.
1. Lift an SS730 or CAF730 from its pallet and turn it upside down, so the Hinges on the
enclosure are on the bottom.
2. Lift the enclosure onto the stack mating the alignment pads and recesses between them.
3. Remove the four Quick Release Pins from the Hinges of the upper enclosure.
4. If they do not drop from gravity, slide the four Hinges on the upper enclosure down into
the Hinge Tubes on the enclosure below it.
5. Attach each Hinge to the Hinge Tube by inserting a Quick Release Pin (removed in Step
9) through both.
6. For a CAF730, use its handles to lift the rear of the enclosure as far as possible and insert
a Quick Release Pin (removed in step 2) into each of the enclosure’s rear Hinge Tubes
as a locking pin. See “Locking Pins” Section 6.4.5.
7. Repeat steps 1 to 6 for additional enclosures.
Page 24 of 28 RD0169 (A) CAF730 & SS730 OWNER’S MANUAL
7.
CONTACTING
woodworxmax
We have tried to answer any questions you may have about the CAF730 and SS730 in this manual
and in the CAF730 Wizard Help file. Should you need further assistance, please do not hesitate to
contact us. You can contact us in several different ways.
RD0169 (A) CAF730 & SS730 OWNER’S MANUAL Page 25 of 28
8.
SERVICE AND MAINTENANCE
8.1
GENERAL SERVICE
For any faults that cannot be field-repaired as noted below, contact the woodworxmax Service Department
listed in Chapter 7 to determine the appropriate action. This applies to both warranty and nonwarranty faults.
8.2
RIGGING SERVICE
Because of the potential, serious consequences and liabilities due to faulty rigging, contact woodworxmax
to determine the appropriate service solution for any rigging hardware problems.
8.3
BASIC FIELD TROUBLESHOOTING
Each CAF730 and SS730 loudspeaker has an input panel, internal components and wiring,
transducers, and an enclosure. Troubleshooting for various performance problems usually
involves isolating the problem to one of these areas:
1. Transducers
2. Input panel, internal components, and wiring
3. Enclosure and integral hardware
If no problems can be traced to any of these items, look for problems with external electronics or
cabling. Troubleshooting these items is beyond the scope of this manual.
8.3.1 Transducers
A faulty transducer will usually cause readily audible distortions or other unwanted noises. In
other cases, they may stop functioning. Use your ears and test signals or other sound source to
determine which one is at fault. Normally a faulty transducer requires service or replacement by
woodworxmax.
8.3.2 Input panel, Internal Components and Wiring
Faults with these items will usually cause transducers to stop working or possibly be intermittent.
Check that audio signals pass from the input jacks to the transducer terminals. Many faults with
this area can be field-repaired.
8.3.3 Enclosures
Enclosure problems, such as loose hardware, faulty joints, or other structural problems, will
usually be heard as distinct buzzes, rattles, or other unwanted noises. To test for enclosure
problems, use a sine wave signal manually swept on the LF sub-system. The input level should
be no more than 6 dB below rated power (equals no more than 1/2 rated voltage). It may be
possible to field-repair some enclosure problems.
8.4
INSPECTION
8.4.1 In-Use Inspection
Visually inspect all rigging parts and enclosures each time they are used for wear, deformation,
cracks, corrosion, damage, and any other condition that may affect load handling capability.
DANGER: If there is any question about the integrity or capability of any rigging part to perform
its intended function, immediately remove it from service for repair or replacement.
Page 26 of 28 RD0169 (A) CAF730 & SS730 OWNER’S MANUAL
8.4.2 Periodic Inspection
Perform complete and thorough inspections on a routine, periodic basis. The interval between
inspections and scope of the inspections will depend on the frequency of system usage and the
conditions of use. This interval must not exceed 1 year.
DANGER: Should any of the below listed types of damage exist, immediately remove the
affected part from service for repair or replacement.
8.4.3 Complete Inspection
A complete inspection should include, but not be limited to, looking for the types of damage or
failures listed in each group:
8.4.4 Rigging Components
1. Bends
2. Breaks
3. Broken parts
4. Corrosion
5. Cracks
6. Cracks in welded joints
7. Deformation
8. Denting
9. Wear
10. Loose parts or fasteners
11. Missing parts or fasteners
12. Binding Hinges, Hinge joints or Hinge Tubes
8.4.5 Loudspeaker Enclosures
1. Cracks or breaks in the wood
2. Cracks or bends in the covers
8.5
8.4.6 Fly-Bar
1. Bends
2. Cracks
3. Cracked welds
4. Worn spots
8.4.7 Connecting Pins
1. Out-of-roundness
2. Plunger binding or other improper
operation
3. Loss of plunger spring action
4. Missing ball bearings
8.4.8 Caster Pallets
1. Cracks or breaks in the wood
2. Bent wheels
3. Wheels that bind when swiveled or rolled
4. Damaged tires
MAINTENANCE
8.5.1 Performance Testing
Listening tests and/or formal measurements should be done periodically. The interval between
such tests will depend on the frequency of system usage and the conditions of use. All
transducers should be tested for functionality and proper performance. A sine wave sweep at
approximately 10% of rated power will usually reveal transducer and/or enclosure problems in the
form of distortion, buzzes, or rattles.
8.5.2 Cleaning
Clean the exterior surfaces of the enclosures as required, using a damp cloth to remove any dust
or dirt. After cleaning, use a clean dry cloth to remove any excess moisture.
CAUTION: To avoid damaging the exterior finishes do not use cleaning solvents or abrasives.
8.5.3 Cosmetic Field Repairs
While the enclosure paint finish and wood is of high quality and durability, mars, marks, and other
blemishes will likely appear from normal use. For paint touchup, contact the woodworxmax Service
Department for original factory paint (Sherwin-Williams Polane® 700T, water reducible
polyurethane-acrylic enamel) and instructions for its application. Otherwise, use the closest match
to this paint from a local Sherwin-Williams dealer. For cosmetically damaged wood, use common
woodworking methods and materials as appropriate for the damage.
RD0169 (A) CAF730 & SS730 OWNER’S MANUAL Page 27 of 28