1
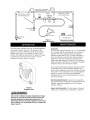
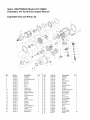
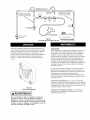
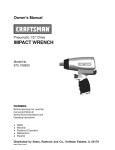
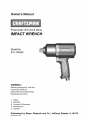
Owner's Manual
Pneumatic 3/4"Anvil
Drive
IMPACT WRENCH
Model No.
875.199850
WARNING:
Before operating tool, read this
manual and follow all
Safety Recommendations
Operating Instructions.
,
,
and
Safety
Warranty
Features & Operation
Maintenance
EspaSol
Distributed
www.Sears.com
by Sears,
Roebuck
and Co., Hoffman
Estates, IL 60179
FULL ON E YEAR WARRANTY ON
CRAFTSMAN AIR-DRIVE TOOLS
If this Craftsman tool fails to give complete satisfaction
within one year from the date of purchase, RETURN IT
TO THE NEAREST SEARS STORE IN THE UNITED
STATES, and Sears will repair or replace it free of charge.
If this Craftsman tool is used for commercial or rental
purposes, this warranty applies for only 90 days from the
date of purchase. This warranty gives you specific legal
rights, and you may also have other rights which vary
from state to state.
Read Operating Instructions
Please become familiar with all the instructions and
warnings before operating any pneumatic tool.
Always Wear Approved Eye Protection
Impact resistant eye protection should meet or exceed
the standards set forth in ANSI Z87.1, Occupational and
Educational Eye and Face Protection. Look for marking
Z87.1 on your eye protection to ensure that it is an
approved style.
Hearing Protection is Recommended
Hearing protection should be used when the noise level
exposure equals or exceeds an 8 hour time-weighted
average sound level of 85dBA. Process noise, reflective
surfaces, other tools being operated nearby, all add to the
noise level in a given work area. If you are unable to
determine your noise level exposure, we recommend the
use of hearing protection.
Avoid Prolonged Exposure to Vibration
Pneumatic tools can vibrate during use. Prolonged
exposure to vibration or very repetitive hand and arm
movements can cause injury. Discontinue the use of any
tool if you experience tingling, numbness, discomfort or
pain in your hands or arms. You should consult your
physician before resuming use of tool.
90 PSI Maximum
This tool is designed to operate at an air pressure of 90
pounds per square inch gauge pressure (90 PSI)
maximum, at the tool. Use of higher air pressure can, and
may cause injury. Also, the use of higher air pressure
places the internal components under loads and
stresses they were not designed for, causing premature
tool failure.
NOTE: THEAIR SUPPLY SHOULD BE CLEAN, DRYAND
PREFERABLY LUBRICATED. FOR BEST RESULTS
DRAIN THE MOISTURE FROM YOUR COMPRESSOR
DAILY.
Use Only Impact Sockets & Accessories
Only use sockets designated "FOR USE WITH IMPACT
WRENCHES." Hand tool sockets can break, creating a
hazard from flying pieces. Always check sockets,
retainers and drives regularly for wear or damage and
replace when necessary.
Distributed by Sears, Roebuck and Co., Dept. 817WA,
Hoffman Estates, IL 60179.
The Craftsman Model 875.199850 3/4" Square Drive
Impact Wrench is ideal for general assembly,
automotive, agricultural and industrial applications.
Features
•
•
•
Specifications
Drive size ............................................................................... 3/4"
Impacts per minute ..................................................... 990 IPM
Free speed (No Load) ........................................... 4,500 RPM
Ultimate torque........................................................ 750 ft. Ibs.
Weight ............................................................................... 8.7 Ibs.
Overall length .................................................................. 9-1/2"
Average air consumption ............................................. 8 SCFM
Recommended hose size ........................................... 3/8" I.D.
Air inlet .......................................................................... 3/8" NPT
Maximum Air Pressure .................................................. 90 PSI
Pre-Operation
Before the tool is connected to the air supply, clear the air
hose of accumulated dust and moisture by running air
freely through the air hose for 5-10 seconds. Before
removing a tool for service or changing sockets, make
sure the air line is shut-off at the compressor. This will
prevent the tool from operating if the throttle is accidently
engaged.
[, WARNINGJ
Some dust created by power sanding, sawing, grinding,
drilling and other construction activities contains chemicals known to cause cancer, birth defects or other
reproductive harm. Some examples of these chemicals
are:
•
•
•
Built-in regulator for power output adjustment.
Twin hammer clutch for increased power output.
Ring-type socket retainer allows quick socket
changes.
Installation
(See figure
1)
This tool is designed to operate at 90 psi. Lower pressure (below 90 psi) will reduce performance of the tool
while higher air pressure (over 90 psi) raises the performance of the tool beyond its rated capacity and could
cause serious damage to tool and user.
Lead from lead based paint
crystalline silica from bricks and cement
and other masonry products, and
arsenic and chromium from chemicallytreated lumber.
Always use clean dry air. Excessive moisture and dirt will
greatly reduce the life of any air motor. We recommend
the installation of an in-line filter-regulator-lubricator
as
close to the tool as possible.
Your risk from those exposures varies, depending on how
often you do this type of work. To reduce your exposure to
these chemicals: work in a well ventilated area, and work
with approved safety equipment, such as dust masks that
are specifically designed to filter out microscopic particles.
A 3/8" air hose is required up to a length of 8 ft. If more
length is required a 1/2" air hose should be used at the
compressor. Attach a 3/8" whip hose for the remaining
4 - 8 ft. for flexibility. Be sure all hoses and fittings are the
correct size and tightly secured before using air tool.
(2)
._
"If
I I
ranch ne = 2 t
........
iool mien/nose size
I I Auto
Morsetha_n 1/100slo. pe
I I
I I
Sto _
v
Valve
Filter
Reoulator
_
Drain
_)A:lve
"_
Main line = 3 times
Tool inlet/hose size
AirTool
I
(
Figure I
Air Hose Hook Up
This tools power regulator valve (fig. 2). Rotate regulaotor
until desired output is achieved. The settings on the
regulator are only for reference only and do not denote a
specific power output. Turn regulator to position with
smaller circle being the least amount of power and larger
circle being for the most amount of power. The tool
operates in maximum power in reverse.
I
Air Compressor
_-r
\\\\\\\\\\\\_x\\
•"
Lubrication
An in-line filter-regulator-lubricator
(fig.l) is recommended
as it increases tool life and keeps the tooI in sustained
operation. The in-line lubricator should be regularly
checked and filled with air tool oil. Proper adjustment of
the in-line lubricator is performed by placing a sheet of
paper next to the tools exhaust ports and holding the
throttle open approximately 30 seconds. The lubricator is
properly set when a light stain of oil collects on the paper.
Excessive amounts of oil should be avoided.
In the event that it becomes necessary to store the tool for
an extended period of time (overnight, weekend, etc.), it
should receive a generous amount of lubrication through
the air inlet. The tool should be run for approximately 30
seconds to ensure oil has been evenly distributed
throughout the tool. The tool should be stored in a clean
and dry environment.
Recommended lubricants:
Use air tool oil or any other
high grade turbine oil containing moisture absorbent, rust
inhibitors, metal wetting agents and an EP (extreme
pressure) additive.
Figure 2
Regulator Valve
WARNING
Once a bolt or fastener is seated, impacting for longer
than five (5) seconds will cause excessive wear and
possible damage to the impacting mechanism. If it
takes longer than five seconds to tighten or loosen your
bolt or fastener, we recommend the use of a larger size
impact wrench.
Impact clutch lubrication:
The tooI reservoir in the anvil
housing is oil lubricated. No maintenance is required.
Sears
CRAFTSMAN
Pneumatic
Model
875.199850
3/4" Anvil Drive Impact Wrench
Exploded View and Parts List
21
29
5
4
26
45
?Ref.
1
2
3
4
5
8
7
8
9
10
11
12
13
14
15
18
17
18
19
2O
21
22
23
24
25
Pad No.
9106153
9106154
9106155
9106156
9106157
9106158
9106159
9106160
9106161
9106162
9106163
9106164
9106165
9106168
9106167
9106168
9106169
9106170
9106171
9106172
9106173
9106174
9106175
9106178
9106177
Description
Housing
Spring Pin
Ornamental Gasket
Bushing
Screw
Bushing
Seal
Screw
Valve Seat
Throttle Valve
Valve Spring
Exhaust Deflector
Washer
Air Inlet Bushing
O-Ring
Trigger
Reverse Switch
Spring
Steel Ball
O-Ring
Reverse Bushing
Valve Bushing
Gasket
Retainer Ring
Ball Bearing
Q'ty
1
1
1
4
4
1
1
1
1
1
1
1
1
1
1
1
1
1
1
1
1
1
1
1
2
Ref.
26
27
28
29
30
31
32
33
34
35
36
37
38
39
40
41
42
43
44
45
46
47
48
49
50
51
44
Pad No.
9108178
9108179
9108180
9108181
9108182
9108183
9108184
9108185
9108188
9108187
9108188
9108189
9108190
9108730
9108192
9108193
9108194
9108195
9108198
9108197
9108198
9108199
9108200
9108201
9108202
956151
Description
Cylinder
Steel Ball
Rotor
Rotor Blades
Washer
Dowel Pin
Front End Plate
O-Ring
Oil Seal
Ornamental
Gasket
Q'ty
1
2
1
7
1
1
1
1
1
1
Hammer Cage
Hammer Dog
Hammer Pin
Anvil
Anvil O-Ring
Socket Retainer
Steel Sleeve
1
2
2
1
1
1
1
Anvil Bushing
Steel Pipe
Hammer Case
Seal
Screw
Oil Seal
Muffler Cover
Ceramic Balls
Gasket
1
4
1
1
1
1
1
20
1
Troubleshooting
Tool runs slowly or will not operate
1. Grit or gum in tool
1. Flush the tool with air tool oil or gum
solvent.
2. No oil in tooI
2. Lubricate the tool according to the lubrication
instructions in this manuai
3. a. Adjust the regulator on the tool to the maximum setting
b. Adjust the compressor regulator to tool
maximum of 90 psi.
4. Tighten and seal hose fittings if leaks are found
use teflon tape.
5. a. Be sure the hose is the proper size. Long
hoses or tools using large volumes of air may
require a hose with an I.D. of 1/2" or larger
depending on the total length of the hose
b. Do not use a multiple number of hoses
connected together with quick connect fittings.
This causes additional pressure drops and
reduces the tool power. Directly connect the
hoses together
6. Replace rotor blade
7. Remove and inspect bearing for rust, dirt and
grit. Replace or clean and grease bearing with
bearing grease
3. Low air pressure
4. Air hose leaks
5. Pressure drops
6. Worn rotor blade in motor
7. Worn ball bearing in motor
Moisture blowing out of tool exahust
Impacts slowly or will not impact
1. Water in tank
1. Drain tank. (See air compressor manual). Oil tool
and run until no water is evident. Oil tool again and
run 1-2 seconds
1. Lack of lubrication
2. Tool regulator set in wrong
position
Impacts rapidly but
will not remove bolts
Does not impact
1. Lubricate the air motor and the impact mechanism.
(See Lubrication section of this manual)
2. Adjust the regulator on the tool to the maximum
setting
3. In-line regulator or
compressor regulator
set too low
3. Adjust regulators in the air system
1. Worn impact mechanism
1. Replace worn impact mechanism
1. Broken impact mechanism
1. Replace
(5)
broken impact mechanism
components
components
Manual del Propietario
LLAVE DE IMPACTO
Neum,_tica con mando de cuadrado de 3/4 pulg
Modelo No.
875.199850
ADVERTENCIA:
Antes de usar esta herramienta,
lea este manual y siga todas las
recomendaciones
de seguridad
e instrucciones de operaci6n.
Seguridad
Garantia
Caracteristicas
Mantenimiento
Espa_ol
Distribuido
www.Sears.com
y operaci6n
por Sears, Roebuck
and Co., Hoffman
Estates,
IL 60179
Lealasinstrucciones
deoperaci6n
GARANTiA POR UN AI_IO COMPLETO EN
LAS HERRAMIENTAS NEUMATICAS CRAFTSMAN
Por favor familiaricese con todas las instrucciones y
advertencias antes de operar cualquier herramienta neumatica.
Use siempre proteccion
adecuada para los ojos
La protecci6n de los o]os resistente al impacto debe cumplir o
exceder los estandares establecidos en ANSI Z87.1, Protecci6n
ocupacional y educativa de los ojos y el rostro. Busque Ia marca
Z87.1 en su protector de los ojos para asegurar que es un estilo
aprobado.
Se recomienda
el uso de proteccibn
auditiva
Debera usar protecci6n auditiva si la exposici6n al nivel de ruido
equivale al nivel act_stico promedio cronoponderado de 8 horas
de 85 dBA o Io supera. El ruido del proceso, superficies
reflectoras, otras herramientas operadas en la cercania, todos
agregan al niveI de ruido en un area determinada de trabajo.
Si no es posible determinar la exposici6n al nivel de ruido, se
recomienda usar protecci6n auditiva.
Evite una exposicion prolongada a la vibracion
Las herramientas neumaticas pueden vibrar durante su uso.
La exposici6n prolongada a las vibraciones o los movimientos
muy repetidos de manos y brazos pueden causar lesiones.
Interrumpa el uso de cualquier herramienta si experimenta
cosquilleo, adormecimiento, malestar o dolor en las manos o
brazos. Antes de reanudar el uso de la herramienta, usted debe
consuItar con su m6dico.
Siesta herramienta Craftsman no le satisface completamente
dentro de un ado a part,Jr de su fecha de compra, DEVUELVALA
ALATIENDASEARS
MAS CERCANA EN LOS ESTADOS UNIDOS,
y Sears la reparar_ o reemplazara gratis. Siesta herramienta
Craftsman se usa para fines comerciales o de alquiler, esta
garantia se aplica por 90 dias solamente a partir de la fecha de
compra. Esta garantia le proporciona derechos legaIes
especificos, y usted puede tener tambien otros derechos que
varian de estado a estado.
Distribuido por Sears, Roebuck and Co., Dept.
817WA, Hoffman Estates, IL 60179.
La Ilave de impacto de mando cuadrado de 3/4 pulg Craftsman,
ModeIo 875.199850, es ideal para usar en el ensamble general,
asi como en apticaciones de autom6viIes, agricultura e
industriales.
Features
Regulador
Embrague
Retenedor
rapidos de
M_ximo de 90 PSI (libras manometricas
por pulg.
cuadrada)
Esta herramienta esta disedada para operar a una presi6n
neumatica maxima de indicador de 99 Iibras por pulgada
cuadrada (90 PSi) en la herramienta. El uso de una presiOn
de aire mayor puede y podra causar lesiones. Tambi¢n, el uso
de una presi6n neumatica mayor somete a los componentes
internos a cargas y tensiones para Ias cuales no fueron
disedados, causando una falla prematura de Ia herramienta.
NOTA: ELSUMINISTRO DEAIRE DEBERA, SER LIMPIOY SECO,
PREFERENTEMENTE LUBRICADO. PARA OBTEN ER LOS
MEJORES RESULTADOS, PURGUEADIARIO
COMPRESOR.
Especificaciones
Tamado del mando .............................................................
3/4 pulg
Impactos por minuto ...........................................................
990 IPM
Velocidad libre (sin carga) ............................................
4,500 RPM
Par torsor final ......................................................
750 pies por libra
Peso ...................................................................................
8.7Iibras
Longitud total .....................................................................
9YLpulg
Consumo promedio de aire .................................................
8 SCFM
Tamado recomendado de la manguera ......... 3/8 pulg de diam. int.
Entrada de aire ...........................................................
3/8 puIg NPT
Presi6n de aire maxima ........................................................
90 PSI
LAHUMEDAD DEL
Use solamente los casquillos y accesorios
clasificados para impactos
Previo a la operacion
Use solamente aquellos casquillos que est_n marcados como
"PARA USAR CON LLAVES DE IMPACTO". Los casquillos para
herramientas de mano pueden romperse y crear el riesgo de
despedir proyectiles. Siempre verifique el estado de los
casquillos, retenedores y elementos de accionamiento para
detectar desgastes o averias. Reemplacelos cuando sea
necesario.
Antes de coneotar la herramienta al suministro de aire, limpie la
manguera de aire para quitarle el potvo y la humedad
acumulados. Hagalo pasando aire libremente por la manguera por
un tiempo de 5 a 10 segundos. Antes de quitar la herramienta del
servicio o cambiar los casquiIIos, asegt_rese de que la linea de
aire este apagada en el compresor. Con ello se prevendr_ que Ia
herramienta funcione si el aceIerador se acciona
accidentalmente.
I ,ADW"TE"c'AH
Instalacion (Yea la Figura 1)
La herramienta esta disedada para que funcione a 90 psi. Una
presi6n menor (por debajo de 90 psi) disminuira el rendimiento de
Ia herramienta, mientras que una presi6n neumatica mayor
(sobre 90 psi) incrementara el rendimiento de la herramienta mas
alia de su capacidad nominal y puede causar dados extensos a
Ia herramienta y lesiones graves al usuario.
Algunos polvos creados por et lijado, aserrado, desgastado,
taladrado y otras actividades de construcci6n contienen
substancias quimicas conocidas como causantes de cancer,
defectos de nacimiento u otras lesiones en el sistema de
reproducci6n.
Algunos ejemplos de esas sustancias
integrado para el ajuste de la salida de potencia.
de martiIIo gemelo para mayor salida de potencia.
de casquillo tipo anilIo que permite cambios
los casquillos.
quimicas
Use siempre aire limpio y seco. La humedad excesiva y la
suciedad reduciran en gran medida la vida Qtil de cuatquier motor
de aire comprimido. Se recomienda Ia instalaci6n de un filtroregulador-lubricador
en linea Io mas cerca posibte a Ia
herramienta.
SOnl
Plomo de pinturas fabricadas a base de plomo
Silice cristalino de ladriIIos, cemento y otros productos
mamposteria, asi como
arsenico y cromo de maderas quimicamente tratadas.
de
Su riesgo a esas exposiciones varia, dependiendo de la
frecuencia a la que usted efect_e este tipo de trabajo. Para
reducir su exposici6n a estos materiales: trabaje en un area bien
ventilada y con los equipos de protecci6n aprobados, como
mascaras de poIvo que esten especificamente disedadas para
filtrar particulas microsc6picas.
Para una Iongitud de hasta 8 pies se requiere usar una manguera
de aire de 3/8 pulgada. Si se necesita una Iongitud mayor, se
debe usar una manguera de aire de 1/2 pulgada en el compresor.
Conecte una manguera de 3/8 pulg de conexi6n flexible para el
resto de los 4 a 8 pies, para que ayude a la flexibilidad.
Aseg_:_rese de que todas las mangueras y accesorios sean deI
tamado correcto y que esten firmemente conectados antes de
usar Ia herramienta neumatica.
(2)
Valvula
delregulador
depotencia
deestaherramienta
(Fig.2).
Gireelregulador
hasta
queIogre
lasalida
deseada.
Losvalores
fijados
enelregulador
sonsolocomo
referencia
ynodenotan
unasalida
depotencia
especifica.
Gireelregulador
auna
posici6n
donde
elcirculo
maspeque_o
sealamenor
cantidad
de
potencia
yelcirculo
masgrande
sealamayor
cantidad
de
potencia.
Laherramienta
funciona
asupotencia
maxima
en
reversa.
Lubricacion
Se recomienda usar un filtro-regulador-lubricador
en linea (Fig.l)
ya que incrementa la duraci6n de la herramienta y mantiene la
herramienta en una operaci6n sostenida. Debera comprobar el
lubricador en Iinea con regularidad y Ilenarlo con aceite para
herramientas de aire comprimido. El ajuste correcto del lubricador
en linea se realiza colocando una hoja de papel pr6xima a los
orificios de escape de Ia herramienta y manteniendo abierto eI
acelerador durante 30 segundos aproximadamente. Se ajusta
correctamente el lubricador cuando el papel queda manchado con
una ligera mancha de aceite. Deberan evitarse Ias cantidades
excesivas de aceite.
En caso de ser neoesario almacenar
la herramienta
durante un
largo tiempo (de la noche a la manana, un fin de semana, etc.),
debera lubricarla abundantemente a traves de la entrada de aire
Debera operar la herramienta durante 30 segundos
aproximadamente para asegurar Ia distribuci6n pareja del aceite
en toda la herramienta. Deber_ almacenarse Ia herramienta en un
medio Iimpio y seco.
Lubricantes
Figura
V_lvula
2
del regulador
a4
Una vez asentado un perno o sujetador, la accion de
impactar por mas de cinco (5) segundos producira
desgaste en exceso y posibles dafios al mecanismo
de
impactacibn 8i tarda mas de cinco segunclos para ajustar
o aflojar su perno o sujetador, recomendamos
el uso de
una Ilave de impacto de tamafio mayor.
recomendados:Use
un aceite de herramienta
neumatica u cualquier otto aceite de grado elevado de turbina que
contenga absorbente de humedad, inhibidores de 6xido, agentes
humidificadores del metat y un aditivo EP (presiOn extrema). (Vea
la para Ia ubicaciOn y entrada de aire).
Lubricacibn del embrague de impacto:
El depdsito de la
herramienta en la caja del yunque esta Iubricado con aceite.
No requiere mantenimiento.
Sears
CRAFTSMAN
Llave de impacto
Vista ampliada
Ref.
Pieza No.
1
2
3
4
5
6
7
8
9
19
11
12
13
14
9106153
9106154
9106155
9106156
9106157
9106158
9106159
9106160
9106161
9106162
9106163
9106164
9106165
9106166
15
16
17
9106167
9106168
9106169
18
19
2O
21
22
23
24
25
9106170
9106171
9106172
9106173
9106174
9106175
9106176
9106177
Modelo
neumatica
875.199850
cuadrado
de 3/4 PULG
y lista de piezas
Descripcibn
Cant,
Caja protectora
Clavija del resorte
Junta de adorno
1
1
1
Cojinete
Tornillo
4
4
Cojinete
Junta estanca
Tornillo
Asiento de Ia valvula
Valvula del acelerador
Resorte de la v_lvuIa
1
1
1
1
1
1
Deflector
Arandela
1
1
de escape
Cojinete de la admisi6n
de aire
Junta tOrica
Gatillo
1
1
1
Interruptor de marcha
atras
Resorte
Esfera de acero
Junta tOrica
Rodamiento de reversa
1
1
1
1
1
Cojinete de la valvula
Junta
Anillo retenedor
Rodamiento esf¢rico
1
1
1
2
(4)
Ref.
Pieza No.
26
27
28
29
3O
31
32
33
34
35
36
37
38
39
4O
41
9106178
9106179
9106180
9106181
9106182
9106183
9106184
9106185
9106186
9106187
9106188
9106189
9106190
9106730
9106192
9106193
42
43
44
45
46
47
48
49
50
51
9106194
9106195
9106196
9106197
9106198
9106199
9106200
9106201
9106202
956151
Descripcion
Cant,
Cilindro
Esfera de acero
Rotor
Paletas del rotor
Arandela
1
2
1
7
1
Clavija
Placa delantera
Junta t6rica
Junta de aceite
Junta de culat decrativa
1
1
1
1
1
Caja del martillo
Garra de martillo
1
2
Clavija del martinete
Yunque
Junta t6rica de yunque
Retenedor de casquilIo
adaptador
Manguito de acero
Cojinete del yunque
Tubo de acero
2
1
1
1
1
1
4
Caja deI martillo
Empaquetado
Tornillo
Junta de aceite
Cubierta del silenciador
Peiota ceramicas
Junta
1
1
1
1
1
20
!
Localizacion
La herramienta
no funciona.
y solucion
funciona Ientamente o
de fallas
1. En la herramienta
arena o resina.
hay polvo,
2. En la herramienta
no hay aceite.
Irrigue la herramienta
para herramientas
en diluyente.
3. La presi6n del aire esta baja.
4. La manguera de aire tiene
escapes.
5. Caidas de presi6n.
con aceite o diluyente de resinas
neumaticas.
2. Lubrique la herramienta de acuerdo a las instrucciones
de lubricaci6n indicadas en este manual.
3. a. Ajuste et regulador de la herramienta al valor maximo.
b. Ajuste el regulador deI compresor al maximo de la
herramienta de 90 psi.
4. Apriete y selle los accesorios de Ia manguera. Si ha
encontrado escapes, use una cinta adhesiva de tefl6n.
5. a. AsegQrese de que la manguera que esta usando
tenga el tamafio correcto. Las mangueras largas o las
herramientas que usan grandes volC_menes de aire
podrian requerir una manguera con un diametro interne
de 112 pulgada o mas, dependiendo de Ia Iongitud total
de la manguera.
b. No use varias mangueras conectadas una a Ia otra
a traves de accesorios de conexi6n r_pidos. Esto
causa caidas de presi6n adicionales y reduce Ia
potencia de la herramienta. Conecte Ias mangueras una
con la otra directamente.
6. Paleta del _toren
el motor
desgastada.
7. Rodamiento es_rico
en et motor
desgastado.
6. Reemplace la pateta del rotor.
7. Retire e inspeccione el rodamiento en busca de
herrumbre, suciedad y arena. Reemplace o limpie y
engrase el rodamiento
Per el escape de la herramienta
saliendo humedad.
esta
Impactos Ientos o no hay impactos.
1. Agua en ettanque.
Drene el tanque. (Consulte el manual del compresor).
Engrase la herramienta y hagaIa funcionar hasta que no
vea agua. Engrase Ia herramienta otra vez y dejela
funcionar de 1 a 2 segundos.
1. Falta de lubricaci6n
2. El regulador de la herramienta
esta puesto en la posici6n
incorrecta.
Proyecta impactos rapidamente
no quita los pernos,
No da impactos
pero
con grasa para rodamientos.
1. Lubrique el motor del aire y el mecanismo de impacto.
(Consulte la secciOn Lubricaci6n de este manual).
2. Ajuste el regulador de la herramienta a su valor m_ximo.
3. Regulador en linea o
regulador del compresor
fijado muy bajo
3. Ajuste los reguladores
1. Mecanismo de impacto
desgastado,
1. Reemplace los componentes
de impacto.
desgastados
1. Mecanismo
1. Reemplace
impacto.
rotos deI mecanismo
de impacto roto.
(5)
deI sistema de aire.
los componentes
del mecanismo
de
For the repair or replacement
parts you need delivered directly to your home
Call 7 am - 7 pm, 7 days a week
1-800-366-PART
(1-800-366-7278)
Para ordenar piezas con entrega
a domicilio - 1-800-659-7084
For the location
of a
Sears Parts and Repair Center
in your area
Call 24 hours a day, 7 days a week
1-800-488-1222
For more information
on
purchasing a Sears
Maintenance Agreement or to inquire
about an existing Agreement
Call 9 am - 5 pm, Monday-Saturday
1-800-827-6655
The model number of your air tool is located
on the serial plate attached to the tool.
When requesting service or ordering parts,
always give the following information:
• Product Type
• Model Number
Distributed
• Pneumatic
SE/ARS
Tool
• Part Description
by Sears, Roebuck
and Co., Hoffman
Estates, IL 60179 USA