1
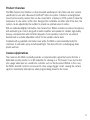
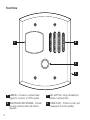
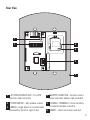
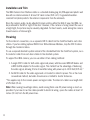
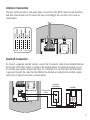
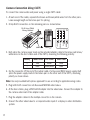
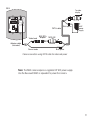
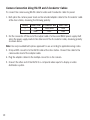
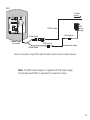
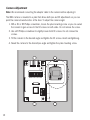
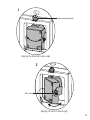
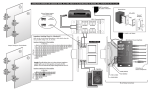
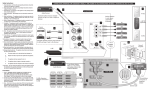
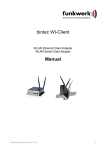
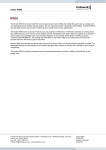
ISK4
ComPoint® Camera Door Station
Instruction Manual
Important Safety Instructions
CAUTION: TO REDUCE THE RISK OF ELECTRIC
SHOCK, DO NOT REMOVE THE COVER. NO
USER-SERVICEABLE PARTS INSIDE. REFER SERVICING TO QUALIFIED SERVICE PERSONNEL.
The exclamation point within an equilateral triangle is
intended to alert the user to the presence of important
operating and maintenance (servicing) instructions in the
literature accompanying the appliance.
Safety Instructions
1. Read Instructions - All the safety and operating
instructions should be read before the appliance is
operated.
2. Retain Instructions - The safety and operating
instructions should be retained for future reference.
3. Heed Warnings - All warnings on the appliance in the
operating instructions should be adhered to.
4. Follow Instructions - All operating and user instructions should be followed.
5. Wall or Ceiling Mounting - The appliance should be
mounted to a wall or ceiling only as recommended
by the manufacturer.
6. Ventilation - The appliance should be situated so
that its location or position does not interfere with
its proper ventilation. For example, the appliance
should not be situated on a bed, sofa, rug, or
similar surface that may block the ventilation openings, or placed in a built-in installation, such as a
bookcase or cabinet that may impede the flow of air
through the ventilation openings.
2
7. Heat - The appliance should be situated away from
heat sources such as radiators, heat registers,
stoves, or other appliances (including amplifiers)
that produce heat.
8. Power Sources - The appliance should be connected
to a power supply only of the type described in the
operating instructions or as marked on the appliance.
9. Cleaning - The appliance should be cleaned only as
recommended by the manufacturer.
10. Object and Liquid Entry - Care should be taken so
that objects do not fall into the enclosure and the
appliance is not subjected to direct streams or
spraying of liquids.
11. Damage Requiring Service - The appliance should be
serviced by qualified service personnel when:
A. Objects have fallen, liquid has been spilled into
the appliance; or
B. The appliance does not appear to operate
normally; or
C. The appliance has been dropped or the enclosure is damaged.
12. Servicing - The user should not attempt to service
the appliance beyond that described in the operating instructions. All other servicing should be
referred to qualified service personnel.
Product Overview
The ISK4 Camera Door Station is a flush-mounted weatherproof call station and door camera
specifically for use with a Russound ComPoint® intercom system. It features a low-light-level
monochrome security camera that can be connected to a display or CCTV system to allow the
homeowner to see visitors at the door. Designed for installation on either side of the door, the
camera can be adjusted by the installer to provide an optimum view of visitors.
With an amber-backlighted call button, the Camera Door Station includes an internal microphone
with automatic gain control along with a built-in amplifier and speaker for reliable, high-quality
two-way communication with ComPoint keypads. It also provides contacts for an external
doorbell and an installer-adjustable control for the speaker volume level.
Complete with a gasketed solid metal cover plate, the ISK4 is environmentally tested for
resistance to salt water spray and ultraviolet light. The device fits into a double-gang deep
plastic wall box.
Camera Applications
The camera in the ISK4 constantly provides a composite video signal that can be fed into a
dedicated security monitor or an RF modulator for viewing on a TV channel. It can also be fed
into a page video input on a multiroom controller such as the Russound CAV6.6. In this case,
the ISK4’s doorbell contacts can be used to close a page trigger circuit, causing the camera
signal to momentarily interrupt any video program being viewed in the zones.
3
Front View
1
2
3
4
1 CAMERA – Provides a constant video
signal for a monitor or CCTV system
2 MICROPHONE AND SPEAKER – Provide
two-way communication with interior
keypads
4
3 CALL BUTTON – Rings doorbell and
initiates communication
4 COVER PLATE – Protects circuits and
components from the weather
Rear View
2
1
3
BR BR/W G G/W O O/W BL BL/W
4
5
6
1 110 PUNCH-DOWN BLOCK – For CAT-5
intercom cable connection
2 POTENTIOMETER – Sets speaker volume
3 CAMERA – Angle adjusts to accommodate
placement to the left or right of door
4 MULTIPIN CONNECTOR – Accepts camera
power and video adapter cable (included)
5 DOORBELL TERMINALS – Screw terminals
for external doorbell connection
6 GASKET – Seals out moisture and dust
5
Installation and Trim
The ISK4 Camera Door Station installs in a standard double-gang UL/CSA-approved plastic wall
box with an internal volume of at least 32 cubic inches (524 cm3). Its gasketed weatherresistant front plate protects the internal components from the elements.
Since the camera angle can be adjusted to place visitors within the field of view, the ISK4 can
be positioned to the left or right of the door. However, if the camera is facing toward the sun or
a bright light, the picture may be severely degraded. For best results, avoid aiming the camera
toward sources of intense light.
Prewiring
For the intercom connection, run a separate CAT-5 cable from the ComPoint hub to each door
station. If you’re installing optional ISDR1 Door Strike Release Modules, loop the CAT-5 cables
through the module locations.
To use a separate doorbell system instead of the doorbell built into the ComPoint system, run a
2-conductor cable from each door station to the doorbell system.
To support the ISK4 camera, you can use either of two cabling methods:
1. A single CAT-5 cable for both video signal and power, with Russound MOD-VB baluns and
a BNC-to-RCA adapter for the video signal. This method has the advantage of balancing
the video signal, allowing it to be transmitted along with power up to 1000 feet (305 m).*
2. An RG-59 cable for the video signal and a 2-conductor cable for power. This is the more
conventional method, but video transmission is limited to shorter distances.
*This applies only to the camera power and signal cable. The intercom cable has a length limit
of 250 feet (76 m).
Note: When running low-voltage cables, avoid running them near AC power wiring as much as
possible. If you have to run the cables parallel to electrical wiring, space the cables at least 12
inches (30 cm) from the AC power lines.
6
Intercom Connection
The door station provides a 110 punch-down connector for the CAT-5 cable from the ComPoint
hub. Use a punch-down tool to connect the wires according to the connector color code as
shown below.
BR BR/W G G/W O O/W BL BL/W
BR BR/W G G/W O O/W BL BL/W
Doorbell Connection
To connect a separate doorbell system, connect the 2-conductor cable to the doorbell terminals
on the back of the door station as shown in the example below. The terminals provide access
to normally open switch contacts that close for a minimum of 4 seconds when the Call button
is pressed. Connect the cable from the ISK4 to the doorbell according to the doorbell system
instructions. A typical connection is shown below.
Doorbell
Transformer
BR BR/W G G/W O O/W BL BL/W
Doorbell
2-Conductor
Cable
7
Camera Connection Using CAT-5
To connect the camera video and power using a single CAT-5 cable:
1. At each end of the cable, separate the brown and brown/white wires from the other pairs.
Leave enough length on the brown pair for splicing.
2. Crimp RJ-45 connectors on the remaining pairs as shown below.
RJ-45 Using T568A
Wiring Standard
3. Butt splice the camera power leads on the included adapter cable to the brown and brown/
white wires on the door station end of the CAT-5, observing the following polarity:
Polarity
Camera Lead
CAT-5 Wire
846C Lead
+
Red
Brown
White
–
Black
Brown/White
Black
4. Cut the connector off the end of the output cable of a Russound 846C power supply. Butt
splice the power supply leads to the brown pair on the other end of the CAT-5, observing
polarity as shown above.
Note: Use only insulated butt splices approved for use according to applicable wiring codes.
5. Plug both RJ-45 connectors into Russound MOD-VB video baluns.
6. At the door station, plug a BNC-to-RCA adapter into the video balun. Connect the adapter to
the camera video lead of the adapter cable.
7. Plug the adapter cable into the multipin connector on the camera.
8. Connect the other video balun to a composite video input of a display or video distribution
system.
8
ISK4
To video
display
BR BR/W G G/W O O/W BL BL/W
Butt splice
CAT-5 cable
Video lead
BNC-RCA
adapter
846C
power
supply
MOD-VB
Adapter cable
(included)
Power leads
Butt splice
Camera connection using CAT-5 cable for video and power
Note: The ISK4 camera requires a regulated 12 VDC power supply.
Use the Russound 846C or equivalent to power the camera.
9
Camera Connection Using RG-59 and 2-Conductor Cables
To connect the camera using RG-59 cable for video and 2-conductor cable for power:
1. Butt splice the camera power leads on the included adapter cable to the 2-conductor cable
at the door station, observing the following polarity:
Polarity
Camera Lead
2-Conductor Wire
846C Lead
+
Red
Red or White
White
–
Black
Black
Black
2. Cut the connector off the end of the output cable of a Russound 846C power supply. Butt
splice the power supply leads to the other end of the 2-conductor cable, observing polarity
as shown above.
Note: Use only insulated butt splices approved for use according to applicable wiring codes.
3. Crimp a BNC connector to the RG-59 cable at the door station. Connect the cable to the
camera video lead of the adapter cable.
4. Plug the adapter cable into the multipin connector on the camera.
5. Connect the other end of the RG-59 to a composite video input of a display or video
distribution system.
10
ISK4
To video
display
BR BR/W G G/W O O/W BL BL/W
846C
power
supply
RG-59 cable
Butt splice
Video lead
Adapter cable
(included)
Butt splice
2-conductor cable
Power leads
Camera connection using RG-59 cable for video and 2-conductor cable for power
Note: The ISK4 camera requires a regulated 12 VDC power supply.
Use the Russound 846C or equivalent to power the camera.
11
Camera Adjustment
Note: We recommend connecting the adapter cable to the camera before adjusting it.
The ISK4 camera is mounted in a yoke that allows both pan and tilt adjustments so you can
point the camera toward visitors at the door. To adjust the camera angle:
1. With a #1 or #2 Phillips screwdriver, loosen the yoke mounting screw so you can swivel
the camera to gain access to the tilt screws on both sides. Do not remove the screw.
2. Use a #0 Phillips screwdriver to slightly loosen both tilt screws. Do not remove the
screws.
3. Tilt the camera to the desired angle and tighten the tilt screws. Avoid overtightening.
4. Swivel the camera to the desired pan angle and tighten the yoke mounting screw.
BR BR/W G G/W O O/W BL BL/W
12
1
Yoke mounting screw
Adjusting the horizontal camera angle
2
Tilt screws
Adjusting the vertical camera angle
13
Powering Up
After making all connections and installing the ISK4 in the wall box, plug the camera power
supply into an AC receptacle and power up the ComPoint system. Also power up the video
display being used to receive the camera signal.
Check the camera angle to make sure a person standing at the door is visible. If necessary,
power down the system and readjust the camera angle.
Operation
Press and release the Call button to ring the doorbell. When a person inside replies from a
keypad, you will hear a single beep when they begin the reply and again when they’re done
speaking. You then can answer the reply within 7 seconds by just speaking. After 7 seconds,
you will hear a double beep, after which you can no longer answer the reply.
Note: Pressing and releasing the Call button always rings the doorbell. To answer a reply, just
speak without pressing the Call button.
You will hear a buzz tone from the door station when the person inside activates the door strike
release.
For a more detailed description of door station operation, read the ComPoint system manual.
Speaker Volume Adjustment
Use the potentiometer to adjust the speaker volume. Turn it clockwise to raise the volume or
counterclockwise to lower it. This does not affect the microphone sensitivity.
14
Technical Specifications
User control: Call button with amber backlight
Audio input: Built-in microphone with automatic gain control
Amplifier: Monaural (for system functions only)
Amplifier power: 2 watts
Volume control: Installer-adjustable potentiometer
Audio output: Built-in speaker
Video output: Composite, 75 ohms unbalanced
Camera resolution: 600 horizontal lines
Camera sensitivity: 0.1 lux minimum illumination
Cover plate: Weatherproof plated die-cast zinc
Intercom CAT-5 connector: 110 punch-down block
Doorbell connector: 2-pole screw terminal
Doorbell wire size: Up to 18 AWG (1.024 mm)
Doorbell contact: 1 A @ 12 VDC
Door station power requirement: 15 VDC 220 mA maximum (provided from ComPoint hub)
Camera power requirement: 12 VDC regulated, 100 mA (use Russound 846C power supply)
Dimensions: 4.8” W × 5.8” H × 2.9” D (12.1 × 14.8 × 7.3 cm)
Fits UL/CSA-approved double-gang 32 ci (524 cm3) wall box
Weight: 15.8 oz (448 g)
Warranty
The Russound ISK4 Camera Door Station is fully guaranteed for two (2) years from the date of purchase against all defects
in materials and workmanship. For this warranty to apply, the unit must be installed and used according to its written instructions. During this period, Russound will replace any defective parts and correct any defect in workmanship without charge for
either parts or labor. Accidental damage and shipping damage are not considered defects under the terms of this warranty.
Russound assumes no responsibility for defects resulting from abuse or servicing performed by an agency or person not
specifically authorized in writing by Russound. If service is necessary, it must be performed by Russound. Damage to or
destruction of components due to excessive power voids the warranty. In these cases, the repair will be made at the owner’s
expense. To return for repairs, the unit must be shipped to Russound at the owner’s expense, along with a note explaining the
nature of the service required. Be sure to pack in a corrugated container with at least 3 inches of resilient material to protect
the unit from damage in transit.
Before returning a unit for repair, call Russound at 603.659.5170 for a Return Authorization number. Write the RA number on
the shipping label and ship to: Russound, 5 Forbes Road, Newmarket NH 03857.
Russound sells product only through authorized dealers and distributors to ensure that customers obtain proper support
and service. Any Russound product purchased from an unauthorized dealer or other source, including retailers, mail order
sellers and online sellers will not be honored or serviced under existing Russound warranty policy. Any sale of products by an
unauthorized source or other manner not authorized by Russound shall void the warranty on the applicable product.
15
ISK4
ComPoint® Camera Door Station
Instruction Manual
Russound
5 Forbes Road, Newmarket NH 03857 USA
Tel 603.659.5170 • Fax 603.659.5388
www.russound.com
Technical Support: [email protected]
28-1301 1/15/08
Copyright © 2008 Russound. All rights reserved. All trademarks are the property of their respective owners.
Specifications are subject to change without notice. Russound is not responsible for typographical errors or
omissions.