1
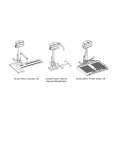
Tension Electric Screen
Elite CineTension Series
USER’S GUIDE
Matte White/High Contrast Grey/High Gain
Rev 1.3
IMPORTANT SAFETY INSTRUCTIONS
1. Carefully unpack the screen.
2. Position the power cord so it will not be tripped over, pulled, or near a hot area or
surface.
3. To avoid an electric shock, do not attempt to disassemble this appliance yourself.
4. Do not attempt to use the screen if there are obvious damages or broken parts to avoid
injury and/or an electric shock.
5. Please disconnect the power supply when screen is not in use for a long time.
6. Always handle the screen in a leveled position and a clean surface.
7. Contact Elite’s Screens service department for help troubleshoot your screen.
Warning: Models may vary in weight and anchors
will not support all models. Elite will not be liable for
improper installation. Please visit your local hardware
store for additional dry wall anchors or concert wall
anchors.
Rev 1.3
INSTALLATION
1. Select the location for your screen projector and access to a good power source. For
best results follow your users manual of your projectors recommended distance
settings.
2. For the best support of your screen, it is ideal to secure the screen (see example page)
into the studs of your house’s internal framework. If you are installing the screen into
a dry wall you will require dry wall anchor. For concrete mounting you will require
concrete anchors.
3. Carefully measure the intervals that correspond with the anchor-mounts on the endcaps. Make sure that the screws/anchors are level and in perfect horizontal alignment
with one another. (See Installation” page)
FOR REFERENCE ONLY:
Tension Screen Adjustment It is not required for the tension to be
(Attention: This adjustment is not required. The screen’s tension has been set to
achieve best performance. Always contact an Elite Screen Technician for
assistance to avoid damaging the screen and voiding your warranty.)
EXAMPLES OF MOUNTING YOUR SCREEN
Rev 1.3
Examples Of Installation & End Cap Dimensions Page
L” Bracket
Mounting
a
Flush wall
Mounting
b
1. Start by locating the studs on
your wall. Make sure to measure
the keyholes located on the back
end of the screens end caps.
2. Mark the area where screw hole
will be inserted for the L”
bracket or screen. The L” bracket
is sold sepperatly.
3. Setup (a) is a well example for
mounting the screen using the L:
bracket.
4. Setup (b) is another example for
mounting the Screen flushing it
against the wall.
5. Setup (c) is a hard task to
achieve and you may need to
consult with a proper installer/
contractor. Additional hardware
may be required. If flush mounted
as shown on example (c) it is wise
to have about 2” of space away
from the housing/case.
6. Setup (d) is an example of cealing
mount/chain hanging. By using a
proper chain and hooks it can be
sustained by the cealing. Locate
studs on the cealing before
mounting for proper support.
Cealing Flush
Mounting
Note:
c
Cealing Chain
Mounting
Cealing Dry
Wall
Regardless of mounting method, screen should be securely supported so that vibration on the viewing surface
will not cause case to work loose or fall. Installer must insure that fasteners used are of adequate strength and
suitable for the mounting surface chosen.
Rev 1.3
d
Remote control and 3 & 4 prong wire information
.
This is the IR
(Infra-Red)
remote with a
range of 15 Ft.
The
Battery
Size is
23A 12V.
.
This is the RF
(Radio
Frequency)
remote with a
range of 30 Ft.
Control box
The 3 prong wire will come from
the outlet and the 4 prong cable
goes directly to the screen. The
directional buttons are located on
the side of the control box.
Up
Stop
Down
4”5/8
Stop
Up
Down
2”7/8
1”1/2
The 3 and 4 prong wires are needle size
and lock when properly inserted into
the correct connection.
The
outlet 3
prong
cable is
98” 3/8
in
Length.
5/8”
The 4
prong
cable is
98” in
length.
¼
The 3 prong cable will
be connected from the
outlet to the control box.
The 4 prong cable will be
connected from the control
to the screen.
** Please remember to always point to the wall switch receiver when using the IR remote.
The IR remote can also work with a Universal Learning Remote Control usually by
programming the Screen’s IR codes in your Universal Learning Remote.
Rev 1.3
OPERATION
Remote Control System And Wiring:
Line Switch: Manual 3-way wall switch for your new Elite Screen with wireless IR and RF
remote.
1. This is the control box connection to your new Elite Screen. First insert the 3-prong
cable (Pins) to the proper input of the control box. Then connect the cord with the 4prong cable (Pins) into the proper output of the control box. The other end of the 4prong cable (Pins) will need to go to the screen’s case. Please see example diagram.
This is the IR “eye” sensor for the IR remote
You will have to aim directly at it for proper operation.
The 4-prong wire connects
the control box to the screen.
Keyhole for flush mounting
The 3-prong wire will connect from
the control box to the power cord.
The screen has a standard 110-volt
power outlet.
Note:
Always press the “stop” button first, then press “up” or “down” when raising or lowering
the screen.
Elite Screens Technician for more detail to avoid damaging the screen and voiding your warrant
Rev 1.3
Vertical Limit Switch Adjustment
(Attention: This adjustment is not required. Always contact an Elite Screen
Technician for assistance to avoid damaging the screen and voiding your
warranty.
*Important Note: It is strongly advised that the user not ever adjust the Vertical Limit
Switch. All screens have already been pre-adjusted in the factory to meet the multitude of
user needs. Description of this feature was included for those rare situations that require it.
Down Vertical Adjustment
Up Vertical Adjustment
Note: You will require a 5/32” allen-wrench to perform the adjustments below.
IMPORTANT NOTES:
1. Do not wind up the vertical adjuster like a clock or wind-up toy. Doing so will damage internal
mechanisms and ruin the screen’s motor.
Up Vertical Adjustment
The screen is preset to flush into casing when raised, this adjustment does not need to be
made unless screen does not retract to its original position.
1. Insert the allen-wrench into the Up vertical keyhole, turning the allen-wrench
clockwise in increments will allow the screen to drop. To see this action take place you
will require to drop your screen and raise it, by doing so you will see that the screen will not
retract up to its original position.
2. Insert the allen-wrench into the Up vertical keyhole, by turning allen-wrench counterclockwise in increments will cause the screen to rise into the casing. To see this action take place
you will need to raise the screen. By letting it stop on its own and inserting the allen-wrench into
the keyhole turning it counter-clockwise will begin to rise the screen.
Down Vertical Adjustment
The screen is preset to drop with 6” of black masking on the top, there is an extra 10”of
black masking rolled in the internal rolling system. This adjustment is only if you would
like to hide or release the extra 10” of black masking
1. Insert the allen-wrench into the Up vertical keyhole, turning the allen-wrench
clockwise in increments will allow the screen to drop. To see this action take place you
will require to drop your screen and raise it, by doing so you will see that the screen will not
retract up to its original position.
2. Insert the allen-wrench into the Up vertical keyhole, by turning allen-wrench counterclockwise in increments will cause the screen to rise into the casing. To see this action take place
you will need to raise the screen. By letting it stop on its own and inserting the allen-wrench into
the keyhole turning it counter-clockwise will begin to rise the screen.
Rev 1.3
TROUBLESHOOTING
If the electric screen does not move, please check the following:
1.
2.
3.
4.
Check the power supply and fuse first. The screen will not move without power.
Make sure the power cord is plugged to the power outlet.
Check all cable connections to see if any may be disconnected.
If the screen works well with the line switch but not with the remote control, please
make sure the remote controls have batteries or replace them with new ones.
FAQ’s
1. Q: What are the differences between the IR and RF remotes?
A: An Infra-Red remote is designed for short distance use, like your television remote.
IR requires direct aim at the IR source located inside your 3-wall switch. RF remote
control is designed for long distance use. The RF is a unique remote configured to
only work with your 3-way wall switch included with this screen. If the RF remote
control is lost or misplaced, the entire 3-wall switch will need to be replaced (Please
keep in a safe place). Change the batteries every 6 months.
2. Q: How is the screen material cleaned?
A: The screen material can be cleaned with mild soap and water only. Do not use
cleaning substances with chemicals, as it will damage the screen material.
3. Q: Can you manually pull down this electric screen?
A: Absolutely not, manually pulling down the screen will damage the electronic
motor rolling system.
4. Q: Can the electric screen be used in a 220-volt outlet?
A: No, the screen can only be used in 110-volt outlets.
5. Q: What is the recommended distance my first row should be?
A: The recommended distance should equal the width x2 of your screen. However,
this may vary depending on the projector type and environment light.
6. Q: How high should I hang the projector screen?
A: The recommend lowest level of the projector screen should be at an eye level of
the first row seat.
7. Q: Technical Support or Problem Report
A: The best way to report a problem is to send an email to
[email protected]
or call 1-877-511-1211 and as for the Service Dept.
Rev 1.3
Warranty Policy - Electric Screens
•
•
•
•
•
•
One (1) year warranty parts and labor from purchase date as follows (except for
refurbished units as specified below)
Refurbished units carry a 90-day parts and labor warranty.
Demo units or open box items carry a full 1-year parts and labor warranty.
Each party will be responsible for one way shipping during the warranty period.
A RMA (Return Merchandise Authorization) number must be issued in order to
process a replacement or to authorize a return for warranty repair. Elite Screens will, at its
sole option, replace or repair the defective unit with a brand new replacement *(see
exceptions below) after the defective unit is received. Once the product is received, Elite
Screens will send out a new *unit to the customer by ground service (subject to inventory
availability). Please do not return any unauthorized items to Elite Screens, as they will be
refused. The RMA number must be included on the outside label of your shipping box and
shipping documents. Our warehouse is not authorized to accept returns without an RMA
number on the shipping label. RMA numbers are valid for 45 days from the date of issue.
Missing Parts must be reported within 7-days of receipt. If reported after 7 days,
customer will be responsible for shipping and handling fees. If reported after 30 days of
receipt, customer is responsible for cost of the parts and shipping & handling fees.
Warranty Policy – Damages
•
•
•
All shipping damages must be reported within 7 business days upon receipt of the
product. After 7 days, Customer is responsible for all incurred costs.
Inspect all shipments upon arrival. If damage or loss is apparent upon delivery, do not accept
the shipment until you make a notation of the damage on all copies of the carrier's delivery
receipt and have the driver sign all copies to acknowledge the notation. Do not sign a clear
receipt for damaged or missing cartons or there will be no basis for a claim. Ask the carrier to
make a detailed inspection of the damage. File a claim with the carrier. Cooperate and follow
up as necessary to secure final settlement.
Immediately advise Elite Screens of all damages or problems. Do not return merchandise to
Elite Screens. File your claim with the carrier, enclosing copies of the bill of lading (signed by
the driver) and inspection report as support. Keep all packing materials and boxes with the
damaged product. Do not throw anything away. Although Elite Screens will provide any
assistance possible, we cannot be responsible for the actual filing of claims on the carrier or
accept liability for non-collectable freight claims
For Warranty and Service requests, please fill out a RMA/Service Form at:
www.elitescreens.com/help.html
Please visit this link for full warranty information:
http://www.elitescreens.com/services.html
For Customer Service and Technical questions, please contact Elite Screens at:
Telephone: (562)-483-8198 Fax: (562)-483-8498
*A new or refurbished replacement will be sent out to the customer depending on the type of purchase (new or refurbished)
or based on stock availability.
Rev 1.3
REGISTER YOUR ELITE PRODUCT
TWO WAYS TO REGISTER YOUR WARRANTY WITH ELITE SCREENS INC.
A. On Line (Faster and Easier)
www.elitescreens.com /register.html
B. Fill out & Fax to (562) 483-8498, Attn: Customer Service Dept.
*Your Name: _______________________________________________________
Address: ____________________________________________________________
City/State/Zip ________________________________________________________
*e Mail Address: ______________________________________________________
*Phone: _____________________________________________________________
*Screen Model: _______________________________________________________
*Serial Number: _______________________________________________________
*Date of Purchase: _____________________________________________________
*Dealer / Reseller Purchased from (name of the reseller): _____________________
What is your Projector Model: ___________________________________________
Application: ___ Home ___ Education ____ Corporation _____ Government
___ Others
How would you rate this screen? ___ Excellent___ Good ___ Ok ___ Improvement
needed
Comments:
If you have pictures of your screen you’d like to share with us, please email your
pictures to [email protected]
(*Required Field)
562-483-8198 Ext. 313
www.elitescreens.com
Rev 1.3