1
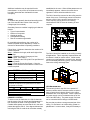
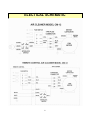
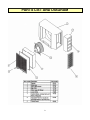
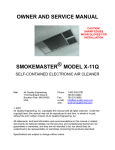
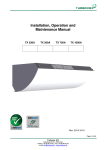
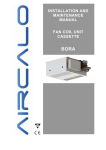
COMMERCIAL INDOOR AIR QUALITY SOLUTIONS
Miracle
™
High Performance HEPA-Type
Air Cleaner
MiracleAir Model CM-12 from Air Quality Engineering, Inc., is the ultimate
solution for indoor air pollution capturing both particulate and gaseous
contaminants. Odors, tobacco smoke, pollen, dust, vapors and many other
irritants are removed by high efficiency, long lasting disposable filters.
Manufacturer and Worldwide Distributor of Air Cleaning Systems for Over 30 Years
TABLE OF CONTENTS
PAGE
SPECIFICATIONS
3
PLANNING THE INSTALLATION
3
ELECTRICAL INSTALLATION
5
ELECTRICAL SCHEMATIC
6
CHECKOUT
7
MAINTENANCE
7
PARTS LIST & DIAGRAM
9
WARRANTY
10
2
TECHNICAL SPECIFICATIONS
IMPORTANT!
THE SPECIFICATIONS GIVEN IN THIS PUBLICATION DO NOT INCLUDE NORMAL MANUFACTURING
TOLERANCES; THEREFORE, THIS UNIT MAY NOT MATCH THE LISTED SPECIFICATIONS EXACTLY. ALSO, THIS
PRODUCT IS TESTED AND CALIBRATED UNDER CLOSELY CONTROLLED CONDITIONS AND SOME MINOR
DIFFERENCES IN PERFORMANCE CAN BE EXPECTED IF THOSE CONDITIONS ARE CHANGED. SPECIFICATIONS
ARE SUBJECT TO CHANGE WITHOUT NOTICE IN THE INTEREST OF CONTINUING PRODUCT DEVELOPMENT.
ELECTRICAL RATING:
115 Vac, 6.5 Amps, 60 Hz, 208-230 Vac, 4 Amps, 60
Hz
BLOWER WHEEL:
Forward curved, direct drive, 12½” x 4”, single inlet
wheel.
AIRFLOW CAPACITY:
With the standard p/n 41190 95% DOP @ 0.3 micron
filter the unit operates on three speeds: Low – 400
CFM, Med – 700 CFM, High – 850 CFM. These are
calculated with two of the odor/vapor panels.
FINE PARTICLE FILTER:
The main particle filter 41190 has a minimum of 102
square feet of media.
PREFILTER:
The standard prefilter is a ½” thick washable
aluminum mesh, PN 41194. Optional disposable
filters are available.
DIMENSIONS:
39” L x 22 5/8” W x 13¼” H,
90 Lbs. Installed, 115 Lbs. Shipping, add 34 lbs. to the
above weights if the optional carbon modules are
ordered.
ODOR / VAPOR FILTER:
The standard MiracleAir™ CM-12 comes with 2
disposable activated carbon filters. The deluxe
version has two modules, each containing 10
disposable panels for a total carbon weight of 22 lbs.
MOTOR:
½ Hp, permanent split capacitor, with sealed ball
bearings.
PLANNING THE INSTALLATION
space. The CM-12 must only be used in areas that
are ventilated for human occupancy.
WARNING!
EXPLOSION HAZARD—Can cause property
damage, severe injury or death.
MAKEUP AIR
Recommended quantities of clean outdoor ventilation
air for various applications are described in Table 2 of
1. Do not install where there is any danger of
gas, vapor or dust explosion.
2.
the ASHRAE Standard 62-89, “Ventilation for
Acceptable Indoor Air Quality.” ASHRAE (American
Society of Heating, Refrigerating and Air Conditioning
Engineering, Inc., Telephone #404-636-8400) notes
that these recommended outdoor air quantities may be
reduced by the use of clean, recirculated air if the IAQ
Procedure 6.2 is used. Appendix E of ASHRAE 62-89
includes recommendations for the use of clean,
recirculated air. However, in most cases, adequate
control of carbon dioxide generally requires a minimum
clean outdoor air quantity of no less than 15 cubic feet
of air per minute per person.
Do not install if explosion-proof electrical
appliances or fixtures are specified.
APPLICATION & OPERATION
The MiracleAir™ Model CM-12 is designed to be
installed on a ceiling where overhead air cleaning is
required. Typical applications include offices,
designated smoking areas, computer rooms, data
processing rooms, etc.
Because it provides its own circulation, the CM-12 may
be used in almost any application requiring the
removal of airborne contamination from an enclosed
3
established in the room. When airflow patterns are not
immediately apparent, observe the smoke from a
cigarette in various locations within the room.
Additional ventilation may be required for toxic
contaminants. In any event, the air cleaner must only
be used in areas that are ventilated for human
occupancy.
The CM-12 should be mounted on the ceiling near the
center of the room. Divide larger rooms into sections
and use a CM-12 in the center of each section. In
rooms requiring varying levels of air cleaning,
concentrate the CM-12 where air cleaning is most
required.
SIZING
Air cleaners are generally best sized according to the
use of the area and the volume of the room (Air
Changes per Hour method).
Secondary factors to consider in applying air cleaners
include:
• Type of contamination
• Number of occupants
• Outside air quality
• Anticipated fan setting
• Rate of contaminant generation
By considering these factors, the number of air
cleaners required can be adjusted up or down to
account for abnormalities in operating conditions.
Follow Steps 1-4 below to determine the number of air
cleaners required:
Step 1 – Measure the length, width and height of the
room in feet.
Step 2 – Determine the Air Changes per Hour
required, ACH. See Chart A.
Step 3 – Determine the CFM (Cubic Feet per Minute of
Air). See Chart B.
Step 4 – Enter the figures from Steps 1-3 into the
Sizing Formula below and calculate the number of air
cleaners required.
The CM-12 should be installed on the ceiling in nearly
all applications. This is especially important when the
air cleaner is used for smoke control. Visible smoke
contains very small particles, so small in fact, that they
are not noticeably affected by gravity. Smoke usually
rises to the ceiling and hangs there.
CHART A – Air Changes Per Hour
Load
Light
Avg
Heavy
Description of Application
General offices & computer rooms
Conference and break rooms
Designated smoking areas, bingo
halls, bars & extra smoky areas
ACH
4-5
6
8-10
CHART B – Cubic Feet of Air Per Minute
The air cleaner has a variable speed fan motor. Use the
CFM that corresponds to the speed that the air cleaner
will operate on normally.
Low
Medium
High
400
700
850
CEILING MOUNTING
The mounting holes in the CM-12 are spaced 16”
between centers and 32” between centers to make it
easy to fasten the air cleaner directly to the ceiling
framework with 3-inch lag screws. Leave a space for
the power supply cord to run between the top of the
CM-12 and the ceiling. The power supply cord must
not be concealed above ceilings or behind walls.
SIZING FORMULA
L x W x H of Room x Air Changes / Hr. = # of CM-12’s
CFM of Air x 60 Min.
CHOOSE LOCATION
To ensure even air distribution, the CM-12 draws air
into the center of the air cleaner and discharges air in
four directions as shown in the figure below. This
Coanda airflow pattern ensures that all air in the room
passes through the CM-12. See diagram below when
mounting the CM-12 to aid the air circulation already
Be sure that you select a strong structural part of the
ceiling. Do not fasten it to a false ceiling, plaster or
plasterboard. In some cases, it may be necessary to
4
construct some type of framing strong enough to
support the weight of the CM-12.
2. Remove the access panel inside the CM-12
cabinet. This panel is the galvanized unpainted
The CM-12 may also be mounted using 3/8” [10 mm]
diameter threaded steel rods available in many
hardware stores. Four steel rods will be required.
panel on the side the door opens from. This will
allow you access to speed control wires.
WIRING
The 120V, 60 Hz CM-12 has a standard three-prong
plug on a 10 foot [3 m] power cord. It requires only a
standard grounded outlet for electrical power. Route
the power cord so that it will be out of the way of the
building’s occupants.
3. Disconnect and discard the power cord, the
solderless connectors and strain relief. Plug the
power cord hole with the plug provided.
4. Run conduit from the power supply to the
appropriate knockout. Fish wires to the speed
control wires in the junction box. Note that you
may gain better access to the junction box within
the cabinet through the discharge end of the air
cleaner. This can be accomplished by removing
the discharge louver with a Philips screwdriver and
removing the carbon filter.
PERMANENT WIRING
To permanently wire the CM-12, follow these
instructions exactly. All wiring must comply with
applicable codes and ordinances. Wire the CM-12
using the built-in junction box. It is recommended that
No. 14 gauge or heavier wire be used to complete the
wiring from the junction box to the external power
source. However, be sure to comply with local codes.
5. Connect lead wires with solderless connectors
including ground (green) wires. Proper grounding
of this device is mandatory for correct operation
and safety.
1. Open the inlet grille of the CM-12 and remove the
primary particle filter by supporting the filter near
the turnstiles and rotating the two turnstiles to the
open position.
ELECTRICAL INSTALLATION
CAUTION!
2. Screw the exhaust grille louvers to the air
cleaners. This must be done after the carbon filter
modules are installed.
Persons qualified to install electrical wiring
should only attempt this procedure. All wiring
must comply with applicable codes and
ordinances.
3. Install the primary filter so that the airflow arrow
points up into the ceiling. Turn the two turnstiles
so that they properly support the filter.
1. Double check that the rating on the air
cleaner is consistent with the power source,
either 120 Vac, 60 Hz or 208-240 Vac, 50/
60 Hz.
4. Hang the intake grille. Position the prefilter and
latch the intake grille into place.
2. Run three No. 14 gauge (or heavier) wires
through conduit to the wiring compartment
on the air cleaner. The green wire should be
attached to the external ground. The black
and the white wires are the power conductors. The connections are shown in Fig. 2.
5. Clean up the installation area.
REASSEMBLE
1. Install the two carbon filter modules into the two
discharge cavities. Make sure the support clips
are in place before letting go of the filter modules.
Caution must be used when handling the filter
modules. They weigh approximately 40 lbs.
when new.
5
ELECTICAL SCHEMATIC
6
CHECKOUT
Before leaving the installation, check to be sure that
the CM-12 is properly installed and operates correctly.
ASSEMBLY AND OPERATION
1. Be sure that the prefilter, primary particle filter and
carbon filters are all properly installed.
MOUNTING
1. The CM-12 is correctly and securely fastened to
the ceiling.
2. Be certain the electrical junction box cover is
reinstalled.
2. It is mounted where it will not interfere with normal
occupant traffic.
3. Turn the air cleaner on using the knob near the
intake grille. Make sure that the blower energizes
and creates airflow into the intake grille.
3. Unit is properly oriented for good air circulation.
MAINTENANCE
prefilter clean, it is time to replace the primary particle
filter. It is a good idea to keep track of how long a
period of time the primary particle filter and odor/vapor
CAUTION!
filters lasted so that you can anticipate how long the
new filters will last. The first filters will likely require
changing sooner than subsequent filters due to dust
that may have settled in areas with poor air circulation
as well as furniture and walls off-gassing from previous
exposure to higher levels of contamination.
1. The power must be shut off before servicing
the filters.
2. When servicing the air cleaner, stand on a
stable work platform or ladder.
FREQUENCY OF FILTER MAINTENANCE
The MiracleAir™ Model CM-12 is designed to have a
very long filter maintenance interval. This is accomplished because of the large volume of media used in
both the particle filter and the odor/vapor module. See
the Specifications section for details.
Please note that your MiracleAir™ unit is equipped
with a variable speed controller. If you are running
your unit on medium blower speed, you can increase
the blower speed to compensate for the filter plugging
with contaminant. If you are operating your unit on the
maximum speed setting and your airflow is reduced,
you will need to replace the primary particle filter.
The exact maintenance interval is determined by the
specific application of the MiracleAir™ unit. In an
office application, the prefilter could require cleaning
every 2-3 months. The primary particle filter may last
1-2 years and the odor/vapor filters should be replaced
every 6 to 9 months in the standard unit.
CLEANING THE PREFILTER
The prefilter is removed from the air cleaner by
opening the intake grille. Push the two buttons on the
grille and guide the grille to the open position, the grille
will hang down towards the floor on its hinges.
Because of the different variables with each
application, it is recommended that the prefilter be
inspected every two weeks during the first couple of
months of operation. When there is a noticeable
accumulation of dust and dirt, clean the filter. After
inspecting the unit for a one or two month time period,
you will have established the proper cleaning interval
for the prefilter. When the MiracleAir™ unit no longer
removes odors from the air, it is time to replace the
disposable filters within the odor/vapor modules.
When there is a noticeable reduction in airflow with the
Shake out or vacuum the accumulated contaminants
from the prefilter. If necessary, the prefilter can be
soaked in an alkaline detergent solution. Do not soak
in an acid detergent solution or use high-pressure
water, air or steam to clean the prefilter. Doing so will
damage the prefilter and shorten its life.
REPLACING THE PARTICLE FILTER
The particle filter is removed from the air cleaner by:
1. Opening the intake grille.
7
2. With one hand supporting the filter near the
turnstiles, rotate the two turnstiles to the open
position.
3. Remove the filter from the unit and discard. It can
not be vacuumed, washed or reverse air blasted.
4. Be extremely careful when handling the new
filter. A damaged filter will compromise the air
cleaning efficiency.
REPLACING THE ODOR/VAPOR FILTERS OF
CM-12 STANDARD UNITS
The standard MiracleAir™ Model CM-12 comes with
two disposable filters that must be replaced on a
periodic basis. These filters are located at the exhaust
ends of the air cleaner just inside the discharge grilles.
1. Remove both of the discharge louvers. This
requires a Philips screwdriver. Handle the louvers
with care.
2. Remove the odor/vapor filters by sliding them out
from the discharge ends of the air cleaner. The
filters are resting in tracks inside the cabinet.
There is no locking mechanism to release.
REPLACING THE ODOR/VAPOR FILTERS OF THE
CM-12 DELUXE UNITS
The standard MiracleAir™ Model CM-12 comes with
two VOC filters that must be replaced on a periodic
basis. These filters are located at the exhaust ends of
the air cleaner just inside the discharge grilles.
1. Remove both of the discharge louvers. This
requires a Philips screwdriver. Handle the louvers
with care.
2. Remove the odor/vapor filters by sliding them out
from the discharge ends of the air cleaner.
3. Place the filter module on a tabletop or workbench. Unscrew the two thumbscrews and
remove the retaining bracket. Slide the ten
disposable filter panels out of each module and
replace with the new filter panels.
4. Slide the odor/vapor filter back into the air cleaner
until it hits the stops in back.
5. Replace the discharge louvers and make sure
they are securely fastened.
8
PARTS LIST AND DIAGRAM
9
CERTIFICATE OF WARRANTY
3-YEAR LIMITED WARRANTY
Air Quality Engineering, Inc., warrants to the original purchaser, subject to the conditions below, that should the
product covered by this warranty (“Product”) fail to perform by reason of improper workmanship or material, Air
Quality Engineering, Inc., (“AQE”) will, during the period of three (3) years from the date of original purchase,
either, (i) replace the Product or (ii) provide all necessary parts to repair the Product, without charge. The
decision to replace the Product or the necessary parts shall rest solely with AQE. This 3-year limited warranty
does not apply to main filter elements. Air Quality Engineering, Inc., will replace without charge the main filter
elements during the period of thirty (30) days from the date of original purchase if the main filter elements fail to
perform by reason of improper workmanship or material. This warranty is valid only under the following
conditions:
CONDITIONS
1. AUTHORIZATION: Purchaser will contact Air Quality Engineering, Inc., 800-328-0787, for authorization,
returned goods authorization number (RGA) and shipping address. AQE will direct purchaser to either return
the necessary parts or the Product at AQE’s option.
2. PROPER DELIVERY: The shipping, freight prepaid, or delivery of the parts or the Product to Air Quality
Engineering, Inc., in either its original carton or in a carton assuring similar protection of the Product with
returned goods authorization number (RGA) clearly displayed on the outside of the carton.
3. UNAUTHORIZED REPAIR: A showing by the original purchaser that the Product has not been altered,
repaired or serviced by anyone other than an authorized service technician using genuine AQE parts.
4. UNAUTHORIZED PARTS: A showing by the original purchaser that the Product has had only genuine Air
Quality Engineering, Inc., parts and filters used in its operation and maintenance.
5. SERIAL NUMBER INTACT: A showing by the original purchaser that the Serial Number has not been altered
or removed.
6. MISUSE: A showing by the original purchaser that the Product has not been involved in an accident, freight
damaged, misused, abused or operated contrary to the instructions contained in the Owner’s Manual.
Air Quality Engineering, Inc.’s, sole responsibility shall be to repair or replace the Product within the terms stated
above. AQE shall not be liable for any consequential damages resulting from any breach of warranty, express or
implied, applicable to this Product. Some states do not allow the exclusion or limitation of consequential damages
so this limitation may not apply to you.
THIS WARRANTY IS IN LIEU OF ALL OTHER WARRANTIES, EXPRESS OR IMPLIED, AND THE
WARRANTIES OF MERCHANTABILITY AND FITNESS FOR A PARTICULAR PURPOSE ARE HEREBY
EXCLUDED BEYOND THE THREE -YEAR DURATION OF THIS WARRANTY. Some states do not allow
limitations on how long an implied warranty lasts so the above limitation may not apply to you.
This warranty gives you specific legal rights and you may also have other rights that vary from state to state.
AIR QUALITY ENGINEERING, INC.
7140 NORTHLAND DRIVE NORTH
MINNEAPOLIS, MINNESOTA 55428-1520
TOLL FREE: 800-328-0787
TELEPHONE: (763) 531-9823
FAX: (763) 531-9900
MANUFACTURER & WORLDWIDE DISTRIBUTOR OF SMOKEMASTER® AIR CLEANING SYSTEMS
PN 51694
Printed in the USA
10