1
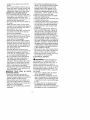
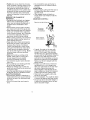
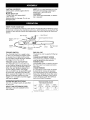
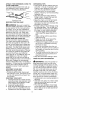
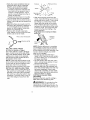
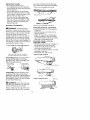
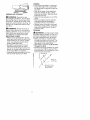
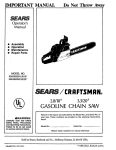
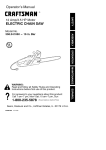
Operator's Manual
I CRRFT$1VlRN°I
12 Amp/3.5 HP Motor
ELECTRIC CHAIN SAW
Model No.
358.341170
- 16 in. Bar
• Safety
• Assembly
• Operation
• Maintenance
•
EspaSol,
p 17
WARNING:
Read and follow all Safety Rules and Operating
Instructions
before first use of this product.
For answers
Call 7 am-7
to your questions about this product:
pm, Mon-Sat;
10 am-7 pm, Sun
1-800-235-5878
Sears,
Roebuck
545154163
(Hours
and Co., Hoffman
Rev. 2 5/24/07
BRW
listed are Central
Estates,
Time)
IL 60179
U.S.A.
Warranty
Safety Rules
Assembly
Operation
Maintenance
2
2
7
7
12
Service and Adjustments
Storage
Troubleshooting
Table
Spanish
Parts Ordering
14
15
16
17
Back Cover
ONE YEAR FULL WARRANTY ON CRAFTSMAN
ELECTRIC CHAIN SAW
When used and maintained according to the operator's manual, if this product fails
due to a defect in material or workmanship within one year from the date of purchase, return it to any Sears store or other Craftsman outlet in the United States for
free replacement.
This warranty excludes the bar and chain, which are expendable parts that can
wear out from normal use in less than one year.
This warranty applies for only 30 days from purchase date if this product is used
for commercial or rental purposes.
This warranty gives you specific legal rights, and you may also have other rights
which vary from state to state.
Sears, Roebuck and Co., Hoffman Estates, IL 60179
WARNING:
When using electric
gardening appliances, basic safety
precautions must always be followed
to reduce the risk of fire, electric shock,
and serious injury. Read and follow all
instructions.
,_ WARNING:
Always disconnect
unit from power source when making
repairs, adjustments, and when changing accessories and attachments such
as saw bar, chain or guards.
Because a chain saw is a high-speed
woodcutting tool, special precautions
must be observed to reduce risk of accidents. Careless or improper use of this
tool can cause serious injury.
PLAN AHEAD
• Restrict the use of your saw to adult
users who understand and can follow the safety rules, precautions,
and operating instructions found in
this manual.
• Dress properly. Wear protective gear.
Always use steel-toed safety footwear with non-slip soles; snug-fitting
clothing; heavy-duty, non-slip gloves;
eye protection such as non-fogging,
vented goggles or face screen; an
approved safety hard hat; and sound
barriers (ear plugs or mufflers) to protect your hearing. Regular users
should have hearing checked regularly as chain saw noise can damage
hearing.
Secure hair above shoulder length.
Do not wear loose clothing or jewelry; they can get caught in moving
parts.
Hearing
Protection ''_
_
I _-_
Safety Hat
Eye
Snug
Fitting
Clothing
Safety
Protection
Heavy Duty
Gloves
_
Safety Chaps
Shoes
Keep all parts of your body away
from the chain when saw is running.
Keep children away. Do not let visitors
contact chain saw or extension cord.
All visitors should be kept at least 30
feet (10 meters) away from work area.
Do not handle or operate a chain saw
when you are fatigued, ill, upset, or if
you have taken alcohol, drugs, or medication. You must be in good physical
condition and mentally alert. If you
have any condition that might be aggravated by strenuous work, check
with doctor before operating. Watch
whatyouaredoing.
Usecommon • Nonconforming
replacement
composense.
nents
ortheremoval
ofsafety
devices
• Donotstartcutting
untilyouhavea
maycause
damage
totheunitand
clear
workarea,
secure
footing,
and
possible
injury
totheoperator
orbyespecially
ifyouarefelling
atree,a
standers.
UseonlyCraftsman
accesretreat
path.Keep
work
areaclean. sories
andreplacement
parts
asrecOPERATE
YOUR
SAW
SAFELY
ommended.
Never
modify
yoursaw.
chain
sawwithcare.
• Donotoperate
withonehand.
Seri- • Maintain
unitsharp
andclean
forbetter
ousinjury
totheoperator,
helpers,
or • Keep
andsaferperformance.
bystanders
mayresult
fromoneinstructions
forlubricating
and
handed
operation.
Achainsawisin- • Follow
tended
fortwo-handed
use.
changing
accessories.
thechain
sawfromthepower
• Donotoperate
sawfromaladder
or • Unplug
source
when
notinuse,before
servicinatree.
ing,andwhen
changing
accessories
• Make
surethechain
willnotmake
such
assawchain
contact
withanyobject
whilestarting andattachments,
thesaw.Never
startthesawwhen
andguard.
• Check
fordamaged
parts.
Before
furtheguide
barisinacut.
theruseofthechain
saw,aguard
or
• Donotforcechainsaw.Itwilldothe
other
partthatisdamaged
should
be
jobbetter
andsaferattheratefor
which
itwasintended.
carefully
checked
todetermine
thatit
willoperate
properly
andperform
its
• Donotputpressure
onthesaw,esintended
function.
Check
foralignment
pecially
attheendofthecut.Doing
ofmoving
parts,
binding
ofmoving
socancause
youtolosecontrol
parts,
breakage
ofparts,
mounting
and
when
thecutiscompleted.
conditions
thatmayaffect
its
• Stopthesawbefore
setting
itdown. anyother
operation.
Aguard
orother
partthatis
• Hand
carrysawonlywhen
motor
is
damaged
should
beproperly
repaired
stopped.
Carry
thechain
sawbythe
byaSears
Service
Center
front
handle
withthesawstopped,
fin- orreplaced
unless
otherwise
indicated
elsewhere
gerofftheswitch,
theguide
barand
sawchain
totherear.
intheoperator's
manual.
• When
notinuse,chain
sawsshould
• Usetherighttool,cutwoodonly.
bestored
inadry,highorlocked-up
Don't
usechain
sawforpurpose
not
place
outofthereach
ofchildren.
intended;
forexample,
don'tuse
storing
saw,unplug
andusea
chain
sawforcutting
plastic,
mason- • When
barsheath
orcarrying
case.
ry,non-wood
building
materials.
• Donotoperate
achain
sawthatis
ELECTRICAL
SAFETY
damaged,
improperly
adjusted,
or
notcompletely
andsecurely
as_, WARNING:
Avoid
adangerous
sembled.
Always
replace
bar,chain, environment.
Toreduce
theriskof
handguard,
orotherparts
immedi- electrical
shock,
donotuseinrain,in
atelyiftheybecome
damaged,
bro- damp
orwetlocations,
oraround
ken,orareotherwise
removed.
swimming
pools,
hottubs,
etc.Donot
• Inspect
chain
sawcords
periodicallyexpose
tosnow,
rain,orwater
toavoid
andifdamaged,
haverepaired
bya thepossibility
ofelectrical
shock.
Do
Sears
Service
Center.
nothandle
extension
cordorplugwith
MAINTAIN
YOURSAWIN GOOD wethands.
WORKING
ORDER
• Useonlyavoltage
supply
asshown
• Have
allchainsawservice
peronthenameplate
oftheunit.
formed
byaSears
Service
Center • Avoid
dangerous
situations.
Donot
except
theitems
listed
intheMAINTE- useinthepresence
offlammable
liqNANCE
section
ofthismanual.
uidsorgases
toavoidcreating
afire
• Make
certain
sawchain
stopsmovorexplosion
and/or
causing
damage
ingwhen
trigger
switch
isreleased. tounit.
theriskofelectrical
shock,
• Keep
thehandles
dryandclean
and • Toreduce
freefromoilandgrease.
thisappliance
hasapolarized
plug
• Keep
oilcapandfasteners
securely (one
blade
iswider
thantheother)
and
tightened.
willrequire
theuseofapolarized
ex-
tension
cord.
Theappliance
plugwillfit on circuit or outlet to be used. Reintoapolarized
extension
cordonly
ceptacles are available having builtoneway.Iftheplugdoes
notfitfully
in GFCI protection and may be used
intotheextension
cord,
reverse
the
for this measure of safety. Inspect
plug.
Iftheplugstilldoes
notfit,obtain chain saw cords periodically and if
acorrect
polarized
extension
cord.
A
damaged, have repaired by a Sears
Service Center.
polarized
extension
cord
willrequire
theuseofapolarized
walloutlet.
This GUARD AGAINST KICKBACK
plugwillfitintothepolarized
walloutlet
all safety rules to help avoid kickonlyoneway.
Ifplugdoes
notfitfully Follow
and other forces which can result
intothewalloutlet,
reverse
theplug.
If back
in serious injury.
theplugstilldoes
notfit,contact
a
Kickback Path
qualified
electrician
toinstall
theproper
walloutlet.
Donotchange
theequipment
plug,
extension
cordreceptacle,
orextension
cordpluginanyway.
• Toreduce
riskofelectrical
shock,
use
extension
cords
specifically
marked
as
suitable
foroutdoor
appliances.
The
electrical
rating
ofthecordmust
notbe
Avoid Obstructions
lessthantherating
oftheunit.The
cordmust
bemarked
withsuffix
"W-A"
(inCanada,
'_/"). Use a polarized
•
•
•
•
•
•
cord. Make sure your extension cord
is in good condition. Inspect extension
cord before use and replace if damaged. Do not use a damaged cord.
Cord insulation must be intact with no
cracks or deterioration. Plug connectors must be undamaged. An undersized extension cord will cause a drop
in line voltage resulting in loss of power and overheating. If in doubt, use the
next heavier gauge. The lower the
gauge number, the heavier the cord
(see SELECT AN EXTENSION CORD in
the OPERATION section). Do not use
multiple cords.
Do not abuse cord. Never carry the
unit by the extension cord or yank
extension cord to disconnect unit.
Secure extension cord to power cord
to prevent disconnection from unit.
Do not use the unit if the switch does
not turn the unit on and off properly,
or if the lock-out does not work. Repairs to the switch must be made by
a Sears Service Center.
Keep extension cord clear of operator and obstacles at all times. Position cord so that it will not be caught
on branches. Do not expose cords to
heat, oil, water, or sharp edges.
To avoid the possibility of electric
shock, avoid body contact with any
grounded conductor, such as metal
fences or pipes.
Ground Fault Circuit Interrupter
(GFCI) protection should be provided
Clear The Working
Area
,t%
A
all.WARNING:
Avoid kickback which
can result in serious injury. Kickback
is the backward, upward or sudden forward motion of the guide bar occurring
when the saw chain near the upper tip
of the guide bar contacts any object
such as a log or branch, or when the
wood closes in and pinches the saw
chain in the cut. Contacting a foreign
object in the wood can also result in
loss of chain saw control.
• Rotational
Kickback can occur
when the moving chain contacts an
object at the upper tip of the guide
bar. This contact can cause the
chain to dig into the object, which
stops the chain for an instant. The
result is a lightning fast, reverse
reaction which kicks the guide bar up
and back toward the operator.
• Pinch-Kickback
can occur when the
the wood closes in and pinches the
moving saw chain in the cut along
the top of the guide bar and the saw
chain is suddenly stopped. This sudden stopping of the chain results in a
reversal of the chain force used to
cut wood and causes the saw to
move in the opposite direction of the
chain rotation. The saw is driven
straight back toward the operator.
• PuB-In
canoccur
when
themoving • Donottwistthesawasthebaris
fromanundercut
when
chain
contacts
aforeign
object
inthe withdrawn
wood
inthecutalong
thebottom
of
bucking.
AvoidPuB-In:
theguide
barandthesawchainis
suddenly
stopped.
Thissudden
stop- • Always
begin
cutting
withthesawat
pingpullsthesawforward
andaway fullspeed
andthesawhousing
fromtheoperator
andcould
easily
against
wood.
cause
theoperator
tolosecontrol
of • Usewedges
made
ofplastic
or
thesaw.
wood.
Never
usemetal
toholdthe
REDUCE
THECHANCE
OF
cutopen.
KICKBACK
MAINTAIN
CONTROL:
• Recognize
thatkickback
canhappen.
Withabasic
understanding
ofkickback,
youcanreduce
theelement
of
Stand
totheleftofthes_
surprise
which
contributes
toaccidents.
• Never
letthemoving
chain
contact
Thumb
on Y""xj I::_;_W
anyobject
atthetipoftheguide
bar.
underside
! _'_
• Keep
working
areafreefromobstrucof handlebar kt_(_
tionssuchasother
trees,
branches,
rocks,
fences,
stumps,
etc.Eliminate
oravoidanyobstruction
thatyour
sawchain
couldhitwhile
cutting.
Never reverse
• When
cutting
abranch,
donotletthe
hand positions
guide
barcontact
another
branch
or
other
objects
around
it.
• Keep
sawchain
sharp
andproperly
tensioned.
Aloose
ordullchain
can
increase
thechance
ofkickback.
_
Elbow
Follow
manufacturer's
chain
sharp_:_l
locked
ening
andmaintenance
instructions.
Check
tension
atregular
intervals, • A good, firm grip on the saw with
butnever
withengine
running.
Make both hands will help you maintain
surebarclamp
nutsaresecurely
control. Don't let go. Grip the rear
tightened.
handle with your right hand whether
• Begin
andcontinue
cutting
atfull
you are right or left handed. Wrap the
speed.
Ifthechain
ismoving
ata
fingers of your left hand over and
slower
speed,
thereisgreater
around the front handlebar, and your
left thumb under the front handlebar.
chance
ofkickback
occurring.
• Useextreme
caution
when
re-enter- Keep your left arm straight with the
elbow locked.
ingacut.
• Donotattempt
cutsstarting
withthe • Position your left hand on the front
tipofthebar(plunge
cuts).
handlebar so it is in a straight line
• Watch
forshifting
logsorotherobwith your right hand on the rear hanjectsthatcouldclose
acutandpinch dle when making bucking cuts.
orfallontochain.
Stand slightly to the left side of the
• Usethespecified
Reduced-Kickback
saw to keep your body from being in
Guide
BarandLowKickback
Chain. a direct line with the cutting chain.
AvoidPinch-Kickback:
• Stand with your weight evenly balanced on both feet.
• Beextremely
aware
ofsituations
or
obstructions
thatcancause
material • Do not overreach. You could be drawn
or thrown off balance and lose control.
topinch
thetopoforotherwise
stop
thechain.
• Do not cut above shoulder height. It
is difficult to maintain control of saw
• Donotcutmore
thanonelogata
time.
above shoulder height.
KICKBACK
SAFETY
FEATURES
,_ WARNING:
The following features are included on your saw to help
reduce hazard of kickback; however,
such features will not totally eliminate
this danger. Do not rely only on safety
devices. Follow all safety rules to help
avoid kickback and other forces which
can result in serious injury.
• Hand Guard: designed to reduce the
chance of your left hand contacting
the chain if your hand slips offthe
front handlebar.
• Position of front and rear handlebars:
designed with distance between
handles and "in-line" with each other.
The spread and "in-line" position of
the hands provided by this design
work together to give balance and
resistance in controlling the pivot of
the saw back toward the operator if
kickback occurs.
• Reduced-Kickback
Guide Bar: designed with a small radius tip which
reduces the size of the kickback
danger zone on the bar tip. This type
bar has been demonstrated to significantly reduce the number and seriousness of kickbacks when tested in
accordance with ANSI B175.1.
Tip Guide Bar
_,_,
Small
Large Radius
I
Tip Guide Bar
Radius
"_
• Low Kickback Chain has met kickback performance requirements
when tested on the representative
sample of these chain saws specified in ANSI B175.1.
Low Kickback
._,_
Chain
Contoured
Depth Gauge
Deflects Kickback Force
And
Allows Guard
Wood Link
To
Elongated
Gradually Ride Into Cutter
SAFETY NOTICE: Exposure to vibrations through prolonged use of hand
tools could cause blood vessel or
nerve damage in the fingers, hands,
and joints of people prone to circulation disorders or abnormal swelling.
Prolonged use in cold weather has
been linked to blood vessel damage in
otherwise healthy people. If symptoms
occur such as numbness, pain, loss of
strength, change in skin color or texture, or loss of feeling in the fingers,
hands, or joints, discontinue the use of
this tool and seek medical attention.
An anti-vibration system does not
guarantee the avoidance of these
problems. Users who operate power
tools on a continual and regular basis
must closely monitor their physical
condition and the condition of this tool.
DOUBLE INSULATION
CONSTRUCTION
This unit is double insulated to help protect against electric shock. Double insulation construction consists of two
separate "layers" of electrical insulation
instead of grounding.
Tools and appliances built with this insulation system are not intended to be
grounded. No grounding means is provided on this unit, nor should a means
of grounding be added to this unit. As a
result, the extension cord used with this
unit can be plugged into any polarized
120 volt electrical outlet.
Safety precautions must be observed
when operating any electrical tool. The
double insulation system only provides
added protection against injury resulting
from an internal electrical insulation
failure.
WARNING:
All electrical
repairs
to this unit, including housing, switch,
motor, etc., must be diagnosed and repaired by qualified service personnel.
Replacement parts for a double insulated appliance must be identical to the
parts they replace. A double insulated
appliance is marked with the words
"double insulation" or "double insulated". The symbol [] (square within a
square) may also be marked on the
appliance. Failure to have the unit repaired by Sears service personnel can
cause the double insulation construction to become ineffective and result in
serious injury.
STANDARDS:
This product is listed by
Underwriters Laboratories, Inc. in accordance with U L Standard 1662 and
ANSI B175.1.
ANSI B175.1-2000
"American National Standard for Powered Tools - Safety Requirements".
SAVE THESEINSTRUCTIONS
CARTON CONTENTS
Check carton contents against the following list.
Model 358,341170
• Chain Saw (fully assembled)
• Bar Sheath
Examine parts for damage. Do not use
damaged parts.
NOTE: If you need assistance or find
that parts are missing or damaged,
please call 1-800-235-5878
ASSEMBLY
Your unit is fully assembled; no assembly is required.
KNOW YOUR CHAIN SAW
READ THIS OPERATOR'S MANUAL AND SAFETY RULES BEFORE OPERATING YOUR
CHAIN SAW. Compare the illustrations with your unit to familiarize yourself with the
location of the various controls and adjustments. Save this manual for future reference.
Bar Oil C._
/._/_
.....
_ _:_/_
/ngger LOCK-OU[_--_.---"-/"----//_==::E;:::_--"
.,_j_
Button
./#_,:_
Power 4,._
Cord
" _
TRIGGER
_-
/_
_
/
.
_
bw_[cn
//-_
\
\
Bar
'_'
O_llLevel Bar Clamp _
Indicator
SWITCH
The TRIGGER SWITCH is used to turn
on the unit. Squeeze the trigger switch
to operate the unit after lock-out button has been pushed forward. Release
the trigger to turn the unit off.
TRIGGER
LOCK-OUT
Hand Guard
Chain Adjustment Screw
/
BUTTON
The TRIGGER LOCK-OUT button is a
control feature designed to prevent the
motor from being accidentally started.
When the rear handle is gripped in a
normal cutting position, the trigger
lock-out button can be pushed forward
by the thumb, permitting the index finger to squeeze the trigger. It is not necessary to maintain pressure on the
trigger lock-out button once the trigger
has been engaged.
Bar Sprocket
Hole
BAR OIL CAP
The BAR OIL CAP is used to fill the bar
oil tank.
CHAIN ADJUSTMENT
SCREW
The CHAIN ADJUSTMENT SCREW is
used to adjust the chain tension.
POWER CORD
The POWER CORD is used to connect
the chain saw to an approved extension cord.
CHAIN TENSION
It is normal for a new chain to stretch
during first 30 minutes of operation.
You should check your chain tension
frequently. Readjust chain after every
15 minutes of operation. See CHECK
CHAIN TENSION under the SERVICE
AND ADJUSTMENTS section.
OPERATING
INSTRUCTIONS
Use only a voltage supply as specified
on your unit.
SELECT AN EXTENSION CORD
Extension cords are available for this
unit at Sears.
_,.....
Chain
MINIMUM WIRE GAUGE
RECOMMENDATIONS
Volts
120
*American
25 ft.
(7.67 M)
16
A.W.G.*
Wire
Gauge
50 ft.
(15.24 M)
16
A.W.G.*
100 ft.
(30.48 M)
14
A.W.G.*
ATTACH THE EXTENSION CORD TO
YOUR CHAIN SAW
To prevent disconnection from unit, secure extension cord to power cord as
shown in the following illustration.
Power Cord
r"-""""'-
Extension Cord
BEFORE
STARTING
SAW
_WARNING:
Be sure to read the
electrical safety information in the safety rules section of this manual before
you begin. If you do not understand
the electrical safety information do not
attempt to use your unit. Seek help
from someone that does understand
the information or call the customer assistance help line at 1-800-235-5878.
GUIDE BAR AND CHAIN OIL
The bar and chain require lubrication.
The chain oiler provides lubrication to
the chain and guide bar. Be sure to fill
the bar oil tank before each cutting session. Lack of oil will quickly ruin the bar
and chain. Too little oil will cause overheating shown by smoke coming from
the chain and/or discoloration of the bar.
For maximum guide bar and chain life,
we recommend you use Craftsman
chain saw bar oil. If Craftsman bar oil is
not available, you may use a good
grade SAE 30 oil until you are able to
obtain Craftsman brand. Use a funnel to
fill the tank. Replace oil cap securely.
Check oil level after every 15 minutes of
operation. Oil level can be monitored by
viewing the oil level indicator (see illustration in KNOW YOUR CHAIN SAW
section).
STOPPING YOUR UNIT
Release the trigger switch.
• If motor does not stop, disconnect
the extension cord. Discontinue use
of unit until repaired by a Sears Service Center.
STARTING YOUR UNIT
1. Connect the saw to a power source
using the proper size extension cord
(see SELECT AN EXTENSION CORD
in the OPERATION section).
2. Grip both handles firmly.
3. Push and hold the trigger lock-out
button with your right hand thumb.
4. Squeeze and hold the trigger switch.
OPERATING TIPS
• Check chain tension before first use
and after 1 minute of operation. See
CHECK CHAIN TENSION in the SERVICE AND ADJUSTMENTS section.
• Cut wood only. Do not cut metal,
plastics, masonry, non-wood building
materials, etc.
• Stop the saw if the chain strikes a
foreign object. Inspect the saw and
repair parts as necessary.
• Keep the chain out of dirt and sand.
Even a small amount of dirt will
quickly dull a chain and increase the
possibility of kickback.
• Practice cutting a few small logs using
the following steps. This will help you
get the '_feel" of using your saw before
you begin a major sawing operation.
• Squeeze trigger switch and allow
unit to reach full speed before cutting.
• Begin cutting with the saw frame
against the log.
• Keep the motor at full speed the
entire time you are cutting.
• Release the trigger switch as soon
as the cut is completed, allowing
the motor to stop.
• Keep the cord away from the cutting area. Position cord so it will not
be caught on branches and the like
during cutting.
• To avoid losing control when cut is
complete, do not put pressure on
saw at end of cut.
• Stop the saw before setting it down.
TREE
FELLING
TECHNIQUES
4_WARNING:
Check for broken or
dead branches which can fall while
cutting causing serious injury. Do not
cut near buildings or electrical wires if
you do not know the direction of tree
fall, nor cut at night since you will not
be able to see well, nor during bad
weather such as rain, snow, or strong
winds, etc. If the tree does make contact with any utility line, the utility company should be notified immediately.
• Carefully plan your sawing operation in
advance.
• Clear the work area. You need a clear
area all around the tree so you can
have secure footing.
• The chain saw operator should keep
on the uphill side of the terrain as the
tree is likely to roll or slide downhill after it is felled.
• Study
thenatural
conditions
thatcan
cause
thetreetofallinaparticular
direction;
such
conditions
include:
• Thewinddirection
andspeed.
• Theleanofthetree.Theleanofa
treemight
notbeapparent
dueto
uneven
orsloping
terrain.
Usea
plumb
orleveltodetermine
thedirection
oftreelean.
• Weight
andbranches
ononeside.
• Surrounding
treesandobstacles.
• Look
fordecay
androt.Ifthetrunkis
rotted,
itcansnap
andfalltoward
the
operator.
• Make
surethereisenough
room
for
thetreetofall.Maintain
adistance
of
2-1/2
treelengths
fromthenearest
person
orother
objects.
Noise
can
drown
outawarning
call.
• Remove
dirt,stones,
loose
bark,
nails,
staples,
andwirefromthetree
where
cutsaretobemade.
'_e4
-t....
First cut
Netch "_
_Direction
offall
oy
FELLING LARGE TREES
(6 inches in diameter or larger)
The notch method is used to fell large
trees. A notch is cut on the side of the
tree in the desired direction of fall. After
a felling cut is made on the opposite
side of tree, the tree will tend to fall in
the direction of the notch.
NOTE: If tree has large buttress roots,
remove them before making the notch.
If using saw to remove buttress roots,
keep saw chain from contacting
ground to prevent dulling of the chain.
NOTCH CUT AND FELLING TREE
• Make notch cut by cutting the top of
the notch first. Cut through 1/3 of the
diameter of the tree. Next complete
the notch by cutting the bottom. See
illustration. Once the notch is cut remove the wedge of wood from the
tree.
2"
t Felling cut here
I/
-_--'_[:'ln
Seco cJ \
e
• After removing the wood from the
notch, make the felling cut on the opposite side of the notch. This is done
by making a cut about two inches
higher than the center of the notch.
This will leave enough uncut wood
between the felling cut and the notch
to form a hinge. This hinge will help
prevent the tree from falling in the
wrong direction.
Hinge holds tree on stump and helps
control fall
Plan
aclear
retreat
path
C"_ _
_
Opening
of felling
Closing of
notch
NOTE: Before felling cut is complete,
use wedges to open the cut if necessary to control the direction of fall. To
avoid kickback and chain damage, use
wood or plastic wedges, but never
steel or iron wedges.
• Be alert to signs that the tree is
ready to fall: cracking sounds, widening of the felling cut, or movement in
the upper branches.
• As tree starts to fall, stop saw, put it
down, and get away quickly on your
planned retreat path.
• DO NOT use your saw to cut down a
partially fallen tree. Be extremely cautious with partially fallen trees that may
be poorly supported. When a tree
doesn't fall completely, set saw aside
and pull down tree with a cable winch,
block and tackle, or tractor.
CUTTING A FALLEN TREE
(BUCKING)
Bucking is the term used for cutting a
fallen tree to the desired log size.
_)_WARNING:
Do not stand on the
log being cut. Any portion can roll
causing loss of footing and control. Do
not stand downhill of the log being cut.
IMPORTANT
POINTS
• Cutonlyonelogatatime.
• Cutshattered
wood
verycarefully;
sharp
pieces
ofwood
couldbeflung
toward
operator.
• Useasawhorse
tocutsmalllogs.
Never
allow
another
person
tohold
thelogwhile
cutting
andnever
hold
thelogwithyourlegorfoot.
• Donotcutinanareawhere
logs,
limbs,
androotsaretangled.
Drag
logsintoaclear
areabefore
cutting
thembypulling
outexposed
and
cleared
logsfirst.
BUCKING
TECHNIQUES
_i_ WARNING:
sion side of the log is where the pressure of the log's weight is concentrated.
First cut on compression side of log
Second
cut
First cut on compression
If saw becomes
pinched or hung in a log, don't try to
force it out. You can lose control of the
saw resulting in injury and/or damage
to the saw. Stop the saw, drive a
wedge of plastic or wood into the cut
until the saw can be removed easily.
Restart the saw and carefully reenter
the cut. Do not use a metal wedge. Do
not attempt to restart your saw when it
is pinched or hung in a log.
Use a wedge to remove pinched saw.
Turn saw OFF and use a plastic or
wooden wedge to force cut open.
Using a log for support
2nd Cut
Overcutting
begins on the top side of
the log with the bottom of the saw
against the log. When overcutting use
light downward pressure.
Overcutting
side of log
BUCKING WITHOUT A SUPPORT
• Overcut through 1/3 of the diameter
of the log.
• Roll the log over and finish with a
second overcut.
• Watch for logs with a compression
side to prevent the saw from pinching. See illustration above for cutting
logs with a compression side.
BUCKING USING A LOG OR
SUPPORT STAND
• Remember your first cut is always on
the compression side of the log.
(Refer to the illustration below for
your first and second cut)
• Your first cut should extend 1/3 of the
diameter of the log.
• Finish with your second cut.
_st
Undercutting
Cut
_¢/1 st Cut
Undercutting involves cutting on the
underside of the log with top of saw
against the log. When undercutting use
light upward pressure. Hold saw firmly
and maintain control. The saw will tend
to push back toward you.
Using a support
_WARNING:
Never turn saw upside down to undercut. The saw cannot be controlled in this position.
Always make your first cut on the compression side of the log. The compres10
stand
2 nd Cut
LIMBING
• Limb a tree only after it is cut down.
• Leave the larger limbs underneath
the felled tree to support the tree as
you work.
• Start at the base of the felled tree
and work toward the top, cutting
branches and limbs. Remove small
limbs with one cut.
• Keep the tree between you and the
chain.
• Remove larger branches with the
cutting techniques described in
BUCKING WITHOUT A SUPPORT.
• Always use an overcut to cut small
and freely hanging limbs. Undercutting could cause limbs to fall and
pinch the saw.
PRUNING
LIMBING AND PRUNING
z't
_
A_,WARNING:
Be alert for and
guard against kickback.
Do not allow
the moving chain to contact any other
branches or objects at the nose of the
guide bar when limbing or pruning. Allowing such contact can result in serious injury.
_,WARNING:
Never climb into a
tree to limb or prune. Do not stand on
ladders, platforms, a log, or in any position which can cause you to lose
your balance or control of the saw.
IMPORTANT POINTS
• Watch out for spring poles. Spring
poles are small size limbs which can
whip toward you or pull you off balance. Use extreme caution when
cutting small size limbs.
• Be alert for spring back from any
branches that are bent or under
pressure. Avoid being struck by the
branch or the saw when the tension
in the wood fibers is released.
• Frequently clear branches out of the
way to avoid tripping over them.
_,WARNING:
Limit pruning to limbs
shoulder height or below. Do not cut if
branches are higher than your shoulder. Get a professional to do the job.
• Make your first cut 1/3 of the way
through the bottom of the limb. This
cut will make the limb sag so that it
falls easily on the second cut.
• Next make a second cut all the way
through the limb.
• Finish the pruning operation by using
an overcut so that the stump of the
limb protrudes 1 to 2 inches (3-5 cm)
from the trunk of the tree.
eo_nd out
3Sto_&y
'_
11
(3-5
cm)1 from
rd out
to 2 in.
trunk of tree
CUSTOMER
RESPONSIBILITIES
,_WARNING:
Disconnect
Fill in dates as you complete
regular service
Check for damaged!worn
power source before performing
Before
Use
parts
After
Use
maintenance.
Every
15 min.
Service
Dates
v"
Check for loose fasteners/parts
_,
Check chain tension
_"
Check chain sharpness
Check guide bar
_"
Check bar and chain oil level
Lubricate
bar sprocket
p"
v"
hole
_"
Inspect and clean unit & labels
v'
Clean guide bar groove
_"
GENERAL RECOMMENDATIONS
The warranty on this unit does not cover items that have been subjected to
operator abuse or negligence. To receive full value from the warranty, the
operator must maintain unit as
instructed in this manual. Various adjustments will need to be made periodically to properly maintain your unit.
Improper maintenance may cause
damage to the unit and possible injury
to the operator or bystanders.
CHECK FOR DAMAGED OR
WORN PARTS
Contact Sears Service Center for replacement of worn or damaged parts.
CHECK
CHAIN TENSION
_, WARNING:
Wear protective
gloves when handling chain. The
chain is sharp and can cut you even
when it is not moving.
Chain tension is very important. Chain
stretches during use. This is especially
true during the first few times you use
your saw. Always check chain tension
each time you use your saw.
1. Unplug unit from the power source.
2. Use a screwdriver to move chain
around guide bar to ensure kinks
do not exist. The chain should rotate freely.
NOTE: It is normal for a small amount
of oil to appear under the saw after
motor stops. Do not confuse this with a
leaking oil tank.
• Trigger Switch - Ensure the trigger
switch functions properly by squeezing and holding the trigger switch.
Make sure motor starts and stops.
• Oil Tank - Discontinue use of chain
saw if oil tank shows signs of damage or leaks.
• Power Cord - Discontinue use if
chain saw power cord shows signs
of damage or wear.
CHECK FOR LOOSE
FASTENERS AND PARTS
• Bar Clamp Nuts
• Chain
• Bar Adjusting Screw
3.
4.
Loosen bar clamp nuts until they
are finger tight against the bar
clamp.
Turn adjusting screw clockwise until chain solidly contacts bottom of
guide bar rail.
Adjusting Screw
12
5.
Using screwdriver, roll chain
around guide bar to ensure all links
are in bar groove.
6. Lift up top of guide bar to check for
sag. Release tip of guide bar, then
turn adjusting screw clockwise until
sag does not exist.
7. While lifting tip of guide bar, tighten
bar clamp nuts with a wrench.
8. Use screwdriver to move chain
around guide bar.
9. If chain does not rotate, it is too
tight. Slightly loosen bar clamp
nuts and loosen chain by turning
the adjusting screw counterclockwise. Retighten bar clamp nuts.
10. If chain is too loose, it will sag below the guide bar. DO NOT operate
the saw if the chain is loose.
and bar clamp. Remove bar and
chain from saw.
• Clean the oil holes and bar groove
after each 5 hours of operation.
Remove Sawdust From
e Bar Groove
Sprocket Hole
o_._
Oil Holes
o_"_
• Burring of guide bar rails is a normal
process of rail wear. Remove these
burrs with a flat file.
• When rail top is uneven, use a flat
file to restore square edges and
sides.
_
_rT_
I'1
_, WARNING:
If the saw is operated
with a loose chain, the chain could
jump off the guide bar and result in serious injury.
File Rail Edges_
and Sides
Square
Worn Groove
Replace guide
worn, the guide
or when excess
the rails occurs.
essary, contact
Center.
LUBRICATION
CHECK CHAIN SHARPNESS
A sharp chain makes wood chips. A dull
chain makes a sawdust powder and
cuts slowly. See CHAIN SHARPENING in
the SERVICE AND ADJUSTMENTS section.
r] r]
I U I
I
I
Correct Groove
bar when the groove is
bar is bent or cracked,
heating or burring of
If replacement is necyour Sears Service
Bar Oil
Fill Cap
CHECK GUIDE BAR
Conditions which require guide bar
maintenance:
• Saw cuts to one side or at an angle.
• Saw has to be forced through the
cut.
• Inadequate supply of oil to the bar
and chain.
Check the condition of the guide bar before each use and each time the chain
is sharpened. A worn guide bar will
damage the chain and make cutting difficult.
After each use, with unit disconnected
from power source, clean all sawdust
from the guide bar and sprocket hole.
To maintain guide bar:
• Disconnect the chain saw from the
• Check bar and chain oil before use
and every 15 minutes while operating the saw. See GUIDE BAR AND
CHAIN OIL under the OPERATION
section.
INSPECT AND CLEAN UNIT AND
LABELS
• After each use, inspect complete unit
for loose or damaged parts. Clean
the unit and labels using a damp
cloth with a mild detergent.
• Wipe off the unit and labels with a
clean dry cloth.
power source.
• Loosen and remove bar clamp nuts
13
CHAIN
SHARPENING
Chain
sharpening
requires
special
tools.
Youcanpurchase
sharpening
toolsatSears
orgotoaprofessional
chain
sharpener.
J_, WARNING:
(
Avoid accidental
Tensioning Rack
starting. Always unplug saw from power source before installing a bar and/or
chain.
5.
CHAIN
6.
7.
REPLACEMENT
_i, WAR NI N G: Wear p rotective
gloves when handling chain. The
chain is sharp and can cut you even
when it is not moving.
It is normal for a new chain to stretch
during the first 30 minutes of operation.
You should recheck your chain tension
frequently and adjust the chain tension
as required. See CHECK CHAIN TENSION section.
Bar
DIRECTION OF ROTATION
Cutters
See your Sears Service Center to replace and sharpen individual cutters
on your chain.
TO REPLACE CHAIN:
1. Disconnect unit from power source.
2. Remove bar clamp nuts.
3. Remove bar clamp.
8.
9.
4.
Depth Gauge
Drive kinks
Place the chain around the
et and fit the drive links into
guide bar groove and then
teeth of the sprocket in the
the guide bar.
sprockthe
into the
tip of
Pull guide bar forward until the
chain is snug in the guide bar
groove.
Ensure all drive links are
in the bar groove.
10. Install the bar clamp.
11. Install bar clamp nuts; finger tighten only. Do not tighten any further
at this point. Proceed to CHAIN ADJUSTMENT.
Drive Sprocket
_ _' _6-_,_Bar
°
Slide guide bar toward the drive
sprocket until guide bar stops
against the sprocket.
Remove the old chain.
Carefully remove the new chain
from the package.
Hold chain with
the drive links as shown.
Tip of
Replace the old chain when it becomes worn or damaged.
Use only
the Low Kickback replacement chain
specified in the list of available replacement parts. The chain must comply with kickback performance requirements of ANSI B175.1 when tested
with this saw.
Bar
_/_/_]
Clamp
o _:::_
Nuts
Turn adjusting screw on the bar
counterclockwise
to move the
tensioning rack as far as it will go
toward the front of the bar.
14
CHAIN
ADJUSTMENT
See CHECK CHAIN TENSION
MAINTENANCE
section.
PARTS AVAILABLE
in the
,_WARNING:
Use of any other accessory or attachment will present a
risk of injury to the operator.
REPLACEMENT
PART
Hex Nuts
Oil Cap
Chain Catcher
Screw
PART NO.
530015917
530053072
530029850
530016269
File (5/32" dia.) Twin Pak
File Guide (File Holder)
71-36524
71-36565
Depth Gauge Tool
Chain -16"
71-36557
71-3629
Guide Bar - 16"
Bar & Chain Lubricant -1 qt.
71-36596
71-36556
Bar & Chain Lubricant -1 gal.
71-36554
SEASONAL STORAGE
Prepare your unit for storage at the end
of the season or if it will not be used for
30 days or more.
If your chain saw is to be stored for a
period of time:
• Clean it thoroughly before lengthy
storage.
• Store in a clean dry area.
• Lightly oil external metal surfaces
and guide bar.
• Oil the chain and use the bar sheath
(included) to cover bar and chain.
,_ WARNING:
Perform the following
steps after each use:
• Allow motor to cool before storing or
transporting.
• Store chain saw and extension cord
in a well ventilated area
• Store chain saw with all guards in
place and position chain saw so that
any sharp object cannot accidentally
cause injury.
• Store chain saw unplugged, well out
of the reach of children.
15
TROUBLESHOOTING
TABLE
WARNING:
Always
stopunitanddisconnect
fromthepower
source
beforeperforming
alloftherecommended
remedies
below
except
remedies
thatrequire
unittobeoperating.
TROUBLE CAUSE
REMEDY
Chain
does 1.Chain
tension
incorrect.
1.See"Check
Chain
Tension"
in
notmove
Maintenance
section.
when
trigger2.Guide
barrailspinched.
2.Repair
orreplace.
switch
is
Sears
Service.
3.Trigger
switch
failure. 3.Contact
engaged. 4.Circuit
breaker
tripped/4.Reset
circuit
breaker
orreplace
fusefailure.
fuse.
1.See"Check
Chain
Tension"
in
tension
incorrect.
Chain
clat- 1.Chain
Maintenance
Section.
tersorcuts
Sears
Service.
damaged. 2.Contact
roughly. 2.Cutters
3.Chain
worn.
3.Resharpen
orreplace
chain.
4.Cutters
dull,improperly
4.See"Chain
Sharpening"
in
Service
andAdjustments
section.
sharpened,
ordepth
gauges
toohigh.
5.Contact
Sears
Service.
5.Sprocket
worn.
Chain
stops 1.Chain
cutter
topsnot 1.See"Chain
Sharpening"
in
during
cut. filedflat.
Service
andAdjustments
section.
2.Guide
barburred
or
2.Repair
orreplace
guide
bar.
bent;railsuneven.
Oilinade- 1.Oiltankempty.
1.Filloiltank.
quate
forbar 2.Oiloutlet
Sears
Service.
clogged. 2.Contact
andchain 3.Guide
baroilhole
3.Remove
barandclean.
lubrication. blocked.
Chain
cuts 1.Cutters
damaged
on 1.See"Chain
Sharpening"
in
oneside.
Service
andAdjustments
section.
atanangle. 2.Chain
dullononeside. 2.See"Chain
Sharpening"
in
Service
andAdjustments
section.
3.Guide
barbentorworn.3.Replace
guide
bar.
Ifsituations
occur
which
arenotcovered
inthismanual,
usecareandgood
judgement.
Ifyouneedassistance,
contact
Sears
Service
ortheCUSTOMER
ASSISTANCE
HELPLINE
at1-800-235-5878.
16