1
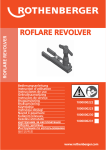
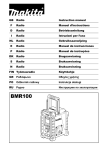
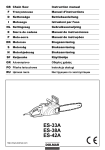
GB Radio Instruction manual F Radio Manuel d’instructions D Radio Betriebsanleitung I Radio Istruzioni per l’uso NL Radio Gebruiksaanwijzing E Radio Manual de instrucciones P Rádio Manual de instruções DK Radio Brugsanvisning S Radio Bruksanvisning N Radio Bruksanvisning SF Työmaaradio Käyttöohje GR Ραδιφωνο Οδηγίες χρήσης PO Odbiornik radiowy Instrukcja obsługi RU Ó˛Š¦þ ÊÞ¹²×³ð¾¦ć=−þ=Ćð¹−ݳ˛²˛¾¦¦ BMR100 10 2 3 12 14 1 4 5 6 7 9 8 13 L K J A B 11 PM C I D H E G F 2 14 15 15 11 16 1 2 18 17 19 19 3 4 10 8 9 5 6 3 Symbols The following show the symbols used for the equipment. Be sure that you understand their meaning before use. Symboles Nous donnons ci-dessous les symboles utilisés pour l’appareil. Assurez-vous que vous en avez bien compris la signification avant d’utiliser l’outil. Symbole Die folgenden Symbole werden für die Geräte verwendet. Machen Sie sich vor der Benutzung unbedingt mit ihrer Bedeutung vertraut. Symboli Per questa attrezzatura vengono usati i simboli seguenti. Bisogna capire il loro significato prima di usare l’utensile. Symbolen Voor deze uitrusting worden de volgende symbolen gebruikt. Zorg ervoor dat u de betekenis van deze symbolen begrijpt alvorens het gereedschap te gebruiken. Símbolos A continuación se muestran los símbolos utilizados para el equipo. Asegúrese de que entiende su significado antes de usarla. Símbolos O seguinte mostra os símbolos utilizados para o equipe. Certifique-se de que compreende o seu significado antes da utilização. Symboler Nedenstående symboler er anvendt i forbindelse med dette udstyr. Vær sikker på, at De har forstået symbolernes betydning, før maskinen anvendes. Symboler Följande visar de symboler som används för denna utrustning. Se noga till att du förstår deras innebörd innan maskinen används. Symbolene Følgende viser de symblene som brukes for utstyret. Det er viktig å forstå betydningen av disse før maskinen tas i bruk. Symbolit Alla on esitetty laitteistossa käytetyt symbolit. Opettele näiden merkitys, ennen kuin käytät konetta. Σύµβολα Τα ακόλουθα δείχνουν τα σύµβολα που χρησιµοποιούνται για το µηχάνηµα. Βεβαιωθείτε ότι καταλαβαίνετε τη σηµασία τους πριν από τη χρήση. Symbole Poniżej przedstawiono symbole stosowane w przypadku omawianego urządzenia. Przed przystąpieniem do jego eksploatacji należy koniecznie zapoznać się z ich znaczeniem. Символы Ниже приводятся символы, используемые для оборудования. Перед использованием убедитесь, что вы понимаете их значение. ❏ ❏ ❏ ❏ ❏ ❏ ❏ 4 Read instruction manual. Lire le mode d’emploi. Bitte Betriebsanleitung lesen. Leggete il manuale di istruzioni. Lees de gebruiksaanwijzing. Lea el manual de instrucciones. Leia o manual de instruções. ❏ ❏ ❏ ❏ ❏ ❏ ❏ Læs brugsanvisningen. Läs bruksanvisningen. Les bruksanvisingen. Katso käyttöohjeita. ∆ιαβάστε τις οδηγίες χρήσης. Przeczytać instrukcję obsługi Ì×þ₣¦²˛Ð²š=׳ðþŁþŠ¹²Łþ=−þ=Ćð¹−ݳ˛²˛¾¦¦K ❏ ❏ Li-ion ❏ ❏ ❏ ❏ ❏ ❏ ❏ ❏ ❏ ❏ ❏ ❏ Always recycle batteries Toujours mettre les batteries au recyclage Akkus bzw. Batterien müssen immer fachgerecht entsorgt werden Riciclare sempre le batterie Accu altijd recyclen Recicle siempre las baterías As pilhas devem ser sempre recicladas Genbrug altid batterier Återvinn alltid batterier Resirkuler alle batterier Kierrätä käytetyt akut Πάντα να ανακυκλώνετε τις µπαταρίες. Baterie podlegają recyklingowi. ‡¹šłŠ˛=³²¦Ý¦ž¦×³Ð²š=ˇ˛²˛×š¦K ❏ Only for EU countries Do not dispose of electric equipment together with household waste material! In observance of European Directive 2002/96/EC on waste electrical and electronic equipment and its implementation in accordance with national law, electric equipment that have reached the end of their life must be collected separately and returned to an environmentally compatible recycling facility. ❏ Pour les pays européens uniquement Ne pas jeter les appareils électriques dans les ordures ménagères ! Conformément à la directive européenne 2002/96/EG relative aux déchets d'équipements électriques ou électroniques (DEEE), et à sa transposition dans la législation nationale, les appareils électriques doivent être collectés à part et être soumis à un recyclage respectueux de l’environnement. ❏ Nur für EU-Länder Werfen Sie Elektrowerkzeuge nicht in den Hausmüll! Gemäss Europäischer Richtlinie 2002/96/EG über Elektro- und Elektronik- Altgeräte und Umsetzung in nationales Recht müssen verbrauchte Elektrowerkzeuge getrennt gesammelt und einer umweltgerechten Wiederverwertung zugeführt werden. ❏ Solo per Paesi UE Non gettare le apparecchiature elettriche tra i rifiuti domestici. Secondo la Direttiva Europea 2002/96/CE sui rifiuti di apparecchiature elettriche ed elettroniche e la sua attuazione in conformità alle norme nazionali, le apparecchiature elettriche esauste devono essere raccolte separatamente, al fine di essere riciclate in modo eco-compatibile. ❏ Alleen voor EU-landen Geef elektrisch gereedschap niet met het huisvuil mee! Volgens de Europese richtlijn 2002/96/EG inzake oude elektrische en elektronische apparaten en de toepassing daarvan binnen de nationale wetgeving, dient gebruikt elektrisch gereedschap gescheiden te worden ingezameld en te worden afgevoerd naar een recycle bedrijf dat voldoet aan de geldende milieu-eisen. ❏ Sólo para países de la Unión Europea ¡No deseche los aparatos eléctricos junto con los residuos domésticos! De conformidad con la Directiva Europea 2002/96/CE sobre residuos de aparatos eléctricos y electrónicos y su aplicación de acuerdo con la legislación nacional, las herramientas eléctricas cuya vida útil haya llegado a su fin se deberán recoger por separado y trasladar a una planta de reciclaje que cumpla con las exigencias ecológicas. ❏ Apenas para países da UE Não deite equipamentos eléctricos no lixo doméstico! De acordo com a directiva europeia 2002/96/CE sobre ferramentas eléctricas e electrónicas usadas e a sua aplicação para as leis nacionais, as ferramentas eléctricas usadas deven ser recolhidas em separado e encaminhadas a uma instalação de reciclagem dos materiais ecológicos. 5 ❏ Kun for EU-lande Elværktøj må ikke bortskaffes som almindeligt affald! I henhold til det europæiske direktiv 2002/96/EF om bortskaffelse af elektriske og elektroniske produkter og gældende national lovgivning skal brugt elværktøj indsamles separat og returneres til miljøgodkendt genindvinding. ❏ Gäller endast EU-länder. Elektrisk utrustning får inte kastas i hushållssoporna! Enligt direktivet 2002/96/EG som avser äldre elektrisk och elektronisk utrustning och dess tillämpning enligt nationell lagstiftning ska uttjänt elektriskt utrustning sorteras separat och lämnas till miljövänlig återvinning. ❏ Kun for EU-land Kast aldri elektroutstyr i husholdningsavfallet! I henhold til EU-direktiv 2002/96/EF om kasserte elektriske og elektroniske produkter og direktivets iverksetting i nasjonal rett, må elektroutstyr som ikke lenger skal brukes, samles separat og returneres til et miljøvennlig gjenvinningsanlegg. ❏ Koskee vain EU-maita Älä hävitä sähkötarvikkeita tavallisen kotitalousjätteen mukana! Vanhoja sähkö- ja elektroniikkalaitteita koskevan EU-direktiivin 2002/96/ETY ja sen maakohtaisten sovellusten mukaisesti käytetyt sähkötarvikkeet on toimitettava ongelmajätteen keräyspisteeseen ja ohjattava ympäristöystävälliseen kierrätykseen. ❏ Μόνο για τις χώρες της ΕΕ Μην απορρίπτετε ηλεκτρικές συσκευές στον κάδο οικιακών απορριµάτον! Σύµφωνα µε την ευρωπαϊκή οδηγία 2002/96/ΕΚ περί ηλεκτρικών και ηλεκτρονικών συσκευών και την ενσωµάτωση της στο εθνικό δίκαιο, οι ηλεκτρικές συσκευές πρέπει να συλλέγονται ξεχωριστά και να επιστρέφονται για ανακύκλωση µε τρόπο φιλικό προς το περιβάλλον. ❏ Dotyczy tylko państw UE Nie wyrzucaj urządzeń elektrycznych wraz z odpadami z gospodarstwa domowego! Zgodnie z Europejską Dyrektywą 2002/96/WE w sprawie zużytego sprzętu elektrotechnicznego i elektronicznego oraz dostosowaniem jej do prawa krajowego, zużyte urządzenia elektryczne należy posegregować i zutylizować w sposób przyjazny dla środowiska. ❏ ÒþÝşðþ=ŠÝČ=¹²×˛Þ=„Ô Îš=ŁŞð¦ŠŞŁ˛Ð²š=ĆÝšð²×¦₣š¹ðþš=þˇþ׳ŠþŁ˛Þ¦š=Łýš¹²š=¹=þˇŞ₣ÞŞý=ý³¹þ×þý> ‡=¹þþ²Łš²¹²Ł¦¦=¹=šŁ×þ−šÐ¹ðþÐ=Š¦×šð²¦ŁþÐ=OMMOLVSLbd=þˇ=³²¦Ý¦ž˛¾¦Č¦=¹²˛×þłþ=ĆÝšð²×¦₣š¹ðþłþ=¦=ĆÝšð²×þÞÞþłþ= þˇþ׳ŠþŁ˛Þ¦Č==¦=š÷=−צýšÞšÞ¦Č=Ł=¹þþ²Łš²¹²Ł¦¦=¹=ýš¹²ÞŞý¦=ž˛ðþÞ˛ý¦=ĆÝšð²×¦₣š¹ðþš=þˇþ׳ŠþŁ˛Þ¦šI=ˇŞŁĞšš=Ł= Ćð¹−ݳ˛²˛¾¦¦I=ŠþÝŽÞþ=³²¦Ý¦žþŁŞŁ˛²ş¹Č=þ²ŠšÝşÞþ=ˇšžþ−˛¹ÞŞý=ŠÝČ=þð׳Ž˛ćğšÐ=¹×šŠŞ=¹−þ¹þˇþýK 6 ENGLISH IMPORTANT SAFETY INSTRUCTIONS WARNING: When using electric tools, basic safety precautions should always be followed to reduce the risk of fire, electric shock, and personal injury, including the following: 1. Read this instruction manual and the charger instruction manual carefully before use. 2. Clean only with dry cloth. 3. Do not block any ventilation opening. Install in accordance with the manufacturer’s instruction. 4. Do not install near any heat sources such as radiators, heat registers, stoves, or other apparatus (including amplifiers) that produce heat. 5. Only use attachments/accessories specified by the manufacturer. 6. Unplug this apparatus during lighting storms or when unused for long periods of time. 7. A battery operated radio with integral batteries or a separate battery pack must be recharged only with the specified charger for the battery. A charger that may be suitable for one type of battery may create a risk of fire when used with another battery. 8. Use battery operated radio only with specifically designated battery packs. Use of any other batteries may create a risk of fire. 9. When battery pack is not in use, keep it away from other metal objects like: paper clips, coins, keys, nails, screws, or other small metal objects that can make a connection from one terminal to another. Shorting the battery terminals together may cause sparks, burns, or a fire. 10. Avoid body contact with grounded surfaces such as pipes, radiators, ranges and refrigerators. There is an increased risk of electric shock if your body is grounded. SAVE THESE INSTRUCTIONS. Features: • • • • • • • • • • • AM/FM-stereo PLL Synthesized Large LCD display with illumination Manual/Preset/Scan tuning Rotary tuning and volume control 5 preset stations each band Time and 2 alarm timers (radio and HWS buzzer) with Snooze Adjustable sleep (auto shut off) timer Stereo speaker for rich sound performance Ultra rugged design Water resistant to JIS 4 Powered by both Makita battery pack and supplied power adaptor Explanation of general view Controls: 1. Power and Sleep timer 2. Band/Tuning step selection and Mono button 3. Radio alarm set 4. Buzzer alarm set 5. Preset stations 6. Scan tuning and Time set 7. Volume and Tuning controls 8. DC IN socket 9. Headphone socket 10. Soft bended rod antenna 11. Battery compartment (including main battery pack and back up batteries) 12. Handle 13. Speaker 14. Battery compartment locker LCD Display: A. B. C. D. E. F. G. H. I. J. K. L. Radio alarm HWS buzzer alarm Scan tuning Band Indicator Low battery indicator Preset stations Sleep and Snooze status Frequency Stereo symbol and Volume Clock Time set PM for clock Battery Installation Note: Keeping back up batteries inside the compartment prevent stored data in preset memories from being lost. 1. Pull out the battery compartment locker to release battery compartment. There are main battery pack compartment and back up battery compartment. (Fig.1 & 2) 2. Remove back up battery compartment cover and insert 2 fresh UM-3 (AA sizes). Make sure the batteries are with correct polarity as shown inside the compartment. Replace the battery cover. 7 3. BH2433 | BH2420After back up batteries are inserted, insert the main battery pack to power radio. The suitable battery packs for this radio listed as below. Cluster Battery: 9.6V: 9135 | 9134 | 9122 | PA09 | 9120 12V: Note: The battery pack can't be charged via the supplied AC power adaptor. 1235 | 1234 | 1222 | PA12 | 1220 14.4V: 1435 | 1434 | 1422 | PA14 | 1420 18V: 6. When low battery sign appears and an “E” keeps on flashing is the time to replace the back up batteries. 1835 | 1834 | 1822 | PA18 Slide Battery: 9.6V: BH9033 | BH9033A | BH9020 | BH9020A 12V: BH1233 | BH1233C | BH1220C 14.4V: BH1433 | BH1420 | BL1430 18V: BL1830 24V: BH2433 | BH2420 Capacity 1.3 Ah Battery Cartridge•Voltage 3.0 Ah 3.3 Ah 24V (At Max. Volume) – Approx. 7 hour 1822 BH2420 Approx. 11 hour 1434 1834 – Approx. 13 hour 1435 1835 BL1430 BL1830 – Approx. 16 hour BH1433 – BH2433 Approx. 17 hour 14.4V PA14 9120 1220 1420 1222 1422 BH9020 BH9020A 2.6 Ah 18V 12V PA12 9122 2.0 Ah 9134 BH1220C BH1420 1234 9135 1235 BH9033 BH1233 BH9033A BH1233C Operating time* PA18 9.6V PA09 * Operating time may differ by the type of battery, charging or operating conditions. 3-1. Installing or removing Slide battery cartridge (Fig. 3) • To insert the battery cartridge, align the tongue on the battery cartridge with the groove in the housing and slip it into place. Always insert it all the way until it locks in place with a little click. • Do not use force when inserting the battery cartridge. If the cartridge does not slide in easily, it is not being inserted correctly. • To remove the battery cartridge, withdraw it from the tool while sliding the button on the front of the cartridge or pressing the buttons on both sides of the cartridge. 3-2. Installing or removing Cluster battery cartridge (Fig. 4) • To insert the battery cartridge, align the tongue on the battery cartridge with the groove in the housing and slip it into place. • Do not use force when inserting the battery cartridge. If the cartridge does not slide in easily, it is not being inserted correctly. • To remove the battery cartridge, withdraw it from the Job site radio. 4. Replace battery compartment locker. 8 Installing the Soft bended rod antenna (Fig. 5) Install the Soft bended rod antenna as show in the figure. The following tables indicate the operating time on a single charge. Battery 5. Reduced power, distortion and a “stuttering sound” or low battery sign that appears on the display are all the signs that the main battery pack needs to replace. Using Supplied AC power adaptor (Fig. 6) Remove the rubber protector and insert the adaptor plug into the DC socket on the front side of the radio. Plug the adaptor into a standard mains socket outlet. Whenever the adaptor is used, the battery pack are automatically disconnected. The AC adaptor should be disconnected from the main supply when not in use. Setting the clock 1. Clock can be set either when the radio is power on or off. 2. Display will show “-: - -” when the back up batteries are installed. 3. Long press the time set button for more than 2 seconds, display will flash time set symbol and also the hour digit, followed by a beep. 4. Rotate Tuning control to set the required hour. 5. Press button to confirm hour setting, the minute digit will flash. 6. Rotate Tuning control to set the required minute. 7. Press the button again to complete clock setting. Operating the radio This radio equips with three tuning methods – Scan tuning, Manual tuning and Memory presets recall. Scan Tuning 1. Press the Power button to turn on the radio. 2. Select the required waveband by pressing the Band button. Make sure the rubber bended rod antenna has been well placed for best FM reception. For AM (MW) band, rotate the radio to get best signal. Try to avoid to operate the radio next to computer screen and other equipment which will cause interference to the radio. 3. Press and release Scan button (long press Scan button more than 2 seconds will activate time setting), LCD display will flash Scan symbol and the radio will up search and stop automatically when it finds a radio station,. Press the Scan button again to pick up the found station. Note: A stereo symbol will appear on the display, if the station found is a stereo station. Note: The radio will continue to search next available stations if you do not press Scan button again when it finds a radio station. 4. Rotate the Volume control to get required sound level. LCD display will show sound level changes. Note: During operating volume control, you can press in Tuning/Volume control knob to change volume control to tuning control status. 5. To turn off the radio, press the Power button. Display will show OFF. Manual Tuning 1. Press the Power button to turn on the radio. 2. Select the required waveband by pressing the Band button. Adjust the antenna as described above. 3. A single rotary to the Tuning control will change the frequency in the following increment: FM: 50 or 100 kHz AM (MW): 9 or 10 kHz Note: If the radio is in volume control status, press in the tuning/volume control to become Tuning status. 4. Keep on rotating the Tuning control until the required frequency shown on the display. 5. Rotate the volume control to get required sound level. 6. To turn off the radio, press the Power button. Display will show OFF. Storing stations in preset memories There are 5 memory presets for each waveband. 1. Press the Power button to turn on the radio. 2. Tune to required station using one of the methods previously described. 3. Press and hold down the required preset until radio beeps. The preset number will appear in the display and the station will be stored under chosen preset button. 4. Repeat this procedure for the remaining presets. 5. Stations stored in preset memories can be overwritten by following above procedures. Recall stations from preset memories 1. Press the power button to turn on the radio. 2. Select the required waveband. 3. Momentarily press the required Preset button, the preset number and station frequency will appear in the display. Setting the radio alarm When the radio alarm is selected, the radio will turn on and play the chosen radio station at the chosen alarm time. The radio alarm will continue for one hour unless turned off by pressing the Power button. Pressing the Power button whilst the alarm is activated will cancel the alarm for 24 hours. Note: When the radio is in low battery status, the radio alarm can't be activated. a. Setting radio alarm time: 1. The radio alarm can be set either when radio is on or off. 2. Press and release radio alarm button , the radio alarm symbol will flash. 3. During radio alarm symbol flashing, press button for more than 2 seconds followed by a beep. 4. Display Hour will flash, rotate Tuning Control to select the hour then press button again to confirm hour setting. 5. Follow same procedures of setting hour to set required minute. Press button to complete alarm time setting. b. Setting radio alarmed station 1. During setting radio alarm time and radio alarm symbol is flashing, press Band button to activate the radio to select required wake-up band and station by manual tuning and recall the preset stations. Press button to complete radio alarm setting. Display will show . 2. When above radio alarm time and station are set, press and hold down radio alarm button for 2 seconds followed by a beep to switch alarm on or off. Display will show when radio alarm is set. Note: If new radio alarm station is not selected, it will select the last alarm station. Setting the HWS (Humane Wake System) buzzer alarm A beep tone will activate when selecting the HWS buzzer alarm. The alarm beep will become shoter and shoter every 15 seconds for one minute followed by one minute silence before repeating the cycle. The HWS alarm will sound for one hour until turning off by pressing the Power button. Press the Power button whilst the alarm is activated will cancel the alarm for 24 hours. 1. The HWS buzzer alarm can be set either radio is on or off. 2. Press and release the HWS buzzer alarm button , the symbol will flash. 3. During the symbol flashes, long pressing the button for more than 2 seconds followed by a beep and display Hour digit will flash. 4. Rotate Tuning Control to select required alarm hour, then press time set button again. The minute digit will then flash. 5. Rotate Tuning Control to select required alarm minute, the press time set button again to complete HWS buzzer alarm setting. 9 6. Press and hold down buzzer alarm button for more than 2 seconds followed by a beep to switch on or off the HWS buzzer alarm. Display will appear when buzzer alarm has been set. Snooze function 1. Whilst the alarm is activated, pressing any buttons except the Power Button will activate the snooze function. The radio or HWS buzzer alarm will be silenced with interval of 5 minutes. 2. The display will flash both the snooze symbol and the alarm symbol. The snooze function can be repeatedly during one hour that the alarms are active. Sleep function The sleep timer will automatically switched off the radio after a preset time has elapsed. 1. Press and continue to hold down the Power button for more than 2 seconds, followed by a beep tone, the display will cycle through the available sleep times in the order 60-45-30-15-120-90-60. Release the Power button when the required sleep time appears in the display. The symbol will appear in the display and the radio will play the last station selected. 2. To cancel the sleep function, press the Power button. The Symbol will disappear and radio is off. Display illumination Press any buttons or rotate tuning/volume control will illuminate the LCD display for approx. 15 seconds. During scanning stations and alarm activated, will also automatically illuminate the display. Setting tuning step Tuning steps on some countries are different from where you purchase the radio. If you buy the radio in Europe and intend to use in Northern America or some Southern American countries, you may have to adjust tuning step so the radio may continue to serve you well. While radio is switched off, long pressing Step/Band button for more than 2 seconds will first show current FM tuning step. Continue pressing Step/Band button for approx. another 5 seconds until display FM and 50 kHz (tuning step) flashing followed by a beep. By rotating the Tuning control, you may adjust to 100 kHz per tuning step. After FM tuning step is reset, pressing Step/Band button again, display will show AM (MW) and flash 9 kHz. By rotating Tuning control, you may adjust to 10 kHz per tuning step. Complete the setting by pressing Step/Band button. Change Stereo to Mono When the stereo FM station reception is weak, you can improve it by pressing Mono button for 2 seconds. The 10 sound is no longer in stereo and stereo indicator disappears. Headphone socket A 3.5 mm headphone socket located in front of your radio is provided for use with either headphones or an hairpiece. Inserting a plug automatically mutes the internal speaker. Specifications: Power Requirements AC power adaptor DC12V 700mA, center pin positive Battery UM-3 (AA size) x 2 for back up Cluster battery: 9.6 - 18V Slide battery: 9.6 - 24 V Frequency coverage: FM 87.50 - 108 MHz AM (MW) 522 - 1629 kHz (9 kHz/step) Circuit feature Loudspeaker 3 inches 8 ohm Output Power 9.6V: 0.8 W x 2, 12V: 1.2 W x 2 14.4V: 2W x 2, 18V: 3W x 2 24V: 5W x 2 Headphone socket 3.5 mm dia. Antenna system FM: soft bended rod antenna AM: bar antenna Dimension (W x H x D) in mm: 263 x 305 x 166 Weight 4.2kg (without battery) NEDERLANDS BELANGRIJKE VEILIGHEIDSINSTRUCTIES WAARSCHUWING: Bij het gebruik van elektrische gereedschappen dienen altijd voorzorgsmaatregelen te worden genomen om het risico op brand, elektrische schokken en persoonlijk letsel te beperken, waaronder de volgende: 1. Lees deze handleiding en de handleiding van de lader zorgvuldig door alvorens de apparaten te gebruiken. 2. Reinig de radio uitsluitend met een droge doek. 3. Dek de ventilatieopeningen van de radio niet af. Plaats de radio volgens de instructies van de fabrikant. 4. Plaats de radio niet in de buurt van warmtebronnen zoals radiatoren, warmteroosters, kachels of andere apparatuur (inclusief versterkers) die warmte afgeeft. 5. Gebruik uitsluitend door de fabrikant gespecificeerde bevestigingsmiddelen en accessoires. 6. Haal de stekker van de radio uit het stopcontact bij onweer of als de radio langere tijd niet wordt gebruikt. 7. Als de radio op batterijen werkt (inwendig of in een los batterijpakket) mogen deze uitsluitend worden opgeladen met de gespecificeerde lader. Een lader die geschikt is voor een bepaald type batterijen kan bij gebruik in combinatie met een ander type batterijen brandgevaar veroorzaken. 8. Gebruik uitsluitend het specifiek voor deze radio ontworpen batterijpakket. Het gebruik van andere batterijen kan brandgevaar veroorzaken. 9. Als het batterijpakket niet wordt gebruikt, houd het dan uit de buurt van metalen voorwerpen zoals paperclips, munten, sleutels, spijkers, schroeven of andere voorwerpen die een verbinding tussen de polen tot stand zouden kunnen brengen. Kortsluiting van de polen kan leiden tot vonk- en vlamvorming en brand. 10. Vermijd lichamelijk contact met geaarde oppervlakken zoals leidingen, radiatoren, fornuizen en koelkasten. Als uw lichaam wordt geaard, is er meer risico op elektrische schokken. BEWAAR DEZE INSTRUCTIES ZORGVULDIG. Kenmerken: • AM/FM-stereo, PLL-synthese • Groot LCD-display met verlichting • Handmatig afstemmen/stationvoorkeuze/automatisch afstemmen • Draaiknop voor afstemmen en volumeregeling • 5 voorkeuzestations per band • Tijdweergave en 2 alarmtimers (radio en HWS-zoemer) met sluimerfunctie • Instelbare slaaptimer (automatisch uitschakelen) • Stereoluidspreker voor hoogwaardige geluidsweergave • Bijzonder duurzaam ontwerp • Waterbestendig tot JIS 4 • Voeding via Makita-batterijpakket of meegeleverde netadapter Overzicht van de belangrijkste onderdelen Bedieningselementen: 1. Aan-/uitknop en slaaptimer 2. Band/afstemstapkeuze en Mono-knop 3. Radioalarm instellen 4. Alarmzoemer instellen 5. Voorkeuzestations 6. Automatisch zoeken en tijd instellen 7. Volume- en afstemknop 8. Gelijkstroom aansluitcontact 9. Hoofdtelefooningang 10. Flexibele sprietantenne 11. Batterijvak (inclusief batterijpakket en backupbatterijen) 12. Handvat 13. Luidspreker 14. Vergrendelpal batterijvak LCD-display: A. B. C. D. E. F. G. H. I. J. K. L. Radioalarm HWS-alarmzoemer Automatisch afstemmen Band-indicator Indicator batterijen leeg Voorkeuzestations Status slaap- en wektimer Frequentie Stereosymbool en volume Klok Tijdsinstelling PM-symbool voor klok De batterijen plaatsen N.B. Door back-upbatterijen in het batterijvak te laten zitten, voorkomt u dat opgeslagen instellingen in het voorkeurgeheugen verloren gaan. 1. Open de klep van het batterijvak. Het batterijvak is verdeeld in een vak voor de accu en een vak voor de back-upbatterijen. (Afb. 1 & 2) 2. Verwijder de klep van het vak voor de backupbatterijen en plaats twee nieuwe UM-3 batterijen (AA-formaat). Plaats de batterijen met de juiste polariteit zoals aangegeven aan de binnenzijde van het vak. Plaats de klep van het vak voor de backupbatterijen terug. 3. Plaats nadat u de back-upbatterijen hebt geïnstalleerd het batterijpakket in de radio. Hieronder zijn de geschikte accu’s voor deze radio aangegeven. Blokaccu: 9,6V: 9135 | 9134 | 9122 | PA09 | 9120 12V: 1235 | 1234 | 1222 | PA12 | 1220 14,4V: 1435 | 1434 | 1422 | PA14 | 1420 23 18V: De flexibele sprietantenne plaatsen (Afb. 5) 1835 | 1834 | 1822 | PA18 Schuifaccu: 9,6V: BH9033 | BH9033A | BH9020 | BH9020A 12V: Plaats de flexibele sprietantenne zoals aangegeven in de afbeelding. BH1233 | BH1233C | BH1220C 14,4V: BH1433 | BH1420 | BL1430 18V: BL1830 24V: BH2433 | BH2420 De meegeleverde netadapter gebruiken (Afb. 6) De onderstaande tabel geeft de gebruikstijd aan per acculading. Accucapaciteit 1,3 Ah 2,0 Ah 2,6 Ah 3,0 Ah 3,3 Ah 9,6V 12V Accuspanning 14,4V 18V 24V Gebruikstijd* (bij max. Volume) PA09 9120 PA12 1220 PA14 1420 PA18 – Ong. 7 uur 1822 BH2420 Ong. 11 uur 9122 1222 1422 BH9020 BH1220C BH1420 BH9020A 9134 9135 1234 1434 1834 – Ong. 13 uur 1235 1435 BL1430 1835 BL1830 – Ong. 16 uur – BH2433 Ong. 17 uur BH9033 BH1233 BH1433 BH9033A BH1233C * De gebruikstijd varieert afhankelijk van het type accu, de oplaadomstandigheden en de gebruiksomstandigheden. 3-1. Plaatsen of verwijderen van de schuifaccu (Afb. 3) • Plaats de accu in de groef van de behuizing en druk de accu naar binnen. Druk de accu geheel in totdat deze zachtjes vastklikt. • Gebruik geen kracht bij het plaatsen van de schuifaccu. Als de accu niet makkelijk naar binnen schuift, wordt deze verkeerd geplaatst. • Om de schuifaccu te verwijderen, drukt u op de knop aan de voorzijde of beide zijkanten van de accu en trekt u de accu uit de radio. 3-2. Plaatsen of verwijderen van de blokaccu (Afb. 4) • Plaats de blokaccu in de groef van de behuizing en schuif de accu op zijn plaats. • Gebruik geen kracht bij het plaatsen van de blokaccu. Als de accu niet makkelijk naar binnen schuift, wordt deze verkeerd geplaatst. • Om de blokaccu te verwijderen trekt u deze uit de radio. 4. Plaats de klep van het batterijvak terug. 5. Minder vermogen, vervorming, een “stotterend” geluid of het symbool batterij leeg op het LCD-display zijn tekenen dat de accu moet worden vervangen of opgeladen. N.B. De accu kan niet worden opgeladen met de meegeleverde netadapter. 6. Als het symbool batterij leeg verschijnt en een “E” blijft knipperen, moeten de back-upbatterijen worden vervangen. 24 Verwijder de rubberen dop en sluit de adapterstekker aan op het gelijkstroom aansluitcontact aan de voorzijde van de radio. Steek de netadapter in een standaard stopcontact. Bij gebruik van de netadapter wordt de batterijvoeding automatisch uitgeschakeld. Haal de netadapter uit het stopcontact als deze niet wordt gebruikt. De klok instellen 1. De klok kan worden ingesteld met de radio aan- of uitgeschakeld. 2. Als de back-upbatterijen zijn geplaatst, geeft het display “- : - -” weer. 3. Houd de tijdinstelknop langer dan 2 seconden ingedrukt. Het symbool en de urenweergave knipperen en de radio geeft een geluidssignaal weer. 4. Draai aan de afstemknop om de uren in te stellen. 5. Druk op de knop om de ureninstelling te bevestigen, de minutenweergave begint te knipperen. 6. Draai aan de afstemknop om de minuten in te stellen. 7. Druk nogmaals op de knop om het instellen van de klok te voltooien. De radio bedienen Deze radio biedt drie verschillende afstemmethodes – automatisch afstemmen, handmatig afstemmen en stationvoorkeuze. Automatisch afstemmen 1. Druk op de aan-/uitknop om de radio in te schakelen. 2. Kies de gewenste golfband door op de Band-knop te drukken. Draai de flexibele sprietantenne in de juiste richting voor een optimale FM-ontvangst. Voor een optimale AM (MW)-ontvangst kan het nodig zijn om de radio te draaien. Vermijd het gebruik van de radio naast een computerbeeldscherm of andere apparatuur die storingen kan veroorzaken. 3. Druk kort op de Scan-knop (als u de knop langer dan 2 seconden ingedrukt houdt, wordt de tijdsinstelling geactiveerd). Het Scan-symbool begint te knipperen op het LCD-display en de radio zoekt automatisch naar het volgende zendstation. Druk nogmaals op de Scan-knop om op het gevonden station af te stemmen. N.B. Als het gevonden station een stereostation is, wordt het stereosymbool op het display weergegeven. N.B. Als u niet op de Scan-knop drukt nadat de radio een station heeft gevonden, blijft deze zoeken naar de volgende beschikbare stations. 4. Draai aan de volumeknop om het gewenste weergavevolume in te stellen. Wijzigingen in het weergavevolume worden op het LCD-display weergegeven. N.B. Bij het instellen van het weergavevolume kunt u de afstem-/volumeknop indrukken om van de volumeregeling naar de afstemregeling te gaan. 5. Als u de radio wilt uitzetten, drukt u op de aan-/ uitknop. Op het display wordt de melding OFF weergegeven. Handmatig afstemmen 1. Druk op de aan-/uitknop om de radio in te schakelen. 2. Kies de gewenste golfband door op de Band-knop te drukken. Richt de antenne zoals hierboven beschreven. 3. Bij elke draai aan de afstemknop wordt de frequentie met de volgende stap gewijzigd: FM: 50 of 100 kHz AM (MW): 9 of 10 kHz N.B. Als de volumeregeling is geactiveerd, druk dan op de afstem-/volumeknop om de afstemregeling te activeren. 4. Blijf aan de afstemknop draaien totdat de gewenste frequentie op het display wordt weergegeven. 5. Gebruik de volumeregeling om het gewenste weergavevolume in te stellen. 6. Als u de radio wilt uitzetten, drukt u op de aan-/ uitknop. Op het display wordt de melding OFF weergegeven. Stations in het voorkeuzegeheugen opslaan U kunt vijf voorkeuzestations instellen voor elke golfband. 1. Druk op de aan-/uitknop om de radio in te schakelen. 2. Stem af op het gewenste station met n van de hierboven beschreven methoden. 3. Houd de gewenste voorkeuzetoets ingedrukt totdat de radio een geluidssignaal weergeeft. Het voorkeuzenummer verschijnt op het display en het station wordt opgeslagen onder de gekozen voorkeuzetoets. 4. Herhaal deze procedure voor de overige voorkeuzetoetsen. 5. U kunt in het voorkeuzegeheugen opgeslagen stations overschrijven door nogmaals de bovenstaande procedure te volgen. Stations uit het voorkeuzegeheugen oproepen 1. Druk op de aan-/uitknop om de radio in te schakelen. 2. Selecteer de gewenste golfband. 3. Druk kort op de voorkeuzetoets voor het gewenste station. Het voorkeuzenummer en de frequentie van het station verschijnen op het display. De alarmfunctie instellen Als het radioalarm wordt geselecteerd, wordt de radio op de ingestelde tijd ingeschakeld en geeft deze het gekozen station weer. Het radioalarm blijft een uur lang actief tenzij u het uitschakelt door op de aan-/uitknop te drukken. Als u op de aan-/uitknop drukt terwijl het alarm is geactiveerd, wordt het alarm voor 24 uur uitgeschakeld. N.B. Als de batterijen van de radio leeg zijn, kan het radioalarm niet worden geactiveerd. a. Tijd voor radioalarm instellen: 1. Het radioalarm kan worden ingesteld met de radio aan- of uitgeschakeld. 2. Druk kort op de knop voor het radioalarm , het symbool voor het radioalarm begint te knipperen. 3. Houd terwijl het symbool voor het radioalarm knippert de knop langer dan 2 seconden ingedrukt. De radio geeft een geluidssignaal weer. 4. De urenweergave knippert, draai aan de afstemknop om de uren in te stellen en druk vervolgens nogmaals op de knop om de ureninstelling te bevestigen. 5. Volg dezelfde procedure om de minuten in te stellen. Druk op de knop om de alarmtijdinstelling te voltooien. b. Station voor radioalarm instellen: 1. Druk tijdens het instellen van de tijd voor het radioalarm en terwijl het symbool voor het radioalarm knippert op de Band-knop om de gewenste golfband te selecteren en stel met de voorkeuzetoetsen het gewenste station voor het radioalarm in. Druk op de knop om de instelling van het radioalarm te voltooien. Op het display wordt weergegeven. 2. Houd nadat de tijd en het station voor het radioalarm zijn ingesteld de knop voor het radioalarm 2 seconden lang ingedrukt om het alarm in of uit te schakelen. De radio geeft een geluidssignaal weer. Als het radioalarm is ingeschakeld, wordt het symbool weergegeven op het display. N.B. Als er geen nieuw station voor het radioalarm wordt geselecteerd, geeft de radio het laatstgekozen alarmstation weer. De HWS (Humane Wake System)alarmzoemer instellen Als u de HWS-alarmzoemer selecteert, geeft de radio een geluidssignaal weer. De alarmzoemer wordt elke 15 seconden korter en korter weergegeven gedurende 1 minuut, gevolgd door 1 minuut stilte. Daarna wordt de cyclus herhaald. Het HWS-alarm blijft een uur lang actief tenzij het wordt uitgeschakeld door op de aan-/uitknop te drukken. Als u 25 op de aan-/uitknop drukt terwijl het alarm is geactiveerd, wordt het alarm voor 24 uur uitgeschakeld. 1. Het HWS-zoemeralarm kan worden ingesteld met de radio aan- of uitgeschakeld. 2. Druk kort op de knop voor het HWS-zoemeralarm , het symbool begint te knipperen. 3. Houd terwijl het symbool knippert de knop langer dan 2 seconden ingedrukt. De radio geeft een geluidssignaal weer en de urenweergave begint te knipperen. 4. Draai aan de afstemknop om de uren voor het alarm in te stellen en druk vervolgens nogmaals op de knop . De minutenweergave begint te knipperen. 5. Draai aan de afstemknop om de minuten voor het alarm in te stellen en druk vervolgens nogmaals op de knop om de instelling van het HWS-zoemeralarm te voltooien. 6. Houd de knop van het zoemeralarm langer dan 2 seconden ingedrukt om het HWS-zoemeralarm in of uit te schakelen. De radio geeft een geluidssignaal weer. Als het zoemeralarm is ingesteld, wordt het symbool weergegeven op het display. De afstemstap instellen Sluimerfunctie Als de stereo-ontvangst van een FM-station zwak is, kunt u deze verbeteren door de Mono-knop 2 seconden lang ingedrukt te houden. De geluidsweergave is nu niet meer stereo en de stereo-indicator verdwijnt. 1. Druk terwijl het alarm is geactiveerd op elke knop behalve de aan-/uitknop om de sluimerfunctie te activeren. Het radioalarm of HWS-zoemeralarm wordt uitgeschakeld en om de 5 minuten herhaald. 2. Op het display knippert zowel het sluimersymbool als het alarmsymbool. De sluimerfunctie kan actief blijven gedurende het hele uur dat de alarmen werkzaam zijn. Slaapfunctie De slaaptimer schakelt de radio automatisch uit nadat een vooraf ingestelde tijd is verstreken. 1. Houd de aan-/uitknop langer dan 2 seconden ingedrukt. De radio geeft een geluidssignaal weer en op het display verschijnen de beschikbare uitschakeltijden in de volgorde 60-45-30-15-120-9060. Laat de aan-/uitknop los zodra de gewenste uitschakeltijd op het display wordt weergegeven. Het symbool verschijnt op het display en de radio geeft het laatst geselecteerde station weer. 2. Druk om de slaapfunctie te annuleren op de aan-/ uitknop. Het symbool erdwijnt en de radio wordt uitgeschakeld. Displayverlichting Druk op ongeacht welke knop of draai aan de afstem-/ volumeknop om het LCD-display gedurende ca. 15 seconden te verlichten. Tijdens het zoeken naar stations en bij activering van een alarm wordt het display automatisch verlicht. 26 In sommige landen wijken de afstemstappen af van de standaard fabrieksinstellingen. Als u de radio in Europa koopt en deze in Noord-Amerika of sommige ZuidAmerikaanse landen gaat gebruiken, moet u de afstemstappen mogelijk aanpassen voor een juiste werking van de radio. Als u met de radio uitgeschakeld de knop Step/Band langer dan 2 seconden ingedrukt houdt, wordt de huidige FM-afstemstap weergegeven. Houd de knop Step/Band nog eens ca. 5 seconden ingedrukt totdat FM wordt weergegeven, 50 kHz (afstemstap) knippert en de radio een geluidssignaal weergeeft. Draai aan de afstemknop om de afstemstap in te stellen op 100 kHz. Als u na het instellen van de FM-afstemstap nogmaals op de knop Step/Band drukt, geeft het display AM (MW) weer en knippert 9 kHz. Draai aan de afstemknop om de afstemstap in te stellen op 10 kHz. Druk op de knop Step/ Band om het instellen te voltooien. Wisselen tussen stereo en mono Koptelefoonaansluiting Aan de voorzijde van de radio bevindt zich een 3,5 mm koptelefoonaansluiting voor gebruik van een koptelefoon of "oortje". Als u een koptelefoon aansluit, wordt de interne luidspreker automatisch uitgeschakeld. Specificaties: Voedingsvereisten Wisselstroomadapter Batterij Frequentiebereik: Circuitfunctie Luidspreker Uitgangsvermogen DC12 V 700 mA, middenpen positief UM-3 (AA-formaat) x 2 voor back-up Blokaccu: 9,6 – 18 V Schuifaccu: 9,6 – 24 V FM 87,50 – 108 MHz AM (MW) 522 – 1 629 kHz (9 kHz/stap) 7,6 cm (3 inch), 8 ohm 9,6 V : 0,8 W x 2 , 12 V : 1,2 W x 2 14,4 V : 2 W x 2 , 18 V : 3 W x 2 24 V : 5 W x 2 Koptelefoonaansluiting 3,5 mm doorsnede Antennesysteem FM: flexibele sprietantenne AM: staafantenne Afmetingen (B x H x D ) in mm: 263 x 305 x 166 Gewicht 4,2 kg zonder batterijen ENGLISH ITALIANO EC-DECLARATION OF CONFORMITY LE NORME DELLA COMUNITÀ EUROPEA We declare under our sole responsibility that this product is in compliance with the following standards of standardized documents, EN55013 in accordance with Council Directives, 89/336/EEC. Dichiariamo sotto la nostra sola responsabilità che questo prodotto è conforme agli standard di documenti standardizzati seguenti: EN55013 secondo le direttive del Consiglio 89/336/CEE. FRANÇAIS NEDERLANDS DÉCLARATION DE CONFORMITÉ CE EG-VERKLARING VAN CONFORMITEIT Nous déclarons sous notre entière responsabilité que ce produit est conforme aux normes des documents standardisés suivants, EN55013 conformément aux Directives du Conseil, 89/336/CEE. Wij verklaren hierbij uitsluitend op eigen verantwoordelijkheid dat dit produkt voldoet aan de volgende normen van genormaliseerde documenten, EN55013 in overeenstemming met de richtlijnen van de Raad 89/336/EEC. DEUTSCH ESPAÑOL CE-KONFORMITÄTSERKLÄRUNG DECLARACIÓN DE CONFORMIDAD DE LA CE Hiermit erklärt wir unter unserer alleinigen Verantwortung, daß dieses Produkt gemäß den Ratsdirektiven 89/336/EWG mit den folgenden Normen von Normendokumenten übereinstimmen: EN55013 Declaramos bajo nuestra sola responsabilidad que este producto cumple con las siguientes normas de documentos normalizados, EN55013 de acuerdo con las directivas comunitarias, 89/336/EEC. Yasuhiko Kanzaki CE 2005 Director Directeur Direktor Amministratore Directeur Director MAKITA INTERNATIONAL EUROPE LTD. Michigan Drive, Tongwell, Milton Keynes, Bucks MK15 8JD, ENGLAND Responsible manufacturer: Fabricant responsable : Verantwortlicher Hersteller: Produttore responsabile: Verantwoordelijke fabrikant: Fabricante responsable: Makita Corporation Anjo Aichi Japan 64 PORTUGUÊS SUOMI DECLARAÇÃO DE CONFORMIDADE DA CE VAKUUTUS EC-VASTAAVUUDESTA Declaramos sob inteira responsabilidade que este produto obedece às seguintes normas de documentos normalizados, EN55013 de acordo com as directivas 89/336/CEE do Conselho. Yksinomaisesti vastuullisina ilmoitamme, että tämä tuote on seuraavien standardoitujen dokumenttien standardien mukainen, EN55013 neuvoston direktiivien 89/336/EEC mukaisesti. DANSK ΕΛΛΗΝΙΚΑ EU-DEKLARATION OM KONFORMITET ∆ΗΛΩΣΗ ΣΥΜΜΟΡΦΩΣΗΣ ΕΚ Vi erklærer hermed på eget ansvar, at dette produkt er i overensstemmelse med de følgende standarder i de normsættende dokumenter, EN55013 i overensstemmelse med Rådets Direktiver, 89/336/EEC. ∆ηλώνουµε υπ την µοναδική µας ευθύνη τι αυτ το προϊν βρίσκεται σε Συµφωνία µε τα ακλουθα πρτυπα τυποποιηµένων εγγράφων, EN55013 σύµφωνα µε τις Οδηγίες του Συµβουλίου 89/336/EEC. SVENSKA POLSKI EG-DEKLARATION OM ÖVERENSSTÄMMELSE Under eget ansvar deklarerar vi härmed att denna produkt överensstämmer med följande standardiseringar för standardiserade dokument, EN55013 i enlighet med EGdirektiven 89/336/EEC. DEKLARACJA ZGODNOŚCI ELEKTROMAGNETYCZNEJ Oświadczamy na własną odpowiedzialność, że omawiany wyrób jest zgodny z następującymi normami dokumentów normalizacyjnych EN55013 zgodnie z Dyrektywami 89/336/ EEC Rady. NORSK ÓÒÔÔËÊÁ EUs SAMSVARS-ERKLÆRING ‚„ËÈfiÓfiÙÊ˝=Ï=ÔÏÏÒ‡„ÒÔÒ‡ÊÊ=„ Vi erklærer på eget ansvar at dette produktet er i overensstemmelse med følgende standard i de standardiserte dokumenter: EN55013, i samsvar med Råds-direktivene, 89/336/EEC. ÌþŠ=Þ˛Ğ³=¹þˇ¹²ŁšÞÞ³ć=þ²Łš²¹²ŁšÞÞþ¹²ş=ýŞ=ž˛ČŁÝČšýI= ₣²þ=Š˛ÞÞþš=¦žŠšÝ¦š=¹þþ²Łš²¹²Ł³š²=¹ÝšŠ³ćğ¦ý= ¹²˛ÞŠ˛×²˛ý=bkRRMNP=Ł=¹þþ²Łš²¹²Ł¦¦=¹=‚¦×šð²¦Ł˛ý¦= ÔþŁš²˛=UVLPPSLbb`K= Yasuhiko Kanzaki CE 2005 Director Direktør Direktör Dyrektor Direktor Johtaja ∆ιευθυντής ‚¦×šð²þ× MAKITA INTERNATIONAL EUROPE LTD. Michigan Drive, Tongwell, Milton Keynes, Bucks MK15 8JD, ENGLAND Fabricante responsável:: Ansvarlig fabrikant: Ansvarig tillverkare: Producent ponoszący odpowiedzialność: Ansvarlig produsent: Vastaava valmistaja: Yπεύθυνος κατασκευαστής: ϲŁš²¹²ŁšÞÞŞÐ=¦žłþ²þŁ¦²šÝşW 65 ENGLISH ITALIANO EC-DECLARATION OF CONFORMITY LE NORME DELLA COMUNITÀ EUROPEA We declare under our sole responsibility that this product is in compliance with the following standards of standardized documents, EN60950, EN61558 in accordance with Council Directives, 73/23/EEC. Dichiariamo sotto la nostra sola responsabilità che questo prodotto è conforme agli standard di documenti standardizzati seguenti: EN60950, EN61558 secondo le direttive del Consiglio 73/23/CEE. FRANÇAIS NEDERLANDS DÉCLARATION DE CONFORMITÉ CE EG-VERKLARING VAN CONFORMITEIT Nous déclarons sous notre entière responsabilité que ce produit est conforme aux normes des documents standardisés suivants, EN60950, EN6155 conformément aux Directives du Conseil, 73/23/CEE. Wij verklaren hierbij uitsluitend op eigen verantwoordelijkheid dat dit produkt voldoet aan de volgende normen van genormaliseerde documenten, EN60950, EN61558 in overeenstemming met de richtlijnen van de Raad 73/23/EEC. DEUTSCH ESPAÑOL CE-KONFORMITÄTSERKLÄRUNG DECLARACIÓN DE CONFORMIDAD DE LA CE Hiermit erklärt wir unter unserer alleinigen Verantwortung, daß dieses Produkt gemäß den Ratsdirektiven 73/23/EWG mit den folgenden Normen von Normendokumenten übereinstimmen: EN60950, EN61558 Declaramos bajo nuestra sola responsabilidad que este producto cumple con las siguientes normas de documentos normalizados, EN60950, EN61558 de acuerdo con las directivas comunitarias, 73/23/EEC. Yasuhiko Kanzaki CE 2005 Director Directeur Direktor Amministratore Directeur Director MAKITA INTERNATIONAL EUROPE LTD. Michigan Drive, Tongwell, Milton Keynes, Bucks MK15 8JD, ENGLAND Responsible manufacturer: Fabricant responsable : Verantwortlicher Hersteller: Produttore responsabile: Verantwoordelijke fabrikant: Fabricante responsable: Makita Corporation Anjo Aichi Japan 66 PORTUGUÊS SUOMI DECLARAÇÃO DE CONFORMIDADE DA CE VAKUUTUS EC-VASTAAVUUDESTA Declaramos sob inteira responsabilidade que este produto obedece às seguintes normas de documentos normalizados, EN60950, EN61558 de acordo com as directivas 73/23/CEE do Conselho. Yksinomaisesti vastuullisina ilmoitamme, että tämä tuote on seuraavien standardoitujen dokumenttien standardien mukainen, EN60950, EN61558 neuvoston direktiivien 73/23/EEC mukaisesti. DANSK ΕΛΛΗΝΙΚΑ EU-DEKLARATION OM KONFORMITET ∆ΗΛΩΣΗ ΣΥΜΜΟΡΦΩΣΗΣ ΕΚ Vi erklærer hermed på eget ansvar, at dette produkt er i overensstemmelse med de følgende standarder i de normsættende dokumenter, EN60950, EN61558 i overensstemmelse med Rådets Direktiver, 73/23/EEC. ∆ηλώνουµε υπ την µοναδική µας ευθύνη τι αυτ το προϊν βρίσκεται σε Συµφωνία µε τα ακλουθα πρτυπα τυποποιηµένων εγγράφων, EN60950, EN61558 σύµφωνα µε τις Οδηγίες του Συµβουλίου 73/23/EEC. SVENSKA POLSKI EG-DEKLARATION OM ÖVERENSSTÄMMELSE Under eget ansvar deklarerar vi härmed att denna produkt överensstämmer med följande standardiseringar för standardiserade dokument, EN60950, EN61558 i enlighet med EG-direktiven 73/23/EEC. DEKLARACJA ZGODNOŚCI ELEKTROMAGNETYCZNEJ Oświadczamy na własną odpowiedzialność, że omawiany wyrób jest zgodny z następującymi normami dokumentów normalizacyjnych EN60950, EN61558 zgodnie z Dyrektywami 73/23/EEC Rady. ÓÒÔÔËÊÁ NORSK ‚„ËÈfiÓfiÙÊ˝=Ï=ÔÏÏÒ‡„ÒÔÒ‡ÊÊ=„ EUs SAMSVARS-ERKLÆRING Vi erklærer på eget ansvar at dette produktet er i overensstemmelse med følgende standard i de standardiserte dokumenter: EN60950, EN61558, i samsvar med Rådsdirektivene, 73/23/EEC. ÌþŠ=Þ˛Ğ³=¹þˇ¹²ŁšÞÞ³ć=þ²Łš²¹²ŁšÞÞþ¹²ş=ýŞ=ž˛ČŁÝČšýI= ₣²þ=Š˛ÞÞþš=¦žŠšÝ¦š=¹þþ²Łš²¹²Ł³š²=¹ÝšŠ³ćğ¦ý= ¹²˛ÞŠ˛×²˛ý=bkSMVRMI=bkSNRRU=Ł=¹þþ²Łš²¹²Ł¦¦=¹= ‚¦×šð²¦Ł˛ý¦=ÔþŁš²˛=TPLOPLbb`K= Yasuhiko Kanzaki CE 2005 Director Direktør Direktör Dyrektor Direktor Johtaja ∆ιευθυντής ‚¦×šð²þ× MAKITA INTERNATIONAL EUROPE LTD. Michigan Drive, Tongwell, Milton Keynes, Bucks MK15 8JD, ENGLAND Fabricante responsável:: Ansvarlig fabrikant: Ansvarig tillverkare: Producent ponoszący odpowiedzialność: Ansvarlig produsent: Vastaava valmistaja: Yπεύθυνος κατασκευαστής: ϲŁš²¹²ŁšÞÞŞÐ=¦žłþ²þŁ¦²šÝşW 67 Makita Corporation Anjo, Aichi, Japan