1
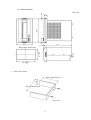
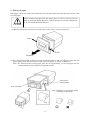
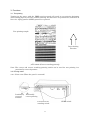
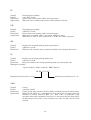
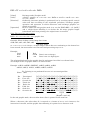
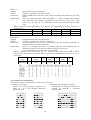
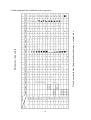
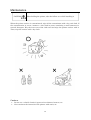
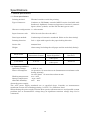
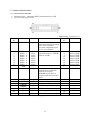
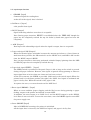
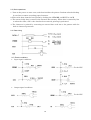
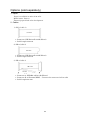
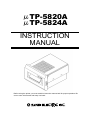
μTP-5820A
μTP-5824A
INSTRUCTION
MANUAL
Before using the printer you must read this instruction manual well for proper operation. Be
sure to save this manual and keep it at hand.
Precautions on Handling the Printer
When incorporating our product in another system or unit, the system must be so
designed so that the customer's final product and system are not defective due to any faults
caused by our product and the corresponding delivery must be performed.
When incorporating our product in another system or unit, please consult with our sales
office.
We shall not assume any responsibility with respect to damage and loss occurring due to
use of the product without our consultation.
If a fault occurs for any reason, please be aware that the product shall basically be
replaced up to a limit such that the extent of replacement does not exceed the product value
or its equivalent.
In addition, we shall confirm the faults and then take swift action when replacing the
product in question.
Contents
Before Use
1
Parts Designation
3
Features
3
How to Use
4
1. Preparation......................................................................................... 4
1-1.Unpacking................................................................................. 4
1-2.Part functions ............................................................................ 4
1-3.Outer dimensions...................................................................... 5
2.Setting roll paper ................................................................................. 6
3.Functions............................................................................................. 8
3-1.Test printing .............................................................................. 8
3-2.Printing mode............................................................................ 8
3-2-1.Front view......................................................................... 8
3-2-2.Setting correct standing printing
and reversed standing printing ............................. 9
3-3.Control codes............................................................................ 9
3-4.Character font configuration.................................................... 12
4.Data code table ................................................................................. 13
Maintenance
14
Specifications
15
1. General specifications...................................................................... 15
1-1. Printer specifications.............................................................. 15
1-2. Operating conditions .............................................................. 15
2. Interface specifications..................................................................... 17
2-1. I/O connection terminals ........................................................ 17
2-2. Input/output functions............................................................. 18
2-3. Basic operations .................................................................... 19
2-4. Data timing............................................................................. 19
2-5. Electric conditions .................................................................. 19
Options
20
Before use
CAUTION (Observe precautions for safe use)
Just after printing, the printer motor becomes hot and dangerous. Do not touch it
directly.
Set the operating power supply to 5Vdc±5%. An extremely high current flow may
cause a fire.
Precautions on Use
•
•
•
•
•
•
•
•
Use the specified DC power supply (+5Vdc 3A).
An extremely high or low voltage may cause a malfunction. Take care not to mix excessive
noise in the power line. When wiring the power line, fully consider the line impedance.
Printing with no sheet loaded may cause a malfunction. Avoid such unloaded printing.
Do not drop or bump the printer.
Absolutely avoid disassembling or repairing the printer yourself.
Do not moisten the printer with water.
When using the printer, do not remove the panel.
Pulling a printing sheet from the insertion slot in the reverse direction may cause a
malfunction.
If an abnormality is found in the printer (when a strange sound or odor is issued),
immediately turn off the power supply. Determine whether or not the abnormality
remains and consult with the shop where you purchased the product or us.
Precautions on Handling Thermal-Sensitive Paper
The thermal-sensitive paper has been specially treated with a chemical agent and is colored
by thermal chemical reaction. Fully heed the following:
• Store paper in a dry, cool, or dark place.
• Do not scrub paper hard with a solid substance.
• Do not place it near an organic solvent.
• Do not leave paper in contact with PVC film, an eraser, or adhesive tape for a long period
of time.
• Do not overlap it with diazo paper or wet copy paper just after copying.
• When gluing paper, do not use chemical paste.
• Adhesive tape may discolor thermal-sensitive paper. Use double-faced tape to join the
rear surfaces.
• Touching paper with a sweaty hand causes your fingerprint to be marked on the paper or
the record to become blurred.
• When using paper as a receipt for a customer, clarify that it is thermal-sensitive paper
and print the precautions for storage on the sheet.
• Use specified thermal-sensitive paper.
1
Location
l Use your printer in a horizontal to vertical place.
l Using or storing your printer in the following places may cause a malfunction.
Avoid dusty places or a
places with excessive
particulates.
Avoid places whose
temperature is 40°C or
higher.
Avoid places with much
water or oil. particulates.
Avoid places subjected to
strong vibration.
Avoid places whose
temperature is below 0°C
Avoid places where the
relative humidity is 80%
or greater.
Avoid places where
electromagnetic noise or
corrosive gas is generated.
Avoid places subjected to
direct sunlight.
Avoid places subject to abrupt
temperature changes and where
condensation can occur.
l When using your printer in a very dusty location, attach the dust-proof cover to the
printer, locate an air ventilation hole in the system you incorporate the printer in, and
take other measures against dust.
2
Parts Designation
Mounting screw for main body fitting
Main body case
Main body
Panel
Main body fitting
PAPER LED
(No sheet LED)
Lock lever
Paper cutter
Printer rear side
FEED switch
. I/O connector
Features:
uTP-5820A/24A incorporates data memory and a character generator. It is an ultra-small
thermal printer that prints data input from a computer or the other host systems via a
thermal-sensitive printing method.
It has the following features:
Design/
mechanism
The printer is contained in a compact case and can be mounted in a
horizontal to vertical location. It needs little space for mounting owing to
its small size and one-touch operation.
Printing
The thermal-sensitive printing method eliminates the need for
consideration of the surroundings and issues almost no noise during
operation.
The character size is 7 x 5 in and they are clear.
Functions
and Power
supply
The printer enables positionally correct or reversed printing as well as
double-sized printing. It stores roll paper inside the main body. It is
available with a no-sheet sensor.
It allows test printing. The operating voltage is +5Vdc±5%. It applies
no-load with the system with low power consumption. Further, it is highly
reliable because it is available with a power protection circuit.
3
How to Use
1. Preparation
1-1. Unpacking
After unpacking the product, ensure that the main body and accessories are all found.
Main body (μTP-5820A or 24A)
1
Main body fitting
1
Main body fitting mounting screw
2
Thermal-sensitive paper
(incorporated in the main body, P-58-15)
1 volume
Instruction Manual
1 volume
A variety of thermal-sensitive paper is available from us.
1-2 Part functions
•
FEED switch
Pressing this switch consecutively feeds paper while it is pressed.
* Turning on the power with the switch pressed performs test printing.
• PAPER LED
Paper end (PE) LED that goes on when no roll paper is found.
• Sheet cutter
Used for cutting roll paper
* Paper can be cut by slightly lifting roll paper up and pulling it.
4
1-3. Outer dimensions
Unit: mm
Mount hole dimensions
•
Main body fitting
Inner dimension:111.5
Inner dimension:99
Unit: mm
5
2. Setting roll paper
Roll paper can be set inside the main body. Pull the main body out from the front surface and
set roll paper.
When setting roll paper with the power ON, be sure to use the pull-out
knob to draw the board. Because a small amount of current is flowing in
it, do not touch the board directly.
Caution
(1) While pushing the lock levers on both sides of the panel, remove the panel.
Push
Push
Remove
(2) Use the pull-out knob to draw the body inside the printer, and set roll paper onto the roll
paper fixing shaft. (Horizontally cut the tip of roll paper as shown in Figure 1.)
Note: The pasted section of roll paper does not accept printing, so cut roll paper for the
corresponding section without the pasted section.
Roll paper
fixing shaft
Pull-out knob
Note: Properly set roll paper while
checking its direction.
Fig. 1
6
(3) Pull out roll paper to this side and turn on the power supply. While pressing the FEED
switch, insert the tip of roll paper with it straight so that it can be set horizontally with the
wall surface of the sheet insertion slot.
Note: If paper is bent, it may cause jams.
If roll paper is not engaged with the roller, no paper is fed. Insert paper deep enough
to reach the roller.
Continuously press the FEED switch until roll paper comes out from the printer head section.
Inner case
FEED switch
Printer head
Main body case
Roller
Printing surface
Sheet insertion slot
Roll paper
Roll paper fixing shaft
(4) Place the tip of roll paper that has come out on the outer side of the sheet cutting outlet of
the panel and set the inner case and panel in the case.
7
3. Functions
3-1. Test printing
Turning on the power with the FEED switch pressed will result in test printing beginning
after feeding paper by one line without printing. All characters are printed once, and then 10
lines of a zigzag pattern (0FEH) patterns are printed.
Test printing sample
Paper feeding
direction
μTP-5820A (Correct standing printng)
Note: The correct and reverse standing printing switch can be used for test printing in a
positionally reversed position.
3-2. Printing mode
3-2-1. Front view (When the panel is removed)
Positionally
reversed
printing
Positionally
correct printing
Correct/reverse
standing switch
8
FEED switch
3-2-2 Setting correct standing printing and reversed standing printing
After turning power ON during initialization, the printer checks the correct and reverse
standing printing switch on the left side of the circuit board to set correct or reversed
standing printing.
Note: When changing the setting, enter the reset or turn OFF the power supply once.
Neglecting to do this does not change the setting even by changing the switch.
Correct standing printing .............Correct/Reversed standing printing switch Correct
(Right side towards you)
Reversed standing printing ...........Correct/Reversed standing printing switch Reversed
(Left side towards you)
Printer
Printer
Correct standing printing
3.3
Paper feeding
direction
Reversed standing printing
Control codes
The μTP-58 series provides the following control commands.
Function code
Name
LF
CR
Line feed
Carriage return
Double-size enlarged
SO
printing mode specification
Double-size enlarged mode
SI
reset
CAN
Cancel
ESC+”S”+n1+n2+n3+n4 Bit-image graphic
Special character
ESC+”c”
specification
International character
ESC+”R”+n
specification
9
Hexadecimal
code
<0A>
<0D>
Decimal
code
<10>
<13>
Reference
page
10
10
<0E>
<14>
10
<0F>
<15>
10
<18>
<1B><53>
<24>
<27><83>
10
11
<1B><63>
<27><99>
12
<1B><52>
<27><82>
12
LF
[Name]
[Code]:
[Function]:
[Operation]:
Printing-paper feeding
<0A> H or <10>D
Prints data in the printer buffer and feeds paper.
When no data is found in the printer buffer, paper is fed only.
CR
[Name]
[Code]
[Function]
[Operation]
Printing/paper feeding
<0D>H or <13>D
Prints data in the printer buffer and feeds paper.
When data preceding <CR> is not found, nothing is done,
When data + <CR> + <LF>, prints data + <CR>, and <LF> is ignored.
SO
[Name]
[Code]
[Function]
Double-size enlarged printing mode specification
<0E>H or <14>D
With the code entered, data is printed in double-size enlarged characters.
SI
[Name]
Double-size enlarged printing mode reset
[Code]
<0F>H or <15>D
[Function]
Resets the double-size enlarged printing mode by entering the code.
[Example of coding]
Lprint chr$(14);" ABC"; chr$(15);" DEF";chr$(13)
ABCDEF
Enlarged size characters (7 x10)
Ordinary size characters (7 x 5)
CAN
[Name]
[Code]
[Function]
[Operation]
Cancel
<18>H or <24>D
Clears all the data stored in the data buffer and waits for the next data entry.
When SO, SI, ESC+"S" + n1n2n3n4 has been entered in the data buffer, the
function is cleared. However, ESC +"c", ESC +"R" + n performs a flag
operation when this command is entered, it is not entered in the data buffer,
so that the previous state is not resumed even when a CAN code has been
entered.
10
ESC +"S" + n1 + n2 + n3 + n4 + DATA
[Name]
[Code]
Bit image mode (Graphic mode)
<1B>H + <53>H + n1 + n2 + n3 + n4 + DATA or <27>D + <83>D + n1 + n2 +
n3 + n4 + DATA
[Function]
Ordinarily, character printing is performed, but by receiving specific control
codes and data according to the stipulated procedure, bit-image graphic
operation and operation in which characters and bit-image graphics are
mixed are possible.
[Operation]
How to control the soft graphic mode is to use the [ESC(1BH) + "S" (53H)"]
and a 4-digit figure following it to declare the bit image graphic length
beforehand. After data printing, the original state is resumed.
Note: The inter-line space exists.
ESC + "S" + n1 + n2 + n3 + n4 + graphic data
Example: When feeding 192 bit image data items
1BH, 53H, 30H, 31H, 39H, 32H, - - - - - - - - - - - - 192 data items
n1 + n2 + n3 + n4 is always a 4-digit integer. When data not conforming to the format has
been entered, the instruction is not executed and processing stays as is.
Example:
Good
0012
0007
Bad
00AB
024
Data is not an integer.
Data is not a 4-digit figure.
The relationship between the graphic data bit and printer head dot is as shown below.
An example of the sof graphic mode is as shown below.
Example: 41H(A), 42H(B), 1BH(ESC), 53H(S), 30H(0), 30H(0)
30H(0), 33H(3), 41H(A), 42H(B), 43H(C), 43H(C)
◎ : Printing is not performed because it is an unassigned dot.
(Data) (Dot)
D0
D1
D2
D3
D4
D5
D6
D7
-
Unassigned
First dot
Second dot
Third dot
Forth dot
Fifth dot
Sixth dot
Seventh dot
○○○○○○○○○○○○○○○◎○◎○○○○○○○○
○○●○○○○●●●●●○○○○●●○●●●○○○○
○●○●○○○●○○○○●○○○○○●○○○●○○○
●○○○●○○●○○○○●○○○○○●○○○○○○○
●○○○●○○●●●●●○○○○○○●○○○○○○○
●●●●●○○●○○○○●○○○○○●○○○○○○○
●○○○●○○●○○○○●○○●●●●○○○●○○○
●○○○●○○●●●●●○○○○○○○●●●○○○○
※※※
↑
(Graphic section)
In the soft graphic mode, data overflow from a line is printed on the next line.
When a character code other than "S" is entered or a format of n1 to n4 is incorrect, the
instruction is invalid, and the graphic data following it is printed as a character code.
11
ESC +"c"
[Name]
[Code]
[Function]
Special character specification
<1B>H + <634>H or <27>D + <99>D
F9H to FDH in the character code table are changed as shown in the table
below.
[Operation]
This is a toggle operation. Executing ESC + "c" again resumes the original
state. However, this change is performed every one line. In one line, "市"
and "Σ”, or "区" and "μ"、etc. cannot be used. It is not influenced by the CAN
code.
When a character code other than "c" is entered, the instruction is invalid, and data is
printed as is.
Code
H9H
FAH
FBH
FCH
FDH
Character at initial time
市
区
町
村
人
ESC + "c"
Σ
μ
Ω
π
δ
ESC+"R"+n
[Name]
[Code]
[Function]
International character specification
<1B>H + <52>H +n or <27>D + <82>D + n
The international character set is changed. Part of the character code table is
changed with set country characters.
[Operation]
Once it is changed, the state is retained until the next command to be
changed is entered. It is also not influenced by the CAN code.
Upon initialization, the character set is JAPAN.
When a character code other than "R" or a numeric value other than n=0H to 6H is
entered, the instruction is invalid. Data is printed in international characters as set
previously.
Country
Country
Country
Country
n
N
n
n
name
name
name
name
JAPAN
0
GERMANY
2
SWEDEN
4
U.S.A
6
FRANCE
1
U.K.
3
ITALY
5
3-4 Character font configuration
The character font is configured as 8 x 6 dots as one unit.
(2) Double-size enlarged character
(1) Ordinary character
Almost all of the character patterns are
The double-size enlarged character is
made of 7 x 5. The illegible character
printed by printing a character
pattern twice.
pattern is 7 x 6.
○○○○○○
○○●○○○
○●○●○○
●○○○●○
●○○○●○
●●●●●○
●○○○●○
●○○○●○
○○○○○○
●●●○○○
●○●○○○
●●●●●●
●○●○●○
●●●○●○
○○○○●○
○○○●●○
○○○○○○○○○○○○
○○○○●●○○○○○○
○○●●○○●●○○○○
●●○○○○○○●●○○
●●○○○○○○●●○○
●●●●●●●●●●○○
●●○○○○○○●●○○
●●○○○○○○●●○○
12
Low-order
bit
High-order
bit
The character inside the parentheses denotes a control code.
Character code table
4. Data code table (An undefined code is ignored.)
13
Maintenance
CAUTION
When holding the printer, take the fullest care while handling it.
When the printer surface is contaminated, wipe off the contaminant with a dry soft cloth. If
the contamination is severe, immerse a soft cloth in water containing a small amount of a
neutral detergent. Wry the water out of the cloth well and wipe the printer surface with it.
Then, wipe the surface with a dry cloth.
Cautions:
•
•
Do not use a volatile chemical agent such as thinner, benzene, etc.
Never moisten the internals of the printer with water, etc.
14
Specifications
1. General specifications
1-1. Printer specifications
Printing method:
Thermal-sensitive serial dot printing
Type of character:
Conforms to JIS-C6220, extended ASCII version (available with
katakana), alphabetic characters (uppercase, lowercase), numeric
figures, kana, symbols, and the like for 250 types in total
Character configuration: 7 x 5 dot matrix
Input character code:
JIS 8-bit code (See the code table.)
Data input method:
Conforming to Centronics standards. (Refer to the data timing).
Printing direction:
Left -> right with regard to the paper feeding direction.
Service life:
500,000 lines
Weight:
About 490 g (including the roll paper and the main body fitting).
Model name
Character
dimensions (in mm)
μTP-5820A
2.4×1.5
μTP-5824A
2.4×1.3
Number of character
digits (digits/line)
20
2-dot space
24
2-dot space
Printing speed
(lines/sec.)
About 0.8
About 0.8
1-2. Operating conditions
Operating voltage:
Power consumption:
Working temperature:
Storage temperature:
Allowable humidity:
+ 5Vdc ± 5%
At operation: No more than 3.0A (instantaneous maximum value
during printing)
At wait: About No more than about 50 mA
0 to + 50℃
-40 to + 60℃
40℃ 85%
About the power supply:
The μ TP power supply standards are as specified above. Consider an instantaneous
maximum current of 3.0A during printing. (+5V-VP, Vcc, GND・four lines)
When sharing the power supply with the host system, take measures to avoid possible system
problems due to instantaneous voltage drop (A significant transient voltage drop can be
estimated).
15
l POWER ON conditions of the internal circuit
With power ON, the voltage level is detected and the circuit is initially reset under the
following conditions:
* Time cycle
Power On
Detection
Reset
l Resetting conditions with POWER DOWN during operation
If power voltage fluctuation arises as follows, the circuit is reset like with POWER ON
RESET:
Reset
16
2. Interface Specifications
2-1. I/O connection terminals
•
•
Connector plug 4234-0001LCSC (manufactured by 3M)
I/O connector signal layout
______________________
Terminal
No.
1
3
5
7
9
11
13
15
17
19
21
Name
Direction
_________________
Input
STROBE
DATA
DATA
DATA
DATA
DATA
DATA
DATA
DATA
0
1
2
3
4
5
6
7
_________
ACK
BUSY
Input
Input
Input
Input
Input
Input
Input
Input
Output
is Active Low)
Name
Return GND
Return GND
Return GND
Return GND
Return GND
Return GND
Return GND
Return GND
Return GND
NC
22
NC
Output
Input
Signal indicating whether
or not data is acceptable
With the fall of the
STROBE signal, data is
accepted and then becomes
Active.
Paper end signal
Paper feed signal
−
−
−
−
25
_______________
Output
Error processing signal
−
−
26
_______________
Input
Initialize signal
−
−
28
30
32
34
VP
GND
23
24
PE
____________
FEED
ERROR
RESET
Vcc
GND
Output
( Signal name
Description
Terminal
No.
With the fall of the
2
command signal for reading
data, data is latched.
The pulse amplitude must
be 0.5 μs or higher.
8-bit parallel data signal.
4
When the data is 1, "HIGH".
6
When 0, "LOW".
8
10
12
14
16
18
Data input end signal
20
27
Input
+5Vdc circuit power supply
29
Input
Power supply GND
31
33
VP
Input
+5Vdc printer power supply
Note: Be sure to connect all the power-supply terminals (27 to 34.)
17
VP
2-2. Input/output functions
________________
1. STROBE [input]
Command signal for reading data
At the fall of the signal, data is latched.
2. DATA0 to 7 [Input]
8-bit parallel data signal
3. BUSY [Output]
Signal indicating whether or not data is acceptable.
______________
___________
Note: During paper insertion, READY is established after the FEED OFF though the
paper has not completely reached the top. So shake by hand after paper has been fed
completely.
_________
4. ACK [Output]
Data input end acknowledge signal. After the signal is output, data is acceptable.
5. Paper end signal (PE) [Output]
When the thermal paper remainder becomes the amount equivalent to 7 lines (about 27
mm) from the top section, the PE terminal is at the "HIGH" level, and LED is ON. At this
time, the BUSY output is HIGH.
Note: At paper insertion, data entry performed unloaded (empty) printing when the LED
is OFF and paper has not completely reached the top.
___________
6. Paper feed signal (FEED)
[Input]
The FEED switch is provided at the panel. Paper is fed as long as the switch is pressed
during roll paper insertion. However, this signal is ignored during printing or when an
input signal data of no less than one character has been received.
___________
At the I/O connector, the FEED is provided. (dedicated to the switch input) When the
printer head is in the home position (far right), the "LOW" level signal is confirmed and
paper is fed by line. While the switch is ON, paper is fed.
It requires the 100 μs or more duration of the LOW level.
______________
7.Error signal (ERROR) [Input]
When an error condition (paper clogging and the like) occurs during printing or paper
feeding, output to the printer mechanism is turned OFF.
In addition, the error output is at "LOW" level, and the BUSY output is at the "HIGH"
level. Data is not receivable. To reset the error state, enter the RESET signal or turn OFF
the power supply once.
_____________
8. Reset (RESET) [Input]
Like in POWER ON resetting, the printer is initialized.
All the input data is cleared by the LOW level signal, and paper is fed by line.
18
2-3, Basic operations
1. Turn on the power or enter reset, and then initialize the printer. Perform unloaded feeding
by one line to remove recording paper looseness.
________________
_________
2. Enter 8-bit data from the host system by shaking the STROBE and BUSY or ACK.
3. The entered 8-bit data is stored in the internal data memory. When data is entered by line
or when the <CR>, <LF> code data has been entered, printing is performed.
4. The character is printed by converting an entered data code into a dot pattern with the
built-in character generator.
2-4. Data timing
2-5. Electric conditions
•
Input signal conditions
To the CPU
•
Output signal conditions
To the CPU
19
Options (sold separately)
1. Paper
Paper is available in units of 20 rolls.
Model name: P-58-15
Thermal paper black color development
2. Cables
1). PK-1 (cable 1)
34-core
• Connector: HIF3BA-34D-2.54R (Hirose)
• Cable length: 500 mm
2) PK-2 (cable 2)
34-core
• Connector: HIF3BA-34D-2.54R (Hirose)
• Cable length: 500 mm
3) PK-3 (cable 3)
26-core
8-core
• Connector A: HIF3BA-34D-2.54R (Hirose)
• Connector B: 57F-40360 (DDK) ... Pressure-fit connector for flat cable
• Cable length:500 mm
20
For inquiries:
171-0014
Taisou Ikebukuro Building 5F,
2-61-1, Ikebukuro, Toshima-ku, Tokyo, Japan
Phone: +81-3-3986-0646 (representative)
Fax: +81-3-3988-5876
Opens at 9:00 am and closes at 5:00 pm
(except 12:00 to 1:00)
(Closed on Saturday, Sunday and national
holidays.)
V1.0 0109
21