1
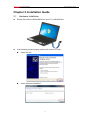
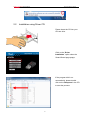
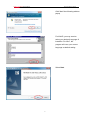
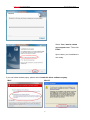
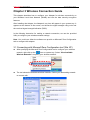
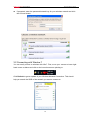
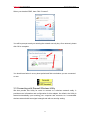
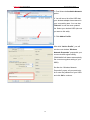
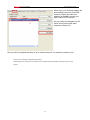
Wireless N Adapter RNX-MiniN2 Quick Installation Guide Wireless N Adapter RNX-MiniN2 Quick Installation Guide Chapter 1 Overview Thank you for choosing Rosewill’s 802.11n Wireless USB adapter – RNX-MiniN2. This chapter is to introduce you more about this Wireless Adapter. 1.1 Package Content Before getting started, please verify that your package includes the following items: 1. Rosewill 802.11n Wireless USB Adapter x 1 2. Quick Installation Guide x 1 3. Resource CD x 1, including: z Rosewill Wireless N Client Utility and Driver z User Manual Note: Make sure that the package contains the above items. If any of the listed items are damaged or missing, please contact with your distributor. 1.2 Overview of the Product The adapter is an 802.11n client device; it is designed to provide a high-speed and unrivaled wireless performance for your computer or notebook. With a faster wireless connection, you can get a better Internet experience, such as downloading, gaming, video streaming and so on. With the 802.11n technology, the RNX-MiniN2 allows high packet transfer rate of up to 300Mbps for maximum download throughput. It can also interoperate with other wireless (802.11b, 802.11g). The adapter supports WEP, WPA and WPA2 encryption to prevent outside intrusion and protect your personal information from being exposed. The adapter is easy to install and manage. The Quick Setup guides you step-by-step through the installation process; the Rosewill Wireless N Client Utility helps you create a wireless connection immediately. With unmatched wireless performance, reception, and security protection, the RNX-MiniN2 is also designed to be one of the smallest size wireless adapters that is capable at the rate of 300 Mbps upload and 300 Mbps download so you can use without any interference. It is the best choice for easily adding or upgrading wireless connectivity to your notebook and computer. 2 Wireless N Adapter RNX-MiniN2 1.3 z Quick Installation Guide Features Comply with IEEE 802.11b/g/n standards with up to 300Mbps data transfer speed. z Thumb size design with USB 2.0/1.1 interface. z Supports QoS Enhancement (WMM) for multimedia applications’ smoothness z High level of security with Wireless encryption of 64/128-bit WEP, WPA, WPA2, and IEEE802.1x functions. z Runs under most operating systems: Windows 2K/XP/Vista/7 (32/64 bits), Mac OSX 10.4~10.6 and Linux 2.6.x. z 1.4 Support One-Click WPS (WiFi Protected Setup) connection. Product Specification Chipset Standard IEEE 802.11n, IEEE 802.11g, IEEE 802.11b, IEEE 802.3, IEEE 802.3u Bus Type USB 2.0 Type A Frequency Band 2.412~2.462GHz Data Rate Output Power Receive Sensitivity Security Antenna OS support Dimension Temperature Humidity 1.5 Realtek RTL8192CU Max 300Mbps 11b: 17±1 dBm , 11g: 13±1 dBm, 11n: 12±1 dBm 802.11b Typical -84dBm 802.11g Typical-70dBm 802.11n Typical-66dBm 64/128-bit WEP, WPA (TKIP with IEEE 802.1x), WPA2, AES WPS button Internal Antenna (2T2R) Windows XP/Vista/7 32 and 64 bit; Linux Kernel 2.6.x; Mac OS X 10.5 and 10.6 1.35” x 0.66” x 0.31” (34.5 x 16.8 x 8 mm (include USB head)) Operating: 32~104°F (0~40°C); Storage: -4~140°F (-20~60°C) Operating: 10~90% (Non-Condensing); Storage: Max. 95% (Non-Condensing) System Requirement You must have at least the following z A laptop computer/desktop PC with an available USB port 3 Wireless N Adapter RNX-MiniN2 Quick Installation Guide z At least a 300MHz processor and 32MB of memory z Windows OS for Win98SE, ME, 2000, XP, Vista, 7 or Mac OS X 10.4~10.6 z A CD-ROM Drive z USB controller properly installed and working in the computer z A 802.11n、802.11g or 802.11b Wireless Access Point/Router (for infrastructure Mode) or another 802.11n、802.11g or 802.11b wireless adapter (for Ad-Hoc; Peer-to-Peer networking mode). 1.6 LED Status This USB Adapter contains one LED. Please refer to the following description for LED definition. LED Status Indications Radio/ACT Working Status Blink blue The Adapter is Radio on Blink blue and flashing The Adapter is already connected but intermittently is not transmitting or receiving data LED Blink blue and fast flashing Off The Adapter is activity and transmitting of receiving data. The Adapter is Radio off 4 Wireless N Adapter RNX-MiniN2 Quick Installation Guide Chapter 2 Installation Guide 2.1 Hardware Installation z Please first insert the RNX-MiniN2 into your PC or NB USB slot. z If the following window popup, please click Cancel or Close: Under Win XP Under Windows Vista/Win7 5 Wireless N Adapter RNX-MiniN2 2.2 Quick Installation Guide Installation using Driver CD: Please insert the CD into your CD-rom drive Click on the “Driver Installation” option when the Smart Wizard page popup. If the program didn’t run automatically, please double click on the Setup.exe in the CD to start the process. 6 Wireless N Adapter RNX-MiniN2 Quick Installation Guide Click Yes if the following window popup For WinXP, you may need to select your desired Language of installtion. For Win7, the program will uses your current language as default setting. Select Next. 7 Wireless N Adapter RNX-MiniN2 Quick Installation Guide Select “Yes, I want to restart my computer now.” Then click Finish. Upon restart, your installation is now ready. if you see below window popup, please select install this driver software anyway. Win7 Win XP 8 Wireless N Adapter RNX-MiniN2 Quick Installation Guide Chapter 3 Wireless Connection Guide This chapter describes how to configure your Adapter for wireless connectivity on your Wireless Local Area Network (WLAN) and use the data security encryption features. After Installing the Adapter, the Adapter’s tray icon will appear in your system tray. It appears at the bottom of the screen, and shows the signal strength using color and the received signal strength indication (RSSI). In the following instruction for making a network connection, we use the provided Utility to configure your wireless network settings. Note: You could use either the software we provide or Microsoft Zero Configuration tool to configure this adapter. 3.1 Connecting with Microsoft Zero Configuration tool (Win XP) z After specifying the Microsoft Zero Configuration tool to configure your wireless icon on system tray. Select “View Available network, right click on the Wireless Networks” to specify your wireless network. z The tool shows the available wireless networks. Select your demanding network to connect with. 9 Wireless N Adapter RNX-MiniN2 z Quick Installation Guide If prompted, enter the password/network key for your wireless network and click the Connect button. 3.2 Connecting with Window 7 You can easily access to wireless with Win7. First, move your mouse to lower right hand corner as below and click on the icon where arrow pointing to. Click Refresh to get an update of your Wireless Network Connection. This should help you search the SSID of the network you want to connect to. 10 Wireless N Adapter RNX-MiniN2 Quick Installation Guide Select your desired SSID, then Click “Connect”. You will be prompt to ask you entering the network security key. Once entered, please click OK to complete. You should see below in a very short period and find out whether you are connected or now. 3.3 Connecting with Rosewill Wireless Utility We also provide this Utility for users to connect to a wireless network easily. It provides more information and configuration for this adapter. As default, the Utility is started automatically upon starting your computer and connects to a connectable wireless network with best signal strength and with no security setting. 11 Wireless N Adapter RNX-MiniN2 Quick Installation Guide 1. First Select the Available Network option: 2. You will see a list of the SSID that your wireless adapter has scanned in your surrounding area. You can also “Refresh” to see the most updated list. Select your desired SSID (the one you want to link with). 3. Click Add to Profile. After click “Add to Profile”, you will see the next window “Wireless Network Properties” popup with your current wireless signal setting. (RNX-MiniN2 will detect automatically the current encryption setting of your SSID). So after the “Wireless Network Properties” popup, all you need to do is to enter the password of your SSID and click OK to continue. 12 Wireless N Adapter RNX-MiniN2 Quick Installation Guide When done, your wireless adapter will automatically connect to this SSID. However, Please do make sure returning to “Profile” and set your SSID Profile as your default. So your utility will remember for the future to link to this SSID when computer is Power-On. Now you have completed the setup of your wireless network. You should be ready to surf! Thank you for purchasing a quality Rosewill Product. Please register your product at: www.rosewill.com for complete warranty information and future support for your product. 13