1
N
DigitalTalk MAX™ 2100
Owner’s Manual
-0-
Table of Contents
Chapter 1: Getting Started ............................................ 1
Phone Activation ............................................................ 1
Phone Safety & Performance..........................................1
NEC Authentic Accessories™ ........................................1
Connecting & Disconnecting the Battery.........................1
Charging the Battery .......................................................2
NiCd and NiMH Battery Charging Times ........................2
Voice Mail Messaging & Text Messaging .......................2
Phone Password .............................................................2
Phone Layout ..................................................................3
Display Icons...................................................................3
Menu Tree Overview.......................................................4
Menu Navigation Keys ....................................................4
Chapter 2: Basic Operations......................................... 5
Turning On Phone.......................................................... 5
Turning Off Phone...........................................................5
Standby Mode .................................................................5
Signal Strength................................................................5
Battery Charge Indicator .................................................5
Placing a Call ..................................................................6
Ending a Call.................................................................. 6
Answering a Call .............................................................6
Adjusting Earpiece Volume ............................................ 7
Adjusting Keypad Volume .............................................. 7
Accessing and Navigating Menus ...................................7
Setting Ringer Volume ................................................... 7
Selecting Ringer Type.................................................... 7
Viewing Your Phone Number ........................................ 7
Retrieving Voice Mail ..................................................... 8
Retrieving Text Messages...............................................8
Using the Phone Book ................................................... 8
Setting the Time and Date ............................................. 8
Chapter 3: Menus ........................................................... 9
Menu Navigation ..............................................................9
Main Menu.........................................................................9
1. Call Logs .................................................................... 10
Dialed (Calls Log)......................................................... 10
Received (Calls Log).................................................... 10
Missed (Calls Log) ....................................................... 10
Air Time........................................................................ 11
Clearing Call Logs & Air Time Counter ........................ 11
2. Phone Book ............................................................... 11
Add to Phone Book ..................................................... 12
View by Name .............................................................. 13
View by Location .......................................................... 13
Viewing by (Phone) Number ........................................ 13
Locking the Phone Book .............................................. 13
Clearing the Phone Book ............................................. 13
-i-
Table of Contents
3. Message ..................................................................... 14
Voice Messages........................................................... 14
Text Messages ............................................................ 15
Text Message Viewer....................................................16
SMS Menu ....................................................................16
Clear All Text Messages .............................................. 17
Store As Voice Mail Number .........................................17
4. Settings ...................................................................... 17
Lock.............................................................................. 18
Auto Lock .................................................................... 18
Set (Change) Password ............................................... 18
Call ............................................................................... 18
Any Key Answer........................................................... 18
Analog/Digital Call Type............................................... 18
DTMF Length ............................................................... 19
Transmit DTMF tone .................................................... 20
Text Message............................................................... 20
Roll Off Order .............................................................. 20
Word Wrap ................................................................... 20
Sort Order .................................................................... 21
Audio ............................................................................ 21
Ring volume ................................................................. 21
Ring type ...................................................................... 21
Escalating alert............................................................. 21
Network ........................................................................ 22
Voice Privacy ............................................................... 22
Select System .............................................................. 22
Select Phone Number ...................................................23
Clock ............................................................................ 23
Set Clock...................................................................... 23
Set Alarm, Auto On, Auto Off ....................................... 23
Environment ................................................................. 24
One-Touch Dialing ....................................................... 24
Fixed Digit Dialing ........................................................ 24
Language ..................................................................... 25
Wakeup Message ........................................................ 25
Handsfree..................................................................... 25
Handsfree Switch ......................................................... 25
Backlight....................................................................... 26
Auto Answer................................................................. 26
Reset Settings.............................................................. 26
5. Lock/Unlock Keypad................................................. 26
6. Silent Mode ................................................................ 27
7. Non Pub(lic) Mode..................................................... 27
Acquire New System.....................................................27
Search for System.........................................................28
View Stored Systems ....................................................28
-ii-
Table of Contents
8. Digits Editing ............................................................. 29
Manual pause............................................................... 29
Auto Pause................................................................... 30
9. Mute............................................................................ 30
Mic Mute........................................................................30
All Mute ........................................................................ 30
Unmute......................................................................... 30
0. Lock Phone................................................................ 31
Chapter 4: Safety & Performance ................................32
Safety Precautions ........................................................32
Phone Performance ......................................................35
Technical Information....................................................35
Battery Care & Disposal................................................35
Chapter 5: Warranty & Service ................................... 36
Limited Warranty ...........................................................36
NEC Service Support ....................................................38
NEC Wireless Marketing ...............................................38
Index............................................................................... 39
-iii-
Chapter 1: Getting Started
Phone Activation
Before you can use your new NEC cellular telephone, the phone
must be activated by a cellular service provider. Please contact
your local cellular service provider for any questions regarding
phone activation.
Phone Safety & Performance
Prior to operating your cellular phone, please read this manual
thoroughly including Chapter 4, “Safety & Performance” on page
32.
NEC Authentic Accessories™
NEC recommends using only NEC Authentic Accessories with
your cellular phone to ensure optimum quality performance.
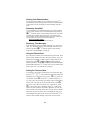
Connecting & Disconnecting the Battery
Your phone is powered by a rechargeable battery. (See “Battery
Care & Disposal” on page 35 for important battery information.)
To connect the battery to your phone, place the grooved end of
the battery against the base of the phone. Lower the battery
toward the phone to lock into place. To remove the battery,
check that the phone is turned off. Slide the locking latch located
above the battery upward and carefully lift the battery away from
the phone.
Battery
Locking Latch
Battery
-1-
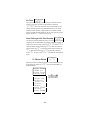
Charging the Battery
A new phone battery must be fully charged before being
used for the first time. The phone battery can be charged
through one of two setups.
Setup 1: Phone & AC Adapter
Only
Plug the AC adapter
into a standard AC
electrical outlet. Insert
the adapter plug into
the jack located on the
side of the phone.
Setup 2: Phone, AC Adapter,
&Charging Stand
Plug the AC adapter
into a standard AC
electrical outlet. Insert
the adapter plug into
the charging stand
jack. Place the phone
in the charging stand.
The red LED indicator
on the charging stand
illuminates while the
battery is charging.
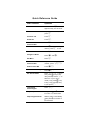
NiCd
NiMH
NiCd and NiMH Battery
Charging Times
With Standard Charger With Rapid Charger
~10-12 hours
~ 1.5 hours
~15 hours
~ 1.5 hours
Voice Mail Messaging & Text Messaging
Voice mail messaging and text messaging services, when available, are provided by your cellular service provider. Before you
can receive either voice or text messages with your phone, you
must subscribe to these cellular service provider options. Contact your cellular service provider for information on availability
and setup of these services. See “Voice Messages” on page 14
and “Text Messages” on page 15 for information on retrieving
messages.
Phone Password
When your phone is activated, a 4-digit password is programmed
into the unit. The password locks and unlocks your phone, and
provides access to restricted phone settings. Check with your
cellular service provider for information on your security password.
-2-
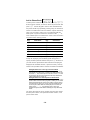
Phone Layout
Antenna
Earpiece
Volume Keys
Display Screen
!, ;(
+
1 2 : 0 0 am
J an 0 1
SER V I CE
Standby Mode Display
Example with Phone
Operating on Digital Control
Channel within Home System
Service Area
\!
Phone Keys
;(
+
5 551 21 2
I n Use
Call in Progress Display
Example with Phone
Operating on a Digital Voice
Channel within
Digital Control Channel
Microphone
Display Icons
Service Indicators
!
or
/
Digital or
Analog Channel
In Use
,
or
$
Home or Roam
System Service In
use
/
or
%
Roam System
A or B In Use
Operation Indicators
Call & Message Indicators
\
Call in Progress
<>
Voice Mail Message
Received
[]
Text Message
Received
+
Battery Charge
Indicator (fully
charged status
shown)
;(
Cellular Signal
Strength
~
Battery Charging in
Progress
=
Phone Lock Setting
Activated
@
Alarm Clock Setting
Activated
Standby, Keypad
{||} InVolume
Adjusted;
During Conversation, Earpiece
Volume Adjusted
-3-
Menu Tree Overview
M
Menu Options
1 Call Logs
2 Phone Book
1
2
3
4
5
6
1
2
3
4
5
Add to Phone Book
View by Name
View by Location
View by Number
Lock Phone Book
Clear Phone Book
3 Message
4 Settings
1
2
3
4
5
6
7
8
9
1
2
3
4
Lock
Call
Text Message
Audio
Network
Clock
Environment
Handsfreep
Reset settings
Dialed
Received
Missed
Air Time
Clear
Voice Messagesl
Text Messagesl
Clear All Text Messages
Store as Voice Mail number
5 Lock
Keypad
6 Silent Mode
1 Off
2 On
w
7 Non Pub Mode
1 Acquire New System
w
2 Search for System
w
3 View Stored Systems
8 Digits Editing
1 Manual Pause
2 Auto Pause
3 Link to Phone Book
9 Mute
1 Mic Mute
2 All Mute
3 Unmute
0 Lock Phone
1 Lock
2 Unlock
l Check with your cellular service provider for availability and service.
p
Only available when phone is used with a handsfree adapter.
t Must have rights to a non-public or private system.
Menu Navigation Keys
Key
Action
Key
Action
M
Display Main Menu
or select a flashing
menu or submenu
selection.
N
Exit any menu and
return to standby
state display.
B
Scroll to view entire
menu and
submenu contents.
C
Press to return to
next higher menu
level; press and hold
to return to standby
mode display.
and
E
-4-
Chapter 2: Basic Operations
Turning On Phone
Press and hold the
P key for approximately two seconds to
turn on the phone.
The cellular signal strength indicator, the battery charge indicator, the time, the date, and the cellular service provider indicator
appear on the display. (See “Display Icons” on page 3.)
! , ;(
1 2 : 0 0 am
J an 0 1
SERVI CE
+
Turning Off Phone
Press and hold the
P key for approximately two seconds to
turn off the phone.
Standby Mode
Once the phone is powered on, the phone enters the standby
mode. (The above screen illustration depicts the phone in
standby mode.) The standby mode remains displayed until a call
is placed or received, a menu is accessed, or the phone is powered off.
Signal Strength
The cellular signal is indicated on the display as
;( with the
maximum of six bars indicating a strong signal. Although you
can use the phone without extending the phone antenna,
extending the antenna can increase the strength of the received
cellular signal.
Battery Charge Indicator
The battery charge indicator ( +) shows the charge level of the
battery. When the battery charge drops to a low level, the phone
displays the following warning message:
RECHARGE BATTERY
While displaying the recharge notification, the phone also
sounds a double beep up to six times at 10-second intervals.
The phone then automatically powers off. See “Charging the
Battery” on page 2.
-5-
Placing a Call
With the phone in the standby mode, key in the telephone num-
S
\
. The phone icon ( ) appears indicating the
ber and press
phone is in use.
Correcting Digit Entry Error
If you make a mistake entering a phone number, press C once to
delete the last entered digit, or press and hold C to erase all of
the entered digits.
Dialing a phone number stored in phone book
With the phone in the standby mode, press B to access the
phone book, use the E or B keys to locate the desired phone
number, and press S.
Calling Last Number Dialed
With the phone in the standby mode, press S to call the last number dialed.
Dialing a phone number on scratchpad
During a call, you can use your phone as a notepad or scratchpad
to record a phone number provided to you. Once the call in
progress is completed and you press N to terminate the call, you
can dial the displayed scratchpad phone number by pressing S.
See “Adding Numbers from Scratchpad to the Phone Book” on
page 12 for storing the scratchpad information to your phone book.
Ending a Call
N . Note that if you are within the menu system (see
N once only exits
the menu system; pressing N twice returns the phone to the
Press
“Menu Navigation” on page 9), pressing
standby mode and ends the call.
Answering a Call
S
When the phone rings, press
to answer the call.
Caller Identification
If caller identification is available in your area, the phone number
and/or name of the incoming call may be displayed when the call is
received. Contact your cellular service provider on the availability
of caller identification.
Call Waiting
If call waiting is available in your area, the phone sounds a tone
during a call in progress to indicate a second call is incoming. To
answer the incoming call, press S; press S again to return to
the initial call in progress. Contact your cellular service provider on
the availability of call waiting.
Any Key Answer Setting
If the any key answer setting is turned on, any key except P or N
can be pressed to answer an incoming call. See “Any Key Answer”
on page 18.
Ring Alert
The type and volume of the incoming call ringer alert can be
adjusted. See “Selecting Ringer Type” on page 7 and “Setting
Ringer Volume” on page 7.
-6-
Adjusting Earpiece Volume
The volume keys located on the side of the phone can be used
to adjust the earpiece volume during a phone call. With a call in
progress, press
< to increase or press > to decrease the ear-
piece volume.
Adjusting Keypad Volume
The volume keys located on the side of the phone can be used
to adjust the keypad volume. With the phone in the standby state
(no call in progress), press
< to increase or > to decrease the
keypad volume.
Accessing and Navigating Menus
M key.
M , the Main Menu is displayed. The contents of
menus and submenus can be viewed by pressing E or B .
The phone menus can be accessed by pressing the
By pressing
See Chapter 3, “Menus” on page 9.
Additional Menu Selection Information
For several menu selections, additional usage information is provided to assist you with making the
appropriate selection. These helpful usage tips are
identified with the marker shown on the left.
?
Setting Ringer Volume
The incoming call ringer volume can be set to one of five settings. Press
M441 .
The ring volume menu appears
with the currently selected ring volume setting flashing on the
display. The available settings are 1 for minimum, 2 for low, 3 for
medium, 4 for high, and 5 for off (no ringer). Press the corresponding number for the desired ringer volume setting. The
phone rings your selection. Press
N to save your selection
and exit the ring volume menu.
Selecting Ringer Type
The incoming call ringer alert can be set to one of four selections. Press
M442 .
The ring type menu appears
with the currently selected ringer selection flashing on the display. The available settings are 1, 2, 3, and 4. Press
1, 2,
3 , or 4 to hear the selected setting. The phone rings your
N to save the selected setting and exit the
selection. Press
ring type menu.
-7-
Viewing Your Phone Number
C
To view the phone number of your cellular phone, press
with the phone in the standby mode. The phone number appears
on the bottom line of the display for approximately three seconds.
Retrieving Voice Mail
If voice mail service is available through your cellular provider,
you can easily retrieve your voice mail messages by pressing
E1
with the phone in the standby mode. If the voice mail
retrieval phone number has been set up in your phone, the
phone number is automatically dialed. Follow your cellular service provider instructions for voice mail retrieval.
Storing Voice Mail Number
See “Store As Voice Mail Number” on page 17.
Retrieving Text Messages
If text messaging service is available through your cellular provider, you can easily view any text messages received in your
E2
with the phone in the standby
phone by pressing
mode. See “Text Messages” on page 15.
Using the Phone Book
Up to 99 phone numbers can be stored in the phone book. Once
phone number entries are stored, the phone book is at your fingertips for easy dialing. To dial a phone number stored in the
B with the phone in the standby mode to
E or B keys to locate the desired
phone number and press S . To add, view, edit, or delete phone
phone book, press
access phone book . Use the
book entries, see “2. Phone Book” on page 11.
Setting the Time and Date
To access the clock menu for setting the correct time and date,
M461 . The current time and date settings are
B . Key in the correct minutes; press B . Press M to select either a.m. or
press
displayed. Key in the correct hour; press
p.m. Key in the correct month by entering in the corresponding
number from 1 through 12 for the desired month; press
B.
Key in the correct day of the month from 1 through 31; press
B . If the correct year is displayed, press N to save the
clock entry and to exit the clock menu. (Note that to enter the
date “February 29” during a leap year, the year must be entered
before the day.) If the correct year is not displayed, key in the
corresponding four digits of the correct year, and press
N to
save the time and date settings, and to exit the clock menu.
-8-
Chapter 3: Menus
Menu Navigation
The phone contains menus and submenus to access and select
the phone settings. You can navigate through all menus and submenus by using the
E
and
B keys to scroll through the
menu listings. Each of the menu and submenu listings has an
assigned menu or submenu number. You can select and access
a menu by pressing the assigned menu number on the keypad or
by pressing
M when the desired menu listing is flashing on
the display.
You can return to the previously displayed menu by pressing
C . You can return to the standby display by pressing N or
C.
by pressing and holding
You can quickly access menus by using the assigned menu and
submenu numbers as shortcuts. Note that the menu shortcuts
are provided for each menu and submenu.
Main Menu
M
The main menu contains all of the menu and submenu settings.
With the phone in the standby mode, the main menu can be
accessed and displayed by pressing
M . The main menu is dis-
played below.
M ai n m e n u
1 . C al l
L o gs
2 .P h o n e
Boo k
3 . M e s s ag e
4 .S e t t i n g s
5 .L o c k
K e y p ad
6 .S i l e n t
Mode
7 .N o n P u b
Mod e
8 .D i g i t s
Edi t i n g
9 .M u t e
0 .L o c k
Phon e
-9-
Use B and E
to scroll through
and view the entire
Main Menu
1. Call Logs
Menu Shortcut
M1
With the phone in the standby mode, the Call Log Menu can be
accessed by pressing
below.
M1 . The Call Log Menu is displayed
C al l L o g
menu
1 . D i al e d
2 .R e c e i v e d
3 .M i s s e d
4 .A i r T i m e
5 . C l e ar
Use B and E
to scroll through
and view the entire
Call Log Menu
Menu Shortcut
Dialed (Calls Log)
M11
Your phone maintains a list of up to 20 of the last phone numbers you dialed. To view the list of the last 20 outgoing calls,
M11 1 . Scroll through the contents of the dialed
phone number log using E and B . Press S to dial a
displayed phone number in the log or press N to exit the
press
dialed phone number log.
Menu Shortcut
Received (Calls Log)
M12
Your phone maintains a list of up to 20 of the last incoming calls
you received. To view the list of the last 20 incoming calls, press
M12 1. Scroll through the contents of the received
phone number log using E and B . Press S to dial a
displayed phone number in the log or press N to exit the
received phone number log.
Menu Shortcut
Missed (Calls Log)
M13
Your phone maintains a list of up to 20 of the last incoming calls
you missed. To view the list of the last 20 unanswered calls,
M13 1 . Scroll through the contents of the missed
phone number log using E and B . Press S to dial a
displayed phone number in the log or press N to exit the
press
missed phone number log.
1. If the dialed, received, or missed phone number log does not contained any call information, the phone beeps and the call log menu
remains displayed when an attempt to view the log is made.
-10-
Menu Shortcut
Air Time
M14
Your phone automatically maintains a log of the total air time
usage. The air time counter can be viewed by pressing
M14 . The time counter for the air time usage in your
cellular provider service area (indicated with an “H” for home
system) and the air time usage outside your cellular provider
service provider (indicated with an “R” for roam system) are displayed. Press
N
to exit the air time log.
Menu Shortcut
Clear Call Logs & Air Time Counter
M15
The phone numbers maintained in the call logs and the air time
usage log can be cleared with all contents completely erased. To
clear one or all of the logs, press
M15 . Select 1 to
2 to clear the received
clear the dialed phone number log,
3 to clear the missed phone number log,
4 to clear the air time log, or 5 to clear all of the logs.
Press 2 for Yes. Press C or N to exit the call log clear
phone number log,
menu.
2. Phone Book
Menu Shortcut
M2
With the phone in the standby mode, the Phone Book Menu can
be accessed by pressing
displayed below.
M2 . The Phone Book Menu is
Phone Book
1 .A d d t o
Phon e Book
2 .V i e w b y
n am
3 .V i e
l o c at
4 .V i e
n umb
5 .L o c
Phon e
6 .C l e
Phone
e
w by
i on
w by
er
k
Book
ar
Book
-11-
Use B and E
to view the entire
Phone Book Menu
Menu Shortcut
Add to Phone Book
M21
To add a phone number to the phone book, press
M21 .
Enter the phone number you want to add to the phone book and
press
M.
Use the keypad to enter a name associated with
the phone number. By repeatedly pressing a key, the characters
shown in the table below can be included in a phone book entry
name. You can enter a name of up to 10 characters with any
blank space or symbol counted as a character. Press
#
to
insert a blank space or to advance the cursor to the next character position when entering a name.
Key
Characters
Key
Characters
1
1.
7
7 PQRS pqrs
2
2 ABC abc
8
8 TUV tuv
3
3 DEF def
9
9 WXYZ wxyz
4
4 GHI ghi
0
0
5
5 JKL jkl
*
&-#*
6
6 MNO mno
#
blank spaces
After the name is entered, press
M . Press M again to
accept the displayed (next available) speed dial location, or
specify another speed dial location and press
M . Note that if
you enter another speed dial location instead of accepting the
displayed next available location, a phone book entry currently
stored in the specified location could be overwritten and deleted.
Adding Numbers from a Call Log to the Phone Book
If you want to add a phone number from a call log to your phone
book, display the call log entry containing the desired phone number. Press M to access the phone book menu. Press 1 to add
the number to the phone book and follow the steps described in
“Add to Phone Book” on page 12.
Adding Numbers from Scratchpad to the Phone Book
During a call, you can use your phone as a scratchpad to record a
phone number. Once the call in progress is ended, you can either
dial the stratchpad phone number (see “Dialing a phone number
on scratchpad” on page 6) or you can store the scratchpad number to the phone book. With the stratchpad phone number displayed, press M21 . As prompted, enter a name and
complete the phone book addition following the steps described
above.
The phone book entries can be recalled using the name stored
with the phone number, the speed dial location number, or the
phone number itself.
-12-
Menu Shortcut
View by Name
M22
To recall a phone book entry by name, press
M22 .
Enter the first letter(s) of the desired phone book entry name
M . If necessary, use the B and E keys to
S to dial the phone number or press N to exit the phone book.
and press
locate the phone book entry. Press
Menu Shortcut
View by Location
M23
To recall a phone book entry by the speed dial location number,
press
Press
M23 . Enter the location number and press M .
S to dial the phone number or press N to exit the
phone book menu.
Menu Shortcut
View by (Phone) Number
M24
To recall a phone book entry by the phone number, press
M24 . Enter the first number(s) of the desired phone
M . If necessary, use the B and E
keys to locate the phone book entry. Press S to dial the
phone number or press N to exit the phone book.
number and press
Menu Shortcut
Locking the Phone Book
M25
Your phone book can be secured to prevent the contents from
being altered or viewed. Locking your phone book also safeguards against the contents being accidentally erased.
To restrict access to your phone book, press
prompted, enter your 4-digit password. Press
M25 . As
1 for no
2 to restrict the phone
3 to completely restrict
access to the phone book. Press N to exit the phone book
restrictions on your phone book,
book contents to view only, or
menu.
Menu Shortcut
Clearing the Phone Book
M26
The phone book contents can be completely erased. To erase
M26 . As prompted, enter your 4digit password. Press 2 to clear your phone book. Press C
the contents, press
to exit the phone book menu.
-13-
3. Message
Menu Shortcut
M3
The Message Menu can be accessed by pressing
Message Menu is displayed below.
M e s s ag e
menu
1 .V o i c e
M e s s ag e s
2 .T e x t
M e s s ag e s
3 . C l e ar
Al l t e x t
M e s s ag e s
4 . S t o r e as
V o i c e M ai l
number
M3 . The
Use B and E
to scroll through
and view the entire
Message Menu
Your phone can receive voice and text messages. Contact your
cellular service provider for information and availability of voice
and text messaging.
Menu Shortcut
Voice Messages
M31
When you receive a voice mail message, the following notification displays:
You Have Voice Mail
S
. If your voice
To retrieve your voice mail immediately, press
mail number has been stored in your phone (see “Store As Voice
Mail Number” on page 17), the voice mail system phone number
is automatically dialed. Follow your cellular service provider
instructions for accessing your voice mail and checking your
messages.
If you do not wish to retrieve a voice mail message immediately,
press
C . The voice mail notification is removed from the dis-
play; however, with the phone in the standby state, the voice
mail icon (<>) and the number of voice mail messages appear
on the display. If the voice mail phone number is stored in your
phone, you can retrieve messages at any time by pressing
E1 or M31 .
-14-
Menu Shortcut
Text Messages
M32
When you receive a text message, your phone sounds an alert
and displays a notification. The alert and the displayed notification vary depending on the type of received text message. The
types of text messages, the displayed notifications, and the
alerts are shown below.
Type of
Text Message
Displayed
Notification
Alert
Normal
XXXNew
Messages
PressMENU
toread
Dual tone alert;
repeated one time.
Urgent
XXXNew
URGENT
Messages
PressMENU
Dual tone alert;
repeated two times.
Emergency
XXXNew
EMERGENCY
Messages
PressMENU
Dual tone alert;
repeated three times.
Bulk
XXXBulk
Messages
PressMENU
toread
Dual tone alert;
repeated one time.
XXX in displayed notification equals the actual number of messages
received.
To view your text message(s) immediately, press
M . The first
new message is displayed within the text message viewer. Use
B
and
E
to scroll through each line of the message.
(See “Text Message Viewer” on page 16 for additional information on navigating within text messages.) The end of a text message is indicated by the following displayed notation:
* * * ** * * * * *
* MSG END *
**********
If you do not wish to view a text message immediately, press
C . The text message notification is removed from the display;
however, when the phone is in the standby mode, the text message icon ([]) and the number of received text messages
remain displayed until the text messages are viewed. You can
view text messages at any time by pressing
M32 .
-15-
E2 or
Text Message Viewer
Text messages are displayed within the text message viewer.
The following keys can be used to navigate and operate within
the text message viewer.
B
E
#
*
S
M
C
N
Scrolls down through text messages line-by-line.
Scrolls up through text messages line-by-line.
Scrolls to the top of the next text message.
Scrolls to the top of the previous text message.
Automatically dials the contact telephone number
of text message sender if the sender provided a
telephone number within the message.
Displays the short messaging service, SMS, popup menu. The SMS menu is detailed below.
Briefly displays the percentage of text message
memory available and the number of unread and
locked messages; then exits the text message
viewer.
Exits the text message viewer.
SMS Menu
The SMS (short messaging service) Menu within the text message viewer contains text messaging options such as locking
or unlocking a message, deleting a message, displaying more
or less message details, and displaying text messages based
on message urgency or arrival time.
1. Lock
Message
2.Delete
Message
With a text message displayed, press M1 to
lock a message; the lock indicator (=) appears on
the top line of the text message indicating the message is locked. Press M1 to unlock the message. Note that a locked message cannot be
deleted using the SMS menu delete message selection; locked messages can only be deleted through
the Message Menu (M331), page 14.t
With a text message displayed, press M2;
press 1 to delete.
3.Display
moremsg
details
With a text message displayed, press M3 to
display a more detailed message header (includes
the time and date the text message is sent and
received); press M3 again to display a less
detailed message header (includes only the time
and date the text message is received).
4.Sortby
message
urgency
5.Sortby
oldest
message
6.Sortby
newest
message
With a text message displayed:
• Press M4 to display the urgent text
messages first.
• Press M5 to display the oldest text
messages first.
• Press M6 to display the newest text
messages first.
-16-
Menu Shortcut
Clear All Text Messages
M33
Text messages stored in your phone can be deleted. Press
M33 . Press 1 to delete all text messages stored in
2 to delete only the unlocked text messages stored in your phone. Press 2 (for yes) to complete the
deletion of text messages. Press N or C to exit the clear
your phone or press
text messages menu.
Menu Shortcut
Store As Voice Mail Number
M34
The voice mail system telephone number can be stored into your
phone. Once the voice mail telephone number is stored into your
phone, voice messages can be easily retrieved by pressing
E1 (or M31 ). To store the voice mail telephone
number into your phone, key in the voice mail telephone number
with the phone in the standby mode; press
M34 . The
following message displays:
Voice mail number has been Stored Press CLR
Press
C or N to exit the store as voice mail number set-
ting.
4. Settings
Menu Shortcut
M4
The Settings Menu can be accessed by pressing
Settings Menu is displayed below.
Se tt
me
1 .L o c
2 . C al
i ng
nu
k
l
3 .T e x t
M e s s ag e
4 .A u d i o
5 .N e t w o r k
6 .C l o c k
7 .E n v i r o n ment
8 . H an d F r e e
9 .R e s e t
s e t t i n gs
-17-
M4 . The
Use B and E
to scroll through
and view the entire
Settings Menu
Menu Shortcut
Lock
M41
Menu Shortcut
Auto Lock
M411
To protect your phone from unauthorized usage, you can set
your phone to automatically lock when it is turned on. With
the phone in the standby mode, press
M411 .
2 to set
As prompted, enter the 4-digit password. Press
the automatic lock selection to on.
If automatic lock is set to on, the phone is locked when it is
powered on. To unlock the phone, press
M0 , enter the
2 for unlock.
4-digit password as prompted, and press
Press
N
to exit the lock menu. To deactivate the auto-
M411 , enter pass1 . Press N to exit the lock menu.
matic lock setting, press
word, and press
Menu Shortcut
Set (Change) Password
M412
The 4-digit password used to access all secured menu
selections and to lock the phone can be changed. Press
M412
. As prompted, enter the current 4-digit
password and then enter the desired new 4-digit password.
M
. The phone automatically resets and powers on
Press
again. The new password must now be entered to access
secured menu settings.
Menu Shortcut
Call
M42
Menu Shortcut
Any Key Answer
M421
With the any key answer setting activated, any key except
N and P can be pressed to answer the phone. Press
M421 . Press 1 to set any key answer to Off
or press 2 to set any key answer to On. When set to On,
you can answer a call with any key except N or P.
Menu Shortcut
Analog/Digital Call Type
M422
Your digital phone operates on either a digital or an analog
system control channel. As shown in “Phone Layout” on
page 3, the current system control channel is indicated on
the standby mode display by the
! icon for digital or the /
icon for analog. Even when your phone is operating on a
digital control channel, the voice channel your phone uses
-18-
each time a call is either sent or received also can be either
digital or analog. (See the following paragraph for information on the use of digital and analog voice channels.) To
M422 ;
1 for digital call type or 2 for analog call
select the voice channel type, press
then press
type. The call type/voice channel currently in use for the call
! icon
/ icon for analog voice
in progress is indicated on the phone display by the
for digital voice channel or the
channel.
?
Digital & Analog Voice Channels/Call Types
With the voice channel/call type selection set to digital, your phone uses a digital voice channel, as available, to send and receive calls. If a digital voice
channel is not available, your phone then automatically searches for an analog voice channel.
With the voice channel/call type selection set to analog, your phone only uses an analog voice channel to
send and receive calls. The restricted use of analog
voice channels is necessary if you are using a PCMCIA data interface card with your phone to send facsimiles or communicate via modem. Note that
operating on an analog voice channel consumes the
phone battery power at a faster rate than operating on
a digital voice channel.
For optimum results and performance, you can set
your phone to the digital call type selection and use
the analog call type selection, as needed, for use with
a data interface card.
Menu Shortcut
DTMF Length
M423
Your phone can transmit tones, referred to as DTMF tones,
when the keys of the phone are pressed. These tones allow
your phone to successfully communicate with automated
telephone services such as banking transactions and credit
card inquiries. You can set your phone to transmit short
tones or long tones. (See the following paragraph for additional information on short tone use and long tone use). To
M423 .
1 to select the short tone setting or press 2 to
select the long tone setting. Press N to exit the DTMF
select the length of the tone, press
Press
length menu.
?
Short Tone Use & Long Tone Use
You can access most automated systems by setting
your phone to the short tone selection. If you experience any problems communicating with an automated
system, set the DTMF length to long and verify that
the capability to transmit tones (see the following
menu selection, Transmit DTMF Tone) is turned on.
Note that you must press and hold a key, up to a maximum of three seconds, to transmit a long tone.
Because transmitting long tones can result in slower
dialing, you can set your phone to the short tone
selection and only use the long tone selection, as
needed.
-19-
Menu Shortcut
Transmit DTMF Tone
M424
For your phone to successfully transmit tones, as described
“Transmit DTMF Tone” on page 20, for accessing automated
telephone systems, the capability to transmit tones must be
turned on. (See the following paragraph for additional information on setting tones on or off.) To select the DTMF tone
M424 . Press 1 to turn off
2 to turn on tone transmission. Press N to exit the transmit DTMF tone menu.
setting, press
tone transmission or press
?
DTMF On or Off
Since the ability to communicate with automated systems is frequently needed, you can usually set and
maintain the DTMF tone transmit selection to on. If
you use the phone scratchpad feature (see “Dialing a
phone number on scratchpad” on page 6) to key in a
phone number during a call in progress, you can turn
off the DTMF selection, as needed, to avoid generating audible tones that can be disruptive during a
phone conversation.
Menu Shortcut
Text Message
M43
Menu Shortcut
Roll Off Order
M431
As described in “Text Messages” on page 15, your phone
can receive text messages if text messaging service is
available through your cellular service provider. When the
phone text message storage is full and more text messages
are delivered, existing messages are automatically replaced
with the new messages. The order in which the existing
messages are replaced, referred to as roll off order, can be
selected based on message arrival time or message
urgency.
To select the roll off order of messages, press
M431 . Press 1
for existing messages to be
replaced based on time and date of message receipt (oldest
messages replaced first) or press
2
for messages to be
replaced based on message urgency classification (with
messages labeled urgent replaced last). Press
N to exit
the roll off order menu.
Menu Shortcut
Word Wrap
M432
The display of words within received text messages can be
changed using the word wrap setting. The word wrap setting
allows you to determine how text breaks within received
messages. (See the following paragraph for additional information on enabling or disabling word wrap.) To set the word
-20-
wrap selection, press
M432 ; press 1 to
2 to disable word wrap.
enable word wrap or press
?
Enabled or Disabled Word Wrap
With the word wrap selection set to enabled, the word
breakage within text messages is limited to words
exceeding 10 characters. Because word division is
restricted, the messages can be easier to read; however, text messages with word wrap enabled usually
contain more lines of text and require additional
scrolling.
With the word wrap selection set to disabled, text
messages are displayed utilizing each of the 10 character blocks per line. Word breakage is not restricted.
Although word breakage may affect readability, the
messages with word wrap disabled usually contain
less lines of text and require less scrolling.
Menu Shortcut
Sort Order
M433
The order for viewing incoming messages can be set using
M433 ; press
1 to view urgent messages first, 2 to view oldest
messages first, or 3 to view new messages first.
the sort order selection. Press
Menu Shortcut
Audio
M44
Menu Shortcut
Ring volume
M441
The ring volume can be set to one of five settings. See “Setting Ringer Volume” on page 7.
Menu Shortcut
Ring type
M442
The incoming call ringer alert can be set to one of four settings. See “Selecting Ringer Type” on page 7.
Menu Shortcut
Escalating alert
M443
The incoming call ringer alert can be set to increase in volume as the phone continues to ring. The initial ring alert
sounds at the minimum volume level. As the phone continues to ring, the volume level escalates up to the maximum
volume level. To set the escalating alert selection, press
M443 . Press 2 to turn on escalating alert or
1 to turn off escalating alert. Press N to exit the
press
escalating alert menu.
-21-
Menu Shortcut
Network
M45
Menu Shortcut
Voice Privacy
M451
Voice privacy is an enhanced security feature available
through some digital cellular service providers. Voice privacy encrypts or scrambles the voice channel to ensure a
telephone conversation is secure and private. For your
phone to utilize the cellular service provider’s enhanced
voice privacy feature, the voice privacy setting in your
phone must be turned on. To set the voice privacy selection,
press
M451 . Press 1
to turn off voice pri-
vacy capability and notifications or press
2 to turn on
voice privacy capability and notification. When sending a
call, VP Active
is displayed if the voice privacy selection is
turned on, enhanced voice privacy is available through the
cellular service provider, and voice privacy security is active
for the call in progress. When sending a call, VP Inactive
is displayed if the voice privacy selection is turned on; but
voice privacy is not available through the cellular service
provider or voice privacy security is inactive for the call in
progress. Contact your cellular provider for the availability
of voice privacy.
Menu Shortcut
Select System
M452
When your telephone is initially activated, your cellular service provider programs (or instructs you to program) your
phone with system information including your telephone
number. The information programmed into your phone is
referred to as the Number Assignment Module or NAM.
Your cellular phone can be programmed with two different
telephone numbers or NAMs. (See “Select Phone Number”
on page 23.) Note that only one phone number or NAM can
be active at one time.
During activation, your phone is also set up on your cellular
service provider’s network. The network your phone uses is
referred to as the Home system. Whenever possible, your
phone accesses the Home system; however, if you are outside of the home cellular service area, your phone attempts
to locate an available system. Locating an available system
is referred to as roaming. The call air time rate on roam systems is usually more expensive than the call air time rate on
your home system. You can, however, limit your phone’s
access to roam systems through your system selection setting.
-22-
M452
To set the system selection, press
.
Select one of the following system settings.
Standard
Press 1 to set your system selection to Standard (Home and
Roam). The Standard setting allows the phone to first search for
an available channel in the home system. If the phone cannot find
an available channel in the home system, the phone searches for
an outside or roam system. The roam indicator, $, and the roam
system type indicator, / or %, are displayed when your phone
accesses an outside or roam system.
Home Only
Press 2 to set the system selection to Home Only. The Home
Only setting restricts the phone to search for an available channel
in the home system only. If the phone cannot locate an available
channel in the home system, the phone enters a no service status
until a channel within the home system is again located.
System A Only
Press 3 to set the system selection to System A only. The System A only setting restricts the phone to search for an available
channel in the home system or a roam system within System A
Only.
System B Only
Press 4 to set the system selection to System B only. The System B Only setting restricts the phone to search for an available
channel in the home system or a roam system within System B
Only.
Menu Shortcut
Select Phone Number
M453
Your phone can be programmed with up to two phone numbers. If two phone numbers are programmed into the phone,
you can select the desired phone number to use by pressing
M453 . Press B
or
E
to highlight the
phone number selection (No.1 or No. 2.). Press
N to exit
the select phone number menu.
Menu Shortcut
Clock
M46
Menu Shortcut
Set Clock
M461
The clock can be set with the time, date, and year. See
“Setting the Time and Date” on page 8.
Menu Shortcut
Set Alarm, Auto On, Auto Off
M462
Your phone can be used as an alarm clock, and your phone
can be set to automatically turn on or off at a specified time
each day. To access the alarm or the auto on/off selections,
press
M462 .
-23-
Alarm
Set Alarm: With the Auto On/Auto Off/Alarm setting screen
displayed, press E or B until ALM is flashing; press M. If
the alarm has been previously set, the last alarm time setting
is automatically displayed. Press B to advance to the hour
field. Key in hour; press B. Key in minutes; press B. Use
M to specify a (for a.m.) or p (for p.m.). Press N to save the
alarm time setting and exit the set alarm menu. The alarm
icon (@) appears on the standby mode display. The alarm
sounds at the specified time setting.
Turn Off Alarming Phone: Press C to turn off the phone
alarm when it sounds.
Deactivate Alarm Prior to Alarming: To turn off the alarm
setting prior to the specified alarm time, press M462
and press E or B until ALM is flashing. Press M to cancel alarm time; press C to exit the set alarm menu.
Auto Power On/Auto Power Off
Set Auto Power On/Auto Power Off: With the Auto On/Auto
Off/Alarm setting screen displayed, press E or B until
either ON or OFF is flashing; press M. If the auto power
selection has been previously set, the last auto power setting
is automatically displayed. Press B to advance to the hour
field. Key in hour; press B. Key in minutes; press B. Use
M to specify a (for a.m.) or p (for p.m.). Press C to save the
auto power on or auto power off setting and exit the menu.
The phone automatically turns on or turns off each day at the
specified time setting.
Deactivate Auto Power On/Auto Power Off: To deactivate
the auto power on or auto power off setting, press
M462, and press E or B until either ON or OFF is
flashing. Press M to cancel the auto power on or auto power
off time; press C to exit the menu.
Menu Shortcut
Environment
M47
Menu Shortcut
One-Touch Dialing
M471
The one-touch dialing feature allows you to quickly speed
dial a phone number by pressing only one key. With onetouch dialing turned on, phone numbers stored in phone
book locations 1 through 9 can be dialed by pressing and
holding the corresponding key on the keypad. To turn on
one-touch dialing, press
M471 . Press 2 to
1 to turn
turn on the one-touch dialing selection or press
off the one-touch dialing selection. See “Add to Phone
Book” on page 12 for phone book storing information.
Menu Shortcut
Fixed Digit Dialing
M472
The type of outgoing calls made from your phone can be
restricted by using fixed digit dialing. For example, the fixed
digit dialing selection can be set to 7 digits to restrict the
-24-
outgoing calls to local phone numbers. To set the fixed digit
dialing selection, press
M472 . As prompted on
the display, enter the 4-digit password. Type in a specified
number of digits for restricting outgoing calls; for example,
press
7 to restrict outgoing calls to 7-digit numbers. The
M to save setting; press
range is 0 to 26 digits. Press
N
to exit the fixed digit dialing menu. If a call is
attempted to a phone number exceeding the restricted fixed
digit setting, the following message is displayed:
Extra Dig Dialed Press CLR
Menu Shortcut
Language
M473
The phone display language can be set to English, Spanish,
or French. To change the display language selection, press
M473 . Press 1 to select English, press 2
to select Spanish, or 3 to select French. Press M . The
phone automatically powers off and then powers on again in
the selected display language.
Menu Shortcut
Wakeup Message
M474
A personal message, referred to as a wakeup message, can
be stored and displayed briefly each time your phone is
turned on. To store a wakeup message, press
M474 . Using the table under “Add to Phone
Book” on page 12, type in the message using the phone
keys. Press
M
to save the message and exit the wakeup
message menu.
Menu Shortcut
Handsfree
M48
The following menu selections - handsfree switch, backlight, and
automatic answer - can only be activated when the phone is
used with a handsfree adapter.
Menu Shortcut
Handsfree Switch
M481
When your phone is connected to an in-vehicle handsfree
adapter, two phone features are available for some vehicle
installation configurations. If available, the features can be
M481 . Press 2 to
to enable radio mute, or 1 to
disable the call alert or radio mute feature. Press N to
activated by pressing
enable call alert,
3
exit the handsfree switch menu.
-25-
Menu Shortcut
Backlight
M482
When your phone is connected to an in-vehicle handsfree
adapter, the keypad and display backlight can be set to
remain illuminated continuously. To select the backlight setting, press
M482 . Press 2 for the phone
backlight to remain on continuously in a handsfree configuration or press
1 to turn it off. Press N
to exit the
backlight menu.
Menu Shortcut
Auto Answer
M483
When your phone is connected to an in-vehicle handsfree
adapter, the phone can be set for automatic answering of
incoming calls. To activate the automatic answer setting,
M483 . Press 2 to turn on automatic
1 to turn off automatic answering.
Press N to exit the auto answer menu.
press
answering or press
Menu Shortcut
Reset Settings
M49
The current phone selections can be cleared and reset to the
factory default settings. To reset the phone settings, press
M49 . As prompted, enter the 4-digit password. Press
2 to reset all selections to the default settings or press 1
to maintain the current settings. Press N to exit the reset
settings menu.
5. Lock/Unlock Keypad
Menu Shortcut
M5
Your phone keypad can be easily and quickly locked to prevent
inadvertent key pressing when the phone is turned on. Press
M5
to lock keypad; press
M5
again to unlock key-
pad. If a key is pressed when the keypad is locked, the following
message is displayed:
Keypad is locked. Use MENU 5 to Unlock
Note that even with the keypad locked, you can still dial 911 and
press
S
to call for emergency services.
-26-
6. Silent Mode
Menu Shortcut
M6
The Silent Mode Menu can be accessed by pressing
The Silent Mode Menu is displayed below.
M6 .
Si l en t
mode
1 .O f f
2 .O n
By setting the phone to the silent mode, all phone alerts are
turned off; an incoming call is indicated only by the keypad and
LED flashing, and the incoming call notification appearing on the
display. With the silent mode menu displayed, press
turn off silent mode or press
N
1
to
2 to turn on silent mode. Press
to exit the silent mode menu.
7. Non Pub(lic) Mode
Menu Shortcut
M7
The Non-Public Mode Menu can be accessed by pressing
M7 . The menu is displayed below.
P r i v at e
Mode Me n u
1 .A c q u i r e
Ne w Sy st e m
2 . S e ar
for Sy
3 .V i e w
St or
Sy s t
ch
stem
Use B and E
to scroll through
and view the entire
Private Mode Menu
ed
ems
In addition to operating on a cellular network system, your
phone is also capable of operating on a non-public or private
telephone system. Note that the phone user must first subscribe
or have rights to a non-public or private telephone system to utilize the following private mode menu selections - Acquire New
System, Search for System, and View Stored Systems.
Menu Shortcut
Acquire New System
M71
The phone automatically searches or scans for the first available
M71. The follow-
private network system by pressing
ing message is displayed:
Search in progress..
-27-
If a system is located, the phone returns to the standby state
with the private system’s descriptive name or label displayed.
The private system is now available for use and is stored into the
phone system database. If a system is not located, the following
message is displayed:
No Systems Found
Press
C
to exit the acquire new system selection.
Menu Shortcut
Search for System
M72
You can set your phone to manually search for available private
M72
. The following mesnetwork systems by pressing
sage is displayed:
Search in progress..
If systems are located, the phone displays a list of the available
systems. Use
N
B
and
E
to scroll through the list; press
to save the selected system. The phone returns to the
standby mode with the private system’s descriptive name or
label displayed. The private system is now available for use and
is stored in the phone system database. If no systems are
located, the following message is displayed:
No Systems Found
Press
C
to exit the search for system selection.
Menu Shortcut
View Stored Systems
M73
System information of each located private system is stored in
the phone system database. The contents of the database can
be viewed by pressing
displayed. Use
N
B
M73 . A list of the systems is
E to scroll through the list; press
and
to exit the database. If there is no information stored in
the database, the following message is displayed:
Press
C
DataBase Empty Press CLR
to exit the view stored systems selection.
-28-
Menu Shortcut
8. Digits Editing
M8
The Digits Editing Menu can be accessed by pressing
The Digits Editing Menu is displayed below.
D i gi t
edi ti
1 . M an
P au
s
ng
u al
se
M8 .
Use B and E
to scroll through
and view the entire
Digits Editing Menu
2 .A u t o
P au s e
3 .L i n k t o
Phon e book
Automated telephone systems prompt you through a recorded
message to enter a set or sets of identifying numbers such as a
credit card account number, bank account number, or personal
identification number. You can use your phone to easily dial or
store multiple sets of numbers, for accessing automated systems, by separating the sets of digits with indicators referred to
as pause marks. Pause marks alert your phone to wait or pause
before sending the remaining sets of digits. There are two types
of pause marks: manual and automatic. The two types are
described below.
Menu Shortcut
Manual Pause
M81
When entering the digits of an automated system telephone
number and any additional strings of numbers needed to communicate with the system, you can insert manual pauses
between the sets of digits. To enter manual pause marks, enter
in the telephone number; press
M81 . A “P” is displayed
after the phone number. Enter in the next set of digits. If necessary, press
M81 to insert another manual pause and
then enter in the next set of digits. When the automated system
telephone number is dialed, your phone waits to transmit the
sets of numbers following a manual pause mark. The following
message is displayed:
Press SND For Manual Pause Dial
As prompted by the automated system, press
next set of digits. Continue to press
sets of digits.
-29-
S
S to send the
to send any remaining
Menu Shortcut
Auto Pause
M82
An automatic pause can be inserted between sets of digits in a
similar manner as manual pauses. To enter automatic pause
M82
. A “,”
marks, enter in the telephone number; press
(comma) is displayed after the phone number. Enter in the next
M82
to insert another
set of digits. If necessary, press
automatic pause and then enter in the next set of digits. When
the automated system telephone number is dialed, your phone
waits approximately three seconds at each automatic pause
mark and then automatically transmits the remaining sets of digits.
Menu Shortcut
Link to Phone Book
M83
If the total number of digits needed to access an automated telephone system exceeds the maximum 26 digits that can be transmitted at one time (or stored in each phone book location), the
phone number can be entered and then linked to a phone book
location containing the remaining strings of numbers. To link a
phone number to a phone book record location, key in the phone
number and press
M83 ; an “L” is displayed. Enter the
phone book location (1-99) containing the applicable information. Press
S to dial the phone number. After the phone num-
ber is dialed, the following message is displayed indicating that
the remaining sets of digits must be sent manually be pressing
S.
Press SND For Manual Pause Dial
Menu Shortcut
9. Mute
M9
M9 during a
The Mute Menu can be accessed by pressing
conversation. The Mute Menu is displayed below.
Se t m u t e
1 .M i c M u t e
2 .A l l M u t e
3 .U n m u t e
Menu Shortcut
Mic Mute
M91
The phone microphone can be turned off or muted during a conversation. With a call in progress, press
M93
M91 . Press
to turn on the microphone again.
-30-
Menu Shortcut
All Mute
M92
The phone microphone and earpiece can be turned off or muted
during a conversation. With a call in progress, press
M92
. Press
and earpiece again.
M93
to turn on the microphone
Menu Shortcut
Unmute
M93
The microphone mute and full mute settings can be cancelled by
pressing
M93 .
0. Lock Phone
Menu Shortcut
M0
Your phone can be locked to prevent unauthorized use. To lock
M0
. As prompted, enter your 4-digit
your phone, press
password. The Lock Phone Menu is displayed.
Loc k Phon e
Me n u
1 . Loc k
2. Un l oc k
Press
1 to lock your phone; press N
to exit the lock
menu. When the phone is set to lock, the lock icon ( = ) is dis-
M0 . As prompted,
enter your 4-digit password. Press 2 to unlock your phone;
press N to exit the lock menu. If the phone is unlocked, the
played. To unlock the phone, press
lock icon ( = ) is not displayed.
-31-
Chapter 4: Safety & Performance
Safety Precautions
For safe and efficient operation of the phone, observe the following guidelines.
The cellular telephone is a radio transmitter and receiver. When the unit
is powered on, the phone receives and sends radio frequency (RF)
energy. The phone operates in the frequency range of 824 MHz to 894
MHz, and employs commonly used frequency modulation (FM) techniques. When the phone is in use, the cellular system handling the call
controls the power level at which the phone transmits. The power level
can range from 0.006 watt to 0.6 watt.
Exposure to Radio Frequency Energy
In 1991, the Institute of Electrical and Electronics Engineers (IEEE) and
in 1992, the American National Standards Institute (ANSI) adopted a
standard for safe levels of human exposure to RF energy. Approximately 120 scientists, engineers, and physicians from universities, government, and industry developed the standard. In March 1993, the
Federal Communications Commission (FCC) proposed the adoption of
the standard. The design of your phone complies with the updated standard. RF exposure can be further limited by controlling the duration of
calls and operating the phone in a power efficient manner.
Efficient Phone Operation
Extend the antenna fully to operate at the lowest power level possible.
Calls can be sent and received with the antenna retracted; however, the
phone operates more efficiently with the antenna fully extended. Hold
the cellular phone in the same manner as a standard telephone is held.
While speaking directly into the mouthpiece, position the antenna up
and over your shoulder. Do not hold the antenna when the phone is in
use. Holding the antenna affects call quality and may cause the phone
to operate at a higher power level than is necessary.
Antenna Care and Replacement
Do not use a phone with a damaged antenna. If a damaged antenna
comes into contact with skin, a minor burn could result. Replace a damaged antenna immediately with a manufacturer-approved antenna. Use
only an NEC supplied or approved antenna. Unauthorized antennas,
modifications, or attachments could damage the phone and could violate FCC regulations.
Driving
Obey the laws and regulations on the use of cellular telephones while
driving. When using your phone while driving:
•
Give full attention to driving.
•
Pull off the road and park before making or answering a call
if driving conditions require additional caution.
-32-
Electronic Devices
Most modern electronic equipment is shielded from RF energy; however, RF energy from cellular telephones may affect some inadequately
shielded electronic equipment. RF energy may affect improperly
installed or inadequately shielded electronic operating and entertainment systems in motor vehicles. Check with manufacturers or manufacturers representatives to determine if systems are adequately shielded
from external RF energy. Consult the manufacturer of any personal
medical devices (for example, pacemakers and hearing aids) to determine if the devices are adequately shielded from external RF energy.
Turn off the phone in health care facilities when any regulations posted
in the area forbid use of electronic devices. Hospitals or health care
facilities may be using equipment sensitive to external RF energy.
Aircraft
•
•
Turn off the phone before boarding any aircraft.
While the plane is on the ground, receive approval from the
airline crew prior to using the cellular phone.
•
Do not use the phone while the plane is in the air.
To prevent possible interference with aircraft systems, Federal Aviation
Administration (FAA) regulations require airline crew permission prior to
phone usage. To prevent interference with cellular systems, FCC regulations prohibit using the phone while an aircraft is in the air.
Children
Do not allow children to play with the phone; the phone is not a toy. Children could hurt themselves or others. In addition, children could damage the phone or make calls that result in an increase to the phone bill.
Blasting Areas
To avoid interfering in construction projects, turn off the phone when in
a blasting area or in areas posted: “Turn Off Two-Way Radio.” Construction crews often use remote control RF devices to set off explosives.
Air Bags
An air bag inflates with incredible force. Do not place objects, including
installed and portable wireless equipment, in the area of the air bag or
in deployment area of the air bag. If in-vehicle wireless equipment is
improperly installed and the air bag inflates, serious injury could result.
Potentially Explosive Atmospheres
Turn off the phone in an area with a potentially explosive atmosphere.
Although it is rare, the phone or its accessories could generate sparks.
Sparks in certain areas could cause an explosion of fire resulting in
bodily injury or even death.
Areas with a potentially explosive atmosphere are usually, but not
always, clearly marked. Potentially explosive areas include fueling
areas such as gas stations, below deck on boats, and fuel or chemical
transfer and storage facilities. Additional areas are atmospheres with
chemicals or particles in the air such as grain, dust, or metal powders;
and any area where it is advised to turn off the vehicle engine.
-33-
Do not transport or store flammable gas, liquids, or explosives in the
same compartment that contains the phone or its accessories.
Vehicles using liquefied petroleum gas, such as propane or butane,
must comply with the National Fire Protection Standard (NFPA-58). For
a copy of the standard, contact the National Fire Protection Association,
One Batterymarch Park, Quincy, MA 02269, Attn: Publication Sales
Division.
Pacemakers
Research sponsored by Wireless Technology Research (WTR) indicates that some wireless telephones cause interference with pacemakers. NEC America, Inc., endorses the following recommendations:
•
Wireless phones should be kept at a safe distance from a
pacemaker. Existing data indicate that the greater the distance between a pacemaker and a wireless phone, the less
the risk of interference. The data further indicates that six
inches is the proper separation distance for minimal risk.
•
Practical steps to achieve the recommended separation distance include not placing a wireless telephone in the area
over the pacemaker, such as a shirt pocket, when the phone
is powered on. (The unit is considered on when power is
being supplied to the phone by the battery.) Another practical step is to listen into the phone using the ear opposite the
location of the pacemaker.
•
Note that no comprehensive data indicates that bystanders
with pacemakers are at risk of interference from another
person operating a cellular phone.
-34-
Phone Performance
Technical Information
Dimensions (without
antenna)
147.32 x 50.8 x 27.94mm
5.8″ x 2.0″ 1.1″
Weight
8.42 ounces (NiCd battery)
8.78 ounces (NiMH battery)
Transmitting Power
0.6 W max. ERP
Operating Voltage
4.8V
Frequency Band
824.040 - 848.970 MHz (TX)
869.040 - 893.970 MHz (RX)
Standard Battery
Capacity
1000 mAh (NiCd)
1300 mAh (NiMH)
Number of Channels
832
Memory Locations
99
Memory Capacity
26 numeric digits per location
10 letters per location
Battery Care & Disposal
Your phone battery is a sealed unit with no serviceable parts
inside; do not attempt to open the case. To ensure the maximum
life from your battery, allow the battery to fully discharge at least
once a week. To fully discharge the battery, leave the phone
turned on until the message
RECHARGE BATTERY
is displayed and the phone shuts itself off. If left unused, a fully
charged battery discharges in approximately one month. Store
batteries uncharged in a cool, dark, and dry place.
DO NOT PLACE USED BATTERIES IN YOUR REGULAR TRASH.
NICKEL CADMIUM (NiCd) BATTERIES MUST BE COLLECTED,
RECYCLED, OR DISPOSED OF IN AN ENVIRONMENTALLY SOUND
MANNER.
The incinerating, landfilling, or mixing of nickel-cadmium (NiCd) batteries with municipal solid waste stream is PROHIBITED BY LAW in most
states.Return batteries to a federal or state approved nickel-cadmium
(or sealed lead) battery recycler. Possible locations include the location
the battery was purchased or local sellers of automotive batteries. In all
states except Minnesota, call 1-800-822-8837 for further disposal information, if necessary. In Minnesota, call 1-800-225-PRBA. Contact local
waste management officials for additional information on the environmentally sound collection, recycling, and disposal of batteries.
-35-
Chapter 5: Warranty & Service
Limited Warranty
1. What Products May Be Covered By This Limited Warranty?
The following products (the “Products” or the “Product”) purchased through an NEC America, Inc. (NECAM), Wireless Communications Division Authorized Dealer (the “Dealer”) in the
United States on or after January 1, 1997, may be covered by
this warranty:
[DIGITALTALK MAX™ 2100 CELLULAR TELEPHONE]
2. What Does This Warranty Cover?
NECAM warrants to the original end-user Product purchaser
(“You”) that the Products will conform to the applicable published
specifications in effect at the time of shipment from NECAM to
the Dealer, and that the Products will be free from defects in
materials or workmanship under normal use and service during
the warranty period described in Paragraph 4.
3. When Does Your Warranty Begin?
The warranty period will begin on the date You purchase the
product. Dated proof of purchase is necessary to accompany
and product returned for warranty service consideration. Valid
proof of purchase must identify the point of purchase, date of
purchase, Product model or trade name, and Electronic Serial
Number or Mechanical Serial Number for transceivers and
boosters.
4. How Long Does The Coverage Last?
The warranty period for the Product is:
[ONE (1) YEAR]
Any Products repaired or replaced under the terms of this warranty are covered under the warranty for the remainder of the
original warranty period or ninety (90) days from the date of service return shipping, whichever is longer.
5.
What Will The Manufacturer Do If The Product Becomes
Defective In Materials Or Workmanship During The Warranty
Period?
If any Product covered under this warranty becomes defective in
materials or workmanship during the applicable warranty period,
NECAM will, at its option, either repair the defective product
without charge for parts and labor, or provide a replacement in
exchange for the defective Product.
6. What Is Not Covered By This Warranty?
(a) This warranty does not extend to:
(i) Products which have been subjected to misuse, accident, physical damage, improper installation, abnormal operation or handling, neglect, inundation, fire, water, or other liquid intrusion, or;
(ii) Products which have been damaged due to repair, altered, or
modified by anyone other than an authorized service warranty
component-level representative of NECAM, or;
(iii) Defects caused by components, parts, or accessories not
compatible with the warranted Product, or;
(iv) Products whose warranty/quality labels, product serial number
plates or electronic serial numbers have been removed, altered, or
rendered illegible, or;
-36-
(v) Accessory items such as antenna, cables, curl cords, cases,
etc., or;
(vi) Products shipped to NECAM for repair from outside the United
States.
(b) Any other warranties, including but not limited to the implied warranties of merchantability and fitness for a particular purpose, shall
be limited to the duration of this warranty. Some states do not allow
limitations on how long an implied warranty lasts, so the above limitation may not apply to you.
(c) NECAM’s total liability for damages for any cause related to or
arising out of the use or inability to use the product, whether in
contract, negligence, strict tort, or based on any other legal theory,
shall not exceed the original price paid for the product.
(d) In no case shall NECAM be liable for any indirect, special, incidental, or consequential damages based upon breach of warranty,
breach of contract, negligence, strict tort, or any other legal theory.
Such damages include, but are not limited to, loss of profits, loss of
savings or revenues, inability to use the products or any associated equipment, cost of capital, cost of any substitute equipment,
facilities or services, claims by third parties other than you, and
injury to property. These limitations do not apply to claims for personal injury. Some states do not allow the exclusion or limitation of
incidental or consequential damages, so the above limitation or
exclusion may not apply to you.
7. How Do You Get Warranty Service?
If Your Product requires warranty service, it must be returned to
an NEC Authorized Service Center along with a description of
the Product malfunction or difficulty. You are required to substantiate warranty status with a dated proof of purchase (as
explained in item #3), inclusive of Products’s serial number (if
applicable). The address of the nearest NECAM Authorized Service Center may be obtained by calling (800) 637-5917 or (972)
751-7500, or by writing to: NEC America, Inc., Attention: Service
Support & Administration, 1621 Walnut Hill Lane, Irving, Texas,
75038. NECAM assumes no risk for damage or loss in transit.
If, in NECAM’s sole opinion, the Product failure is not covered
under this warranty, or proof of purchase does not meet the
terms of this warranty, you will be notified and your authorization
will be requested for any further repair activity. Products
repaired under warranty will be returned to You, transportation
prepaid.
8. How Does State Law Apply To This Warranty?
This warranty gives You specific legal rights, and You may also
have other rights which vary from state to state.
9. This Warranty Is The Entire Agreement.
Unless modified in writing, signed by both You and NECAM, this
warranty is understood to be the complete and exclusive agreement.
REV: LW012097
-37-
NEC Service Support
NEC Service Support can assist you with any additional information that you may need in the operation your NEC cellular telephone and NEC Authentic Accessories™. Contact NEC Service
Support at the following telephone number or address.
Writing:
NEC America, Inc.
Service Support
1621 Walnut Hill Lane
Irving, Texas 75038
Telephone:
1-800-637-5917*
1-972-751-7500
*The 800 number listed above also provides access to NEC
Repair Service and Parts Sales.
NEC Wireless Marketing
NEC Wireless Marketing can be contacted at the following
address or telephone number.
Telephone:
1-800-421-2141
Writing:
NEC America, Inc.
Wireless Marketing Division
1621 Walnut Hill Lane
Irving, Texas 75038
Copyright © 1998 by NEC America, Inc.
Manual Part Number: 621-0317
1st Edition November 1998
All Rights Reserved. Printed in U.S.A.
All specifications and conditions subject to change without notice.
LICENSED UNDER ONE OR MORE OF THE FOLLOWING U.S. PATENTS
4,954,951
4,396,976
4,739,396
4,942,516
4,371,923
4,675,863
4,896,260
4,121,284
4,817,089
4,829,419
4,120,583
4,912,705
-38-
4,825,364
4,435,732
5,022,024
4,686,622
4,471,385
5,121,391
4,531,182
4,672,457
Index
A
Acquire New System. . . . . . . . . . . 27
Activation, Phone . . . . . . . . . . . . . . 1
Add to Phone Book . . . . . . . . . . . . 12
Adding Numbers from a Call Log to the
Phone Book . . . . . . . . . . . . . . . . . 12
Adding Numbers from Scratchpad to
the Phone Book . . . . . . . . . . . . . . . 12
Adjusting
Earpiece Volume . . . . . . . . . . . 7
Keypad Volume . . . . . . . . . . . . 7
Air Time. . . . . . . . . . . . . . . . . . . . . 11
Alarm. . . . . . . . . . . . . . . . . . . . . . . 24
Deactivate . . . . . . . . . . . . . . . 24
Set . . . . . . . . . . . . . . . . . . . . . 24
Turn Off . . . . . . . . . . . . . . . . . 24
All Mute . . . . . . . . . . . . . . . . . . . . . 30
Analog Call Type. . . . . . . . . . . . . . 18
Answering a Call . . . . . . . . . . . . . . . 6
Any Key Answer . . . . . . . . . . . . . 6, 18
Audio . . . . . . . . . . . . . . . . . . . . . . . 21
Authentic Accessories. . . . . . . . . . . 1
Auto
Answer. . . . . . . . . . . . . . . . . . 26
Lock . . . . . . . . . . . . . . . . . . . . 18
Pause . . . . . . . . . . . . . . . . . . 30
Power On/Power Off . . . . . . . 24
Deactivate . . . . . . . . . . . 24
Set . . . . . . . . . . . . . . . . . 24
Turn Off . . . . . . . . . . . . . 24
B
Backlight . . . . . . . . . . . . . . . . . . . . 26
Basic Operations. . . . . . . . . . . . . . . 5
Battery
Care & Disposal . . . . . . . . . . . 35
Charging . . . . . . . . . . . . . . . . . 2
Connecting . . . . . . . . . . . . . . . 1
Disconnecting . . . . . . . . . . . . . 1
Locking Latch . . . . . . . . . . . . . 1
Battery Charge Indicator . . . . . . . . . 5
C
Call . . . . . . . . . . . . . . . . . . . . . . . . . 18
Analog/Digital Type . . . . . . . . 18
Answering . . . . . . . . . . . . . . . . 6
Any Key Answer . . . . . . . . . . 18
Digital & Analog Channels. . . 19
Ending . . . . . . . . . . . . . . . . . . . 6
Placing. . . . . . . . . . . . . . . . . . . 6
Call Waiting . . . . . . . . . . . . . . . . . . . 6
Caller Identification . . . . . . . . . . . . . 6
Cellular Phone Number, Viewing . . . 8
Charging the Battery . . . . . . . . . . . . 2
Charging Times, Battery . . . . . . . . . 2
Checking Signal Strength . . . . . . . . . 5
Clear
All Text Messages . . . . . . . . . 17
Call Logs & Air Time Counter 11
Phone Book . . . . . . . . . . . . . . . 13
Clock . . . . . . . . . . . . . . . . . . . . . . . 23
clock, setting . . . . . . . . . . . . . . . . . . 8
Connecting Battery . . . . . . . . . . . . . 1
Correcting Digit Entry Error. . . . . . . . 6
D
Date, Setting . . . . . . . . . . . . . . . . . . 8
Dialed Calls Log . . . . . . . . . . . . . . 10
Dialing . . . . . . . . . . . . . . . . . . . . . . . 6
Fixed Digit . . . . . . . . . . . . . . . 24
Number stored in Phone Book 6
One-Touch . . . . . . . . . . . . . . . 24
Digit Entry Error, Correcting . . . . . . . 6
Digital Call Type . . . . . . . . . . . . . . . 18
Display Icons . . . . . . . . . . . . . . . . . . 3
Display, Standby Mode . . . . . . . . . . 5
DTMF
Length . . . . . . . . . . . . . . . . . . . 19
On or Off . . . . . . . . . . . . . . . . . 20
transmit . . . . . . . . . . . . . . . . . . 20
E
Enabled or Disabled Word Wrap . . 21
Ending a Call . . . . . . . . . . . . . . . . . . 6
Environment . . . . . . . . . . . . . . . . . 24
Escalating alert . . . . . . . . . . . . . . . 21
F
Fixed Digit Dialing . . . . . . . . . . . . . 24
G
Getting Started . . . . . . . . . . . . . . . . 1
H
Handsfree . . . . . . . . . . . . . . . . . . . . 25
Handsfree Switch . . . . . . . . . . . . . 25
Home Only System . . . . . . . . . . . . 23
I
Indicator, Battery Charge . . . . . . . . . 5
K
Keypad Volume, Adjusting . . . . . . . . 7
L
Language . . . . . . . . . . . . . . . . . . . . 25
Last Number Dialed, Calling . . . . . . 6
Limited Warranty . . . . . . . . . . . . . . 36
Link to Phone Book . . . . . . . . . . . . 30
Lock 18
Auto. . . . . . . . . . . . . . . . . . . . . 18
Keypad . . . . . . . . . . . . . . . . . . 26
Lock/Unlock Keypad . . . . . . . . 26
Phone . . . . . . . . . . . . . . . . . . . 31
Locking Latch, Battery . . . . . . . . . . . 1
Locking the Phone Book . . . . . . . . 13
Log
Dialed Calls . . . . . . . . . . . . . . . 10
Missed Calls . . . . . . . . . . . . . . 10
Received Calls . . . . . . . . . . . . 10
Long Tone Use. . . . . . . . . . . . . . . . 19
M
Main Menu . . . . . . . . . . . . . . . . . . . . 9
Manual Pause . . . . . . . . . . . . . . . . 29
Marketing, NEC Wireless . . . . . . . . 38
Menu 0 Lock Phone . . . . . . . . . . . . 31
Menu 1 Call Logs . . . . . . . . . . . . . . 10
Menu 3 Message . . . . . . . . . . . . . . 14
Menu 4 Settings . . . . . . . . . . . . . . . 17
Menu 5 Lock/Unlock Keypad . . . . . 26
Menu 6 Silent Mode . . . . . . . . . . . . 27
Menu 7 Non Pub(lic) Mode. . . . . . . 27
Menu 8 Digits Editing . . . . . . . . . . . 29
Menu 9 Mute . . . . . . . . . . . . . . . . . 30
Menu Navigation Keys . . . . . . . . . . . 4
Menu Tree Overview . . . . . . . . . . . . 4
Message
Wakeup . . . . . . . . . . . . . . . . . . 25
Messages
Text . . . . . . . . . . . . . . . . . . . 2, 15
Voice . . . . . . . . . . . . . . . . . . 2, 14
Mic Mute. . . . . . . . . . . . . . . . . . . . . 30
Missed Calls Log . . . . . . . . . . . . . . 10
Mode
Non Public . . . . . . . . . . . . . . . 27
Silent . . . . . . . . . . . . . . . . . . . . 27
-39-
Index
Standby . . . . . . . . . . . . . . . . . . 5
Mute
All. . . . . . . . . . . . . . . . . . . . . . 31
Microphone . . . . . . . . . . . . . . 30
Unmute . . . . . . . . . . . . . . . . . 31
N
Navigation, Menu . . . . . . . . . . . . . . 9
Network. . . . . . . . . . . . . . . . . . . . . 22
O
One-Touch Dialing . . . . . . . . . . . . 24
P
Password
Change . . . . . . . . . . . . . . . . . 18
Phone . . . . . . . . . . . . . . . . . . . 2
Set . . . . . . . . . . . . . . . . . . . . . 18
Pause
Auto . . . . . . . . . . . . . . . . . . . . 30
Manual. . . . . . . . . . . . . . . . . . 29
Performance, Phone . . . . . . . . . . . . 1
Phone
Turning Off. . . . . . . . . . . . . . . . 5
Turning On. . . . . . . . . . . . . . . . 5
Phone Activation . . . . . . . . . . . . . . . 1
Phone Book
Add to . . . . . . . . . . . . . . . . . . 12
Adding Numbers from a
Call Log . . . . . . . . . . . . . . . . . 12
Adding Numbers from
Scratchpad . . . . . . . . . . . . . . . 12
Clearing . . . . . . . . . . . . . . . . . 13
Locking . . . . . . . . . . . . . . . . . . 13
Using . . . . . . . . . . . . . . . . . . . . 8
View by Location . . . . . . . . . . 13
View By Name . . . . . . . . . . . . 13
View By Phone Number . . . . . 13
Phone Layout . . . . . . . . . . . . . . . . . . 3
Phone Number
Dialing Number Stored in
Phone Book . . . . . . . . . . . . . . . 6
Select. . . . . . . . . . . . . . . . . . . 23
Viewing Your . . . . . . . . . . . . . . 8
Phone Password. . . . . . . . . . . . . . . 2
Phone Performance . . . . . . . . . . . 35
Phone Safety & Performance . . . . . 1
Phone, Turning Off . . . . . . . . . . . . . 5
Phone, Turning On . . . . . . . . . . . . . 5
Placing a Call . . . . . . . . . . . . . . . . . 6
R
Received Calls Log . . . . . . . . . . . . 10
Reset Settings. . . . . . . . . . . . . . . . 26
Retrieving Voice Mail . . . . . . . . . . . . 8
Ring Alert . . . . . . . . . . . . . . . . . . . . . 6
Ring type . . . . . . . . . . . . . . . . . . . . 21
Ring volume . . . . . . . . . . . . . . . . . . 21
Ringer
Type, Selecting . . . . . . . . . . . . . 7
Volume, Setting . . . . . . . . . . . . 7
Roll Off Order . . . . . . . . . . . . . . . . 20
S
Safety & Performance . . . . . . . . . . 32
Safety Precautions . . . . . . . . . . . . 32
Safety, Phone . . . . . . . . . . . . . . . . . 1
Search for System . . . . . . . . . . . . . 28
Secured Conversation . . . . . . . . . . 22
Select Phone Number . . . . . . . . . . 23
Select System . . . . . . . . . . . . . . . . 22
Selecting Ringer Type . . . . . . . . . . . 7
Service . . . . . . . . . . . . . . . . . . . . . . 36
Service Support . . . . . . . . . . . . . . . 38
Set (Change) Password . . . . . . . . 18
Set Alarm, Auto On, Auto Off . . . . 23
Set Clock . . . . . . . . . . . . . . . . . . . . 23
Setting Ringer Volume . . . . . . . . . . . 7
Settings
Reset . . . . . . . . . . . . . . . . . . . 26
Short Tone Use . . . . . . . . . . . . . . . 19
Signal Strength, Checking . . . . . . . . 5
SMS Menu . . . . . . . . . . . . . . . . . . . 16
Sort Order . . . . . . . . . . . . . . . . . . . 21
Speed Dialing . . . . . . . . . . . . . . . . . 24
Standard System . . . . . . . . . . . . . . 23
Standby Mode Display . . . . . . . . . . 5
Store As Voice Mail Number . . . . . 17
Storing Voice Mail Number . . . . . . . 8
System
Acquire New . . . . . . . . . . . . . . 27
Search for . . . . . . . . . . . . . . . 28
View Stored . . . . . . . . . . . . . . 28
System A Only . . . . . . . . . . . . . . . . 23
System B Only . . . . . . . . . . . . . . . . 23
T
Technical Information . . . . . . . . . . 35
Text Message . . . . . . . . . . . . . . . . 20
Text Message Viewer . . . . . . . . . . 16
Text Messages . . . . . . . . . . . . . 2, 15
Alert . . . . . . . . . . . . . . . . . . . . 15
Clear All . . . . . . . . . . . . . . . . . 17
Displayed Notification . . . . . . 15
Types . . . . . . . . . . . . . . . . . . . 15
Viewer . . . . . . . . . . . . . . . . . . . 16
Time, Setting . . . . . . . . . . . . . . . . . . 8
Tone
length . . . . . . . . . . . . . . . . . . . 19
short & long. . . . . . . . . . . . . . . 19
transmit DTMF . . . . . . . . . . . . 20
Transmit DTMF Tone . . . . . . . . . . . 20
Turning Off Phone . . . . . . . . . . . . . . 5
Turning On Phone . . . . . . . . . . . . . . 5
U
Unmute. . . . . . . . . . . . . . . . . . . . . . 30
Using Phone Book . . . . . . . . . . . . . . 8
V
View
by (Phone) Number. . . . . . . . . 13
by Location . . . . . . . . . . . . . . . 13
by Name . . . . . . . . . . . . . . . . . 13
Stored Systems. . . . . . . . . . . . 28
Your Phone Number . . . . . . . . . 8
Voice Channels/Call Types . . . . . . 19
Voice Mail
Retrieving . . . . . . . . . . . . . . . . . 8
Store As Number . . . . . . . . . . 17
Storing Number. . . . . . . . . . . . . 8
Voice Mail Messages . . . . . . . . . . . . 2
Voice Messages . . . . . . . . . . . . . . 14
Voice Privacy . . . . . . . . . . . . . . . . . 22
Volume
Adjusting Earpiece . . . . . . . . . . 7
Adjusting Keypad . . . . . . . . . . . 7
Keys . . . . . . . . . . . . . . . . . . . . . 7
W
Wakeup Message. . . . . . . . . . . . . . 25
Warranty. . . . . . . . . . . . . . . . . . . . . 36
Word Wrap . . . . . . . . . . . . . . . . . . . 20
-40-
Quick Reference Guide
Basic Function
Operation
Turn On/Off Phone
Press and hold P for
approximately two seconds.
Place A Call
Key in phone number;
press S .
Answer A Call
Press
S.
End A Call
Press
N.
View Own
Phone Number
Press C .
Access Phone Book
Press B to scroll through
names; press S to call.
Access Main Menu
Press M .
Navigate in Menus
Press
E
Exit Menu
Press
N.
Store Voice Mail
Phone Number
Key in voice mail phone
number; press M34 .
Retrieve Voice Mail
Press
E1 .
Retrieve Text Messages
Press
E2 .
Set Time and Date
Press M461 . Key in
hour; press B . Key in minutes; press B . Press M to
select a.m. or p.m. Key in
month (1-12); press B . Key
in day (1-31); press B . Key
in year; press N .
Lock/Unlock
Phone Keypad
Press M5 .
Adjust Earpiece Volume
During a call, press < to
increase or > to decrease.
Adjust Keypad Volume
With the phone in the standby
mode, press < to increase or
> to decrease.
and
B.
Menu Overview
M
M1
Main Menu
Call Logs
M11
M12
M13
M14
M15
M2
Phone Book
M21
M22
M23
M24
M25
M26
M3
M0
Off
On
Acquire New System
Search for System
View Stored Systems
Digits Editing
M81
M82
M83
M9
Lock
Call
Text Message
Audio
Network
Clock
Environment
Handsfree
Reset settings
Non Public Mode
M71
M72
M73
M8
Voice Messages
Text Messages
Clear All Text Messages
Store Voice Mail Phone Number
Lock Keypad
Silent Mode
M61
M62
M7
View by Name
View by Location
View by Number
Lock Phone Book
Clear Phone Book
Settings
M41
M42
M43
M44
M45
M46
M47
M48
M49
M5
M6
Add to Phone Book
Messages
M31
M32
M33
M34
M4
Dialed
Received
Missed
Air Time
Clear Call Logs & Air Time Counter
Manual Pause
Auto Pause
Link to Phone Book
Mute (In Conversation)
M91
Mic Mute
M92
Mic and Earpiece Mute
M93
Unmute
Lock Phone
M01
Lock
M02
Unlock