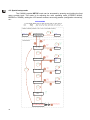
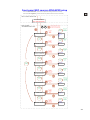
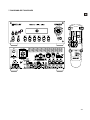
1
USER MANUAL MANUAL DE INSTRUCCIONES CA200z Graphic Symbol Explanation The lightning flash with arrowhead symbol, within an equilateral triangle, is intended to alert the user to the presence of uninsulated “dangerous voltage” within the product’s enclosure that may be of sufficient magnitude to constitute a risk of electric shock to persons. The exclamation point within an equilateral triangle is intended to alert the user to the presence of important operating and maintenance (servicing) instructions in the literature accompanying the appliance. The lightning flashes printed next to the OUTPUT terminals of the amplifier are intended to alert the user to the risk of hazardous energy. Output connectors that could pose a risk are marked with the lightning flash. Do not touch output terminals while amplifier power is on. Make all connections with amplifier turned off. WARNING: To prevent fire or shock hazard, do not expose this equipment to rain or moisture. IMPORTANT SAFETY INSTRUCTIONS 1. 2. 3. 4. 5. 6. 7. 8. 9. 10. 11. 12. 13. 14. 2 Read these instructions. Keep these instructions. Heed all warnings. Follow all instructions. Do not use this apparatus near water. Clean only with dry cloth. Do not block any ventilation openings. Install in accordance with the manufacturer’s instructions. Do not install near any heat sources such as radiators, heat registers, stoves, or other apparatus (including amplifiers) that produce heat. Do not defeat the safety purpose of the polarized or grounding type plug. A polarized plug has two blades with one wider than the other. A grounding type plug has two blades and a third grounding prong. The wide blade or the third prong are provided for your safety. If the provided plug does not fit into your outlet, consult an electrician for replacement of the obsolete outlet. Protect the power cord from being walked on or pinched particularly at the plugs, convenience receptacles, and at the point where they exit from the apparatus. Only use attachments/accessories specified by the manufacturer. Unplug the apparatus during lightening sorts or when unused for long periods of time. Refer all servicing to qualified personnel. Servicing is required when the apparatus has been damaged in any way, suck as power supply cord or plug is damaged, liquid has been spilled or objects have fallen into the apparatus, the apparatus has been exposed to rain or moisture, does not operate normally, or has been dropped. Disconnecting from mains: Switching off the POWER switch all the functions and light indicators of the amplifier will be stopped, but fully disconnecting the device from mains is done unplugging the power cord from the mains input socket. For this reason, it always shall remain readily operable. INSTRUCTION MANUAL 1. IMPORTANT NOTE 1.1. Compliance with international standards 04 04 2. INTRODUCTION 05 3. INSTALLATION 3.1. Location and assembly 3.2. Mains connection 3.3. Audio input connections 3.4. Audio output connections 3.5. Remote control options 06 06 06 06 08 08 4. OPERATION AND USAGE 4.1. Initial operation and default mode 4.2. Special setup mode 4.3. LINE 1 to LINE4, MIC1 and MIC2 front panel keys 4.4. AUTO STANDBY Function 4.5. LED indicators 4.6. Lock mode 4.7. Restore default settings and update firmware 11 11 12 14 19 20 20 21 5. CLEANING 21 6. LIST OF FUNCTIONS 22 7. DIAGRAM OF FUNCTIONS 23 8. TECHNICAL CHARACTERISTICS 46 9. BLOCK DIAGRAM 47 10. CONFIGURATION DIAGRAM 48 All numbers subject to variation due to production tolerances. ECLER S.A reserves the right to make changes or improvements in manufacturing or design which may affect specifications. 3 1. IMPORTANT NOTE Congratulations! You have acquired the result of painstaking design and manufacturing. Thank you for having chosen our CA200z Compact Amplifier. In order to get the optimum operation and efficiency from your product, it is VERY IMPORTANT - before you plug anything - to read this manual very carefully and take seriously into account all considerations specified within it. We strongly recommend that its maintenance be carried out by our Authorised Technical Services. 1.1. Compliance with international standards The CA40 micro amplifier complies with the following international standards: EN55103-1 Electromagnetic Compatibility. Product family standard for audio, video, audio-visual and entertainment lighting control apparatus for professional use Part 1: Emission EN55103-2 Electromagnetic Compatibility. Product family standard for audio, video, audio-visual and entertainment lighting control apparatus for professional use Part 1: Immunity EN60065 Audio, video and similar electronic apparatus. Safety requirements Complying with the requirements of directives 73/23/EC and 2004/108/EC 4 2. INTRODUCTION The CA200z is a 2 channel amplifier and digital mixer, capable of managing 2 independent audio zones and equipped with many remote control functions (RS-232 serial port, infrared remote control, 0-10VDC remote control ports). It is an ideal choice for audio applications requiring audiovisual integration with other devices: educational classes, meeting rooms and multimedia presentations, business premises, etc. Main features: 2 x 70 W RMS @ 4 Operation in STEREO/MONO/BRIDGE 2 INDEPENDENT ZONES modes (at the level of assigning audio, line and microphone sources, volume management, remote control, sending notices, etc.) Universal internal power supply 4 stereo line inputs + 2 balanced microphone inputs Duplicate MIC2 and LINE2 inputs on the front panel for quickly and conveniently connecting portable audio players, microphones for presentations, etc. (3.5 mm mini jack and 6.35 mm jack connectors, respectively) Auxiliary output for connecting to other amplifiers or external audio devices Global MUTE connector for silencing the entire unit by closing an external contact (for example: when an alarm centre needs to mute the device in order to activate an evacuation siren) Local control with backlit keys, digital rotary encoder knob, and front LCD display Infrared remote control (included): source and volume selection by zones, presets recovery, etc. Remote control through RS-232 port and CA-NET protocol 2 inputs for independent remote zone control (0-10 VDC) by 2 wall panels: WPmVOL (volume) or WPmVOL-SR (volume + source or presets selection) TALKOVER and/or PAGER functions from microphone inputs Compatible with MPAGE4 tabletop paging station for sending priority voice messages with the PAGER function 5 configuration memories (presets) recoverable from the front panel, the IR control, the WPmVOL-SR control or the RS-232 communications port AUTO STANDBY function: in the absence of an audio signal the unit automatically goes into STANDBY mode, minimising power consumption Lightweight, silent, high-performance amplifier (fan-free convection cooling) 5 3. INSTALLATION 3.1. Location and assembly The CA200z can be installed on a tabletop, in a standard 19" wide rack cabinet or in a standard 9.5" wide half-rack cabinet. Any of these installation options is possible using the available rack installation accessories (kit of 2 2UHRMKIT supports, not included as standard). 3.2. Mains connection The amplifier is powered by alternating current through its internal power source: 90264VAC and 47-440Hz. The amplifier's AC power cable must be earthed through its mains cable (earth resistance Rg = 30or lower). The working environment should be dry and completely dust-free. Do not expose the unit to rain or water splashes. Do not place liquid containers or incandescent objects such as candles on top of the unit. Always unplug the unit from the mains supply before working on or connecting/disconnecting the amplifier. There are no elements that can be manipulated by the user inside the amplifier. To avoid buzzing, do not allow the power cable to intertwine with the shielded audio cables that transport the signal. 3.3. Audio input connections The CA200z accepts two types of signals in its input channels: Microphone (MIC): with balanced Euroblock-type connections on the rear panel or jack (MIC2) connections on the front panel that can accept a signal level between -20 dBV and –50 dBV with adjustable sensitivity through its ADJ control Note: The microphone inputs have phantom power to supply condenser microphones, activated by the internal jumper (see 10. CONFIGURATION DIAGRAM section). This option comes disabled (OFF) by default or from the factory. Line signals (LINE 1 to LINE 4): equipped with a non-balanced mini jack stereo connection on the front panel (LINE 2) or double RCA on the rear panel (LINE1 to LINE4). They can admit nominal signals of -6 dBV and 0 dBV, with input sensitivity that can be adjusted through internal jumper (see section 10. CONFIGURATION DIAGRAM). These can be used to connect signals from CD players, radio tuners, mixing consoles, media players, PC and tablet audio outputs, etc. Note: Turntables CAN NOT BE CONNECTED directly to this device because none of the inputs have an RIAA preamp. Active audio sources are selected/deselected by a short press of the front panel keys labelled LINE 1 to 4, MIC1 and MIC2. The possible source selections are: 6 LINE SELECTION: -Pressing one of the LINE1 to LINE4 keys activates the corresponding line input (LED lit = selected source) -Two or more sources of this type cannot be selected simultaneously: when one line input is selected, the previous one is deselected -A selected source (LED lit) is deselected when its key is pressed again (all LEDs off), leaving the unit without an active line MICROPHONE SELECTION: -Pressing either the MIC1 or MIC2 keys activates the corresponding microphone input (LED lit = microphone selected) -One, both or neither microphone can be selected simultaneously (both LEDs lit) -A selected microphone (LED lit) is deselected (LED off) when its key is pressed again Note: Sources can also be selected with a remote control, with a WPmVOL-SR remote control panel (only LINE sources) or with the serial communication port. It is also possible to store presets that have a determined combination of active sources and recover them later with any of the available methods. Continue reading this manual to learn the details of all of these options. The way in which the active (selected) sources are directed to the unit's outputs depends on its operating mode: OPERATING MODE STEREO (St displayed on the LCD screen) MONO (Mo displayed on the LCD screen) BRIDGE (Br displayed on the LCD screen) ZONES A/B (ZA or ZB displayed on the LCD screen) ROUTING SIGNALS TO THE OUTPUTS The selected line is sent in stereo configuration to the outputs (input L to output A (L) and input R to output B (R)) The selected microphones are either simultaneously sent to both outputs (L and R) either as a direct sum of the line signal or using the TALKOVER / PAGER function (*) The selected line is sent in mono configuration (L+R) to both outputs (input L + input R to outputs L and R) The selected microphones are either simultaneously sent to both outputs (L and R) either as a direct sum with line signal or using the TALKOVER / PAGER function (*) The selected line is sent in mono configuration (L+R) to the single output in bridge mode (the speakers must be connected using the rear panel's BRIDGE + and connectors) The selected microphones are either sent to the single output in bridge mode (rear panel's BRIDGE + and - connectors), as a direct sum with the line signal or using the TALKOVER / PAGER function (*) Each output zone is monophonic and can have a source selection and/or microphones that are independent from each other: ZONE A: can receive the signal from one line (L+R) and/or one of the two microphones ZONE B: can receive the signal from one line (L+R) and/or one of the two microphones Consequently the two zones are totally independent in terms of output volumes, selection of received sources and broadcast volumes. The microphones can either work on the output zone directly (as a direct sum over the selected line signal) or by using the TALKOVER / PAGER function (*) (*) If the Talkover function is active, the microphone signal attenuates the line signal when it exceeds the activation threshold. In addition, if an MPAGE4 alert console is connected to the PAGER connector and the PAGER function of the MIC1 input is activated, it is possible to select the destination of the voice message emitted by the console, directing it either to zone A, zone B or both (internally the PAGER connector delivers its microphone signal to the MIC1 input). 7 3.4. Audio output connections The amplified outputs (OUT L (A) and R (B)) are equipped with Euroblock connectors. The cable that connects the CA200z outputs and the speakers should be of good quality, with a suitable cross-section and as short as possible. The outputs can operate in stereo mode, mono mode (same L+R signal in both channels), bridge mode (L+R signal amplified through both channels, linked together as one) or ZONES A and B independently (each output receives a set combination of active audio sources and volumes). Modes are selected from the unit's SETUP menu (see section 4.2 Special setup mode for more information) or from an external device using the serial or RS-232 port. In bridge mode, the output signal is connected through the terminals marked BRIDGE + and - on the rear panel. Remember that the minimum operating impedance for the amplifiers in mono or stereo mode is 4, and 8 when working in bridge mode. For the correct operation of the CA200z, under no circumstances should you work with impedances lower than those specified above. Attention: only the terminals indicated as BRIDGE on the unit's serigraph can be used for connecting the speakers in bridge mode. Additionally, the CA200z has an unamplified auxiliary output (AUX OUT) which makes it possible to connect it to amplifiers or other external devices. The auxiliary output AUX OUT supplies a line signal level (0 dBV) which is an unamplified replica of the signal delivered to the terminals OUTPUT L and R. 3.5. Remote control options REMOTE1 and REMOTE2 ports: each RJ-45-type REMOTE connector can be connected to a WPmVOL or WPmVOL-SR wall control panel (control 0-10 VDC). In STEREO, MONO and BRIDGE modes, the panel connected to the REMOTE1 port actuates on the 2 amplifier outputs and the REMOTE2 port is disabled. In ZONES A and B mode, the panel connected to the REMOTE1 port is associated to output A, and the panel connected to the REMOTE2 port to output B. The following can be controlled from each panel (*): o the general volume adjustment of the associated output (A, B, or both), depending on the operating mode selected, STEREO/MONO/BRIDGE/ZONES o the selection of the LINE source for the associated output (OFF, LINE1, LINE2, LINE3, LINE4) o the selection of a preset, from 1 to 5 (**), which, when selected, recovers the configuration that was stored in memory when the preset was saved (source selection, updating adjustments, volumes, etc.) (*) WPmVOL can only control the volume, whereas WPmVOL-SR can control the volume and select sources or presets (**) In ZONES (A and B) mode, only one of the two remote panels can recover presets (when this function is activated in one panel, the option automatically disappears from the SETUP menu of the other) The connection is made with a standard CAT5 cable between the WPmVOL or WPmVOL-SR wall panel and the CA200z's REMOTE connector. 8 The total volume of each output is a result of the concatenation of the MASTER volume, adjusted with the rotary encoder knob on the CA200z's front panel or with the infrared remote control, and the REMOTE volume, adjusted with each associated panel, if any. When actuated, the remote panel volume is displayed for a few moments on the front panel's LCD screen with the text REMOTE VOL 1 or 2 and a volume bar. In ZONES mode, this volume is only displayed if the zone associated with the panel in question has been selected on the screen. Note: See section 4.2 Special setup mode for instructions on how the operating modes of the ports REMOTE1 and REMOTE2 are programmed. Note: Configure the internal jumpers on the WPmVOL or WPmVOL-SR panels in 10V/Alog mode for the CA200z to operate correctly MUTE port: the MUTE connector on the rear panel makes it possible to connect an potential-free external contact closure to totally silence the CA200z if an external device actuates on it (example: a centralised emergency and evacuation warning system). For the MUTE port to be active, ports REMOTE1 or REMOTE2 can not be deactivated (OFF position) o The REMOTE1 port must be active (other than OFF) for the MUTE port to be able to silence both of the unit's outputs when it receives an external contact closure in STEREO, MONO or BRIDGE modes o When the port receives a single external contact closure in ZONES mode, the REMOTE1 port must be active (other than OFF) for the MUTE port to be able to silence output A, whereas the REMOTE2 port must be active (other than OFF) for the MUTE port to be able to silence output B Note: See section 4.2 Special setup mode for instructions on programming the operating modes of ports REMOTE1 and REMOTE2 to enable the silence function associated with the MUTE port RS-232 port: the serial communication port RS-232 allows remote management of the CA200z from a computer or external control system supporting the CA-NET protocol. See the CA-NET protocol manual for detailed information on connection and the syntaxes of the supported commands. The serial connection specifications are as follows: o o o o o o Baud rate: 9600 (fixed, without auto-negotiation) Data bits: 8 Parity: None Stop bits: 1 Flow control: None Cable: standard RS-232 DB9-DB9 (pin to pin) IR receiver: the integrated IR receptor enables controlling the CA200z with the remote control that comes with the unit: o Zone selection keys (ZONE A / B). Enables selecting the output zone that will be adjusted afterwards. After pressing the A or B key it will be possible to adjust the MASTER volume, use the MUTE control, select audio sources, etc. It is possible to change the selected zone on the unit's front panel by briefly pressing the front rotary encoder knob (only in ZONES mode). 9 o o o o o o o o Keys A and B and briefly pressing the rotary encoder knob do not work when the unit is in a mode other than ZONES mode, given that adjustments in these other modes will be shared by both outputs VOL + and - keys in the ZONE section: the MASTER volume of the previously-selected zone increases/decreases by pressing the keys. This works the same as turning the unit's front rotary encoder knob in default operation mode. Pressing and holding these keys increases or decreases the volume continuously. MUTE key: activates/deactivates the full silence of the previouslyselected zone LINE keys 1 to 4: enable selecting/deselecting a LINE source as active for the previously-selected zone (the same as the LINE1 to LINE4 keys on the front panel) VOL + and - keys in the LINE section: the volume of the previouslyselected source for the likewise previously-selected zone increases/decreases with each press of the key. A single source has independent volume adjustments for sending to zones A and B when operating in ZONES mode (example: the LINE1 source can be sent with volume of 50 to zone A and at a volume of 62 to zone B, etc.). If no LINE is selected, these controls are not operative, and the LCD screen displays the message "LINE NOT SELECTED" MIC1/MIC2 keys: enable selecting/deselecting a MIC source as active for the previously-selected zone (the same as the MIC1 and MIC2 keys on the front panel) VOL + and - keys in the MIC1 or MIC2 section: the volume of the MIC source in question for the previously-selected zone increases/decreases with each press of the key. A single microphone source has independent volume adjustments for sending to zones A and B when operating in ZONES mode (example: MIC1 can be sent at a volume of 35 to zone A and at a volume of 57 to zone B, etc.) PRESET keys: enable recovering one of the CA200z 5 presets or configuration memories. These keys must be held down for a few seconds to recover the preset in question, while the active preset is displayed on the LCD screen as P1, P2, P3, P4 or P5 ON/STBY key: Enables changing from STANDBY mode to ON mode and vice versa. To change from ON to STANDBY, this key must be pressed and held for a few moments Note: The first time a key that actuates in timed mode is pressed (PRESET 1-5 and ON/STBY), it wakes up the LCD panel if it is off, in attenuated inactivity in the DIMMED or OFF modes, or if the CA200z is in AUTO STAND BY mode. If the key is held down (long pulsation) or released and pressed again, the CA200z will execute the associated function. 10 4. OPERATION AND USAGE 4.1. Initial operation and default mode It is best to switch on the devices in the following order: sound sources, mixing unit, equalisers, active filters and processors, and finally power amplifiers. The devices should be switched off in the reverse sequence. By following this order, the transients produced from to switching the devices on or off will not affect those further on in the chain and will be inaudible. The CA200z is switched on by connecting the unit to the mains using an IEC cable (MAINS INPUT on the rear panel) and the ON/OFF switch on the rear panel. The front panel ON/STBY LED will light up in green if the unit is in operating mode (ON), in steady orange if it is in rest or power save mode (STANDBY) and in blinking green and orange if the unit has the AUTO STANDBY function enabled and has entered this mode due to a lack of audio input signals. When it is switched on and in operating mode (ON), the unit will be in the default configuration or ready for MASTER volume adjustment (output volume) and zone and audio source selection. In STEREO, MONO and BRIDGE modes, the MASTER volume is the same for the unit's two A and B outputs. In ZONES mode, the LCD screen displays the selected zone in the top left corner (ZA or ZB). To change the selected zone, press the front panel's rotary encoder knob briefly (each key press changes from ZA to ZB, or from ZB to ZA, etc.). After the zone is selected, turning the front encoder knob will change the MASTER output volume of that zone, with the change displayed on a volume bar on the LCD screen. When a zone is selected and the volume adjusted using the infrared remote control, the LCD screen's visual indicators will be exactly the same as when they are changed and adjusted with the rotary encoder knob on the front panel. In default mode it is also possible to activate or deactivate audio sources by briefly pressing the LINE1, LINE2, LINE3, LINE4, MIC1 or MIC2 front panel keys (or with the infrared remote control). A brief press of one of the LINE or MIC keys activates/deactivates said audio source in the previously-selected zone. Only one (or none) of the 4 LINE sources can be active in each output zone. It is possible, however, to activate one or even both microphones (or none) in each output zone. See section 4.3 Front panel keys LINE 1 to LINE4, MIC1 and MIC2 for more information on the ADVANCED adjustment mode for the LINE and MIC inputs, accessed by pressing and holding down their respective keys on the front panel. 11 4.2. Special setup mode The CA200z's special SETUP mode can be accessed by pressing and holding the front rotary encoder knob. This mode is for adjusting the unit's operating mode (STEREO, MONO, BRIDGE or ZONES), setting the LCD screen contrast, recovering presets (configuration memories), etc.: SETUP MODE To enter SETUP MODE press and hold the front knob for more than 2.5 Front : Short (press the front panel knob briefly, less than 0.5 Front : Long (press & hold the front panel knob for more than 2.5 DEFAULT MODE (MASTER volume control and ZONE selection) SWITCH ZA / SP (only for ZONES mode) SP to select ZA or ZB MASTER VOLUME / ZONE SELECT SETUP MODE L P Rotate knob to adjust main output volume Level shown in LCD graphbar OUTPUT Level: 0 to 64 (64 steps) LP to enter the SETUP mode SP LOAD PRESET 1 ... 5 L PRESET number shown in LCD LP to enter the PRESET recovery mode Rotate knob to select PRESET number LOAD 1, 2, 3, 4 or 5 SP to load PRESET and get back SP Rotate knob to browse options L OUTPUT MODE Mode shown in LCD LP to enter the OUTPUT mode selection Rotate knob to select a mode OUTPUT STEREO SP to get back SP MONO BRIDGE ZONES Rotate knob to browse options Rotate knob to browse options Mode shown in LCD LP to enter the LCD working MODE L LCD MODE Rotate knob to select a mode LCD SP to get back SP ON DIMMED OFF Rotate knob to browse options Contrast level shown in LCD LP to enter L LCD CONTRAST the LCD CONTRAST adjust mode Rotate knob to adjust level LCD Level: 0 to 100 SP to get back SP Rotate knob to browse options VERSION INFO vX.Y Firmware version shown in LCD Rotate knob to browse options ADVANCED MODE KEY CODE REQUIRED 12 MIC1 MIC2 + + L Press and hold MIC1 + MIC2 + front panel knob to enter the MIC SETUP ADVANCED MODE Notes: The LCD mode adjustment makes it possible to leave the screen on whenever the CA200z is in ON mode, or for it to be DIMMED or OFF after about 20 seconds of inactivity on the user controls. In setup mode, the options of each parameter are displayed intermittently on the LCD screen To access the ADVANCED SETUP mode, press and hold the special key combination MIC1 + MIC2 + front rotary encoder knob: ADVANCED SETUP mode Front knob SP: Short Press (press the front panel knob briefly, less than 0.5 seconds) Front knob LP: Long Press (press & hold the front panel knob for more than 2.5 seconds) SETUP MODE ADVANCED MODE KEY CODE REQUIRED MIC1 ADVANCED SETUP MODE MIC2 + + LP Press and hold MIC1 + MIC2 + front panel knob to enter the ADVANCED SETUP MODE SP LP SAVE PRESET 1 ... 5 PRESET number shown in LCD LP to enter the PRESET SAVE mode SAVE PRESET 1, 2, 3, 4 or 5 SP to SAVE and get back SP Rotate knob to browse options LP AUTOLOAD PRESET 1 Status shown in LCD LP to enter the AUTOLOAD PRESET 1 setup Rotate knob to select an option AUTOLOAD PR 1 (at every power ON) ON / OFF SP to get back SP Rotate knob to browse options LP Rotate knob to browse options Rotate knob to select PRESET number Mode shown in LCD LP to enter the REMOTE1 control port setup mode REMOTE1 REMOTE1 SP to get back SP Rotate knob to browse options LP Rotate knob to adjust REMOTE2 control port working mode REMOTE2 REMOTE2 SP Rotate knob to browse options LP VOL + INPUTS VOL + PRESETS OFF Mode shown in LCD LP to enter the REMOTE2 control port setup mode SP to get back Rotate knob to adjust REMOTE1 control port working mode VOL + INPUTS VOL + PRESETS OFF Mode shown in LCD LP to enter the Infrared remote control setup Rotate knob to enable or disable the IR REMOTE control IR REMOTE IR REMOTE ON / OFF SP to get back SP 13 1. 2. 3. Notes: The special adjustment mode can be exited at any time (returning to the default mode) by briefly pressing any front panel key or not touching the controls for 20 seconds. AUTOLOAD PRESET 1: when this function is active (ON) the CA200z will recover preset no. 1 every time it starts up (using the ON/OFF switch on the rear panel or the power supply). REMOTE1/REMOTE2: o When OFF mode is selected, the REMOTE port in question is disabled along with its associated MUTE function, which is triggered by closing the external contact connected to the MUTE port on the rear panel o When the VOL + INPUTS mode for a remote port is selected, it can manage the remote volume in its associated zone (using a WPmVOL-type panel) or the remote volume and the active LINE source selection in its associated zone (using a WPmVOL-SR-type panel). The options on the panel are OFF, LINE1, LINE2, LINE3, and LINE4, corresponding to the 5 physical positions of the dial on the remote panel o When the VOL + PRESETS mode for a remote port is selected, it will be able to manage the remote volume in its associated zone (using a WPmVOL-type panel) or the remote volume and the CA200z's active preset selection, from 1 to 5 (using a WPmVOL-SR-type panel) o As only one of the two REMOTE ports can be configured in VOL + PRESETS mode, the other will not display this option in the SETUP menu See section 3.5 Remote control options for more details on remote management from the REMOTE ports based on the operating mode selected on the CA200z (STEREO, BRIDGE, MONO or ZONES) 4. When switching on the unit or recovering a given preset with any of the available methods (starting up the equipment with the AUTOLOAD PRESET 1 option activated, using the front panel, infrared remote control, RS-232 communication port, etc.), the physical position of the dial on the wall panels connected to the REMOTE ports (if any) will be bypassed if the CA200z's start up or new presets have source selection or presets adjustments that differ from that physical position. As soon as the wall panel dial is used again, the panels will synchronise with the CA200z unit, with the new selection prevailing 4.3. LINE 1 to LINE4, MIC1 and MIC2 front panel keys A short press of one of the LINE or MIC keys activates/deactivates said audio source in the previously-selected zone (see section 4.1 for selecting zones in ZONES mode). Only one (or none) of the 4 LINE sources can be active in each output zone. It is possible, however, to activate one or even both microphones (or none) in each output zone. Press and hold one of the LINE keys to access its detailed adjustments (VOL, BASS, TREBLE). The complete process for entering and operating in this special adjustment mode, as well as the available adjustment options, are shown in the following graphic: Note: It is possible to exit the special adjustment mode (returning to the default mode) at any time by briefly pressing any front panel key or waiting 20 seconds without working the controls. 14 Note: In ZONES mode, the detailed LINE input adjustments are made independently for the selected zone, A or B: a single LINE audio source can be adjusted with different volume and tone controls for zones A or B. In STEREO, MONO and BRIDGE (single zone) modes, the detailed adjustments are shared, given that there are no zones for independently directing and adjusting the audio sources. During detailed adjustments of a LINE input, the affected zone is displayed in the top left corner of the LCD screen (ZA or ZB). Front panel LINE sources setup To enter the LINE SETUP MODE, first select zone A or B with a tap of the front knob or the IR remote (only when using the ZONES mode), then press LINE1 or LINE2 or LINE3 or LINE 4 key and hold it for more than 2.5 seconds Front knob SP: Short Press (press the front panel knob briefly, less than 0.5 seconds) Front knob LP: Long Press (press & hold the front panel knob for more than 2.5 seconds) Default mode (STEREO / MONO / BRIDGE / ZONE A or ZONE B) LINE1, 2, 3 or 4 LINEx setup mode (x = 1, 2, 3 or 4) Press & hold LINEx key to enter LINEx setup mode SP LP Level shown in LCD LP to enter the VOLUME adjust mode Rotate knob to adjust level LINEx VOLUME VOL Level: 0 to 64 SP to get back SP Rotate knob to browse options Rotate knob to browse options LP Level shown in LCD LP to enter the BASS adjust mode Rotate knob to adjust level LINEx BASS BASS Level: -10 to +10 SP to get back SP Rotate knob to browse options LP Level shown in LCD LP to enter the TREBLE adjust mode Rotate knob to adjust level LINEx TREBLE TREBLE Level: -10 to +10 SP to get back SP Pressing and holding down one of the MIC keys accesses its detailed adjustments. The complete process for entering and operating in this special adjustment mode, as well as the available adjustment options, are shown in the following graphic: Note: It is possible to exit the special adjustment mode (returning to the default mode) at any time by briefly pressing any front panel key or waiting 20 seconds without working the controls. Note: In ZONES mode, the detailed VOL adjustment of the MIC inputs are made independently for the selected zone, A or B, and a single MIC audio source can be adjusted with different volumes for zones A and B (but with the same BASS/TREBLE adjustments for both destination 15 zones). In STEREO, MONO and BRIDGE (single zone) modes, the detailed adjustments are shared, given that there are no zones for independently directing and adjusting the audio sources. Front panel MIC sources setup To enter the MIC SETUP MODE, first select zone A or B with a tap of the front knob or the IR remote (only when using the ZONES mode), then press MIC1 or MIC2 key and hold it for more than 2.5 seconds Front knob SP : Short Press (press the front panel knob briefly, less than 0.5 seconds) Front knob LP: Long Press (press & hold the front panel knob for more than 2.5 seconds) Default mode (STEREO / MONO / BRIDGE / ZONE A or ZONE B) MIC1 or MIC2 MICx setup mode (x = 1, 2, 3 or 4) Press & hold MICx key to enter MICx setup mode SP LP Level shown in LCD LP to enter the VOLUME adjust mode Rotate knob to adjust level MICx VOLUME VOL Level: 0 to 64 SP to get back SP Rotate knob to browse options LP Level shown in LCD LP to enter the BASS adjust mode MICx BASS BASS Level: -10 to +10 SP to get back Rotate knob to browse options Rotate knob to adjust level SP Rotate knob to browse options LP Level shown in LCD LP to enter the TREBLE adjust mode Rotate knob to adjust level MICx TREBLE TREBLE Level: -10 to +10 SP to get back SP Rotate knob to browse options ADVANCED MODE KEY CODE REQUIRED MIC1 MIC2 + + LP Press and hold MIC1 + MIC2 + front panel knob to enter the MIC SETUP ADVANCED MODE The following graphic shows the ADVANCED adjusting procedure for the MIC1 and MIC2 inputs (a special key combination is required for access): 16 Front panel MIC sources ADVANCED setup Front knob SP : Short Press (press the front panel knob briefly, less than 0.5 seconds) Front knob LP : Long Press (press & hold the front panel knob for more than 2.5 seconds) MIC1 or MIC2 SETUP mode ADVANCED MODE KEY CODE REQUIRED MIC1 MIC1 or MIC2 ADVANCED SETUP mode MIC2 + + LP Press and hold MIC1 + MIC2 + front panel knob to enter the MIC SETUP ADVANCED MODE SP LP TALKOVER ASSIGN Options shown in LCD LP to enter the TLK ASSIGN mode SP to get back SP Rotate knob to browse options LP TALKOVER PRIORITY ZONE A ZONE B ZONES A & B PAGER OFF Level shown in LCD LP to enter the TLK PRIORITY level mode Rotate knob to set PRIORITY level TLK PRIORITY 1 (HIGH) / 2 (LOW) SP to get back SP Rotate knob to browse options LP TALKOVER THRESHOLD Level shown in LCD LP to enter the TLK THRESHOLD adjust mode Rotate knob to adjust THRESHOLD level TLK THRESHOLD Level: 20 ... 30 dB SP to get back SP Rotate knob to browse options LP Rotate knob to browse options Rotate knob to select TALKOVER destination TALKOVER ATTACK Time shown in LCD LP to enter the TLK ATTACK time adjust mode Rotate knob to adjust ATTACK time TLK ATTACK Time: 50 ... 300 msec. SP to get back SP Rotate knob to browse options LP TALKOVER RELEASE Time shown in LCD LP to enter the TLK RELEASE time adjust mode Rotate knob to adjust RELEASE time TLK RELEASE Time: 300 ms ... 3 sec. SP to get back SP Rotate knob to browse options LP TALKOVER DEPTH Level shown in LCD LP to enter the TLK DEPTH adjust mode Rotate knob to adjust DEPTH (attenuation over LINE signal) level TLK DEPTH Level: 20 ... 80 dB SP Rotate knob to browse options LP NOISE GATE Status shown in LCD LP to enter the NOISE GATE activation mode Rotate knob to activate / deactivate NOISE GATE NOISE GATE Status: ON / OFF SP Rotate knob to browse options LP NOISE GATE THRESHOLD Level shown in LCD LP to enter the NOISE GATE THRESHOLD adjust mode Rotate knob to adjust THRESHOLD level NOISE G THRESHOLD Level: 20 ... 30 dB SP 17 Notes regarding the ADVANCED adjustments for MIC1 and MIC2 inputs: Contrary to the detailed LINE or MIC input adjustments, the ADVANCED MIC input adjustments (TALKOVER and NOISE GATE functions) are unique and individualised for each MIC input (MIC1, MIC2), but shared for the possible destination zones, A and B, when working in ZONES mode. For example: a 20 dB adjustment of the Talkover function threshold for the MIC1 input will be considered the activation threshold of that function, regardless of whether the MIC1 Talkover function is assigned to zone A, zone B or both. For this reason, instead of indicating the affected zone as is displayed in other types of adjustments (ZA or ZB), the top left corner of the LCD screen will display “- -” during the adjustment process of said advanced parameters. TALKOVER ASSIGN: When the Talkover function is assigned to an output from a MIC input, the microphone signal will cause an attenuation of the active LINE signal in that output zone (and also of the other microphone, unless that microphone has an active Talkover function with higher priority) when the microphone exceeds the Talkover or detection threshold. The possible assignments are: o ZONE A o ZONE B o ZONES A-B (both zones) o PAGER: real-time voice message function with zone selection, or paging (zone A, B or both). Only available when using an MPAGE4 desktop console connected to the PAGER port on the CA200z's rear panel. The console uses the MIC1 input for managing the PAGER function and its internal jumpers must be in the 10 V / ALOG positions (see the MPAGE4 console manual for more details). In the CA200z's ZONES mode, the operative keys on the MPAGE4 unit will be the zone 1 and 2 (A and B on the CA200z) selection keys, whereas in STEREO, MONO and BRIDGE modes, only the zone 1 selection key will be operative. Note: In PAGER mode, the MIC1 input is silenced unless a call is being made from the MPAGE4 station (= zones selection + pressing the MPAGE4's PAGE button). Adjusting the output level of the MPAGE4 unit with its internal potentiometers is also recommended to correctly couple the unit to the CA200z (see the MPAGE4 console manual for more details) o 18 OFF: MIC input's TALKOVER function disabled TALKOVER PRIORITY: The Talkover function of the MIC1 and MIC2 inputs can have the same or different priority levels. The effect of this hierarchy of priorities is as follows: o MIC1 and MIC2 with the same Talkover priority (both 2 (LOW) or both 1 (HIGH)): the first of the two microphones whose Talkover actuates on a destination zone (its signal exceeds the detection threshold) disables the Talkover of the other microphone in the same zone until the Talkover of the first microphone stops actuating (its signal drops below the activation threshold), at which time the Talkover function can be activated again by the first microphone that exceed the threshold o MIC1 and MIC2 with different priorities: When the microphone with the higher priority, whose Talkover is assigned to a destination zone, is activated (its signal exceeds the detection threshold), it disables the Talkover of the other microphone in the same zone. If the microphone with a lower priority has its Talkover function activated at a given moment, the activation of the microphone with the higher priority would also interrupt it until the higher priority Talkover ceases actuating (after its signal drops below the activation threshold again) TALKOVER THRESHOLD: trigger threshold of the Talkover function. The microphone signal in question activates its Talkover function when said threshold is exceeded. This trigger level depends on the sensibility level of the microphone (rear panel), but is independent of the VOL adjustment of the MIC inputs ADVANCED adjustments menu TALKOVER ATTACK: the time the Talkover function takes to actuate, from the moment the microphone signal exceeds the trigger threshold TALKOVER RELEASE: The time the Talkover function takes to cease actuating, from the moment the microphone signal drops below the trigger threshold again TALKOVER DEPTH: The attenuation applied by the Talkover function on the active line signal when triggered NOISE GATE: noise gate function for the microphone input. When this function is active, the MIC input is muted whilst there is no signal above the NOISE GATE function activation threshold, such that the unit rejects the background noise captured by the microphone connected to it NOISE GATE THRESHOLD: NOISE GATE function trigger threshold 4.4. AUTO STANDBY Function The CA200z's AUTO STANDBY (rest or power saving mode) enables leaving the device connected to the mains indefinitely such that the rest mode can be automatically deactivated when there is an input signal and activated when there is none. To enable AUTO STANDBY mode, the mode's ON option must be activated in special setup mode. See section 4.2 Special setup mode for more details. One of the following two situations may occur when the AUTO STANDBY mode is enabled: a) There is NO audio signal in the inputs. Result: the amplifier immediately goes into AUTO STANDBY mode b) If there is an audio signal in the inputs. Result: the amplifier stays active When it is enabled and there is no audio signal (or a very weak one below the activation threshold) in any of the unit's inputs for two minutes or more, the CA200z automatically goes into AUTO STANDBY mode, and the ON/STBY LED lights up in green with orange flashes, and the LED indicators for the inputs and LCD screen switch off. If the front panel controls or infrared remote control are actuated while the CA200z is in AUTO STANDBY mode, the LCD screen will light up for a short period (even when the LCD 19 MODE has been adjusted in the OFF or DIMMED options), and will switch off or dim again if the conditions to keep it from exiting AUTO STANDBY mode are still met. If, to the contrary, the unit is manually forced into STANDBY mode using the ON/STBY key on the infrared remote control, the unit will not respond to keys being pressed on the front panel, nor will the LCD screen light up, until it is woken up by again pressing the ON/STBY key or briefly pressing the front panel rotary encoder knob; the unit will then switch to ON mode. 4.5. LED indicators SP: The signal presence or SP LED indicator shows whether there is a signal on any of the amplifier's inputs. This lights up when the input level reaches the established detection threshold. CLIP: The saturation or CLlP LED indicator lights up when the signal delivered to the speakers is close to the amplifier's clipping or saturation level. Input signals should be adjusted to ensure the CLIP (saturation or cut off) indicators never stay lit, but that at most they light up to the rhythm of the lowest bass frequencies. Otherwise the amplified signal will be distorted with low-quality and intelligible sound. Note: The CA200z has an "ANTICLIP" circuit that is always active, constantly analysing the harmonic distortion (produced by excessive trimming of the signal to the amplifier output), automatically reducing the input level and actuating only when the distortion limit is exceeded ON/STBY: o it lights up green when the equipment is in normal operation mode. In this mode, it blinks when it receives commands from the infrared remote control o it lights up orange when in standby mode, a mode accessed by pressing the ON/STBY key on the infrared remote control. o it lights up in green with orange flashes when the unit has automatically entered AUTO STANDBY mode 4.6. Lock mode To enter or exit the CA200z's lock mode, the combination of LINE4 + MIC1 + the front rotary encoder knob must be pressed and held for several moments. To protect the device from tampering, it cannot be operated with the front panel keys while in lock mode. In this mode, the LCD screen will display PANEL LOCKED every time there is an attempt to operate with the keys. When exiting the mode with the same above key combination, the LCD panel will display PANEL UNLOCKED for a short period of time. Note: Once the lock mode is activated it will remain so even when the unit is switched off and on again. It will stay locked until the three-key combination described above is pressed and held. 20 4.7. Restore default settings and update firmware 1. 2. 3. 4. To restore the CA200z to factory settings, follow this procedure: Press and hold the front rotary encoder knob with the unit switched off Keeping it pressed, switch on the unit with the ON/OFF switch on the rear panel. The LCD panel will show a special message indicating that the CA200z is ready to be switched off in order to recover the default adjustment mode when it is switched on again Wait a few seconds and then switch the CA200z off again The next time it is switched on, the factory settings will be in the memory Note: for instructions on how to update the unit's firmware, see the product web page at www.ecler.com, where you will find the update software utility and instructions on how to proceed. 5. CLEANING The CA200z must not be cleaned with solvents or abrasive substances which may damage the prints. Clean using a cloth moistened in water and a neutral liquid detergent, then dry with a clean cloth. Under no circumstances allow water to enter any of the orifices in the equipment. 21 6. LIST OF FUNCTIONS 1. Operation/standby indicator light, ON/STBY 2. Input signal presence indicator light, SP 3. Zone A and Zone B saturation or clipping indicator lights, CLIP 4. Front panel LCD display 5. Rotary encoder knob 6. Front microphone input, MIC 2 7. Front line input, LINE 2 8. Line input selector, LINE 1 9. Line input selector, LINE 2 10. Line input selector, LINE 3 11. Line input selector, LINE 4 12. Microphone input selector, MIC 1 13. Microphone input selector, MIC 2 14. Remote control receiver, REMOTE 15. RCA line input, LINE 1 16. RCA line input, LINE 2 17. RCA line input, LINE 3 18. RCA line input, LINE 4 19. Microphone input sensitivity setting, MIC 1 and PAGER 20. Microphone input, MIC 1 21. R-45 connector, PAGER 22. Microphone input sensitivity setting, MIC 2 23. Microphone input, MIC 2 24. Auxiliary output, AUX OUT 25. Zone A amplified output, OUT A (L) 26. Zone B amplified output, OUT B (R) 27. Remote volume silencing control, MUTE 28. RJ-45 connector, REMOTE 1 29. RJ-45 connector, REMOTE 2 30. Remote control, RS-232 port 31. Mains socket 32. Fuse holder 33. Power switch, ON/OFF 34. ON/STBY key 35. Volume off key, MUTE 36. Signal input selection keys, LINE 1, 2, 3, and 4 37. LINE input volume adjustment keys 38. Setup memory recovery keys, PRESET 39. Microphone input selection key, MIC 1 40. MIC 1 input volume adjustment keys 41. Microphone input selection key, MIC 2 42. MIC 2 input volume adjustment keys 43. Zone selection key, ZONE A 44. Zone selection key, ZONE B 45. Keys for adjusting selected zone volume 22 7. DIAGRAM OF FUNCTIONS 23 Explicación de los Símbolos Gráficos El símbolo del relámpago con una flecha en la punta y dentro de un triangulo equilátero, tiene el propósito de alertar al usuario de la presencia de un voltaje peligroso y sin aislar dentro del aparato, y de una magnitud tal que puede constituir riesgo de descarga eléctrica para las personas. El símbolo de exclamación dentro de un triangulo equilátero, tiene el propósito de alertar al usuario de la presencia de instrucciones importantes sobre la operación y mantenimiento en la información que viene con el producto. Los símbolos de relámpagos dibujados cerca de los terminales de salida se utilizan para alertar al usuario del riesgo de descargas peligrosas. Los conectores de salida que podrían plantear algún riesgo se indican con este símbolo del relámpago. No toque los terminales de salida mientras que el amplificador esté encendido. Hacer todas las conexiones con el amplificador apagado. ADVERTENCIA: para prevenir choques eléctricos o riesgo de incendios, no exponer este equipo a la lluvia o la humedad. INSTRUCCIONES IMPORTANTES DE SEGURIDAD 1. 2. 3. 4. 5. 6. 7. Lea estas instrucciones Guarde estas instrucciones Preste atención a todas las advertencias Siga todas las instrucciones No utilice este aparato cerca del agua Límpielo solamente con un paño seco No bloquee ninguna abertura para ventilación. Instálelo de acuerdo con las instrucciones del fabricante 8. No lo instale cerca de fuentes de calor como radiadores, estufas u otros aparatos que produzcan calor, incluidos amplificadores. 9. No elimine el propósito de seguridad del cable de corriente polarizado o con conexión de tierra. Un cable polarizado tiene dos bornes, uno más ancho que el otro. Un enchufe con conexión a tierra, tiene dos bornes y un tercer borne conectado a tierra. Este tercer borne está previsto para su seguridad. Si el cable proporcionado no entra en su enchufe, consulte con un técnico electricista para reemplazar ese enchufe obsoleto. 10. Proteja el cable eléctrico de ser aplastado, en especial en la zona de los conectores, los receptáculos de los mismos y en el punto en el que el cable sale del aparato. 11. Utilice solamente los accesorios especificados por el fabricante. 12. Desconecte el aparato durante las tormentas eléctricas o cuando no lo vaya a usar durante periodos largos de tiempo. 13. Para cualquier reparación, póngase en contacto con un servicio técnico cualificado. La reparación es necesaria cuando el aparato no funciona con normalidad o ha sido dañado por cualquier motivo, ya sea porque el cable o el enchufe estén dañados, porque se hayan derramado líquidos o hayan caído objetos dentro del aparato, o porque el aparato haya sido expuesto a la lluvia o se haya caído. 14. Desconexión de la red: apagando el interruptor de puesta en marcha, todas las funciones e indicadores del amplificador se pararán, pero la completa desconexión del aparato se consigue desconectando el cable de red de su conector. Por esta razón, éste siempre debe tener fácil acceso. 24 MANUAL DE INSTRUCCIONES 1. NOTA IMPORTANTE 1.1. Conformidad con normativas internacionales 26 26 2. INTRODUCCIÓN 27 3. INSTALACIÓN 3.1. Ubicación y montaje 3.2. Conexión a red eléctrica 3.3. Conexiones de audio de entrada 3.4. Conexiones de audio de salida 3.5. Opciones de control remoto 28 28 28 28 30 30 4. OPERACIÓN Y USO 4.1. Puesta en funcionamiento y modo por defecto 4.2. Modo especial de configuración (SETUP) 4.3. Teclas frontales LINE 1 a LINE4, MIC1 y MIC2 4.4. Función AUTO STANDBY 4.5. Indicadores LED 4.6. Modo de bloqueo 4.7. Restaurar valores por defecto y actualización de firmware 33 33 34 36 41 42 42 43 5. LIMPIEZA 43 6. LISTA DE FUNCIONES 44 7. DIAGRAMA DE FUNCIONES 45 8. CARACTERÍSTICAS TÉCNICAS 46 9. DIAGRAMA DE BLOQUES 47 10. DIAGRAMA DE CONFIGURACIÓN 48 Todos los datos están sujetos a variación debida a tolerancias de producción. ECLER S.A. se reserva el derecho de realizar cambios o mejoras en la fabricación o diseño que pudieran afectar las especificaciones. 25 1. NOTA IMPORTANTE ¡Enhorabuena!. Vd. posee el resultado de un cuidadoso diseño y una esmerada fabricación. Agradecemos su confianza por haber elegido nuestro amplificador compacto CA200z. Para conseguir la máxima operatividad del aparato y su máximo rendimiento es MUY IMPORTANTE, antes de su conexión, leer detenidamente y tener muy presentes las consideraciones que se especifican en este manual. Para garantizar el óptimo funcionamiento de este aparato, recomendamos que su mantenimiento sea llevado a cabo por nuestros Servicios Técnicos autorizados. 1.1. Conformidad con normativas internacionales El amplificador compacto CA200z está conforme a las siguientes normativas internacionales: EN55103-1 Compatibilidad Electromagnética. Norma de familia de Productos para aparatos de uso profesional de sonido, vídeo, sistemas audiovisuales y para el control de iluminación para espectáculos Parte 1: Emisión EN55103-2 Compatibilidad Electromagnética. Norma de familia de Productos para aparatos de uso profesional de sonido, vídeo, sistemas audiovisuales y para el control de iluminación para espectáculos Parte 1: Inmunidad EN60065 Aparatos de audio, vídeo y aparatos análogos. Requisitos de seguridad Cumpliendo los requisitos de las directrices 73/23/CEE y 2004/108/CE 26 2. INTRODUCCIÓN El CA200z es un amplificador + mezclador digital compacto de 2 canales, con posibilidad de gestión de 2 zonas independientes de audio y multitud de funciones de control remoto (puerto serie RS-232, mando a distancia por infrarrojos, puertos de control remoto 0-10VDC), siendo una opción ideal en aplicaciones de audio que requieran de integración audiovisual con otros dispositivos: clases de enseñanza, salas de reuniones y presentaciones multimedia, locales comerciales, etc. Características principales: Amplificador de 2 x 70 W RMS @ 4 Funcionamiento en modos ESTEREO / MONO / PUENTE / 2 ZONAS INDEPENDIENTES (independientes a nivel de asignación de fuentes sonoras de línea y micrófono, gestión de volúmenes, control remoto, envío de avisos, etc.) Fuente de alimentación interna universal 4 entradas de línea estéreo + 2 entradas de micrófono balanceadas Entradas LINE2 y MIC2 duplicadas en panel frontal para una rápida y cómoda conexión de reproductores portátiles de audio, micrófonos para presentaciones, etc. (conectores minijack 3.5mm y jack 6.35mm respectivamente) Salida auxiliar para enlace con otros amplificadores o dispositivos de audio externos Conector MUTE general para silenciamiento total de la unidad mediante cierre de contacto externo (ejemplo: cuando una central de alarmas precisa silenciar el dispositivo para, paralelamente, activar una sirena de evacuación) Control local mediante teclas retroiluminadas, control giratorio digital (“encoder”) y display frontal LCD Control mediante mando a distancia por infrarrojos (incluido): selección de fuentes y volumen por zonas, recuperación de presets, etc. Control remoto mediante puerto RS-232 y protocolo CA-NET 2 entradas para control remoto independiente de zonas (0-10 VDC) mediante 2 paneles murales WPmVOL (volumen) o WPmVOL-SR (volumen + selección de fuentes ó selección de presets) Funciones de TALKOVER y/o PAGER desde las entradas de micrófono Compatible con estación de avisos de sobremesa MPAGE4 para envío de mensajes de voz con prioridad mediante la función PAGER 5 memorias de configuración (presets) recuperables desde el panel frontal, mando IR, mando WPmVOL-SR o comunicación RS-232 Función AUTO STANDBY: en caso de ausencia de señal de audio la unidad pasa automáticamente al modo de reposo o STANDBY, quedando su consumo eléctrico minimizado Amplificador de alto rendimiento ligero y silencioso (refrigeración por convección, sin ventilador) 27 3. INSTALACIÓN 3.1. Ubicación y montaje El CA200z admite instalación en sobremesa, en armario rack de anchura estándar (19”) o en armario rack de media anchura estándar (9,5”). Cualquiera de estas opciones de instalación es posible empleando los accesorios de instalación en rack disponibles (kit de 2 soportes 2UHRMKIT, no incluidos de serie). 3.2. Conexión a red eléctrica El amplificador se alimenta con corriente alterna mediante su fuente de alimentación interna: 90-264VAC Y 47-440Hz. El cable de alimentación AC del amplificador debe conectarse a una toma de tierra en condiciones (resistencia de tierra, Rg = 30, o menor). El ambiente de trabajo deberá ser seco y estar totalmente libre de polvo. No exponga el aparato a la caída de agua o salpicaduras. No ponga encima objetos con líquido ni fuentes de llama desnuda, como velas. En caso de requerir alguna intervención y/o conexión-desconexión del amplificador debe desconectarse previamente la alimentación. En el interior del amplificador no existen elementos manipulables por el usuario. Debe evitarse que el cable de red se entremezcle con los cables blindados que transportan la señal de audio, ya que ello podría ocasionar zumbidos. 3.3. Conexiones de audio de entrada El CA200z admite dos tipos de señales en sus canales de entrada: Micrófono (MIC): dispone de conexiones balanceadas tipo Euroblock en panel posterior o jack (MIC2) en panel frontal, preparadas para admitir un nivel de señal entre -20dBV y –50dBV, con sensibilidad ajustable mediante su control ADJ Nota: Las entradas de micrófono disponen de alimentación Phantom para alimentar micrófonos de condensador, activable mediante puente interno (ver sección 10. DIAGRAMA DE CONFIGURACIÓN). Esta opción viene deshabilitada (OFF) en la configuración por defecto o de fábrica. Señales de línea (LINE 1 a LINE 4): disponen de conexión estéreo no balanceada, tipo minijack en panel frontal (LINE 2) o doble RCA en panel posterior (LINE1 a LINE4). Están preparadas para admitir señales nominales de -6dBV y 0dBV, con sensibilidad ajustable mediante puente interno (ver sección 10. DIAGRAMA DE CONFIGURACIÓN). Es posible conectar a ellas señales de reproductores de CD, sintonizadores de radio, consolas de mezcla, reproductores multimedia, salidas de audio de ordenadores y tablets, etc. Nota: NO PUEDEN CONECTARSE directamente a este aparato platos giradiscos ya que ninguna de las entradas dispone de preamplificador tipo RIAA. La selección / deselección de las fuentes sonoras activas se realiza mediante la pulsación corta de las teclas frontales rotuladas como LINE 1 a 4, MIC1 y MIC2. Las posibilidades de selección de fuentes son: 28 SELECCIÓN DE LÍNEAS: -Pulsando una de las teclas LINE1 a LINE4 se activa la entrada de línea en cuestión (LED encendido = fuente seleccionada) -No es posible seleccionar 2 o más fuentes de este tipo simultáneamente: al seleccionar una entrada de línea se deselecciona la anterior -Al pulsar de nuevo sobre la tecla de una fuente seleccionada (LED encendido) se deselecciona la misma (todos los LEDs apagados), quedando el equipo sin selección de línea activa SELECCIÓN DE MICRÓFONOS: -Pulsando una de las teclas MIC1 o MIC2 se activa la entrada de micrófono en cuestión (LED encendido = micrófono seleccionado) -Es posible seleccionar ninguno, uno o los dos micrófonos simultáneamente (ambos LEDs encendidos) -Al pulsar de nuevo sobre la tecla de un micrófono seleccionado (LED encendido) se deselecciona el mismo (LED apagado) Nota: La selección de fuentes también se puede realizar mediante el mando a distancia, un panel de control remoto WPmVOL-SR (solo fuentes LINE) o la comunicación vía puerto serie. También es posible almacenar presets que contengan una combinación de fuentes activas determinada, y recuperarlos posteriormente por cualquiera de los métodos disponibles. Continúe leyendo este manual para conocer en detalle todas estas posibilidades. Las fuentes activas (seleccionadas) son dirigidas a las salidas del equipo de una u otra forma, en función del modo de trabajo del mismo: MODO DE TRABAJO ESTEREO (St mostrado en pantalla LCD) MONO (Mo mostrado en pantalla LCD) PUENTE (Br mostrado en pantalla LCD) ZONAS A / B (ZA o ZB mostrado en pantalla LCD) ENCAMINAMIENTO DE SEÑALES HACIA LAS SALIDAS La línea seleccionada es enviada en configuración estéreo a las salidas (entrada L a salida A ( L) y entrada R a salida B (R)) Los micrófonos seleccionados son enviados a ambas salidas (L y R) simultáneamente, como una suma directa sobre la señal de línea o bien empleando la función TALKOVER / PAGER (*) La línea seleccionada es enviada en configuración mono (L+R) a ambas salidas (entrada L + entrada R a salidas L y R) Los micrófonos seleccionados son enviados a ambas salidas (L y R) simultáneamente, como una suma directa sobre la señal de línea o bien empleando la función TALKOVER / PAGER (*) La línea seleccionada es enviada en configuración mono (L+R) a la salida única en modo puente (se deben conectar los altavoces empleando los conectores BRIDGE + y - del panel posterior) Los micrófonos seleccionados son enviados a la salida única en modo puente (conectores BRIDGE + y - del panel posterior), como una suma directa sobre la señal de línea o bien empleando la función TALKOVER / PAGER (*) Cada zona de salida es monofónica y puede disponer de una selección de fuente y/o micrófonos independiente de la otra: ZONA A: puede recibir la señal de una línea (L+R) y/o la de uno o de los dos micrófonos ZONA B: puede recibir la señal de una línea (L+R) y/o la de uno o de los dos micrófonos Ambas zonas son, pues, totalmente independientes a nivel de volumen de salida, selección de las fuentes que reciben y sus volúmenes de envío. Los micrófonos pueden operar sobre las zonas de salida de forma directa (como una suma directa sobre la señal de línea seleccionada) o bien empleando la TALKOVER / PAGER (*) 29 (*): Si la función Talkover se encuentra activa, la señal de micrófono atenuará a la de línea al superar el umbral de activación. Adicionalmente, si se conecta una consola de avisos MPAGE4 al conector PAGER y se activa la función PAGER de la entrada MIC1, será posible seleccionar el destino del mensaje de voz emitido mediante la consola, dirigiéndolo a la zona A, a la B o a ambas (internamente el conector PAGER entrega su señal de micrófono a la entrada MIC1). 3.4. Conexiones de audio de salida Las salidas amplificadas (OUT L (A) y R (B)) están provistas de conectores Euroblock. El cable de conexión que une las salidas del CA200z y los altavoces deberá ser de buena calidad, de suficiente sección y lo más corto posible. Las salidas pueden funcionar en modo estéreo, mono (misma señal L+R en ambos canales), puente (señal L+R amplificada por ambos canales, enlazados como uno solo) o ZONAS A y B independientes (cada salida recibe una combinación determinada de fuentes sonoras activas y de volúmenes de las mismas). La selección de uno u otro modo se realiza mediante el menú SETUP del equipo (ver sección 4.2. Modo especial de configuración (SETUP) para más información), o bien desde un dispositivo externo, empleando el puerto serie o RS-232. En el modo puente, la conexión de señal de salida se realizará a través de los terminales marcados como BRIDGE + y - en el panel posterior. Recuerde que la impedancia mínima de trabajo para los amplificadores en los modos mono o estéreo es de 4, y trabajando en modo puente de 8. Para un buen funcionamiento del CA200z bajo ningún concepto se debe trabajar con impedancias inferiores a las especificadas anteriormente. Atención: en modo puente sólo deben utilizarse los terminales indicados como BRIDGE en la serigrafía del equipo para la conexión de los altavoces. Adicionalmente, el CA200z dispone de una salida auxiliar (AUX OUT) no amplificada, que permite enlazarlo con amplificadores u otros dispositivos externos. La salida auxiliar AUX OUT proporciona una señal de nivel de línea (0dBV) que es una réplica sin amplificar de la señal entregada en los terminales OUTPUT L y R. 3.5. Opciones de control remoto 30 Puertos REMOTE1 y REMOTE2: cada conector tipo RJ-45 REMOTE permite la conexión de un panel de control mural tipo WPmVOL o WPmVOL-SR (control 010 VDC). En los modos STEREO, MONO y BRIDGE el panel conectado al puerto REMOTE1 actúa sobre las 2 salidas del amplificador y el puerto REMOTE2 se encuentra deshabilitado. En el modo ZONAS A y B el panel conectado al puerto REMOTE1 se encuentra asociado a la salida A y el panel conectado al puerto REMOTE2 a la salida B. Desde cada panel se puede controlar lo siguiente (*): o el ajuste del volumen general de la salida asociada (A, B o ambas), en función del modo de trabajo seleccionado, STEREO / MONO / BRIDGE / ZONES o la selección de la fuente de LINEA para la salida asociada (OFF, LINE1, LINE2, LINE3, LINE4) o la selección de un preset, del 1 al 5 (**), recuperando al seleccionarlo la configuración guardada en memoria en el momento de salvar dicho preset (selección de fuentes, ajustes de actualización, volúmenes, etc.) (*) WPmVOL sólo puede controlar el volumen, mientras que WPmVOL-SR puede controlar el volumen y realizar la selección de fuentes o presets (**) En modo ZONES (A y B) sólo uno de los dos paneles remotos puede recuperar presets (al activar esta función en uno de los dos, desaparece dicha opción automáticamente del otro dentro del menú SETUP) El conexionado se realiza mediante un cable CAT5 estándar entre el panel mural WPmVOL o WPmVOL-SR y el conector REMOTE del CA200z. El volumen total de cada salida responderá a la concatenación del volumen MASTER, ajustado mediante el control giratorio del panel frontal del CA200z, o bien mediante el mando de infrarrojos, y del volumen REMOTE ajustado por cada panel asociado, si los hubiese. El volumen del panel remoto se visualiza durante unos breves instantes en la pantalla LCD del panel frontal cuando se actúa sobre él, mediante el texto REMOTE VOL 1 ó 2 y una barra de volumen. En el modo ZONES sólo se visualiza dicho volumen si se encuentra seleccionada en pantalla la zona asociada al panel en cuestión. Nota: Consulte el apartado 4.2. Modo especial de configuración (SETUP) para conocer cómo se programan los modos de trabajo de los puertos REMOTE1 y REMOTE2. Nota: Configure los puentes internos de los paneles WPmVOL o WPmVOL-SR en modo 10V / Alog para un correcto funcionamiento con el CA200z Puerto MUTE: el conector MUTE del panel posterior permite la conexión de un cierre de contacto externo libre de potencial para silenciar totalmente el CA200z en caso de que un dispositivo externo actúe sobre él (ejemplo: un sistema de avisos para emergencias y evacuación centralizado). Es preciso que los puertos REMOTE1 o REMOTE2 no se encuentren desactivados (posición OFF) para que el puerto MUTE se encuentre activo: o En los modos STEREO, MONO o BRIDGE el puerto REMOTE1 debe estar activo (diferente de OFF) para que el puerto MUTE pueda silenciar ambas salidas de la unidad al recibir un cierre de contacto externo o En el modo ZONES el puerto REMOTE1 debe estar activo (diferente de OFF) para que el puerto MUTE pueda silenciar la salida A, mientras que el puerto REMOTE2 debe estar activo (diferente de OFF) para que el puerto MUTE pueda silenciar la salida B, al recibir dicho puerto un único cierre de contacto externo Nota: Consulte el apartado 4.2. Modo especial de configuración (SETUP) para conocer cómo se programan los modos de trabajo de los puertos REMOTE1 y REMOTE2 y, de esta forma, habilitar la función de silenciamiento asociada al puerto MUTE Puerto RS-232: el puerto de comunicación serie RS-232 permite la gestión remota del CA200z desde un ordenador o sistema de control externo que soporte el protocolo CA-NET. Vea el manual del protocolo CA-NET para obtener información completa acerca de los detalles de la conexión y la sintaxis de los comandos soportados. Las especificaciones de la conexión serie son las siguientes: o o Baud rate: 9600 (fijo, sin autonegociación) Data bits: 8 31 o o o o 32 Parity: None Stop bits: 1 Flow control: None Cable: tipo RS-232 DB9-DB9 estándar (pin a pin) Receptor IR: el receptor IR integrado permite el control del CA200z desde el mando a distancia incluido con la unidad: o Teclas de selección de zona (ZONE A / B). Permiten seleccionar la zona de salida que será objeto de los ajustes posteriores. Tras pulsar la tecla A o B, será posible ajustar su volumen MASTER, actuar sobre el control de MUTE, seleccionar fuentes sonoras, etc. Desde el panel frontal de la unidad es posible cambiar de zona seleccionada pulsando brevemente el control giratorio frontal (sólo en modo ZONES). Las teclas A y B y la pulsación breve del control giratorio frontal no tienen función cuando la unidad se encuentra en un modo distinto del modo ZONES, puesto que todos los ajustes que se realicen en dichos modos serán comunes para ambas salidas o Teclas VOL + y – de sección ZONE: aumentan / disminuyen a cada pulsación el volumen MASTER de la zona seleccionada previamente. Equivale al giro del control giratorio frontal de la unidad en el modo por defecto de funcionamiento. Al mantener una de estas teclas pulsada, el volumen aumentará o disminuirá de forma continuada. o Tecla MUTE: activa / desactiva el silenciamiento total de la zona seleccionada previamente o Teclas LINE 1 a 4: permiten seleccionar / deseleccionar una fuente LINE como activa para la zona seleccionada previamente (equivalen a las teclas LINE1 a LINE4 del panel frontal) o Teclas VOL + y - de la sección LINE: aumentan / disminuyen a cada pulsación el volumen de la fuente seleccionada previamente para la zona también seleccionada previamente. Una misma fuente dispone de ajustes de volumen independientes de envío a las zonas A y B cuando se trabaja en el modo ZONES (ejemplo: la fuente LINE1 puede ser enviada con un volumen = 50 a la zona A y con un volumen = 62 a la zona B, etc.). Si no hay ninguna LINEA seleccionada estos controles no están operativos, mostrando la pantalla LCD el mensaje "LINE NOT SELECTED" o Teclas MIC1 / MIC2: permiten seleccionar / deseleccionar una fuente MIC como activa para la zona seleccionada previamente (equivalen a las teclas MIC1 y MIC2 del panel frontal) o Teclas VOL + y - de la sección MIC1 o MIC2: aumentan / disminuyen a cada pulsación el volumen de la fuente MIC en cuestión para la zona seleccionada previamente. Una misma fuente de micrófono dispone de ajustes de volumen independientes de envío a las zonas A y B cuando se trabaja en el modo ZONES (ejemplo: MIC1 puede ser enviado con un volumen = 35 a la zona A y con un volumen = 57 a la zona B, etc.) o Teclas PRESET: permiten recuperar uno de los 5 presets o memorias de configuración del CA200z. Es preciso mantener pulsada una de estas teclas durante unos pocos segundos para recuperar el preset en cuestión, siendo mostrado el preset activo en la pantalla LCD como P1, P2, P3, P4 o P5 o Tecla ON/STBY: permite pasar manualmente del modo de reposo (STAND BY) al modo encendido (ON) y viceversa. El paso del estado ON a STAND BY requiere de una pulsación larga de dicha tecla Nota: La primera pulsación de una tecla que actúa de modo temporizado (PRESET 1-5 y ON/STBY) siempre despierta el panel LCD si éste se encuentra apagado o atenuado inactividad en los modos DIMMED u OFF o bien por hallarse el CA200z en el modo AUTO STAND BY. Si se mantiene pulsada (pulsación larga) o bien si se libera y pulsa de nuevo, el CA200z ejecutará su función asociada. 4. OPERACIÓN Y USO 4.1. Puesta en funcionamiento y modo por defecto Es muy recomendable poner en marcha todos los aparatos siguiendo la secuencia siguiente: fuentes de sonido, unidad de mezclas, ecualizadores, filtros activos y procesadores y, finalmente, amplificadores de potencia. El apagado de los aparatos debe realizarse en la secuencia inversa. Siguiendo este orden los transitorios producidos por el encendido o apagado de los aparatos no afectarán a los siguientes en la cadena, permaneciendo inaudibles. El encendido del CA200z se realizará mediante la conexión de la unidad al suministro eléctrico utilizando un cable IEC (MAINS INPUT en panel posterior) y el interruptor ON/OFF del panel posterior. El indicador LED ON/STDBY del panel frontal se iluminará en verde si la unidad se encuentra en modo operativo (ON), en naranja fijo si en halla en modo de reposo o bajo consumo (STAND BY) y en verde + naranja parpadeante si la unidad tiene habilitada la función AUTO STAND BY y se ha entrado en dicho modo por ausencia de señales de audio de entrada. Al encenderse, y estando en modo operativo (ON), la unidad se encontrará en la condición por defecto, o de ajuste de volumen MASTER (volumen de salida) y selección de zonas y fuentes sonoras. En los modos STEREO, MONO y BRIDGE el volumen MASTER es único para las dos salidas A y B de la unidad. En el modo ZONES, la pantalla LCD mostrará la zona seleccionada en la esquina superior izquierda (ZA o ZB). Para cambiar la selección de zona, es preciso pulsar brevemente el control giratorio del panel frontal (cada pulsación pasa de ZA a ZB, ZB a ZA, etc.). Una vez seleccionada una zona, el giro del control frontal modificará el volumen MASTER de salida de dicha zona, visualizándose éste en la pantalla LCD en forma de barra de volumen. Si se realiza una selección de zona y un ajuste de volumen mediante el mando a distancia por infrarrojos las indicaciones visuales mediante la pantalla LCD son exactamente las mismas que para el ajuste mediante el control giratorio del panel frontal. En el modo por defecto también es posible activar o desactivar fuentes sonoras mediante una pulsación breve de las teclas frontales LINE1, LINE2, LINE3, LINE4, MIC1 o MIC2 (o empleando el mando a distancia por infrarrojos). Una pulsación breve de una de las teclas LINE o MIC activa / desactiva dicha fuente sonora en la zona seleccionada previamente. Sólo una de las 4 fuentes LINE (o ninguna) puede estar activa en cada zona de salida, mientras que es posible activar uno o incluso los dos micrófonos (o ninguno) en cada zona de salida. Consulte el apartado 4.3. Teclas frontales LINE 1 a LINE4, MIC1 y MIC2 para obtener información adicional sobre el modo de ajuste AVANZADO de las entradas LINE y MIC, accesible mediante pulsación larga de sus respectivas teclas en el panel frontal. 33 4.2. Modo especial de configuración (SETUP) Mediante una pulsación larga del control giratorio frontal es posible entrar en el modo especial de configuración o SETUP del CA200z. En dicho modo se realizan los ajustes del modo de trabajo de la unidad (STEREO, MONO, BRIDGE o ZONES), contraste de la pantalla LCD, recuperación de presets (memorias de configuración), etc.: SETUP MODE To enter SETUP MODE press and hold the front knob for more than 2.5 Front : Short (press the front panel knob briefly, less than 0.5 Front : Long (press & hold the front panel knob for more than 2.5 DEFAULT MODE (MASTER volume control and ZONE selection) SWITCH ZA / SP (only for ZONES mode) SP to select ZA or ZB MASTER VOLUME / ZONE SELECT SETUP MODE L P Rotate knob to adjust main output volume Level shown in LCD graphbar OUTPUT Level: 0 to 64 (64 steps) LP to enter the SETUP mode SP LOAD PRESET 1 ... 5 L PRESET number shown in LCD LP to enter the PRESET recovery mode Rotate knob to select PRESET number LOAD 1, 2, 3, 4 or 5 SP to load PRESET and get back SP Rotate knob to browse options L OUTPUT MODE Mode shown in LCD LP to enter the OUTPUT mode selection Rotate knob to select a mode OUTPUT STEREO SP to get back SP MONO BRIDGE ZONES Rotate knob to browse options Rotate knob to browse options Mode shown in LCD LP to enter the LCD working MODE L LCD MODE Rotate knob to select a mode LCD SP to get back SP ON DIMMED OFF Rotate knob to browse options Contrast level shown in LCD LP to enter L LCD CONTRAST the LCD CONTRAST adjust mode Rotate knob to adjust level LCD Level: 0 to 100 SP to get back SP Rotate knob to browse options VERSION INFO vX.Y Firmware version shown in LCD Rotate knob to browse options ADVANCED MODE KEY CODE REQUIRED 34 MIC1 MIC2 + + L Press and hold MIC1 + MIC2 + front panel knob to enter the MIC SETUP ADVANCED MODE Notas: El ajuste LCD MODE permite que la pantalla se encuentre siempre encendida cuando el CA200z está en modo ON, o bien que quede atenuada (DIMMED) o totalmente apagada (OFF) tras, aproximadamente, 20 segundos de inactividad sobre los controles de usuario. Dentro del modo de configuración, las diferentes opciones de cada parámetro se muestran de forma intermitente en la pantalla LCD La pulsación larga de la combinación especial de teclas MIC1 + MIC2 + control giratorio frontal permite entrar en el modo ADVANCED SETUP (configuración avanzada): ADVANCED SETUP mode Front knob SP: Short Press (press the front panel knob briefly, less than 0.5 seconds) Front knob LP: Long Press (press & hold the front panel knob for more than 2.5 seconds) SETUP MODE ADVANCED MODE KEY CODE REQUIRED MIC1 ADVANCED SETUP MODE MIC2 + + LP Press and hold MIC1 + MIC2 + front panel knob to enter the ADVANCED SETUP MODE SP LP SAVE PRESET 1 ... 5 PRESET number shown in LCD LP to enter the PRESET SAVE mode SAVE PRESET 1, 2, 3, 4 or 5 SP to SAVE and get back SP Rotate knob to browse options LP AUTOLOAD PRESET 1 Status shown in LCD LP to enter the AUTOLOAD PRESET 1 setup Rotate knob to select an option AUTOLOAD PR 1 (at every power ON) ON / OFF SP to get back SP Rotate knob to browse options LP Rotate knob to browse options Rotate knob to select PRESET number REMOTE1 Mode shown in LCD LP to enter the REMOTE1 control port setup mode SP to get back REMOTE1 SP Rotate knob to browse options LP REMOTE2 Rotate knob to adjust REMOTE2 control port working mode REMOTE2 SP Rotate knob to browse options LP VOL + INPUTS VOL + PRESETS OFF Mode shown in LCD LP to enter the REMOTE2 control port setup mode SP to get back Rotate knob to adjust REMOTE1 control port working mode VOL + INPUTS VOL + PRESETS OFF Mode shown in LCD LP to enter the Infrared remote control setup Rotate knob to enable or disable the IR REMOTE control IR REMOTE IR REMOTE ON / OFF SP to get back SP 35 Notas: 1. 2. 3. En cualquier momento es posible salir del modo especial de ajuste (regresando al modo por defecto) pulsando brevemente cualquier tecla frontal o esperando 20segundos sin operar sobre los controles. AUTOLOAD PRESET 1: cuando esta función se encuentra activa (ON) el CA200z recuperará el preset nº1 cada vez que sea puesto en marcha (interruptor ON/OFF del panel posterior o suministro eléctrico). REMOTE1 / REMOTE2: o Al seleccionar el modo OFF el puerto REMOTE en cuestión quedará inhabilitado, así como su función MUTE asociada, la cual se dispara mediante cierre de contacto externo conectado al puerto MUTE del panel posterior o Al seleccionar el modo VOL + INPUTS para un puerto remoto, éste podrá gestionar el volumen remoto de su zona asociada (empleando un panel tipo WPmVOL) o bien el volumen remoto y la selección de fuente LINE activa para su zona asociada (empleando un panel tipo WPmVOL-SR). Las opciones de selección desde el panel son OFF, LINE1, LINE2, LINE3 y LINE4, correspondientes a las 5 posiciones físicas del selector del panel remoto o Al seleccionar el modo VOL + PRESETS para un puerto remoto, éste podrá gestionar el volumen remoto de su zona asociada (empleando un panel tipo WPmVOL) o bien el volumen remoto y la selección de preset activo del CA200z, del 1 al 5 (empleando un panel tipo WPmVOL-SR) o Sólo uno de los dos puertos REMOTE puede ser configurado en el modo VOL + PRESETS, de manera que el otro ya no presentará esta opción dentro del menú SETUP de configuración Consulte el apartado 3.5. Opciones de control remoto para conocer detalles acerca de la gestión remota desde los puertos REMOTE, en función del modo de trabajo seleccionado en CA200z (STEREO, BRIDGE, MONO o ZONES) 4. Al encender el equipo o al recuperar un preset determinado, por cualquiera de los métodos disponibles (al arrancar el equipo con la opción AUTOLOAD PRESET 1 activada, mediante el panel frontal, mando a distancia por infrarrojos, comunicación RS232, etc.), la posición física del selector de los paneles murales conectados a los puertos REMOTE (si los hubiese) será obviada si el arranque o el nuevo preset del CA200z contienen ajustes de selección de fuentes o presets diferentes de dicha posición física. En el instante en que se actúe de nuevo sobre el selector de los propios paneles murales se sincronizarán éstos con la unidad CA200z, prevaleciendo la nueva selección 4.3. Teclas frontales LINE 1 a LINE4, MIC1 y MIC2 Una pulsación breve de una de las teclas LINE o MIC activa / desactiva dicha fuente sonora en la zona seleccionada previamente (ver apartado 4.1 para la selección de zonas en modo ZONES). Sólo una de las 4 fuentes LINE (o ninguna) puede estar activa en cada zona de salida, mientras que es posible activar uno o incluso los dos micrófonos (o ninguno) en cada zona de salida. La pulsación larga de una de las teclas LINE permite entrar en sus ajustes detallados (VOL, BASS, TREBLE). El procedimiento completo para entrar y operar en este modo especial de ajuste, así como las opciones disponibles para ajuste, se encuentran reflejados en el gráfico siguiente: Nota: En cualquier momento es posible salir del modo especial de ajuste (regresando al modo por defecto) pulsando brevemente cualquier tecla frontal o esperando 20 segundos sin operar sobre los controles. 36 Nota: En el modo ZONES los ajustes detallados de las entradas LINE se realizan de forma independiente para la zona seleccionada, A o B: una misma fuente sonora LINE puede ser ajustada con diferente volumen y control de tonos para las zonas A o B. En los modos STEREO, MONO y BRIDGE (zona única) los ajustes detallados son comunes, pues no existen zonas a las que direccionar y ajustar de forma independiente las fuentes sonoras. La zona afectada durante los ajustes detallados de una entrada LINE se muestra en la esquina superior izquierda de la pantalla LCD (ZA ó ZB). Front panel LINE sources setup To enter the LINE SETUP MODE, first select zone A or B with a tap of the front knob or the IR remote (only when using the ZONES mode), then press LINE1 or LINE2 or LINE3 or LINE 4 key and hold it for more than 2.5 seconds Front knob SP: Short Press (press the front panel knob briefly, less than 0.5 seconds) Front knob LP: Long Press (press & hold the front panel knob for more than 2.5 seconds) Default mode (STEREO / MONO / BRIDGE / ZONE A or ZONE B) LINE1, 2, 3 or 4 LINEx setup mode (x = 1, 2, 3 or 4) Press & hold LINEx key to enter LINEx setup mode SP LP Level shown in LCD LP to enter the VOLUME adjust mode Rotate knob to adjust level LINEx VOLUME VOL Level: 0 to 64 SP to get back SP Rotate knob to browse options Rotate knob to browse options LP Level shown in LCD LP to enter the BASS adjust mode Rotate knob to adjust level LINEx BASS BASS Level: -10 to +10 SP to get back SP Rotate knob to browse options LP Level shown in LCD LP to enter the TREBLE adjust mode Rotate knob to adjust level LINEx TREBLE TREBLE Level: -10 to +10 SP to get back SP Por su parte, la pulsación larga de una de las teclas MIC permite entrar en sus ajustes detallados. El procedimiento completo para entrar y operar en este modo especial de ajuste, así como las opciones disponibles para ajuste, se encuentran reflejados en el gráfico siguiente: Nota: En cualquier momento es posible salir del modo especial de ajuste (regresando al modo por defecto) pulsando brevemente cualquier tecla frontal o esperando 20 segundos sin operar sobre los controles. Nota: En el modo ZONES el ajuste detallado VOL de las entradas MIC se realiza de forma independiente para la zona seleccionada, A o B: una misma fuente sonora MIC puede ser ajustada con diferente volumen para las zonas A o B (pero mismo ajuste de tonos BASS / TREBLE para ambas zonas de destino). En los modos STEREO, MONO y BRIDGE (zona única) 37 los ajustes detallados son comunes, pues no existen zonas a las que direccionar y ajustar de forma independiente las fuentes sonoras. Front panel MIC sources setup To enter the MIC SETUP MODE, first select zone A or B with a tap of the front knob or the IR remote (only when using the ZONES mode), then press MIC1 or MIC2 key and hold it for more than 2.5 seconds Front knob SP : Short Press (press the front panel knob briefly, less than 0.5 seconds) Front knob LP: Long Press (press & hold the front panel knob for more than 2.5 seconds) Default mode (STEREO / MONO / BRIDGE / ZONE A or ZONE B) MIC1 or MIC2 MICx setup mode (x = 1, 2, 3 or 4) Press & hold MICx key to enter MICx setup mode SP LP Level shown in LCD LP to enter the VOLUME adjust mode Rotate knob to adjust level MICx VOLUME VOL Level: 0 to 64 SP to get back SP Rotate knob to browse options LP Level shown in LCD LP to enter the BASS adjust mode MICx BASS BASS Level: -10 to +10 SP to get back Rotate knob to browse options Rotate knob to adjust level SP Rotate knob to browse options LP Level shown in LCD LP to enter the TREBLE adjust mode Rotate knob to adjust level MICx TREBLE TREBLE Level: -10 to +10 SP to get back SP Rotate knob to browse options ADVANCED MODE KEY CODE REQUIRED MIC1 MIC2 + + LP Press and hold MIC1 + MIC2 + front panel knob to enter the MIC SETUP ADVANCED MODE En el siguiente gráfico se muestra el procedimiento de ajuste AVANZADO para las entradas MIC1 y MIC2 (requiere de una combinación especial de teclas para su acceso): 38 Front panel MIC sources ADVANCED setup Front knob SP : Short Press (press the front panel knob briefly, less than 0.5 seconds) Front knob LP : Long Press (press & hold the front panel knob for more than 2.5 seconds) MIC1 or MIC2 SETUP mode ADVANCED MODE KEY CODE REQUIRED MIC1 MIC1 or MIC2 ADVANCED SETUP mode MIC2 + + LP Press and hold MIC1 + MIC2 + front panel knob to enter the MIC SETUP ADVANCED MODE SP LP TALKOVER ASSIGN Options shown in LCD LP to enter the TLK ASSIGN mode SP to get back SP Rotate knob to browse options LP TALKOVER PRIORITY ZONE A ZONE B ZONES A & B PAGER OFF Level shown in LCD LP to enter the TLK PRIORITY level mode Rotate knob to set PRIORITY level TLK PRIORITY 1 (HIGH) / 2 (LOW) SP to get back SP Rotate knob to browse options LP TALKOVER THRESHOLD Level shown in LCD LP to enter the TLK THRESHOLD adjust mode Rotate knob to adjust THRESHOLD level TLK THRESHOLD Level: 20 ... 30 dB SP to get back SP Rotate knob to browse options LP Rotate knob to browse options Rotate knob to select TALKOVER destination TALKOVER ATTACK Time shown in LCD LP to enter the TLK ATTACK time adjust mode Rotate knob to adjust ATTACK time TLK ATTACK Time: 50 ... 300 msec. SP to get back SP Rotate knob to browse options LP TALKOVER RELEASE Time shown in LCD LP to enter the TLK RELEASE time adjust mode Rotate knob to adjust RELEASE time TLK RELEASE Time: 300 ms ... 3 sec. SP to get back SP Rotate knob to browse options LP TALKOVER DEPTH Level shown in LCD LP to enter the TLK DEPTH adjust mode Rotate knob to adjust DEPTH (attenuation over LINE signal) level TLK DEPTH Level: 20 ... 80 dB SP Rotate knob to browse options LP NOISE GATE Status shown in LCD LP to enter the NOISE GATE activation mode Rotate knob to activate / deactivate NOISE GATE NOISE GATE Status: ON / OFF SP Rotate knob to browse options LP NOISE GATE THRESHOLD Level shown in LCD LP to enter the NOISE GATE THRESHOLD adjust mode Rotate knob to adjust THRESHOLD level NOISE G THRESHOLD Level: 20 ... 30 dB SP 39 Notas acerca de los ajustes ADVANCED de las entradas MIC1 y MIC2: Al contrario que los ajustes detallados de las entradas LINE o MIC, los ajustes AVANZADOS de las entradas MIC (funciones TALKOVER y NOISE GATE) son únicos y personalizados para cada entrada MIC (MIC1, MIC2), pero comunes para las posibles zonas de destino, A y B, cuando se trabaja en el modo ZONES. Por ejemplo: un ajuste del umbral de la función Talkover para la entrada MIC1 a 20 dB será considerado el umbral de activación de dicha función, con independencia de que la función Talkover de MIC1 se asigne a la zona A, a la zona B o a ambas. Es por ello que durante el proceso de ajuste de dichos parámetros avanzados, en la esquina superior izquierda de la pantalla LCD se mostrarán los caracteres “- -“, en lugar de la indicación de zona afectada que se muestra en otro tipo de ajustes (ZA ó ZB). TALKOVER ASSIGN: al asignar la función de Talkover desde una entrada MIC hacia una salida, la señal de micrófono provocará una atenuación de la señal LINE activa en dicha zona de salida (y también del otro micrófono, a no ser que éste disponga de un función Talkover activa y de mayor prioridad), cuando el micrófono sobrepase el umbral de detección o Talkover Threshold. Las posibilidades de asignación son: o ZONE A o ZONE B o ZONES A-B (ambas zonas) o PAGER: función de envío de mensajes de voz con selección de zonas en tiempo real, o paging (zona A, B o ambas). Únicamente disponible empleando una consola de sobremesa MPAGE4, conectada a puerto PAGER del panel posterior del CA200z. La consola emplea el canal de entrada MIC1 para la gestión de la función PAGER, y debe tener sus puentes internos en las posiciones 10V / ALOG (consulte el manual de la consola MPAGE4 para más detalles). En el modo ZONES del CA200z las teclas operativas en la unidad MPAGE4 serán las de selección de zonas 1 y 2 (A y B en el CA200z), mientras que en los modos STEREO, MONO y BRIDGE sólo se hallará operativa la tecla de selección de zona 1. Nota: En el modo PAGER la entrada MIC1 se encuentra silenciada cuando no se esté realizando una llamada desde la estación MPAGE4 (= selección de zonas + pulsación de la tecla PAGE de la MPAGE4). Es recomendable ajustar también el nivel de salida de la unidad MPAGE4, mediante sus potenciómetros internos, para un correcto acoplamiento de la unidad con el CA200z (consulte el manual de la consola MPAGE4 para más detalles) o 40 OFF: función Talkover de la entrada MIC no habilitada TALKOVER PRIORITY: las entradas MIC1 y MIC2 pueden tener su función TALKOVER con el mismo nivel de prioridad o con niveles diferentes. El efecto de dicha jerarquía de prioridades es el siguiente: o MIC1 y MIC2 con misma prioridad de Talkover (ambos 2 (LOW) o ambos 1 (HIGH)): el primero de los dos micrófonos cuyo Talkover actúa sobre una zona de destino (su señal sobrepasa el umbral de detección), inhabilita al Talkover del otro micrófono en la misma zona, hasta que el Talkover del primero deja de actuar (su señal desciende de nuevo por debajo del umbral de activación), momento en que la función Talkover o puede ser de nuevo activada por el primer micrófono que sobrepase el umbral MIC1 y MIC2 con prioridad diferente: el micrófono con mayor prioridad, cuyo Talkover se encuentra asignado a una zona de destino, inhabilita al activarse (su señal sobrepasa el umbral de detección) al Talkover del otro micrófono en la misma zona. En caso de que el micrófono de menor prioridad tuviese su función Talkover activa en un momento dado, la activación del micrófono de mayor prioridad también lo interrumpiría hasta que el Talkover de este último dejase de actuar (una vez su señal desciende de nuevo por debajo del umbral de activación) TALKOVER THRESHOLD: umbral de disparo de la función Talkover. La señal del micrófono en cuestión activa su función Talkover cuando supera dicho umbral. Este nivel de disparo depende del ajuste de sensibilidad del micrófono (panel posterior), pero es independiente del ajuste VOL del menú de ajustes ADVANCED de las entradas MIC TALKOVER ATTACK: tiempo que tarda la función Talkover en actuar desde el instante en que la señal de micrófono supera el umbral de disparo TALKOVER RELEASE: tiempo que tarda la función Talkover en dejar de actuar desde el instante en que la señal de micrófono desciende de nuevo por debajo del umbral de disparo TALKOVER DEPTH: atenuación aplicada por la función Talkover, al dispararse, sobre la señal de línea activa NOISE GATE: función de puerta de ruido para la entrada de micrófono. Cuando dicha función se encuentra activada, la entrada MIC permanece silenciada mientras no exista una señal superior al umbral de activación de la función NOISE GATE, rechazando de esta forma el ruido de fondo captado por el micrófono conectado a ella NOISE GATE THRESHOLD: umbral de disparo de la función NOISE GATE 4.4. Función AUTO STANDBY La funcionalidad AUTO STANDBY (modo de reposo o bajo consumo) del CA200z permite dejar el aparato conectado a la red eléctrica de forma indefinida, desactivándose o activándose el modo de reposo de forma automática según haya presencia de señal de entrada o no. Para habilitar el modo AUTO STANDBY es preciso activar la opción ON del modo especial de configuración (SETUP). Consulte el apartado 4.2. Modo especial de configuración (SETUP) para más detalles. a) b) Al habilitar el modo AUTO STANDBY puede ocurrir uno de los siguientes 2 supuestos: NO hay señal de audio en las entradas. Resultado: el amplificador entra en AUTO STANDBY inmediatamente SÍ hay señal de audio en las entradas. Resultado: el amplificador continúa activo 41 Cuando se encuentre habilitado y no exista señal de audio durante 2 minutos o más en cualquiera de las entradas del aparato (o sea muy débil, inferior al umbral de activación), el CA200z pasará automáticamente a modo AUTO STANDBY, encendiéndose el indicador LED ON/STBY en verde con destellos naranjas periódicos, y apagándose los indicadores LED de las entradas y la pantalla LCD. Mientras el CA200z se encuentra en el modo AUTO STANDBY, si se actúa sobre los controles del panel frontal o el mando a distancia por infrarrojos, la pantalla LCD se iluminará durante un tiempo corto, (incluso cuando LCD MODE se haya ajustado en las opciones OFF o DIMMED), para luego volverse a apagar o atenuar si se siguen cumpliendo las condiciones para no salir del modo AUTO STANDBY. Si, por el contrario, se fuerza a la unidad al modo STAND BY manual, mediante la tecla ON/STBY del mando a distancia por infrarrojos, la unidad no responderá a la pulsación de teclas del panel frontal, ni se iluminará la pantalla LCD, hasta que sea despertada mediante una nueva pulsación de dicha tecla o una pulsación corta del control giratorio frontal, pasando al modo ON (encendido). 4.5. Indicadores LED SP: El indicador LED de presencia de señal o SP advierte de la presencia de señal en cualquiera de las entradas del amplificador. Se enciende cuando el nivel en la entrada supera el umbral de detección establecido. CLIP: El indicador LED de saturación o CLlP se ilumina cuando la señal entregada a los altavoces se halla cercana al nivel de recorte o saturación del amplificador. Deben ajustarse los niveles de señal entrante de manera que nunca queden permanentemente encendidos los indicadores CLIP (saturación o recorte), sino que lo hagan como máximo al ritmo de las frecuencias más graves del pasaje sonoro. De lo contrario la señal amplificada presentaría altos niveles de distorsión y una baja calidad acústica e inteligibilidad. Nota: El CA200z incluye un circuito “ANTICLIP”, siempre activo, el cual analiza constantemente la distorsión armónica (producida por el recorte excesivo de la señal a la salida del amplificador) y reduce automáticamente el nivel de entrada, actuando sólo cuando se supera el límite de distorsión ON/STBY: o se ilumina en verde cuando el equipo se encuentra en su régimen normal de funcionamiento. En este modo parpadea cuando recibe comandos desde el mando a distancia por infrarrojos o se ilumina naranja cuando se encuentra en el modo de reposo o bajo consumo (STANDBY), modo al que se accede mediante la pulsación de la tecla ON/STBY del mando a distancia por infrarrojos. o se ilumina en verde con destellos naranjas periódicos cuando la unidad ha entrado automáticamente en el modo AUTO STANDBY 4.6. Modo de bloqueo Para entrar o salir del modo de bloqueo del CA200z es preciso realizar una pulsación larga de las teclas LINE4 + MIC1 + control giratorio frontal. En el modo de bloqueo no es posible manejar el dispositivo mediante las teclas frontales, quedando éste protegido frente a manipulaciones indebidas La pantalla LCD mostrará el texto PANEL LOCKED en este modo cada vez que se intente operar con ellas. Al salir del modo, mediante la misma combinación de teclas, la pantalla LCD mostrará el texto PANEL UNLOCKED durante un breve intervalo de tiempo. 42 Nota: El modo de bloqueo, una vez activado, se mantiene incluso después de apagar y encender el equipo, no saliendo de él hasta que se efectúa de nuevo la pulsación larga de la combinación de teclas anterior. 4.7. Restaurar valores por defecto y actualización de firmware 1. 2. 3. 4. Si desea restaurar los ajustes de fábrica del CA200z siga este procedimiento: Con el equipo apagado, pulse y mantenga pulsado el control giratorio frontal Sin soltarlo, encienda la unidad mediante el interruptor ON/OFF del panel posterior. El panel LCD mostrará un mensaje especial, indicando que está listo para ser apagado y recuperar de este modo los ajustes por defecto al encenderse de nuevo el CA200z Espere unos segundos y apague de nuevo el CA200z La próxima vez que lo encienda, tendrá en memoria los ajustes por defecto con los que la unidad sale de fábrica Nota: Para actualizar el firmware de la unidad, consulte la página de producto en www.ecler.com, donde hallará la utilidad software de actualización y las instrucciones para llevar a cabo el proceso. 5. LIMPIEZA El CA200z no deberá limpiarse con sustancias disolventes o abrasivas puesto que se corre el riesgo de deteriorar la serigrafía. Para su limpieza se utilizará un trapo humedecido con agua y un detergente líquido neutro, secándolo a continuación con un paño limpio. En ningún caso se debe permitir la entrada de agua por cualquiera de los orificios del aparato. 43 6. LISTA DE FUNCIONES 1. Indicador luminoso de funcionamiento/reposo, ON/STBY 2. Indicador luminoso de presencia de señal en la entrada, SP 3. Indicadores luminosos de saturación o recorte zona A y zona B, CLIP 4. Display frontal LCD 5. Control giratorio digital (“encoder”) 6. Entrada frontal de micrófono, MIC 2 7. Entrada frontal de línea, LINE 2 8. Selector de entrada de línea, LINE 1 9. Selector de entrada de línea, LINE 2 10. Selector de entrada de línea, LINE 3 11. Selector de entrada de línea, LINE 4 12. Selector de entrada de micro, MIC 1 13. Selector de entrada de micro, MIC 2 14. Receptor del mando a distancia, REMOTE 15. Entrada línea RCA, LINE 1 16. Entrada línea RCA, LINE 2 17. Entrada línea RCA, LINE 3 18. Entrada línea RCA, LINE 4 19. Ajuste de sensibilidad entrada micrófono, MIC 1 y PAGER 20. Entrada de micrófono, MIC 1 21. Conector RJ-45, PAGER 22. Ajuste de sensibilidad entrada micrófono, MIC 2 23. Entrada de micrófono, MIC 2 24. Salida auxiliar AUX OUT 25. Salida amplificada zona A, OUT A (L) 26. Salida amplificada zona B, OUT B (R) 27. Control de silenciamiento remoto, MUTE 28. Conector RJ-45, REMOTE 1 29. Conector RJ-45, REMOTE 2 30. Control remoto, puerto RS-232 31. Base de red 32. Portafusible 33. Interruptor de puesta en marcha, ON/OFF 34. Tecla ON/STBY 35. Tecla de silenciamiento MUTE 36. Teclas de selección entrada señal, LINE 1, 2, 3 y 4 37. Teclas para ajustar el volumen de las entradas LINE 38. Teclas de recuperación memorias de configuración, PRESET 39. Tecla de selección entrada micrófono, MIC 1 40. Teclas para ajustar el volumen de la entrada MIC 1 41. Tecla de selección entrada micrófono, MIC 2 42. Teclas para ajustar el volumen de la entrada MIC 2 43. Tecla de selección de zona, ZONE A 44. Tecla de selección de zona, ZONE B 45. Teclas para ajustar el volumen de la zona seleccionada 44 7. DIAGRAMA DE FUNCIONES 45 8. TECHNICAL CHARACTERISTICS 8. CARACTÉRISTIQUES TECHNIQUES 8. CARACTERÍSTICAS TÉCNICAS 8. TECHNISCHE DATEN POWER (each output) BRIDGE Damping Factor 1kHz @ 8 >140 Frequency response 15Hz - 40kHz (-3dB) THD+Noise @ 1kHz Full Pwr. SPKR OUT THD+Noise AUX OUT <0.08% <0.03% Channel crosstalk @ 1kHz >60dB Inputs Sensitivity nom / Impedance LINE 1-4 0dBV (-6dBV*)/>10k CMRR MIC 1-2 (BAL) MIC 1-2 (BAL) -20 to -50dBV/>1k >65dB @ 1kHz Outputs Level / Minimum Load AUX OUT -6dBV/10k Tone control (LINE & MIC) BASS TREBLE 100Hz ±10dB 6KHz ±10dB Signal Noise Ratio LINE MIC (BAL) >85dB >62dB Talkover TIME DEPTH Microphone Noise Gate 2 Sec.** -30dB** 20-25-30dB below max.** Phantom voltage +24VDC/8mA max.* RS-232 DB-9 BAUD RATE DATA PARITY STOP BITS FLOW CTRL 9600 (fixed) 8 bits NONE 1 NONE ANALOG REMOTE 1-2 (0-10V. based) INFRARED REMOTE Volume & Input selection Preset, Source & Volume Mains 90-264VAC 47-440Hz Power consumption (pink noise, 1/8 power @ 4ohm) Power consumption (pink noise, 1/3 power @ 4ohm) Power consumption (max. @ 4ohm) Power consumption Stand By (time 2 minutes) 62VA/30W 78VA/61W 240VA/160W <8W Dimensions WxDxH 210x230x88mm Weight *Internally selectable **Software selectable 46 70W@4 1% THD 38W@8 1% THD 97W@8 1% THD Net Gross 2340g 3550g 9. BLOCK DIAGRAM 9. SCHÉMA FONCTIONNEL 9. DIAGRAMA DE BLOQUES 9. BLOCKSCHALTBILD 47 10. CONFIGURATION DIAGRAM 10. SCHÉMA DE CONFIGURATION 10. DIAGRAMA DE CONFIGURACIÓN 10. KONFIGURATIONSÜBERSICHT JUMPERS FACTORY ADJUST Line Gain 1, 2, 3 & 4 Phantom 0dB OFF off on PHANTOM L1-4 GAIN 0dB -6dB ECLER Laboratorio de electro-acústica S.A. Motors 166-168, 08038 Barcelona, Spain INTERNET http://www.ecler.com e-mail: [email protected] 50.0249.01.00