1
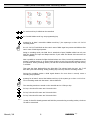
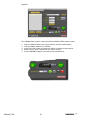
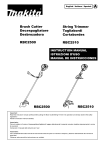
Manual / UK
1
DMXPEN
tablet
INDEX
Introduction .................................................................. page
3
Warnings ...................................................................... page
4
SetUp / Connections ...................................................... page
5
Technical Specification ................................................... page
6
Description ................................................................... page
7
Touch Panel controlled DMX recording mode ................... page
8
Touch Panel controlled playback mode ............................ page
9
MIDI controlled playback mode ...................................... page
9
PenSuite controlled playback mode ................................ page
10
Warranty ...................................................................... page
14
Maintenance / Cleaning ................................................. page
14
Manual / UK
2
DMXPEN
tablet
INTRODUCTION
Thanks to buy this DMXPEN series products.
A correct use of this product, will ensure a correct functionality, a long life and at the
same time will avoid product failure.
Please read this manual carefully and be sure to understand the information provide to
ensure a safe and reliable application, to learn a suitable knowledge of the product and
his necessary precaution before using it.
Manual / UK
3
DMXPEN
tablet
WARNINGS
1.
This manual describes the DMXPEN Tablet operating functions. The user must
operate the product according to the performance specifications described in the
operation manuals.
2.
While every effort has been made to ensure that the information on this manual is
accurate and complete, we would appreciate any errors or omissions submitted to
our attention.
3.
Maintenance, inspection, and replacement of parts must be performed only by
authorized personnel.
4.
We reserve the right to change the specifications of the hardware and software
described in this manuals at any time and without prior notice.
5.
Do not use DMXPEN Tablet with wet finger and do not place water on the touch
panel.
6.
After the package opening, please make this check:
• The received product correspond with the ordered one.
• No part are missing on the received product.
• The product is not damaged.
• Contact immediately a DMXPen distributor in case of fault.
Manual / UK
4
DMXPEN
tablet
SET UP/CONNECTION
DMXPEN Tablet was developed for a desk use and the Black opaque PVC wings allow to
move the device on the desk surface avoiding any scratch.
To start up the product, be sure that the microSD card is inserted (as provided from the
factory) and power on it with the provided power supply.
Note: DMXPen Tablet do not has a main ON/OFF switch and we recommend to unplug
the power supply for maintenance.
Now the product is ready to plug on DMX line or ethernet network for show recording and
playback.
Manual / UK
5
DMXPEN
tablet
Technical Specification
Dimension ( L x W x H )
200 x 160 x 88 mm
Weight
700 gr.
Material / Finishing
Glazed Inox steel
One Optocoupled bidirectional DMX Line
One DMX universe recording / playback
One ArtNet universe recording / playback
Convert ArtNet to DMX / DMX to ArtNet
One General MIDI Input port
Loop funcionaly
2GB microSD card
Degree protection
IP 30
Operating Relative Humidity : from 30% to 85% without condensation
Operating Temperature
-5°C + 50°C
DMX IN Connector
5 pole XLR Neutrik male
DMX OUT Connector
5 pole XLR Neutrik female
Ethernet Connector
RJ45 Neutrik
Power Supply
12-24VDC – 500 mA
Power Consumption
200 mA @ 12 VDC
front
6
Back Panel
5
7
2
1
Manual / UK
6
3
4
1. Touch Panel
2. DMX OUT
3. DMX IN
4. Ethernet
5. Power Supply
6. Midi IN
7. MicroSD card
DMXPEN
tablet
DESCRIPTION
DMXPen Touch is a desktop device with the following features:
–
–
–
–
–
–
–
DMX512 Signal Recording and Playback
ArtNet Signal Recording and Playback
ArtNet → DMX Conversion
DMX → ArtNet Conversion
Recording and Playback remote control through ethrnet port
Playback remote control through MIDI port
Recording and Playback control through touch panel user interface
Briefly the DMXPen products mission is record and carry easily: “Design your show, record and
bring with you”.
Why recording? The first goal of a professional light programmer is to select a light desk and
learn to use it in the best way, because this means freedom of expression and productivity.
The DMXPen products range improve this concept taking care of recording what the light
programmer realize whit his preferred equipment.
Why carry? Often the light programmer presence is not necessary during the show playback, so
he can realize the show and record it so the user has only the duty to activate his playback (i.e.
fair booth, shop, club, etc.)
Moreover doing this with a normal light desk, mean carry heavy or expensive equipment that
usually are not so familiar to the users (i.e. barman, custodian, etc.).
This is another issue improved from the DMXPen products because contains only the show
engine with a simple user interface at a very low cost.
Manual / UK
7
DMXPEN
tablet
Touch panel controlled DMX recording mode
1
6
for each touch key 2 SHOW can be controlled
7
8
the 7 and 8 hidden touch key, are programming key
7
G
pressing for at least 3 second the hidden touch key 7, the system go on show 1-2-3-4-5-6
recording mode:
the 1-2-3-4-5-6-7 leds blinks at slow rate in case of DMX signal not present and blinks at fast
rate in case of DMX signal present.
Going in recording mode, the DMX Port is switched to Input (DMXPen tablet has only one
DMX line shared for Input and Output and the 5 pole male and female XLR connector are
wired in parallel).
Now is possible to connect the light desk and select one of the 6 touch key associated to the
primary recording session. A 10 second time out allow to exit from recording mode in case of
non selection. During recording session, the led near to the associated touch key and the key
7 will blink.
Then start the show playback from the light desk. The selected touch key and key 7 will
blink fast upon DMX receiving. Finally pressing any touch key ends the recording session.
During the recording session a DMX signal absence for more that 10 second, cause a
recording stop operation.
8
G
pressing for at least 3 second the hidden touch key 8, the system go on show 11-12-13-1415-16 recording mode with the same 1-6 show behavoir.
The recording session are stored on the microSD card on 2 files per key:
1
for key 1 the show file name are 1.bin and 11.bin
2
for key 2 the show file name are 2.bin and 12.bin
3
for key 3 the show file name are 3.bin and 13.bin
etc....
in case of show file already present and DMX line present during recording session, the show
file will be overwrited.
Manual / UK
8
DMXPEN
tablet
Touch panel controlled playback mode
Note: we suggest to not hold in your hand the DMXPen tablet during recording or operation playback
to avoid unintentional key press. Leave the product on the desk surface and touch the key with
one finger.
On standby all led will be switched off.
Pressing the first time key 1-6, show 1.bin-6.bin (if present) will be playback on both DMX and
ArtNet line and the associated led will blink 2 times in a short time with a long off time.
In case of show not present, the led associated to the relative key will blink slowly 2 timers and
after 2 second the device back to standby state.
During playback, the show runs an automatically loop mode.
Pressing the second time key 1-6, show 11.bin-16.bin (if present) will be playback on both DMX
and ArtNet line and the associated led will blink 1 times with a long off time.
Each time the key number will be changed, the show selection restart from show 1-6 in the first
pression and 11-16 in the second pression.
MIDI Remote control playback mode
The MicroSD card recorded session can be playback also through the MIDI port using a normal
MIDI device as a guitar MIDI foot switch, MIDI keyboard, or other MIDI device.
The DMXPen products are arranged to receive Program Change MIDI command, used in most
case from MIDI device to recall a preset.
A preset 1 recall will start show playback 1, preset 2 recall will start show playback 2, and so
on.
Manual / UK
9
DMXPEN
tablet
PenSuite Remote control mode
DMXPEN products can be remote controlled through the free PenSuite software available on the
device micorSD card or on www.dmxpen.com web site in both PC and MAC OS version.
The communication between the computer and the device is possible through the ethernet port,
in two different way: direct connection (using a cross cable) or through Hub/Switch connection
(using a Patch cable)
Figure 1: Cross cable direct connection
Figure 2: Patch cable HUB/Switch connection
Then launch PenSuite software; remember that a firewall systems can cause an incorrect
Manual / UK
10
DMXPEN
tablet
operation.
The “DMXPEN Show Control” section provide the DMXPen Tablet remote control:
1.
2.
3.
4.
5.
Manual / UK
Plug the DMXPen Tablet power supply with the microSD card inserted;
Connect DMXPen Tablet to PC network;
Press “find node” button to scan all the device connected to the network;
Select from the list the device that you want to control;
Press to DMXPEN image to select the correct data direction;
11
DMXPEN
tablet
REC
6.
Connect DMXPen Tablet DMX In port to the light desk DMX Out port using DMX cable;
7.
8.
9.
Select a show number for the recording session to store on microSD card;
Press REC button from “DMXPEN Show Control” panel on PenSuite;
Press STOP button to end the recording session;
In case of show already present, the recording session will be overwrited.
PLAY
10. Connect DMXPen Tablet to the stage DMX or ArtNet line;
11. Select the playback show number;
12. Press PLAY button from “DMXPEN Show Control” Panel on PenSuite;
13. Press STOP button to end playback;
Manual / UK
12
DMXPEN
tablet
In order to have an easy to use product, DMXPen Tablet was designed to handle up to 12
programs controlled directly through 6 key touch panel.
PenSuite allow to control up to 1000 recording and playback sessions so we can have 12 show
that can be controlled directly from the touch panel and 1000 from a remote PC. In this way we
can have some show controlled form basic users and show controlled from advanced user.
Moreover PenSuite allow to design simple cue selecting the “Test DMX Out” tab; refer to the
PenSuite user manual to have more information.
Manual / UK
13
DMXPEN
tablet
WARRANTY
12 month
(according to D.L. n.24 2 february2002, directive 1999/44/CE of European Parliament)
MAINTENANCE / CLEANING
No special maintenance operation are required for DMXPEN Tablet.
Anyway remember to unplug the device from the power supply during maintenance and
cleaning operation.
Moreover we suggest to make a backup copy of the show file stored on the microSD card
using a PC connected or other card reader device.
Use only humid cleaning cloth to clean DMXPen Tablet. Do not use cleaning solvent or
washing powder.
Manual / UK
14
DMXPEN
tablet
www.dmxpen.com
www.ArtisticLicence.com
Designed by and Copyright
Artistic Licence (UK) Ltd.
www.esta.org
Manual / UK
15
DMXPEN
tablet