1
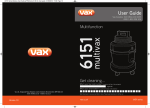
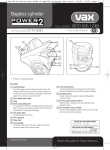
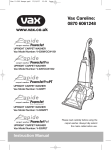
Vax Careline:
0870 6061248
www.vax.co.uk
BAGGED CYLINDER VACUUM CLEANER
Vax Model Number: V-100
Instruction Manual
Please read carefully before using
this cleaner. Always fully extend
the mains cable before use.
Parts Overview
1.
Parts Overview
10
11
12
9
8
2
1
7
6
5
4
13
3
Fig. 1/1
1
Telescopic extension tube
8
On/off button
2
Flexible hose
9
Carry handle
3
Combination floor tool
10
Dusting brush
4
Castor wheels
11
Crevice tool
5
Top cover retainer clips
12
Upholstery tool
6
Post-motor filter (at rear)
13
Dust bags (x5)
7
Power cord
IMPORTANT: The accessories are stored in the dust bag compartment and need to be removed before operating
the vacuum cleaner.
2
Safety Information
2.
Safety Information
FOR HOUSEHOLD USE ONLY.
When using the vacuum cleaner, basic safety
precautions should always be observed, including
the following:
1.
2.
3.
4.
5.
6.
7.
8.
9.
10.
11.
12.
13.
14.
15.
16.
17.
Only use the vacuum cleaner indoors on
dry surfaces.
Turn off the vacuum cleaner controls before
connecting to or disconnecting from the mains
supply.
Always unplug the vacuum cleaner before
connecting or disconnecting the vacuum hose.
Close attention is necessary when used by or
near children. Do not allow children to use as
a toy.
Use only as described in this manual. Use only the
manufacturer’s recommended attachments.
Do not use the vacuum cleaner if it has been
dropped, damaged, left outdoors or dropped
into water. Do not use the vacuum cleaner with
a damaged cord or plug. If the supply cord or
plug is damaged, return the vacuum cleaner to a
Vax Authorised Service Agent or suitably qualified
person for examination, repair or adjustment.
Do not pull or carry by the cord. Do not use
the cord as a handle, close a door on the cord
or pull the cord around sharp edges or corners.
Do not run the vacuum cleaner over the cord.
Keep the cord away from heated surfaces.
Do not handle the plug or vacuum cleaner with wet
hands. Do not use outdoors or on wet surfaces.
Do not put any objects into openings. Do not use
with any openings blocked and do not restrict air
flow. Keep all openings free of dust, lint, hair or
anything that may reduce airflow.
Keep hair, loose clothing, fingers and all parts of
the body away from openings and moving parts.
Do not pick up hot coals, cigarette butts, matches
or any hot, smoking or burning objects.
Do not pick up flammable or combustible materials
(lighter fluid, petrol, kerosene, etc) or use in the
presence of explosive liquids or vapours.
Do not vacuum up harmful or toxic material
(chlorine bleach, ammonia, drain cleaner, etc).
Do not vacuum up hard or sharp objects such as
glass, nails, screws, coins, etc.
Do not use without the filters in place.
Take extra care when vacuuming on stairs.
Keep vacuuming area well lit.
18. Store the vacuum cleaner indoors in a cool,
dry area.
19. Turn off the switch before unplugging.
20. Use only CE-approved 13 amp extension cords.
Non-approved extension cords may overheat.
Care should be taken to arrange the cord so that
the cord cannot be pulled or tripped over.
WARNING: Always switch off and unplug the vacuum
cleaner from the electrical outlet before assembling,
opening or replacing the dust bag, or before
connecting/disconnecting the attachments.
CAUTION: The vacuum cleaner is a very powerful unit.
Before plugging the cord into the electrical outlet make
sure the switch is in the ‘off’ position. Hold the vacuum
cleaner firmly when starting and in use.
IMPORTANT: If the inlet or hose is blocked, switch off
the vacuum cleaner and remove the blockage(s) before
re-starting the vacuum cleaner.
IMPORTANT: Replacing filters and changing the dust
bag improves vacuum performance. Make sure the
foam filter sleeve is completely dry before inserting
back into the vacuum cleaner.
This vacuum cleaner is intended for household use
only and not for commercial or industrial use.
PLEASE KEEP
FURTHER USE.
THESE
INSTRUCTIONS
FOR
Motor Thermostat
IMPORTANT: The motor is equipped with a thermal
cut-out. If for any reason, the vacuum cleaner should
over-heat, the thermostat will automatically turn the unit
off. Should this occur, unplug the vacuum cleaner from
the wall outlet and turn off the switch. Open the unit
and check the dust bag. If full, replace. Wash the foam
filter sleeve. Allow the cleaner to cool for approximately
one (1) hour.
To re-start, plug into a wall outlet and switch back on.
3
Initial Set Up/Use and Function
3.
Initial Set Up
4.
Use and Function
IMPORTANT: The accessories are stored in the dust
bag compartment and need to be removed before
operating the vacuum cleaner.
IMPORTANT: Always remove the power plug from
the wall outlet before assembling or before removing
accessories.
1.
1.
Unclip the retainer clips on either side of the
vacuum cleaner and lift off to gain access to the
dust bag compartment (Fig.3/1).
Fig.3/1
2.
Remove the accessories (Fig.3/2).
Insert the flexible hose into the inlet on the main
body of the vacuum cleaner. Push in and twist
clockwise a quarter turn until tight (Fig.4/1).
Fig.4/1
2.
Push the telescopic extension tube onto the end
of the handle (Fig.4/2).
Fig.3/2
3.
Fig.4/2
Fit the dust bag by aligning the front of the dust
bag with the inlet shots (Fig.3/3).
3.
The telescopic extension tube can be lengthened
or shortened by pushing the button in and sliding
the tubes apart or together as required (Fig.4/3).
Fig.3/3
4.
Position the dust bag to fill the inside of the bin
(Fig 3/4).
Fig.4/3
Fig.3/4
5.
4
Replace motor top.
Use and Function/How to Operate
4.
Fit the combination floor tool by pushing on to the
extension tube (Fig 4/4).
Hard Floor Cleaning
For hard floor cleaning, press the rocker switch on the
combination floor tool as shown to lower the brushes
(Fig.5/3).
Fig. 4/4
Fig. 5/3
5.
How to Operate
On/off Button
Fully unwind the power cord and plug the cord into
the electrical outlet. Turn the vacuum cleaner on by
depressing the button located on the top of the carry
handle (Fig.5/1). The vacuum cleaner can be turned off
by pressing the on/off button again.
Cord Wrap
After use, turn the vacuum cleaner off and unplug from
the electrical outlet. Wrap the cord around the top
section of the vacuum cleaner and secure in place with
the cord clip (Fig.5/4).
Fig.5/4
Fig.5/1
Carpet Cleaning
Carry Handle
Use the carry handle located on the top of the vacuum
cleaner to move from room to room (Fig.5/5).
For carpet cleaning, press the rocker switch on the
combination floor tool as shown to raise the brushes
(Fig.5/2).
Fig.5/5
Fig.5/2
5
Accessories/Dust Bag & Filters: Removal & Replacement
6.
Accessories
1.
IMPORTANT: Always remove the power plug from
the wall outlet before assembling or before removing
accessories.
1.
Turn off the vacuum cleaner and unplug it from
the mains. Remove the hose. Unclip the retainer
clips on either side of the vacuum cleaner and lift
off to gain access to the dust bag compartment
(Fig.7/1).
The accessories can be attached directly to the
handle by removing the telescopic tubes and
pushing in the desired accessory (Fig.6/1).
Fig.7/1
2.
Lift out the full dust bag (Fig.7/2).
Fig.6/1
2.
The accessories can also be attached to the
telescopic extension tube for extra reach. Remove
the combination floor tool and push on the desired
accessory (Fig.6/2).
Fig.7/2
3.
Dispose of the full dust bag and insert a new dust
bag back into the vacuum cleaner aligning the
front of the dust bag with the inlet slots (Fig.7/3).
Fig.6/2
Crevice Tool: For crevices, corners, cracks etc.
Dusting Brush: For delicate surfaces.
Fig.7/3
Upholstery Tool: For carpet, upholstery, stairs etc.
Pre-motor Filter
1.
7.
Dust Bag & Filters:
Removal & Replacement
IMPORTANT: Always unplug the vacuum cleaner
from the electrical outlet before removing the
dust bag.
IMPORTANT: DO NOT use the vacuum cleaner
without ALL of the filters in place.
6
Turn off the vacuum cleaner and unplug it from
the mains. Unclip the retainer clips on either side
of the vacuum cleaner and lift off to gain access
to the dust bag compartment (Fig.7/4).
Dust Bag & Filters: Removal & Replacement/Clearing Blockages
Fig.7/4
2.
The pre-motor filter is found on the underside of
the top cover. To release the filter turn the cover
anti-clockwise and lift away (Fig.7/5).
Fig.7/7
3.
Remove the post-motor filter (Fig.7/8).
Fig.7/8)
Fig.7/5
3.
The pre-motor filter is protected by a foam filter
sleeve. This can be washed using cold water,
leaving it to fully air dry before replacing (Fig.7/6).
Fig.7/6
4.
4.
8.
The post-motor filter should be replaced every
9-12 months.
Clearing Blockages
1.
Switch the vacuum cleaner off and disconnect the
power plug from the electrical outlet.
2.
The flexible hose can be disconnected from the
vacuum cleaner by rotating anti-clockwise and
pulling away from the machine (Fig.8/1). Remove
any blockages found then reconnect the hose
securely.
The pre-motor filter should be replaced every
9-12 months.
Post-motor Filter
1.
Located at the rear of the vacuum cleaner is a
post-motor filter which can also be removed and
replaced.
2.
Push in on the latches on both sides of the filter
cover to release to post-motor filter (Fig.7/7).
Fig.8/1
7
Troubleshooting
9.
Troubleshooting
WARNING: TO REDUCE RISK OF PERSONAL INJURY, UNPLUG VACUUM
CLEANER BEFORE SERVICING
PROBLEM: Cleaner won’t run
Cause: Not properly plugged into electrical outlet.
Solution: Plug in firmly.
Cause: No electricity in electrical outlet.
Solution: Check fuse or breaker.
Cause: On/off switch not turned on.
Solution: Push on/off switch to on.
Cause: Motor thermostat has tripped.
Solution: Switch off and unplug cleaner. Leave for one (1) hour before switching the cleaner back on.
Cause: Blown fuse/tripped breaker.
Solution: Reset circuit breaker or replace fuse.
PROBLEM: Vacuum cleaner won’t pick up/loss of suction
Cause: Dust bag not installed correctly.
Solution: Review dust bag removal and replacement.
Cause: Dust bag full or blocked.
Solution: Replace dust bag.
Cause: Clogged filter.
Solution: Remove filter and clean.
Cause: Blockage in hose.
Solution: Disconnect hose, remove obstruction then re-fit.
PROBLEM: Accessories won’t pick up
Cause: Accessories not attached correctly.
Solution: Refer to page 5 for fitting information.
PROBLEM: Dust escaping from the vacuum cleaner
Cause: Dust bag full.
Solution: Dispose of dust bag and replace with a new one.
Cause: Dust bag not installed correctly.
Solution: Review dust bag removal and replacement.
Cause: Hose not installed correctly.
Solution: Review hose installation.
Cause: Filter not installed completely.
Solution: Review filter removal and replacement.
8
TBS/UK Service & Help/Technical Specifications
10. Guarantee
Conditions
Vax Pro
Terms &
for V-100
Vax Ltd guarantees this vacuum cleaner to be free from
defects in material or workmanship commencing upon
the date of the original purchase. Save your original
sales receipt to validate the start of warranty period.
If the vacuum cleaner should become defective within
the first two years, Vax will repair or replace any
defective parts free of charge (details of parts excluded
are in the conditions below).
The complete machine must be delivered to any Vax
authorised service agent along with proof of purchase
(for full terms and conditions see below).
After the two year period has expired, Vax will guarantee
the main unit for parts only for three years (for full terms
and conditions see below).
1
OUR COMMITMENT TO YOU
1.1 Vax promise that, provided you use the Product
in accordance with the operating instructions for
normal domestic purposes:
(a) the Product should be free from defects
in design, materials, workmanship and
manufacture for 2 years from the date of
purchase (the “Initial Guarantee Period”); and
(b) for an additional three years after the
expiry of the Initial Guarantee Period
(the “Additional Guarantee Period”) the main
unit of the Product should be free from
defective parts.
1.2 Please note however that our commitment to
you is subject to the terms of this Guarantee.
In particular, please read Section 1.4, Section 2
(Important Exceptions from our commitment to
you), Section 3 (Transfer of our Commitments)
and Section 5 (Limits to our responsibility).
1.3 If Vax is in breach of our commitments then, subject
to the other terms of this Guarantee, Vax will pay
the cost of parts and labour during the “Initial
Guarantee Period” and for the cost of parts only
during the “Additional Guarantee Period”. Please
refer to Section 4 of this guarantee for details of
how to make a claim under this Guarantee.
1.4 Our commitment to you is only valid if you are
a consumer (not a business) [living] in mainland
United Kingdom. If you live outside mainland
United Kingdom (or unsure if this covers
you) please contact your local Vax Approved
Service Agent.
2
IMPORTANT EXCEPTIONS FROM OUR
COMMITMENT TO YOU
2.1 Please note that our commitment (and this
Guarantee) does not cover:
(a) Products that have been used for anything
other than normal domestic purposes.
(b) Products that have not been used in
accordance with instructions which are
set out in the documentation provided with
your Product;
(c) Products which are only damaged
cosmetically;
(d) Products which are deliberately or
accidentally damaged;
(e) Problems with the Product which result from
your negligence;
(f)
Regular maintenance or servicing including
the clearing of blockages from the hose
and tools;
(g) Products which have been damaged as a
result of bags, filters, fluids or accessories
which are not of a specification or quality
that we provide or recommend;
(h) Consumable items including bags and filters;
(I)
Products which have been damaged as a
result of consumable items such as bags
and filters not being regularly cleaned and
replaced;
(j)
Products which have been exposed to fire,
water, excessive moisture or dampness or
extreme change in temperature or climate;
(k) Products which have been opened up,
repaired or altered by anyone other than a
Vax Approved Service Agent;
(l)
Damage or loss to Product occurring
during transit to or from the Vax Approved
Service Agent.
(m) The replacement of perishable items
including hoses, cables, attachments and
floor tools; and
(n) Costs associated with callout, collection of
the Product;and
(o) Cost of repair of the Product during the
Additional Guarantee Period.
9
3 TRANSFER OF OUR COMMITMENTS TO YOU
3.1 You cannot transfer our commitments (and this
Guarantee) to another person. Our commitments
(and this Guarantee)will terminate if you transfer
the Product to another person.
4
4.1
4.2
4.3
4.4
4.5
WHAT VAX WILL DO IF THEY BREAK THEIR
COMMITMENTS TO YOU
If Vax break their commitment to you during the
relevant Guarantee Period, Vax will seek to remedy
the problem. Vax may do this:
(a) By repairing the Product for you; or
(b) By replacing the Product with a new or
rebuilt Product; [or
(c) (in the Additional Guarantee Period) by
providing you with a replacement part.]
If Vax provides a rebuilt Product Vax will ensure
that the refurbished parts are of similar quality and
functionality to your original Product before the
problem arose.
So that Vax can provide you with a remedy
you must return the Product to one of our Vax
Approved Service Agents. You can find details of
our Vax Approved Service Agents by contacting
the Vax Careline on 0870 6061248 or by visiting
www.vax.co.uk.
You must include with the returned Product, proof
of purchase showing that it was purchased by
you and is within the relevant Guarantee Period.
If Vax repair or replace the Product under
this section 4 then Vax will give you the same
commitments in relation to the repaired or
replaced Product. However, these commitments
will only apply for the remainder of the Guarantee
Period and Additional Guarantee Period relating
to your original Product or for 30 days, whichever
period is longer.
5
LIMITS TO OUR RESPONSIBILITY
5.1 Vax accept full liability to you:
(a) for death or personal injury if it arises from
our act or omission; and
(b) for any fraud Vax may commit.
Nothing in this Guarantee will exclude or limit that
liability.
5.2 Neither ourselves, our suppliers nor our dealers
will be liable to you for loss that you suffer which
was not foreseeable to you and us when you
purchased the Product (i.e. for losses that you and
we did not anticipate and would not reasonably
expect to occur).
10
6
GENERAL
6.1 No person other than you and Vax Limited has
any rights under this Guarantee.
6.2 This Guarantee is subject to English law. Any
court proceedings must be brought in the
United Kingdom.
If you have any queries about how to obtain a remedy if
Vax break its commitments to you, then please contact
the dealer from whom you purchased the Product.
11.
UK Service & Help Vax
Care 0870 6061248
Monday-Friday 9.00am to 5.00pm.
An answerphone is available out of these hours.
Any queries or concerns about using the Vax, call
the Vax Careline. Calls are charged at the UK
national rate.
Please make a note of the serial number and model
number of the carpet cleaner before calling. There
are over 400 approved Vax Service Agents in the UK.
For the nearest Service Agent, please call the
Vax Careline.
www.vax.co.uk
12. Technical Specification
Voltage:
Wattage:
Capacity:
Filters:
Cord length:
Weight:
220-240V ~50Hz
1100W (nom)
10 litres max
Pleated paper HEPA
pre-motor filter
Pleated paper HEPA
post-motor filter
10m
6.77kg
Subject to technical change without notice.
This page has been intentionally left blank.
11
EEC STATEMENT OF COMPLIANCE
Manufacturer/EEC importer: Vax Limited, hereby on our own responsibility declare that the product
V-100 Vax Pro is manufactured in compliance with the following:
Safety: 73/23/EEC Low Voltage Directive, as modified by 93/68/EEC
EMC: 89/336/EEC Electromagnetic Compatibility Directive, as modified by 93/68/EEC
Waste electrical products should not be disposed of with household waste. Please recycle where
facilities exist. Check with your Local Authority or retailer for recycling advice.
Vax Ltd., Kingswood Road, Hampton Lovett, Droitwich, Worcestershire, WR9 OQH, UK
email: [email protected] - website: www.vax.co.uk