1
INSTRUCTION MANUAL
Model HDE-3000
High Definition (HD) and
Standard Definition (SD)
Serial Digital Interface (SDI)
Captioning Encoder/Decoder
and Graphics Inserter
Revised for firmware version 1.59
L IN K ELECTRONICS, INC.
2137 Rust Avenue
Cape Girardeau, Missouri 63703
Phone: 573-334-4433
Fax: 573-334-9255
e-mail: sales @ linkelectronics.com
website: www.linkelectronics.com
HDE-3000
-2-
Table of Contents
Table of Contents................................................................................................ 3
Important Safeguards and Notices.................................................................... 5
Important Warnings and Cautions..................................................................... 6
1. General Information
1.1 Introduction ..................................................................................................... 9
1.2 HDE-3000 Core Hardware and Operating System ......................................... 9
1.3 Closed Caption Encoder ............................................................................... 10
1.4 Graphics Inserter........................................................................................... 10
2. Installing and Operating Instructions
2.1 Installation procedure.................................................................................... 11
2.2 Rear Panel Connections ............................................................................... 12
2.3 Rear Panel CPU board Connections ............................................................ 13
2.4 Rear Panel SDI, LTC, and GPI Connections ................................................ 14
2.5 Weather Lift and Encoder Bypass GPI Connector ........................................ 15
2.6 Digital video connections .............................................................................. 15
2.7 Front Panel Controls and Indicators.............................................................. 16
2.8 Operating the HDE-3000............................................................................... 17
3. Network Configuration
3.1 Network Setup............................................................................................... 18
3.2 Network Administration ................................................................................. 18
3.3 Changing the Administrator account password............................................. 19
3.4 Adding User Accounts................................................................................... 19
3.5 Configuring the Jobs Folder on a Network Server ........................................ 20
4. HDE3000Remote Window
4.1 Remote Window Screens.............................................................................. 22
4.2 Status Screen................................................................................................ 23
4.3 Menu Tree..................................................................................................... 24
5. Setup Menus
5.0.0 Main Menu ................................................................................................. 25
5.0.1 Select Encoder Men................................................................................... 25
5.1.1 Job Menu ................................................................................................... 26
5.1.2 Com 1 Setup Menu .................................................................................... 27
5.1.3 Com 2 Setup Menu .................................................................................... 37
5.2.1 CC Monitor Setup Menu............................................................................. 38
5.2.2 Open Cap Decoder Setup Menu................................................................ 38
5.2.3 Open Captions Options Menu.................................................................... 39
5.2.4 SD Decoder Mode Menu............................................................................ 40
5.3.1 Time Code Source Menu ........................................................................... 40
5.3.2 Timecode Offset Menu............................................................................... 41
5.3.3 Time Code Override Menu ......................................................................... 41
5.4.1 EIA - 608 Setup Menu................................................................................ 42
5.4.2 NTSC CC Level Setup Menu ..................................................................... 42
5.4.3 NTSC CC Position Setup Menu ................................................................. 42
5.4.4 PAL CC Level Setup Menu ........................................................................ 43
HDE-3000
-3-
5.4.5 PAL CC Position Setup Menu .................................................................... 43
5.4.6 PAL CC Line Setup Menu .......................................................................... 44
5.5.1 HD VANC Lines Setup Menu ..................................................................... 44
5.5.2 NTSC VANC Lines Setup Menu ................................................................ 45
5.5.3 PAL VANC Lines Setup Menu ................................................................... 45
5.5.4 VANC Markers Menu ................................................................................. 46
5.6.1 XDS Ratings Setup Menu (VCHIP) ............................................................ 46
5.6.2 XDS CGMS Setup Menu............................................................................ 47
5.6.3 XDS TSID Setup Menu .............................................................................. 48
5.7.1 Transcoder 1 Setup Menu.......................................................................... 49
5.7.2 Transcoder 2 Setup Menu.......................................................................... 50
5.7.3 F1 Subtitle Sync Menu ............................................................................... 51
5.7.4 Generator Standard Menu ......................................................................... 52
5.7.5 Safe Title Area Menu ................................................................................. 52
5.7.6 Weather Lift Menu...................................................................................... 53
5.7.7 RGB 4:4:4 Mode Menu .............................................................................. 54
5.8.1 Shutdown Menu ......................................................................................... 55
5.8.2 Software Upgrade Menu ............................................................................ 55
6. Script, Caption, and Subtitle Files
6.1 Introduction ................................................................................................... 56
6.2 Script Files .................................................................................................... 57
6.3 Script Control Commands ............................................................................. 58
6.4 Caption Files ................................................................................................. 59
6.5 Subtitle Files.................................................................................................. 60
6.6 Subtitle applications information for software developers ............................. 61
6.7 Graphics Files ............................................................................................... 65
6.8 UYC File Format ........................................................................................... 67
7. Time Taylor
7.1 Introduction ................................................................................................... 72
7.2 Example Setups ............................................................................................ 72
7.3 Dual Configuration ........................................................................................ 73
7.4 Operation ...................................................................................................... 74
7.5 Spanish Captions .......................................................................................... 74
8. Specifications
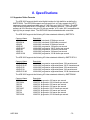
8.1 Supported Video Formats ............................................................................. 75
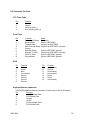
8.2 Connector Pin Outs....................................................................................... 76
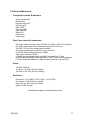
8.3 Electrical/Mechanical .................................................................................... 77
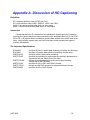
Appendix A. Discussion of HD Captioning..................................................... 78
Appendix B. Discussion of HD Subtitling ....................................................... 82
Appendix C. Discussion of HD Time Code ..................................................... 85
Appendix D. EDS400 Command Set................................................................ 88
Appendix E. Upgrade Release Notes .............................................................. 95
Using LEI-599D with HDE-3000 Bypass ........................................................ 107
About MCC Files ............................................................................................. 108
Caption Re-encoding with a Dual .................................................................. 109
Sony HD VTR’s ................................................................................................ 110
Firmware Maintenance Agreement................................................................ 111
Product Warranty ............................................................................................ 112
HDE-3000
-4-
Important Safeguards and Notices
Information on the following pages provides important safety guidelines for
both Operator and Service personnel. Specific warnings and cautions will be
found throughout the manual where they apply, but may not appear here. Please
read and follow the important safety information, noting especially those
instructions related to risk of fire, electric shock or injury to persons.
WARNING
Any instructions in this manual that require opening the equipment cover
or enclosure are for use by qualified service personnel only. To reduce the
risk of electric shock, do not perform any servicing other than that
contained in the operating instructions unless you are qualified to do so.
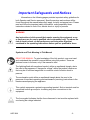
Symbols and Their Meaning in This Manual
READ THIS MANUAL: To gain knowledge of the Link product, user must read
and understand the operator’s manual before using this product. There are
features known to the user, only if the manual is read.
The lightning flash with arrowhead symbol, within an equilateral triangle, alerts
the user to the presence of “dangerous voltage” within the product’s enclosure
that may be of sufficient magnitude to constitute a risk of electric shock to
persons.
The exclamation point within an equilateral triangle alerts the user to the
presence of important operating and maintenance (servicing) instructions in the
literature accompanying the appliance.
This symbol represents a protective grounding terminal. Such a terminal must be
connected to earth ground prior to making any other connections to the
equipment.
The fuse symbol indicates that the fuse referenced in text must be replaced with
one having the ratings indicated.
HDE-3000
-5-
Important Warnings and Cautions
Warnings:
Always use good engineering practice. It is highly recommended to mount this
equipment in a well ventilated equipment rack. It is also recommended to use a
blank one RU spacer between mounting frames.
¾ Heed all warnings on the unit and in the operating instructions.
¾ Do not use this product in or near water.
¾ Disconnect ac power before installing any options.
¾ This product is grounded through the grounding conductor of the power cord. To
avoid electrical shock, plug the power cord into a properly wired receptacle
before connecting the product inputs or outputs.
¾ Route power cords and other cables so that they are not likely to be damaged.
¾ Disconnect power before cleaning. Do not use liquid or aerosol cleaners; use
only a damp cloth.
¾ Dangerous voltages exist at several points in this product. To avoid personal
injury, do not touch exposed connections and components while power is on.
¾ Do not wear hand jewelry or watches when troubleshooting high current circuits,
such as the power supplies.
¾ During installation, do not use the door handles or front panels to lift the
equipment as they may open abruptly and injure you.
¾ To avoid fire hazard, use only the specified correct type, voltage and current
rating as referenced in the appropriate parts list for this product. Always refer
fuse replacements to qualified service personnel.
¾ To avoid explosion, do not operate this product in an explosive atmosphere
unless it has been specifically certified for such operation.
¾ Have qualified personnel perform safety checks after any completed service.
¾ If equipped with redundant power, this unit has two power cords. To reduce the
risk of electrical shock, disconnect both power supply cords before servicing.
¾ This equipment may employ laser(s). If it does, they comply with the current
construction requirements of the code of Federal regulations, title 21, chapter I,
subchapter J, sections 1010.2 and 1010.3 and sections 1040.10 and 1040.11.
¾ Do not attempt to view light output of the laser transmitter, eye damage may
result. Always use an optical power meter to verify laser output.
HDE-3000
-6-
To prevent injury:
¾ Never install telephone wiring during a lightning storm.
¾ Never install telephone jacks in wet locations unless the jack is specifically
designed for wet locations.
¾ Never touch un-insulated telephone wires or terminals unless the telephone line
has been disconnected at the network interface.
¾ Use caution when installing or modifying telephone lines.
Cautions:
¾ When installing this equipment, do not attach power cord to building surfaces.
¾ To prevent damage to equipment when replacing fuses, locate and correct the
trouble that caused the fuse to blow before applying power.
¾ Verify that all power supply lights are off before removing power supply or
servicing equipment.
¾ Use only specified replacement parts and follow static precautions at all times
when handling this equipment.
¾ Leave the back of the frame clear for air exhaust cooling and to allow room for
cabling. Slots and openings in the cabinet are provided for ventilation. Do not
block them.
¾ Front door is part of fire enclosure and should be kept closed during normal
operation.
¾ This product should be powered on as described in the manual. To prevent
equipment damage select the proper line voltage at the ac input connector as
described in the installation documentation.
¾ To prevent damage to this equipment read the instructions in this document for
proper input voltage range selection.
¾ To reduce the risk of electric shock, ensure that the two power supply cords are
each plugged into a separate branch circuit.
¾ Circuit boards in this product are densely populated with surface mount and
ASIC components. Special tools and techniques are required to safely and
effectively troubleshoot and repair modules that use SMT or ASIC components.
For this reason, service and repair of Link products incorporating surface mount
technology are supported only on a module exchange basis. Customers should
not attempt to troubleshoot or repair modules that contain SMT components.
Link assumes no liability for damage caused by unauthorized repairs. This
applies to both in- and out-of-warranty products.
HDE-3000
-7-
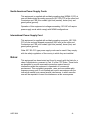
North American Power Supply Cords
This equipment is supplied with molded grounding plug (NEMA 5-15P) at
one end and molded grounding connector (IEC 320-C13) at the other end.
Conductors are CEE color coded, light blue (neutral), brown (line) and
green/yellow (ground).
Operation of this equipment at voltages exceeding 130 VAC will require
power supply cords which comply with NEMA configurations.
International Power Supply Cord
This equipment is supplied with molded grounding connector (IEC 320C13) at one end and stripped connectors (50/5 mm) at the other end.
Connectors are CEE color coded, light blue (neutral), brown (line) and
green/yellow (ground).
Other IEC 320-C13 type power supply cords can be used if they comply
with the safety regulations of the country in which they are installed.
Notes:
This equipment has been tested and found to comply with the limits for a
class A digital device, pursuant to Part 15 of the FCC Rules. These limits
are designed to provide reasonable protection against harmful
interference when the equipment is operated in a commercial
environment. This equipment generates, uses, and can radiate radio
frequency energy and, if not installed and used in accordance with the
instruction manual, may cause harmful interference, in which case the
user will be required to correct the interference at his own expense.
HDE-3000
-8-
1. General Information
1.1 Introduction
Thank you for purchasing the HDE-3000, a versatile Windows XP platform for
high definition and standard definition SDI captioning encoder/decoder and
subtitle/graphics inserter. With HDE-3000 you can insert slates, bugs, TV rating icons
and subtitles while encoding closed caption and XDS data. Post production and tape
duplication facilities can perform these jobs in a single pass without the need for a PC.
Broadcasters can comply with FCC rules by encoding closed captions and V-chip data
while simultaneously displaying on-screen TV rating icons.
HDE-3000 is constructed in a modular fashion. All of the components plug into
industry standard PCI slots. The modular architecture allows for easy upgrades in the
field. There are slots available for functions that may be required in the future.
Easy operation
A common complaint in the caption industry is that post houses must deal with
caption files with different formats and encoding requirements. HDE-3000 addresses
this by reading most of the popular caption file formats. The encoder automatically
determines the proper settings by looking at the data contained in the file, the operator
doesn’t even have to specify the format.
In a broadcast environment, HDE-3000 can act as a caption server. Caption
data does not have to reside in the VANC of programs on videotape; it can be encoded
“on-the-fly” as the program airs. Captions may be downloaded to HDE-3000’s hard disk
via a network connection, floppy drive, or USB drive. A script may be generated that
instructs HDE-3000 to encode a sequence of shows based on time code. This
technique saves a tape generation, plus it allows easier reformatting of captions if a
show is edited.
The HDE-3000 is network ready and will allow you to load closed caption jobs,
interactive TV links, subtitles, scripts, or graphics files from your server.
1.2 HDE-3000 core hardware and Operating System
The HDE-3000 utilizes an advanced Intel microprocessor and the Microsoft
Windows XP Embedded operating system. The Windows XP Embedded (XPE)
operating system is based on Microsoft Windows XP SP2, but it is customized
specifically for the HDE-3000 core hardware. XPE provides an established, stable
operating system and user interface for the HDE-3000.
When a VGA monitor, keyboard, and mouse (optional) are connected to an HDE3000, the HDE-3000 appears to the user to be a standard Windows XP workstation. This
allows the HDE -3000 network to be easily configured by IT personnel who are familiar with
Windows XP.
HDE-3000
-9-
IMPORTANT! The HDE-3000 is a sophisticated piece of video equipment.
Never think of or use an HDE-3000 as if it were a standard desktop PC. Do not install
any software, update any operating system components, or apply any service packs
intended for “normal” Windows XP. Doing so may cause the HDE-3000 to malfunction,
will void the warranty, and will require the operating system to be re-installed at the
factory.
IMPORTANT! Always shut down the HDE-3000 using the “shut down” menu and
wait for the front panel LED’s to go out before turning off the power via the front panel
“soft power-off” switch. Never turn off the power without executing the “shut down”
menu unless absolutely necessary. Turning off the power to the unit while it is running
may cause damage to the file system on the hard disk which can only be repaired by reinstalling the operating system at the factory.
1.3 Closed Caption Encoder
HDE-3000’s most important feature is its ability to read caption files from the
industry’s leading agencies and caption software providers. Files from unsupported
software venders may be converted to .ULT format and read directly. Of course, HDE3000 may still encode captions the old fashion way, by sending data to a HDE-3000
serial port or network interface from a PC. HDE-3000 may also encode “live” caption
data via an optional internal or external modem. HDE-3000 encodes captions into the
VANC portion of the stream using the latest SMPTE standards.
1.4 Graphics Inserter
HDE-3000 comes standard with a full screen, full color graphics inserter (GI).
The GI provides two video frame stores of 24 bit RGB plus 8 bits of transparency
(“alpha” channel). You can create any image in 16 million colors with 256 levels of
transparency over the background video. Your image can occupy the full screen of all
HD formats, including wide screen. A global fade function allows you to fade images on
and off the screen independently from transparency settings.
How images are displayed with HDE-3000 GI
The HDE-3000 GI displays text and graphics in a special format known as “UYC”
format. Link provides file converters to convert from BMP, TIF, and PNG formats to
UYC. Sub-pictures are loaded into a non-displayed graphics buffer then displayed at the
desired time. Sub-pictures are always rendered off-line, that is, on an external PC or
Mac. You can use any graphics drawing program to create sub-pictures including those
from Adobe, Macromedia, Jasc and many others. Sub-pictures can be faded on and off
the screen.
Link also has an optional drop and drag graphic software that will convert the
images for you and write the script file that controls the graphics inserter. The program
can also be used to remotely insert graphics.
HDE-3000
- 10 -
2. Installing and Operating Instructions
2.1 Installation procedure
The following is the recommended installation and setup procedure when an HDE-3000
is installed at the customer site:
1. Unpack HDE-3000 from its shipping container. Please retain the original shipping
container, if it is ever necessary to ship the HDE-3000 to the factory for service, this
specially designed double-box container will prevent the unit from being damaged during
shipment.
2. Mount the HDE-3000 into a standard 19 inch equipment rack, leaving 6 inches of space
behind the unit for ventilation. It is not necessary to mount the HDE-3000 in an
equipment rack, but it is recommended.
3. Connect power to the HDE-3000. It is recommended that the HDE-3000 be
powered from a clean, uninterruptible power source.
4. To connect the HDE-3000 to your network, connect a category 5 network cable to the
NETWORK connector and refer to section 3.1 Network Setup. A VGA monitor and
keyboard may be connected to the HDE-3000 at any time (a VGA monitor is required
for normal HDE-3000 operation); a mouse may be connected prior to boot-up.
Power
Apply AC line power to the unit via the detachable three wire cord.
Grounding (earth ground)
The HDE-3000 must be connected to a protective earth conductor via the three
wire AC line (mains) cord. The AC power plug shall be inserted only into a receptacle
outlet that has a protective earth contact. The ground wire must not be defeated by use
of a two wire extension cord.
HDE-3000
- 11 -
2.2 Rear Panel Power Connections
1. Fan Grill. You must mount the HDE-3000 in a location that provides at least 6” of
clearance behind this grill. Air is supplied through the front panel filter and
discharged through the rear panel fan grill.
2. IEC power output connector for detachable three wire AC line cord. Rated 120 VAC
at 3A Max, or 240V at 2A Max.
3. Main power switch.
4. 120 VAC / 240 VAC line voltage selection switch.
HDE-3000
- 12 -
2.3 Rear Panel CPU board Connections
1. Com Port 1 & 2 is a DB9 RS-232 serial interface connector. When optional
internal modem(s) is installed, com port(s) will not be available.
2. VGA output connector. All on-screen menus and status screens appear at the
VGA output. This on-screen menus and status screens can be monitored from
another PC via network, so you do not need a VGA monitor attached to the unit,
however, you will need a VGA monitor when setting up network and when
performing other maintenance.
3. RJ-45 modular jack for unshielded twisted pair 100 Mbps network cabling.
4. Keyboard/mouse connector. LINK supplies an adapter cable that enables you
to plug a PS-2 style keyboard and mouse into HDE-3000. However, you do not
need to connect a keyboard/mouse for normal operation. You only need a
keyboard for setting up network and when performing other maintenance.
5. USB connectors (Advantech CPU only) for keyboard and mouse.
HDE-3000
- 13 -
2.4 Rear Panel SDI, LTC, and GPI Connections
1.
SD/HD SDI video input. This input expects a standard SMPTE-292M digital
signal. The input is internally terminated by 75 ohms.
2.
SD/HD SDI program video output #1. This is a standard SMPTE-292M output
with 75 ohm source impedance. The output format will always follow the input
format. The output employs a controlled rise time cable driver circuit and has a
power-off bypass relay to Video In.
3.
SD/HD SDI program video output #2. This is identical to program video output
#1 except for the power-off bypass.
4.
LTC time code input. This is a balanced longitudinal time code input that
expects a nominal +4 dbu analog signal. A mini-DIN connector is used to save
panel space. This input is not required when encoding captions via com
port or modem.
5.
Encoder Weather lift/Bypass GPI. This is a 1/8” stereo phone plug that is used
to enable the encoder bypass and/or weather lift. A male 1/8” stereo phone plug
to male XLR cable is included detailed is on the following page.
Note: If the unit is a dual unit then it will have two encoder cards in it, the connections
for both cards will be the same. Encoder 1 (ENC 1) will be the encoder card that is in the top
slot and encoder 2 (ENC 2) will be the encoder card that is in the middle slot.
HDE-3000
- 14 -
2.5 Weather Lift & Encoder Bypass GPI Connector
2.6 Digital video connections
The following procedure describes the proper sequence of digital video connections
required to enable an HDE-3000 to encode data or graphics into digital video.
1. Connect input video (HD serial digital video) to the VIDEO IN connector. Typically this
video comes from a digital VTR set up to play a master tape. The HDE-3000 terminates
the source video with 75 ohms. Source must be standard SMPTE 292M video.
2. Connect input longitudinal time code (LTC) to the LTC IN connector (next to the VIDEO
OUT #2 connector) using the supplied time code adapter cable (XLR to mini-DIN).
Typically this time code comes from the digital VTR that the input video is coming from.
The LTC input can use either balanced or single-ended time code with a nominal level of
+4 dBu.
3. Connect the output serial digital video of the HDE-3000 (the VIDEO OUT #1 connector)
to the destination video equipment. Typically the output video is connected to a digital
VTR set up to record a dub tape. This output has a power-off bypass relay on HDE3000s that connects VIDEO OUT #1 to VIDEO IN when power is removed from the unit.
HDE-3000
- 15 -
2.7 Front Panel Controls and Indicators
1. Power on/off switch. IMPORTANT NOTE: never shut off unit without first running the
“Shutdown” procedure (see section 5.8.1 “Shutdown Menu”).
2. Reset. The HDE-3000 contains a reset button which is recessed inside the front
panel. Pushing this button will cause the HDE-3000 to perform a power-on reset.
3.
USB ports, for using USB drives to load jobs into unit or to upgrade the unit.
4. Program Video LED. Illuminates when HDE-3000 detects proper incoming video.
5. Encoding LED. Illuminates when HDE-3000 is actively encoding data into the VANC
portion of the incoming HD-SDI video.
6. Data In LED. Illuminates when HDE-3000 detects data at its RS-232 or modem
inputs.
7. Time code LED. Illuminates when LTC time code is detected.
8. Hard Disk LED. Illuminates when HDE-3000 reads or writes from its hard drive.
9. Setup LED. The red Setup LED illuminates when you are in setup mode. In setup
mode, on-screen menus are displayed on the decoder monitor.
10. Floppy Drive. The HDE-3000 can read closed caption, subtitle, and scripts via this
drive. Graphics files should be loaded using the network or USB drives because of
their large size. New units will not have a floppy drive installed in them.
11. Cursor keys. Press ENTER to bring-up the on-screen menu. Press the left, right, up,
down cursor keys together with the ENTER key to move through the menus and
make selections.
HDE-3000
- 16 -
2.8 Operating the HDE-3000
Power on
When power is first applied, the HDE-3000 will boot its operating system and will
then run its HDE-3000 application program. This process takes about 15 seconds. After
the application program has started, an HDE-3000 status screen will appear at the VGA
output; nothing appears at the monitor output other than the video source which is
connected to the monitor input.
User interface
HDE-3000 may be controlled in three ways:
1. via the front panel
2. via a PC keyboard
3. via the network with the “HDE-3000 Remote” program
1. Front Panel
Front panel control of the HDE-3000 is accomplished using the cursor keys
and on-screen menus. The menus appear at the VGA output only. Pressing ENTER
brings-up the main menu. Pressing the left and right arrow keys brings you to other
menus. Pressing the up and down arrow keys allows you to scroll through choices
within a menu. Pressing ENTER within a menu allows you to make changes to
settings. Every menu screen has help messages to guide you.
2. PC keyboard
PC control of the HDE-3000 is accomplished by plugging in a PS/2-style
keyboard into the rear of the unit. The menus appear at the VGA output. Emulating
the font panel keys, pressing ENTER brings-up the main menu. Pressing the left and
right arrow keys brings you to other menus. Pressing the up and down arrow keys
allows you to scroll through choices within a menu.
3. HDE-3000 Remote
You may control the HDE-3000 over an IP network connection using the
Windows utility “HDE-3000 Remote” program that is supplied with each unit (you will
find a copy of this program in the directory c:\dv3000). HDE-3000 Remote gives you
the same screens and control that you have with the front panel or PC keyboard. The
HDE-3000 Remote program is also used to configure certain “job” and network
settings (see section 3.5 Configuring the Jobs Folder on a Network Server).
HDE-3000
- 17 -
3. Network Configuration
3.1 Network Setup
The HDE-3000 will run normally with no network connection, but the ability to
load and run Interactive TV, caption, subtitle or script jobs from a network server will
not be available.
The HDE-3000 networking is configured at the factory as follows:
Client: Microsoft Network Client
Protocol: TCP/IP
IP address: Automatically obtain IP address via DHCP
Computer Name: HDE3000-xxxx (where xxxx is the serial number of the HDE-3000)
Workgroup Name: WORKGROUP
For many customers this configuration is acceptable and no adjustments to
the HDE-3000 network configuration are necessary. If your HDE-3000 network
configuration requires modification then perform the following procedure:
1. Connect a VGA monitor, keyboard, and mouse (a mouse is not necessary but
recommended) to the HDE-3000. Note that if the unit was booted without a mouse
connected then it may be necessary to re-boot the unit with the mouse connected to get
the mouse to function.
2. The HDE-3000 displays several status items on the VGA monitor via an On-Screen
Display Application. Hold down the ALT key and press TAB to minimize the display
application and reveal the Windows desktop. You can switch back to the display
application at any time by clicking the “HDE3000 Remote” icon in the task bar.
3. Select the Start Menu, then Settings, then Control Panel. Then double click the
Network icon.
4. You may now change the computer name, workgroup name, or TCP/IP protocol
properties as required for your network.
3.2 Network Administration
The following accounts are set up on an HDE-3000 when it is configured at the
factory: Administrator account: login = Administrator, password = Administrator
Operator account: login = Operator, password = blank (no password)
For many customers these accounts are acceptable and no adjustments are
necessary. If these accounts need to be modified or new accounts need to be added
then refer to the following procedures.
HDE-3000
- 18 -
3.3 Changing the Administrator account password
Extreme care must be observed when changing the Administrator account
password. If you change the Administrator password and forget what you changed it
to then the operating system will have to be reinstalled at the factory.
The following procedure must be followed exactly to change the Administrator password.
1. Connect a VGA monitor, keyboard, and mouse (a mouse is not necessary but
recommended) to the HDE-3000. Note that if the unit was booted without a mouse
connected then it may be necessary to re-boot the unit with the mouse connected to get
the mouse to function.
2. The HDE-3000 displays several status items on the VGA monitor via an OnScreen Display Application. Hold down the ALT key and press TAB to minimize
the display application and reveal the Windows desktop. You can switch back to
the display application at any time by clicking the “HDE3000 Remote” icon in the
task bar.
3. There are two ways to change the Administrator password: with the Windows User
Manager utility (Start Menu – Programs - Administrative Tools - User Manager) or via
the Windows NT Security Dialog (press Cntl-Alt-Del then select Change Password).
Use these methods to change the Administrator password.
4. Now you must change the password for the Auto-Logon utility. Select the Start Menu
and then Run. Enter the following path into the “Open” box:
c:\winnt\system32\Autolog.exe, and then click “OK”. “Set Auto Logon” must be selected,
and then type the new Administrator password into the “password” box and click “OK”.
IMPORTANT! Do not add any clients or protocols to the HDE-3000 network
configuration. Doing so will require the re-application of the service pack which cannot
be done in the field, so the operating system will have to be reinstalled at the factory.
IMPORTANT! The standard HDE-3000 configuration does not include the
necessary components to log on to a Windows Domain. If you need to log your HDE3000 on to a Windows domain, please contact LINK technical support for assistance.
3.4 Adding User Accounts
The following user account is set up on an HDE-3000 when it is configured at the
factory.
Operator account: login = Operator, password = blank (no password)
For most customers this is adequate and no other user accounts are necessary.
If it is necessary to add additional accounts to the HDE-3000, they can be added using
the Windows User Manager utility (Start Menu – Programs - Administrative Tools - User
Manager) exactly the same as adding accounts on a “normal” Windows XP workstation.
Refer to the Windows XP documentation and help.
HDE-3000
- 19 -
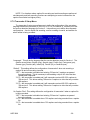
3.5 Configuring the Jobs Folder on a Network Server
The HDE-3000, once properly configured, can load caption, subtitle and script
jobs from a shared folder on a network server. This eliminates the need to use floppies
or USB flash drives to load jobs onto the HDE-3000, and it is required for very large jobs
that will not fit on a floppy.
How to configure
First you must create a shared folder on a PC on your network to contain
your HDE-3000 job files. The shared resource must be a shared folder, not a shared
drive. After you create the shared folder, copy at least one job file into the folder.
Once the shared folder has been created, you will need the following information to
configure the HDE-3000:
1. The computer name of the PC where the shared folder resides.
2. The shared folder name.
3. The login and password required to access the shared folder on the PC.
The “HDE-3000 Remote” utility program is used to configure the jobs folder for
an HDE-3000. Note that HDE-3000 Remote can be run locally (on the HDE-3000) or it
can be run remotely (on another Windows PC on the network). Since the HDE-3000
Remote program can be executed on any Windows machine, and it can connect to any
HDE-3000 on your network, you must specify the particular HDE-3000 that you want to
configure when you execute the HDE-3000 Remote program. The following procedure
describe how to configure the jobs folder on an HDE-3000.
If you want to run HDE-3000 Remote on a Windows PC on the network:
1. Execute the HDE-3000 Remote program on the Windows PC.
2. Proceed to step 4 below.
If you want to run the HDE-3000 Remote program on the HDE-3000:
1. Connect a VGA monitor, keyboard, and mouse (mouse not necessary but
recommended) to the HDE-3000. Note that if the unit was booted without a mouse
connected then it may be necessary to re-boot the unit with the mouse connected to get
the mouse to function.
2. The HDE-3000 displays several status items on the VGA monitor via an OnScreen Display Application. Hold down the ALT key and press TAB to minimize
the display application and reveal the Windows desktop. You can switch back to
the display application at any time by clicking the “On-Screen Display” icon in the
task bar.
3. Double click the HDE-3000 Remote icon on the desktop.
HDE-3000
- 20 -
4. The first time you run HDE-3000 Remote it will ask for the host name (the computer
name) of the HDE-3000 that you want to access. You can enter the computer name of
the HDE-3000 (when shipped from the factory the computer name is HDE3000-xxxx
where xxxx is the serial number of the HDE-3000), the IP address of the HDE-3000, or
the reserved word “localhost” (this only works when you run HDE-3000 Remote on the
HDE-3000). If you make a mistake entering the host name the program will not be able
to connect to the HDE-3000, so select File – Close then File – New to try again. When
you successfully connect to an HDE-3000, the LINK HDE-3000 on-screen menu will be
displayed in the main window.
5. IMPORTANT! Verify that you are connected to the HDE-3000 that you think you are
connected to by selecting the “Window” menu and inspecting the computer name with
a check next to it at the bottom of the menu. The computer name with a check next to
it is the name of the HDE-3000 that you are connected to.
6. Select the “Tools” menu then select “Config Server”.
7. In the “Server” box, enter the following: \\ServerName\ShareName. The “ServerName”
is the computer name of the PC where the shared folder is located, and the
“ShareName” is the name of the shared folder. For example, if the computer name of
the PC where the shared folder is located is “Production Server” and the shared folder
name is “Jobs” then you would enter \\Production Server\Jobs. Note: If you click the little
“globe” icon to the right of the “Server” box, the HDE-3000 will search the network for
shared folders that contain jobs (caution: this can take several minutes on large
networks).
8. In the “Connect As” box, enter the login used to access the shared folder, and in the
“Password” box enter the password for this login. Click “OK”.
9. Test the configuration by executing the “load and run job from server” menu. Press the
E N T E R key (on your keyboard or on the front panel of the HDE-3000). Use the up/down
arrow keys to select “load and run job from server” and press the E N T E R key. If the
configuration information was entered correctly then a list of the jobs contained in the
shared folder should be displayed.
Note: HDE3000 Remote — Config Server only enters & stores server, folder, and logon
info, i.e. it does not attempt to connect at this time. If one or more entries are wrong, or
if some other problem prevents HDE-3000 from connecting to the server, you will not
know until you try to “Load job from Server” in the HDE-3000 main menu.
HDE-3000
- 21 -
4. HDE3000Remote Window
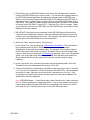
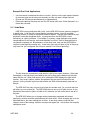
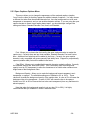
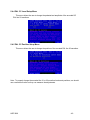
4.1 Remote Window Screens
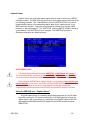
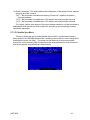
Once the 3000 is powered up you will get a window that looks like the one below. This
is the same window that you would use to control the 3000 remotely.
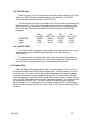
1) This is the Status screen or the setup menus. The Status screen is explained on the
following page. Pressing enter on the front panel or keyboard will bring up the setup
menus. This will also turn on the front panel Setup LED, the setup menus are explained
in the following section.
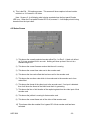
2) This is the EIA - 608 captions screen. This screen will show captions in there location
relative to a 4:3 screen in SD video.
3) This is the service descriptor screen. This screen shows the EIA - 608 and 708
descriptors that are encoded into the HD SDI stream.
HDE-3000
- 22 -
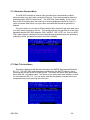
4) This is the EIA - 708 captions screen. This screen will show captions in there location
relative to a 16:9 screen in HD video.
Note: Screens 2 - 4 will display what is being encoded when the front panel Encode
LED is on. When the Front panel Encode LED is off, screens 2 - 4 will display what is being
decoded from the input video.
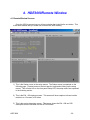
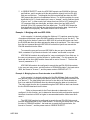
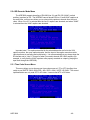
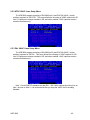
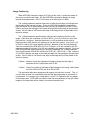
4.2 Status Screen
1) This shows the currently selected encoder either Enc 1 or Enc 2. A dual unit will act
as if it is two encoders built in one unit. Nothing will show up here if the unit is a
standard single unit.
2) This shows the current firmware version that the unit is running.
3) This shows the current time code sent to the encoder card.
4) This shows the time code offset that has been set for the encoder card.
5) This shows the new time code which is time code sent to the encoder card ± time
code offset.
6) This shows the format of the video input to the encoder card. If no input is detected
then it will show the format of the black burst that it is generating.
7) This shows the line or field location of the captioning data from the video input of that
encoder card.
8) This shows the job that is running for that encoder card.
9) This shows the current frame rate of the video of that encoder card.
10) This shows either the weather lift or bypass GPI of that encoder card has been
activated.
HDE-3000
- 23 -
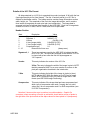
4.3 Menu Tree
HDE-3000
- 24 -
5. Setup Menus
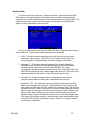
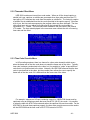
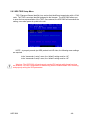
5.0.0 Main Menu
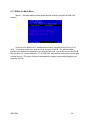
The HDE - 3000 setup uses a menu system with a main menu that allows you to jump to
a series of submenus. Here is the main menu that shows up the first time you press enter
on the front panel or keyboard.
1) Menu Navigation, in this case, the left front panel button (left on the keyboard) would
exit the setup menus and return to the status screen or the right front panel button
(right on the keyboard) would go to the next menu.
2) Menu Title this is self explanatory.
3) Menu selection or change, use the front panel up and down buttons (up and down on
the keyboard) with the front panel enter button (enter on the keyboard) will change or
make a selection.
Basically this is how all the setup menus work. The submenus are all numbered to
correspond with the list in the above menu selection.
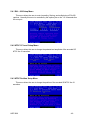
5.0.1 Select Encoder Menu
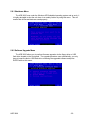
This menu allows you to switch to the other encoder card. Only one encoder card can
be displayed at one time, however, the other one will still function even though it is not
selected. This menu will not show up if the unit is a standard single encoder card unit.
HDE-3000
- 25 -
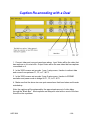
Example Dual Card Applications
o
o
o
Use one card to encode and the other to monitor. Just turn on the open caption decoder
for one card, and use the other card normally as if the unit were a single card unit.
Encode two SDI streams simultaneously or independently.
Re-encode captions after they are lost in a SDI stream such as a “Video Squeezer” or a
frame rate converter.
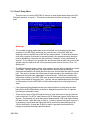
5.1.1 Jobs Menu
HDE-3000 users typically deal with “jobs”, so the HDE-3000’s menu system is designed
to handle jobs. A job may be a closed caption encoding session, it may be a subtitle
mastering session, or it may be a graphics insertion session. Jobs are more natural for post
production users than broadcast users. In post production, the HDE-3000 is used
exclusively on a job by job basis. For example, in one day, a tape duplicator may encode
closed captions for two movies, and create subtitles for a third. Each of these activities is
considered a separate job. Broadcasters, on the other hand, may use the HDE-3000 for
real-time closed caption encoding only. In that case, they may not have a “job” or they may
only have one “job” configured, and it may be named “Live Closed Captioning”.
The first three are commands to load and run a job from a certain locations. Other jobs
that appear on the jobs menu are loaded by the user or they are the default test jobs that
came with the unit. When load and run job is selected the 3000 displays the jobs at that
location. Only script, caption, subtitle, and graphics files are copied; all other files are
ignored. Once you select a job from that location the 3000 will automatically load and run
that job.
The HDE-3000 can only run one job at a time per encoder card. So you must stop one
job before you run another job. The HDE-3000 can only see up to 50 jobs at once, so you
should limit the number of jobs in a folder to 50, otherwise you will not be able to see all of
the jobs.
The HDE-3000 allows you to change certain parameters associated with closed
captioning, such as waveform amplitude and time code offset. When a caption job is ran as
described above, the menu settings are in effect. A user may create a script file that
changes some of the settings, and then executes the caption job. In that case, the script file
settings are used.
HDE-3000
- 26 -
Job Menu
The job menu allows you to work with a particular job. You can run the job, cancel
the job (if it is already running), or delete the job. Each job resides in its own
subdirectory under DV3000\jobs that has the same name as the main job file. When you
delete a job from the hard drive, all of the files contained in the job’s subdirectory are
erased, and the subdirectory is removed.
Important: The jobs menu will only display 47 jobs at once, so when you are done
with a job you should delete it thru the job menu. Never manually delete a job from the
HDE-3000’s hard drive, this will corrupt the program and the hard drive will have to be
re-imaged, only delete jobs thru this menu.
5.1.2 Com 1 Setup Menu
This menu lets you set the HDE-3000 to receive or send closed caption data via its RS232 serial interface, com port 1. To support existing software, HDE-3000 provides an
EDS400 “emulation” mode for caption encoding via the HDE-3000 serial port(s). Closed
caption data can be sent to or from Com port1 and Com port 2 simultaneously or
independently.
HDE-3000
- 27 -
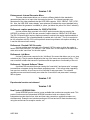
EDS400 Emulation
This enables the emulation of the commands and functionality of the EDS400.
The EDS400 is able to merge local caption data with upstream data, as well as multiplex
locally inserted XDS data with upstream data. You can read time code in EDS400
emulation mode by way of the serial port.
You can set the baud rate to 1200, 9600, 19.2K, 38.4K, 57.6K, and 115.2K bits per
second on this menu. You can set the port parameters to 8-none-1 (Sets the Com
1 serial port to 8 bits, no parity, 1 stop bit) or 7-odd-1 (Sets the Com 1 serial port to 7
bits, odd parity, 1 stop bit) on this menu. Please consult your applications
software manual or your caption provider for the preferred settings.
The parser mode parameter is used to tell the HDE-3000 how to interpret the data
being received on its serial port. There are five possible settings for this parameter:
1. In “NORMAL” mode, the HDE-3000 expects “normal” caption encoder
commands (also known as “control-A” commands) as transmitted by typical
caption authoring and encoding software.
2. In “BRIDGE ULT F1” mode, the HDE-3000 expects raw EIA-608 field one data,
and it encodes all of this data verbatim, directly into EIA-608 field one.
3. In “BRIDGE ULT F2” mode, the HDE-3000 expects raw EIA-608 field two data,
and it encodes all of this data verbatim, directly into EIA-608 field two.
4. In “BRIDGE ULT F1+F2” mode, the HDE-3000 expects raw EIA-608 data for field
one and field two, and it encodes all of this data verbatim, directly into EIA-608
field one and field two. To distinguish the field one and field two data, the HDE3000 expects the data to be formatted as follows. First a “sync byte” (hex 0x80,
decimal 128), then two bytes of EIA-608 field one data, then two bytes of EIA608 field two data. Note that for this mode to work properly, the format must be
set to “8-none-1”
HDE-3000
- 28 -
5. In “BRIDGE EVERTZ” mode, the HDE-3000 expects raw EIA-608 for field one
and field two, and it encodes al of this data verbatim, directly into line EIA-608
field one and field two. To distinguish the field one and field two data, the HDE3000 expects the data to be formatted as follows. For all field one data, the most
significant bit (bit 7) of each data byte is zero or “cleared”, and for field two the bit
is one or “set”. In other words, byte values from hex 0x00 to 0x7F (decimal 0 to
127) represent field one data bytes, and byte values from hex 0x80 to 0xFF
(decimal 128 to 255) represent field two data bytes. The HDE-3000 clears the
most significant bit in the field two data before encoding the data. Note that for
this mode to work properly, the format must be set to “8-none-1”.
Example 1: Bridging with two HDE-3000s
In this example, it is desired to bridge the field one CC1 captions around a piece
of equipment that doesn’t pass EIA-608 (hereafter referred to as just “the box”). The
video being fed to the box is also fed to HDE-3000 #1 so that this injector can read
the EIA-608 data from the video and pass the data out its serial port. The video output
from the box is passed through HDE-3000 #2 so that this injector can encode the
EIA-608 data back into the video.
To connect the com port from one HDE-3000 to the com port of another HDE3000, a standard 15 pin female to female “null modem” serial cable is required.
HDE-3000 #1 needs to be configured for “com port redirection” from field one. In
the com port setup menu, set the function to “redirect data”. For this example, the
baud rate will be set to 9600 and the format will be set to “8-none-1”. Then set the
“source” parameter to “F 1”.
HDE-3000 #2 needs to be configured to encode the raw EIA-608 field one data.
In the com port setup menu, set the function to “EDS400 Emulation”, the baud rate to
9600, the format to “8-none-1”, and the parser mode to “BRIDGE ULT F1”.
Example 2: Bridging from an Evertz decoder to an HDE-3000
In this example, it is desired to bridge all of the EIA-608 data (field one and field
two) around a piece of equipment that doesn’t pass EIA-608 (hereafter referred to as
just “the box”). The video being fed to the box is also fed to an Evertz decoder so
that it can read the EIA-608 data from the video and pass the data out is serial port.
The video output from the box is passed through an HDE-3000 so that it can encode
the line EIA608 data back into the video.
Refer to the manuals for the Evertz decoder to determine how to
configure it for this function, and to determine the serial cable configuration required.
Note that a baud rate of 9600 or higher is recommended and the format must be 8none-1.
The HDE-3000 needs to be configured to encode the raw EIA-608 field one and
field two data transmitted by the Evertz decoder. In the com port setup menu, set the
function to “EDS400 Emulation”, the baud rate to match the Evertz decoder, the
format to “8-none-1”, and the parser mode to “BRIDGE EVERTZ”.
HDE-3000
- 29 -
Redirect Data
This function configures com port 1 for data redirection. Note that when the HDE3000 performs com port redirection, the selected source of data is redirected to the
selected com port without disturbing any of the normal operations of the HDE-3000. The
data being redirected continues to flow through its normal path in the HDE-3000 in
addition to being transmitted out the com port.
The Source parameter is used to tell the HDE-3000 where to get the data to be sent
out its serial port. These are the possible settings for this parameter:
1. COM: This setting causes everything received by the other com port to be
redirected to this com port. This function can be used to “daisy chain” two
encoders together to simultaneously encode two separate video feeds.
2. Upstream F1: This setting causes all upstream field 1 caption data to be
redirected to this com port. Note that the upstream data is the data already
encoded into the video being received by the HDE3000. It is not the
“downstream” data that has been encoded into the video by the HDE-3000. The
HDE-3000 will redirect all field 1 caption data to this serial port. There will be two
bytes transmitted for each frame of video (59.94 bytes per second).
3. Upstream F2: Exactly the same as the F1 setting above except that the
upstream caption data from field 2 will be redirected to this com port.
4. Upstream F1+F2: This setting will cause all upstream caption data from both
fields to be redirected to this com port. To differentiate the field 1 data from the
field 2 data, the HDE-3000 will insert a frame sync character (0x80, 128 decimal)
just before the field 1 data, so there will be five bytes of data transmitted for each
frame of video: a frame synch char followed by two bytes of field 1 data then two
bytes of field 2 data (149.85 bytes per second). Note that when this source is
selected for this comport, the baud rate of this com port must be set higher than
1200 baud (120 bytes per second) to avoid overrunning the serial transmit buffer
in the HDE-3000, and the format must be set to “8-none-1” to properly transmit
the frame sync characters.
HDE-3000
- 30 -
5. Upstream TC+F1+F2: This does the same as # 4, except time code is added.
Three “marker characters” are used to identify the data being transmitted: 90h
(144d), A0h (160d), and B0h (176d). When the time code changes, the following
is transmitted: 90 hhmmssff (where hhmmssff is an ASCII character string
representing the time code value). When field 1 caption data is decoded, the
following is transmitted: A0 bb (where bb is two bytes of caption data, and each
byte can be 00h to 7Fh). When field 2 caption data is decoded, the following is
transmitted: B0 bb (where bb is two bytes of caption data, and each byte can be
00h to 7Fh). Examples output (hex):
90 30 31 30 30 30 30 30 30
= 01:00:00:00
(No caption data transmitted, so both fields were “null”)
90 30 31 30 30 30 30 30 31
= 01:00:00:01
A0 14 20
= field 1 data: 14 20 (RDC CC1)
B0 15 26
= field 2 data: 15 26 (RU3 CC3)
90 30 31 30 30 30 30 30 32
= 01:00:00:02
A0 14 70
= field 1 data: 14 70 (PAC)
B0 14 70
= field 2 data: 14 70 (PAC)
6. Encoded F1: Same as # 2, except that the caption data comes from outgoing
video instead of incoming video.
7. Encoded F2: Same as # 3, except that the caption data comes from outgoing
video instead of incoming video.
8. Encoded F1+F2: Same as # 4 except that the caption data comes from outgoing
video instead of incoming video.
9. Receive: This selection directs the HDE3000 to receive data on this com port
and pass the received data to the function running on the other com port. This
function is only required to support running “source = Time Taylor” on the other
com port.
10. Time Taylor: This selection directs the HDE3000 to receive commands from the
Time Taylor. When this source is selected, this function takes control of the
encoder, buffers the caption data received on the other com port (the other com
port must be set to “source = receive”), and encodes the buffered caption data at
the proper time codes.
For more information on setting up the HDE-3000 for the Time Taylor see section 7
“Time Taylor” of this manual.
HDE-3000
- 31 -
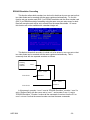
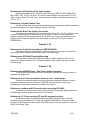
EDS400 Emulation Cascading
This function allows both encoders in a dual unit to be driven by one com port so that
two video feeds can be encoded with the same captions simultaneously. To use this
function set one encoder card (ENC 1) to EDS400 emulation and the other encoder card
(ENC 2) to EDS400 emulation cascading using the same com port setup menu for both.
Now both encoder cards will be set to encode from the same data stream. Of course
this function will not be available with a standard single unit.
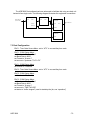
This feature allows both encoders in a dual unit to be driven by one com port so that
two video feeds can be encoded with the same captions simultaneously. This is
commonly done with two separate encoders as follows:
PC
Running
Caption
Software
Com1
Com1
Video Feed 1
Com2
Encoder 1
Com1
Video Feed 2
Com2
Encoder 2
In this scenario, encoder 1 com 1 is set to “EDS400 Emulation”, encoder 1 com 2 is
set to “Redirect Data” with the source set to “com 1”, and encoder 2 com 1 is set to
“EDS400 Emulation”. Encoder 1 echoes all the commands it receives from the PC on
com 1 out com 2 so that the second encoder receives the same commands.
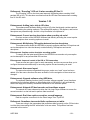
HDE-3000
- 32 -
In a dual unit, both encoders are contained in one chassis with only two com ports,
so the same scenario using a dual unit is as follows:
PC
Running
Caption
Software
Com1
Com1
Video Feed 1
Video Feed 2
Com2
Encoder 1
Encoder 2
The serial connection between the encoders in a dual unit has to be implemented
internally. This is done thru the “com setup menu” function called “EDS400 Emul Casc”.
To configure the dual unit, set encoder 1 com1 to “EDS400 Emulation” to receive
commands from the PC. Then set encoder 2 com 1 to “EDS400 Emul Casc”. This
enables an internal connection between encoder 1 and encoder 2 so that both encoders
receive the commands from the PC simultaneously.
A dual unit can be connected to another encoder, allowing three video streams to be
encoded simultaneously when connected as follows:
Set the com ports to cascade as described at the bottom of the previous page. Then
set encoder 1 com 2 to redirect data from com 1.
HDE-3000
- 33 -
Caption Server
Caption Server is a device that sends caption data to another device like a MPEG
emission encoder. The HDE-3000 can be set up to be a caption server using one of the
two following protocols: The “Grand Alliance” protocol (SMPTE RP 2007) is a serial
communications protocol for transmitting caption data from a “caption server” to an
MPEG emission encoder. This protocol is sometimes referred to as “the old 19200
protocol” or “the push protocol”. The “SMPTE333” protocol (SMPTE 333M) is similar to
“grand alliance”, but SMPTE333 is more complex. The SMPTE333 protocol is
sometimes referred to as “the pull protocol”.
NOTE! IMPORTANT!
The required baud rate and format for SMPTE333 is 38400 baud and 8-none-1.
The required baud rate and format for Grand Alliance is 19200 baud and 8-none-1.
You must manually select the correct baud rate and format for the selected protocol.
When using an HDE3000 as a “caption server”, it is necessary to turn off the open
caption decoder. In the menu “2.2 OPEN CAP DECODER SETUP MENU”, set both
items to “OFF”. Failure to turn off the open caption decoder will cause serial
communication problems between the HDE3000 and the MPEG emission encoder.
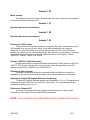
Using an HDE3000 as a “Caption Server”
A typical caption server is a relatively simple device that has only an SD video
input and a serial port. SD video containing line 21 EIA608 captions is fed to the
caption server, and it up-converts (or “transcodes”) the EIA608 caption to EIA708
and transmits the EIA608 and EIA708 captions to an MPEG encoder via serial
(SMPTE333).
HDE-3000
- 34 -
The HDE3000 is a full featured HD/SD caption encoder, so it has many more
video input options, caption decoding/encoding options, and “transcoding” options.
The following sections describe how to configure the HDE3000 for several different
scenarios. The caption data that the HDE3000 transmits to the MPEG encoder is
the exact same caption data that the HDE3000 displays on the VGA monitor.
Scenario 1: HD video input with VANC captions
This is the simplest scenario for the HDE3000. Just make sure the HDE3000
is not encoding (the “encoding” LED on the front panel is not lit), and it will
decode the existing EIA608 and EIA708 captions from the input video and
transmit them to the MPEG Encoder.
Scenario 2: SD video input with VANC captions
The HDE3000 must be configured to decode the VANC captions from the SD
input video (as opposed to decoding the line 21 captions from the SD input
video) using menu “2.4 SD DECODER MODE”. Then just make sure the
HDE3000 is not encoding (the “encoding” LED on the front panel is not lit), and it
will decode the existing EIA608 and EIA708 captions from the input video and
transmit them to the MPEG Encoder.
Scenario 3: SD video input with Line 21 captions and no VANC captions
The HDE3000 must be configured to decode the line 21 captions from the SD
input video (as opposed to decoding the VANC captions from the SD input video)
using menu “2.4 SD DECODER MODE”.
If the HDE3000 is not encoding, (the “encoding” LED on the front panel is not
lit), then the HDE3000 will only decode the EIA608 caption from the SD input
video and transmit them to the MPEG encoder.
To up-convert (or “transcode”) the EIA608 captions to EIA708 and transmit
both EIA608 and EIA708 captions to the MPEG encoder:
1. In the menu “4.1 EIA-608 SETUP”, field 1 and/or field 2 must be set to
“REENCODE”. This will make the HDE3000 encode (and light the “encoding”
LED on the front panel).
2. In the menu “5.2 NTSC VANC LINES SETUP”, the “NTSC VANC Encoder”
must be set to “ENABLED”. This will turn on the transcoders so that the
EIA608 captions will be up-converted to EIA708.
Additionally, the “TRANSCODER SETUP” menus (7.1 and 7.2) must be
configured to transcode the desired EIA608 services to the desired EIA708
services.
Once the HDE3000 is configured properly as described above, it will read the
EIA608 line 21 captions from the input video, up-convert them to EIA708, and
transmit the EIA608 and EIA708 captions to the MPEG encoder.
HDE-3000
- 35 -
Scenario 4: Caption server while encoding via Caption File or Serial/Modem
Make sure the “Transcoder” menus 7.1 and 7.2 are set up they way you want
then to be. Usually Transcoder 1 set to CC1 and Trancoder 2 set to CC2 or
CC3. These two menus will transcode the 708 service 1 and 708 service 2.
If you are encoding SD video and you want to send 708 captions as well as
608 captions then in the menu “5.2 NTSC VANC LINES SETUP”, the “NTSC
VANC Encoder” must be set to “ENABLED”. If the format is PAL then use the
PAL menu. This will turn on the transcoders so that the EIA608 captions will be
up-converted to EIA708.
Note that if you do not have to apply video because when no input video is
connected to the HDE3000 then it will generate its own video internally. Use the
menu “7.4 GENERATOR STANDARD” to select the type of video to generate
(SD/HD, etc.).
HDE-3000
- 36 -
5.1.3 Com 2 Setup Menu
This menu lets you set the HDE-3000 to receive or send closed caption data via its RS232 serial interface, com port 2. This menu has the same functions as com port 1 setup
menu.
Warnings
o
The raw data encoding modes take control of the field one and/or the field two data
encoders in the HDE-3000, preventing any other function in the HDE-3000 from
obtaining control of the field one and/or field two data encoders. To allow other functions
(such as the caption file encoder) to operate properly, the raw data encoding functions
must be disabled by setting the com port function to “disabled” or the “parser mode” to
“normal”. If you attempt to run a caption file, and the raw data encoder has control of the
encoder, then the caption file will not encode and you will receive the error “Error 170
Starting Job”.
o
The bridging process causes a delay in the captions, and the delay is typically one frame
(two fields). Typically there are a few milliseconds of delay caused by decoding
equipment that reads the EIA-608 data from the video and transmits the data out a serial
port. Then there is another few milliseconds of delay caused by the serialization of the
data across the serial cable (dependant on the baud rate). Then there is another few
milliseconds of delay in the HDE-3000 in the process of receiving the data and getting it
ready to be encoded in the proper field. Typically, the raw data decoded from one frame
of video makes it into the HDE-3000 in time to be encoded into the following frame of
video.
o
If the equipment being bridged causes more than two frames of delay then the video
being fed to the EIA-608 decoder must also be delayed to prevent the line 21 captions
from being re-encoded too early.
o
There are four bytes of EIA-608 data per frame of video (two bytes in field one and two
bytes in field two). For NTSC video there are 29.97 frames per second (59.94 fields per
second). This equates to a serial baud rate of approximately 1200 baud (approximately
600 baud for field 1 plus 600 baud for field 2). In order to prevent serial port overruns, it
is necessary to use a baud rate higher that 600 for one field of data and higher than
1200 for both fields. A baud rate of 9600 or higher is generally recommended for
bridging to minimize the delays described above.
HDE-3000
- 37 -
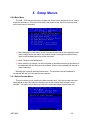
5.2.1 CC Monitor Setup Menu
The monitor menu lets you determine which captioning services to monitor from the VGA
monitor or remote software, it will not show up in the video. For 608 captions you can choose
CC1-CC4 or XDS. For 708 captions you can choose S1-S2. 16 second timer automatically
erases the VGA captions after 16 seconds of inactivity.
5.2.2 Open Cap Decoder Setup Menu
An “open caption decoder” is a device that decodes closed captions and overlays (or
“burns”) the caption characters into the video. This feature is used by post houses to create
“open caption demo tapes” for their customers to inspect. This menu allows the user to control
the open caption decoder for SD and for HD video. When SD video is fed to the HDE-3000, the
top setting is used to control the open caption decoder. When HD video is fed to the HDE-3000,
the bottom setting is used to control the open caption decoder. For SD video your options are
CC1 – CC4 and for HD you options are CC1 – CC4 or S1 – S2. 16 second timer automatically
erases the open caption decoder display after 16 seconds of inactivity.
WARNING! When you are not creating an open caption demo tape, set the open
caption decoder to “OFF” to prevent the HDE-3000 from overlaying open captions into your
video when you are encoding closed captions.
HDE-3000
- 38 -
5.2.3 Open Captions Options Menu
This menu allows you to change the appearance of the rendered captions (caption
“burnt” into the video) so that they appear as subtitles instead of captions. You may choose
a different font other than the standard decoder font, force the background box to be semitransparent or transparent, and you can enable character outlines. If you are using the open
caption decoder to create “open caption demo tapes”, you should always configure the
settings as follows: Standard Decoder Font, None, and Disabled.
Font: Allows you to choose the font used by the open caption decoder to render the
caption text. Currently there are two fonts available: Standard Decoder Font and Courier
New. Additional font selections will be added in the future. Currently, the open caption
decoder is only compatible with mono-spaced (fixed width) fonts. Support for proportionally
spaced (variable width) fonts will be added in the future.
Char Effect: Allows you to enable/disable special character rendering effects. Currently
the available settings are: None and Outline. This is necessary when the background
opacity is set to 0% (transparent) to allow the characters to be visible when rendered over
bright areas of the background video.
Background Opacity: Allows you to make the background boxes transparent, semitransparent, or opaque. The allowable settings are: Disabled or 0% to 100%. These
values will override the background opacity of the caption data. A value of 0% will cause the
background box to be transparent. A value of 100% will cause the box to be opaque.
Values from 10% to 90% will cause the box to be semi-transparent (from very translucent to
almost opaque).
Note that when the background opacity is set very low (0% to 20%), it is highly
recommended that you enable the “outline” character effect.
HDE-3000
- 39 -
5.2.4 SD Decoder Mode Menu
The HDE3000 supports decoding of EIA-608 (line 21) and EIA-708 (VANC (vertical
ancillary) captions for SD. The HDE3000 cannot decode SD line 21 and VANC captions at
the same time, so this menu allows you to select which captions to decode from the input
video. When “Line 21” is selected then the line 21 captions are decoded, and when “VANC”
is selected then the VANC captions are decoded.
Important note! The captions decoded by the selected decoder are fed to the VGA
caption monitors, the open caption decoder, and the input of the caption encoder module
(which performs re-encoding and multiplexing). It is recommended that you always keep the
SD decoder set to “Line 21” except for when you need to decode SD VANC captions (for
example, to verify that the VANC captions were properly encoded on a tape by playing the
tape back through the HDE3000).
5.3.1 Time Code Source Menu
This menu allows you to choose your time code source as LTC or ATC (ancillary time
code) as per SMPTE 12M-2-2008 (DID = 60h, SDID = 60h). NOTE: HD ONLY. The current
implementation can only read ATC in HD video. It cannot read ATC in SD video.
HDE-3000
- 40 -
5.3.2 Timecode Offset Menu
HDE-3000 contains an internal time code reader. When an off-line closed caption or
subtitle job is ran, captions or subtitles are processed when time code read from the LTC
input port or ATC matches time code from the caption or subtitle file. The timing for caption
or subtitle files is established from the time code provided to the caption agency. But when
a job is run, the time code accompanying the program video may have changed. The time
code offset menu lets you adjust time code read by the internal time code reader in
increments of +/- 1 frame. The time code offset is added to the time read by the internal
LTC reader. The time code displayed in the on-screen menu reflects the sum of incoming
time code and the offset.
5.3.3 Time Code Override Menu
In HD encoding sessions, there is a chance for a time code mismatch which occurs
when the frame rate of the time code does not match the frame rate of the video. Typically,
time code is always synchronized to the video, but it is possible to “stripe” a tape with time
code that is not synchronized to the video. Normally, the HDE-3000 assumes that the time
code is synchronized to the video, but the override menu allows the user to specify the
frame rate of the time code if it is different than the frame rate of the video.
For example, suppose an HD tape containing a movie in 1080PsF/24 format must be
captioned using an authoring system that must use NTSC (29.97) time code. It is possible
to stripe the tape with NTSC time code and author the captions to these time codes. For the
HDE-3000 to encode these captions properly, the time code override menu must be used to
tell the HDE-3000 that the time code is 29.97 FPS instead of 24 FPS.
HDE-3000
- 41 -
5.4.1 EIA – 608 Setup Menu
This menu allows the user to control encoding, filtering, and multiplexing of EIA-608
captions. Normally this menu is controlled by the caption jobs or the “^A” commands thru
the com port.
5.4.2 NTSC CC Level Setup Menu
This menu allows the user to change the pedestal and amplitude of the encoded SD
NTSC line 21 waveform.
5.4.3 NTSC Position Setup Menu
This menu allows the user to change the position of the encoded SD NTSC line 21
waveform.
HDE-3000
- 42 -
5.4.4 PAL CC Level Setup Menu
This menu allows the user to change the pedestal and amplitude of the encoded SD
PAL line 22 waveform.
5.4.5 PAL CC Position Setup Menu
This menu allows the user to change the position of the encoded PAL line 22 waveform.
Note: To properly change the encoded line 21 or 22 waveform levels and positions, one should
use a waveform monitor so they can measure the adjustments.
HDE-3000
- 43 -
5.4.6 PAL CC Line Setup Menu
This menu allows the user to change the VBI waveform to be inserted on line 18 instead
of line 22 for PAL. This menu allows for PAL caption encoding for the following countries
Argentina, Uruguay, and Paraguay. The PAL 608 VBI decoder will also follow this line
selection.
5.5.1 HD VANC Lines Setup Menu
This menu allows you to set the "start lines" of the HD VANC area. Typically this will
cause the VANC caption packets to be encoded on the selected lines. But if the selected
line is full (already filled up with other VANC data packets) then the VANC caption packets
will be encoded on the next line (or the line after that if that line is full, etc.).
HDE-3000
- 44 -
5.5.2 NTSC VANC Lines Setup Menu
The HDE3000 supports encoding of EIA-608(line 21) and EIA-708 (VANC, vertical
ancillary) captions for SD NTSC. This menu allows the encoding of VANC captions for SD.
Line 21 captions are always encoded in SD, and when enabled, VANC captions are also
encoded simultaneously.
5.5.3 PAL VANC Lines Setup Menu
The HDE3000 supports encoding of EIA-608(line 22) and EIA-708 (VANC, vertical
ancillary) captions for SD PAL. This menu allows the encoding of VANC captions for SD.
Line 22 captions are always encoded in SD, and when enabled, VANC captions are also
encoded simultaneously.
Note: Current SMPTE standards say that EIA – 708 VANC captions should only be on
field 1 and not on field 2. Link recommends that you keep the VANC field 2 encoding
disabled.
HDE-3000
- 45 -
5.5.4 VANC Markers Menu
VANC markers are data packets that may be used to mark the beginning and end of any
data service packet encoded in the VANC of HD-SDI video. VANC markers help
downstream equipment identify the beginning and end of service packets. SMPTE
specification 291 encourages equipment designers to include this feature in new equipment.
5.6.1 XDS Rating Setup Menu (VCHIP)
This menu allows you to encode VCHIP data as part of the XDS service. VCHIP data is
used to set guidelines for the viewing of television programming or movies, whose ratings
are determined by the U.S. TV Parental Guidelines rating system. HDE-3000 also supports
the MPAA (Motion Picture Association of America) ratings as well as the Canadian English
and Canadian French guidelines. When VCHIP mode is enabled, HDE-3000 continuously
sends the selected rating at the repetition rate recommended by EIA-608. For more
information on VCHIP, please refer to EIA document EIA-744-A or EIA/CEA-608B.
HDE-3000
- 46 -
5.6.2 XDS CGMS Setup Menu
This menu allows you to encode CGMS data as part of the XDS service. CGMS (Copy
Generation Management System) is described in section 9.5.1.8 of the EIA-608-B
specification. The EIA-608-B specification also references “The Digital Video Recording Act”
for more information about CGMS.
There are three possible settings for the “CGMS-A” (Copy Generation Management
System – Analog) parameter as follows: “Copying Allowed”, “One Copy Allowed”, and “No
Copying Permitted”.
When the above CGMS-A parameter is set to “No Copying Permitted”, then the “APS”
(Analog Protection System) parameter is valid. There are four possible settings for the
“APS” parameter as follows; “No APS”, “PSP on, Splt Brst Off”, “PSP on, 2 Ln Splt Brst”, and
“PSP on, 4 Ln Splt Brst”. When “APS” is enabled, “PSP” (Pseudo Sync Pulse) is on, and
the “Split Burst” can be set to “off”, “2 Line”, or “4 Line”. When the CGMS-A parameter is
set to “Copying Allowed” or “One Copy Allowed”, then there is no APS, so the “APS”
parameter should be set to “No APS”.
The “ASB” (Analog Source Bit) is specified in EIA-608-B. This bit can be on (“1”) or off
(“0”).
HDE-3000
- 47 -
5.6.3 XDS TSID Setup Menu
TSID (Transport Stream Identifier) is a service that identifies a transmission with a 32 bit
code. The TSID is a unique identifier assigned to the licensee. The HDE-3000 allows you
to enter the hex representation of the TSID. Once entered, the HDE-3000 will remember the
setting, even when power is cycled to the unit.
NOTE – to properly encode just XDS packets into HD video, the following menu settings
are required.
In the “transcoder 1 setup” menu, the “default” setting must be “off”.
In the “transcoder 2 setup” menu, the “default” setting must be “off”.
Warning: The HDE-3000 will continuously encode XDS packets while these functions
are enabled. The user is responsible for determining when to enable/disable XDS encoding
and properly setting the XDS parameters.
HDE-3000
- 48 -
5.7.1 Transcoder 1 Setup Menu
The transcoder 1 setup menu allows you to define the configuration of the primary
language transcoder (transcoder 1: 608 CC1 to 708 service 1). It allows you to set the
service descriptor language for Service 1. It also allows you to define three separate
configurations; one for caption file encoding, one for encoding via serial, and another for
when neither is being encoded. It also allows you to disable transcoder 1 when necessary.
“Language”: This will be the language that the service descriptor uses for Service 1. The
options are as follows; English (eng), Spanish (spa), French (fre), Portuguese (por),
German (ger), Danish (dan), Italian (ita), Finnish (fin), or Swedish (swe).
“Default”: This setting defines the configuration of transcoder 1 when not encoding a caption
file and not encoding via serial.
“OFF” = the transcoder is disabled and existing 708 service 1 captions are passed
through unaltered. This is necessary to allow adding vchip to HD video that has
already been captioned.
“CC1” = the transcoder is enabled and it will transcode received 608 CC1 captions to
708 service 1. This allows adding 708 service 1 captions to video that only contains
608 captions.
“for Caption Files”: This setting defines the configuration of transcoder 1 when a caption file
is being encoded.
“OFF” = the transcoder is disabled and existing 708 service 1 captions are passed
through unaltered.
“CC1” = the transcoder is enabled when CC1 captions are being encoded from a caption
file. This is the recommended setting for all caption file encoding scenarios.
“for Serial Commands”: This setting defines the configuration of transcoder 1 when captions
are being encoded via serial.
“OFF” = the transcoder is disabled and existing 708 service 1 captions are passed
through unaltered.
“CC1” = the transcoder is enabled when CC1 captions are being encoded via serial.
This is the recommended setting for all serial encoding scenarios.
The “status” section at the bottom of the menu indicates whether or not the transcoder is
enabled and which encoding function (caption file encoding or serial encoding) currently
controls the transcoder.
HDE-3000
- 49 -
NOTE: For situations where caption file encoding and serial encoding are performed
simultaneously and both encoding functions are attempting to control a transcoder, the
caption file encoder has higher priority.
5.7.2 Transcoder 2 Setup Menu
The transcoder 2 setup menu allows you to define the configuration of the secondary
language transcoder (transcoder 2: 608 CC2 or CC3 to 708 service 2). It allows you to set
the service descriptor language for Service 2. It also allows you to define three separate
configurations – one for caption file encoding, one for encoding via serial, and another for
when neither is being encoded.
“Language”: This will be the language that the service descriptor uses for Service 1. The
options are as follows; English (eng), Spanish (spa), French (fre), Portuguese (por),
German (ger), Danish (dan), Italian (ita), Finnish (fin), or Swedish (swe).
“Default”: This setting defines the configuration of transcoder 2 when not encoding a
caption file and not encoding via serial.
“OFF” = the transcoder is disabled and existing 708 service 2 captions are passed
through unaltered. This is necessary to allow adding vchip to HD video that has
already been captioned.
“CC2” = the transcoder is enabled and it will transcode received 608 CC2 captions to
708 service 2. This allows adding 708 service 2 captions to video that only contains
608 captions.
“CC3” = the transcoder is enabled and it will transcode received 608 CC3 captions to
708 service 2. This allows adding 708 service 2 captions to video that only contains
608 captions.
“for Caption Files”: This setting defines the configuration of transcoder 2 when a caption file
is being encoded.
“OFF” = the transcoder is disabled and existing 708 service 2 captions are passed
through unaltered.
“CC2” = the transcoder is enabled when CC2 captions are being encoded from a caption
file.
“CC3” = the transcoder is enabled when CC3 captions are being encoded from a caption
file.
HDE-3000
- 50 -
“for Serial Commands”: This setting defines the configuration of transcoder 2 when captions
are being encoded via serial.
“OFF” = the transcoder is disabled and existing 708 service 2 captions are passed
through unaltered.
“CC2” = the transcoder is enabled when CC2 captions are being encoded via serial.
“CC3” = the transcoder is enabled when CC3 captions are being encoded via serial.
The “status” section at the bottom of the menu indicates whether or not the transcoder is
enabled and which encoding function (caption file encoding or serial encoding) currently
controls the transcoder.
5.7.3 F1 Subtitle Sync Menu
This menu allows the user to enable/disable the new field 1 synchronization feature.
When enabled, the HDE3000 detects when a subtitling event is about to occur during field 2
and delays the event until field 1. The reason for this feature is to prevent any subtitle
events from occurring during field 2 because this can cause problems for down converters
with the progressive segmented frame video formats.
HDE-3000
- 51 -
5.7.4 Generator Standard Menu
The HDE-3000 contains an internal video generator that is automatically enabled
whenever there is no input video connected to the unit. The internal generator defaults to
generating black 1080i 60 (“black burst”). The HDE-3000 “status display” (in the “menu”
area of the VGA display when the menus are not being displayed) reports “No Video” in
yellow to indicate when there is no input video connected and the internal generator is
enabled.
This menu allows you to select a different default video standard to generate when there
is no input video connected to the unit. The internal generator can generate all of the video
standards that the HDE-3000 supports: 1080i, 1080PsF, 720P, NTSC, etc. Also, the HDE3000 “status display” indicates the current standard being generated when the generator is
enabled (in yellow, just below the yellow “No Video” indicator).
5.7.5 Safe Title Area Menu
This feature displays a safe title area test pattern per SMPTE Recommended Practice
RP 27.3. The HDE-3000-generated pattern deviates from the SMPTE pattern in that it
shows square corners as well as round corners. The pattern will “paint” after each subtitle
when used with .usf subtitle scripts. This allows you to easily check each subtitle in a show
for conformance to RP 27.3. You can set the safe title area pattern to several colors and
transparencies by cycling through the color menu.
HDE-3000
- 52 -
5.7.6 Weather Lift Menu
This feature moves the captions up on the screen so that they don’t cover weather
information placed at the bottom of the screen.
The top line enables/disables the weather-lift function. The possible settings are:
•
•
•
DISABLED – the weather-lift function is disabled.
ENABLED – the weather-lift function is enabled.
GPI – the weather lift function is enabled by activating GPI 2.
The second line selects the weather-lift mode:
•
•
•
•
LIFT 1 ROW – captions will be lifted 1 row so there will always be a blank row at the
bottom of the screen.
LIFT 2 ROWS– captions will be lifted 2 rows so there will always be two blank rows at
the bottom of the screen.
LIFT 3 ROWS– captions will be lifted 3 row so there will always be three blank rows at
the bottom of the screen.
LIFT ALL TO TOP – the captions will all be moved to the top several rows at the top of
the screen.
HDE-3000
- 53 -
5.7.7 RGB 4:4:4 Mode Menu
Menu 7.7 has been added to allow proper subtitle insertion into dual link RGB 4:4:4
streams.
First you will to take the UYC subtitles and convert it using the WinUycToUyc V1.03
utility. You have to do this twice once for link A and once for link B. Two get the subtitle
insertion to be timed at the same frame you will need two units. Link A thru one unit and link B
thru the other unit. Set the new menu 7.7 to RGB 4:4:4, then load the subtitle jobs into the units
to match the link. This menu will have to be disabled to properly insert subtitles(graphic) into
single link YCrCb.
HDE-3000
- 54 -
5.8.1 Shutdown Menu
The HDE-3000 runs under the Windows XP Embedded operating system and as such, it
is highly advisable to shut the unit down in an orderly fashion by using this menu. This will
ensure that all files and data are saved properly.
5.8.2 Software Upgrade Menu
The HDE-3000 allows you to perform firmware upgrades via the floppy drive or USB
flash drive located on the front panel. The upgrade procedure runs automatically, you only
have to insert the disk or USB flash drive containing the upgraded software and press
ENTER while at this menu.
HDE-3000
- 55 -
6. Script, Caption, and Subtitle Files
6.1 Introduction
The HDE-3000 is able to read and encode closed caption files in a number of formats.
Likewise, it can read subtitle files and associated “bit mapped” image files to produce open
subtitles. When reading a caption or subtitle file, the HDE-3000 processes each caption or
subtitle single-mindedly until the file ends. Although this mode of operation is fine for simple
captioning and subtitling jobs, the full potential of HDE-3000 is realized using script files.
6.2 Script Files
HDE-3000 VBI Encoder/Subtitle Inserter may be controlled by command sequences
stored in script files. Script files may be loaded from the HDE-3000 floppy drive, USB drive,
or local area network port. Scripts may be created and edited using a text editor such as
Microsoft Notepad. LINK provides script templates for many different applications. The
templates contain default settings for all of the changeable parameters.
HDE-3000 scripts contain sections for setting up closed captioning, teletext, Audio-inVBI, and the graphics inserter. These sections correspond to HDE-3000 on-screen menus.
The body of the script may contain commands to display text and graphics. The script may
also contain commands to encode line 21 data such as closed captions and XDS. When a
script is loaded, the user can scroll through the menus in order to verify settings. The user
can also change settings, although some are awkward using just cursor keys (such as XDS
fields with long names). HDE-3000 scripts have a file extension of “.scr”. In section 6.5, you
will read about another script file format that is optimized for subtitle applications.
Details of Script Language
A script file is an ASCII text file that contains lines of commands. There are three
categories of commands:
1. Script Control Commands which control the sequencing of the script files.
2. Caption Commands which affect HDE-3000 caption settings or generate closed
caption/text/XDS data.
3. GI Commands affects graphics inserter settings or generate graphics on screen.
Only one command per line is allowed with a maximum of 132 characters per line.
Script commands are case insensitive and leading spaces are allowed. Any text
separated by a delimiter following a script command on the same line is considered a
comment and is ignored except with the MSG command where the entire line following
the command is used as a message.
Numeric command arguments can be entered in decimal or hexadecimal. A $ must
prefix a hexadecimal number if used as a numeric command argument.
Valid delimiters - {space} {;} {,} {=} and are denoted by |
HDE-3000
- 56 -
6.3 Script Control Commands
Delay|n
n = [0..65535]
The Delay command waits for n milliseconds before further script commands will
execute.
Msg|string
string = [1..70 characters]
The Msf command displays a string in the osd window of the HDE-3000’s monitor
output. It is useful for cueing and aiding the HDE-3000 operator. Example; Msg This is a
message
Pause
The Pause command waits for a front panel key or key press on the optional keyboard to
be pressed before further script commands will execute. The message ‘Press any key to
continue...’ will be displayed on the monitor output.
Rem|string
string = [1..70 characters]
The Rem command is used for inserting comment lines into a script file. All characters
following the Rem command will be ignored. This command is useful for displaying
messages on the screen and adding comments to lines that contain no other commands.
Rerun
Reruns the script file from the beginning.
Script|filename
(filename must conform to MS-DOS file naming conventions)
The Script command is used to pass control over to another script file. The extent of
Control passing is unlimited. Example; Script c:\test\test1.uxf
RunSubtitle | filename
(filename must conform to MS-DOS requirements)
The RUNSUBTITLE command is used to initiate the subtitle engine from a script. The
subtitle engine will run simultaneously with the script engine, and the subtitle engine will
continue running until the script finishes executing or the script job is cancelled. If the
subtitle engine is already running when an RUNSUBTITLE command is executed then the
current subtitle job is canceled and the new subtitle job is started. Caution must be
observed so that the script engine does not use the GI memory while the subtitle engine is
running or unpredictable results will occur.
WaitUntilBefore | n
n = H:M:S:F
Wait until the time code is less than or equal to H:M:S:F before further script commands
are executed. This command is used to force a script to wait until the tape is rewound (if the
time code is coming from a tape machine) before re-running a script via the RERUN
command. Time code is either read externally or is simulated with the HDE-3000’s internal
clock. If you are using simulated time code then you must precede the first
WAITUNTILBEFORE command with a SETTIME command.
HDE-3000
- 57 -
WaitUntil|n
n = H:M:S:F
Wait until the time code is greater than or equal to H:M:S:F before further script
commands are executed. Time code is either read externally or is simulated with the HDE3000’s internal clock. If you are using simulated time code then you must precede the first
WaitUntil command with a SetTime command.
LoadPCX|X Y filename
Loads a YCrCb bitmap image in .yc or .uyc format to the non-displayed memory at
location (X,Y). Location X,Y is with respect to the top-left corner of the screen. The bitmap
image is in Y Cr Cb format. LINK provides a conversion program to convert from PCX, Tiff,
PNG and BMP to Y Cr Cb (.yc or .uyc).
Flip
Flips frame buffer memories. The HDE-3000 contains two video frame buffers: one is
considered the “displayed” memory, and the other the “non-displayed” memory. The Flip
command causes the displayed memory to become the non-displayed memory and vice
versa.
FlipE
Same as Flip but also erases the non-displayed memory.
EDM
Erases the displayed frame buffer memory.
ENM
Erases the non-displayed frame buffer memory.
Fade | ontime | offtime
The FADE command initiates a mechanism in the HDE-3000 GI hardware to perform
fading when executing a FLIP or FLIPE command. Before the memories are flipped the GI
overlay is faded off, and after the memories are flipped the GI overlay is faded on. The
ONTIME and OFFTIME parameters specify how fast to fade on and how fast to fade off, and
their values are expressed in number of fields (60 fields per second for NTSC and 50 for
PAL). For example if ONTIME is set to 60 (50 for PAL) then it will take 1 second for the
overlay to fade on. To disable fading set both ONTIME and OFFTIME to zero.
EncodeCC|filename
Starts a closed caption encoding session. The caption data file specified by filename
can be in any format supported by the HDE-3000. The HDE-3000 will automatically
determine which format is supplied by reading the file. Once started, the caption encoding
job will run concurrently with subsequent HDE-3000 commands. The caption job will run
until it is completed or the script file is aborted.
End
Marks the end of the script file.
HDE-3000
- 58 -
6.4 Caption Files
Currently, HDE-3000 can read caption files in the following formats:
National Caption Institute (NCI) –
.CAP binary versions 1.p, 1.mx, 2.0, and PAL2
.FLC text
The Caption Center (WGBH) –
.TDS text
.0
text
old “dot number” format (multiple files: name.0, name.1, etc.)
Captions Inc –
.CIN text
Cheetah Systems – CAPtivator Software
.CAP binary CAPtivator File Format
versions 2.0and 2.1
Computer Prompting and Captioning (CPC) – CaptionMaker Software
.ONL binary CPC-715 Online CaptionMaker DataFile
.MCC see About MCC Files for more information
ULTECH –
.TLS binary TV Link Creator Format
.ULT binary Line 21 services
Line of Sight .LOS text
DVD caption file formats
.CC
text
.SCC text
The caption files may be loaded into the HDE-3000 via the front panel floppy drive, USB
drive, or network interface.
The ULTECH caption file format (ULT file) is a compact binary file that stores captions
with embedded EIA-608 control codes and time code data. It was designed as a fast
intermediate file format for the HDE-3000, not for general purpose caption creation. As a
result it is not readable by a text editor.
Note: The .ULT file must contain captions that have the appropriate control codes
embedded with the text. Also the time code for each caption, should be equal to the desired
appear time. HDE-3000 does not adjust the caption appear time.
The .ULT file format supports multi-stream captions. Multi-stream captions allow multiple
data channels to be encoded at the same time. For example, bilingual captioning: English
on CC1 and Spanish on CC2.
HDE-3000
- 59 -
6.5 Subtitle Files
There are two ways to display text on screen. The “traditional” method involves sending
commands and text to the graphics inserter (GI) by way of a serial communications port.
The GI interprets the commands and turns the text strings into on-screen characters. The
GI renders the characters in real time based on attributes you have specified, such as color,
font, and position.
A more modern way of inserting text on screen is to create the subtitles off-line in the
form of bit-mapped images. Each subtitle becomes an individual bit-mapped image file. The
advantage of this approach is that the graphics inserter (GI) does not have to deal with
fonts, nor does it have to deal with rules involving the conversion of commands and text
strings into on-screen characters. With this method, subtitles are created on a PC using any
font installed on the PC. You can see on the PC’s monitor how the subtitle will look when
displayed on a TV screen.
Subtitling using the bit-mapped method involves two sets of files: a single subtitle “script”
file and a series of bit-mapped files, one for each subtitle. In the DVD world, subtitle script
files are known as “navigation” files. The HDE-3000 uses a simple file format that is
optimized for subtitling. Files in this format have a file extension of “.usf”, and are therefore
referred to as “USF” files, or simply “subtitle files”.
.USF File Format
LINK subtitle script files contain a single command, subtitle. The command takes the
parameters time code, and optionally, filename, x position and y position. The first
parameter is the time that the file is to appear on the display. If the filename is omitted,
then the display is erased at the time code. Thus a subtitle command with a time code
and a filename means “display this graphic file at time t at position x,y”; and a subtitle
command with only a time code means “erase whatever is on the display at time t”.
Note: The commands must appear in chronological order in the file.
Example:
SUBTITLE 00:01:00:09 nine.uyc 10 43
SUBTITLE 00:01:20:15 ten.uyc 10 43
SUBTITLE 00:01:28:00
This example displays the bitmap nine.uyc in position 10,43 at time code
00:01:00:09, at time code 00:01:20:15 ten.uyc is displayed, and finally at 00:01:28:00
the display is erased. This specialized command makes the creation and reading of
subtitle files easy and intuitive. The subtitle application reads bit mapped graphics
files in LINK’s “.uyc” format that is discussed later in this manual.
HDE-3000
- 60 -
6.6 Subtitle applications information for software developers
The HDE-3000 encodes subtitle “jobs” by overlaying graphics files onto program video.
A subtitle “job” consists of one usf file and multiple uyc files. A usf file is a text file with the
extension “.usf”. It contains timing and location information to command the HDE-3000 to
overlay specific uyc files at the proper time.
A uyc file is a custom graphics file with the extension “.uyc”. A uyc file is very similar to
standard graphics files (such as gif, jpg, png, etc.), but the format of the information in the
file is arranged to optimize the loading time of the graphics information into the HDE-3000.
To run a subtitle job on an HDE-3000, the usf file and the uyc files need to be copied to
a network server folder that the HDE-3000 can access.
HDE-3000 File System
The file system of the HDE-3000 can only handle 512 files in the root directory, so
the HDE-3000 will automatically search for uyc files in any sub folders included with the
usf file. Most subtitle agencies have adopted a standard practice of putting the usf file in
the root folder, with a subfolder (usually named “uycfiles”) containing all of the uyc files.
USF Files
The following is the syntax for each line of a usf file:
SUBTITLE TimeCode UycFileName xPosition yPosition
Each parameter must be separated by at least one space.
SUBTITLE
a keyword (it is required at the beginning of each line).
TimeCode
the time to display the uyc file.
UycFileName
the file name of the uyc file to display.
XPosition, yPosition where to overlay the uyc file on the TV screen
The following is an example of the contents of a usf file:
SUBTITLE 01:00:41:09 biaa0001.uyc 86 196
SUBTITLE 01:00:44:10
SUBTITLE 01:00:44:18 biaa0002.uyc 103 218
SUBTITLE 01:00:47:18
The first line commands the HDE-3000 to display the file “biaa0001.uyc” at
01:00:41:09, and the “86” and the “196” are positioning parameters (see below). The
second line commands the HDE-3000 to clear the screen at 01:00:44:10. These
“clear the display” lines are optional—you can display one file after another without
erasing if you want to.
HDE-3000
- 61 -
UYC files
The uyc file format was developed to optimize the loading speed of the graphics
information into the HDE-3000. A uyc file contains the color information and the
alpha information for each pixel in the image. The color information for each pixel is
stored in YCrCb format (Y = luminance, CrCb = chrominance). The alpha
information consists of an 8 bit value for each pixel. The alpha information controls
the transparency of each pixel independently from the color. An alpha value of zero
means that the pixel will be transparent (you will only see background video for this
pixel). An alpha value of 255 means that the pixel will be opaque (you will only see
the overlaid image for this pixel—no video). Values from 1 to 254 mean that the
pixel will be semi-transparent. For example, a value of 64 will cause the pixel to be
75% video / 25% image, and a value of 128 will cause the pixel to be a 50% video /
50% GI image.
UYC File Positioning Parameters for NTSC
The positioning parameters (xPosition and yPosition) tell the HDE-3000 where to
overlay the uyc file on the TV screen. For NTSC, the TV screen is 720 pixels wide by
525 lines, but 40 lines are used for the VBI (vertical blanking interval), and two lines (line
21 of each field) are used for closed captioning. The HDE-3000 can overlay lines 23 to
263 in field 1 and lines 23-262 in field 2, so the total number of lines that the HDE-3000
can overlay is 481.
The xPosition parameter controls the left/right positioning of the uyc file on the TV
screen. It tells the HDE-3000 where to place the left edge of the uyc file on the TV
screen. Valid values are from 0 to 359. A value of 0 will place the left edge of the uyc file
at the left edge of the TV screen. A value of 159 will place the left edge of the uyc file in
the middle of the TV screen.
The yPosition parameter controls the up/down positioning of the uyc file on the TV
screen. It tells the HDE-3000 where to place the top edge of the uyc file on the TV
screen. The yPosition parameter is the video line number at which to place the top edge
of the uyc file. Valid values are from 23 to 262. A value of 23 will place the top edge of
the uyc file at the top edge of the TV screen. A value of 141 will place the top edge of
the uyc file in the middle of the TV screen.
Full Frame UYC files for NTSC
For NTSC, the full frame uyc file size is 720 X 480. When full frame uyc files are
used, then the xPosition parameter should always be 0 and the yPosition parameter
should always be 23.
HDE-3000
- 62 -
UYC File Positioning Parameters for PAL
For PAL, the TV screen is 720 pixels wide by 625 lines, but 42 lines are used for the
VBI (vertical blanking interval), and two lines (line 22 of each field) are used for closed
captioning. The HDE-3000 can only overlay 512 lines (because it only has 512 lines of
video memory), so the HDE-3000 can overlay lines 40 to 255 in each filed. So the total
number of lines the HDE-3000 can overlay is 512.
The xPosition parameter is the same for PAL as for NTSC.
The yPosition parameter valid values for PAL are from 40 to 295. A value of 40 will
place the top edge of the uyc file as close to the top edge of the TV screen as possible.
A value of 166 will place the top edge of the uyc file in the middle of the TV screen.
Full Frame UYC files for PAL
For PAL, the full frame uyc file size is 720 X 512. When full frame uyc files are used,
the xPosition parameter should always be 0 and the yPosition parameter should always
be 40.
Converting Graphics Files to UYC Files
Before a graphics file can be overlaid onto video by the HDE-3000, the file must be
converted to a uyc file. The HDE-3000 cannot directly overlay other graphics files such
as bmp or gif. LINK provides a number of converter utilities to convert other graphics
files to uyc files. The following is a list of the available converter utilities:
From
BMP
PCX
TIF
PNG
converter name
BMP2UYC
PCX2UYC
TIF2UYC
PNG2UYC
Note that there is a problem with most graphics files: they do not contain
transparency (alpha) information. The only graphics files that do contain alpha
information are 32 bit BMP (RGB-alpha), and PNG.
To solve this problem, we have added a capability to our TIF and BMP converter
utilities to define a “transparent color”. When a uyc file is created by the utilities, every
pixel that is the “transparent color” is assigned an alpha value of 0 (transparent), and
every pixel that is not the “transparent color” is assigned an alpha value of 255 (opaque).
The next challenge is defining the “transparent color”. You can choose an RGB color
value as the “transparent color”, or if your files use a color palette then you can define a
color index as the “transparent color index” (for example, the first color in the palette).
Unfortunately, no two HDE-3000 users agree on the definition of the “transparent color”,
so LINK offers to customize the converter utilities for each user.
HDE-3000
- 63 -
BMP2UYC.EXE
This utility converts 8, 24, and 32 bit BMP files to the UYC format. Note that
“transparency” is only supported for 32 bit BMP files (RGBalpha). The command
syntax is:
bmp2uyc inputfilename.bmp [outputfilename.uyc]
The [outputfilename.uyc] part is optional. If you leave it off then the output
filename will be the same as the input filename. For example, to convert the file
abc.bmp, type:
bmp2uyc abc.bmp
and the file abc.uyc will be created.
PNG2UYC.EXE
This converter works exactly the same as bmp2uyc except it converts PNG files.
PNG files can contain alpha information.
TIF2UYC.EXE
This converter works exactly the same as bmp2uyc except it converts TIFF files.
There is a problem associated with creating TIFF files for subtitling. A color has to
be defined as the “transparent” color (for the transparent areas of the graphic that do
not disturb the background video—typically everything except the subtitle
characters). There are two basic types of TIFF files: RGB and color table. The RGB
type contains an RGB color value for every pixel in the image. The color table type
contains an indexed list of color values (a palette), and only an index number for
each pixel in the image.
When you convert an RGB type TIFF, the transparent color is RGB value
C0C0C0. Only pixels of this color will be transparent when the subtitle is displayed
over the video. When you convert a color table type TIFF, the first color in the color
table (color number 0) will be the transparent color. So any pixels assigned to color
0 will be transparent.
Using the UYC File Conversion Utilities in Batch Mode
The TIF2UYC, BMP2UYC, and PNG2UYC utilities only convert one file at a time,
but they were designed so that they can be used in a batch file. A batch file is just a
text file with its file name ending in .bat that contains DOS commands just as if they
were typed in directly at the DOS prompt.
The contents of a batch file to convert three TIF files would look like this:
tif2uyc 0001.tif
tif2uyc 0002.tif
tif2uyc 0003.tif
HDE-3000
- 64 -
The Safe Title Area
Normal consumer TV’s do not display the whole video picture, and each TV is a little
different, so SMPTE defined a standard called the “safe title area”. The SMPTE
document defining the safe title area is: SMPTE RP 27.3.
The safe title area is the area of the middle of the TV screen that is guaranteed to be
displayed on all TV sets. In order to stay within the safe title area, you must be careful
when calculating your xOffset and yOffset parameters so that your subtitles stay within
the safe title area. The following table defines the safe title area for the HDE-3000
parameters.
PARAMETER
xOffset
yOffset
NTSC
ALLOWED
RANGE
0-359
23-262
NTSC
SAFE TITLE
RANGE
36-322
44-239
PAL
ALLOWED
RANGE
0-359
40-295
PAL
SAFE TITLE
RANGE
36-322
50-284
The viewUYC Utility
The viewUYC utility is a graphics viewer program for viewing uyc files. It is a single
executable file, and it is a Windows application that will run under Windows
98/NT/2000/XP.
To execute viewUYC just double click viewUYC.exe from within Windows Explorer.
You can associate uyc files with viewUYC.exe in Windows Explorer, and then you can
just double click on uyc files and viewUYC will automatically be executed.
6.7 Graphics Files
HDE-3000 displays bit mapped graphics files in a format known as “YCrCb”. YCrCb is
the component video format inherent in serial digital video. ULTECH created a YCrCb file
format known as “YC” format. Section 6.8 provides details about this file format. Software
developers may choose to produce graphics files directly in YC format. Other HDE-3000
users may create files in several industry formats, then convert them to YC format. A future
version of HDE-3000 software will convert all of the popular formats to YC format as the files
are transferred to the HDE-3000. The current version of software requires a separate
conversion step on a PC using graphics file converters supplied by LINK. LINK provides a
Microsoft Windows program that lets you view YC files on a PC without requiring HDE-3000
hardware.
HDE-3000
- 65 -
Graphics Files Supported
All of the files described in this section are comprised of Red, Green, and Blue color
components (“RGB”). Combinations of RGB are mixed to produce all of the colors
possible on a TV screen. The 8 bit RGB formats—the formats where RGB can each be
1 of 256 possible values—produce over 16 million colors. Not all can be conveyed with
serial digital component video, though, as component video yields a color space that is a
subset of RGB colors (11,137,500 colors out of 16,777,216).
Some of the formats below employ an “alpha” channel in addition to RGB channels.
An alpha channel specifies transparency. Each pixel is made up of a Red, Green, and
Blue component. Plus, there is an alpha component that specifies the opacity of the
pixel. An alpha value of “0” means the pixel is transparent: only background video is
seen. An alpha value of “255” means the pixel is 100% opaque. Values in between
allow background video to mix with foreground text/graphics. The HDE-3000 provides
an 8 bit alpha capability. Use of an alpha gradient between foreground images and
background video is one of the secrets for producing perfect images on screen.
BMP Version 4
This is Microsoft’s BMP format released for Windows 95, and is a 32 bit format
containing 8 bits each of red, green, and blue, plus an 8 bit alpha channel. LINK
supports the non-compressed, 32 bits per pixel version of this format. Use the file
converter “BMP2UYC.EXE” to convert these files to LINK’s “YC” format. Note, this
converter also handles 8 bit and 24 bit BMP files.
PCX
PCX, also known as PC Paintbrush Format, is a popular graphics file format.
PCX does not provide an alpha channel. LINK supports the 24 bit format. Use the
file converter “PCX.EXE” to convert these files to LINK’s “YC” format. Because PCX
does not support alpha, the converter generates a fully opaque image in YC format.
PNG
PNG, pronounced “ping”, is the format recommended by LINK for use with the
HDE-3000. PNG files are compressed, so they require less disk space than the
other formats. Plus, PNG offers a full alpha channel. Unlike 32 bit BMP, PNG files
are handled by Adobe Photoshop, a leading graphics creation and editing program
for the Mac and PC. Use the file converter “PNG2UYC.EXE” to convert PNG files to
LINK’s “YC” format. LINK’s converter supports true color + alpha (type 6) PNG files
(RGB + alpha).
HDE-3000
- 66 -
TIFF
The TIFF format is important as one of its variants seems to be the format of
choice for DVD subtitles. The LINK TIFF converter handles non-compressed 256
color “color map” type TIFF files in single or multiple strips. Like PCX, TIFF does not
support alpha, so the converter considers the first entry in the color palette to be the
transparent “color”; all other entrees in the palette are opaque colors. Use the file
converter “TIF2UYC.EXE” to convert these files to “YC” format. Note, this converter
also handles RGB TIFF files in which case the transparent color is C0C0C0.
DVD TIFF files come in two formats: full size and cropped. A full size TIFF file
occupies the entire 720 x 480 pixel plane (720 x 512 for PAL), regardless of how big
the actual subtitle is. A cropped TIFF file is just large enough to hold the subtitle
image. For example, a cropped TIFF file may be 260 pixels wide by 80 pixels high.
Full size TIFF files are normally very wasteful of disk space, and may require more
time to transmit, load, and render on screen. Because of this, LINK has created a
compressed version of the “UYC” format that drastically reduces file size and load
time. This format has the extension “UYC”. Use the file converter “TIF2UYC.EXE”
to convert files to compressed “UYC” format.
YC File Viewer
LINK provides a utility program that enables you to view UYC graphics files on a
PC. This allows users and software developers to inspect files without the need for
HDE-3000 hardware. The program is called “ViewUYC.exe” and runs under
Microsoft Windows. ViewUYC lets you view foreground RGB colors independently
from the alpha channel.
6.8 UYC File Format
Digital Video (SMPTE 125M—4:2:2 Component) information consists of luminance (Y)
and color difference (CR & CB) values. For each line of active video there are 720
luminance values and 360 pairs of color difference values. The information for each line is
transmitted in the following order:
CB0, Y0, CR0, Y1, CB1, Y2, CR1, Y3, ..... CB359, Y718, CR359, Y719
HDE-3000 groups this information into “pixel pairs”. The first pixel pair of a line consists
of the Y values for both pixels (Y0 & Y1) and the CB & CR values for the pixel pair (CB0 &
CR0). The values are each 8 bits and are organized into two 16 bit words (Y0 is the least
significant byte of the Y word and CB0 is the least significant byte of the C word). Alpha
information is also used by HDE-3000 to control the opacity of the overlaid graphics. An 8
bit alpha value is assigned to each pixel and organized into a third 16 bit word (alpha0 is the
least significant byte of the alpha word and aligns with the same pixel as Y0). There are 256
levels of opacity for each pixel. An alpha value of zero is transparent, so the pixel will be
100% background video. An alpha value of 255 is opaque, so the pixel will be 100%
overlay. All of the values in between select levels of semi-transparency for the pixel.
The information for each pixel pair consists of 1 word of Y values, 1 word of color
difference values, and 1 word of alpha values.
HDE-3000
- 67 -
Image Positioning
When HDE-3000 inserts an image (UYC file) into the video, it must know where on
the screen to position the image. So, the HDE-3000 command to display an image
requires three parameters: the UYC file name, an X offset, and a Y offset.
The X offset parameter specifies how much to offset the left edge of the image from
the left edge of the television screen. Since the HDE-3000 handles all image data in
pixel pair format, the X offset parameter value can only be between 0 and 360. If the X
offset is zero then the left edge of the image will align with the left edge of the television
screen. If the X offset is 180 then the left edge of the image will be in the middle of the
television screen.
The Y offset parameter specifies which video line will contain the first line of the
image. Video lines are numbered 1 to 262 for NTSC (1 to 313 for PAL) for each video
field with line 1 at the top. Note that video lines 1 to 20 are defined as the vertical
blanking interval (VBI) and are not displayed on the television screen. Also, line 21 (22
for PAL) is used for the closed caption waveform. Because of this, the first displayed
video line overlaid by the HDE-3000 GI is line 23 (lines 1 to 22 are overlaid by the VBI
waveform generator and lines 23 to 262 are overlaid by the graphics inserter). Since the
HDE-3000 performs image processing on a field by field basis, the Y offset parameter
can only be between 23 and 262 inclusive for NTSC (40 - 295 for PAL). If the Y offset is
23 (in NTSC) then the top edge of the image will align with the top edge of the television
screen. If the Y offset is 142 then the top edge of the image will be in the middle of the
television screen.
X offset = Number of pixel pairs between left edge of image and left edge of
television screen. Valid values are 0 to 360.
Y offset = Video line number (of odd field) of the top edge of the image. Valid values
are 23 to 262 for NTSC and 40 to 295 for PAL.
The discussion talks about alignment with respect to a television “screen”. This, of
course, does not take into consideration the fact that the image raster on televisions is
overscanned. So a portion of the image will be “cut-off” if it is placed at the very edges
of the image raster. HDE-3000 has a built-in safe title area generator to help you locate
images in a location that will be visible on consumer television sets.
HDE-3000
- 68 -
Details of the UYC File Format
All data contained in a UYC file is organized into words (unsigned 16 bit) with the low
(least significant) byte first (Intel format). The first 16 entries (words) in a UYC file is
defined as the header section. The header section contains image information such as
width, height, etc. The remainder of the file is the image data section, and it contains
three words of image data for each pixel pair (see introduction). The image data is
arranged into lines to facilitate faster transfer to the HDE-3000. Each line of image data
consists of a line of Y data, a line of C data, and a line of alpha data.
Header Section
Word
0
1
2
3
4
5
6 - 15
Description
Value
Signature 0
0x5955 (“YU”)
Signature 1
0x2043 (“ C”)
Version
0x0100 (1.00)
X size (image width)
0-0x02D0 (0-720)
Y size (image height)
0-0x0200 (0-512)
Compression type
0-1
Reserved for future use
(always zero)
Signature 0, 1
These two words are used by the HDE-3000 to indicate that this
file is a UYC file. The words are arranged so that when a UYC file
is viewed with a hex editor the first four bytes appear as
“UYC<space>”.
Version
This entry indicates the version of the UYC file.
X Size This entry indicates the width of the image in pixels. NOTE
that this parameter MUST be an even number to conform to the
pixel pair organization described in the introduction.
Y Size
This entry indicates the height of the image in pixels (or lines).
NOTE that the HDE-3000 can display up to 479 lines of image
data in NTSC format and up to 512 lines of image data in PAL
format (see HDE-3000 Image Positioning).
Compression
This entry indicates if the image data has been compressed and
which type of compression was used. Currently the only valid
values are 0 for no compression and 1 for RLE compression (see
UYC RLE Compression).
Note that X size must be even to conform to word boundaries. Graphic file
converters, when converting a file with an odd width, should add a column of pixels to
the right side of the picture and set the alpha values for these pixels to 0 (transparent).
HDE-3000
- 69 -
Image Data Section of a UYC File
The image data section contains all of the Y, C, and alpha data (see Converting RGB
to YCRCB that follows). The origin of the HDE-3000 coordinate system is the upper left
(line 0 is at the top and pixel 0 is at the left edge). The image data is arranged into lines
to facilitate faster transfer to the HDE-3000. Each line of image data consists of a line of
Y data, a line of C data, and a line of alpha data. The order of the lines of data is
dependent on the type of compression.
For uncompressed UYC files (compression = 0) the line of Y data is written first, then
the line of C data, then the line of alpha data. The following pseudo code illustrates how
to write an uncompressed UYC file.
write the file header
for L = 0 to (Y size - 1)
for P = 0 to ((X size/2) - 1)
write the Y data for line L and pixel pair P
next P
for P = 0 to ((X size/2) - 1)
write the C data for line L and pixel pair P
next P
for P = 0 to ((X size/2) - 1)
write the alpha data for line L and pixel pair P
next P
next L
For compressed UYC files (compression != 0) the line of alpha data is written first,
then the line of Y data, then the line of C data. Also each line of alpha, Y, and C data is
compressed to reduce file size (see Appendix B - UYC RLE Compression). For
simplicity, the compression is only applied to one line of data at a time so that the
decompression algorithm doesn’t have to find the boundaries between each line of
compressed data. The following pseudo code illustrates how to write a compressed
UYC file.
write the file header
for L = 0 to (Y size - 1)
compress the line of alpha data for line L
write the compressed line of alpha data
compress the line of Y data for line L
write the compressed line of Y data
compress the line of C data for line L
write the compressed line of C data
next L
HDE-3000
- 70 -
Converting RGB to YCRCB
The following pseudo code illustrates how to convert RGB image information into
YCRCB image information.
GREEN, BLUE, Yvalue, Cvalue, and Avalue are 8 bit unsigned values,
Yhi, Ylo, Chi, Clo, Ahi, and Alo are 8 bit unsigned values,
R0, G0, B0, A0, R1, G1, B1, and A1 are floating point values,
AVGR, AVGG, and AVGB are floating point values,
Y0, Y1, CR, and CB are floating point values,
Yarray, Carray, and Aarray are arrays of 16 bit unsigned values.
for L = 0 to (Y size - 1)
for P = 0 to (Xsize - 1) step 2
get RED, GREEN, BLUE. and alpha value for line L, pixel P
R0 = RED / 255
(floating point value between 0 and 1)
G0 = GREEN / 255 (floating point value between 0 and 1)
B0 = BLUE / 255
(floating point value between 0 and 1)
`
if (X size is odd) and (P = (Xsize - 1)) then
R1 = R0
(if image width is odd then make the
G1 = G0
image width even by adding a
B1 = B0
transparent pixel at the end of each line)
A1 = 0
else
get RED, GREEN, BLUE. and alpha value for line L, pixel P+1
R1 = RED / 255
(floating point value between 0 and 1)
G1 = GREEN / 255 (floating point value between 0 and 1)
B1 = BLUE / 255 (floating point value between 0 and 1)
end if
AVGR = (R0 + R1) / 2
AVGG = (G0 + G1) / 2
AVGB = (B0 + B1) / 2
Y0
Y1
CR
CB
HDE-3000
=
=
=
=
(compute average color of pixel pair)
0.299 R0 + 0.587 G0 + 0.114 B0
0.299 R1 + 0.587 G1 + 0.114 B1
2 * (0.500 AVGR - 0.419 AVGG - 0.081 AVGB)
2 * (0.500 AVGB - 0.169 AVGR - 0.331 AVGG)
- 71 -
7. Time Taylor
7.1 Introduction
The Time Taylor is used to shorten video programs by selectively removing frames of
video until the length of the program is reduced by the desired amount. But since the act of
removing video frames also removes caption data, the captions must be “bridged” around
the Time Taylor.
When the source is set to “Time Taylor”, a buffer is enabled to store the TC+F1+F2 data
received on the other com port until it is time to encode it, and another line is displayed in
the menu to indicate the status of this buffer. When a job is running (the source video is
playing), the buffer must be running (not stopped). Normally, the Time Taylor commands
received via serial will automatically control the buffer and this line will simply indicate the
current status of the buffer. But you can manually change the status of the buffer by
pressing “enter” when the status line is selected.
The HDE3000 expects to see the following two ASCII command strings transmitted by
the Time Taylor:
“Start CR LF” (hex 73 74 61 72 74 0D 0A) – this command is transmitted by the Time
Taylor when it starts a job (starts playing the source VTR), and it instructs the HDE3000 to
reset its buffer and encode sequencer.
“End CR LF” (hex 65 6E 64 0D 0A) – this command is transmitted by the Time Taylor
when it ends a job (stops the source VTR), and it instructs the HDE3000 to stop buffering.
But the encode sequencer will continue running until all of the buffered data is encoded.
7.2 Example Setups
The following diagram illustrates the equipment connections to perform this using two
HDE3000 units.
HD Video in
(with ATC)
Time Taylor
6 second delay
V in
V in
Vout
(Com)
Info out
Vout
“Encode”
HDE3000 #2
V in
“Decode”
HDE3000 #1
Com2
V in
Com1
Vout
HD Video out
Com1
HDE-3000
- 72 -
The HDE3000 Dual software has been enhanced to facilitate this using one dual unit
instead of two single units. The following diagram illustrates the equipment connections.
HD Video in
(with ATC)
Time Taylor
6 second delay
V in
V in
Vout
(Com)
Info out
Vout
ENC 2
“Encode”
V in
Vout
HD Video out
Com2
ENC 1
“Decode”
V in
HDE3000 Dual
7.3 Dual Configuration
ENC 1: Time Code Source Menu: set to “ATC” to use ancillary time code.
ENC 1: COM1 Setup Menu:
set function to “Redirect Data”
set Baud Rate to 9600
set Format to “8-none-1”
set source to “Upstream TC+F1+F2”
ENC 1: COM2 Setup Menu:
set function to “Disabled”
ENC 2: Time Code Source Menu: set to “ATC” to use ancillary time code.
ENC 2: COM1 Setup Menu:
set function to “Disabled”
ENC 2: COM2 Setup Menu:
set function to “Redirect Data”
set Baud Rate to 9600
set Format to “8-none-1”
set source to “TIME TAYLOR”
set status to “buffer stopped” (used to start/stop the job, see “operation”)
HDE-3000
- 73 -
7.4 Operation
If the Time Taylor sends the proper start/stop commands to ENC 2 (via COM2) then
everything is automatic. If it does not, or if the serial cable from the Time Taylor to COM2 is
not connected, then use the ENC 2 “COM2 Setup Menu” (the one with the source set to
“TIME TAYLOR”) to start/stop the job.
1.
Set the “status” to “buffer running”. This resets the decoded caption data queue and
the encoder sequencer inside the “encode” HDE3000.
2.
Start the job on the Time Taylor.
3.
After the job is finished, set the “status” to “buffer stopped”.
Note that it is necessary to switch the status from “buffer stopped” to “buffer running” to
trigger the start of a job. This is handled automatically when the Time Taylor Controller
sends a start signal to ENC 2 via serial.
Important Note:
When a COM port is configured to “redirect data” and the “source” is set to “Time Taylor”,
the encoder is completely controlled by the serial data. If you try to run a caption file you will
get “error 170” (resource busy). To release the encoder so that you can run a caption file,
set the COM ports to “disabled”.
7.5 Spanish Captions
The “encode” HDE3000 in the above diagrams cannot automatically detect the presence
of Spanish captions. To properly bridge the Spanish captions, you must correctly configure
the “encode” HDE3000 via the new “transcoder 2 setup” menu.
Note that the encoder that must be configured for Spanish captions is the “encode”
HDE3000 in the above diagrams. The configuration of the “decode” HDE3000 does not
have to be changed.
In the “encode” HDE3000, the “for serial commands” setting in the new “transcoder 2
setup” menu (see above) controls the “bridging” of the 708 service 2 captions:
HDE-3000
o
If only bridging one language (CC1 English) then set the “for serial commands”
setting in the transcoder 2 setup menu to “OFF”.
o
If bridging CC2 Spanish captions then set the “for serial commands” setting in the
transcoder 2 setup menu to “CC2”.
o
If bridging CC3 Spanish captions then set the “for serial commands” setting in the
transcoder 2 setup menu to “CC3”.
- 74 -
8. Specifications
8.1 Supported Video Formats
The HDE-3000 supports the bit serial digital interface for high definition as defined by
SMPTE292M. The HDE-3000 supports a single serial link, so it only supports the HDTV
component signals operating at data rates of 1.485 Gb/s and 1.485/1.001 Gb/s. The HDE3000 currently supports the 4:2:2 component YCbCr sampling structure. The HDE-3000
performs all of its functions using ten (10) bits per sample, so it is also 100% compatible with
eight (8) bits per sample video. The HDE-3000 Passes embedded audio untouched.
The HDE-3000 supports the following HD video standards defined by SMPTE274.
Common Name
1080i/60
1080i/59.94
1080i/50
1080P/30
1080P/29.97
1080P/25
1080P/24
1080P/23.98
Description
1920x1080, interlaced, 60 fields per second
1920x1080, interlaced, 59.94 fields per second
1920x1080, interlaced, 50 fields per second
1920x1080, progressive, 30 frames per second
1920x1080, progressive, 29.97 frames per second
1920x1080, progressive, 25 frames per second
1920x1080, progressive, 24 frames per second
1920x1080, progressive, 23.98 frames per second
The HDE-3000 supports the following HD video standards defined by SMPTE RP211.
Common Name
1080PsF/30
1080PsF/29.97
1080PsF/25
1080PsF/24
1080PsF/23.98
Description
1920x1080, progressive segmented frame, 30 frames/second
1920x1080, progressive segmented frame, 29.97 frames/second
1920x1080, progressive segmented frame, 25 frames/second
1920x1080, progressive segmented frame, 24 frames/second
1920x1080, progressive segmented frame, 23.98 frames/second
The HDE-3000 supports the following HD video standards defined by SMPTE296M.
Common Name
720P/60
720P/59.94
720P/50
720P/30
720P/29.97
720P/25
720P/24
720P/23.98
HDE-3000
Description
1280x720, progressive, 60 frames per second
1280x720, progressive, 59.94 frames per second
1280x720, progressive, 50 frames per second
1280x720, progressive, 30 frames per second
1280x720, progressive, 29.97 frames per second
1280x720, progressive, 25 frames per second
1280x720, progressive, 24 frames per second
1280x720, progressive, 23.98 frames per second
- 75 -
8.2 Connector Pin Outs
LTC Time Code
Function
Ground
Ground
Inverting Input (-)
Non-inverting Input (+)
Pin
1
2
3
4
Com Ports
Pin
1
2
3
4
5
6
7
8
9
Function
Data Carrier Detect
Receive Data
Transmit Data
Data Terminal Ready
Ground
Data Set Ready
Request To Send
Clear To Send
Ring Indicator
Notes
(not used)
(input to HDE-3000)
(output from HDE-3000)
(output from HDE-3000, not used)
(input to HDE-3000, ignored)
(output from HDE-3000, not used)
(input to HDE-3000, ignored)
(input to HDE-3000, ignored)
VGA
Pin
1
2
3
4
5
6
7
8
Function
Red
Green
Blue
(no connect)
Ground
Ground
Ground
Ground
Pin
9
10
11
12
13
14
15
Function
(no connect)
Ground
(no connect)
(no connect)
Hsync
Vsync
(no connect)
Keyboard/mouse connector
(HDE-3000 combines these two functions to save room on the CPU bracket)
Pin
Function
1
PS/2 Keyboard Data
2
PS/2 Mouse Data
3
Ground
4
+5VDC
5
PS/2 Keyboard Clock
6
PS/2 Mouse Data
HDE-3000
- 76 -
8.3 Electrical/Mechanical
Front panel controls & indicators
Power on/off switch
Reset button
Program video LED
Encoding LED
Data in LED
Time code LED
Hard disk LED
Setup LED
Floppy drive
Cursor keys
Rear Panel controls & connectors
IEC power output connector, rated 120 VAC at 3A Max or 240 VAC at 2A Max
IEC power input connector for detachable three wire AC line cord
120 VAC / 240 VAC line voltage selection switch
PS-2-style keyboard/mouse connector, 6 pin mini-DIN
(2) RS-232 serial interface connector, DB9M.
VGA output connector, DB15F
(1) 800 mVpp serial digital video input BNC, terminated into 75 ohm
(2) 800 mVpp serial digital video output BNCs, with 75 ohm source impedance
LTC time code input, balanced, +4dBu nominal input level, 4 pin mini-DIN
Power
150 Watt, 50/60 Hz
90 VAC to 135 VAC (120 VAC setting)
180 VAC to 265 VAC (240 VAC setting)
Enclosure
Dimensions: 19" W (483) x 3.50" H (89) x 14.5" D (368)
Front panel: 0.125" aluminum, painted
Rear, tray, top: .042” steel, gold iridite
Weight: 18 lbs. (8.2 kg.)
* Specifications subject to change without notice
HDE-3000
- 77 -
Appendix A. Discussion of HD Captioning
Definitions
SD = standard definition video (NTSC and PAL).
HD = high definition video (1080i, 1080PsF, 1080P, and 720P).
VANC = the vertical ancillary data area in a video signal.
HANC = the horizontal ancillary data area in a video signal.
Introduction
Closed captioning for HD represents a new paradigm in closed captioning. Instead of
encoding the caption data as an analog waveform into a dedicated video line (21 for NTSC,
22 for PAL), HD caption data is encoded as ancillary data packets in the VANC area of the
video. Along with the caption data, the VANC area may contain several other types of
ancillary data packets.
The Important Specifications
EIA-608-B
EIA-708-B
SMPTE291M
SMPTE334M
SMPTE RP168
SMPTE274M
SMPTE RP211
SMPTE296M
HDE-3000
specifies SD line 21 caption data authoring, encoding, and decoding.
specifies HD caption data authoring, encoding, and decoding.
specifies ancillary data packet formatting.
specifies the formatting of caption data into ancillary data packets to
be encoded into the VANC area of the video.
defines the switching point for synchronous video switching
(referenced in SMPTE334M).
specifies all of the 1080 I and 1080 P formats.
defines the 1080 PsF (progressive segmented frame) formats.
specifies all of the 720 P formats.
- 78 -
The VANC Area
The vertical ancillary space is specified for the 1080 formats in SMPTE274M and for the
720 formats in SMPTE296M. SMPTE334M specifies the VANC area as follows: “data may
be located in any lines in the area from the second line after the line specified for switching
to the last line before active video”. The “line specified for switching” is defined by SMPTE
RP168 and summarized in the following table.
Format
720 P
1080 I
1080 PsF
1080 P
RP168 switch lines
7
7 and 569(6)
7 and 569(6)
7
second line after the line specified for switching
9
9 and 571(8)
9 and 571(8)
9
NOTE! For 1080 I and 1080 PsF: line 569 = field 2 line 6, and line 571 = field 2 line 8
The “last line before active video” is specified for the 1080 formats in SMPTE274M and
for the 720 formats in SMPTE296M. The following table lists the VANC area definitions for
each video format.
Format
720 P
1080 I
1080 PsF
1080 P
field 1 VANC area
first line
last line
9
25
9
20
9
20
9
41
field 2 VANC area
first line
last line
571(8)
583(20)
571(8)
583(20)
-
Ancillary data packets to be encoded into the VANC area are encoded contiguously
starting at the beginning of the VANC area (see SMPTE291M section 4). Several types of
data packets may be encoded into the VANC area. The following is a list of the types of
ancillary packets that may be encoded into the VANC area.
Caption data (SMPTE334M)
MPEG2 recoding info (SMPTE353M)
Camera position metadata (SMPTE315M)
Ancillary timecode (SMPTE RP188)
DTV program description (SMPTE RP207)
VBI data (SMPTE RP208)
VANC key length value data (SMPTE RP214)
Film transfer info (SMPTE RP215)
Because the VANC area may contain several types of data packets, and they are
packed contiguously in the order that they are encoded, there is no guarantee that any
particular data packets will always be encoded on any particular video line. However, all of
these data packets will always be encoded within the VANC area (space permitting), and
the first data packet encoded will always be at the beginning of the VANC area.
HDE-3000
- 79 -
Contents of the Caption Data Packets
To be fully compliant with all of the latest specifications, VANC caption encoders must
encode three types of data: EIA-708 captions, EIA-608 captions, and caption service
descriptors. All of this data is encapsulated within the caption data packet, so the VANC
caption encoder only has to encode one ancillary data packet per field/frame. Note that the
caption data packet can also contain time code, but this is not required because LTC time
code is preferred.
The VANC caption encoder must encode EIA-708 captions for HDTV’s and DTV
receivers. HDTV’s and DTV receivers are required to be capable of decoding and
displaying EIA-708 captions. Some can also decode and display EIA-608 captions, but this
is not required.
The VANC caption encoder must also encode EIA-608 captions for down converters.
When a down converter (either a professional down converter or a consumer set top box)
down converts HD video to NTSC video, the EIA-608 data must exist in the HD video so that
it can be encoded into line 21 of the NTSC video. This is why the EIA-608 data encoded in
the HD video is referred to as “compatibility data”. Many set top boxes are available that
can receive DTV transmissions and down convert to NTSC. These boxes allow the
reception and viewing of DTV transmissions on a standard TV. These boxes encode the
EIA-608 captions into line 21 of their NTSC video output so that a standard TV can display
the EIA-608 captions, block programs with certain vchip ratings, etc.
The VANC caption encoder must also encode caption service descriptors (defined in
EIA-708-B). The caption service descriptors provide a list of the caption services (EIA-608
and EIA-708) that are encoded into the HD video.
Caption Data Bandwidth Requirements
Sections 4.1 and 4.2 of EIA-708-B require the caption data to maintain a data rate of
9600 bits per second (1200 bytes per second). Note that 960 bits per second is used by the
EIA-608 caption data which leaves 8640 bits per second available for the EIA-708 caption
data. To achieve this required data rate, the size of the encoded caption data packets must
be fixed for each video field/frame rate. EIA-708-B provides a method of filling up the
unused portion of the caption data packets with “null” data. The following table lists the
sizes of the caption data packets for each field/frame rate. Note that the CDP length is the
size of the VANC packet payload, and it is also the value of the VANC packet DC (data
count) word. Also note that the total VANC packet length includes the ancillary data flag
words (000 3FF 3FF).
Field/Frame
Rate
60/59.94
50
30/29.97
25
24/23.98
HDE-3000
cc_count
10
12
20
24
25
CDP
length
43
49
73
85
88
total VANC
packet length
50
56
80
92
95
- 80 -
Current HDE-3000 Implementation
The HDE-3000 software release version 1.35 meets all of the requirements listed in the
previous sections. The HDE-3000 can encode all current popular EIA-608 caption files, and
it will easily be able to encode EIA-708 caption files when they emerge.
When the HDE-3000 encodes an EIA-608 caption file, it “up converts” or “transcodes”
the EIA-608 captions to EIA-708. To do this, it interprets the EIA-608 captions and creates
EIA-708 captions that will produce the same display on an EIA-708 decoder that the EIA608 captions will produce on an EIA-608 decoder. The EIA-708 captions produced by this
“up conversion” or “transcoding” process are referred to as “derived EIA-708 captions”.
The HDE-3000 also creates and encodes a list of caption service descriptors. It encodes
one caption service descriptor for each encoded caption service.
As per the requirements of the specifications, the HDE-3000 encodes the EIA-608
captions, the “derived” EIA-708 captions, and the caption service descriptors into the VANC
area of the HD video. The HDE-3000 also decodes and displays all of this data for
monitoring purposes.
HDE-3000
- 81 -
Appendix B. Discussion of HD Subtitling
Definitions
SD
standard definition video (NTSC and PAL).
HD
high definition video (1080i, 1080PsF, 1080P, and 720P).
USF
ULTECH subtitle file. A text file with the extension “.uyc” containing the
“navigation” information for a subtitle job.
UYC
ULTECH luminance (Y) chrominance (C) image file. A specialized
graphics file similar to common image files such as BMP, TIF, etc., but
optimized for fast transfer speed into video overlay memory.
Subtitle job
a collection of files containing all of the information needed to subtitle a
video program. A subtitle job for HDE-3000 consists of one USF file and
multiple UYC files (one UYC file for each subtitle).
x_position
a parameter in a USF file that controls the horizontal positioning of a
subtitle on the TV screen. The units of this parameter are pixel pairs (a
side effect caused by the fact that 4:2:2 digital video only contains one
color value for every two pixels). This parameter specifies the number of
pixel pairs between the left edge of the TV screen and the left edge of the
subtitle image.
y_position
a parameter in a USF file that controls the vertical positioning of a subtitle
on the TV screen. This parameter specifies the video line number in field
1 at which to place the top edge of the subtitle image.
HDE-3000
- 82 -
Introduction
Subtitling for HD is essentially the same as subtitling for SD. The only difference is the
size of the TV screen. For example, the size of the TV screen for NTSC is 720 pixels by 485
lines, but for 1080i video it’s 1920 pixels by 1080 lines.
The file formats of the USF and UYC files are exactly the same for SD and HD. The
definitions of the x_position and y_position parameters in the USF file are the same for all
video formats (SD and HD), but the values of these parameters are specific to the video
format. In the past, subtitle authoring systems only had to calculate the values of these
parameters for two video formats (NTSC and PAL), but now they must calculate these
values for the HD formats also.
Since the resolution of HD is so much higher than SD, subtitle images created for SD will
appear very small in HD. Subtitle authoring systems must use larger fonts for HD subtitles.
In the past, since the UYC files only had to contain images large enough for NTSC and
PAL, it was not necessary for the size of the image in a UYC file to be any larger than 720 X
512. To support HD, it may now be necessary to create UYC files up to 1920 X 1080. The
UYC file format can contain images up to 65535 X 65535, so this is not a problem.
However, software designed to produce UYC files only up to 720 X 512 will have to be
updated to produce files up to 1920 X 1080. All of Link’s conversion utilities (BMP2UYC,
TIF2UYC, etc.) have been updated to support images up to 1920 X 1080, as well as Link’s
UYC viewer utility.
HDE-3000
- 83 -
Table of USF Positioning Parameters
The following tables list the position parameter value ranges for all video formats. The safe title
area value ranges are compliant with SMPTE RP 27.3 and SMPTE RP 218.
NOTE that the NTSC and PAL values are only applicable to SD graphics inserters, and the other
values are only applicable to the Link HDE-3000. All possible values were included here for
comparison and to facilitate SD to HD conversion calculations.
x_position:
Format
NTSC
PAL
720 P
1080 I
1080 PsF
1080 P
safe title area
min max
36
323
36
323
64
575
96
863
96
863
96
863
pixels
720
720
1280
1920
1920
1920
pixel pairs
360
360
640
960
960
960
min
0
0
0
0
0
0
active
lines
485
583
720
1080
1080
1080
active lines
in field 1
242.5
291.5
720
540
540
1080
last VBI
line in field 1
20
21
25
20
20
41
max
359
359
639
959
959
959
y_position:
Format
NTSC
PAL
720 P
1080 I
1080 PsF
1080 P
min
23
40
26
21
21
42
safe title area
min
max
45
238
51
283
98
673
75
506
75
506
150
1013
max
263
295
745
560
560
1121
Annex A: Example Conversion Calculation
The following calculation is a simple example showing how to convert an NTSC screen
coordinate (x_position, y_position) into a 1080 P screen coordinate.
[1080P x_ position] = [NTSC x_position] * 960 / 360
[1080P y_position] = (( [NTSC y_position] – 20) * 1080 / 242.5) + 41
HDE-3000
- 84 -
Appendix C. Discussion of HD Time Code
Definitions
SD = standard definition video (NTSC and PAL).
HD = high definition video (1080i, 1080PsF, 1080P, and 720P).
FPS = frames per second.
Introduction
In the past, subtitle/caption authors only had to contend with two video standards (NTSC
and PAL) and three time code frame rates (NTSC non-drop frame, NTSC drop frame, and
PAL). Now for HD video, there are more video standards and more time code frame rates to
manage. This results in time code issues that authors have to deal with in order to author
subtitles and captions for HD video. The HDE-3000 compensates for several of these
issues, but authors must be aware of what the HDE-3000 can and can’t compensate for.
The HDE-3000 will always encode syntactically correct subtitle/caption jobs, but if there are
time code problems then the captions/subtitles will not be encoded at the correct times.
The Importance of Time Code
Time code provides the time source required for “offline” (post production)
subtitle/caption authoring. The authoring systems produce the information to be encoded
with reference to the time codes associated with the video. As it has always been for offline
authoring, if the time code gets altered between the authoring and encoding processes (restriped, frame rate converted, etc.) then the timing of the subtitles/captions will be encoded
improperly.
With the array of HD format conversion features available on many pieces of HD video
equipment, the chances of the time code being altered between the authoring and encoding
processes is greatly increased. Extra care must be observed to insure the integrity of the
time code during the subtitling/captioning process.
HDE-3000
- 85 -
Rules for Successful Authoring
•
Analyze and solve all time code issues before authoring.
•
Insure that the time code integrity will be maintained through the authoring and encoding
process.
•
Insure that the time code values used in your subtitle/caption job match up with the time
codes on the “master media”.
•
Use “half rate” time code for HD video with frame rates above 30 FPS (see the section
“Issues with Frame Rates Above 30 FPS” below).
•
For captioning, only author NTSC caption files. PAL caption files are not compatible with
EIA-708-B, so the HDE-3000 does not currently support the encoding of PAL caption
files.
Authoring System Time Code Requirements for HD
At the current time, all of the subtitle/caption authoring systems in use were designed for
NTSC and/or PAL time code. The good news is that most of these systems should have no
problems authoring subtitle/caption jobs for HD, but the authors using these systems will
have to understand the time code issues involved.
For example, suppose you need to caption a video at 1080Psf/23.98. The HDE-3000
requires LTC time code as specified by SMPTE12M. This standard specifies time code
frame rates of 24, 25, 29.97, and 30 FPS. These frame rates cover almost all of the
possible frame rates required for HD video, but there are a few issues that are not covered
by the current version of the specification. The following two sections describe these issues
and how to deal with them.
The Time Code Specification
The HDE-3000 requires LTC time code as specified by SMPTE12M. This standard
specifies time code frame rates of 24, 25, 29.97, and 30 FPS. These frame rates cover
almost all of the possible frame rates required for HD video, but there are a few issues that
are not covered by the current version of the specification. The following two sections
describe these issues and how to deal with them.
Issues with 23.98 FPS
The issue with 23.98 FPS does not cause any problems for the HDE-3000 or for
authoring, but everyone in the industry should be aware of this issue. The SMPTE12M
standard defines 24 FPS time code for use with film. A common practice in the industry is to
slow down the film by .1% to 23.98 FPS when transferring it to HD video. This makes it
simpler to convert the HD video to NTSC at 29.97 FPS. If the HD video is recorded at 23.98
FPS, 24 FPS time code can be used, but the time code will accumulate an error with respect
to “wall clock” time. This situation also exists for NTSC video at 29.97 FPS, but SMPTE12M
defines a “drop frame” mode to compensate for this. Currently, there is no “drop frame”
mode specified for 23.98 FPS.
HDE-3000
- 86 -
Issues with Frame Rates Above 30 FPS
The SMPTE12M standard does not specify time code frame rates above 30 FPS. This
presents a problem for the 720 P formats with frame rates of 50, 59.94, and 60 FPS. There
is one solution being used in the industry to work around this issue, and this solution is
described below. There may be other solutions to work around this issue, but these have
not as yet been brought to our attention.
The current work around supported by the HDE-3000 is to use LTC time code that has
half the frame rate of the HD video. 25 FPS time code is used for 720P/50 video, 29.97 FPS
time code for 720P/59.94, and 30 FPS time code for 720P/60. This causes there to be only
one time code value for every two frames of video (very similar to NTSC where there is one
time code value for every two fields of video).
SMPTE12M specifies LTC and VITC time code. VITC time code is encoded into both
fields of interlaced video, so it includes a “field” indicator flag. This flag can be used to
indicate each frame of progressive video at frame rates above 30 FPS. When used with HD
video, to calculate the time code value for a particular progressive frame, the time code
value is doubled, and one is added if the “field” flag is set. Since LTC time code is encoded
only once per frame, it does not have a “field” flag, so when VITC is converted to LTC the
“field” information is lost. So the LTC time code will only have one time code value for every
two frames.
The HDE-3000 supports this work around by expecting the time code frame rate to be
half of the video frame rate when the video frame rate is above 30 FPS. For example, when
720P/60 video is fed to the HDE-3000, it will expect the time code to be at 30 FPS.
Time Code Mismatch
A time code mismatch is caused when the frame rate of the time code does not match
the frame rate of the video. Typically, time code is always synchronized to the video, but it
is possible to “stripe” a tape with time code that is not synchronized to the video (including
time code with a different frame rate than the video). Theoretically, this situation should not
exist, but in the event that this is required by a particular authoring system, the HDE-3000
can compensate for this via a menu setting. Normally, the HDE-3000 assumes that the time
code is synchronized to the video, but the “time code override” menu allows the user to
specify the frame rate of the time code if it is different than the frame rate of the video.
For example, suppose an HD tape containing a movie in 1080PsF/24 format must be
captioned using an authoring system that must use NTSC (29.97) time code. It is possible to
stripe the tape with NTSC time code and author the captions to these time codes. For the
HDE-3000 to encode these captions properly, the “time code override” menu must be used
to tell the HDE-3000 that the time code is 29.97 FPS instead of 24 FPS.
HDE-3000
- 87 -
Appendix D. EDS400 Command Set
Features/Definitions
• Command syntax:
An RS-232 command can have one of two formats:
1. [SOM] [command number] <command parameters> [CR]
2. [SOM] [command number] <command parameters> [CR]
<caption/text data> [EOM] [CR]
Spaces (20 hex), tabs (09 hex), or commas (2C hex) can be used to separate
command parameters. The encoder will acknowledge a valid command with [CR][LF]. If
a command error occurs, it will respond with [CR][LF][error code]. If an invalid command
number is received, it will respond with [CR][LF]1. The encoder uses XOFF/XON flow
control to prevent buffer overflow.
Definitions:
HDE-3000
SOM
EOM
ACK
CR
LF
Start Of Message: ^A (01 hex)
End Of Message: ^C (03 hex)
Acknowledge: ^F (06 hex)
Carriage Return: ^M (0D hex)
Linefeed: ^J (0A hex)
XOFF
XON
[]
<>
Flow control stop character: ^S (13 hex)
Flow control start character: ^Q (11 hex)
indicates a mandatory parameter
indicates an optional parameter
Input
Output
input channel: O0, O2. (O1 and O3 not allowed); default: O0.
output channel: O0, O1, O2, O3; default: default: O0.
Dataservice
Rows
Mode
caption/text data service: C1, C2, T1, T2; default: C1.
height of caption roll-up window: 2, 3, 4; default: 3.
data preprocessing mode: 1, 2, 3, 4; default: 4.
Count
Text
0, 1; default: 1.
ASCII text.
Class
Type
Repeat count
Repeat time
XDS class id (2 digit ASCII hex #): 01, 03, 05, 07, 09, 0B, 0D.
XDS type id (2 digit ASCII hex #): 01-7F.
"0001" - "FFFF" 0000 = repeat time, FFFF indefinitely.
transmission repeat time, "HH:MM:SS" example "00:30:00").
Line
Error code
VBI line: 10 – 24(SD) 9-20(HD).
0 - 9, A - Z.
- 88 -
Data input
• Enter Text Article
Syntax:
[SOM] 0 <output> <dataservice> [CR]
<article text line> [CR]
<article text line> [CR]
[EOM] [CR]
A text article is input into the encoder’s article memory. The encoder can store one
article per output channel. Data service is either T1 or T2.
Delays of 1 to 9 seconds may be included in the article as <^Bn> with n being the
number of seconds to delay the output.
A color change may be input into the article text by including <^Dc> with c = W, G, B,
C, R, Y, M, or I for White, Green, Blue, Cyan, Red, Yellow, Magenta or Italics. An
uppercase character indicates no underline, a lower case characters indicates underline.
The valid data range is: 0, 2, 4, 20h - 7fh. Invalid data bytes are ignored. The article
memory must be empty before sending this command, otherwise the encoder will return
an error code. (See “Delete Text Article”). If the article exceeds the buffer size (1000
bytes), the encoder will return an error code and drop the article.
Errors:
1. Unrecognized command
2. Invalid command argument(s)
3. Article already exists
7. Article buffer size exceeded
• Delete Text Article
Syntax:
[SOM] 4 <output> [CR]
The text article in the specified output memory is deleted. If the article is currently
being output, it is not removed until the current transmission has been completed.
Note: An article has to be deleted before a new one can be input into memory.
Errors:
HDE-3000
1. Unrecognized command
2. Invalid command argument(s)
4. Article not accessible or does not exist
- 89 -
• Enter Newswire/Real Time Caption/Text
Syntax:
[SOM] 2 <output> <dataservice> <rows> [CR]
<caption/text line> [CR]
<caption/text line> [CR]
[EOM] [CR]
The caption/text lines input through the serial port are output to <output>. Output
delays may be included in the data portion as <^Bn> with n = 1-9 seconds.
If data service is T1 or T2, the display is in normal text (data is formatted for text and
sent to the T1 or T2 output queue). If data service is C1 or C2, the display is in roll-up
mode as specified by the <rows> parameter (data is formatted for roll-up caption and
sent to the C1 or C2 output queue).
The valid data range is: 0, 2, 10h - 0x7fh. Invalid data bytes are ignored. All
upstream caption/text data is lost while this command is active.
Errors:
1. Unrecognized command
2. Invalid command argument(s)
• Enter Pass Through Caption/Text
Syntax:
[SOM] 3 <mode> <output> [CR]
<caption/text data> [EOM] [CR]
The caption/text data input through the serial port is output to <output> with varying
degrees of processing as determined by <mode>.
mode = 1 All data is allowed and passed.
mode = 2
Legal caption control codes are transmitted in the same field.
mode = 3 Same as mode = 2, except that control codes are automatically doubled.
mode = 4 Same as mode = 3, except that no non-caption codes are transmitted.
The valid data range is: 0, 10h - 0x7fh. Invalid data bytes are ignored. All upstream
caption/text data is lost while this command is active.
Errors:
HDE-3000
1. Unrecognized command
2. Invalid command argument(s)
- 90 -
• Enter XDS
Syntax:
[SOM] * [class] [type] [CR]
<XDS data packet> [CR]
XDS data is entered as data packets preceded by their class and type identifiers.
The valid data range is: 0, 20h - 7fh. The maximum packet size is 32 (excluding
class and type identifiers).
Errors:
1. Unrecognized command
2. Invalid command argument(s)
8. XDS data packet exceeds 32 characters
Data Filter
• Disable Upstream Data
Syntax:
[SOM] 6 <input> <dataservice>...<dataservice> [CR]
Deletes upstream caption/text data for specified input and data service(s). The
status of any unspecified data service is unchanged.
Errors:
1. Unrecognized command
2. Invalid command argument(s)
• Enable Upstream Data
Syntax:
[SOM]7 <input> <dataservice>...<dataservice>[CR]
Enables upstream caption/text data for specified input and data service(s) to be
passed through to the encoder’s output. The status of any unspecified data service is
unchanged.
Errors:
HDE-3000
1. Unrecognized command
2. Invalid command argument(s)
- 91 -
Data Output
• Output Text Article
Syntax:
[SOM] 1 <output> <count> [CR]
The text article for the specified output is transmitted <count> times. If <count> is 0,
the article will be transmitted continuously until a second command with a different
<count> is issued or the “Delete Text Article” command is sent.
The encoder will return an error if no article is in the specified article memory.
Upstream text data only is lost while this command is active (upstream captions are
passed through without delay).
Errors:
1. Unrecognized command
2. Invalid command argument(s)
4. Article not accessible or does not exist
Encoder Setup and Status
• Reset Encoder
Syntax:
[ACK] [ACK]
The encoder’s 4 output channels are reset. This will stop any local encoding and all
upstream data will be passed through unfiltered.
• Set Output Channels
Syntax:
[SOM] % [output] [line] [CR]
Assigns VBI lines to the four output channels (O0-O3). O0 and O1 are always field 1
lines; O2 and O3 are always field 2 lines. The status of any unspecified output is
unchanged.
The VBI line range is 10-24. Setting line to 0 will disable an output channel.
Errors:
1. Unrecognized command
2. Invalid command argument(s) 9. Line already reserved
Note: The caption waveform for output channels O1 and O3 will only be present
while the encoder is actively encoding data unless you set "Filter Upstream Data" to
"On" in Setup Menu #1. Otherwise, the waveform is disabled and video is passed through
when the encoder is idle.
HDE-3000
- 92 -
XDS Commands
•
Add XDS Packet
Syntax:
[SOM] @ [class] [type] [repeat count] [repeat time] [CR]
<XDS data packet> [CR]
The XDS data packet parameter of the command is used to initialize the XDS
packet. Some types of packets, such as Program Title, have static data that must be
initialized. Other packet types such as Time of Day do not require initialization; the time
is retrieved from the DV2000 internal real-time clock.
When a packet is Added it is scheduled to be transmitted either repeat count
times or for the time duration of repeat time, whichever is nonzero. If both are nonzero
then a command error is returned. The rate at which the packet is encoded is specified
by the EIA-608 specification. When a packet has been transmitted either repeat count
times or for time duration repeat time it is automatically deleted.
If the user adds a packet that is already allocated then the packet data is updated
with the new data. So, for example, if a user enters a Program Title packet with a repeat
count of "FFFF' the title is transmitted forever at a rate dictated by EIA-608. When the
program is over the user can change the title by sending an Add command with the new
title.
The Add command is similar to the EDS-400 Data Input Enter XDS command.
Errors:
•
2. Invalid Command Arguments
4. Invalid Repeat Count/Repeat Time Values
5. Invalid Packet Data
Delete XDS Packet
Syntax:
[SOM] # [class] [type] [CR]
This command takes effect immediately; however if a packet is in the middle of
being encoded then it is completed. It is safe to delete a packet that has not been
added.
Errors:
HDE-3000
2. Invalid Command Arguments
- 93 -
Time Code commands
• Read the current time code
Syntax: [SOM] R [CR]
This command is intended for encoder software that would otherwise poll a PC
plug-in time code card. It returns the current time code in packed binary coded decimal
format “HMSF” (Hours, Minutes, Seconds, Frames). An offset of 20h is added to each of
the four bytes sent from the HDE-3000 to the PC. This keeps the four time code bytes in
the range of 20h to 79h. If time code bytes below 20h were allowed, it would be possible
for the PC to confuse a time code byte with an XON or XOFF flow control character. If
you send a ^AR “Read time code” command to the HDE-3000, you must receive the four
time code bytes before issuing a new command. This command is not acknowledged by
the HDE-3000.
• “Quick read” the current time code
Syntax: [SOM] G
This command is identical to the above ^AR “Read current time code” command
except it enables you to read time code while in the middle of a ^A3 “Enter caption”
command. With ^AR you have to exit the ^A3 mode, issue ^AR[CR], read four resulting
time code bytes, then reenter ^A3... for the next link/caption. With ^G “Quick read
current time code”, you do not have to leave the ^A3 mode. However, you must be in
^A3 mode 2 or 3 for ^G to work. ^G (07h) returns the current time code in packed binary
coded decimal format “HMSF” (Hours, Minutes, Seconds, Frames). An offset of 20h is
added to each of the four bytes sent from the HDE-3000 to the PC. If you send a ^G
“Quick read current time code” command to the HDE-3000, you must receive the four
time code bytes before issuing a new command. This command is not acknowledged by
the HDE-3000.
• Wait for specified time code
Syntax: [SOM] W HMS F [CR]
This command can trigger the PC to send a link/caption or End Of Caption
control code (“flip memories”) to the encoder at a specific time. The encoder waits for a
match between the requested time code and the current time code (encoder time code
>= specified time code). When the time code is reached the encoder sends a “T” to the
PC. This command allows the encoding software to be interrupt driven. You must add
an offset of 20h to each of the four bytes you send to the HDE-3000. This keeps the four
time code bytes in the range of 20h to 79h. This command is not acknowledged by the
HDE-3000. No separator is allowed between “W” and “H”; you must follow the “W”
immediately with the “hours” character.
HDE-3000
- 94 -
Appendix E. Upgrade Release Notes
Version 1.20
New Feature: field 1 synchronization for subtitling.
A new menu was added to the DV3000 software: This menu allows the user to
enable/disable the new field 1 synchronization feature. When enabled, the HDE3000 detects
when a subtitling event is about to occur during field 2 and delays the event until field 1. The
reason for this feature is to prevent any subtitle events from occurring during field 2 because
this can cause problems for down converters with the progressive segmented frame video
formats.
New Feature: support for CC2 Spanish transcoding
A new menu was added to the DV3000 software: This menu allows the user to select
which EIA-608 service to transcode to EIA-708 service 2. Typically, Spanish captions are
encoded in the EIA-608 CC3 service (in field 2), but sometimes they are encoded in the EIA-608
CC2 service. This menu allows you to tell the HDE3000 whether the Spanish captions are in
CC2 or CC3.
Enhancement: improved time code frame rate controls
The current time code frame rate has always been displayed in the lower right corner of
all the menus. The functionality of this indicator was improved. It now more accurately displays
the current time code frame rate (determined by the input video frame rate and the settings of
the “time code override” menu). The “time code override” menu was also improved to include
29.97 as a valid override value. In addition, all time code calculations in the HDE3000 software
were updated with new high accuracy calculations (especially improved for drop frame time
code calculations).
Enhancement: support for EIA-608 data redirection completed
This enhancement allows the HDE3000 to redirect upstream EIA-608 data (decoded
from the VANC caption packets) out its serial ports or out through its network API. This
facilitates caption data capturing and bridging.
Version 1.21
Experimental version not released
Version 1.22
Experimental version not released
Version 1.23
New Feature: SD (standard definition) support.
The following standard definition video formats are now recognized by the HDE3000 (in
addition to all of the HD standards already recognized by the HDE3000):
NTSC “D1” (SMPTE259M 270Mb SDI 4:2:2 component 525 line)
PAL “D1” (SMPTE259M 270Mb SDI 4:2:2 component 625 line)
HDE-3000
- 95 -
New Feature: New menus.
To allow the HDE3000 to encode, decode, filter, and multiplex EIA-608 captions new
menus had to be added to the HDE3000. The “EIA-608 SETUP MENU” menu allows the user to
control EIA-608 encoding and filtering. The “CC LEVEL and POSITION SETUP MENU” menus
allow the user to control the amplitude, vertical offset, and horizontal offset of the EIA-608
caption waveform encoded into line 21 for NTSC and line 22 for PAL.
New Feature: re-direct “encoded” caption data
New options were added to the COM port setup menus in the HDE3000 software: The
following new options were added: ENCODED F1, ENCODED F2, and ENCODED F1+F2.
These options instruct the HDE3000 to transmit all “encoded” EIA-608 data out the serial port.
This is also termed the “downstream” caption data. This data is the caption data
encoded/multiplexed into the output video of the HDE3000.
Correction: fixed EDS400 emulation problems
To encode serial caption commands (“control A” commands) , the HDE3000 serial ports
can be configured to “emulate” the ULTECH EDS400 analog caption encoder. The serial
command processor used to emulate the EDS400 serial caption commands had some problems
related to the ability to encode two languages of captions simultaneously.
Correction: fixed EIA-608 decoder
There was a bug in the EIA-608 decoder in the HDE3000 Remote program (the
application that displays status, menus, and captions on the VGA monitor). The bug caused
incorrect display of roll-up captions when they appeared at the top of the display.
Version 1.24
Experimental version not released
Version 1.25
New Feature: Open Caption Decoder.
An “open caption decoder” is a device that decodes closed captions and overlays (or
“burns”) the caption characters into the video. The HDE-3000 allows you to monitor the closed
captions on the VGA monitor. This new feature allows you to “burn” the open captions into the
program video. This feature uses the subtitling hardware in the HDE-3000 to “burn” the
captions into the program video as if they were subtitles.
Enhancement: Pass Special Characters in Newswire mode.
The EDS400 emulator was enhanced to pass EIA-608 “special character” control codes
when in the “newswire” mode. The “newswire” mode is entered using the “control-A 2” serial
command. The EDS400 emulator will now recognize special character control codes, force
them to be correct for the current channel (CC1, CC2, etc.), and encode them.
HDE-3000
- 96 -
Version 1.26
Enhancement: “Caption to Subtitle” conversion.
The open caption decoder feature was enhanced to perform “caption to subtitle”
conversion. The open caption decoder feature was originally implemented in V1.25 to allow the
monitoring of captions and to facilitate the creation of “open caption demo tapes”. The open
caption decoder renders captions into the program video. This new enhancement allows you to
change the appearance of the rendered captions so that they appear as subtitles instead of
captions. You may choose a different font other than the standard decoder font, force the
background box to be semi-transparent or transparent, and you can enable character outlines.
Enhancement: Safe Title Area Indicator.
The safe title area indicator was not working properly for SD (NTSC and PAL). This was
corrected.
Version 1.27
Enhancement: XP Embedded operating system
Microsoft is no longer supporting windows NT, but XP is still being supported by Microsoft.
With the new operating system we are now able to use large fonts on the HDE3000 Remote
software making the program more legible. The networking glitch when setting up server from a
remote XP computer is no longer an issue. The Front Panel USB ports can now be used to load
jobs from removable drives
Version 1.28
Enhancement: XDS Decoder / Monitor.
A new entry was added to the “VGA CC Monitor Setup” menu. The “608 Monitor” can
now be set to CC1, CC2, CC3, CC4, and XDS.The XDS selection configures the VGA 608
monitor to display the contents of ten XDS packets:
Enhancement: XDS Encoding Expanded.
Support was added for two new groups of XDS packet types that were added to the
latest specifications (EIA-608-B): the future class “PSIP” packets, and the miscellaneous class
“channel map” packets. The HDE-3000 can now encode, decode, and re-encode these packet
types.
Refinement: 608 Decoder / Monitor.
A minor problem was corrected in both the 608 monitor on the VGA and in the 608 open
caption decoder. The HDE-3000 is encoding the caption data properly. The problem was in the
decoder, and it caused a caption to be displayed improperly under certain circumstances.
Refinement: Front Panel “Encode” LED.
A problem was corrected that prevented the “encode” LED from illuminating when
encoding line 21 caption data into SD video.
HDE-3000
- 97 -
Refinement: “EIA-608 Setup” Menu Problems.
This menu was added when SD support was added. It allows you to control the filtering
and re-encoding of upstream EIA-608 data. In SD, one field can be set to “reencode” and the
other can be set to “passthru”. When a field set to “passthru”, the line 21 waveform encoder is
disabled for that field, so the existing line 21 waveform in the video is allowed to pass through
the encoder untouched. In HD, both fields of EIA-608 data are encoded into the VANC packets.
If one field is set to “passthru”, it is impossible to pass just that portion of the VANC packet
through the encoder untouched.
Refinement: “VANC Lines Setup” Menu Problems.
This menu was added to provide a method to work around two problems with Sony HD
VTR’s. It allows you to set the field 2 line to 572 for Sony VTR’s that cannot record VANC
packets on line 571 of 1080i video, and it allows you to disable the encoding of field 2 VANC
packets for Sony VTR’s that cannot record VANC packets in field 2 of 1080PsF video.
Enhancement: HD VANC Packet Encoder Improved.
The VANC packet encoder was designed to comply with the HD specifications, but the
HDE-3000 (and other encoding equipment) can be configured to violate the specifications to
work around problems with Sony HD VTR’s. The HDE-3000 VANC packet encoder was
enhanced to search for all existing packets in the VANC area and delete all other caption
packets (other than the one being encoded.
Enhancement: “Upstream Data” indicator added to VGA status.
A new item was added to the “VGA status screen” to display the status of detected
upstream captioning. For HD, the line numbers where the caption packets are detected is
displayed. For SD, whether or not field 1 and field 2 line 21 waveforms are detected is
displayed. The “VGA status display” is displayed in the “menu” area when the menus are not
being displayed (when the “setup” LED is off).
Refinement: 708 Decoder / Monitor.
A minor problem was corrected in both the 708 monitor on the VGA and in the 708 open
caption decoder. The problem was in the decoder, and it caused certain 708 captions encoded
by other equipment to not display.
Refinement: 608 to 708 Up-converter.
A minor problem was corrected in the 608 to 708 up-converter. The problem was that
certain types of colored 608 captions were not getting colored when up-converted to 708
captions.
Version 1.29
Refinement: 608 to 708 Up-converter.
A minor problem was corrected in the 608 to 708 up-converter. The problem was certain
sequence of caption control codes caused the up-converter to make mistakes.
HDE-3000
- 98 -
Version 1.30
Enhancement: Internal Generator Menu.
This new enhancement allows you to select a different default video standard to
generate when there is no input video connected to the unit. The internal generator can
generate all of the video standards that the HDE-3000 supports: 1080i, 1080PsF, 720P, NTSC,
etc. Also, the HDE-3000 “status display” was enhanced to indicate the current standard being
generated when the generator is enabled (in yellow, just below the yellow “No Video” indicator).
Refinement: caption packet sizes for 1080PsF 24/23.98.
A minor problem was corrected in the VANC packet encoder that was causing the
HDE3000 to encode only 9216 bits per second of caption data into 1080PsF 24/23.98 video.
The EIA-708 specification requires caption encoders to maintain the caption data bandwidth at
9600 bits per second. The unused bandwidth is padded with “null data”. This fix is required to
be fully compliant with EIA-708, but this problem caused no problems with caption encoding, so
it was not discovered until recently.
Refinement: Cheetah CAP file reader.
A minor problem was corrected in the Cheetah CAP file reader to allow the reader to
handle “time code collisions”. For example, if the “erase time” for one caption is the same time
code value as the “send time” for the next caption.
Refinement: Job Menu.
A minor Problem was corrected in the “Job Menu” (the menu that allows you to run, stop,
or delete a job). The job number displayed at the top of the menu was sometimes off by 1. This
was a cosmetic mistake that caused no problems with the operation or functionality of the unit.
Refinement: “Upgrade Software” Menu.
A problem was corrected that was causing the “insert disk 2 and press enter” message
to sometimes not appear during the software upgrade process. If this occurs when upgrading
from previous versions, all you have to do is insert disk 2 and press enter. The software
upgrade process continues normally even when the “insert disk 2 and press enter” message
fails to appear.
Version 1.31
Experimental version not released
Version 1.32
New Product: HDE3000 DUAL.
A new HDE3000 product version is now available that contains two encoder cards. This
product functions as two independent HDE3000 encoders inside one chassis. Each
independent encoder has its own video and time code connections, and both encoders run
simultaneously. Example uses include encoding an HD feed and an SD feed simultaneously,
using the second card as a caption monitor, etc.
HDE-3000
- 99 -
Enhancement: HD Ancillary Time Code Support.
Support was added for ATC (ancillary time code) as per SMPTE 12M-2-2008 (DID =
60h, SDID = 60h). NOTE: HD ONLY. The current implementation can only read ATC in HD
video. It cannot read ATC in SD video. A new menu was added to select the time code input
(LTC or ATC).
Refinement: Cheetah Caption Files.
A minor problem was corrected that was sometimes causing caption position mistakes in
the second language for multiple language Cheetah .CAP files.
Enhancement: Real Time Caption Correction.
This support was added for the Prime Image Time Taylor HD. The Time Taylor is used
to shorten video programs by selectively removing frames of video until the length of the
program is reduced by the desired amount. But since the act of removing video frames also
removes caption data, the captions must be “bridged” around the Time Taylor using two
HDE3000 units.
Version 1.33
Enhancement: Com Port Cascading for HDE3000 DUAL.
This feature allows both encoders in a dual to be driven by one com port so that two
video feeds can be encoded with the same captions simultaneously.
Enhancement: SD VANC Encoding/Decoding.
This new feature allows the encoding/decoding of VANC captions for SD. Line 21
captions are always encoded in SD, and when enabled, VANC captions are also encoded
simultaneously.
Version 1.34
Enhancement: HDE3000 Dual - Real Time Caption Correction.
The HDE3000 Dual software has been enhanced to facilitate this using one dual unit
instead of two single units.
Refinement: dual units intermittent “memory errors” and lockups.
There was an overflow problem with the event queues that was sometimes causing
intermittent memory errors and lockups on HDE3000 dual units with the most recent
motherboards. This problem has been corrected in this version.
Refinement: problem with 608 monitor when encoding SD VANC.
A mistake was corrected that under certain conditions was causing garbled captions in
the 608 caption monitor display window on the VGA screen.
Refinement: V1.33 not encoding CC into HD progressive video.
A problem has been corrected that was accidentally introduced when SD VANC
encoding was implemented in V1.33. The bug caused the HDE3000 to not encode VANC
packets into HD progressive video (1080P and 720P) when F2 is set to “disabled” in the “HD
VANC Lines Setup” menu.
HDE-3000
- 100 -
Refinement: “Encoding” LED not lit when encoding SD line 21.
The “Encoding” LED on the front panel was only illuminating when encoding VANC
packets (SD or HD). This has been corrected so that the LED also illuminates when encoding
line 21 into SD video.
Version 1.35
Enhancement: Adding just v-chip to HD video
This enhancement facilitates adding v-chip to HD video that already contains captions
(without disturbing the existing captions). The existing 608 captions, 708 captions, and service
descriptors are passed through, and the v-chip information is multiplexed in.
Enhancement: Correct service descriptors when encoding via serial
Previous versions of the HDE3000 software had difficulty encoding the correct caption
service descriptors when encoding captions via serial.
Enhancement: Multiplexing 708 caption data and service descriptors
This enhancement allows the HDE3000 to properly multiplex additional 708 captions and
service descriptors into video that already contains existing 708 captions and service
descriptors.
Enhancement: Caption service descriptor encoding update
To comply with the latest specifications, the HDE3000 now encodes only one caption
service descriptor for any/all encoded 608 services.
Enhancement: Improved control of the 608 to 708 transcoders
There are now two menus (one for each transcoder), and the new menus allow you to
configure the transcoders differently for encoding caption files and encoding via serial.
Enhancement: New menu layout
The menus have been reorganized into groups, and a new “main” menu has been
added. All of the menus functions the same as before, but the navigation of the menus has
changed.
Enhancement: Upgrade software using USB drive
The software updating function (via the “perform software upgrade” menu) has been
enhanced to find software updates on either floppy disk or USB drives. It will automatically
search the floppy drive and any connected USB drives for the software update.
Enhancement: Network API dual encoder and transitions support
The network API was enhanced to allow the Link Logo Player software to access the
second encoder in a dual unit and to perform fade transitions.
Enhancement: Real time caption correction, second language
Real time caption correction is for the Prime Image Time Taylor HD.
Refinement: Sometimes transcoded italic captions are not white.
There was a bug in the transcoders that sometimes didn’t properly set the 708 text color
to white when transcoding the 608 “white-italics” mid row codes. This problem has been
corrected in this version.
HDE-3000
- 101 -
Version 1.36
Minor change:
This change is required to support the latest build of encoder cards, and it is compatible
will all previous builds of encoder cards.
Version 1.37
Experimental version not released
Version 1.38
Experimental version not released
Version 1.39
Refinement: CDP headers
A bug was corrected that was sometimes causing the cdp_frame_rate parameter in the
CDP headers to be set to an incorrect value. A bug was corrected that was causing a
“Reserved” bit in the CDP header to be set to 0 (the last “Reserved” bit in the CDP header,
between the caption_service_active bit and the cdp_hdr_sequence_cntr parameter). A bug was
corrected that was causing the encoded 608 caption data rate to be too high for 1080i50,
1080PsF25, 1080P25, 720P50, and 720P25.
Change: 1080 PsF Caption Encoding
A change was made to permanently disable the encoding of VANC packets in field 2 for
1080 PsF. This change was required to correct the cdp_frame_rate parameter in the CDP
headers (see above) for 1080PsF24 and 1080PsF23.98.
Refinement: Menu System
A problem was corrected that would sometimes cause the software to crash when
attempting to view certain menus while simultaneously encoding captions via serial/modem.
Adjustment: Default SD Caption Waveform Positioning
The default SD caption waveform position was changed from 13 to 15. This parameter is
configured using the NTSC/PAL “CC POSTION” setup menus. It is recommended that you
change these settings from 13 to 15.
Refinement: Network API
A problem was corrected that was causing the SetFade method to fail for certain
combinations of the FadeOnTime and FadeOffTime parameters.
NOTE: To be compliant every HDE-3000 should be updated to this version.
HDE-3000
- 102 -
Version 1.40
Minor change:
This change is required to support the latest build of encoder cards, and it is compatible
will all previous builds of encoder cards.
Version 1.41
Minor change:
This change is required to support the latest build of encoder cards, and it is compatible
will all previous builds of encoder cards.
NOTE: To swap out old encoder cards with new encoder cards the HDE3000 should be updated to this version.
Version 1.42
Enhancement: Added SMPTE333 Support
SMPTE333 is a serial communications protocol for transmitting caption data from a
“caption server” to an MPEG emission encoder. A new “CAPTION SERVER” function was
added to the “COM Setup Menus” (menus 1.2 and 1.3). NOTE! The required baud rate and
format for SMPTE333 is 38400 baud and 8-none-1.
Version 1.43
Experimental version not released
Version 1.44
Enhancement: Added “Grand Alliance” Protocol Support
The “Grand Alliance” protocol (SMPTE RP 2007) is a serial communications protocol for
transmitting caption data from a “caption server” to an MPEG emission encoder. This protocol is
sometime referred to as “the old 19200 protocol” or “the push protocol”.
Enhancement: Corrected SMPTE333 Timing Error
A timing problem was corrected in the HDE3000 software that was causing intermittent
delays in its SMPTE333 serial transmissions. This was causing intermittent serial
communication problems between the HDE3000 and the MPEG emission encoders.
Version 1.45
Enhancement: Corrected Subtitle Issue in 1080PsF24/23.98
A bug was corrected that was cutting off the right edge of subtitles placed at the
rightmost edge of the screen in 1080 progressive segmented frame 24/23.98 fps.
HDE-3000
- 103 -
Version 1.46
Experimental version not released
Version 1.47
Enhancement: Weather-Lift
A new feature was added to perform “weather-lift”. This feature moves the captions up
on the screen so that they don’t cover weather information placed at the bottom of the screen. A
new menu was added to configure weather-lift:
Enhancement: Optional GPI inputs
A new optional feature is now available: GPI inputs. The new option includes new GPI
connectors at the back of the unit (one for each encoder). Each connector has two GPI inputs
(GPI 1 and GPI 2) providing the following functions; Encoder Weather Lift and Encoder Bypass.
Enhancement: 16 Second Auto-Erase Timers
A new feature was added to automatically erase the VGA caption decoder displays
and/or the open caption decoder display after 16 seconds of inactivity.
Refinement: Open Caption Decoder Issue in 1080P
A bug was corrected that was causing gaps (single video lines) between some of the
rows of captions displayed by the open caption decoder in 1080P (progressive) video.
Refinement: Improved Handling of Missing S352 packets
Some improvements were added to better handle input video that does not contain
SMPTE352M video payload ID packets.
Refinement: Setting Field 2 to “Passthru” with Upstream XDS
A bug was corrected that would make it difficult to set field 2 to “passthru” in the menu
“4.1 EIA-608 SETUP MENU” if the input video contains active XDS information (program rating,
transmission signal identifier, etc.).
Version 1.48
Refinement: 708 Monitor and Open Caption Decoder Issue
An issue was corrected that was causing the 708 decoder to display captions improperly
when Hide Window Command and Display Window Command were being used.
Version 1.49
Refinement: Frame Rate CDP Header Issue
In some cases where the SDI stream had missing or inaccurate SMPTE 352M Video
Payload Identifier (VPID), the HDE-3000 would encode the frame rate in the SMPTE 334-2
Caption Data Packet (CDP) header incorrectly. This would also cause the caption timing to be
incorrect. Now no matter what the VPID is the frame rate in the CPD header will always be
correct along with the caption timing.
HDE-3000
- 104 -
Version 1.50
Refinement: VANC bypass issue
The VANC captioning encoder wasn't being totally disabled during bypass, so the logic
was accidentally blanking the upstream packets. It now allows upstream VANC captioning
packets to pass thru untouched. The decoder and monitor now will display upstream captions
during bypass.
Refinement: 16 second caption auto-erase issue
The 16 second auto-erase timer for the open caption decoder will now clear the decoded
captions.
Refinement: Re-encoding SD with VBI and VANC captions issue
When re-encoding SD with both VBI and VANC captions present the monitor and
decoder would display duplicated captions. It would read both VBI and VANC at the same time.
Now it will only read one or the other.
Version 1.51
Refinement: 708 Transcoder Issue
The 708 Transcoder was resetting during multiple ^A3 and ^C commands most noted
when using Eclipse software. The Transcoder being reset was causing 708 captions to be
encoded improperly. The HDE-3000 will now encode 708 captions properly with the Eclipse
software’s reiteration mode on.
Version 1.52
Experimental version not released
Version 1.53
Refinement: Menu navigation issue with ^C commands
When the unit was receiving a serial ^C commands most of the menu selections would
reset to the top most selection, making menu navigation difficult. This issue did not affect the
encoder just the menu.
Enhancement: PAL line 18 VBI encoding
A menu has been added to allow 608 VBI captions to be encoded on line 18 instead of
line 22 for PAL. This menu allows for PAL caption encoding for the following countries
Argentina, Uruguay, and Paraguay. The PAL 608 VBI decoder will also follow this line
selection.
Version 1.54
Refinement: 1/1.001 format detection
The unit now properly detects 1/1.001 (59.94, 29.97, & 23.98) formats. This problem was
induced with version 1.53.
HDE-3000
- 105 -
Version 1.55
Enhancement: Decode 708 Services 3 thru 6
The VGA screen decoders and the open caption decoder can now decode CEA-708
services 3, 4, 5, and 6. Previous versions could only decode services 1 and 2.
Enhancement: Support for MCC files
The ability to read and encode CPC MCC files was added. These files have the
extension *.mcc. Version 1 and version 2 MCC files are supported. The HDE3000 can encode
the following data contained in an MCC file:
•
Field 1 608 data (CC1, CC2, T2, T2)
•
Field 2 608 data (CC3, CC4, T3, T4, XDS)
•
708 services 1, 2, 3, 4, 5, and 6
Version 1.56
Enhancement: Language Selection for Service Descriptors S1 & S2
The options are as follows; English (eng), Spanish (spa), French (fre), Portuguese (por),
German (ger), Danish (dan), Italian (ita), Finnish (fin), or Swedish (swe).
Refinement: Hard lock with long .MCC files
The unit will now run long .MCC files with out locking up.
Version 1.57
Experimental version not released
Version 1.58
Enhancement: Dual Link RGB 4:4:4 Subtitling
A new menu 7.7 has been added to allow proper subtitle insertion into dual link RGB
4:4:4 streams. First you will to take the UYC subtitles and convert it using the WinUycToUyc
V1.03 utility. You have to do this twice once for link A and once for link B. Two get the subtitle
insertion to be timed at the same frame you will need two units. Link A thru one unit and link B
thru the other unit. Set the new menu 7.7 to RGB 4:4:4, then load the subtitle jobs into the units
to match the link. This menu will have to be disabled to properly insert subtitles (graphic) into
single link YCrCb.
Version 1.59
Refinement: Improved NTSC frame rate detection
An improvement was added to the frame rate detector to allow it to better detect NTSC
frame rates (23.98/29.97/59.94). Occasionally the detector switch from NTSC frame rate to
computer frame rate (24/30/60). This switch would cause the graphic memory to clear.
HDE-3000
- 106 -
Using LEI-599D with HDE-3000 bypass
GPI Connection
Using the above two diagrams one can connect the LEI-599D to the HDE-3000,
so that the HDE-3000 automatically goes into encoder bypass when captions are
present. With this setup you would want to set the LEI-599D GPI caption detect menu
to normally closed and set the foreground, background, and 708 window opacities to
transparent.
HDE-3000
- 107 -
About MCC Files
MCC files contain the raw VANC packet data (CDP’s, caption data packets) for a
segment of video. The raw data contains 608 and 708 captions and service information (CSD’s,
caption service descriptors). MCC files are created using CPC MacCaption, CPC CaptionMaker,
and possibly other software.
What makes MCC files different from all the other caption file formats that the HDE3000
can encode is that they contain 708 caption data. All the other file formats that the HDE3000
can encode only contain 608 caption data (the HDE3000 “transcodes” the 608 to 708).
Encoding MCC files with the HDE3000
The HDE3000 menus have not changed, but you may now select MCC files for encoding
just like all the other caption file formats that the HDE3000 supports (Cheetah *.cap, Ultech *.ult,
etc.).
When the HDE3000 encodes an MCC file, it directly inserts the 608 data, 708 data, and
service information contained in the MCC file, overwriting any existing caption data and service
information. Because of this, it cannot multiplex when encoding MCC files (it cannot add a
service of captions while preserving existing services).
Important!
•
•
•
•
•
An MCC file is generated for the particular frame rate of the video it is to be encoded
into. If the frame rate of the video and the frame rate of the MCC file do not match then
the caption data will not be encoded properly.
When encoding an MCC file, the HDE3000 cannot multiplex (add a service of captions
while preserving existing services).
When encoding an MCC file, the HDE3000 cannot perform weather lift (weather lift is
automatically disabled when encoding an MCC file).
When encoding an MCC file, the HDE3000 will only encode one CDP per frame of video
(in field one only, no VANC data will be encoded into field 2).
Since MCC files contain 708 data, the transcoders in the HDE3000 are disabled when it
is encoding an MCC file.
HDE-3000
- 108 -
Caption Re-encoding with a Dual
1. Connect video and com ports as shown above. Input Video will be the video that
has captions on it to start with. Output Video will be the new video that has captions
re-encoded on it.
2. In the 3000’s menus set encoder 1 com 1 setup menu, function to redirect data
and source from upstream F1, F2, or F1 & F2.
3. In the 3000’s menus set encoder 2 com 2 setup menu, function to EDS400
emulation and parser mode to bridge Ult F1, F2, or F1 & F2.
4. Make sure that the above two com port menus have their baud rates and formats
matched up.
Note: the captions will be advanced by the approximate amount of video delay
through the “Black Box”. Most captions are delayed to start with so most of the time
this will not be a problem.
HDE-3000
- 109 -
Sony HD VTR’s
Many of our customers had issues with getting a Sony VTR to record captions.
This is some of the steps that people have to do to get some Sony HD recorders to hold
captions. You may have to call Sony to have them step you thru the menus it get their
recorders setup properly.
Here are the basic steps described.
Set up your Sony HD VTR according to these instructions.
1. Go to the "maintenance menu" and set the "metadata settings" for "CC" to:
line 1 = 9, line 2 = 572, DID = 61, SDID = 01.
2. Save the changes. This is a separate step that you have to perform before
you exit the "maintenance menu".
3. Go to the "system menu" and set "metadata" to "CC".
Then follow these instructions to configure the HDE-3000:
There are two problems that we have run into with some Sony HD VTR's.
The "vanc lines setup menu" was added to the HDE-3000 software to work
around these problems.
1. For 1080i, some Sony VTR's can't record ancillary data packets on line
571. The caption data packets normally are encoded on lines 9 and 571 (line
571 = field 2 line 8). To work around this problem, use the "vanc lines setup
menu" to encode on lines 9 and 572 (the Sony VTR can record ancillary data
on line 572).
2. For 1080PsF (progressive segmented frame), some Sony VTR's can only
record data packets on line 9. They can't record any data packets in field 2.
To work around this problem, use the "vanc lines setup menu" to disable
encoding into field 2. Leave field 1 set to line 9, and set field 2 to "disabled".
This forces the HDE-3000 to encode all the caption data into line 9 only.
HDE-3000
- 110 -
Firmware Maintenance Agreement
Link Electronics has implemented a Firmware Maintenance Agreement (FMA) for the
HDE-3000, high definition closed caption encoder, and former Ultech DV3000. The Firmware
Maintenance Agreement provides upgrades to the HDE-3000, or DV3000 as they become
available. The FMA is included with each HDE-3000 for two years from date of purchase. The
Link Electronics distributed firmware covers all version updates through the date of shipment.
The FMA coverage entitles you to all firmware changes made up to twenty four months after the
date of shipment to your company.
You will receive updates of new firmware releases as they become available, or at your
request. Normally the FMA will be sent to the customer listed on the sales order on a Mini CD,
including two zip files and two .doc files.
Firmware Maintenance Details
Each HDE-3000 includes free firmware updates for twenty four months from date of
purchase; thereafter it is renewable on your anniversary date of the unit. After the internet
system is setup, the FMA program will recognize, and each transaction has its own anniversary
date that occurs twenty four full months after purchase.
We strongly recommend that customers continuously renew their FMA coverage
because it will provide them with unbroken access to all new releases and versions of their
HDE-3000. The Link Electronics technical support staff is available for consultation during
normal working hours 8:00AM to 5:30PM, Monday through Friday, Central Standard Time. The
cost of renewing FMA program after it has lapsed is greater than keeping current.
Customers will be notified of any pending Firmware Maintenance renewals
approximately 75 days before the Anniversary date, and a quote for renewal will be sent to the
customer. The FMA renewals can then be purchased directly from Link Electronics. Customers
also have a choice in how to place their renewal order - it can be placed by sending a purchase
order to Link Electronics, by email or US Mail.
The renewal order must be placed by the customer and received by Link Electronics
before the anniversary expiration date. This will ensure that FMA coverage is not interrupted,
and the customer avoids the additional costs of having to buy "FMA" after expiration date.
The FMA program shall include the name of the person to whom the updates are to be
sent. If any personnel changes take place in your company, please notify Link Electronics at the
following address
Link Electronics Inc.
2137 Rust Ave.
Cape Girardeau, MO 63703
Phone: 573-334-4433
Email: [email protected]
HDE-3000
- 111 -
Product Warranty
Link Electronics Inc. warrants its product to be free from defective material and
workmanship for a period of TEN-YEARS from date of shipment, including parts and labor to the
original customer who purchased the product. The length of the warranty may be different with
some products, as noted in “Exclusion A” below, but the following restrictions apply to all
products.
This warranty does not extend to products which have been subjected to misuse,
neglect, accident or act of nature, incorrect wiring, alteration, improper installation, or used in
violation of instructions from Link Electronics. Link Electronics makes no other warranties,
express or implied, of merchantability, fitness for a particular purpose, or otherwise. Link
Electronics liability for any cause, including breach of contract, breach of warranty, or
negligence, with respect to products sold by Link Electronics is limited to repair or replacement
by Link Electronics, at its sole discretion.
The product must be shipped to Link Electronics, freight costs prepaid. Labor will be
performed at the Link Electronics factory in Cape Girardeau, Missouri. Repaired or replaced
equipment shall be returned by surface freight, unless customer wants to pay for air freight.
This warranty is in lieu of all other warranties, expressed or implied, with respect to the condition
or performance of any Link Electronics products, its merchantability, or fitness for a particular
purpose.
The product warranty will be null and void, if a specific component part should become
obsolete by the parts manufacturer. If the component part becomes obsolete and not available
through distribution, Link Electronics, Inc will not be responsible for repair or replacement of a
Link Electronics manufactured product.
In no event shall Link Electronics be liable for any incidental or consequential damages,
including loss of profits. This warranty supersedes all previous warranties, whether implied,
written or verbal; Date September 1, 2010
SERVICE INFORMATION
In the event that the Link Electronics equipment should fail, you should contact the
Customer Service Department and request a Return Authorization (RA) number. At that time,
the details of how the repair should be processed will be discussed. All inquiries relating to
either parts replacement or warranty service should be directed to:
LINK ELECTRONICS, INC.
Cape Girardeau, Missouri 63703
Phone: 573 334 4433
2137 Rust Avenue
Attention: Service Department
Fax: 573 334 9255
EXCLUSION A
Some of the product line is affected by outside factors that LINK ELECTRONICS cannot
control. These products have a limited time for the parts and labor warranty. They are, but not
limited to:
HDE-3000 HD/SD SDI Encoder/Decoder
HDC-925 HD/SD SDI Up/Down Converter
860/861/862 Series Video Routers
Modems for Captioning Encoders
HDE-3000
3 years
1 year
7 years
2 years
AL through XY Series Routers 7 years
Cable Assemblies
2 years
Graphics software
2 years
HAC-66/50
1 year
- 112 -