1
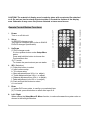
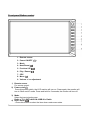
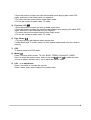
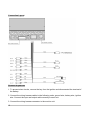
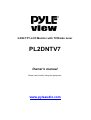
2-DIN TFT-LCD Monitor with TV/Radio tuner
PL2DNTV7
Owner’s manual
Please read it before using this equipment.
www.pyleaudio.com
CONTENTS
Welcome …………………………………………………………………………………
Features ………………………………………………………………………………….
General Specifications ………………………………………………………………….
Operating Instructions……………………………………………………………………
Safety Precautions ………………………………………………………………………
Display care & cleaning………………………………………………………………….
Remote control button function…………………………………………………………
Using remote control……………………………………………………………………..
Front panel Button control……………………………………………………………….
Basic operation…………………………………………………………………………...
Connection Layout ……………….…………………………………………………..
1
1
1
1
2
2
3
6
7
9
13
Connect to your car..…..………………………………………………………………..
Troubleshooting ………………………………………………………………………….
13
14
WELCOME
Thank you for purchasing the TFT-LCD wide screen MONITOR.
We are grateful for your support.
Please read this user’s manual in its entirety before operating the unit.
After reading this manual, be sure to keep it in a handy place for future reference.
Check the contents of the enclosed warranty card and keep it carefully with this manual.
FEATURES
7” Wide-Screen Display Panel
Auto Switch NTSC and PAL
High Brightness: 450 cd/m²
Telephone Mute Control
Headlight Control
Auto Radio Antenna Control
Password Protection
Adjustable Color/Contrast/Brightness/Tint
IR Remote Control
On Screen Display
AM/FM Radio Tuner
Radio Data System (RDS)
4 Channels x 40Watt Amplifier
SANYO DVD/VCD/CD Changer Control
Support RGB Input
3 RCA Video Input (for Rear View Camera, DVD changer and AUX)
2 RCA Stereo Audio Input
1 RCA Video Output
4 Channels Line-Out
General Specifications
Power Source:
Operating Voltage:
Operating Current:
Operating Temperature:
Storage Temperature:
Dimensions:
Car Battery (DC 9-16V)
DC 12V
< 1A (Typical)
0℃ to 70℃
-30°C to 80°C
L178 x W100 x H154mm
*Specifications and design are subject to change without notice.
OPERATING INSTRUCTIONS
Please read all of these instructions regarding your LCD headrest and retain them for future
reference.
1. Read this manual fully and carefully before operating the unit.
1
2. Keep this manual handy for future reference.
3. Pay close attention to all warnings in this manual and follow the instructions carefully.
4. Never allow others to use the system until they have read and understood the operation
instructions.
SAFETY PRECAUTIONS
1.The unit is designed for using in DC12V, negative ground battery.
2. Do not disassemble or alter the unit in any way. Failure to do so can cause damage to the
unit and invalidate your warranty.
3. Be careful not to run down the car battery while using the unit with the car engine stopped.
4. Never clean the surface of the screen with chemical solvent or corrosive detergent, which
may cause permanent damage to TFT LCD screen.
5. Please note that the normal working temperature of the unit is between 0℃ to 50℃. If the
internal temperature of the vehicle is extremely high, a short cooling down period is
necessary before operating the unit.
6. If the inside of the car is very cold and the monitor is used soon after switch on the heater,
moisture may form on the unit. Turn off the unit immediately! Failure to do so may cause the
internal components to short. Allow the unit to rest for about one hour to allow the
condensation to disappear before continue operation.
7. In extremely cold temperatures, the movement of the picture may be slow and the picture
may be dark .It is not a malfunction .The unit will work normally once it reaches its operating
temperature.
8. Small black and shiny dots inside the liquid crystal panel are normal for liquid crystal panel
are normal for liquid crystal product.
9. Do not drop or hit the LCD panel with a hard object, as it may cause permanent damage to
the LCD panel .If you come into contact with the fluid, do flush and clean effect areas with
plenty of water and seek medical attention immediately.
10. Kindly refer to authorized dealers if you get any questions.
DISPLAY CARE & CLEANING
Wipe off dust gently with a soft, dry cloth.
Avoid scratching: do not rub the display with hard objects.
Do not use any chemical solvent, cleaning agent or corrosive detergent to clean the
display and unit.
2
CAUTION! The material of display area is made by glass with a protector film attached
on it. Do not use hard or sharp objects to strike or scratch the surface of the display
area. Otherwise it may cause the picture distorted or have scars forever.
Remote Control Button Functions
1. Power
Turn on or off this unit.
2. Setup
(1) DVD/CD changer mode
DVD built-in functions menu (refer to SANYO
DVD/CD changer Specification)
3. Up/Down
(1) DVD changer mode
It is the up/down button under Setup/Menu
status.
Press and hold this button to choose the
Previous/Next disc.
(2) TV mode
To choose the previous/next pre-set station
4. SEL (Selection)
(1) Press this button, to select
a. Initial volume setup
b. TA volume setup
c. Bass adjustment(use VOL+/- to adjust)
d. Treble adjustment(use VOL+/- to adjust)
e. Balance adjustment(use VOL+/- to adjust)
f. Fader adjustment (use VOL+/- to adjust)
(2) Push and hold this button to select
a. Loud on/off
5. Enter
(1) under DVD menu state, to confirm your selected item.
(2) TV mode, press this button to affirm after input 0~9.
6. Left / Right
When startup the Setup/Menu/P. Menu function, to reduce/increase the system value or
choose in the left/right direction.
3
7. Scan /RDM
(1) DVD/CD changer mode
Press this button to switch scan on/off,
Press and hold to switch random on/off.
(2) Radio mode
Press this button to scan any available frequency and play each one in 5 seconds.
*During playing, will play the current frequency if you press this button again; if press
other button, will stop this function and play the frequency at beginning of scan.
*During scanning, will stop scanning function and play the frequency at beginning of scan.
8. Previous/Next
(1) Under DVD/CD changer mode
Press this button to select the previous chapter/track or the next chapter/track;
Press and hold this button to fast forward or fast reverse.
(2) Under TV/Radio mode
Press this button to search by step or fine tune;
Press and hold this button to automatically search the previous station or the next station.
9. Play/Pause
(1) Under DVD/CD changer mode, to pause the playback or resume the playback.
10. P. Menu
(1) TFT-LCD display: picture adjustment (Brightness, Color, Contrast, Tint),
and select PAL/NTSC/AUTO.
(2) Including all functions on the SEL button.
11. P. Mode
TFT-LCD Display mode (Full, Normal).
12. H. Angle
It’s not available.
13. P. Power
It’s not available.
14. Source
(1) To select the mode in the following order:
Radio > TV > DVD > AUX IN > RGB IN > Radio
* The original mode is Radio mode.
15. Mute
mute on/off.
16. Menu/Band
(1) CDC mode
Return to the DVD main menu during playing DVD media.
4
(2) Radio mode
To switch the band in the follows order:
FM1 > FM2 > FM3 > MW1 > MW2
press and hold this button to automatically search all stations and store the stations on
band FM3 or MW2.
17. Audio CH
Select Tone:
JAZZ-ROCK-CLASSIC-POP-VOCAL-FLAT-EQ OFF.
18. VOL+ / To increase volume or reduce volume.
19. PBC/LOC
(1) CDC mode
To select play mode: PBC on/PCB off.
(2) Radio mode
As PS function, to scan all pre-set station of the current band (M1~M6, step: 5seconds).
20. Stop
(1) CDC mode
To stop playback.
21. Audio
(1) CDC mode,
To select audio language when playing DVD disc.
(2) Radio mode
To select stereo / mono
22. Title
Under CDC mode, to display DVD title during playing DVD media.
23. Sub-Title
Under CDC mode, to select sub-title language during playing DVD media.
24. Angle
It’s only available when playing DVD disc, which recorded some pictures from different
angles. Press it to select from different filming angles stored on the DVD media during
playback.
25. Go to
Under CDC mode, to select playtime and desired chapter.
26. Slow
It is not available.
5
27. RPT
Under DVD mode, allows the user to repeat playback:
repeat mode: disc, track/chapter
28. Angle + / It is not available.
USING REMOTE CONTROL
Aim the IR remote control directly at the unit, or video source with an IR input.
Tips:
− Maximum IR distance is 3 meters from the sensor.
− Direct sunlight or very bright light reduces sensitivity to the IR remote signal commands.
Make sure the monitor is not located in direct sunlight.
− Obstruction between the remote sensor and remote control may disrupt reception.
BATTERY
If the remote control does not function the operating range is shortened, please change to a
new battery.
1. Pull out the battery holder.
Follow the arrow 1 slide it to the right toward the battery
while at the same time pull the battery holder away from the
remote control.
2. Insert a new battery with the (+) side up. (The type of battery:
Crd2025).
3. Push to close the holder.
You will hear a small clicks as the tray locks.
Batteries contain chemical substances, so they should be disposed of properly.
Tips:
Remove batteries if they are empty or if the remote control will not be
used for a long time.
Battery and small parts can be a choking hazard. Keep the remote control away from
young children.
6
Front panel Button control
1. Remote sensor
2. Power ON/OFF (
)
3. Mode
4. Next/Down (
)
5. Previous/ UP (
6. Play / Pause (
)
)
7. CDC
8. Menu ( )
9. Volume +/- or adjustment
1) Remote sensor
For remote control.
2) Power on/off
Press this power switch, the LCD monitor will turn on. Press again; the monitor will
turn to “Mute on/off” mode. Press and hold for 3 seconds, the monitor will turn off.
3) Mode
Select the input signal source.
Radio > TV > DVD >AUX IN >RGB IN > Radio
4) Next / Down ( )
1.Press this button to select the item down under menu state.
7
2.Press this button to select the next track/chapter when playing disc under DVD
mode, and hold to fast forward until you release it.
3.To select the Next preset station under Radio mode.
4.To fine the current program under TV mode.
5) Previous / UP ( )
1.Press this button to select the item up under menu state.
2.Press this button to select the previous track/chapter when playing disc under DVD
mode, and hold to fast backward until you release it.
3.To select the previous preset station under Radio mode.
4.To fine the current program under TV mode.
6) Play /Pause ( )
1.To play or pause the playback when playing disc.
2.under Radio and TV mode, press it to auto search stations and auto store them in
memory.
7) CDC
To directly select the DVD mode.
8) Menu ( )
Press it to setup initial volume, TA VOL, BASS, TREBLE, BALANCE, FADER.
Hold it to enter the system menu, and you can use [ ] and [ ] to select the item
you like to adjust, and then use [- /+] to adjust the system value.
9) VOL - /+ or adjustment
Press it to reduce or increase the volume.
Press it under menu state to adjust the system value.
8
Basic Operation
System adjustment
Press [MODE] to change the mode from AUX IN, RGB IN, REAR VIEW, RADIO MODE, TV
MODE and DVD MODE.
AUX IN
It will display “NO SIGNAL” when there is no AUX in.
RGB IN
It will display “NO SIGNAL” when there is no RGB in.
REAR VIEW
It will display “NO SIGNAL” when there is no rear view in.
RADIO MODE
When you enter radio mode, it will display as below:
RADIO
BAND
RREQ
CHANNEL
PS
PTY
TA/AF/PTY/REG/EON
INFORMATION
FM1
87.5MHZ
PRESET 6
NONE
LISTENING
It will display “STERED” behind “LISTENING” when broadcasting a program.
When you select band of “MW1” or “MW2”, “TA/AF/PTY/REG/EON” will not display on the
above list.
Select stations
Press and hold [ ] or [ ] for 3 seconds to automatically search stations in the related band
(such as FM1), and will automatically store the stations of strongest signal in related band; or
press and hold [ ] for 3 seconds to search stations automatically and then will automatically
store 6 stations of strongest signal in FM3.
Value adjustment
Press [ ] repeatedly to change from Volume >TA VOL >Bass>Treble>Balance>Fader. You
can change the value of these five items by pressing [+] and [-].
Press and hold [ ] to activate the system menu.
BUZZER MODE -------500Hz
DISP MODE ------------FULL
PASSWORD------------OFF
9
DISP TIME --------------OFF
ADJ TIME ---------------00:25
RADIO AREA ----------EUROPE
TV SYSTEM ------------C.C.I.R
EXIT
And then, press [ ] again; it will display another page as below:
RDS
TA/TP ------------------OFF
RDS
AF -----------------------OFF
RDS
PTY ---------------------OFF
SEARCH PTY -----------------NEWS
RDS
REG--------------------OFF
RDS
EON--------------------ON
EXIT
You can adjust the values by pressing [ ] and [ ] as below in case of entering the related
page.
BUZZER MODE: Select Off, 500Hz, 1KHz, 2KHz
DISP MODE: Select the Display mode: FULL NORMAL
PASSWORD: Password protection, select On/ Off
DISP TIME: Display current time, select On/Off
ADJ TIME: Time adjustment
RADIO AREA: Select the radio area: EUROPE, China, U.S.A, TAIWAN
TV SYSTEM: Select the TV system, C.C.I.R, U.S.A, China, Italy, Australia.
EXIT: To exit adjustment of this page
RDS
TA/TP: Selecting OFF or ON
RDS
AF: Selecting OFF or ON
RDS
PTY: Selecting OFF or ON
SEARCH PTY: Selecting from
News>Affairs>Info>Sport>Educate>Drama>Culture>Science>Varied>
Pop M>Rock M>Easy M>Light M>Classics>Other M
>Weather>Finance>Children>Social>Religion>Phone in
>Travel>Leisure>Jazz>Country>Nation M>Oldies>Folk M
>Document>Test>Alarm.
RDS
REG: Selecting OFF or ON
RDS
EON: Selecting OFF or ON
EXIT: To exit adjustment of this page
Band change
You can change the bands from FM1, FM2, FM3, MW1 and MW2 by pressing [
] repeatedly.
EQ adjustment
Press [ ] repeatedly when there is playing a program to change from Volume, TA VOL,
Bass, Treble, Balance or Fader. And then press [+] and [-] to adjust the value of related EQ
option above.
10
TV MODE
Select stations
Press and hold [ ] or [ ] for 3 seconds to automatically search stations and it will
automatically store the stations of strongest signal in related band; or press and hold [ ] for
3 seconds to search stations automatically and then it will automatically store stations of
strongest signal.
If you want to stop searching, press and hold [ ] for 3 seconds again.
Select the display mode FULL or NORMAL with menu.
Display
Display
Note
Mode
Full
Normal
Input video signals 16:9 picture is fully
displayed on screen.
When 4:3 picture is played on wide
screen, black bands appear on both side
of the picture.
Picture adjustment
Press and hold [ ] to active the menu when there are some pictures on display.
You can use [ ] and [ ] to select the item you would like to adjust, and then use [-/+]
to adjust it.
COLOR ---------------------18
CONTRAST----------------18
BRIGHTNESS-------------18
TINT--------------------------18
NTSC PAL -----------------AUTO
RESET
EXIT
COLOR: Color adjustment
CONTRAST: Contrast adjustment
BRIGHTNESS: Brightness setting
TINT: Adjustment to color saturation
NTSC PAL: Select NTSC, PAL or AUTO format
RESET: Reset above menu to default value
EXIT: exit the menu
11
EQ adjustment
Press [ ] repeatedly when there are some pictures on display to change from Volume, TA
VOL, Bass, Treble, Balance or Fader. And then press [+] and [-] to adjust the value of related
EQ option above.
CDC MODE
When you select CDC mode, it will display as below:
CDC
DISC No.:
TRACK No.:
PLAY TIME:
PLAY MODE:
STATUS
INFORMATION
01
01
00:00
Repeat
OFF
Intro
OFF
Random
OFF
DISC PLAY
Note: When it is playing a disc, it will display “DISC PLAY” behind “STATUS” on the screen,
and when it is changing discs, it will display “DISC CHANGE” behind “STATUS” on the
screen.
EQ adjustment
Press [ ] repeatedly when there is playing a program to change from Volume, TA VOL,
Bass, Treble, Balance or Fader. And then press [+] and [-] to adjust the value of related EQ
option above.
Change disc
Press and hold [
] to change to next disc and press and hold [CDC] to change to previous
disc.
Select track
You can select the desired track by pressing [
] and [
] repeatedly when a disc is playing.
12
Connection Layout
Connect to your car
1. To prevent short circuits, remove the key from the ignition and disconnected the terminal of
the battery.
2. Connect the wiring harness cables in the following order: ground wire, battery wire, ignition
wire. Connect the input and output cable correctly to each unit.
3. Connect the wiring harness connector to the monitor unit.
13
4. Reconnect the terminal of the battery of procedure.
Notes
●
If your vehicle ignition does not come with an ACC position, connect the ignition cables
to a power source that can be turned on and turned off with the ignition key. If you
connect the ignition cable to a power source that receives a constant voltage supply, as
with battery cable, the battery may be overloaded.
●
If the fuse blows, first check whether the cables have caused a short circuit or not, then
replace the old fuse with a new one of the same type.
●
Do not let unconnected cables or terminals touch the metal on the car of anything else
conducting electricity. Besides, to prevent short circuits, do not remove the caps from
unused terminals or from the ends of the unconnected cables.
●
After the monitor unit is installed, please check whether the brake lamps, blinkers,
wipers, etc…on the vehicle can work properly.
.
●
Please cover unconnected cables or terminals with rubberized tape or insulators.
Troubleshooting
Problems
No picture and
sound when the
monitor is turned
on
Blurry picture on
the screen
No function on the
remote control (or
operation distance
is shortened)
The picture on the
screen is relatively
dark.
Possible Cause
1. Power wire is connected
improperly or fuse is blown.
2. System cable isn’t
connected or contacts
unwell.
Interfered by short-distanced
strong interference (e.g.
motorbike, high voltage wire,
transformation station or
aircraft etc…)
1. The battery of remote
control has exhausted.
2. Remote control is destroyed.
The equipment locates at a low
temperature area.
Remedy
1. Check the power wire
and replace the fuse.
2. Check the system cable
or replace a new one.
The reception of signal will
get better immediately once
leaving the interference
area.
1. Change a new rating
battery.
2. Contact with the dealer
and then change a new
remote control.
This is the character of LCD
monitor in low temperature,
it will restore to normal
brightness after powering on
the monitor for few minutes.
14