1
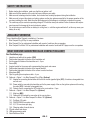
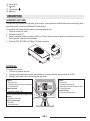
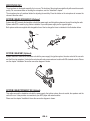
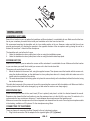
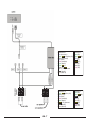
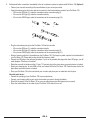
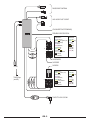
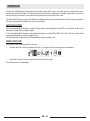
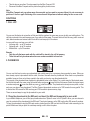
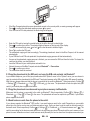
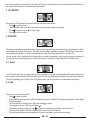
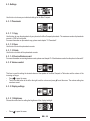
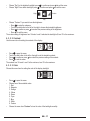
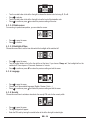
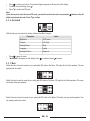
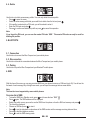
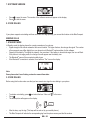
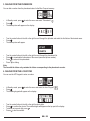
TABLE OF CONTENTS
SAFETY INSTRUCTIONS.............................................................................................................. 2
AVAILABLE VERSIONS................................................................................................................. 2
WHAT DOES MR HANDSFREE BLUE COMPACT INCLUDE?.................................................... 2
DESCRIPTION................................................................................................................................ 3
INSTALLATION . ............................................................................................................................ 5
OPERATION................................................................................................................................... 10
TROUBLE-SHOOTING................................................................................................................... 24
TECHNICAL PARAMETERS.......................................................................................................... 25
BLUETOOTH®. ............................................................................................................................... 25
CARE AND TECHNICAL MAINTENANCE.................................................................................... 26
GUARANTEE.................................................................................................................................. 26
SAFETY INSTRUCTIONS
1.
2.
3.
4.
Before starting the installation, make sure that the car ignition is off.
Make sure that the operation of the carkit will never influence your safety.
Make sure not to damage electrical cables, fuel or brake lines or safety equipment during the installation.
Make sure not to impact the steering or braking system or other key systems essential for the proper operation of the
car when installing the carkit. Make sure that the deployment of the airbags is not blocked or impaired in any way.
5. The carkit may only be used at an operating voltage of 12V with the minus pole earthed. Failure to observe this requirement may result in damage to the car’s electronics system.
6. Do not operate your carkit off the car battery for a long time, i.e. with the engine switched off, as this may cause your
battery to run dry.
AVAILABLE VERSIONS
The mr Handsfree Blue Compact is available in 3 versions:
1. Blue Compact Plug & Play: for easy installation
2. Blue Compact Pro: for professional installation with sound of carkit over the car speakers
3. Blue Compact Pro Music 100: for professional installation with sound of carkit and MP3 player over the car speakers
WHAT DOES MR HANDSFREE BLUE COMPACT INCLUDE?
See illustration page
1.
2.
3.
4.
5.
6.
7.
8.
9.
10.
11.
12.
13.
14.
15.
Handsfree unit with built-in speaker (SM2)
Double-sided tape plate for fixation of the handsfree unit
Set of screws for fixation of the handsfree unit – 5 pcs.
Screen (D2)
Angular bracket for the screen with corresponding fixing parts and screws
Double-sided tape plate for fixation of the angular bracket
Double-sided tape plate for fixation of the screen to vertical surfaces
Microphone (M1)
Clips for guiding the microphone cable – 4 pcs.
Cable set – Option 1 – for Blue Compact Plug & Play (Optional)
10.1. Adapter for connecting the handsfree unit to the car via the cigarette lighter (SC3). It includes a changeable fuse
and coil cord.
10.2. Power cable for connecting the handsfree unit to the power supply of the car, the ignition system and for muting
the radio (SC2). It includes a changeable fuse.
10.3. Contact clips for connecting the SC2 cable to the car circuitries – 5 pcs.
Cable set – Option 2 – for Blue Compact Pro (Optional)
11.1. Mute box (MB1)
11.2. Cable with ISO sockets for connection to the car circuitries
Cable set – Option 3 – for Blue Compact Pro Music 100 (Optional)
12.1. Pro Music 100 cable
12.2. DIN/ISO/FAKRA converter cables
12.3. 2,5 / 3,5 mm stereo jack plug
12.4. Charging cables for audio device
CD with manual and drivers
USB reprogramming cable
Quick Reference Guide
GB - 16. Screw driver
17.
button
18. Central button
19.
button
DESCRIPTION
HANDSFREE UNIT (SM2)
The handsfree unit includes built-in speaker, echo canceller, noise suppressor and Bluetooth® wireless technology, which
provides a wireless connection with Bluetooth® mobile phones.
The handsfree unit has the following jacks for connecting external units:
1. Socket for screen (D2) cable.
2. Microphone socket M1.
3. Socket for external speaker connection (3-6W, min 8 Ohm). When the external speaker is connected to socket 3, the
built-in speaker is switched off automatically.
4. Socket for SC2, SC3, MB1 or Pro Music 100 cable connection.
4
2
3
1
SCREEN (D2)
The screen unit includes:
1. LCD with big symbols and icons.
2. Convenient adjustable fixation system, which allows you to choose the best viewing position of the LCD.
3. Backlight with variable light colors and day and night mode.
If press:
- Receiving a call.
- Connecting with paired phone in Handsfree
or Headset profile. If press and hold:
- Switching on pairing mode.
If press:
- Ending a call.
- Rejecting an incoming call.
- Returning to the previous level of the menu.
- Deleting input data.
If press and hold:
- Returning to Standby mode.
If turn Central button to the right or to
the left:
- Navigation in the menu.
If press Central button:
- OK button.
- Opening the menu.
GB - MICROPHONE (M1)
The microphone is developed especially for in-car use. The location of the microphone significantly influences the acoustic
quality. For a recommendation on locating the microphone, see the “Installation” chapter.
The microphone has a 2 positional button for adjusting its sensitivity. Press the button on the microphone to increase the
volume to the other caller.
SYSTEM CABLES SC2 AND SC3 (Optional)
System cable SC2 connects the handsfree unit with the power supply and the ignition system and is used for muting the radio.
System cable SC3 is used for plug & drive installation. It provides power supply via the cigarette lighter.
Both system cables are supplied with changeable fuses. How to change the fuses is indicated in the illustration below.
Fuse
Fuse
SC3
SC2
SYSTEM CABLE MB1 (Optional)
System cable MB1 connects the handsfree unit with the power supply, the ignition system, the mute socket of the car radio
and the 2 front car speakers. It includes the mute box with relay components and a cable with ISO standard sockets. Please
see the chapter “Installation” where the connection diagram is shown.
SYSTEM CABLE PRO MUSIC 100 (Optional)
This cable connects the handsfree unit with the power supply, the ignition system, the mute socket, the speakers and the
radio of the car. It also provides a connection to your MP3 player and antenna cables.
Please see the chapter “Installation” where the connection diagram is shown.
GB - INSTALLATION
HANDSFREE UNIT (SM2)
Search for a location in your car where the handsfree unit fits and where it is comfortable for use. Make sure that the location in your car where you would like to install your handsfree unit is free from dust and dirt.
We recommend mounting the handsfree unit at a less visible position in the car. However, make sure that the unit can
provide good acoustic, by directing the speaker in the opposite direction of the microphone and by placing the unit at a
distance of more than 1 meter from the microphone.
The handsfree unit can be fixed in 2 ways:
1. Under the dashboard or at any other place in the car using the installation screws.
2. Under the dashboard or at any other place in the car using the double-sided tape plate.
SCREEN UNIT (D2)
Search for a location in your car where the screen unit fits and where it is comfortable for use. Make sure that the location
in your car where you would like to install your screen unit is free from dust and dirt.
The screen unit can be fixed in 2 ways:
1. Mount the bracket to the screen unit, using the supplied screws. Then please mount the bracket with the screen unit,
using the double-sided tape, on the dashboard or at any other place where it is clearly visible but make sure not to
impair control or operation of the vehicle.
2. The most advanced and nice looking option is to place the screen directly on the dashboard, without the bracket, using
the double-sided tape.
The cable that comes out of the screen unit is used for connecting the screen unit to the handsfree unit. Make sure that the
cable is placed so that it will not be damaged (e.g. not laid under car seats or over sharp edges).
MICROPHONE (M1)
Mount the microphone close to the user’s head (30 cm is optimal) and place it so that it is directed towards the mouth.
Experience has shown that the best location is near the rearview mirror or to the left of the sun visor. To avoid echo, it is
recommended to have a minimum distance of 1 meter between the microphone and the handsfree unit.
Make sure to mount the microphone so that it is not exposed to air streams from the vents. Do not lay the microphone cable
in the heating, ventilation or AC systems. Fix the microphone using Velcro.
CONNECTING TO THE POWER
There are 4 ways of connecting the Blue Compact to the car’s electronic system:
1. Plug & drive connection: Via the adapter for the cigarette lighter (SC3) (Optional).
GB - 2. Built-in connection: Immediately to the car’s electronic system via system cable SC2 (Optional).
The wires of cable SC2 are color-coded. They are listed in Table 1 in column A and each wire should be connected to
the corresponding item listed in column B.
Table 1
A
B
Red wire
The + voltage of the car’s power supply
Black wire
The negative GND connection
Blue wire
Ignition
Brown wire
Used for Car Radio Muting (CRM) and has to be connected to the car radio (Mute)
• To avoid distortions, make sure that the cables are laid far away from the electronic systems of the car.
• Connect the wires with the contact clips. Put the car wire in the through groove of the clips and the cable wire in the
groove with the confining rib.
Attention!
If there is no “Ignition” wire or if it is unavailable, you should connect the blue cable wire to the red wire of the handsfree
unit and the red cable wire to the “continuous” wire of the car which keeps the voltage when ignition is turned off. In
this case, the phone call will not be disconnected if the ignition is turned off.
CAR RADIO MUTING (CRM)
The Blue Compact allows muting your car radio when there is an incoming call.
• Check the user’s manual of your car radio and ensure that it has a Mute function. If additional settings have to be
set from the car radio menu, make sure that they are done correctly.
• Remove the control panel of the car radio.
• Remove the decorative panel and take the car radio out of the sleeve using the handles. Disconnect the car radio plug.
• Connect the wires of the mr Handsfree Blue Compact to the corresponding wires of the car radio according to Table
1. Use the contact clips for the connection.
• Restore the connection and installation of the car radio.
3. Professional built-in connection: Immediately to the car’s electronic system via system cable MB1 (Optional).
• Disconnect the car radio and power leads.
• Join the cable according to the connection diagram shown below. If the car radio has a mute jack, connect the yellow wire of the cable to one of the “mute in” jacks (1, 2 or 3). Refer to your car radio manual to determine the position
of the mute jack.
GB - 7
5
3
1
8
6
4
2
Y1
7
5
3
1
8
6
4
2
Y2
8
6
4
X1 2
7
5
3
1
8
6
4
2
7
5
3
1 X2
GB - POWER/MUTE X1
1. blue (to mute box) +
green yellow (toY1) ignition (+12V)
2. black + black (Ground)
3. blue (Aerial*)
4. violet (Illumination*)
5. green (Mute N1)
6. green yellow (to
mute box) + yellow
(to Y1) (+12V) permanent
7. white (Mute N2)
8. brown (Mute N3)
SPEAKERS X2
1. green (LB+)
2. green yellow (LB-)
3. blue (LF+)
4. white (LF-)
5. yellow (RF+)
6. brown (RF-)
7. black (RB+)
8. violet (RB-)
POWER/MUTE Y1
1. green yellow ignition (+12V)
2. black (Ground)
3. blue (Aerial*)
4. violet (Illumination*)
5. green (Mute N1)
6. yellow (+12V) permanent
7. white (Mute N2)
8. brown (Mute N3)
SPEAKERS Y2
1. green (LB+)
2. green yellow (LB-)
3. white (LF+)
4. blue (LF-)
5. brown (RF+)
6. yellow (RF-)
7. violet (RB+)
8. black (RB-)
4. Professional built-in connection: Immediately to the car’s electronic system via system cable Po Music 100 (Optional)
• Take out your car radio according to the specifications of your car and your radio.
• Unplug the antenna plug from your radio and connect it to the female antenna socket of your Pro Music 100.
– If the car has DIN type (1), make the connection via the conversion plug (3).
– If the car has ISO type (2), make the connection directly.
– If the car has FAKRA type, make the connection via the conversion plug (4.2).
1
2
3
4.1
4.2
• Plug the male antenna plug from the Pro Music 100 into the car radio.
– If the car has DIN type (1), make the connection directly.
– If the car has ISO type (2), make the connection via the conversion plug (3).
– If the car has FAKRA type, make the connection via the conversion plug (4.1).
• Select a frequency with the 4 dip switches on the Pro Music 100. The frequency table is printed on the backside of
your Pro Music 100. Please take a close look at this frequency table!
• Connect the ISO-plug to the radio and speakers. If your car is provided with plugs other than ISO-plugs, you will
need adapters. These are not included.
• Guide the wire with the button and the 2.5 mm / 3.5 mm jack plug to the place where your audio device is located.
• Select your charging wire, for mini USB or iPod, and connect this to the Pro Music 100. Guide this wire also to the
place where your audio device is located.
• Place your Pro Music 100 in the hole behind your car radio and place your car radio back into its place.
Use with audio device
• Connect the jack plug of your Pro Music 100 to your audio device.
• Connect your charging cable to your music device when you need to charge the battery.
• Select the frequency of the Pro Music 100 on your car radio (please store this frequency as a preset).
• Press the control button on the cable of your Pro Music 100 to switch it on or off.
GB - DIN/ISO/FAKRA TO ANTENNA
JACK + MOLEX PLUG TO CARKIT
YELLOW WIRE TO MUTE FROM RADIO*
FREQUENCY SELECTOR FOR FM
X1
8
6
4
2
7
5
3
1
8
6
4
2
7
5
3
1 X2
FUSE 2 A
POWER/MUTE X1
1. blue (to mute box) +
green yellow (toY1) ignition (+12V)
2. black + black (Ground)
3. blue (Aerial*)
4. violet (Illumination*)
5. green (Mute N1)
6. green yellow (to
mute box) + yellow
(to Y1) (+12V) permanent
7. white (Mute N2)
8. brown (Mute N3)
SPEAKERS X2
1. green (LB+)
2. green yellow (LB-)
3. blue (LF+)
4. white (LF-)
5. yellow (RF+)
6. brown (RF-)
7. black (RB+)
8. violet (RB-)
CAR SPEAKERS
CAR POWER
CAR RADIO
MUTE 3
MUTE 2
TO MP3-Player
(mini USB)
MUTE 1
TO iPod
Y1
7
5
3
1
8
6
4
2
7
5
3
1
8
6
4
2
Y2
POWER/MUTE Y1
1. green yellow ignition (+12V)
2. black (Ground)
3. blue (Aerial*)
4. violet (Illumination*)
5. green (Mute N1)
6. yellow (+12V) permanent
7. white (Mute N2)
8. brown (Mute N3)
TO MP3 ETC. JACK 3.5/2.5 MM
GB - SPEAKERS Y2
1. green (LB+)
2. green yellow (LB-)
3. white (LF+)
4. blue (LF-)
5. brown (RF+)
6. yellow (RF-)
7. violet (RB+)
8. black (RB-)
OPERATION
Since devices with Bluetooth® technology communicate through radio waves, your carkit and your mobile phone do not
need to be in direct line-of-sight. The 2 devices only need to be within a maximum of 10 meters of each other, so you don’t
need to take your phone out of your pocket or bag to make and receive calls via the carkit.
Since Bluetooth® phones produced by different manufacturers provide various functionalities; some functions described in
this user’s manual could be different or may not be available.
SWITCHING ON/OFF
If the mr Handsfree Blue Compact is connected to the power via the adapter with cable SC3, you can switch on the unit by
clicking the adapter into the cigarette lighter.
If the mr Handsfree Blue Compact is connected to the power via cable SC2 or MB1 or Pro Music 100, the unit will switch
on automatically when you turn the ignition key on.
Mr Handsfree Blue Compact will turn off automatically when the ignition is off. MENU STRUCTURE
All functions of the unit are grouped in the menu.
• To access the menu, press the central button once. The menu of quick access appears on the display.
•
To move in the menu, turn the central button to the left or to the right.
The menu structure is shown below:
GB - 10
1. Call list *
1.1. Dialed numbers *
1.2. Received calls *
1.3. Missed calls *
2. Phonebook
3. Keypad
4. Profiles
4.1. Select *
4.2. Add
4.3. Settings
4.3.1. Phonebook
4.3.1.1. Copy
4.3.1.1.1. Phone *
4.3.1.1.2. SIM *
4.3.1.2. Open *
4.3.1.3. Delete*
4.3.1.3.1. Delete all*
4.3.1.3.2. Delete selected*
4.3.1.4. Receive business card
4.3.1.5. Settings *
4.3.1.5.1. SIM + Phone*
4.3.1.5.2. Phone*
4.3.1.5.3. SIM*
4.3.2. Volume control
4.3.3.1. Brightness
4.3.3. Display
4.3.3.1.1. Day
4.3.3.1.2. Night
4.3.3.1.3. Custom
4.3.3.2. Contrast
4.3.3.3. Color
4.3.3.3.1. Red
4.3.3.3.2. Magenta
4.3.3.3.3. Orange
4.3.3.3.4. Yellow
4.3.3.3.5. Green
4.3.3.3.6. Cyan
4.3.3.3.7. Blue
4.3.3.3.8. White
4.3.3.3.9. Custom
4.3.3.4. Rotate
4.3.3.5. Backlight off time
4.3.4. Language
4.3.5. Security
4.3.6. Set default
4.3.7. Mute
4.3.7.1. Carkit front, back silent
4.3.7.2. Carkit front, back music
4.3.7.3. No music mute
4.4. Delete
5. Bluetooth
5.1. Connection
5.2. Disconnection
5.3. Pairing
6. SMS
6.1. SIM *
6.2. Phone *
7. Software version
8. Voice call
*These menus will only be visible when this information is available in your carkit/mobile phone
GB - 11
USER PROFILES
The Blue Compact supports a multiple user profiles structure. The maximum quantity of user profiles is four. Every user
can copy and keep in the carkit memory his phonebook, call list and configuration settings of the device. The name of each
profile is identified according to the Bluetooth® name of the corresponding mobile phone. If no phone is paired with the
carkit, the pairing operation has to be done first.
As soon as the carkit is switched on, the latest profile is activated automatically and the carkit is making an attempt to connect with the corresponding phone. If the last paired phone is not found, the carkit will switch to Standby mode. For your
security, every profile can be protected by a PIN code (up to 4 digits). You can read more detailed information about the
profiles in the chapter “Profiles”.
PAIRING, CONNECTION AND DISCONNECTION
A. PAIRING
•
For pairing the mr Handsfree Blue Compact with your Bluetooth® mobile phone, you should go to Bluetooth® a Pairing
and then press . Now your Blue Compact is in registration mode for about 2 minutes. The corresponding message
appears on the display and a confirmation tone will be heard.
•
•
Activate the Bluetooth® function in your mobile phone.
Search for available Bluetooth® devices by entering the corresponding submenu of the phone. Your phone will find all
Bluetooth® devices within 10 meters distance and display them as a list.
Select “Blue Compact” from the list.
Enter the passkey “0000”. “Pairing OK” will appear on the display and the device will return to Standby mode. “Blue
Compact” will be stored in the list of paired devices in your phone.
We suggest setting the Blue Compact as “authorized” in your mobile phone.
•
•
•
Note:
• If necessary, the pairing mode could be activated by pressing and holding the
button on the screen unit for
more than 5 seconds.
• If you want to pair a new phone with the Blue Compact and store the currently paired phone in the carkit’s
memory, you should create a new user.
B. CONNECTION
In some cases the device could be disconnected from your phone. For example, if the Blue Compact was switched off. To
restore the connection between the Blue Compact and your phone:
• Switch on the power and the connection will be restored automatically; OR
• Use the central button to go to Bluetooth® a Connection and press
. “Connection” will appear on the display;
OR
• In Standby mode, press the
button on the screen unit.
C. DISCONNECTION
Sometimes you need to disconnect your phone from the Blue Compact. For example, if the phone should communicate
with another Bluetooth® device. To disconnect the Blue Compact and your phone:
• Switch off the Blue Compact; OR
• Go to Bluetooth® a Disconnection and press ; OR
• Press and hold the
button on the screen unit for 5 seconds; OR
GB - 12
•
•
Take the phone more than 10 meters away from the Blue Compact; OR
Disconnect the Blue Compact and the phone through the phone’s menu.
Note:
If the Blue Compact and your phone were disconnected and you want to reconnect them it is not necessary to
pair these 2 devices again. Restoring of the connection will be performed without asking for the access code.
FUNCTIONS
1. CALL LIST
You can use this feature to review the call lists and dial the numbers the same way as you do with your mobile phone. The
call lists are stored in the carkit memory even if you switch off the power. There are three call lists for every profile: received
calls, dialed numbers and missed calls. Each call list can keep up to 32 numbers.
In every profile you can keep your call lists:
• Incoming calls – up to 32 numbers
• Outgoing calls – up to 32 numbers
• Missed calls – up to 32 numbers
Remark:
• Only the calls that were made with the carkit will be stored in the call list memory.
• These lists will only be shown when there are numbers available in these lists.
2. PHONEBOOK
You can use this item to review your phonebook and quickly search for a necessary phone number by name. When you
have already copied a phonebook into the carkit, this menu item will show the phonebook. When there is no phonebook
available, because it has not yet been copied to the carkit, you have to copy the phonebook first.
The records of the phonebook are displayed in alphabetical order in the display. For a quick search of the desired name,
find its first letter with the cursor using the central button and press
to see the list of the names. Select the desired name
or number and press
to see the details or press
to dial the number. The phonebook is stored per user profile, so that
each user can store is own phonebook. The Blue Compact phonebook can store up to 1000 records for every profile. This
is divided into 250 records for SIM card copy and 750 records for phone memory copy.
There are several ways to copy the phonebook to your carkit:
2.1 Copy the phonebook to the SIM card, and insert the SIM card temporarily in your carkit
In your mobile telephone, you will find your phonebook and an “Options” menu. In this “Options” menu, you can choose to
copy the contents of the phonebook to the SIM card. The physical memory on the SIM card is often 250 names & numbers.
To copy the phonebook using the SIM card reader, please insert the SIM card into the SIM card holder according to the
picture. Make sure that you push the card deep enough, until it clicks into place.
GB - 13
•
•
•
If the Blue Compact already has some phonebook records in the current profile, a warning message will appear.
Press
to confirm the phonebook erasing or press
to cancel.
If the SIM card is PIN code protected, the screen keypad will appear:
•
•
•
•
•
Enter the PIN code by turning the central button to the left or the right to select digits.
Press
to confirm your choice. The selected digits will appear on the top part of the display.
To delete an incorrect digit, press
or hold
for a few seconds to delete all digits.
Press
to confirm the PIN code.
The phonebook copying will start accordingly. The existing phonebook, stored in the Blue Compact, will be erased
automatically.
If your SIM card is not PIN code protected, the phonebook copying process will start automatically.
As soon as the phonebook copying process is finished, you can remove the SIM card from the holder. To release the
card from the holder, you should press it.
Insert the SIM card in your mobile phone and switch it on.
Activate the menu of the Blue Compact and select Bluetooth® a Connection.
Press
to confirm your choice.
The connection should be restored.
•
•
•
•
•
•
2.2 Copy the phonebook to the SIM card, and copy the SIM card contents via Bluetooth®
In your mobile telephone, you will find your phonebook and an “Options” menu. In this “Options” menu, you can choose to
copy the contents of the phonebook to the SIM card. The physical memory on the SIM card is often 250 names & numbers.
After this copy, please make sure that the phone is connected to the carkit via Bluetooth®. Select respectively: Profiles
a Settings
a Phonebook
a Copy
a SIM card
in the menu. The phonebook will now be copied into your
carkit, if your mobile phone supports this feature.
2.3 Copy the phonebook records saved in your phone memory via Bluetooth®
Make sure that the phone is connected to the carkit via Bluetooth®. Select respectively: Profiles
a Settings
a
Phonebook
a Copy
a Phone in the menu. The phonebook will now be copied into your carkit, if your mobile
phone supports this feature.
2.4 Send business cards from the phone to the carkit.
If your phone supports the Bluetooth® OPP profile, it can send business cards to the carkit. Depending on your mobile
phone type, this can be one-by-one or all business cards at once. Firstly you have to set the carkit in receiving mode for
a Settings
a Phonebook
a Receive business card
. The
business cards. Select respectively: Profiles
carkit is now waiting for the business cards that have to be sent from your phone. Please check the user’s manual of your
phone for more information on how to send business cards (Normally this can be done from the options menu when you
GB - 14
are in the phonebook of your mobile phone). After you have sent your business cards, you need to press the red button on
the carkit to exit this screen. The phonebook is now updated.
3. LCD KEYPAD
By using the LCD keypad and the central button you can dial out any number.
• Press
to open the menu.
• Turn the central button to the left or the right to move and choose a digit on the display.
• Press
to confirm or press
to delete a digit.
• Press
to dial the number.
4. PROFILES
The maximum quantity of user profiles is four. Every user can copy and keep in the carkit memory his phonebook, call list
and configuration settings of the device. The name of each profile is identified according to the Bluetooth® name of the
corresponding mobile phone. If no phone is paired with the carkit, the pairing operation has to be done first.
As soon as the carkit is switched on, the latest profile is activated automatically and the carkit is making an attempt to
connect with the corresponding phone. If the last paired phone is not found, the carkit will switch to Standby mode.
4. 1. Select
Use this item to select the necessary profile by name to activate it. This item is only available when various profiles have
been created. If the necessary profile is protected by a PIN code, the digital keypad will appear and you have to enter the
PIN code accordingly (up to 4 digits). If the PIN code is correct, you will get access to your phonebook and settings.
4. 2. Add
Use this item to create a new profile.
• Press
to open the menu.
• As soon as this item is selected, the Blue Compact will ask you to enter the PIN code for the new profile and the digital
keypad will appear.
to confirm.
• You can enter the PIN code (up to 4 digits) and press
• If you decide not to use a PIN code, just press .
• To activate the pairing procedure, press
and pair your mobile phone according to the instructions.
• The name of the profile is identical to the Bluetooth® name of your mobile phone.
• If the pairing procedure passed successfully, the carkit is connected to your phone automatically.
GB - 15
4. 3. Settings
Use this item to choose your individual settings for the Blue Compact.
4. 3. 1. Phonebook
4. 3. 1. 1. Copy
Use this item to copy the phonebook of your phone to the Blue Compact phonebook. The maximum number of phonebook
records is 1000 for each profile.
For more information on phonebook copy, please read chapter “2. Phonebook”.
4. 3. 1. 2. Open
Use this item to view the phonebook records.
4. 3. 1. 3. Delete
Use this item to delete all the phonebook records.
4. 3. 1. 4. Receive Business card
For more information on receiving business cards, please read chapter “2.4 Send business cards from the phone to the carkit”.
4. 3. 2. Volume control
This item is used for setting the desired volume of the speaker of the Blue Compact in Talk mode and the volume of the
incoming call ringer.
to open the menu.
• Press
to exit the menu. The volume setting has
• Turn the central button to the left or the right to set the volume and press
now been saved.
4. 3. 3. Display settings
4. 3. 3. 1. Brightness
Choose this menu item for setting the brightness of the display backlight.
•
Press
to open the menu.
GB - 16
•
•
Choose “Day” for the brightest backlight: press
to confirm and press
to exit the menu.
Choose “Night” for a darker backlight: press
to confirm and press
to exit the menu.
Custom
Night
Day
•
Choose “Custom” if you want to tune the brightness:
– Press
to enter the submenu.
– Turn the central button to the left or the right to choose the desirable brightness.
– Press
to confirm or press
to restore the previous setting of the brightness.
– Press
to exit the menu.
The custom setting of brightness has 16 levels. Level 0 switches the backlight off, level 15 is the maximum.
4. 3. 3. 2. Contrast
Use this menu item for setting the contrast of the display.
• Press
to open the menu.
• Turn the central button to the left or the right to set the desirable contrast.
to confirm or press
to restore the previous setting of the contrast.
• Press
• Press
to exit the menu.
The contrast has 16 levels. Level 0 is the minimum, level 15 is the maximum.
4. 3. 3. 3. Color
Choose this menu item for setting the color of the display backlight.
•
•
•
Press
to open the menu.
Choose one of the available colors:
1.Red
2.Magenta
3.Orange
4.Yellow
5.Green
6.Cyan
7.Blue
8.White
9.Custom
Choose the menu item “Custom” to tune the color of the backlight smoothly.
GB - 17
•
•
•
•
Turn the central button to the left or the right to choose the desired color for tuning: R, G or B.
Press
to activate.
Turn the central button to the left or the right to tune the level of the desirable color.
Press
to confirm or press
to restore the previous setting of the color.
4. 3. 3. 4. Rotate screen
For mounting in upside down position, you can rotate the screen.
•
•
Press
Press
to open the menu.
to confirm.
4. 3. 3. 5. Backlight off time
Choose this menu item to set the time after which the backlight will be switched off.
•
•
•
Press
to open the menu.
Turn the central button to the left or the right to set the timer. If you choose “Always on”, the backlight will not be
switched off. Timer steps are 10 seconds, maximum is 1 minute.
Press
to confirm or press
to restore the previous setting and exit the menu.
4. 3. 4. Language
•
•
•
Press
to open the menu.
Choose one of the available languages (English, Russian, Dutch …).
Press
to confirm or press
to restore the previous setting and exit the menu.
4. 3. 5. Security
Choose this menu item to activate or deactivate the security PIN code for the current profile.
•
•
•
Press
to open the menu.
The digital keypad will appear.
Enter the PIN code by turning the central button to the left or the right to select digits.
GB - 18
•
•
•
Press
to confirm your choice. The selected digits will appear on the top part of the display.
To delete an incorrect digit, press .
Press
to confirm the PIN code.
Note:
If you don’t want to enter the secure PIN code, you should not enter the code. Just press the
digits to deactivate the code. Press
to confirm.
button or clear all
4. 3. 6. Set default
With this item you can restore the factory settings of the Blue Compact.
Parameter
•
•
Value
Brightness
15/15 (max)
Contrast
8/15 (mid)
Backlight Color
White
Language
English
Backlight off time
Always on
Press
to open the menu.
“Set default?” will appear on the display. Press
to confirm or press
to cancel.
4. 3. 7. Mute
Select this item to have the sound of your carkit (with ISO cable or Pro Music 100 cable) at the 2 front speakers. The rear
speakers will be muted.
Select this item to have the sound of your carkit (with ISO cable or Pro Music 100 cable) at the 2 front speakers. The music
will remain at the rear speakers.
Select this item to have the sound of your carkit (with ISO cable or Pro Music 100 cable) over your carkit speakers. Your
car speakers will not be muted.
GB - 19
4. 4. Delete
Use this item to delete unnecessary profiles. You can only delete the active profile.
• Press
to open the menu.
• Select the unnecessary profile that you would like to delete from the list and press
• If this profile is protected by a PIN-code, you will be asked to enter it.
• Enter the PIN-code and press .
• Press
to confirm and delete the profile or press
to cancel the operation.
.
Note:
If you forgot the PIN-code, you can use the master PIN-code ‘8888’. This master PIN-code can only be used for
deleting the profiles.
5. BLUETOOTH
5. 1. Connection
Use this item to connect the Blue Compact and your mobile phone.
5. 2. Disconnection
Use this item to break the connection between the Blue Compact and your mobile phone.
5. 3. Pairing
Use this item to pair the Blue Compact and your Bluetooth® mobile phone.
6. SMS
With this item of the menu you can copy received SMS from your phone’s memory or SIM card (up to 20). You will see the
first word of each message. By clicking these words, you will open the message and see more details.
Note:
This function is not supported by some mobile phones.
overview list of sms
•
•
•
•
•
•
•
•
To view the SMS list in Standby mode, press
and choose the item “SMS”
.
again. The SMS submenu will be displayed.
Press
Select from which source you want to see the SMS: from the phone or from the SIM card memory and press
The list will be displayed.
Choose an SMS and press
to view it.
Press
to see the telephone number/name of the SMS sender and the message receiving date and time.
Press
to dial this telephone number.
Press
to exit the SMS viewing mode.
GB - 20
.
7. SOFTWARE VERSION
•
•
Press
Press
to open the menu. The number of the software version will appear on the display.
to exit the menu.
8. VOICE DIALING
If your phone supports voice dialing and there are saved voice tags (names), you can use this function via the Blue Compact.
MAKING CALLS
1. STANDBY MODE
In Standby mode the display shows the current parameters of your phone:
• Signal strength of the cellular network at the current location. The higher the bars, the stronger the signal. The number
of bar-segments may differ slightly from your phone due to Bluetooth® implementation for this software.
• Capacity of the battery. The higher the capacity, the more bars. If the battery is almost discharged, the icon will flash.
If the phone is in charging mode, the charger icon will appear near the battery icon.
• The Bluetooth® name of the connected mobile phone.
• If the Bluetooth® connection is activated, there will be a “Car” icon on the display.
Note:
Some phones don’t send battery, network or name information.
2. VOICE DIALING
Before using this function make sure that you have saved voice tags for voice dialing in your phone.
•
•
•
To activate voice dialing, press
and select the item “Voice call”
Press .
The below picture will appear on the display.
•
•
After the beep, say the tag. (This beep will be sent out by your mobile phone.)
The Blue Compact will activate the corresponding tag from the phone memory and dial the number.
GB - 21
in the menu.
3. DIALING FROM THE PHONEBOOK
You can dial a number from the phonebook stored in the Blue Compact memory.
•
•
•
In Standby mode, press
to enter the menu and select “Phonebook”
Press .
The below picture will appear on the display.
.
•
•
•
Turn the central button to the left or the right to scroll through the alphabet and select the first letter of the desired name.
Press .
The below picture will appear.
•
•
•
•
Turn the central button to the left or the right to scroll through the phonebook list.
Press
to view detailed information of the record (name and phone number).
to return to the phonebook.
Press
Press
for dialing.
Note:
The line with the letters only contains the letters corresponding to the phonebook records.
4. DIALING FROM THE LCD KEYPAD
You can use the LCD keypad to enter a number.
•
•
•
In Standby mode, press
to enter the menu and select the item “Keypad”
Press .
The following keypad will appear on the display:
•
•
•
•
Turn the central button to the left or the right to select digits.
to confirm the choice. The selected digits will appear on the top part of the display. Press
To delete an incorrect digit, press .
to dial the number.
Press
GB - 22
.
5. REDIAL
Redial is done from the call lists. By selecting the outgoing call list, you can redial the last numbers that have been dialed with the
Blue Compact after switch on.
two times.
• In Standby mode, press
• Three lists will appear on the display:
You can choose the desirable number from every list:
• Outgoing calls
• Incoming calls
• Missed calls
Remark:
These lists will only be shown when there are numbers available in these lists.
The maximum capacity of each list is 32 records. If a number was stored in the phonebook, the name will be displayed.
• Turn the central button to the left or the right to move from one list to another.
• Press
to enter into the selected list.
• Turn the central button to the left or the right to scroll through the list.
to dial the number.
• Press
to exit the menu.
• Press
6. DURING A CALL
During a call, the display shows the following information:
1. Telephone number (if your mobile phone supports Caller ID)
2. Name (if this number has been saved in the phonebook of your carkit)
3. Duration of a call
4. Icons, which show the left and the right button function
•
•
•
•
•
•
•
•
During a call you can adjust the volume by turning the central button to the left or the right.
Transfer the call from the Blue Compact to the phone by pressing
2 times.
Transfer a call from the phone to the Blue Compact through the corresponding item in the phone’s menu.
and select the menu item “DTMF“
. Press
to enter and the screen
If you need to dial the DTMF command, press
keypad will appear.
Turn the central button to the left or the right to select the digits.
Press
to confirm your choice. The selected digits will appear on the top part of the display.
To delete an incorrect digit, press .
Press
to send the DTMF command.
GB - 23
Second incoming call
• The caller information appears on the display.
•
•
•
Press
to receive the second incoming call.
The first call will be put on hold.
Press
to end the current call.
•
To switch between the calls, press
.
7. ENDING A CALL
Press
to end a call.
8. ANSWERING A CALL
If there is an incoming call, the number of the caller will appear on the display.
If the name and number are stored in the phonebook of the Blue Compact, the name will appear on the display as well.
Press
to answer a call.
9. REJECTING A CALL
If you do not want to receive a call, press
.
TROUBLE-SHOOTING
Problem
The device does not work. The green
LED of the power adapter is off.
Reason
1. The cigarette lighter jack is damaged.
2. No contact between the power adapter
and the cigarette lighter jack.
3. 1.5 A fuse in the power adapter is
burned.
4. The power adapter is damaged.
GB - 24
Elimination
1. Check if the cigarette lighter functions normally.
2. Clean the contact of the cigarette
lighter jack and the power adapter.
3. Change the fuse.
4. If items 1-3 did not help, apply to
a service center.
The device does not work. It is connected to the car radio through the
adapter. The car radio works.
1. No contact between the wires.
2. Car radio wires have a smaller diameter
than necessary (with cross section area
less than 0.75mm2).
3. 1.5 A fuse in the adapter is burned.
A caller does not hear you.
1. The microphone is disconnected.
1. Check the contact in the connection points.
2. For the connection, use contact
clips which correspond to the
standard of your car or another
suitable type of connection.
3. Change the fuse.
2. The microphone’s cord is damaged.
1. Check the connection of the microphone and the microphone
jack of the handsfree unit.
2. Apply to a service center.
The device is connected to the car radio, but does not mute it during a call.
The car radio Mute function needs additional
settings to be activated.
Check your car radio user’s manual
and make the necessary settings.
The display shows “No answer”.
There is no proper connection between screen
and speaker box. Check the wire and plugs between
screen and speaker.
TECHNICAL PARAMETERS
Car battery voltage
12.6 V (10.8 – 13.5)
with negative pole of GND
Consumption current
In Talk mode – 0.8 А (max)
In Standby mode – 50 mА
Fuse
1.5 А
System cable SC2
•
•
•
•
Red: +12В
Black: GND
Blue: ignition, ACC/IGN
Brown: Mute function of car radio. In Talk mode voltage switches from +12 V to 0 V.
BLUETOOTH®
The Bluetooth® word mark and logos are owned by the Bluetooth SIG, Inc. and any use of such marks by TE-Group NV is under
license. Other trademarks and trade names are those of their respective owners.
GB - 25
CARE AND TECHNICAL MAINTENANCE
The Blue Compact is a product of superior design and craftsmanship and should be treated with care. The suggestions below will
help you to fulfill any guarantee obligations and to enjoy this product for many years.
•
•
•
•
•
Keep the device and all its parts dry. Precipitation, humidity and all types of liquids or moistures can contain minerals that will
corrode the electronic circuitry.
Do not store the device in hot areas. High temperature can shorten the life of electronic devices and warp or melt certain plastics.
Do not store the device in cold areas. When it warms up (to its normal temperature), moisture can form inside, which may
damage electronic circuitry boards.
Do not attempt to open the device. Non-expert handling may damage it.
Do not use harsh chemicals, cleaning solvents or strong detergents to clean the device.
GUARANTEE
Mr Handsfree is a registered trademark of TE-Group NV.
The mr Handsfree brand stands for superior product quality and outstanding customer service. That is why mr Handsfree warrants this product against all
defects in material and workmanship for a period of three (3) years from the date of original purchase of the product.
The conditions of this guarantee and the extent of responsibility of mr Handsfree under this guarantee are as follows:
•
This guarantee is limited to the original purchaser of the product and is not transferable to any subsequent purchaser/end user.
•
During the guarantee period, the sole responsibility of mr Handsfree will be limited to repair or replace, at its option, any defective parts of the product
if this is needed because of malfunction or failure under normal use and conditions. No charge shall be made to the customer for parts and/or repair
labor. •
The product must be shipped to an authorized service center in its original and complete packaging, with transportation charges prepaid. Mr Handsfree will not assume responsibility for any losses or damages during transportation.
•
To obtain repair or replacement within the terms of this guarantee, the customer must provide (a) a proof of purchase (e.g. dated bill of sale); (b) a
written specification of the defect(s); (c) a return address and phone number.
•
This guarantee does not cover and is void with respect to the following:
(a) Products which have been subjected to improper installation, unauthorized repair, improper maintenance, unauthorized modifications or other
acts which are not the fault of mr Handsfree; (b) Products which have been subjected to misuse, abuse, neglect, improper handling and storage, an
accident or physical damage; (c) Products which have been subjected to fire, water, excessive humidity, sand, dirt, extreme changes in temperature
or other conditions which are beyond the control of mr Handsfree; (d) Products which have been used with non-mr Handsfree approved accessories;
(e) Products which have the serial number altered, defaced or removed; (f) Products which have been opened, altered, repaired or modified by any
unauthorized service center.
•
Excluded from any guarantee are consumable items which may need replacing due to normal wear and tear, such as batteries, headset ear cushions,
decorative parts and other accessories.
•
This guarantee gives you specific legal rights, and you may also have other rights which vary from country to country.
GB - 26