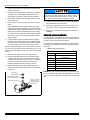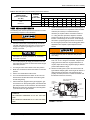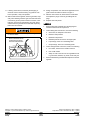
1
67404 / 035-20507-001 Rev. D (0205)
ACCESSORY KIT INSTALLATION INSTRUCTIONS
1NP0580 - PROPANE CONVERSION ACCESSORY
TWO- STAGE INDUCED COMBUSTION FURNACES
MODELS: PT9 / FL9T / FC9T / GM9T / PV9 / FL9V / FC9V / GM9V / XYF9S / XYF9V
PT8 / FL8T / FC8T / GM8T / PV8 / FL8V / FC8V / GM8V / XYF8S / XYF8V
This conversion kit is to be installed by a qualified service agency in accordance with the manufacturer's instructions and
all applicable codes and requirements of the authority having jurisdiction. If the information in these instructions is not followed exactly, a fire, an explosion or production of carbon monoxide may result causing property damage, personal injury
or loss of life. The qualified service agency is responsible for the proper installation of this kit. The installation is not proper
and complete until the operation of the converted appliance is checked as specified in the manufacturer's instructions supplied with the kit.
The conversion of new certified central heating gas appliances must conform to directions outlined in this instruction.
Installation must be made in accordance with the National Fuel Gas Code, ANSI Z223.1-latest edition, unless superseded
by local codes. For Canadian installations, the conversion shall be carried out in accordance with the requirements of the
Provincial authorities having jurisdiction and in accordance with the CAN1-B149.1 and .2 installation codes. The manufacturer accepts no responsibility for malfunctions due to improper conversions.
Lo-NOx furnaces requiring propane (LP) gas must have the NOx screens removed prior to operation. Failure to do so may
result in operational problems and/or reduced heat exchanger life. Follow the instructions below for removal of the NOx
screens.
GENERAL
CONTENTS OF KIT
This kit is intended for the conversion of new equipment only,
from natural gas to propane gas operation.
DESCRIPTION
Propane Conversion Label
Gas Line Pressure Switch
Tapped Gas Pipe Nipple
Main Burner Orifices
Wire Harness 80% (1/4” Terminals)
Wire Harness 90% (1/4” Terminals)
Installation Instructions
Valve Spring Kit
All unit installations above 2,000 ft. must be field derated as
required by the National Fuel Gas Code, ANSI Z223.1 (latest
edition), or in Canada, CAN/CGA B149.1 or .2 and all other
applicable local codes and utility requirements.
This instruction covers the conversion of this unit when it is
equipped with a White- Rodgers gas valve. The installation
instruction supplied with the unit is to be used for all other
aspects of the installation.
An overpressure protection device, such as a pressure regulator, which conforms to the National Fuel
Gas code, ANSI Z223.1 (U.S.) or CAN- B149.1 or .2
(Canada) and acts to limit the downstream pressure
to value that does not exceed 0.5 PSI (14" w.c.),
must be installed in the gas piping system upstream
of the furnace. Failure to do so may result in a fire or
explosion or cause damage to the furnace or some
of its components.
Unitary Products Group
PART NUMBER
035-11635-000
024-27688-XXX
029-22152-000
029-20423-056
373-20975-001
373-20976-001
035-20507-001
025-38943-000
QTY
1
1
1
6
1
1
1
1
FURNACE CONVERSION
The gas supply shall be shut off prior to disconnecting the electrical power, before proceeding with the
conversion.
1.
Remove the upper access door. On 90+ AFUE units,
remove the burner box cover.
2.
Carefully remove the wires from the gas valve and note
their location so they may be properly replaced. Remove
the screws that hold the manifold to the manifold bracket
and slide the manifold off the burners. On 90+ AFUE
units, the manifold is retained by two screws at the bottom and hooks in at the top of the burner box.
67404 / 035-20507-001 Rev. D (0205)
3.
Remove the main burner orifices from the manifold and
retain for future use.
4.
Install the propane main burner orifices in the manifold
and tighten them. After installing a propane orifice in
each location, any leftover orifices may be discarded.
5.
Reinstall the manifold in the assembly by reversing the
removal process.
6.
Reconnect the wires to the proper terminals on the gas
valve.
12. Install the propane gas conversion label as described in
the labels section of this instruction.
7.
When installing gas piping on 80% AFUE units, insert
tapped gas pipe nipple (supplied with kit) into inlet fitting
of gas valve. If using the right side cabinet knock out, the
nipple can be either be installed before or after making
the u-bend. On 90% AFUE units, install an elbow into the
inlet fitting on the gas valve and then install the tapped
gas pipe nipple.
13. Refer to test and adjustments on the next page to property adjust to low fire and high fire manifold pressures.
8.
Install (thread) the gas line pressure switch (supplied
with kit) into the 1/8 NPT tapped hole in nipple applying
pipe dope to the switch fitting prior to installation. Tighten
the switch making sure the connection does not leak.
NOTE: The gas line pressure switch will cause the furnace to
lock out if the gas supply pressure drops below 6” w.c. The
ignition control will display a fault code 7 and will reset after
one hour.
9.
Disconnect the purple wire from the flame sensor.
10. Using the appropriate wire harness (supplied with kit)
connect the purple wire from the flame sensor into the
insulated male connector; connect the two 1/4” insulated
terminals to the pressure switch; and connect the
remaining insulated terminal to the flame sensor.
11. Replace the high fire gas valve regulator spring only
using the instruction sheet packed in the envelope with
the spring.
14. Refer to the unit installation instructions to complete the
installation.
ORIFICE SIZE SELECTION
A number of factors determine the correct orifice usage for
your application. These factors include the original orifice sizing, BTU content of the gas and the altitude.
For propane (LP) applications, Use Table 1 for burner orifice
part numbers. Use Table 2 to select the proper high altitude
orifice size.
Table 1: Orifice Part Numbers
BURNER ORIFICES
Size #
Source 1 Part Number
54
029-20423-054
55
029-20423-055
56
029-20423-056
57
029-20423-057
58
029-20423-058
59
029-20423-059
60
029-20423-060
EXAMPLE: If your unit has a #56 orifice, as standard for propane, and a heating gas value of 2516 BTU/CU.FT., at an altitude of 7,000 feet, a #58 orifice will provide the correct firing
rate.
REGULATOR
COVER SCREW
PLASTIC REGULATOR
ADJUSTMENT SCREW
REGULATOR SPRING
Low fire manifold pressure is 4.0” w.c. Do not replace
the low fire gas valve regulator spring. Refer to Figure 3
in the Instructions that came with the LP Gas Conversion Kit for gas valve pressure regulator locations.
DO NOT CHANGE
SPRING ON LOW
FIRE PRESSURE
REGULATOR
FIGURE 1 : 36G 2-Stage Model
2
Unitary Products Group
67404 / 035-20507-001 Rev. D (0205)
Table 2: Altitude/Propane (LP) Gas Heating Value Orifice Selection
PROPANE GAS
HEATING VALUE
(MANIFOLD PRESSURE
10.0" W.C.)
PROPANE
ORIFICE
@ SEA LEVEL
2516
BTU/CU.FT.
RECOMMENDED ORIFICE
ALTITUDE (FT. ABOVE SEA LEVEL)
0
2,000
3,000
4,000
5,000
6,000
7,000
8,000
9,000
10,000
54
54
54
55
55
55
55
55
56
56
56
55
55
55
55
55
56
56
56
56
56
57
56
56
56
56
57
57
57
58
59
59
60
TEST AND ADJUSTMENTS
8.
The following tests must be performed at the time of conversion following completion of the installation.
Make sure both gas and power supplies are shut off
before proceeding.
1.
Connect a manometer to the pressure tap on both the
inlet and outlet side of the gas valve. Connect a power
supply and a propane gas supply to the unit, if not
already connected.
On 90+ AFUE models, refer to unit installation
instructions for proper procedure for connecting
manometer to furnace.
2.
Turn on the propane gas supply and bleed air from the
gas supply lines at a point as close to the inlet of the gas
valve as is practical.
3.
Turn the gas valve control switch to the “ON” position.
4.
Make sure unit electrical disconnect switch is in the OFF
position.
5.
Set the room thermostat to call for heat.
6.
Turn unit electrical disconnect switch to ON. The combustion blower should start and the hot surface igniter
should start glowing.
7.
After air has been purged from the gas supply line, ignition should occur. Shortly after ignition, the manifold and
gas inlet pressures can be checked on the manometers.
Main burner ignition may be delayed on the first ignition
cycle due to air in the gas manifold.
INLET GAS PRESSURE MUST BE AT 11-13" WC AT
FURNACE.
SET MANIFOLD PRESSURE AT 4.0" WC FOR LOW
FIRE.
SET MANIFOLD PRESSURE AT 10.0" WC FOR HIGH
FIRE.
Unitary Products Group
Adjust the manifold pressure on low fire by turning the 3/
32" set screw below the low adjustment seal screw either
clockwise (to increase) or counterclockwise (to
decrease) as required until the manometer reads 4.0"
w.c. Using this same procedure, adjust the manifold
pressure on high fire to 10.0" w.c. Refer to Figure 1 for
location of low and high fire set screws. These settings
will result in a propane gas input which is the same as
the natural gas input found on the unit rating plate. When
adjustments are complete, replace adjustment seal
screws.
On 90+ AFUE furnaces, the gas valve regulator seal
screws must be in place to determine final gas pressure setting.
9.
The supply gas must be supplied to the unit as a pressure of 11-13" w.c. Using the manometer, verify that the
supply pressure is within the range specified above. If
required, adjust the incoming regulator spring so that the
pressure falls within the range.
10. Observe several ignition cycles. All main burners must
ignite without delayed ignition or burning at the orifices. If
delayed ignition is observed, verify that the igniter is
properly mounted (not loose or crooked on bracket, and
that bracket screws are not loose).
HIGH STAGE REGULATOR
ADJUSTMENT
OUTLET
PRESSURE
PORT
VENT
PORT
INLET
OUTLET
WRENCH
BOSS
INLET
PRESSURE
PORT
ON OFF
SWITCH
LOW STAGE REGULATOR
ADJUSTMENT
FIGURE 2: Gas Valve
3
13. During unit operation, the main burner appearance and
igniter location should be as shown in Figure 2.
11. If burning at the orifices, excessive yellow tipping, or
excessive noise is observed during any phase of main
burner operation, verify unit operation.
12. With the main burners ignited, check for gas leaks, especially in the following locations: gas valve inlet and outlet
connections, gas line pressure switch connection, manifold union in the burner compartment, and main burner
orifices where they thread into the manifold. Repair any
leaks found and recheck.
14. With the main burners off, disconnect the manometers
and replace the plugs. Check for gas leakage at the
plugs.
15. Replace all access panels.
LABELS
1.
Remove label 035-11635-000 from the shipping box.
Check the Natural Gas to Propane box.
2.
Under "Rating After Conversion", write in the following:
Do not use an open flame or any source of ignition
to check for leaks.
BLUE CONE PORTION OF
FLAME SHOULD ENTER
HEAT EXCHANGER TUBE
3.
4.
a.
Orifice size, as stamped on the orifice
b.
Maximum inlet pressure
c.
Minimum inlet pressure
d.
Manifold pressure for both low and high inputs
e.
Input ratings, same as on the Rating Plate
f.
Output ratings, same as on the Rating Plate
Under "Changes After Conversion", write in the following
a.
Kit number, located on the outside of the box
b.
Unit model number
c.
Stamp or write in the name of the organization making conversion, address, city, state, month and year
Remove label backing and affix label adjacent to the Rating Plate.
FIGURE 3: Proper Burner Flame Appearance
Subject to change without notice. Printed in U.S.A.
Copyright © by York International Corp. 2005. All rights reserved.
Unitary
Product
Group
67404 / 035-20507-001 Rev. D (0205)
Supersedes: 67404 / 035-20507-001 Rev. C (1004)
5005
York
Drive
Norman
OK
73069