1
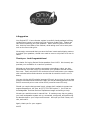
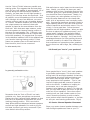
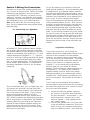
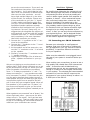
Your Rocket
ELT-1 Home
Theater
Enjoyment
Guide
Yours exclusively through
2150 W. 6th Ave. • Suite L • Broomfield, CO 80020 • Toll Free 1-877-543-7500 • e-mail: [email protected]
A Suggestion
Your Rocket ELT-1 home theater system is carefully hand-packaged utilizing
molded foam inserts to protect their fine furniture-grade finish. Please use
care when unpacking your new speakers. When removing them from the
box, hold the wood sides of the cabinet, while taking care not to exert pressure on the front cloth grille.
We strongly recommend that you save the foam inserts and shipping cartons
to protect your speakers, should ever need to move or ship them to a new location.
Thank you. And Congratulations!
Our thanks for buying Rocket Series speakers from AV123. We sincerely appreciate your confidence in us and our products.
Although we know these speakers represent extraordinary value, we also
know that the real test is how you feel about your speakers several months
from now. That’s why AV123 will continue to work hard to earn your respect
with technical advice and customer service that is second to none in our industry.
You can visit the AV123 website (www.av123.com) at any time for up-to-date
product information and answers to FAQ’s, as well as seeking advice from the
AV123 community at our new online forum (www.forum.av123.com).
Should you require that personal touch, please don’t hesitate to contact our
support department, toll-free, at (877) 543-7500 option 2. You’ll find our
knowledgeable Technical Services Department eager and willing to help.
We ask you read this owner’s manual first. It contains many tips on getting
your new loudspeaker system set up, connected, configured, and performing
its absolute best in your unique environment. We hope you find it clear, concise, and useful.
Again, thank you for your support.
AV123
Your Rocket ELT-1 Enjoyment
Guide
Table of Contents
Product and Company Introduction
Section 1-Getting Started
Section 2-Placement
2.1 Front Speaker Placement
2.2 Should You “Toe In” Your Speakers
2.3 Center Channel Speaker Placement
2.4 Surround Speaker Placement
2.5 Alternative Speaker Placement Options
•
Shelf Mounting
•
Stand Mounting
•
Wall Mounting
2.6 Your ELT SW-10 Subwoofer Placement
Section 3-Making the Connections
3.1 Connecting Your Speakers
•
1) A Question of Polarity
3.2 Connecting Your SW-10 Subwoofer
Section 4-Features and Functions of Your ELT SW-10 Subwoofer
4.1 Control Panel Features of Your SW-10
4.2 SW-10 Setup
•
Rubber and Spike Feet
•
Phase
•
Frequency
•
Cheater Plug
•
Port Plug
Section 5-Setting Up Your Receiver
5.1 Simple Calibration
•
*What is Reference Level?
5.2 Setting “Small” or “Large”
Section 6-Proper Care and Feeding
6.1
6.2
6.3
6.4
6.5
Speaker Grilles…On or Off?
Some Advice on Speaker Wire
Speaker Break In
Speaker Care
Stay in Touch
Section 7-Specifications and Your ELT-1 Warranty
7.1 AV123 Warranty Policy and Registration
7.2 Specifications
•
ELT LRS Satellite
•
ELT Center
•
ELT SW-10 Subwoofer
Introduction to AV123 and your new
Rocket ELT-1 Home Theater System
At AV123, our absolute highest
priority begins and ends with you,
the customer. You can rest assured that if you’re not 100% satisfied with your purchase within 30
days from your original receipt
date, you may return your product(s) for a
prompt refund in full (excluding shipping
charges) with no explanation necessary. Coupled with the expert advice on our website and
through our trained advisors, there is simply not
a safer way or place to buy today. At AV123,
misleading and high-pressure sales tactics have
no place. Not only do we give you the tools and
the resources to fully evaluate your purchase before your order is placed, we back this up after
the fact by allowing you a full month to audition
our products in your own home before your final
decision is made.
We’ve done our best to provide you with products and services meeting or exceeding your expectations. However as good as our products
are, they do not match our dedication to each
and every sale. Should you need any further assistance in the future with your A/V system, you
can bet that AV123 will be there supporting and
assisting you as you make your way to your next
level of audio/visual enjoyment.
The Onix Rocket ELT-1 (Extremely Luscious
Theater) is a very potent and agile loudspeaker
system. Unlike many all-in-one home theater
systems, your ELT-1 has been specifically designed to offer stellar performance for both music and home theater formats. For this reason,
the placement tips and suggestions in this manual are vital for proper imaging and soundstaging. Features of your new system include a 200watt powered 10” ported subwoofer, dedicated
3-way, 4-driver center channel, extremely rigid,
high excursion 5.25” alloy cone woofers, and an
incredibly smooth and refined hybrid silksuspended aluminum dome tweeter. We hope
you enjoy your new home theater, and thank
you again for your support of AV123!
Section 1-Getting Started
Your new ELT-1 loudspeaker system includes just
about everything to get you up and running in a
few short minutes. However, listed below are a
few things you will need to complete proper installation. Should you have any questions about
those items below or where to find them, feel
free to call our support staff at any time.
• Home theater receiver or preamp/
processor and amplifier.
• An audio source such as a DVD / CD
player.
• Speaker wire – 16 gauge or lower (larger)
• Source Interconnects – A digital coaxial or
fiber optic cable and possibly standard
analog RCA cables depending on your
equipment (if DVD-A or SACD is going to
be used, you will need both digital and
analog connections. See your player’s
manual for more information).
• Subwoofer Connection – RCA is the most
common and preferred connection
method from receiver to subwoofer. You
will need a single mono RCA cable to
make this connection.
Section 2-Placement
To achieve the best performance your ELT system has to offer, there are several tips, suggestions, and guidelines to follow when setting up
your system in its new environment. Details for
the most common placement techniques are
listed below. However, at the end of this section
you will also find more information on placement
alternatives in unique situations.
2.1-Front Speaker Placement
Try to place your main speakers (Left, Center,
and Right) along the same wall of your listening/
viewing room. Although we've seen successful
installations that didn't follow this guideline,
they're generally more problematic in terms of
system response and accurate theater sound reproduction.
Use the "Rule of Thirds" whenever possible as a
starting guide. This suggests that the best placement for your Left speaker is approximately 1/3 of
the way along the wall behind your speakers.
Similarly, the best place for the Right speaker is
usually 2/3 of the way across the same wall. If at
all possible, move the speakers out from the back
wall. Although all rooms are different, we recommend a minimum wall-to-rear-of-speaker distance
of 3 inches. Whatever distance you finally select,
use a tape measure to make sure that each
speaker is placed at the same distance from the
back wall. With that same tape measure, make
sure the speaker-to-listening/viewing position is
the same for each speaker, too. If there's a conflict here (as would happen with an irregular wall
behind the speakers), we suggest that you equalize the distance between front of the speakers and
your favorite listening/viewing position. If that
places one speaker closer to the wall behind it
than the other, don't be too concerned.
In other words, this…
Side walls have a major impact on the sound you
hear. Ideally, you should not place your main
speakers close to them. Remember that the Rule
of Thirds" gives you a good starting position, but
you should feel free to experiment. Ideally, try
not to place your main speakers so they're exactly the same distance from the closest side
walls. A bit of asymmetry here is actually preferable. Symmetrical placement generally results in
larger standing waves in the room that reinforce
certain frequencies and diminish others. This, obviously, is not a good idea. Follow the same
guideline with the Right speaker. When you take
the time to place your speakers properly, you'll
realize better "imaging" (the apparent lateral
placement of individual instruments or voices),
and more depth or "layering". You'll hear those
advantages because you'll be avoiding the aural
confusion caused by so-called "first reflections"
that complicate our perceptions when speakers
are too close to a wall's large, flat, reflecting surface.
2.2 Should you “toe-in” your speakers?
Is generally preferable to this…
Remember that the "Rule of Thirds" is a basic
guideline only. Some acousticians recommend
placing the main (Left and Right) speakers so that
they form an equilateral triangle with the prime
listening/viewing position. This is as close to
ideal. Notice different distances between speakers
and left and right sidewalls. It's worth trying for
this ideal, but don't get overly concerned if your
room doesn't allow this precision.
Some people like to "toe-in" their main speakers
to get better performance. This simply means
aiming both Left and Right speakers so that they
point towards the prime listening/viewing position rather than straight ahead. This is how
many people aim their speakers. "Toe-in" can
improve imaging and add a sense of spaciousness to the sound. In addition to imaging improvements, toe-in can also change your
speaker's tonal balance (or timbre). For that reason, you may want to play with toe-in to get the
most out of your speakers. Some time experimenting here can yield a better match to your
room's acoustic properties, provide a clearer,
more precise center channel speaker, or just better suit your own listening preferences. Enjoy!
2.3 Center Channel Speaker Placement
Place your center-channel speaker between your
Left and Right speakers as close to your TV
screen as possible. Try to keep the tweeters of
all three speakers (Left, Center, and Right)
as close to the same height from the floor as
possible. If the tweeters are at - or very close
to - on-axis with your ear level when you're
seated, you're doing very well indeed (this may
pose a challenge if you're placing a single Center
Channel speaker either above or below the
screen. Try aiming the Center Channel slightly
down or up to compensate). It's a good idea to
place the Center Channel speaker at exactly the
same distance from your listening/viewing
position as the main Left and Right speakers.
This will ensure the sound from all three front
speakers arrives at your ears at the same time.
This will help to create the most convincing image (yes, some surround receivers and
processors have circuitry that can compensate
electronically for different distances but we feel
it's always good to start mechanically rather
than electronically if possible).
2.4 Surround Speaker Placement
Surround speaker placement is a bit more challenging. Ideal placement can either be on the
back or side walls of your listening/viewing room
depending on how the system will be used. Regardless of exactly where they are placed on either wall, make sure to locate them above ear
level. Try not to place furniture between your
speakers and your listening/viewing position.
You have every right to expect a high level of
sound quality from your Rocket ELT Series
speakers. Make sure you can see them when
you're ready to enjoy some music or a movie!
useful as you scout out possible locations.
1. Shelf mounting: Logically, this may be your
first consideration. That's fine if the shelf is
sturdy enough and deep enough to hold your
speakers securely. Remember, a shelf that is up
against a wall should be at least 2" deeper than
the speaker itself to allow for cable connections
and port “breathing” room. So, since your ELT
speaker is 7.5" deep, you will need to allow a
minimum 9.5" of shelf space. Note that the
Rocket Series speakers are bass reflex enclosures with a port on the rear panel. Because the
port is very important for proper bass reproduction, please do not block it. In fact, if you're
shelf-mounting your speakers, try to leave at
least 3" to 6" of open space behind the rear
panel. Note: these instructions are for open
shelves. Mounting your speakers on "enclosed
shelves" as would be found in an entertainment
center or built-in cabinets can affect bass response substantially.
For shelf mounting, use the adhesive rubber feet
provided or a moldable, reusable adhesive such
as BluTack or other "earthquake wax." If you
elect to use the rubber feet, simply peel them
from the protective sheet and apply them close
to the corners of the speaker bottom. Be sure
the shelf itself is firmly in place and there are no
loose items on the shelf to rattle or buzz while
the speaker is playing. Again, BluTack or similar
is great for securing and dampening your speakers.
2. Stand mounting: If you're placing your
Rocket Series bookshelf speakers on stands, you
have several options:
•
•
2.5 Alternative Speaker Placement Options
We realize that the real world (family opinions,
room traffic patterns, etc.) will have more impact on where you place your Rocket ELT Series
speakers than any academic discussion of a
room's acoustical properties. That being said,
following are some guidelines you might find
•
a. You can use the rubber feet on a
speaker stand, but this may be risky if
there is a chance the speaker or stand
may be bumped and the speaker
knocked off.
b. You can use a material like BluTack to
keep your speakers firmly (but not permanently) attached to the stands. If you
can't find BluTack, just ask your
neighborhood hardware store for the generic equivalent or some "earthquake
wax."
c. We do not recommend the use of
double sided foam tape or other strong
adhesives to secure your speakers to a
stand, as they will damage the furniture
grade finish if and when removed.
No matter how you mount your speakers to the
stands, make sure you follow the instructions
supplied with the stands and try to keep standmounted speakers out of the major traffic paths
in your room just as you would with floorstanding speakers.
3. Wall mounting: Although proper wall mounting usually requires more effort than shelf or
stand mounting, it is often the most practical
since it positions the speaker safely out of room
traffic patterns.
We like Vogel (www.vogelsusa.com), Haropa
(www.haropa.com) and OmniMount (www.
omnimount.com) mounting brackets, although
there are others that will work well. When you
shop for brackets you'll find different models
which allow you to mount to a wall, ceiling, or
cabinet top, allowing for a great deal of flexibility.
A word of caution: Make sure that the brackets
you select are strong enough to hold your speakers securely. Pay attention to the bracket manufacturer's recommended weight limit. In fact, we
recommend adding a little "fudge factor" for
safety's sake. If your speaker weighs 25 pounds,
for example, look for a bracket rated for 30
pounds or more. Follow the bracket manufacturer's instructions carefully as you attach it to
the wall. Make sure it is firmly and securely
mounted. You should mount into the studs in the
wall themselves as a first option. If this is not
possible, a 50 lb dry wall anchor will also be suitable. Extra effort here is well worth it. An inadvertent fall will damage your speaker as well as
anything under it! If you're in doubt about how
best to do this, please call a qualified carpenter
or contractor to help. Note: If you're considering
brackets, we can help! Just call your AV123.com
representative and let him or her know what you
need.
2.6 Your ELT SW-10 Subwoofer Placement
Unlike most all-in-one home theater systems,
your ELT-1 includes a true 200W powered 10”
subwoofer for wall-rattling bass. Because subwoofers play a frequency range few other speakers can handle, setup, configuration, and placement for this speaker is different from that we’ve
just finished explaining.
Unlike regular loudspeakers, subwoofers work
very well when placed in a corner - even if a few
feet to the side and/or behind the closest main
speaker. Try your front right or left corner first.
The driver can be facing you or be pointed along
either wall. The lower frequency sound waves
emitted by the SW-10 are quite long and will
therefore interact greatly with the walls of your
room, so consequentially even small placement
adjustments can make noticeable alterations to
the sound you hear. A room corner will provide
maximum output for a given power level.
Low frequencies tend to be non-directional so if
your subwoofer is placed and calibrated well, you
should not be able to easily localize it. Factors
that can affect performance in this regard are
rattles from walls or nearby objects, or distorted
output. If you are having issues with being able
to locate where the bass is coming from, try to
isolate rattling or buzzing objects if any, or try
the other corner in your room. If the sub's output is distorted, check to see that you are not at
the maximum sub level setting on your receiver.
This can induce audible distortion, so you may
need to turn down the subwoofer level on your
processor and turn the level up on the subwoofer
to compensate. Note: Subwoofer placement in
the back of the room can provide good results,
but we find the most natural sound in most
rooms is obtained with placement in front of the
listeners.
...One last note.
Although the advice in this section will certainly
help you enjoy the best possible sound from
your Rocket ELT Series speakers, you might
want an even fuller exploration of how rooms
and speakers interact. If you do, we suggest beginning with F. Alton Everest's The Master Handbook of Acoustics (McGraw-Hill). Currently in its
fourth edition, this is THE source for anyone who
wants to understand more about this fascinating
topic.
Section 3-Making the Connections
Now that you've got your speaker placed properly, it's time to connect them. Before you begin
connecting your speakers, turn your system
components OFF. That way, you won't run any
chance of "shorting" your amplifier and possibly
damaging it as you're hooking up your speakers.
And remember to turn your system back on...
then you're done! No, we're not being funny
here. You'd be amazed how many people forget
that little step!
3.1 Connecting Your Speakers
All Rocket ELT Series speakers feature a single
pair of heavy-duty binding posts for connecting
the speaker cable from your amplifier, each composed of a red binding post (positive or "+") and
a black binding post (negative or "-"). Each terminal is a "four way" binding post that will accept
bare wire, or wire terminated with pins, spade
lugs, or single banana plugs. ELT binding posts
do not accept "dual bananas," a concession to
the safety standards in force for our European
customers.
If you choose bare wire, pins, or spade lugs, simply unscrew the terminal's end cap (the piece
with the red or white stripe on it) to expose the
hole in the center of the shaft. If you're using
bare wire connections, make sure you've
properly prepared the wire first. Expose about
3/8" of each conductor by stripping the insulation
with a wire stripper or sharp knife. (BE CAREFUL,
please!) Make sure you twist all the individual
strands of each conductor together before you
insert the end into the hole in the shaft. Then
tighten the end cap down over the wire so that
there's a firm connection.
For pin and spade lug connections, follow the
same general guidelines. If you're attaching pins
or spade lugs to your speaker cables, read the
instructions supplied with the termination you've
chosen. Make sure that you don't leave any loose
strands of wire exposed as you're attaching the
pins or lugs. If you're using pre-terminated
wires, the manufacturer has already taken care
of this potential problem for you. With a pin termination, unscrew the end piece, insert the pin
through the shaft hole, and tighten carefully. If
you're using large spade lugs, unscrew the cap
and place the lug so that it straddles the entire
shaft. If you're using a smaller lug, you'll probably have to insert one leg through the shaft hole.
In either case, tighten carefully and you're done.
With banana connectors, you don't have to unscrew the connector's end cap. Simply insert the
banana plug into the hole on the end cap's rear
surface.
A Question of Polarity
If you're like most of us, you'll simply run
speaker wire from the appropriate output of your
receiver to the connectors on each speaker.
However, you need to observe the proper polarity as you connect your components. This simply
means that you should connect the positive terminal on your receiver or amplifier (may be
marked "+" or be colored red) to the positive
terminal (red) on your Rocket ELT Series
speaker. Then connect the negative terminal on
the amplifier ("-" or black) to your speaker's
negative (black) terminal. Don't worry about
damaging anything if you inadvertently make a
mistake here. Sound quality will suffer but you
won't ruin anything. We'll explain this further in
below.
If you're still concerned about the procedure,
here are step-by-step instructions for connecting
the Left front output from your receiver or amplifier to the Left front speaker.
1. Locate the Left front speaker output on
the receiver or amplifier. Note that there
are two connectors - one marked "+" (the
positive terminal - usually red in color)
and one marked "-" (the negative terminal—usually black).
2. Look at your speaker wire. You'll see that
it has two different conductors. If the insulation is clear, the conductors themselves
may be of different colors - silver and cop-
3.
4.
5.
6.
7.
per are the most common. If you can't see
the conductors themselves, look closely at
the insulation. You'll notice that the insulation over one conductor is different than
that over the other conductor - one will
have slight molded ridges in it, the other
will be smooth, for example. Choose one
of the conductors to carry the "+" signal.
It really makes no difference which one
you pick. Just be consistent! Note: Some
specialized speaker cables are already
marked to avoid confusion but if you're using common "zip cord" (lamp wire), we
suggest that you designate the copper colored conductor or the one with the molded
insulation over it as "+". As we've already
said, consistency is far more important
than which conductor you choose.
Connect the "+" conductor to the "+" terminal on the amplifier.
Connect the "-" conductor to the "-" terminal on the amplifier.
At the speaker end of the same wire, connect the "+" conductor to the "+" terminal
on the speaker.
Similarly, connect the "-" conductor to the
"-" speaker terminal.
Follow steps 1 through 6 for all other amplifier - speaker connections in your system.
Why are we placing as much emphasis on consistency here? That's simple. We want you to get
all the performance you pay for. When your amplifier-to-speaker connections are consistent,
when "+" is always connected to "+" and "-" is
always connected to "-," your speakers are said
to be connected "in phase." That means the drivers (the active elements that produce sound) in
each speaker will push out when they get a common positive signal from an amplifier and will
pull in when they get a negative signal. When all
the speakers in your system are "in phase," all
the cones work together to give you the sound
the original artists and engineers intended you to
hear.
When speakers are connected "out of phase," the
drivers fight each other - some move out while
others move in. The result? You'll get less bass
and blurred imaging. That's a pretty heavy price
to pay for not taking just a few extra seconds to
make sure your connections are correct.
Don’t Over Tighten!
Be careful when tightening the connector's end
caps. Although logic may seem to indicate that
compressing the wire as much as possible will
result in better signal transfer from amplifier to
speaker, it doesn't. A firm mechanical connection is obviously better than a loose one. But
don't go overboard. If a gentle tug on the
speaker wire causes it to move inside the post,
you probably need to tighten things up just a
bit. But don't think you need a connection tight
enough to let you swing the speaker by the
wires! In fact, you can strip some connectors by
over-tightening them. We've designed Rocket
Series connectors to minimize this concern but
we still caution against over-tightening.
3.2 Connecting your SW-10 Subwoofer
Because your subwoofer is a self-powered
speaker, that runs off the built-in 200W amplifier (as opposed to your A/V receiver’s internal
amplifiers), it requires a different connection
from your speakers.
Make sure the subwoofer is not plugged in and
the rest of your system is turned off before proceeding.
When making your connections, be sure to use a
high quality and reliable Mono RCA interconnect
cable. It should be well shielded and long
enough to do the job, but not excessively long—
though it is likely to be the longest interconnect
in your system. The simplest and recommended
connection is from the sub/LFE output on the
back panel of your receiver directly to either L or
R RCA input on the SW-10.
Section 4-Features and Functions of
Your ELT SW-10 Subwoofer
Your ELT-1 system includes an incredible 10”
front ported 200W subwoofer for thundering bass
response. This sub has several features you
won’t find in other subwoofers at even 2-3 times
the price. These features, and their use is explained in the section below.
4.2 SW-10 Setup
Though relatively “plug and play” the following
information will help you configure your ELT SW10 properly in your new home theater environment.
Rubber and Spiked Feet
4.1 Control Panel Features of Your SW-10
(see figure on next page)
1. Power switch
2. AC Voltage – Use only when traveling to
a country that uses a different voltage than
standard.
3. Power Cord – A standard IEC socket allows removal of the power cord.
4. Phase – This controls the phase of your
subwoofer relative to the rest of your speakers. Rotate this dial in small amounts while
you listen at your listening position to achieve
the best in-room response.
5. Frequency Adjustment – This controls
the high-frequency cut off. Generally this is
set to 80 Hz if used. We will cover this in
detail later in the manual.
6. Level – This control allows you to match
the output of your main/satellite speakers to
the sub. Set this to the lowest level when
you power your system for the first time,
then try setting the gain at 1/4 of max to begin calibrating your system. It’s good to
have some room for adjustment, so try to
keep from having either the subwoofer's gain
or the subwoofer level in your receiver or
pre/pro up near it's maximum level. This will
also minimize the potential for a distorted input signal.
7. Audio Inputs (RCA) – Use standard RCA
type cables. If your receiver has only one
sub out, use either L or R. Both do not have
to be used but a Y-cable can be used to gain
an additional 3 db of output.. If your receiver
has two sub outs, it is OK to use both.
8. Audio Outputs (RCA) – If your receiver
has no sub out, a ‘tape loop’ can be used if
present. You can also connect a pair of powered speakers.
9. Speaker Input – This is only used if you
have no sub out but have an extra set of
speaker terminals.
Attach the rubber bumpers included with
your subwoofer to keep from marring any
hard surfaces. Thread the screw through the
large hole in the base of the rubber foot and
attach via the pre-drilled holes in the bottom
of your SW-10. Please be careful to not over
tighten.
If used on carpet, we’ve also included audiophile quality brass spike feet. Simply screw
them into the threaded inserts on the bottom
of your SW-10. If your floor is not level, adjust the spikes accordingly to level the sub.
Note: You may notice a bolt sticking out
from the bottom of the sub – this is to hold
the SW-10’s extremely large power transformer in place within the sub and should be
there.
Phase
The phase dial controls the relative phase of
the subwoofer to best reinforce the other
loudspeakers in your system. With SPL meter in hand or better yet on a tripod, play an
80 Hz tone (or wherever your cross your
mains to the sub) and slowly rotate the
phase control starting from "0". When you
here the loudest response, you’ve found your
optimum setting. This indicates the least
possible amount of cancellation between
your mains and subwoofer.
Frequency
As shown in the figure above (please see
item # 5) your SW-10 subwoofer includes a
continuously variable crossover adjustment
built directly into the amplifier. This lowpass filter will allow you to limit the frequencies at which the subwoofer will produce an
audible response. The number selected with
this dial is the highest the subwoofer will
play. Thus, for example, if set to 80 Hz your
subwoofer will play ONLY 80 Hz information
and below, regardless of what it is receiving.
If used with a home theater processor or receiver, we recommend bypassing the SW10’s crossover (set to its maximum 150 Hz
value) and using the electronic crossover
built into your components.
Cheater Plug
A three-prong to two-prong adapter also
known as a cheater plug is included with the
SW-10. Try plugging in your subwoofer without this adapter first. If your subwoofer
buzzes or hums while NOT receiving a signal,
then try the cheater plug. This hum is
caused by a ground loop. The cheater plug
will lift this ground and eliminate the interference. Note: Do not utilize the small metal
tab on the adapter, as this will effectively
ground the system.
Port Plug
Generally speaking, porting a subwoofer will
allow the speaker to play louder and lower,
with a smaller cabinet volume. Sealing this
port with the included foam plug will tighten
up the sub and make it more accurate, tuneful, and refined, though at the sacrifice of total output and extension. If your sub sounds
overly boomy or undefined in your listening
area, we recommend the use of this plug on
both music and home theater listening.
Section 5-Setting Up Your Receiver
Though much of this information may also be
found in you’re receiver manual, the guidelines
below are specifically for your receiver to ELT-1
speaker connections, and should be followed for
best performance.
5.1 Simple Calibration
First you'll need an SPL meter. Radio Shack sells
an analog meter that works very well for this
purpose.
Set the meter on ‘slow’ and
“C” weighting. The dial
should be set at either 70 or
80 depending on your pre/pro
or receiver’s test tone level.
Consult your owner’s manual
to determine what reference
point your unit uses (most
use 75, so the 70 setting on
the meter would be appropriate).
Let's start by setting the level
of your sub to match the rest of your speakers.
From the receiver’s speaker calibration menu, set
the subwoofer level to 0 dB. Start with the gain
on the subwoofer at about 1/4 max.
In the speaker configuration menu (as a part of
the set-up on your HT receiver), be sure all your
speakers are set to “small” with subwoofer to
"yes". The crossover should be set to 80 Hz or
100 Hz. Experiment with what you prefer. Typically, higher crossover settings are used for systems in extremely large rooms or with very demanding low-end material.
Set the volume control on your receiver to the
"00 dB" level. See the note below if your unit
uses a positive number scale for volume instead
of a minus-to-plus scale.
Ensure that all main, center, and rear channels
are calibrated to the reference point using your
test tones, then direct the tone to the subwoofer.
Adjust its level using the gain control on the subwoofer itself until it reaches the SPL level used
for the other speakers. An assistant will be very
helpful for this process. Some like to run their
sub “hot” for movies by increasing the sub level
by 5 dB or so above the main channel level. This
can be very effective at lower listening levels,
but be sure to use care when watching that big
action movie for the first time! Especially at or
near reference levels. Once the subwoofer is
calibrated, small adjustments can be made easily
using the subwoofer level control in your processor/receiver. If you find the need to go much
above +2 or +3 consistently, we recommend adjusting the gain control on the sub upward instead and using a lower number for reference
level* on the processor.
Note: If your unit does not use a minus/plus
volume scale, activate the test tones and increase the volume of your pre/pro or receiver
until it reaches 75 or 85 dB on your SPL meter.
Remember this number as this will be “reference
level”*. Remember to check with your unit’s
manual to determine if they use a 75 or 85 dB
test tone.
*What is “Reference Level?”
Reference level allows for peaks of 105 dB from
the speakers and 115 dB for the LFE (low frequency effects) channel. When calibrated as
above, the correct relative volume of each
speaker is as the director/sound engineer of the
film intended.
5.2 Setting “Small” or “Large”
Like many things audio related, this is somewhat
subjective, but it’s also a function of your room.
By a good majority, most rooms will obtain their
best sound with all speakers set to "small" with
the receiver’s internal crossover setting engaged
at 80 Hz. This is assuming a high performance
subwoofer, as a good sub ideally placed will handle sub-80 Hz information better than "most"
loudspeakers in "most" rooms. This is mainly
due to the tendency for competing sources of information below 80 Hz that result in destructive
bass wave cancellation, thus effectively eliminating the amount of total information you hear at
the listening position. However, in addition to
the greater overall output, an 80 Hz crossover
setting will allow your other loudspeakers to play
with greater ease and less distortion— free from
the demands of deep and complex sub-80 Hz
waveform reproduction. Your speaker system
amplifier will see some benefit as well, since
much of the stress of producing deep bass will
be eliminated, and handled solely by the integrated 200W amplifier featured in your SW-10
subwoofer. Consequentially, your front loudspeakers will sound cleaner and more controlled.
The easiest way to test different methods and
frequencies for crossing over your subwoofer is
by using bass sweeps from the "AVIA Guide To
Home Theater" DVD. Specifically, the tones that
descend in frequency from the individual satellite
speakers to the subwoofer are quite useful and
effective. Using your SPL meter, watch for the
smallest amount of overall needle fluctuation
while you direct and descend the tones from
speaker to subwoofer going around your system.
6.3 Speaker Break In
Your system should now be fully set up, and configured for optimum performance in your room.
We hope this information has been straightforward and easy to follow. However, should you
have any further questions or concerns that have
not been addressed in this guide, please feel free
to contact our support team at any time. You
may either call us at 877-543-7500 or simply email us at [email protected].
Many audiophiles believe a component's sound
quality improves with use. With speakers in particular, this belief has basis in fact. With Rocket
ELT Series speakers, you'll notice an improvement in timbre, responsiveness, and sheer musicality during the first few weeks you use them.
That's because, like all electro-mechanical devices, the drivers, especially the suspension elements that keep everything properly centered as
they move in and out to produce sound, "settle
in" with use. How long should you wait until
your Rocket ELT Series speakers are ready to
sing? That depends on the kind of music or
movie soundtracks you play and the volume you
feel comfortable with. If you regularly listen to
AM radio at low volume, give your products
about 100 hours to get comfortable. If, on the
other hand, you favor orchestral music at levels
you'd experience at Carnegie Hall, you won't
need that kind of patience.
6.1 Speaker Grilles...On or Off?
6.4 Speaker Care
The grille assemblies for all Rocket speakers
have been custom-designed to have negligible
effect on performance while affording some protection from inadvertent indiscretions of wayward children or adults with an uncontrollable
urge to poke at your drivers, curious pets, and
some low-level environmental hazards (such as
dust). While Rockets sound good and look good
with the grilles on, you may prefer listening to
and looking at your speakers with the grilles removed. Go right ahead. There is certainly no
performance penalty in doing so.
Your Rocket ELT Series speakers don't need
much maintenance. Dust them occasionally.
The durable matte finish on the wood veneer requires only some dusting or it can be wiped off
with a water-damp, soft cloth. Please do not try
to push in the drivers with an aggressive finger!
In fact, the tweeters are somewhat fragile so
they should not be touched. Above all, listen and
enjoy! That's what your Rocket ELT Series speakers were designed for. And why AV123 takes
such pride in bringing them to you!
Section 6-Proper Care and Feeding
6.2 Some Advice on Speaker Wire
Your Onix ELT Rocket Series speakers are already wired internally with high quality Onix cable. That's one of the reason they sound as good
as they do. Why not extend that performance
advantage even further by using Onix speaker
cable between your amplifier and your new
speakers? You'll find several types of Onix
speaker cable on the AV123 web site. We'll be
glad to advise you on the best match for your
system. And, as a new Onix Rocket Series
speaker owner, you're entitled to courtesy pricing on your cable choice. Just call us. If you're
satisfied with regular "zip cord" (the typical lamp
wire you'll find in hardware stores), please use
16 gauge wire if your amplifier-to-speaker runs
are under 50 feet. For longer runs, we strongly
suggest 14 gauge.
6.5 Stay in Touch!
Remember that personalized tech support is only
a phone call away. Call USA toll-free (877) 5437500, or worldwide (303) 543-7500. Whether
you need our help, or you have some suggestions to make Rockets even better, or you simply
want to let us know how much you are enjoying
your new speakers, we encourage you to get in
touch with us. We like hearing from our customers. For the latest information on the entire
Rocket line or to register your new speakers,
please visit us online at www.av123.com.
Section 7-Specifications and Your
ELT-1 Warranty
7.1 AV123 Warranty Policy and Registration
All products sold through AV123 carry a limited
manufacturer's parts and labor warranty. All
Rocket Series loudspeakers are guaranteed to be
free from manufacturer's defects for a period of
one year from the date of purchase.
Get an extra two years of warranty coverage
free!
When you go online and register your product,
we will extend the warranty by an additional two
years - that's three years total.* This extended
warranty is free simply for registering within 60
days of your purchase. We urge you to take advantage of this offer. Warranties apply to the
original owner only and are non-transferable.
AV123 will exchange all defective merchandise,
including shipping charges to the original shipment destination, at no charge for up to 60 days
after the date of purchase. After 60 days the
product must be returned to AV123 for repair
only and return shipping costs are the responsibility of the customer. All questions should be directed to customer service.
*All electronics are guaranteed for 2 years. This
includes the SW-10 amplifier in the ELT System.
ELT Center
System: 3-Way, 4-Driver, rear-ported enclosure.
Drivers: custom 5.25" long-throw aluminum cone woofers, custom 2.5” paper composite midrange, hybrid silk-suspended alloy
dome tweeter.
Frequency Response: 60 Hz to 20 KHz (±
3 dB)
Impedance: 6 Ohms nominal.
Efficiency: 87 dB (@ 1 watt / 1 meter)
Power Rating: 25-150 Watts
Dimensions: 7.75" H x 6.75" D x 20” W
Weight: 20 lbs. each
Finish: Russian Baltic Birch with custom
Cherry stain
ELT SW-10 Subwoofer
System: 200W Powered 10” long-throw
woofer, front-ported enclosure.
Drivers: Custom 10” paper-composite longthrow driver
Crossover Point: 40 Hz – 140 Hz
Frequency Response: 28 Hz to 150 KHz
(± 3 dB)
Power Rating: 200 Watts
Dimensions: 19” H x 11.75” D x 14.25” W
Weight: 50 lbs.
Finish: Russian Baltic Birch with custom
Cherry stain
7.2 Specifications
ELT LRS Satellite
System: LRS Satellites - 2-Way, 2-Driver,
rear-ported enclosure.
Drivers: custom 5.25" long-throw aluminum
cone woofers, hybrid silk-suspended alloy
dome tweeter
Crossover Point: 3.8 kHz
Frequency Response: 65 Hz to 20 KHz (± 3
dB)
Impedance: 8 Ohms nominal
Efficiency: 89 dB (@ 1 watt / 1 meter)
Power Rating: 25-150 Watts power handling
Dimensions: 11.5" H x 6.75" D x 7.5” W
Weight: 12 lbs each; ship weight = 25 lbs.
Finish: Russian Baltic Birch with custom
Cherry stain
Thank you for supporting AV123!