1
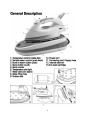
WARRANTY AND INSTRUCTIONS MODEL NO: STI 01E SALTON ELITE STEAM STATION IRON Thank you for purchasing the SALTON Elite Steam Station Iron. All SALTON appliances are manufactured with the strictest standards to ensure your satisfaction. Please read this instruction manual carefully and familiarize yourself with your new steam station iron, before using it for the first time. Retain the manual for future reference and if you pass the iron on, please pass on the instructions too. IMPORTANT SAFEGUARDS When using electrical appliances, basic safety precautions should always be followed, including the following: 1. Please read all instructions carefully before using the appliance for the first time. 2. Before connecting the appliance. Check if the voltage indicated on the rating plate corresponds with the mains voltage in your home. 3. Keep out of reach of children. This appliance is not intended for being used by young children or infirm persons without supervision. Young children should be supervised to ensure that they do not play with the appliance. 4. VERY IMPORTANT: To protect against the risk of electric shock, do not immerse appliance, plug or cord set in water or other liquids. Do not use near washbasins or sinks. Ensure that the appliance does not get wet (water splashes etc.) and do not use it with wet hands. 5. Use caution when using this iron. Do not touch hot surfaces as burns can occur from touching hot metal parts. Use the handle of the iron. 6. 7. When you have finished ironing or when you only leave it for a short while: Turn the Steam Button to position “ Stand the iron on its station ensuring it is correctly in place. Disconnect the iron from the wall outlet. “. Do not use the iron when it is damaged in any way. Do not operate the iron with a damaged cord or plug. Do not replace the power cord or any other parts by yourself. Take the iron to the nearest authorized service facility or to the shop where you bought it, as special tools are required for repair. 8. This appliance is intended for Household Use Only. Do not use appliance for anything other than its intended purpose since this will result in the warranty being null and void. 9. Do not place the iron near or on a hot gas or electrical burner or in a heated oven. 10. Please use only genuine attachments supplied by an authorized Service-Dealer or the supplier. 11. Do not pull on the cord to disconnect from the power outlet. Always grasp the plug firmly and pull to disconnect. 12. Disconnect the iron from the water outlet for filling in water or when you remove the water after use. Empty the station after use. Do not store with water still in the tank. 13. The plug and cord should not be allowed to touch the hot soleplate. Let the iron cool down 2 completely before packing it away. 14. Do not put vinegar or any other de-scaling agents into the water tank. 15. Do not used chemically de-scaled water in the water tank. 16. Never use an extension power cord that is not approved by an authorized and competent authority. Please check that the cord is correctly wired and rated for its use. 17. The iron is for household use only. If appliance is to be used by a third party, please supply the instruction manual with it. 18. No liability can be accepted for any damage caused by non-compliance with these instructions or any other improper use or mishandling. NOTE: Some parts of the iron have been slightly greased and as a result the iron may smoke slightly when switched on for the first time. Remove any protective films or stickers from the soleplate and the cabinet. Clean the sole plate with a soft cloth. When using the iron for the first time, test it on an old piece of fabric to ensure that the soleplate and water tank are completely clean. HINTS BEFORE USE 1. Remove all the packaging material and protective labels from the soleplate and clean the iron’s soleplate surface and vents as well as the water tank to remove manufacturing dust. 2. Unwind the mains leads and straighten them out. 3. Fill the water tank with water (preferably distilled) to its maximum/1 litre, set the iron on its station and plug in the mains. 4. Turn the temperature setting to maximum; the power light will go off when the set temperature is reached. 5. Set steam to maximum and push the steam button in. Steam will start after about 2 minutes. Iron an old cloth for about one or two minutes. The iron is now operational and ready for general use. 3 4 CHOICE OF WATER 1. This iron can be used with normal tap water. 2. If the water in your area is particularly hard, it is advisable to use distilled or de-mineralized water. 3. Do not use chemically de-scaled water or any other liquids for refilling. FILLING THE WATER TANK (for steam ironing and spray function) 1. Unplug the iron from the wall outlet. 2. Turn the Steam Button to the “ “ position, and Temperature Control Dial to the MIN position. 3. Fill the water tank to its maximum level as indicated on the side (i.e. 1 litre). Important: Remove the water after use. Do not store the iron with water still in the water tank. SELECTING THE CORRECT TEMPERATURE 1. Before setting the temperature, read the care instructions on the garment. If there are no hints for care of the garment, then the table below may assist you. 2. If the fabric consists of a combination of fibre types, you must always select the lowest ironing temperature for a particular fibre type in the garment. TIP: The iron heats up quicker than it cools down, therefore start by ironing articles requiring the lowest temperature first such as those made of synthetic fibres. Temperature Setting Kind of Textile Label Better Ironing-methods Dry ironing on the back and ● pad of garment. Do not spray Synthetic water directly, or water marks/ spots will appear. ● Dry ironing on the back of Silk garment Dry ironing on the back of ●● Nylon garment, ironing collar, sleeves, pocket ●●● Wool Do not use dry ironing. ●●● Cotton Steam Ironing and Spraying ●●● Linen NOTE according to thick-thin and fold crease of garment. The table is valid for materials only and is not applicable when there is an applied finish, gloss etc. In these instances, please use the lowest temperature setting. 5 3. If it is not clear what type of fabric the article is made from, find an area on the garment which is invisible when the item is worn. Select an ironing temperature that you feel will be suitable and iron this area first. Always start at a low temperature. 4. Pure woolen fabrics (100% wool) may be pressed with the iron set to a steam position. Preferably set the steam control to maximum and use a dry pressing cloth. 5. When steam ironing woollen garments, shining of the fabric may occur. This can be prevented by turning the garment inside out and ironing the reverse side. 6. Velvet and other textures which rapidly acquire shiny spots should be ironed in one direction only (with the nap) applying light pressure. 7. Always keep an iron moving over a garment to prevent burning of the fabric. 8. Iron the reverse side of synthetic materials and silk to prevent shiny spots. 9. Do not use the spray function on synthetics and silks in order to prevent water marks forming on these fabrics. SETTING THE TEMPERATURE 1. Insert the plug into the wall socket and stand the iron on the station. 2. Turn the temperature control dial to the correct temperature according to the Fabric Type being ironed (see table under “Selecting the Correct Temperature”). 3. The pilot light will turn off when the correct temperature has been reached. 4. The pilot light will switch on and off from time to time indicating that the selected temperature is being maintained. STEAM IRONING 1. Fill the iron as described above, plug in and switch on. Always ensure that there is sufficient water in the tank when steam ironing. 2. Turn the temperature control dial to the desired temperature allowing approximately 2 min for the iron to reach the set temperature. The indicator light will cycle on and off as the temperature is maintained. Steam will commence as soon as the set temperature is reached. 3. Push the steam control trigger (refer General Description (2)) for one minute to refill the iron from the water tank. NOTE: Just prior to the water tank becoming completely empty, a burst of steam is usually released and some minor splattering. This is a normal phenomenon and is related to the electrical pump. 6 BURST OF STEAM IRONING 1. By pushing the burst of steam button, a powerful “shot” of steam is released from the soleplate. This can be very useful for removing stubborn creases. 2. The “Burst-Of-Steam” function can only be used when ironing at high temperatures (i.e. positions ranging from “● ●” to “● ● ●”) and at an interval of 5 seconds. VERTICAL STEAM IRONING “Burst-Of-Steam” can also be applied when holding the iron in a vertical position, which is useful for removing creases from hanging clothes or curtains etc. This function can be used only at higher ironing temperatures and at an interval of 5 seconds. Important: This iron is not suitable for continuous vertical steaming although burst of steam can be used regularly. 1. Fill water into the iron as described above to the maximum mark. 2. Stand the iron on its station. 3. Connect the iron to a suitable mains supply outlet. 4. Turn the temperature control dial to the MAX setting and allow the iron time to heat up to the set temperature. 5. The pilot light will turn off when the required temperature is reached. The iron is ready for use. 6. Press the Bursting button once. 7. Steam will penetrate into the garment removing wrinkles. 8. Wait a few seconds before pressing the Bursting Button again. Usually 3 bursts of steam will be sufficient to remove stubborn wrinkles. NOTE: With conventional steam ironing, water may leak from the soleplate if a too low temperature has been selected. If this happens, turn the temperature control dial to the advised position; steaming will recommence as soon as the appropriate, temperature has been reached. DRY IRONING 1. Turn the temperature control dial to MIN position and insert the power cord into the wall socket. 2. According to the Temperature Control Settings and Garment Care Instructions, turn the temperature control dial to the correct temperature. When the pilot light turns off, the required temperature is reached. The iron is ready for use. 3. Do not use the Steam Trigger Button during dry ironing. 4. After ironing, please turn the Temperature Control Dial to the MIN position. Pull out the plug, stand the iron on the station, and wait until the soleplate has cooled down completely before packing away for storage. 7 SPRAY FUNCTION This function can be used any time and it is not affected by the ironing temperature. An electrical pump in the ironing station supplies the small internal reservoir with water for spraying. 1. When the internal reservoir is empty, after intensive spraying, push the steam trigger (refer General Description (2)) for about 1 minute to refill. Note: Refilling is complete when you see/hear steam being released from the steam vents on the soleplate. 2. Filling and refilling the internal reservoir must be executed at a temperature setting between “● ●” to max. It is not possible to refill the reservoir at a temperature setting below “● ●”. CLEANING & MAINTENANCE 1. After using, first unplug the unit and allow it to cool down before cleaning. 2. Empty out the remaining water from the station/tank. Hold the soleplate away from you while doing this incase it is still hot. 3. Wipe the soleplate with a soft wet cloth and keep it level and smooth avoiding metal-friction. 4. Scrub incrustation off the spraying nozzle with a toothpick. 5. Wash the inside of the water tank frequently. First fill with water, and then sway it from side to side finally pouring out the water through the water opening. 6. Don’t use strong acid or alkali products on the iron as this may damage the frame and produce a colour change to the body of the unit. 7. Do not use harsh abrasive cleaners or solvents when cleaning the iron. 8. Pour out water in the water tank completely after using every time. ANTI-CALCIFICATION CARTRIDGE 1. At the back of the base is a replaceable cassette which purifies the water in the tank before entering the internal reservoir. 2. Depending on the number of times the iron is used as well as the hardness of the water in your region, this cassette should last for 6 months, at 2hrs per week with soft water, or 2 months, at 4hrs per week with hard water. CHANGING THE CASSETTE 1. Purchase the replacement cassette from an authorized service dept. 2. Remove the empty cassette from the base of the iron. 3. Empty the water from the water tank and the cassette housing. 4. Place the new cassette into the housing. 5. Fill the water tank with water. 6. Cover the water filling hole. 8 7. Push the Steam Trigger (refer General Description (2)) for about 1 minute. The new cassette should not be filled with water. 8. Ironing can be resumed. IF THE PLUG NEEDS CHANGING 1. Connect the Green/Yellow wire (Earth) to the terminal marked E 2. Connect the Blue wire (Neutral) to the terminal marked N. 3. Connect the Brown wire (Live) to the terminal marked L. 4. Fasten the grip cord securely. Note: If in doubt, please consult a qualified electrician. WARNING: THIS APPLIANCE MUST BE EARTHED Ensure that the voltage marked on the appliance corresponds with the supply voltage. AFTER SALES SERVICE This appliance is not user serviceable. If it is not working properly check the following: 1. You have followed the instructions correctly and carefully. 2. The plug fuse hasn’t blown. 3. The mains supply fuse/circuit breaker hasn’t blown/tripped. 4. If the appliance still doesn’t function, please consult your retailer. If the retailer is unable to resolve the problem and you need to return the unit to the distributor, please proceed as follows: Repack carefully into its original packaging. Enclose your contact details (Name, address, contact telephone number). Enclose an explanation of the problem you are experiencing with the appliance. If the appliance is still under guarantee, state where and when it was purchased and include 9 your proof of purchase (e.g. till receipt). Return to the retailer where it was purchased, who will ensure that it is sent in to our service department. An estimate for the inspection/repairs will be sent to you should the unit be outside of the warranty. Spare parts can be obtained from our Spares Division. Please contact the Customer Service Department on 011 490 9000 for a quote or further information. 10 PLEASE AFFIX YOUR PROOF OF PURCHASE/RECEIPT HERE IN THE EVENT OF A CLAIM UNDER WARRANTY THIS RECEIPT MUST BE PRODUCED. WARRANTY 1. Tedelex Trading (Pty) Limited (“Tedelex”) warrants to the original purchaser of this product (“the customer”) that this product will be free of defects in quality and workmanship which under normal personal, family or household use and purpose may manifest within a period of 1 (one) year from the date of purchase (“warranty period”). 2. Where the customer has purchased a product and it breaks, is defective or does not work properly for the intended purpose, the customer must notify the supplier from whom the customer bought the product (“the supplier”) thereof within the warranty period. Any claim in terms of this warranty must be supported by a proof of purchase. If proof of purchase is not available, then repair, and/or service charges may be payable by the customer to the supplier. 3. The faulty product must be taken to the supplier's service centre to exercise the warranty. 4. The supplier will refund, repair or exchange the product in terms of this warranty subject to legislative requirements. This warranty shall be valid only where the customer has not broken the product himself, or used the product for something that it is not supposed to be used for. The warranty does not include and will not be construed to cover products damaged as a result of disaster, misuse, tamper, abuse or any unauthorised modification or repair of the product. 5. This warranty will extend only to the product provided at the date of the purchase and not to any expendables attached or installed by the customer. 6. If the customer requests that the supplier repairs the product and the product breaks or fails to work properly within 3 (three) months of the repair and not as a result of misuse, tampering or modification by or on behalf of the customer, then the supplier may replace the product or pay a refund to the customer. 11 7. The customer may be responsible for certain costs where products returned are not in the original packaging, or if the packaging is damaged. This will be deducted from any refund paid to the customer. TEDELEX TRADING (PTY) LTD (JOHANNESBURG) JOHANNESBURG TEL NO. (011) 490-9000 CAPE TEL NO. (021) 552-5161 TOWN DURBAN TEL NO. (031) 792-6000 www.amap.co.za 12