1
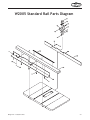
MODELS
W2005, W2006, W2007
CLASSIC FENCE
INSTRUCTION MANUAL
Phone: 1-360-734-3482 • On-Line Technical Support: [email protected]
COPYRIGHT © JANUARY 2000, REVISED MARCH 2004 BY WOODSTOCK INTERNATIONAL, INC.
WARNING: NO PORTION OF THIS MANUAL MAY BE REPRODUCED IN ANY SHAPE OR FORM WITHOUT
THE WRITTEN APPROVAL OF WOODSTOCK INTERNATIONAL, INC.
Printed in Taiwan
CONTENTS
INTRODUCTION ............................................................................................ 2
¦¦¦¦
General ........................................................................................................... 2
Warranty ......................................................................................................... 3
SAFETY PRECAUTIONS ................................................................................... 4
INSTALLATION ............................................................................................. 5
Inventory ........................................................................................................ 5
Rail Installation ................................................................................................ 6
Correcting Mounting Hole Misalignment ................................................................... 7
Magnetic Switch ................................................................................................ 8
7-Foot Rails ..................................................................................................... 9
Blade Guard ................................................................................................. 10
Fence .......................................................................................................... 10
ADJUSTMENTS ............................................................................................11
Fence Parallelism ............................................................................................
Lock Handle ..................................................................................................
Fence-to-Table Clearance ..................................................................................
Scale and Cursor .............................................................................................
11
12
12
13
OPERATIONS ..............................................................................................14
Using a Wood Fence Facing ................................................................................ 14
Using Board Buddies® ....................................................................................... 14
PARTS ......................................................................................................15
W2005
W2005
W2007
W2005
W2007
Fence Parts Diagram ................................................................................
Standard Rail Parts Diagram .......................................................................
Leg and 7' Rail Parts Diagram .....................................................................
Parts List ..............................................................................................
Parts List ..............................................................................................
15
16
17
18
18
INTRODUCTION
General
Thank you for purchasing Woodstock
International’s SHOP FOX® Classic Fence.
This fence is classic in its design and function,
and provides a perfect upgrade for table saw
owners who expect precision and ease of
installation. It has been designed to fit almost
all contractor and cabinet-style table saws and
is easy to install.
The SHOP FOX® Fence features include:
• Wide T-shape style design for maximum
accuracy and support.
• Single locking action cam lever.
• Simple mounting procedure, easy lift off
design for the fence makes using jigs and
fixtures simple.
• HDPE high durability plastic fence surface
provides low sliding resistance.
• Fence can be used on either the right or
left side of the blade.
• Magnified cursor can be mounted on
either side of the fence.
• Fence body has powder coated paint
surface for durability.
Woodstock is pleased to provide this manual
to assist in the installation and operation of
the SHOP FOX® Classic Fence. It represents
our effort to offer the finest documentation
available. If you feel there are areas where this
manual could be improved, we encourage you
to write us with your comments at the following
address:
Technical Documentation
Woodstock International, Inc.
P.O. Box 2309
Bellingham, WA 98227
Tel: (360) 734-3482
Fax: (360) 671-3050
This fence was specifically designed to
be used on table saws to assist in cutting
operations. DO NOT MODIFY AND/OR USE
THIS FENCE FOR ANY OTHER PURPOSE.
Modifications or improper use of this device
will void the warranty. If you are confused
about any aspect of this accessory, DO NOT
use it until all your questions have been
answered. Serious injury may occur.
• Standard rails provide 25" maximum rip to
the right of the blade (W2005).
• Optional long rails provide 54" maximum
rip to the right of the blade (W2006).
-2-
Shop Fox® Classic Fence
Warranty
Woodstock International, Inc. (Woodstock)
warrants this product against defects in
workmanship and materials under normal use
and service for a period of one year. This
warranty extends to the original purchaser from
the date of purchase. This warranty does not
apply to defects due directly or indirectly to
misuse, abuse, negligence, accidents, repairs
or alterations or lack of maintenance.
This is Woodstock’s sole written warranty and
any and all warranties that may be implied by
law, including any merchantability or fitness,
for any particular purpose, are hereby limited
to the duration of this written warranty. We do
not warrant or represent that the merchandise
complies with the provisions of any law or acts.
In no event shall Woodstock’s liability under
this warranty exceed the purchase price paid
for the product and any legal actions brought
against Woodstock shall be tried in the State of
Washington, County of Whatcom.
Shop Fox® Classic Fence
We shall in no event be liable for death,
injuries to persons or property or for incidental,
contingent, special or consequential damages
arising from the use of our products.
To take advantage of this warranty, the product
or part must be returned to the original place
of purchase. Proof of purchase must accompany
the merchandise. Woodstock reserves the right
to change specifications at any time since we
constantly strive to achieve better quality
equipment.
We make every effort to ensure that our
products meet high quality and durability
standards and we hope you never need to use
this warranty.
-3-
SAFETY PRECAUTIONS
These safety rules cannot cover every situation in a woodshop. Consider your conditions when
setting up and using your SHOP FOX® Classic Fence.
1.
KNOW YOUR TABLE SAW. Read the
owner’s manual carefully. Learn the tool’s
applications and limitations, as well as its
particular hazards.
12. USE A PUSH STICK WHEN CUTTING
NARROW PIECES.
13. DO NOT REACH BEHIND TABLE SAW
TO GRAB CUTOFF PIECE. If wood binds
against saw blade it will kick back faster
than you can let go.
2.
DO NOT REMOVE GUARDS. Maintain
guards in working order.
3.
ENSURE THAT YOUR TABLE SAW IS
ELECTRICALLY GROUNDED. Never remove
the grounding prong.
4.
KEEP WORK AREA CLEAN. Cluttered areas
invite accidents.
14. DO NOT LET THE END OF THE
WORKPIECE CONTACT THE FENCE WHILE
CROSSCUTTING WOOD WITH THE MITER
GAUGE. There is a potential for kick-back.
Move the fence away.
5.
AVOID DANGEROUS ENVIRONMENTS.
Do not use power tools in damp or wet
locations or expose them to rain. Keep
your work area well lighted.
15. DISCONNECT TABLE SAW FROM POWER
before servicing and when changing
accessories, such as blades, bits, and
cutters.
6.
MAKE WORKSHOP CHILD-PROOF with
padlocks, master switches, or by removing
starter keys.
16. AVOID ACCIDENTAL STARTING. Make sure
the switch is in the “OFF” position before
plugging in the cord.
7.
DO NOT FORCE WORK THROUGH TABLE
SAW. Tools work better and more safely
when they are allowed to work at their
own speed.
17. CHECK DAMAGED PARTS. Do not operate
the table saw until you are certain it is in
perfect running condition.
8.
9.
WEAR PROPER APPAREL. Do not wear
loose clothing, gloves, neckties, or jewelry
that might get caught in moving parts.
Non-slip footwear should be worn. Tie
back long hair.
NEVER STAND OR LEAN ON TOOL.
18. NEVER LEAVE THE TABLE SAW RUNNING
UNATTENDED - TURN POWER OFF. Do not
leave the saw until it comes to a full stop.
19. DO NOT OPERATE EQUIPMENT IF USING
DRUGS, ALCOHOL, OR MEDICATION.
20. DO NOT OPERATE EQUIPMENT if you are
mentally or physically fatigued.
10. ALWAYS USE SAFETY GLASSES, EAR
PROTECTION AND RESPIRATORY
PROTECTION.
21. IF THERE IS SOMETHING YOU DO NOT
UNDERSTAND, DO NOT OPERATE
MACHINE! Ask for help first.
11. DO NOT OVERREACH. Keep proper footing
and balance at all times.
22. BAD HABITS ARE DANGEROUS. Review all
safety procedures often.
-4-
Shop Fox® Classic Fence
INSTALLATION
Inventory
Installation of the SHOP FOX® Classic Fence
involves mounting the front and back rails to
your table saw, setting the fence on the rails
and doing a simple alignment. First check the
contents of the package:
Model W2005
Fence Assembly .............................. 1
Back Rail ..................................... 1
Front Rail ..................................... 1
Front Rail Rectangular Tube ............... 1
Scale ........................................... 1
Drill and Tap ................................. 1
Blade Guard Clamp Bag
• V-Clamp .................................. 1
• L-Bracket ................................. 1
• Locking Plate ............................ 1
• Hex Bolt 1⁄4-20 X 11⁄2" ................. 2
• Flat Washer 1⁄4" ......................... 4
• Hex Nut 1⁄4-20 ........................... 2
• Hex Bolt 5⁄16-18 X 3⁄4" ................. 1
• Flat Washer 5⁄16" ....................... 2
• Hex Nut 5⁄16-18 .......................... 1
Rail Mounting Bags
• Hex Bolt 1⁄4-20 X 3⁄4" ................... 4
• Hex Bolt 3⁄8-16 X 1" ..................... 4
• Flat Hd Scr 1⁄4-20 X 3⁄4" ................. 2
• Flat Washer 1⁄4" ........................10
• Flat Washer 3⁄8" ......................... 8
• Hex Nut 1⁄4-20 ............................. 2
• Hex Bolt M10-1.5 X 25 ................. 4
Model W2006
Fence Assembly .............................. 1
All other components are the same as the
Model W2007.
Shop Fox® Classic Fence
Model W2007
Back Rail 7' ................................... 1
Front Rail 7'................................... 1
Front Rail Rectangular Tube 7' ............ 1
Scale ........................................... 1
Drill and Tap ................................. 1
Blade Guard Clamp Bag
• V-Clamp .................................. 1
• L-Bracket ................................. 1
• Locking Plate ............................ 1
• Hex Bolt 1⁄4-20 X 11⁄2" ................. 2
• Flat Washer 1⁄4" ......................... 4
• Hex Nut 1⁄4-20 ........................... 2
• Hex Bolt 5⁄16-18 X 3⁄4" ................. 1
• Flat Washer 5⁄16" ....................... 2
• Hex Nut 5⁄16-18 .......................... 1
Rail Mounting Bags
• Hex Bolt 1⁄4-20 X 3⁄4" ................... 4
• Hex Bolt 3⁄8-16 X 1" ..................... 4
• Flat Hd Scr 1⁄4-20 X 3⁄4" ................. 2
• Flat Washer 1⁄4" ........................10
• Flat Washer 3⁄8" ......................... 8
• Hex Nut 1⁄4-20 ............................. 2
• Hex Bolt M10-1.5 X 25 ................. 4
Legs ........................................... 2
Support Bracket .............................. 2
Feet ............................................ 2
Leg Mounting Bag
• Hex Nut 1⁄2-12 ............................. 2
• Flat Washer 3⁄8" ......................... 8
• Hex Bolt 1⁄4-20 X 1⁄2" .................. 4
• Flat Washer 1⁄4" ......................... 4
• Hex Bolt 3⁄8-16 X 5⁄8" ................... 2
Note—Extra mounting hardware has been included
to compensate for differences between table
saws. You may not need all of the hardware that
is included in the inventory.
-5-
3.
UNPLUG the saw power cord, and TURN
OFF the power switch before you begin
fence installation procedures. Accidental
saw startup while installing or adjusting the
fence will result in serious personal injury.
Position the back rail so its top edge
is flush with the table top and the
rectangular cut-outs are in line with the
miter slots. See Figure 1.
Rail Installation
On most saws, the mounting holes for the rails
will match the existing rail mounting holes.
On the saws where the mounting holes do
not line up, see Correcting Mounting Hole
Misalignment on Page 14 for instructions on
drilling new holes.
Metric and standard hex bolts have been
included to fit most common rail installations.
Mounting the Back Rail
1.
Remove the mounting hardware for the
blade guard which extends over the back
edge of the table. (Be sure to reinstall the
guard after completion.)
2.
Locate the back fence rail (the rail with
the two rectangular cut-outs on one edge
and one cutout on the other edge) and set
it against the rear edge of the table saw.
Figure 1. Attaching the back rail.
4.
Attach the rail using the mounting
hardware from the old rail or two 3⁄8"-16
x 1" or M10-1.5 X 25 hex head bolts and
washers. Secure as shown in Figure 2.
Figure 2. Mounting the front and back rails.
-6-
Shop Fox® Classic Fence
Mounting The Front Rail
Mounting The Front Rail Tube
1.
Align the side of the front rail with two
rectangular cutouts against the edge of the
table.
1.
Orient the machined flat edge of the tube
so it faces the table edge.
2.
Set the top edge of the front rail so it is
flush with the table top and the cutouts
are in line with the miter slots. If your saw
table has a beveled front edge, then align
the top of the rail with the bottom edge of
the bevel. See Figure 3.
2.
Thread four 1⁄4-20 X 3⁄4" hex bolts and
1⁄4" washers through the rail and into the
threaded holes in the bottom of the tube.
3.
If your table has a beveled front edge,
it may be necessary to install spacers or
shims between the rail and the rectangular
tube as shown in Figure 4. The spacers
should equal approximately the height of
the bevel (3⁄8" on most saws). Four to six
washers installed with each of the four
attachment screws should raise the height
of the tube enough to assure clearance of
the fence above the table surface.
4.
Mount the fence on the rails and check the
clearance between the bottom edge of the
HDPE facing and the table top.
5.
Add or remove shims from the tube to
rail mounting until a clearance of at least
1⁄16" is achieved. Note—This clearance
should never exceed 1⁄8", as this can allow
material to get under the fence during
certain types of sawing operations.
Bottom Edge
of Bevel
Figure 3. Attaching the front rail bracket.
3.
Attach the rail using the mounting
hardware from the old rail or two 3⁄8"-16
x 1" or M10-1.5 X 25 hex head bolts and
washers. Secure as shown in Figure 2.
Note: Do not install the scale at this time.
Figure 4. Shimming the front tube.
Shop Fox® Classic Fence
-7-
Fence
7-Foot Rails
1. Raise the lock handle up to release the
fence locking tab and place the fence down
on the rails.
The W2006/2007 extended 7' rail set for the
SHOP FOX® Classic Fence increases the rip
capacity to the right of the blade to 54''.
These are mounted in the same manner as the
standard rails. The long rail set also includes
legs which provide added stability for the table
saw/fence assembly when large or heavy work
is positioned on the table.
2. Make sure the angle bracket of the fence
assembly fits easily into the slot created by
the front rail bracket and rectangular tube.
• If any binding is experienced, loosen the
rail mounting bolts and adjust the rails.
3. Install the fence, and check to see that
it slides smoothly along the rails without
binding or catching on the table surface.
• If any binding is experienced, loosen the
rail mounting bolts and adjust the rails.
4. Make sure you keep the rail support pad free
of debris and dirt. This pad is pre-positioned
so that it slides along the top of the rail or
the top of the table. The rear rail support
pad is located on the underside of the fence.
See Figure 5.
Mounting the extension legs
1. Attach rails according to the rail installation
instructions on page 6 & 7.
2. Thread a 1⁄2" hex nut onto each foot and
thread a foot into the bottom of each leg.
3. Loosely bolt a brace to each of the legs
with a 3⁄8-16 x 3⁄4" hex bolt and three 3⁄8"
washers. Place two of the washers between
the leg and the brace.
4. Position the legs as shown in Figure 6 and
insert two 1⁄4-20 x 1⁄2" hex bolts with washers
through each rail and loosely thread them
into the legs.
5. Rotate the braces up and thread a 3⁄8-16 x
5
⁄8" hex bolt with a washer through each rail
and into the braces.
Rear Rail
Support Pad
6. Place a level on the rails and adjust the feet
until the rails are level, then tighten the hex
nuts on the feet against the bottom of the
legs.
Fence Shown Upside Down
7. Tighten all of the bolts.
Figure 5. Rear rail pad location.
-8-
Shop Fox® Classic Fence
Extension Table
An extension table should be mounted between
the fence extension rails to provide workpiece
support. The extension table width should be
sized to fit in the gap between the rails. The
length of the table extension can be set so the
table replaces the existing right wing of the saw
(if your saw is so equipped) or can be used in
conjunction with the existing wing.
2.
When installing the extension table, be sure
it is flush with the table saw top by placing
a long straightedge across both tables and
adjusting the extension until it is even along
the length of the straightedge. Figure 7
shows a typical installation.
Constructing the extension table
1.
Construct the extension table as shown
in Figure 6 using a frame with a separate
top or a solid table can be made from
countertop materials with a 3⁄4" to 1" thick
particle board surfaced with a Melamine® or
Formica® type of material.
Figure 7. Extension rails and table assembly.
Figure 6. Extension table.
Shop Fox® Classic Fence
-9-
Blade Guard
Magnetic Switch
The SHOP FOX ® Classic Fence is intended
to work with all table saw blade guards.
After installing the rear rail you will be
able to reinstall the guard assembly without
interference with the rail. A typical installation
is shown below in Figure 8.
At the left hand edge of the front rail there are
pre-drilled holes which can be used to mount
the table saw ON/OFF switch to the rail. This
relocation of the magnetic switch makes it easy
to turn the saw on and off without reaching
underneath the table. Consult the instruction
manual for your saw table to determine
whether it is possible to locate your switch on
the rail. Mount the switch to the rail using the
1
⁄4-20 X 3⁄4" flat head screws, 1⁄4-20 hex nuts,
and 1⁄4" flat washers.
If you have any questions or concerns about the
blade guard on your saw working in conjunction
with the new fence, please see your dealer or
contact Woodstock’s Technical Support.
DO NOT operate the saw without a blade guard
installed. Operating without a guard creates a
risk of injury from kickback or flying debris. If
you encounter any difficulty with reinstalling
the blade guard with the new fence system,
contact Woodstock’s Technical Support.
Always make certain the saw is disconnected
from the power supply before opening the
switch box.
Figure 8. Rail and guard bracket installation.
-10-
Shop Fox® Classic Fence
ADJUSTMENTS
Your SHOP FOX® Classic Fence requires little
adjustment since most of the features are builtin to the fence at the factory. The primary
adjustment is to adjust the fence so it is
parallel to the saw blade.
UNPLUG the saw power cord,
OFF the power switch before
fence adjustment procedures.
saw startup while adjusting the
result in serious personal injury.
and TURN
you begin
Accidental
fence will
Fence Parallelism
If your table saw has been properly adjusted,
the saw blade should be parallel to the miter
slot. Refer to your table saw manual for the
proper procedure to check and adjust the saw
blade to the miter slot correctly.
1. Locate the two setscrews on the lower edge
of the fence bracket. See Figure 9.
2. Turn the setscrews to align the edge of the
fence to the edge of the miter slot while
alternately locking and unlocking the fence
lock lever.
3. Check to see if the fence is parallel along
the length of the miter slot, carefully slide
the tip of your finger along the edge of the
miter slot and the fence to detect a variation
in spacing.
4. Readjust the setscrews as required.
If the wood is binding when fed through the
table saw and the cut edge is burned, the fence
may need to be adjusted out slightly. Use the
setscrews to adjust the back end of the fence
approximately 1⁄64" away from the miter slot.
Figure 10 shows the fence adjusted for use on
the right side of the blade.
Shown exaggerated for
illustration purposes
⁄64"
1
Figure 10. Lead adjustment.
Setscrews
Figure 9. Setscrews on bracket.
Shop Fox® Classic Fence
DO NOT cut on the left side of the blade if the
fence was adjusted for cutting on the right
side of the blade. The wood will pinch and
could cause dangerous kick-back. Readjust
the fence when changing the side of the
blade you are cutting on.
-11-
Fence-to-Table
Clearance
It is important to minimize the gap between
the bottom of the fence and the table so
thin material will not slide under the fence
during operation. This clearance must be
uniform along the table surface. It is also very
important that the fence does not contact the
table surface when sliding from side to side.
The support pads, two on the T shaped rail
and one on the end of the fence, support the
fence above the front and rear rails. As long
as those rails are flush with the table surface,
the table clearance should be okay. Over time
these pads will wear and may eventually need
replacement. Replacement pads are available
from your dealer.
If ripping thin laminates or veneers, clamp
an auxiliary fence to the SHOP FOX® Classic
Fence so it rests right on the table. This will
ensure that thin material will not slip under the
fence.
Lock Handle
The lock handle is cam actuated and locks
against the machined edge of the front rail
rectangular tube. Generally it will require no
adjustment. However it is sometimes possible
that the process of aligning the fence as
described the Fence Parallelism on Page 11
will cause the clamp to be too tight or too
loose. This can result when the setscrews are
both adjusted too far in or too far out.
To check the locking adjustment, lock the
handle in the down position, then try to move
the fence by pushing on its side. If the fence
slips when pushing with a moderate amount of
force (approximately 50 lbs. of lateral force),
it should be adjusted. Turn both setscrews in
an equal amount, then perform the parallelism
adjustment described on Page 11 again. This
will bring the locking cam closer to the front
rail tube and increase the locking pressure.
Figure 11. Lock Handle close up.
-12-
Shop Fox® Classic Fence
Scale and Cursor
The self adhesive scale and magnified cursor
provide fast and accurate fence positioning.
1.
2.
Zero Point for
right of blade use
Loosen the adjusting screws on the
magnified cursor until the cursor can be
adjusted.
Approx 57⁄8''
Raise the table saw blade guard out of the
way. With the fence mounted on the right
side of the blade, slide it over until its left
edge touches the side of the blade. See
Figure 12.
Scale 1⁄2'' From Front Edge
Figure 13. Scale location for right-side blade use.
6.
To fine tune the position of the magnified
cursor, make a test cut and adjust the
cursor to correspond with the actual width
of the test board. This method accounts
for any vibration or wobble that may be
present in the spinning blade.
Different blades may have different widths
of cutting teeth, so readjustment is required
whenever changing type or style of blade. This
procedure must be repeated every time the saw
blade is changed to maintain accuracy.
Figure 12. Fence contacting the blade.
3.
Centralize the magnified cursor within
its range of adjustment and tighten the
screws. Mark the position of the hairline on
the front rail tube with a pencil. This is the
zero mark for applying the scale.
4.
Remove the fence and apply a strip of
masking tape along the rail a 1⁄2'' in from
the front edge.
5.
Using the zero mark as the starting point
and the masking tape as a guide, apply the
adhesive scale to the rail. See Figure 13.
Push the scale into place with heavy thumb
pressure.
When cutting on the left side of the blade,
this scale will not be accurate. It is possible to
attach another scale (not included) which can
be set for left side cutting. See Figure 14. The
magnified cursor assembly can be moved to the
left side of the fence to allow for orienting a
separate scale.
Zero Point for
left of blade use
Approx 57⁄8''
Be careful when laying the scale into position
because the scale can be stretched if too
much pressure is applied.
Scale 1⁄2'' From Front Edge
Shop Fox Classic Fence
®
Figure 14. Scale location for right-side blade use.
-13-
Correcting Mounting
Hole Misalignment
If the front and back mounting holes do not line
up with the existing holes in the table top, it
will be necessary to drill additional holes using
one of the three following methods. Drilling
and tapping holes into the edge of the table,
drilling through the edge of the table and
securing the rail with long bolts, washers, and
nuts, or drilling holes in the rail that align with
the holes in the table top.
Drilling Through-Holes
1. Position the rails flush with the top of the
table saw table, and with the left end of
the rails even with the left edge of the table
extension.
2. Clamp the rails to the table saw using Cclamps or bar clamps.
3. Mark the mounting holes on the edge of the
table.
Drilling and Tapping Mounting Holes
4. Remove the rail, and center punch the
middle of the outlined holes.
1. Position the rails flush with the top of the
table saw table, and with the left end of
the rails even with the left edge of the table
extension.
5. Drill a 7⁄16" hole all the way through the
table edge. Again, cutting oil should not be
required, but be sure to use a relatively slow
speed on the drill.
2. Clamp the rails to the table saw using Cclamps or bar clamps.
6. Remove any chips or burrs around the edge
of the hole which might cause the rail to
mount crooked.
3. Mark the mounting holes on the edge of the
table.
4. Remove the rail and center punch the middle
of the outlined holes on the table edge.
5. At each center punch location, drill a 1⁄8"
diameter starter hole, then drill a 5⁄16" hole
using the bit supplied with the SHOP FOX®
Classic Fence.
6. Insert the included 3⁄8"-16 tap in a tap
wrench if one is available. If a tap wrench
is not available use a socket and ratchet
wrench.
7. Carefully align the tap with the hole. Advance
the tap half a turn, back it out half a turn,
advance another half turn, etc., until the
tap turns freely or can be visually seen at
the exit end of the hole.
8. Back the tap out and proceed to the next
hole. It is not necessary to use cutting oil
when tapping cast iron.
7. Install the rails and long bolts and make sure
that the nut is fully threaded on the bolt.
Drilling Holes In the Rails
1. Clamp the rails to the table.
2. Using a try square and pencil, transfer the
location of the rail mounting hole onto the
rails.
3. Remove the rails, and center punch the
middle of the outlined holes.
4. Drill 1⁄2" holes in the rails that match the rail
mounting holes in your table.
5. Remove any chips or burrs around the edge
of the hole which might cause the rail to
mount crooked.
6. Install the rails and bolts.
9. Install the rails and the bolts.
-14-
Shop Fox® Classic Fence
OPERATIONS
To operate this, or any tool, safely and
efficiently, it is essential to become as familiar
with its characteristics as possible. Take as
much time as necessary to become acquainted
with the SHOP FOX® Classic Fence. The time
you invest before you begin to use it will be
time well spent.
Using a Wood Fence
Facing
The SHOP FOX® Classic Fence can be faced
with 3⁄4" kiln dried hardwood, plywood or
medium density fiber board (MDF) in place
of the HDPE plastic fence sides. For certain
operations such as dadoing or close sawing, it
is necessary to have a fence material which
can be cut into. If using kiln dried lumber, use
a piece that is free of knots and other defects
and preferably a species with dimensional
stability such as maple, birch or beech.
It is extremely important to attach the wood
facing correctly. Lumber less than 3⁄4" is not
recommended. Screws or fasteners must be
counter sunk at least 1⁄8" below the wood
surface, but no more than 1⁄4".
Using Board Buddies®
A T-slot track can be mounted in the top of the
SHOP FOX® Classic Fence to accept another
popular product from Woodstock International
- Board Buddies®. These one directional, spring
loaded hold-down wheels keep material pressed
firmly against the table and fence. They are
fully adjustable and non-marking.
Be sure to request the T-nuts and T-slot
tracks separately from your Woodstock dealer
for mounting Board Buddies® to your fence.
Board Buddies® are a great addition to any
fence system! For the location of your nearest
Woodstock dealer, call Woodstock International
at (360) 734-3482.
Operation of this equipment has the potential
to propel debris into the air which can
cause eye injury. Always wear safety glasses
or goggles when operating equipment.
Everyday glasses or reading glasses only
have impact resistant lenses, they are not
safety glasses. Be certain the safety glasses
you wear meet the appropriate standards of
the American National Standards Institute
(ANSI).
Attaching the wood facing to the fence:
1. Size a suitable piece of wood for the face
of the fence.
2. Drill and counterbore six 3⁄8" mounting
holes in the wood face piece using the
HDPE supplied fence facing as a drill
guide.
3. Attach the wood facing to the fence,
making sure the screws are counterbored
1
⁄8" - 1⁄4" below the wood surface. Do not
over tighten.
Shop Fox® Classic Fence
-15-
W2005 Fence Parts Diagram
NOTE: The W2006 is a combination of the W2005
Fence and the W2007 Legs and 7' Rails.
-16-
Shop Fox® Classic Fence
W2005 Standard Rail Parts Diagram
26
Shop Fox® Classic Fence
-17-
W2007 Leg and 7' Rail Parts Diagram
NOTE: The W2006 is a combination of the W2005
Fence and the W2007 Legs and 7' Rails.
-18-
Shop Fox® Classic Fence
W2005 Parts List
REF
1
2
3
4
8
8A
12A
14A
15A
16
16A
17
17A
18
20
22
23
26
PART #
X2005001
X2005002
X2005003
X2005004
X2005008
X2005008A
X2005012A
X2005014A
X2005015A
XPB19
X2005016A
XPB88
X2005017A
XPB18
XPB25
XPS06
X2005023
XPFH21
DESCRIPTION
FENCE LOCKING TAB
KNOB
BEARING PAD
LOCKING LEVER
FENCE BODY
FENCE FACING
MAGNIFIED CURSOR
SCALE
FRONT RAIL TUBE
HEX BOLT 1/4-20 X 1/2
FRONT RAIL SUPPORT
HEX BOLT 1/4 - 20 X 1-3/4
REAR RAIL
HEX BOLT 3/8-16 X 1
HEX BOLT 3/8-16 X 1-3/4
PHLP HD SCR 10-24 X 3/8
SET SCREW 3/8-16 X 5/16
FLAT HD SCR 10-24 X 3/4
REF
PART #
27
28
30
31
32
33
34
35
36
37
38
39
40
41
42
43
44
45
XPLN02
XPLN01
XPW03
XPW06
XPW02
XPW03
XPN05
X2005035
X2005036
X2005037
XPB26
XPW06
XPN05
XPB07
XPW07
XPN02
X2005044
XPS43
DESCRIPTION
LOCK NUT 1/4-20
LOCK NUT 3/8-16
FLAT WASHER #10
FLAT WASHER 1/4
FLAT WASHER 3/8
FLAT WASHER 1/4
HEX NUT 1/4-20
V-CLAMP
L-BRACKET
LOCKING PLATE
HEX BOLT 1/4-20 X 1 1/2
FLAT WASHER 1/4
HEX NUT 1/4-20
HEX BOLT 5/16-18 X 3/4
FLAT WASHER 5/16
HEX NUT 5/16-18
MAGNET
PHLP HD SCR 10-24 X 1/2
W2007 Parts List
REF
6
7
10
10A
11
14
16
18
19
26
PART #
X2007006
X2007007
X2007010
X2007010A
X2007011
X2007014
X2007016
XPB18
XPN34
XPFH21
DESCRIPTION
EXTENSION LEG
FRONT RAIL TUBE
REAR RAIL
FRONT RAIL SUPPORT
SCALE
ADJUSTABLE FOOT
HEX BOLT 1/4-20 X 3/4
HEX BOLT 3/8-16 X 1
HEX NUT 1/2-12
FLAT HD SCR 1/4-20 X 3/4
Shop Fox® Classic Fence
REF
PART #
31
32
33
34
35
36
46
47
48
XPW06
XPW02
XPW06
XPN05
XPB65
XPB21
XPW02
XPB19
X2007048
DESCRIPTION
FLAT WASHER 1/4
FLAT WASHER 3/8
FLAT WASHER 1/4
HEX NUT 1/4-20
HEX BOLT 3⁄8-16 X 5⁄8
HEX BOLT 3/8-16 X 3/4
FLAT WASHER 3/8
HEX BOLT 1/4-20 X 1/2
BRACE
-19-