1
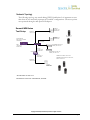
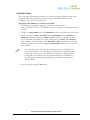
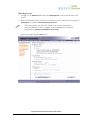
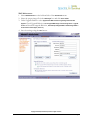
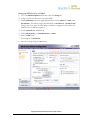
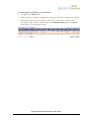
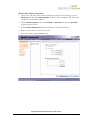
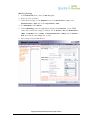
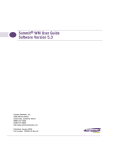
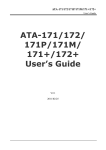
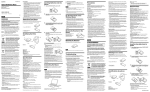
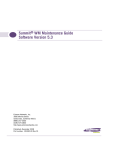
Extreme Networks Summit WM-Series
Wireless Controller and Altitude 350-2 APs
Configuration and Deployment Guide
SpectraLink's Voice Interoperability for Enterprise Wireless (VIEW) Certification
Program is designed to ensure interoperability and high performance between NetLink
Wireless Telephones and WLAN infrastructure products. The products listed below
have been thoroughly tested in SpectraLink’s lab and have passed VIEW Certification.
This document details how to configure Summit WM100 and WM1000 Wireless
Controllers and Altitude 350-2 access points (APs) (models 15939 & 15938) with
NetLink Wireless Telephones.
Certified Product Summary
Manufacturer:
Extreme Networks
http://www.extremenetworks.com/solutions/appl
ications/wireless.asp
Approved products:
Wireless Controllers
Access Points
WM 100
WM 1000
Altitude 350-2
RF technology:
802.11b/g
Radio:
2.4 – 2.484 GHz
Security:
WPA-PSK, WPA2-PSK
AP firmware version tested:
1.1.4.03.03
NetLink Wireless Telephone software version tested:
SRP Version 2.0 (89.124)
Maximum telephone calls per AP:
10
Recommended network topology:
Switched Ethernet (recommended)
Copyright © 2006 SpectraLink Corporation. All rights reserved.
PN: 72-9958-00-A.doc
Page 1
Network Topology
The following topology was tested during VIEW Certification. It is important to note
that these do not necessarily represent all "certified" configurations. The access points
were powered through a mid-span POE adaptor.
Summit WM-Series
Test Setup
SUB-NET A
15939 AP
192.168.110.11
255.255.255.0
192.168.110.X
15939 AP
192.168.110.12
255.255.255.0
Summit WM 1000
ES0 192.168.110.10:5825
255.255.255.0
*Phones DHCP
192.168.121.X
Extreme Switch
DHCP
192.168.121.X
Handed out by
SVP SERVER192.168.110.5
Gateway 192.168.110.15
Port 0/0
192.168.110.15
255.255.255.0
PRI GATEWAY 192.168.110.5
Gateway: 192.168.110.15
Router
Port 0/1
192.168.123.15
255.255.255.0
WIRED TEST PC DHCP 192.168.110.9
WIRELESS TEST PC DHCP on SSID ‘DATA’,
Subnet 192.168.122.X
SUB-NET B
192.168.123.X
15938 AP
192.168.123.11
255.255.255.0
* Phones DHCP 192.168.121.X
*All Clients are on their own “Virtual Subnet”, Per SSID
Copyright © 2006 SpectraLink Corporation. All rights reserved.
PN: 72-9958-00-A.doc
Page 2
Product Limitations
1. Beacons are sent from the AP inconsistently; therefore you may see decreased
battery life on the handsets.
2. A hex-key is not supported with both WPA-PSK and WPA2-PSK. You must use a
passphrase for each.
3. Because the Controller configures a virtual subnet, broadcast data cannot be sent to
the handsets.
Installing Software & Configuration
1. If software upgrades are required, contact Extreme Networks Customer Support for
the latest version of software and instructions.
2. The current version of software installed can be found by opening a telnet session of
the AP, and typing the command ‘version’, or by looking at the configuration GUI
under Wireless APs then selecting the general tab for the AP in the field ‘s/w
version’.
If you encounter difficulties or have questions regarding the configuration process,
please contact your Extreme Networks representative or visit the web site
http://www.extremenetworks.com/solutions/applications/wireless.asp.
Initial Setup
1. The following instructions are for configuring a wireless controller and a number of
access points with no prior configuration.
2. All of the initial setup is done via a web interface. Connect a ‘Cross-Over’ Ethernet
cable directly from the Management Port of the controller to a PC’s Ethernet port.
3. Log onto the controller by opening a web browser and connect to
https://192.168.10.1:5825/. The default username is ‘admin’; the default password is
‘abc123’.
4. Do this step only if it is necessary to reset the controller back to its factory default
configuration. Browse to WM-AD Configuration and select System Maintenance screen. Select
Reset database to factory default and reboot and click Apply. This will reset the database and
cause the controller to reboot. It will take three to four minutes before the controller
is finished.
Copyright © 2006 SpectraLink Corporation. All rights reserved.
PN: 72-9958-00-A.doc
Page 3
Controller Setup
The setup steps described below refer to the network topology diagram shown in this
document. Make sure all the access points are disconnected from the system if
configuring the system for the first time.
Assigning an IP Address to a Wireless Controller
1. Log onto the controller by opening a web browser and connect to
https://192.168.10.1:5825/. The default username is ‘admin’; the default password is
‘abc123’.
2. Navigate to Summit™ Switch and select IP Addresses from the left hand side of the screen.
3. Change the value of esa0 to 192.168.110.10 and 255.255.255.0 for the IP Address and
Subnet mask. Click the checkbox for Mgmt and SLP for this port only (thus turning it
on). Leave them unchecked (off) for the other ports. For Function, select Host Port if
static routing is used. Otherwise, select Dynamic Port if OSPF is being used for routing
and routing advertisements. Enter esa0 for Multicast Support. Refer to the screen shot
shown below.
This is for topologies where the SpectraLink gateway(s) and SVP Servers
are located adjacent to the esa0 port, as was done in this certification test.
In topologies where the setup is different this multicast setting should be
configured to be whichever port the SpectraLink servers are adjacent to.
This setting permits proper wired replication of multicast data from the
wireless subnet.
4. Save the settings using the Save button.
Copyright © 2006 SpectraLink Corporation. All rights reserved.
PN: 72-9958-00-A.doc
Page 4
Copyright © 2006 SpectraLink Corporation. All rights reserved.
PN: 72-9958-00-A.doc
Page 5
Assigning Routing Protocols to Summit WM Series Controller
1. Select Routing Protocols from the left-hand side of the Summit™ Switch screen.
2. Enter 0.0.0.0 for the Destination Address and 0.0.0.0 for the Subnet Mask. Add the
appropriate address for the Gateway.
If dynamic routing (OSPF) is being used, then the default route should be
set automatically. However, it is always recommended that you assign a
temporary static route in dynamic environments to allow the device to
operate immediately without having to wait for the initial updates. Be sure
to clear the checkbox for Override dynamic routes. This will allow dynamic
routes to be the default once they arrive.
3. Save the settings using the Save button.
Copyright © 2006 SpectraLink Corporation. All rights reserved.
PN: 72-9958-00-A.doc
Page 6
WAP Registration
1. Navigate to the Altitude™ APs tab and select WAP Registration on the left-hand side of the
screen.
2. Enter all information for your APs (see screen shot below). Make sure the setting for
Security Mode is selected to Allow all Altitude™ APs to Connect.
This setting allows new APs to be added to the system automatically.
Once the addition of APs is complete it is recommended to switch this
setting back to Allow only approved Wireless APs to connect.
3. Save the settings using the Save button.
Copyright © 2006 SpectraLink Corporation. All rights reserved.
PN: 72-9958-00-A.doc
Page 7
WAP Maintenance
1. Select WAP Maintenance on the left-hand side of the Altitude™ APs menu.
2. Select the proper image file in the WAP Images box and click Set as default.
3. Under Upgrade Behavior select Upgrade when WAP connects using settings from Controlled
Upgrade. Check Upgrade Behavior, Do not upgrade WAP images if current image version = upgrade
version and check Downgrade Behavior, Automatically downgrade WAP to default image if WAP is
at later release number (major/minor rev).
4. Save the settings using the Save button.
Copyright © 2006 SpectraLink Corporation. All rights reserved.
PN: 72-9958-00-A.doc
Page 8
Setting up SSID, Security and QOS
1. Go to the WM-AD Configuration menu and select the Topology tab.
2. Assign a subnet for clients for a specific SSID.
3. Under DHCP Settings, enter the appropriate address for the Gateway. For Mask enter
255.255.255.0. The address range should default to 192.168.121.2 – 192.168.121.254.
Change this if you want a limited range of addresses assigned to this subnet. No
DNS Servers or WINS is required.
4. Set the Timeout Idle pre and post to 2.
5. Under Next Hop Routing, set the OSPF Route Cost to 50000.
6. Enter an SSID name.
7. Check b/g for all Altitude™ APs
8. Save the settings using the Save button.
Copyright © 2006 SpectraLink Corporation. All rights reserved.
PN: 72-9958-00-A.doc
Page 9
Filtering
1. From the WM-AD Configuration menu select the Filtering tab.
2. Select Default from the Filter ID drop down box. Select all 3 options, In, Out and Allow.
Leave the IP:Port as *.*.*.*.
3. Select Non-Authenticated in the Filter ID drop down box. Select all 3 options, In, Out and
Allow. Leave the IP:Port as *.*.*.*.
4. Save the settings using the Save button.
A more secure setup for this topology might be:
Allow 192.168.121.* UDP
Allow 192.168.110.* UDP
Allow 192.168.123.* UDP
Disallow
*.*.*.* N/A T
Copyright © 2006 SpectraLink Corporation. All rights reserved.
PN: 72-9958-00-A.doc
Page 10
Multicast Configuration
1. From the WM-AD Configuration menu, select the Multicast tab.
2. Select the Enable Multicast Support check box.
3. In the Defined Group dropdown field, select or enter Spectralink SVP (224.0.1.116) and click
the Add button.
4. Enable Wireless Replication for the multicast selection by selecting the checkbox for the
entry.
5. Save the settings using the Save button.
Copyright © 2006 SpectraLink Corporation. All rights reserved.
PN: 72-9958-00-A.doc
Page 11
Security
1. From the WM-AD Configuration menu, select the Privacy tab.
2. For WPA2 AES-CCKM, select WPA-PSK, deselect WPA v.1, then select WPA v.2.
3. For WPA TKIP, select WPA-PSK, deselect WPA v.2, then select WPA v.1
4. Enter the appropriate pass phrase in the Pre-shared key field.
5. Save the settings using the Save button.
There is no hex key available at this time.
Copyright © 2006 SpectraLink Corporation. All rights reserved.
PN: 72-9958-00-A.doc
Page 12
Quality of Service
1. From the WM-AD Configuration menu, select the Policy tab.
2. For the Quality of Service drop down box, select Voice WM-AD w/o WMM; this is required for
SpectraLink handsets.
3. Save the settings using the Save button.
Setting up Other SSIDs
1. Repeat the above steps, starting at step 1.
2. Create a new SSID and DHCP pool as before. Each SSID has its own sub-net.
3. Use the same filtering settings as before.
4. Set up privacy as required.
5. If creating a sub-net for data, select Best Effort in the Policy page.
Make sure the proper SSID is selected on each page as it is being configured.
Copyright © 2006 SpectraLink Corporation. All rights reserved.
PN: 72-9958-00-A.doc
Page 13
Connecting Access Points to the Controller
1. Navigate to the Reports menu.
2. Make sure the controller is configured to accept new APs (this is selected by default).
3. Physically connect the access points to the system one at a time. Once an AP is
connected to the system, it will show up in the Active Altitude™ APs page of the Reports
menu. Press F5 to refresh the screen.
Copyright © 2006 SpectraLink Corporation. All rights reserved.
PN: 72-9958-00-A.doc
Page 14
Wireless APs Address Assignment
1. After all the APs have been connected and discovered by the controller, go to the
Altitude™ APs tab and select Static Configuration. Select an AP to configure. The AP’s name
will default to their MAC address.
2. Under IP Address Assignment select either Use DHCP or Static Values. If selecting Static Values,
assign the proper values.
3. Under Summit™ Switch Search List add the IP address of the controller port.
4. Repeat steps 4 and 5 for each access point.
5. Save your settings using the Save button.
Copyright © 2006 SpectraLink Corporation. All rights reserved.
PN: 72-9958-00-A.doc
Page 15
For each AP, follow the steps in the following sections.
AP Properties
1. In the Altitude™ APs menu, select WAP Properties. Select an AP to configure. Here you can
assign a meaningful name to each AP.
2. Enable Telnet Access. This is useful for troubleshooting the setup and configuring
security settings.
Copyright © 2006 SpectraLink Corporation. All rights reserved.
PN: 72-9958-00-A.doc
Page 16
802.11b/g Settings
1. In the Altitude™ APs menu, select the 802.11 b/g tab.
2. Select an AP to configure.
3. Under Basic Settings, set the DTIM Period to 3, set the Beacon Period to 100, set the
RTS/CTS Threshold to 2346, and set the Frag. Threshold to 2346.
4. For Enable Radios, select 802.11b.
5. Under Radio Settings, select the appropriate channel and Tx Power Level. (Note: DRM
values will override this setting, if enabled). Set the Diversity to Best, the Min Basic Rate to
1 Mbps, the Max Basic rate to 11Mbps, the Max Operational Rate to 11Mbps, and the Preamble to
Short (note that the value Long works as well).
6. Save settings using the Save button.
Copyright © 2006 SpectraLink Corporation. All rights reserved.
PN: 72-9958-00-A.doc
Page 17
Enable the Radio
1. Go back to WM-AD Configuration menu, and select the Topology tab.
2. Enable each AP’s b/g radio for each SSID.
3. Set No. of Retries for Voice VO to adaptive (multi-rate) and No. of Retries for Turbo Voice TVO to 2.
4. Save all settings.
After the controller and access points are set up, the Management port is
no longer required. The Controller can now be managed through the
Host Port, or the esa0 port in this configuration. Open a browser and
connect to https://<ip address>:5825.
Copyright © 2006 SpectraLink Corporation. All rights reserved.
PN: 72-9958-00-A.doc
Page 18