1
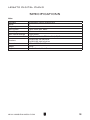
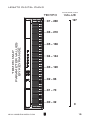
L E G AT O
digital piano
owner's manual
LEGATO D I G ITAL P IAN O
CAUTION: TO REDUCE THE RISK OF ELECTRIC SHOCK, DO NOT
REMOVE COVER OR BACK. NO USER-SERVICEABLE PARTS INSIDE.
REFER SERVICING TO QUALIFIED SERVICE PERSONNEL
IMPORTANT SAFETY INSTRUCTIONS
Do not use near water.
Clean only with a soft, dry cloth.
Do not block any ventilation openings.
Do not place near any heat sources such as radiators, heat registers, stoves, or any other apparatus
(including amplifiers) that produces heat.
Protect the power cord from being walked on or pinched.
Only use the included attachments/accessories.
Unplug this apparatus during lightning storms or when unused for a long period of time.
Refer all servicing to qualified service personnel. Servicing is required when the apparatus has been damaged in any
way, such as power-supply cord or plug is damaged, liquid has been spilled or objects have fallen into the apparatus, the
apparatus has been exposed to rain or moisture, does not operate normally, or has been dropped.
FCC STATEMENTS
1) C
aution: Changes or modifications to this unit not expressly approved by the party responsible for
compliance could void the user’s authority to operate the equipment.
2) N
OTE: This equipment has been tested and found to comply with the limits for a Class B digital device,
pursuant to Part 15 of the FCC Rules. These limits are designed to provide reasonable protection against harmful
interference in a residential installation. This equipment generates, uses, and can radiate radio
frequency energy and, if not installed and used in accordance with the instructions, may cause harmful
interference to radio communications. However, there is no guarantee that interference will not occur in a particular
installation. If this equipment does cause harmful interference to radio or television reception, which can be
determined by turning the equipment off and on, the user is encouraged to try to correct the interference by one or
more of the following measures:
• Reorient or relocate the receiving antenna.
• Increase the separation between the equipment and receiver.
• Connect the equipment into an outlet on a circuit different from that to which the receiver is connected.
• Consult the dealer or an experienced radio/TV technician for help.
W ILLIAM S P IAN OS. CO M
3
INTRODUCTION
Congratulations! You have just purchased a state-of-the-art digital piano that provides remarkable acoustic
sound and feel. We recommend that you read through this owner's manual carefully, so you can get the most
enjoyment from your new piano.
Features:
• 88 semi weighted, velocity-sensitive keys
• 5 piano & keyboard sounds
• Metronome feature with variable tempo to facilitate practice or recording
• Demo songs corresponding to each voice
• USB MIDI connections
• Stereo/mono line out jacks
• Music rest
• Battery operation (6 x D-cell 1.5V batteries are not included)
Optional Accessories (Not Included):
ESS1 Essentials Pack: • Headphones
• AC adapter
• Sustain pedal
BEFORE YOU GET STARTED
Shipment
Your piano was carefully packed at the factory, and the packaging was designed to protect the unit from
rough handling. Nevertheless, we recommend that you carefully examine the packaging and its contents for
any signs of physical damage that may have occurred during transit.
• If the unit is damaged, notify us immediately at 1-888-241-1582.
• Always use the original packing carton to prevent damage during storage or transport.
• Make sure that no children are left unsupervised with the piano or its packaging.
• Please ensure proper disposal of all packing materials.
INITIAL OPERATION / QUICK START
• Set the piano on a secure, flat surface at a comfortable height for playing.
• Insert batteries in the compartment on the bottom of the keyboard or insert the optional AC adapter
into the back panel. Then plug in the power cord into a 110V supply.
• Plug the optional sustain pedal into the Sustain jack on the back panel of the piano.
• Insert the supplied music rest into the two holes on the top panel.
• Turn on the power switch on the left side of the front panel. The LED on the button will light.
• NOTE: Set the volume control at minimum level when you connect the unit to power.
• Press the Voice Select button for the desired voice.
• Adjust the volume control.
4
O W N E R ' S MAN UAL
LEGATO D I G ITAL P IAN O
TABLE OF CONTENTS
IMPORTANT SAFETY INSTRUCTIONS.............. 3
INTRODUCTION.................................................. 4
BEFORE YOU GET STARTED............................. 4
INITIAL QUICK START......................................... 4
MIDI................................................................ 11
MIDI Channels................................................ 11
Local ON/OFF................................................ 11
Multitimbral Mode.......................................... 12
MIDI Channel Mode....................................... 12
MIDI Panic Reset............................................ 12
TAKING CARE OF YOUR DIGITAL PIANO......... 6
Memory Autosave.......................................... 12
TOP PANEL.......................................................... 7
KEYBOARD SHORTCUTS................................. 13
BACK PANEL........................................................ 7
SPECIFICATIONS............................................... 14
BOTTOM PANEL.................................................. 7
PARAMETER VALUES....................................... 15
DEMO SONGS...................................................... 8
WARRANTY........................................................ 16
OPERATIONS....................................................... 8
TUNING................................................................. 9
MENUS AND BUTTONS.................................... 10
ADVANCED FUNCTIONS.................................. 11
Factory Reset................................................. 11
Velocity Curves............................................... 11
W ILLIAM S P IAN OS. CO M
5
TAKING CARE OF YOUR DIGITAL PIANO
This Williams Legato digital piano will supply you with years of musical enjoyment if you follow the
suggestions listed below.
Product Servicing
This product should be serviced by qualified service personnel when:
• The power supply cord or the plug has been damaged.
• Liquid has been spilled into the unit or it has been exposed to rain.
• The instrument does not appear to operate normally or exhibits a marked change in performance.
• The instrument has been dropped or the cabinet has been damaged.
• Please contact [email protected] or call 888-241-1582 for parts and service information.
Handling and Transport
• Never apply excessive force to the controls, connectors or other parts of the instrument.
• Always unplug cables by gripping the plug firmly, not by pulling on the cable.
• Disconnect all cables before moving the instrument.
• Physical shocks caused by dropping, bumping, or placing heavy objects on the instrument can result in
superficial or operational damage.
• Carefully check the volume control before playing. Excessive volume can cause permanent hearing
loss.
Cleaning
• Clean the cabinet and panel with a soft, dry cloth. Do not use paint thinner or petrochemical
based polishes.
• To maintain the luster of the keys and buttons, wipe with a clean, lightly dampened cloth, and then
polish with a soft, dry cloth.
Location
• To avoid deformation, discoloration, or more serious damage, do not expose the instrument to the
following conditions: Direct sunlight, high temperatures, excessive humidity, excessive dust, strong
vibration.
• Leave enough space around the piano for proper ventilation.
• This instrument contains digital circuitry and may cause or be susceptible to interference if placed
too close to radio, television receivers, or mobile phones. If interference occurs, move the instrument
further away from the affected equipment.
• Avoid placing vinyl objects on top of the instrument, vinyl can stick to and discolor the surface.
Power
• Turn the power off when the instrument is not in use.
• To avoid damage to the instrument and other devices to which it is connected, turn the power switches
of all related devices off prior to connection or disconnection of MIDI cables.
• Turn the power off if the main cable is damaged, or the instrument has been exposed to liquid.
• Do not switch the unit on and off in quick succession, as this places an undue load on the electronic
components.
• Unplug the DC power adapter during an electrical storm.
• Avoid plugging the DC power adapter into the same AC outlet as appliances with high power
consumption, such as electric heaters or ovens.
6
O W N E R ' S MAN UAL
LEGATO D I G ITAL P IAN O
TOP PANEL
Power On/Off
Press the [POWER] button in the upper left corner of the front panel. The LED light in the button will stay on
when the piano is on.
Volume Knob
Controls the overall output volume of the piano.
Function Button Group
Reverb Button, Chorus Button, Metronome Button, Tempo Button
Voice Select Buttons
Piano, Electric Piano, Organ, Synth, Bass
Split
Delivers the keyboard into two two zones with different voices
BACK PANEL
USB Input
For computer connection, the USB connection supports Class Compliant MIDI Drivers to use with MIDI
Sequencer applications.
Sustain Input
The sustain pedal will function in a similar method as an acoustic piano sustain pedal. Using this pedal will
allow the piano key sounds to decay slowly. An optional piano-style pedal may be used. The jack will autodetect the polarity of the sustain pedal.
Outputs
Stereo/ Mono Line Out RCA Jacks. The output jacks supply a line-level signal for external amplification. Use
both jacks for stereo or just the Left jack for mono.
Headphone
The headphone socket disconnects the speakers when headphones are connected.
Power Input
Connection for the Optional DC power adapter.
BOTTOM PANEL
Battery Compartment
The product can either be powered via a power supply or battery. If batteries are inserted while the unit is
powered from a power supply, no power will be drawn from the batteries.
6 x D-cell 1.5V batteries
W ILLIAM S P IAN OS. CO M
7
DEMO SONGS
There are 5 demo songs in the Legato piano.
Each demo song will demonstrate a different
voice as indicated in the chart below.
Demo Song
Voice
2
Electric Piano
1
3
4
5
The button will light and the LED will indicate
the selection.
Piano
Changing the Voice Volume Level
Organ
1. Press the Metronome and Tempo Buttons
together to enter the Function mode.
Bass and Piano
2. Pressing C#0 activates the voice volume
menu.
Synth
The demo songs may be selected by pressing
the REVERB and CHORUS buttons together
simultaneously for 5 seconds. The demo starts
with the Piano. During playback, another voice
may be chosen by pressing a different voice
select button.
OPERATIONS
Function Mode allows you to change
parameters for Voices, Voice Volume Level,
Layer Mode, Layer Volume Level, Split Mode,
Split Volume, Split Point and Tuning.
To enter Function Mode, press the Metronome
and Tempo buttons together.
Parameter values are entered using the
keyboard, which is scaled so that the keys in
the lower octaves provide low values and the
keys in the upper octaves provide high values.
C7=127 Press and hold data entry functions
should activate after 1.5 seconds.
See Appendix on pg. 14-15.
Voices
The Legato piano has 5 built-in voices. Each
voice may be selected one at a time. They can
be layered to produce two voices at once, or
assigned to the left or right hands in the split
mode.
Voices include: Piano, Electric Piano, Organ,
Synth and Bass.
8
To select a voice, press the Voice Select button
that relates to the sound listed above the
button.
3. The volume can be changed in 88 note
steps from 0-127
4. Press the Metronome and Tempo Buttons
together again to exit the Function
mode.
Layer Mode
In Layer mode two voices may be played
simultaneously.
1. To layer two sounds, press the
corresponding voices simultaneously. Both
LEDs will light up while layered.
2. To turn Layer Mode off, select a single voice
button and the other Voice will be turned off.
To Change the Layer Volume Level
1. Press the Metronome and Tempo Buttons
together to enter the Function mode.
2. Pressing D#0 activates the layer volume
menu. The volume can be changed in 88
note steps from 0-127 where C7=127 and
A-1=0.
3. Pressing a key will play C3 of the currently
selected layered sound at the volume
corresponding to the key value.
4. Press the Metronome and Tempo Buttons
together again to exit the Function mode.
O W N E R ' S MAN UAL
LEGATO D I G ITAL P IAN O
Split Mode
To Change the Split Point
Split Mode allows the keyboard to be divided
into two sections so that different voices may
be played with the left and right hands. The
volume may be independently adjusted for each
voice, the Split Point (the highest note played
with the left hand) may be adjusted and the
Split Voice may be changed as desired.
1. Press the Metronome and Tempo Buttons
together to enter the Function mode.
To Enter Split Mode
2. Pressing C#2 activates the Split Point menu.
3. The split point can be changed in 88 note
steps from 0-87 where C7=87 and A-1=0.
4. Press the Metronome and Tempo Buttons
together again to exit the Function mode.
Press the [SPLIT] button.
The Split (left hand) voice will be Upright Bass
and the Split Point will be B2.
To Change the Split Volume
1. Press the Metronome and Tempo Buttons
together to enter the Function mode.
2. Pressing D#2 activates the Split Volume
menu. See Appendix on pg. 14.
3. The volume can be changed in 88 note
steps from 0-127 where C7=127 and A-1=0.
4. Press the Metronome and Tempo Buttons
together again to exit the Function
mode.
To Change the Split (Left Hand) Voice
Press and hold the [SPLIT] button while
depressing the desired Voice Select button.
Change the Main (Right Hand) Voice
Turn Off Split Mode
Press the SPLIT button. The LED will turn off as
well as the currently selected voice
MICRO TUNING
To Change the Voice Tuning
1. Press the Metronome and Tempo Buttons
together to enter the Function mode.
2. Press the A#-1 key to activate the tuning
menu. The keyboard will now play middle C
piano 1 voice (C3) on every note across the
keyboard. Playing C3=C3. Pressing any key
downwards to A#-1 will play C3 but change
the tuning setting proportionately to tune
down by a whole semi tone. (See Appendix
Pg 15)
3. Pressing any key from C3 and up will play
the C3 note but at tuning settings to tune
the keyboard up by a whole semi tone.
4. Press the Metronome and Tempo Buttons
together again to exit the Function mode.
1. Exit Split Mode by pressing the [SPLIT]
button.
2. Select the new voice and then press [SPLIT]
again to re-enter Split mode.
W ILLIAM S P IAN OS. CO M
9
Metronome Button
MENUS &
BUTTONS
There are 4 function buttons on the Legato that
control various functions. These are Reverb,
Chorus, Metronome and Tempo.
Reverb and Chorus Buttons
The Reverb and Chorus effects may be applied
to each voice individually and will be retained
even when the power is turned off.
To apply either effect, press either button. The
button will light and the effect will be heard
when the piano is played.
To turn off the effect, press the button of the
desired effect again and the LED light will go off.
To modify the depth of the effects
1. Press and hold the effect button
1. Press the METRONOME button to activate
the metronome function. You can hear the
click in headphones or speakers. When on,
the button LED is lit.
2. To set the level of the metronome click,
press and hold the button. The LED will
blink once the menu is active.
3. You can then select the level by pressing a
key on the keyboard.
4. Press the Metronome button again to exit to
the previous state.
Tempo Button
This affects the speed of the metronome.
1. To change the tempo, press and hold the
button for 3 seconds to change the setting.
The LED will blink to current tempo speed.
If the Metronome is off, no sound will be
heard.
2. While this function is active the LED should
blink. You can then release the button and
press a key on the keyboard corresponding
to the setting you want for the reverb
depth. It's possible to change the setting by
pressing multiple keys after each other until
the right setting is found.
2. Press a key on the keyboard to select a
tempo. The LED will blink to the new value.
It is possible to make multiple changes and
see the LED tempo change as the keys are
pressed.
3. Set the reverb depth by pressing a key on
the keyboard to select the value. See the
Appendix for the value ranges.
Tempo defaults to 120 but settings are retained
over power cycling. 120BPM = C3 or Middle C.
4. The keyboard should still play the sound
originally selected so the user can hear the
new setting with the sound selected.
5. To exit, press the Reverb button again.
Reverb should be activated upon exit and
the LED button light.
Reverb and Chorus settings are set per
Instrument and retained over power cycling.
10
3. To exit, press the tempo button. The LED
will stop blinking and go off. See Appendix.
Advanced Functions/Edit mode for Metronome
and Tempo See Appendix pg 15.
Changing the Time Signature
Pressing the Metronome and Tempo butons
allows the user to change the time signature for
the metronome. When this menu is selected the
metronome starts playing at the current tempo
setting. Pressing G#0 toggles through the time
signature options starting with the current
setting. Default is 4/4 and the following options
are available to toggle through: 2/4, 3/4, 4/4,
5/4, 6/8, 9/8, 12/8.
O W N E R ' S MAN UAL
LEGATO D I G ITAL P IAN O
ADVANCED
FUNCTIONS
Advanced Function Mode
To enter Advanced Function Mode, press
Metronome and Tempo buttons simultaneously.
The keyboard does not play a sound at this
point but is used for menu selection as per the
information below.
Velocity Curve Table
F#1
Low Velocity
G#1
Normal Velocity
A#1
High Velocity
MIDI
Performing a Factory Reset will clear all battery
backed memory and restore all functions to
factory defaults.
The Musical Instrument Digital Interface
(MIDI) is an industry-standard protocol that
enables electronic musical instruments such
as keyboards, computers, drum machines,
etc. to communicate, control and synchronize
with each other. MIDI transmissions consist of
electronic codes that communicate notes to be
played, the instrument, pitch or intensity that
notes are to be played with, and the controlling
codes such as volume, vibrato, cues and clock
signals. The Legato has several functions that
facilitate its use as a MIDI device or controller.
1. Turn the Power Off.
MIDI Channels
2. Hold down the [REVERB] and [CHORUS]
buttons while powering on the piano (The
LED Display will light ALL segments and all
LEDs on the device will light).
The Legato has 16 channels numbered from
1-16. Each of the channels is responsible for
a voice. When the instrument receives MIDI
information from an external device, the active
channel is determined by the control message.
To accept a menu setting press the Metronome
and Tempo buttons simultaneously again. This
will exit the Edit menu and then you will have
to re-enter the Edit menu to make changes to
other settings.
Factory Reset
3. Release the [REVERB] and [CHORUS]
buttons.
The transmission channels are fixed as follows:
Velocity Curves
Channel 1 Master voice (keyboard)
You can change the way the keyboard responds
to your playing by adjusting the Velocity curve
settings
Channel 2 Split voice (keyboard)
1. Press the Metronome and Tempo Buttons
together to enter the Function mode.
2. Press F#1, G#1 and A#1 to select between
Low, Normal and High velocity curves.
When selecting F#1 low, Piano 1 C3 will
play at velocity value 30. When G#1 Normal
is selected, Piano 1 C3 will play at velocity
value 70. When A#1 High is selected, Piano
1 C3 will play at velocity value 127 and the
piano will exit Function Mode automatically.
W ILLIAM S P IAN OS. CO M
Channel 3 Layer voice (keyboard)
Local On/Off
Turning the Local On/Off function to “Off” will
disconnect the keyboard from the internal
sound engine of the piano. The Legato may
then be used as a MIDI controller to control
other MIDI devices or virtual instrument
software running on a computer, without
playing the sounds on the piano. Additionally,
it may be desirable to turn local playing off for
other requirements such as when using MIDI
sequencing software on your computer.
11
Local On/Off (cont'd)
MIDI Panic Reset
1. Press the Metronome and Tempo Buttons
together to enter the Function mode.
1. Press the Metronome and Tempo Buttons
together to enter the Function mode.
2. Pressing D#1 allows the user to switch
local on or off. When D#1 is first pressed
the current setting is confirmed by Piano
1 C3 playing once for on and twice for off.
Pressing D#1 again will change the setting
playing Piano 1 C3 the amount of times
equivalent to the new setting.
2. Pressing C#1 allows the user to activate
Panic, which send out general MIDI reset
messages such as all note off, etc. Once
Panic reset has been completed, Piano will
automatically exit Edit mode.
3. Press the Metronome and Tempo Buttons
together again to exit the Function mode.
1. Press the Metronome and Tempo Buttons
together to enter the Function Mode.
Multitimbral Mode
2. Pressing F#2 allows the user to switch auto
Power On or Off. When F#2 is first pressed,
the current setting is confirmed by Piano 1
C3 playing once for On and twice for Off.
Pressing F#2 again will change the setting
playing Piano 1 C3 the amount of times
equivalent to the new setting.
The Legato is able to receive MIDI information
on up to 16 channels simultaneously. If you
plan to use your piano with a multitrack MIDI
recording system, you can record up to 16
different parts using the Williams Legato voices,
each played back individually on different MIDI
channels. To ensure your recorded part is
played back with the correct voice, make sure
to press the voice button first and play your part
second.
NOTE: Because the Legato is receiving
playback information via MIDI, the currently
selected voice on the piano may not correspond
to the voice being played back.
MIDI Channel Modes
1. Press the Metronome and Tempo Buttons
together to enter the Function mode.
2. Pressing A#0 allows you to change the MIDI
channel. The main piano sound will play
Piano 1 C3 the amount of times equivalent
to the current value. So if MIDI channel 5 is
selected it will play 5 times. You then press
A#0 five times to select channel 10. Piano 1
C3 will play the amount of times equivalent
to the current setting, after 2 seconds of
inactivity. Once 16 is reached, pressing one
more time will select 1.
Auto Power On/Off
3. Press the Metronome and Tempo buttons
together again to exit the Function Mode.
NOTE: If Default is on, it means the unit will
Auto Power Off after 30 minutes if there is no
operation, but expect no demo playing.
Memory Autosave
When modifying the settings of the Williams
Legato the following settings will be saved after
you turn off the keyboard — Reverb, Chorus (for
each voice), Tempo, Metronome volume, Time
Signature, Main Volume, Layer Volume, Split
Volume, MIDI Channel, Velocity Curve, Split
point and Auto Power On/Off.
3. Press the Metronome and Tempo Buttons
together again to exit the Function mode.
12
O W N E R ' S MAN UAL
LEGATO D I G ITAL P IAN O
SPECIFICATIONS
Value
Keyboard
Voices
Polyphony
Voice Control
Demo Songs
MIDI Transmit Settings
Connectors
Speakers
Dimensions
Weight
Supplied
88 weighted, velocity-sensitive keys
5
32
Layer, Touch, Split, Metro
5
Local Control
USB, Sustain Pedal, RCA-Line Out (L/R), Phones
2x10W @ 8Ω, low freq driver
2x10W @ 8Ω, high freq driver
127 cm X 27.6 cm X 90 mm
8.5 kg
Owners Manual, Music Stand
W ILLIAM S P IAN OS. CO M
13
14
O W N E R ' S MAN UAL
A#-1
Tuning
C#0
Voice Volume
G#0
Time Signature
D#1
Local On/OFF
C#1
Panic
A#1
Hard Velocity
G#1
Normal Velocity
F#1
Soft Velocity
C#2
Split Point
D#2
Split Volume
To accept a menu setting, press the Metronome and Tempo buttons
simultaneously again. This will exit the Edit menu and then you will have
to re-enter the Edit menu to make changes to other settings.
To enter Advance Function Mode, press Metronome and Tempo buttons
simultaneously. The keyboard does not play a sound at this point but is
used for menu selection as per the information below.
FUNCTION MODE:
F#0
A#0
Metronome Volume MIDI Channel
D#0
Layer Volume
KEYBOARD
SHORTCUTS
F#2
Auto Power
On/Off
C3
Middle C
LEGATO D I G ITAL P IAN O
VOLUME, REVERB, CHORUS
VALUE
C7 – 280
127
100
TEMPO
C5 – 168
Parameter Values by Key Range
TEMPO MAP
PARAMETER VALUES
BY KEY RANGE
C6 – 210
C4 – 144
C3 – 120
C2 – 96
C1 – 70
0
C0 – 32
W ILLIAM S P IAN OS. CO M
0
15
WARRANTY
Williams provides the following limited warranty, to the original purchaser: this piano is warranted to
be free from electronic and/or structural defects in materials and workmanship for a period of one
(1) year from the date of original purchase. If this Williams piano is defective, at its option during the
warranty period, subject to the terms of this limited warranty and upon proof of purchase, Williams
will either repair or replace the listed piano with a same or similar model of equal age or newer. Any
repairs or modifications must be completed by Williams and/or an authorized agent of Williams.
The warranty obligations as set forth herein shall be performed free of charge with the exception of
all delivery and shipping expenses. This limited warranty will not apply to this product in the case
of misuse, abuse, neglect, alterations, normal wear and tear or other circumstance not directly
attributed to electronic and/or structural defects in materials or workmanship. Without limiting the
foregoing, this limited warranty will also be inapplicable to products that have not been maintained
or replaced in accordance with the manufacturer’s instruction, or to products from which the serial
number has been removed or altered. If covered defects are found, contact your authorized Williams
dealer with regard to the alleged defect within ten (10) days of discovery of the problem.
The foregoing repair or replacement obligation for defective products shall be the sole and exclusive
remedy of this limited warranty. All warranties including, but not limited to, the express warranty and
the implied warranties of merchantability and fitness for a particular purpose are limited to the one (1)
year warranty period. Some states do not allow limitation on how long an implied warranty lasts, so
the above limitation may not apply to you. There are no express warranties beyond those stated here.
In the event that applicable law does not allow the limitation of the duration of the implied warranties
to the warranty period, then the duration of the implied warranties shall be limited to as long as is
provided by applicable law. No warranties apply after that period. Retailer and manufacturer shall not
be liable for damages based upon inconvenience, loss of use of product, loss of time, interrupted
operation or commercial loss or any other incidental or consequential damages including but not
limited to lost profits, downtime, goodwill, damage to or replacement of equipment and/or property.
1-Year Parts & Labor Warranty
Register online at www.williamspianos.com
16
O W N E R ' S MAN UAL


![Overture 2 Owner`s Manual [US]](http://vs1.manualzilla.com/store/data/005690862_1-0f7bb48baaf3473aa086657512069e12-150x150.png)
![Rhapsody 2 Owner`s Manual [US]](http://vs1.manualzilla.com/store/data/005663417_1-92bddf67d752d586c47af9cd7ea47d7e-150x150.png)