1
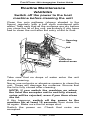
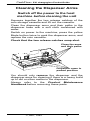
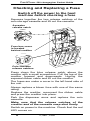
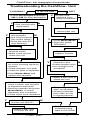
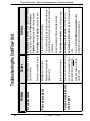
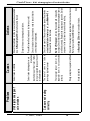
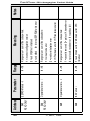
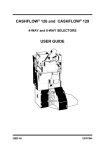
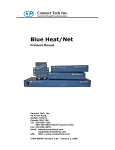
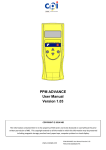
The ® 530 REFERENCE SERIES CHANGEGIVER POCKET GUIDE ROUTINE MAINTENANCE, SAFETY, INSTALLATION & TROUBLESHOOTING CashFlow®CashFlow®CashFlow®C ashFlow®CashFlow®CashFlow®Cas hFlow®CashFlow®CashFlow®Cash Flow®CashFlow®CashFlow®CashFl ow®CashFlow®CashFlow®CashFlo w®CashFlow®CashFlow®CashFlow ®CashFlow®CashFlow®CashFlow® CashFlow®CashFlow®CashFlow®C ashFlow®CashFlow®CashFlow®Cas hFlow®CashFlow®CashFlow®Cash Flow®CashFlow®CashFlow®CashFl ow®CashFlow®CashFlow®CashFlo w®CashFlow®CashFlow®CashFlow ®CashFlow®CashFlow®CashFlow® CashFlow®CashFlow®CashFlow®C ashFlow®CashFlow®CashFlow®Cas hFlow®CashFlow®CashFlow®Cash Flow®CashFlow®CashFlow®CashFl ow®CashFlow®CashFlow®CashFlo w®CashFlow®CashFlow®CashFlow 20562 G1 143834044 CashFlow® 530 changegiver Pocket Guide Published by : MEI Internet: http://www.meigroup.com For information on translations in your country, please write to the Technical Communications Manager at the above address. CashFlow® 530 changegiver Pocket Guide ©, MEI UK International Ltd., 1994. All rights reserved. Except as permitted under the relevant local legislation, no part of this publication may be copied, transmitted, transcribed, or distributed in any form or by any means, or stored in a database or retrieval system, or translated into any language (natural or computer), without the prior written permission of MEI. MEI®, CashFlow® and the MEI device are registered trademarks. ©, MEI., 1994. MEI reserves the right to change the product or the product specifications at any time. While every effort has been made to ensure that the information in this publication is accurate, MEI disclaims any liability for any direct or indirect losses (howsoever caused) arising out of use or reliance on this information. This document does not necessarily imply product availability. Part Number : 143834044 This Edition ( August 1994 ) ii , MEI., 1994 CashFlow® 530 changegiver Pocket Guide User Safety Notices WARNING Before cleaning, servicing, removing or replacing CashFlow® units, ALWAYS SWITCH OFF or ISOLATE the ELECTRICITY SUPPLY to the host machine. CAUTION This guide is for use only by personnel trained to carry out electrical installation. Maximum Operating Voltage Do not apply more than the voltage specified on the unit. Dangerous Environments Do not operate the unit in the presence of flammable gases or fumes, or after the entry of fluid into the machine. Disposal of Product If necessary, always dispose of defective units according to local regulations. Conformance to International Standards When installed and operated according to the instructions provided for the particular unit, CashFlow® products meet the applicable international and national safety standards for any country in which they are used. , MEI., 1994 3 CashFlow® 530 changegiver Pocket Guide Routine Maintenance WARNING Switch off the power to the host machine before cleaning the unit Clean the coin pathway (shown shaded in the figure) regularly with a soft cloth moistened with water. Take care that all the surfaces are dry before you close the lid of the unit, particularly if you have had to clean the unit after the entry of dirt or fluid. Opening tab Lid Clean the shaded areas Take care that no drops of water enter the unit during cleaning. Never use solvents or abrasive creams to clean the unit. These will damage the surfaces. Ensure that the lid is fully closed after cleaning. NOTE: If you switch the machine on when the lid of the acceptor unit is not fully closed, coins will be rejected, even if you then close the lid. If this happens, switch off the power to the machine for at least 15 seconds, then close the lid again. Make sure the lid snaps shut. Switch the power on. Check that coins are accepted. 4 , MEI., 1994 CashFlow® 530 changegiver Pocket Guide Cleaning the Dispenser Arms Switch off the power to the host machine before cleaning the unit Squeeze together the two release catches of the coin storage cassette and lift out the cassette. Clean the dispenser arms and their paths in the dispenser base with a soft cloth moistened with water. Switch on power to the machine, press the yellow Mode button twice to park the dispenser arms, and replace the coin cassette. Check that the two release catches snap shut. Clean the arms and their paths Dispenser arms in parked position You should only remove the dispenser and the dispenser arms for cleaning if there is a heavy build up of dirt or other matter in the dispenser. Always refer to the Product Maintenance Handbook before removing these parts. , MEI., 1994 5 CashFlow® 530 changegiver Pocket Guide Checking and Replacing a Fuse Switch off the power to the host machine before checking a fuse Squeeze together the two release catches of the coin storage cassette and lift out the cassette. Acceptor release catch Fuse box cover is located behind creditor Coin cassette release catches Press down the blue release catch above the creditor with a small screwdriver. Pull the top of the creditor forward and downwards. Unplug the exposed ribbon cable and lift out the creditor. The fuses are under a cover in the left hand side of the unit. Always replace a blown fuse with one of the same rating. Replace the creditor, reconnect the ribbon cable and press the creditor into place. Park the dispenser arms and replace the coin cassette. Make sure that the release catches of the creditor and of the cassette snap shut firmly. Switch on power to the machine. Check that the red LED comes on. 6 , MEI., 1994 CashFlow® 530 changegiver Pocket Guide Troubleshooting the CashFlow Unit Is the red LED... FLASHING? • Check Route Alpha addresses 340 to 349 for error description Y • Press A, B, C, D • Are correct coins dispensed? Y OFF? • Is the unit’s interface loom firmly connected? N N • Re-connect loom and re-start unit Y • Feed change coins into acceptor • Are coins routed to the correct tubes? • Does the red LED stop flashing? N Y • Float up tubes to the required levels • Make a trial vend to check the unit • Press Mode+Mode • Does the yellow LED flash? N • Check fuses, replace if blown Y • Remove cassette, check for coins covering top-level sensors • Check acceptor coin path • Check for jams in separator • Press Mode+Mode and replace the cassette • Press A, B, C, D to dispense coins • Insert change coins • Are change coins accepted? N • Make a trial vend to check the unit • Check for sufficient change coins in tubes, and for jams in dispenser and tubes • Remove cassette and press Mode+Mode to check dispenser arm movement • Check reject lever clearance Y • Are all coins accepted and the red LED lit? • Blocker signal from VMC not present. • Check for blocker from VMC to unit. Is signal present? N • Make a trial vend to check the unit , MEI., 1994 • Refer to the troubleshooting table in this Guide 7 N 8 Coins are accepted but no credit is given Poor coin acceptance No coins accepted Problem , MEI., 1994 Switch off power to the machine, and check the loom. Switch off power to the machine, and check the separator for jams. Refer to the Product Maintenance Handbook before attempting to clean the strobes or the opto’s. Coin jam in the separator module (post gate strobes are covered) Accept gate strobes mechanism blocked or dirty Switch off power to machine, check and clean acceptor. Adjust the modules until they are aligned accurately. Check that the coin entry and exit chutes of the machine are aligned with the coin entry cup on the unit and the cashbox on the machine. Power loom is not inserted correctly Build-up of dirt in the acceptor Modules are not mounted and aligned correctly Check and re-level the unit if necessary. Switch off power to the machine, and check the loom. Power loom not inserted correctly Changegiver unit is not level Switch off power to machine, check if the opto’s are blocked, and clean the unit. Refer to the Product Maintenance Handbook’s cleaning section before cleaning the opto’s. Actions Blocked accept gate opto’s, or build up of dirt in the unit Causes Troubleshooting the CashFlow Unit CashFlow® 530 changegiver Pocket Guide Coins are not routing correctly Unit rejects one type of coin or token Problem , MEI., 1994 9 A tube is disabled Check that the acceptor and separator are the correct versions. Refer to your authorised MEI distributor. Use the Route Alpha 250 terminal to enable the tube. Switch off the power, remove the cassette and release the acceptor. Check that the top-level sensor and separator looms are fitted correctly. Replace the acceptor and cassette. Switch on power to the unit, insert coins and check routing. The top-level sensor loom or the separator loom is not connected correctly Wrong acceptor or separator is fitted Check tube counts. If they are above the pre-set float levels and automatic tube inventory is set, press Mode+A+C to float-down the coins in the tubes. Check the tube levels, then make a vend to check that the correct change is dispensed. Press A to leave float mode and to clear any credit. Discard the worn or damaged coin/token. Check the coin/token is in the coin set, and has been enabled. Use the Route Alpha 250 terminal to enable the coin Actions The level of coins in a tube is covering a top-level sensor Coin or token is damaged or w o r n A tube has reached pre-set float level, further coins are rejected because the unit is in float mode Coin or token is inhibited Causes CashFlow® 530 changegiver Pocket Guide 10 If required, float up through acceptor with correct change coins. Check coin values and prices, reset if necessary using the Route Alpha 250 terminal. Press A, B, C and D to check if change coins are dispensed. Insufficient change coins are available Incorrect coin values are set Incorrect prices are set for selections No coins are dispensed Check that change coins are available in the tubes. If necessary, float up the tubes with the correct change coins. Switch off power to the machine and check that the dispenser loom is fitted correctly. Refer to the Product Maintenance Handbook. Check that the dispenser module is operating correctly. Refer to Maintenance Handbook’s module replacement section before you attempt to service or to replace the dispenser. Levels of coins in the tubes are below the safe count Dispenser loom not connected, or loose Faulty dispenser module Check that coins are being routed to the tubes correctly. Check Route Alpha 250 address 242. Unit is in No overpay mode Incorrect change is dispensed Re-float the coin tubes through the acceptor until the low-level sensor mirrors are covered. Too few coins in the change tubes, leaving the low-level sensors uncovered High-value coins are rejected and exact change light is ON Actions Causes Problem CashFlow® 530 changegiver Pocket Guide , MEI., 1994 , MEI., 1994 Red LED stays OFF No power to the unit - loose loom or blown fuse No power to the unit, or voltage not correct 11 Restart the machine and check that the red LED is on. Replace any blown fuses. If yellow LED stays off, switch off power to the machine, and check all power looms and fuses. If the yellow LED flashes, the power is ON. Test the power supply by pressing the Mode button. Check that the power supply to the changegiver is at the voltage shown in the window on the keypad label. Check clearance is between 2 - 3mm, and adjust if necessary. Not enough reject lever clearance Press Mode+Mode to park the dispenser arms before replacing the cassette, then dispense a coin from each tube to check operation. Check for jams in the acceptor and in the tubes. Clear the jams. Switch off the power to the machine. Open and close the lid of the acceptor, wait at least 15 seconds, then switch on again. Coin jam in the changer mechanism Red LED is ON but coins are not accepted No action Actions Lid of the acceptor is open Normal operation Causes Red LED is ON, except when a vend is made Problem CashFlow® 530 changegiver Pocket Guide 12 , MEI., 1994 Remove the coin cassette and check the tops of the coin tubes. Switch off the power to the machine, remove the cassette and check the dispenser for jams. A coin has covered the top-level sensor mirrors A coin is jammed in the dispenser module Coin cassette is unclipped Fault with the audit module Check Route Alpha 250 addresses 340 - 349. Press A, B, C & D to check if coins are dispensed. If the red LED is still flashing, switch off the power to the machine, wait at least 15 seconds and switch on again. Check that coins are dispensed. Fault with the changegiver unit Red LED is FLASHING Press coin cassette into place firmly, ensure clips snap shut. Return the unit to your MEI distributor for repair if necessary. Check the Route Alpha 250 audit addresses. Clear any blockages and check for damaged coins. Press and hold down A, B, C and D for at least three seconds each to dispense coins down to the tube safe counts. Press Mode + A + B, and insert change coins through the creditor until tubes reach their pre-set levels. If an audit FEM is fitted, Mode+A+B is not available to reset tubes automatically to pre-set levels. In this case, float tubes to required levels and make a trial vend. Mismatch between the true coin count in a tube and the count being registered by the changegiver Red LED is OFF, but change coins are routed to the cashbox and not to the tubes Actions Causes Problem CashFlow® 530 changegiver Pocket Guide , MEI., 1994 Switch off power to the machine and open and close the lid of the unit. Make sure the lid snaps shut firmly. Wait at least 15 seconds and switch the power on again. The lid of the acceptor is not closed firmly Yellow LED is OFF Use the table of Route Alpha 250 error addresses in this manual Check Route Alpha addresses 340 to 349 for a description of the error Red LED is flashing and no coins are accepted 13 No action Switch off power to the machine and clean the acceptor. The coin path in the acceptor is dirty Normal operation Check the acceptor loom and reconnect it if necessary. The acceptor loom is not connected If it is faulty, refer to your authorised MEI distributor. Check the keypad module. Check the transformer. If faulty, refer to your MEI distributor. Faulty LED or keypad module Check the keypad module. If faulty, refer to your MEI distributor. Faulty transformer .Check for a full waste bucket. Check if machine is paused halfway through a vend cycle. Complete the cycle if necessary. LED or keypad fault Restock machine if necessary. No blocker signal from the machine Actions No stock available for vending Causes Red LED permanently OFF. No other problems. Red LED stays OFF and all coins are rejected Problem CashFlow® 530 changegiver Pocket Guide 14 Normal operation No power supply to the vending machine The changegiver is in shifted mode because the Mode button has been pressed Faulty LED or faulty keypad module Faulty unit, or faulty modules Yellow LED remains OFF when Mode button is pressed Yellow LED is flashing Yellow LED is OFF permanently. No other problems. Problems in handling coins persist after all solutions have been tried Causes Yellow LED flashes when coins are accepted Problem , MEI., 1994 Contact your MEI distributor. To help diagnosis, note the symptoms, and the model and serial number of the unit for reference. These numbers are on a label on the side of the unit. If faulty, refer to your MEI distributor. Check the keypad module. (To exit from shifted mode, press Mode or wait for 45 seconds ) The keypad is available to change the functions of the unit. Replace blown fuses, following the instructions in this manual. Switch off power to the machine, check all looms and check all fuses. No action Actions CashFlow® 530 changegiver Pocket Guide CashFlow® 530 changegiver Pocket Guide Setting a Unit’s Functions with a MEI Route Alpha 250 Terminal Each piece of data which determines the unit’s functions is stored in a separate address. Use the terminal to read an address and to check or set the unit’s functions. Setting Functions Insert the plug on the Route Alpha 250 terminal into the six-way connector in the acceptor unit. Six-way connector ENTER LEFT RESET Display UP RIGHT DOWN A half-size zero is displayed when the terminal powers up, followed by the software version number and then the first address number with a dot, or a dot and dash (1. or 1.-) Functions can be changed only if a dash shows after the address number. Press UP or DOWN slowly to display addresses one after the other. Hold down a key to display addresses at an increasing speed. Press a key twice quickly to jump large blocks of addresses. To set a function, press ENTER to show the current value in the selected address, then change the value by pressing UP or DOWN. Press ENTER again to return to the address display. Press RESET to store the new value. NOTE: If an error occurs, four half-size zeros appear. Press RESET to clear this display and to return to the current address. , MEI., 1994 15 CashFlow® 530 changegiver Pocket Guide Troubleshooting the MEI Route Alpha 250 Terminal Symptom Cause Solution Terminal displays an error message at power-up Communications error Press RESET Terminal displays an error message when changing between address and data mode Communications error between terminal and product, or the terminal does not recognise the product it has been connected to Repeat the last operation. Terminal powers up but addresses cannot be accessed The product is not compatible with the terminal Different terminal needed, or different software needed. Terminal does not power up Bad connections or faulty cable Check connections. replace lead if necessary. Terminal powers up but one of the keys does not work Faulty key Use the terminal’s selftest option. If the key is faulty, send terminal for repair. Non-standard characters printed on the display Faulty unit Send unit for repair. 16 , MEI., 1994 Single vend or multi-vend Escrow return inhibit Reset mode (electromechanical installation only) 227 228 Prices 1, 2, 3, & 4 201 - 204 226 Maximum credit Parameter 200 Address , MEI., 1994 0-4 0-1 0-1 0-65,535 0-65,535 Range 1 = multi-vend 17 4 = reset after escrow accept signal 3 = blocker hold reset 2 = delayed blocker reset (300mS) 1 = delayed blocker reset (20mS) 0 = blocker reset 1 = escrow return inhibited 0 = escrow return allowed 0 = single vend Values of prices 1, 2, 3 & 4 Maximum credit allowed Meaning Address Settings for Use with the MEI Route Alpha 250 Terminal Notes CashFlow® 530 changegiver Pocket Guide 18 Inhibit coin: coins 5 to 8 Inhibit coin: coins 9 to 12 231 Inhibit coin: coins 1 to 4 Parameter 230 229 Address , MEI., 1994 0 - 15 0 - 15 0 - 15 Range Code 8 = inhibit coin 4 Code 2 = inhibit coin 2 Code 1 / 2 / 4 / 8 = inhibit coin 9 / 10 / 11 / 12 Code 0 = no coins inhibited Address value = the sum of the codes where: Code 1 / 2 / 4 / 8 = inhibit coin 5 / 6 / 7 / 8 Code 0 = no coins inhibited Address value = the sum of the codes where: For example, codes 1 + 8 = 9. If you enter 9 as this address range value, coins 1 and 4 will be inhibited. To inhibit more than one coin at the same time, add their codes together. Code 4 = inhibit coin 3 Code 1 = inhibit coin 1 Code 0 = no coins inhibited Address value = the sum of the codes where: Meaning Notes CashFlow® 530 changegiver Pocket Guide , MEI., 1994 Clear overpayment inhibit 243 Decimal point position 241 Overpayment inhibit Price hold 238 242 Change delay Inhibit coins 9 - 12 Inhibit exact change group Inhibit coins 5 - 8 Inhibit exact change group 235 234 233 Inhibit exact change group 232 Inhibit coins 1 - 4 Parameter Address 19 0-1 0-1 0- 3 0-1 0-255 0 - 15 0 - 15 0 - 15 Range 1 = hold price 0 = cleardown allowed 1 = cleardown inhibited 0 = overpayment allowed 1 = overpayment inhibited 0 / 1 / 2 / 3 = move point position 1, 2, or 3 spaces 0 = do not hold price Delay in steps of 0.5 second Code 1 / 2 / 4 / 8 = inhibit change coin 9 / 10 / 11 / 12 Code 1 / 2 / 3 / 4 = inhibit change coin 5 / 6 / 7 / 8 Code 1 / 2 / 4 / 8 = inhibit change coin 1 / 2 / 3 / 4 Meaning Notes CashFlow® 530 changegiver Pocket Guide 20 Price teach inhibit Fast sense 245 246 Float down (automatic tube inventory) Float level for tube A Float level for tube B Float level for tube C Value of coins in tubes Coin count for tube A 247 251 252 253 310 311 (electromechanical only) Keypad inhibit Parameter 244 Address , MEI., 1994 0 - 255 0 - 65,535 0 - 255 0 - 255 0 - 255 0-1 0-1 0-1 0-1 Range 1 = price teach inhibited 1 = keypad disabled Current number of coins in tube A - READ ONLY Value of coins in ALL tubes - READ ONLY Set number of coins to be floated to in tube C Set number of coins to be floated to in tube B Set number of coins to be floated to in tube A 1 = float down enabled 0 = float down disabled 1 = fast 0 = normal 0 = price teach allowed 0 = keypad enabled Meaning Notes CashFlow® 530 changegiver Pocket Guide Disabled tube at position A, B, or C EEPROM errors - i 341 READ ONLY 342 READ ONLY Value of coins 1 - 12 321 - 332 Full sensor errors on tubes A, B, or C Coin count for tube C 313 340 READ ONLY Coin count for tube B Parameter 312 Address , MEI., 1994 0 - 15 0 - 31 0 - 255 0 - 65,535 0 - 255 0 - 255 Range 21 4 = corrupt audit FEM 8 = audit FEM removed 2 = page 1 EEPROM error Range value = sum of the codes, where: 1 = page 0 EEPROM error 1 / 2 / 4 = tubes A / B / C Range value = sum of the codes, where: 128 = post gate strobe error Range value = sum of the codes, where: 1 / 2 / 4 = tubes A / B / C Current number of coins in tube C - READ ONLY Current number of coins in tube B - READ ONLY Meaning Notes CashFlow® 530 changegiver Pocket Guide 22 Operational errors - ii BDV errors i 346 Operational errors - i 344 READ ONLY 345 EEPROM errors - ii Parameter 343 READ ONLY Address , MEI., 1994 0 - 15 0 - 15 0 - 15 0 - 15 Range 8 = internal EEPROM write error 8 = cashbox full 1 = audit timed out 2 = VMC timed out 4 = CPC timed out 4 = protocol A receive error 1 = cassette removed 2 = protocol A transmit error Range value = sum of the codes, where: 4 = HI2 hardware error 8 = HI2 transmission error 2 = creditor initialisation error 1 = coin-set code error Range value = sum of the codes where: 4 = undefined 2 = audit FEM not initialised 1 = incorrect configuration version Range value = sum of the codes, where: Meaning Notes CashFlow® 530 changegiver Pocket Guide , MEI., 1994 363 362 361 Audit module - VMC I/D 360 23 ADVANCED AUDIT ONLY Audit - print-out lines limit ADVANCED AUDIT ONLY Audit - print-out type ADVANCED AUDIT ONLY Audit - print-out language ADVANCED AUDIT ONLY Reset error flags BDV errors ii Parameter 349 347 Address 0 - 25 0-2 0-4 0 - 65,535 0-1 0 - 15 Range Limits the details on the print-out to the first few specified price lines 2 = BASIC + INTERIM + FREE VEND REPORT 0 = BASIC 1 = BASIC + INTERIM VEND REPORT 3 = Dutch 4 =Spanish 0 = English. 1 = French 2 = German Vending machine identification code 1 = reset error flags 2 = VMC incompatible 0 = do not reset error flags 4 = CPC incompatible 1 = audit incompatible Range value = sum of the codes where: Meaning Notes CashFlow® 530 changegiver Pocket Guide 24 Audit unit is BDV VMC unit is BDV 386 ADVANCED AUDIT ONLY Audit - installation year ADVANCED AUDIT ONLY Audit - installation month ADVANCED AUDIT ONLY Audit - installation day Parameter 385 366 365 364 Address , MEI., 1994 0-1 0-1 0 - 99 1 - 12 1 - 31 Range 1 = VMC is BDV 0 = VMC unit is not BDV 1 = audit unit BDV type 0 = audit unit not BDV type Year of installation into machine Month of installation into machine Day date of installation into machine Meaning Notes CashFlow® 530 changegiver Pocket Guide CashFlow® 530 changegiver Pocket Guide Installing, Starting and Testing a CashFlow Unit Before installation... 1. Check that the unit’s specifications are correct for the host machine. 2. Ensure that the unit’s modules are assembled securely. 3. Check that the connector on the unit’s loom matches the one on the host machine. 4. Confirm that the voltage of the power supply to the changegiver is the same as that shown in the keypad window of the changegiver. Tighten the screw in the right-hand keyhole slot to secure the unit in the host machine Mounting points Note the model number and serial number before you contact your MEI distributor Fit the changegiver onto the locating screws in the machine 1. Ensure that the unit is level on its three keyhole mounting slots. 2. Check that the right-hand mounting screw is at the top of the keyhole slot, and that the unit is level. 3. Press down the top cover flap and tighten the right-hand mounting screw to secure the unit in place in the machine. 25 , MEI., 1994 CashFlow® 530 changegiver Pocket Guide Push open the top cover flap to get access to the fixing screw and to tighten it Connect the looms and secure them in their correct positions 1. Check that the looms cannot be trapped by the unit or by the door of the machine. 2. Check that the unit’s lid opens fully when the reject button is pressed, and that the lever has 2mm - 3mm of clearance from the reject mechanism of the machine. Adjust the clearance if necessary. 3. Ensure that the unit’s coin entry cup is aligned with the machine’s coin entry chute, and that the coin exit chutes are lined up. 4. With the power off, insert ten of the largest and smallest coins to check the coin routing to the coin return cup. Switch on the power to the unit 1. Check that the red LED comes on. 2. Set the vend prices with the keypad or with the Route Alpha 250 terminal. NOTE: Use the keypad if the installation has an electromechanical interface. If the installation has an electronic serial interface, prices are normally held in the vending machine. 26 , MEI., 1994 CashFlow® 530 changegiver Pocket Guide Float the coin tubes Floating the tubes through the creditor 1. Press Mode + A, and insert change coins. When the tubes reach the pre-set maximum float level, further coins are routed to the cashbox. Use the coin entry slots to replace any coin that falls inadvertently through a tube, so that it is not counted twice by the creditor. 2. Press A to return to normal operation. Floating the tubes by hand NOTE: Do not attempt to float up the tubes by hand if the unit has an audit module fitted. Float the tubes through the creditor. 1. Insert a full coin cassette, or remove the unit’s cassette and fill the tubes to the float levels. If the cassette is difficult to remove, release it and tilt it forward. Push in the coin filling flap, and fill tube A through the gap. Fill tubes B, C and D through the coin entry slots. 2. Press Mode + Mode, replace the cassette, then press Mode + A + B. 3. Insert samples of non-change coins to check that they route to the cashbox. 4. Press A, B, C and D in turn to check that coins are dispensed. 5. Press Mode + A and refloat the tubes through the creditor. When the pre-set float level is reached, further coins are routed to the cashbox. 6. Press A to return the unit to normal operation. The unit is now ready for use , MEI., 1994 27 CashFlow® 530 changegiver Pocket Guide MEI Product Manuals Full technical details of this product are included in the CashFlow 530 changegiver Product Maintenance Handbook, a copy of which is available, with other handbooks related to the product, from your MEI Approved Distributor, or your regional MEI sales office. MEI Product Training Product training courses are available for CashFlow and other MEI products. The courses cover the technical features and the maintenance of the product, and give you hands-on experience in servicing CashFlow products quickly and efficiently. Contact your regional MEI Sales Office for more information. 28 , MEI., 1994 CashFlow® 530 changegiver Pocket Guide REGIONAL OFFICES WWW.MEIGROUP.COM , MEI., 1994 29 ™ YOUR MEI REPRESENTATIVE