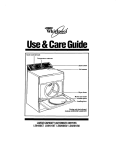
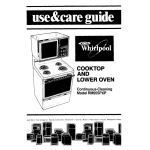
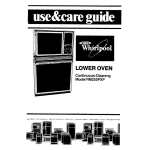
1
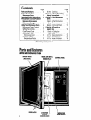
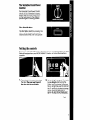
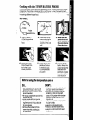
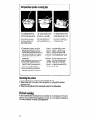
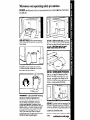
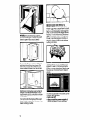
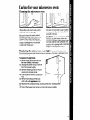
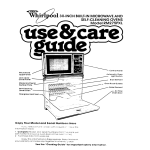
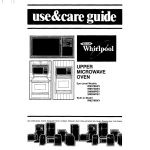
1I
wave
Ovens. Trash Compactors. Room AN Condltloner!,
UPPER
MICROWAVE
O”iJEN
Eye-Level Model
RM955PXP
Built-h Model
RM255PXP
Oehumldlflers. Automallc Yashers. Clothes Oryers. Freezers. Refrigerator-free1
Contents
Page
2
Parts and Features.
Before You Use Your
Microwave
Oven.
Important
Safety Instructions.
Precautions
to Avoid Possible
Exposure to Excessive
Microwave
Energy
Using Your Mtcrowave
Oven
Microwave
Oven Controls
Setting the Controls.
Cook Power Chart
Defrosting in Your
Microwave
Oven
Cooking with the
Temperature Probe.
3
4
4
6
6
7
8
8
9
C_1985 Whirlpool
Bi-Levc
Microwc
Safety
Caring fl
Oven.
Clean
Over
Replan
If You Ne
Assistc:
1. Befc
Assi:
2. If Yo
3. IfYo
4. If Yo
Cooking
de Oven Operating
Precautions
r Your Microwave
Corpora?
an
13
ing the Light Bulb.
?d Service or
rice...
e Calling for
ante
Need Assistance
Need Service
Have a Problem
UPPER MICROWAVE OVEN
DOOR LATCH
MODEL AND SERI AL
NUMBER PLATE
2-POSITION
M-LEVEL \
COOKING RACK
11
‘19 the Microwave
Parts and features
DEFROSTGUIDE
(Not Shown)
10
CONTROL PANEL
\
TEMPERATURE
PROBE SOCKET
13
13
14
14
14
15
15
Copy your Model and Serial Numiblers here...
If you need service, or call with a question,
ha e this information
ready:
1. Complete
Model and Serial Numbers (from the plate located behind
Model Nur~ ber
the microwave
oven door).
2. Purchase date from sales slop.
Copy this information
in these
Serial Nun bmr
spaces. Keep this book, other oven
literature, your warranty
and sales
slip together in a handy place.
Purchase 1,#ate
There is no warranty registration to
return. Proof-of-purchase
is all that is
Service CI Nmpany/Phone
Number
required for in-warrant-y service.
Fill out and return the “Microwave
Registration
Cal-d” attached
to the
Microwave
Oven Door. If the card is missing, plea% send the model and serial
number of your Microwave
Range, with your name I::lnd address to...
Whirlpool Corporation
Microwave
Registration Department
Administrative
Center
2000 U.S. 33 North
Benton Harbor, Michigan
49022
This information will help us reach you if there is eve a need to pass along
information about your microwave
range.
Remove
the Consumer
Buy Guide
label
before
usl~ng your microwave
range.
Before you use your microwave oven
Read and carefully follow the 6~INSTALLAT10N INSTRUCTIONS”
packed with your microwave oven.
Read this “Use & Care Guide” and your”Cooking
G .lide” carefully for important
use and safety information. Store these with Range c,r Lower Oven literature.
It Is your personal
responsibility
and obligation
tcr be sure your microwave
oven:
l Has been
installed where it is protected
from the c lements. The microwave
oven should be at a temperature
above 50°F (IUl’C] for proper operation.
l Has been
installed and levelle8d on a floor strong ci!nough to suppori its weight.
(Eye-level models only.)
l Has been
properly connected
to electrical
suppl ,I and grounded.
(See “Installation
Instructions!‘)
l Is not used by anyone
unable to operate it propel y.
l Is properly
maintained.
l Is used only for jobs expected
of a home microw(,~ve oven.
See your Range or lower
operating
instructions.
Oven “Use & Care GuidP
for additional
safety
and
IMPORTANT
SAFETY IN?iTRUCTIONS
For Use of Microwave
Upper Ovm
Microwave
ovens have been used successR Ily in homes for a
number of years. They are thoroughly
testeal for safe and efficient
operation.
However, as with any appliance,
‘Ihere are special installation
and safety precautions
which mul!I t be followed to ensure
safe and satisfactory
operation
and preven’ damage to the unit.
PRECAUTIONS TO AVOI D POSSIBLE
EXPOSURE TO EXCESSIVE
MICROWAW ENERGY,..
DO NOT attempt to operate this
oven with the door open since
open-door
operation can result
in harmful exposure to microwave energy. It is important not
to defeat or tamper with the
safety interlocks.
DO NOT operate the microwave
oven if thf door glass is broken.
DO NOT place
The oven ‘joor should not be
adjusted
)r repaired by anyone
except pt Dperly qualified
service PI ?rsonnel.
any object between the oven front surface and
the door or allow soil or cleaner
residue to accumulate
on sealing surfaces.
DO NOT operate the oven if it is
damaged.
It is particularly
important that the oven door
close properly and that there
is no damage
to the
(I] Door (bent),
(2) Hinges and latches (broken
or loosened),
(3) Door seals and sealing
surfaces.
The micrc:l Nave oven should be
checked
or microwave
leakage
by qualifiN?d service personnel
after a rel lair is made.
-To reduce
persons
1. Read all instructions before
using appliance.
2. Read and follow the specific “PRECAUTIONS TO AVOID
POSSIBLE EXPOSURE TO
EXCESSIVE MICROWAVE
ENERGY” found on page 4.
3. This appliance must be
installed and properly
grounded in accordance
with
the separately provided
“Installation
Instfuctions?
4. Some products such
as whole eggs and sealed
containers - for example,
closed jars - may explode
and should not be heated
in this oven.
5. Use this appliance only .for
its intended use as described
in this manual.
6. As with any appliance,
close supervision is necessary
when used by children.
7. Do not operate this appliance if it has a damaged
cord or plug, if it is not workrIng
properly, or if it has been
damaged or dropped.
Electric shock, fire or other
hazards may result.
8. This appliance should
be serviced only by qualified
service personnel. Call a
Whirlpool authorized
TECH-CARE@Service Company for examination, repair
or adjustment.
the! risk of burns, electric
or ~!xposure to excessive
9. Do r #otcover or block any
openirj J on the appliance,
becau #efire may result.
10. Do s?otuse outdoors because 1lamage to the oven or
electril : shock may result.
11. See door surface cleaning
instruct ons on page 13.
12. To I #educe the risk of fire in
the ovc: n cavity:
a. Do r lot overcook food.
Carefu ly watch appliance if
paper, ,olastic, or other combustiblf 3 materials are placed
inside ‘Ilie oven to facilitate
cookin 3. Paper can char or
burn, a id some plastics can
melt if a,sed when heating
foods.
b. Ren eve wire twist-ties from
paper >r plastic bags before
placinl 1 bag in oven. Cooking
in metc.1 containers can
damar je the oven. So can
contair lers with hidden metal
(twist-tiI?s, foil lining, staples,
metalli : glaze or trim].
Test dir ierware or cookware
before usinq. See page 11.
~.
c. If mc iterials inside the oven
should ignite, keep oven door
closed turn oven off, and
discori sect the power cord,
or shut Yf power at the fuse
or circ lit breaker panel.
13. ReI:Id and follow ‘%dICROWAVE 0VEN OPERATING
SAFm PRECAUTIONS” starting
on pa< e 11.
SAW THESE INSTRUCTIONS
5
Using your microwave ovt~n
Microwave oven controls
There are four parts in the microwave
oven control
-The Timer
-The Probe Temperature Control
-The Variable Cook Power Control
- The Start Button
Instructions for each are covered on the following
.ection:
jages. Read them carefully.
The Timer
The tin or can be set for up to 59
minute ;, 55 seconds. This controls
how Ic, ig the microwave
oven cooks.
The F robe Temperature
Control
The Prc be Temperature
Control
allows you to cook by temperature
insteac of by time. See your MICRO
MENU! * Cookbook
for helpful informatior in cooking different types of
food.
‘Tmk
The Variable Cook Power
Control
The Variable Cook Power Control
allows you to control the cooking
speed. See the Cook Power Chart
on the next page for the different
percentages
of cooking powers
The Start Button
The Start Button starts the cooking. The
door must be closed and securely
latched before the oven will operate.
Setting the controls
1.
Place food in the oven, then close
the door. The oven won’t work if
the door isn’t closed tightly.
2. Set cc oking times up to 10 minutes
by PL, shing in and turning the
Timer (nob clockwise. To reduce
the cl oking time, push in and turn
the Tir ier Knob counterclockwise.
To se’1 timer for less than 15
secor ids, turn Timer Knob past
15 sel:‘onds then to desired time.
Tmk.
3. Set cooking times longer than IO
minutes by turning the Timer Knob
and Wheel. First set the Timer
Knob, then move the Wheel.
Example: To set 22 minutes, 313
seconds...
l Set 2 minutes,
30 seconds by
pushing in and turning the Timer
Knob.
l Set 20 minutes
by pushing up on
the Wheel.
4. Set t! le Variable Cook Power to
the ( esired setting from HIGH to
KEEF WARM. Some recipes call for
lowf r Cook Powers for best results.
(See chart.) The lower the Cook
Pow’ !r, the slower the cooking.
COOK POWER CHART
Ret pes in the MICRO MENUS’
Cot:; kbook use Cook Power
sefti’lgs from HIGH to LOW.
Recipes from other books and
ma&azines
may use different
Cot:‘< Power percentages.
The
follc: Ning chart may be
hell: ful:
5. Push the START Button. The oven
light will come on and the cooking will begin. You will hear the
fan running during oven
operation.
When the set time is up, the oven
will shut off automatically.
You will
hear a bell, the light will go off
and the fan will stop.
To stop the oven
1. Push in and turn the
counterclockwise
OR
Timer Knob
to 0O:OO.
2. Open the oven door.
HIGH - 100% of full power
MED -HI - 70% of full power
MED - 50% of full power
MED .LO/DEFROST - 30% of
full power
LO -. 15% of full power
KEEP WARM - 5% of full power
To resll art the oven
1. Clos the oven door.
2. Set tr 3 Timer [if needed]
desir ?d cooking time.
to the
3. Push 78 START Button.
Defrosting in your microwave oven
Use the MED-LO/DEFROST setting to thaw frozen foot
Defrost Guide inside the oven door or your MICRO-I
suggested defrost times.
B
before cooking. See the
IENUS’ Cookbook
for
‘Tmk.
Cooking with the TEMPERATURE
PROBE
The Temperature Probe helps take guesswork out of :ooking roasts and larger
casseroles. The probe is designed to turn off the ove ) when it senses the temperature you chose. See your MICRO MENUS* Cook look for helpful information
in cooking different types food
DO THIS...
1. Insert
at least Y3
of the temperature
probe into the
food.
4. Set the Variable
Cook Power Control to the Cook
Power you want.
2. Place food in the
oven and plug th<
probe into the
socket on the ovel
wall.
3. Make sure the
probe does not
touch anv Dart of I
the oven interior.
Close the door.
5. Set the Probe Temperature Control
to the final cooking temperature
you want.
6.
Hints for using the temperature
DO...
l
l
l
l
l
use hot pads when removing
probe from food or from oven.
stir foods during cooking when
recommended.
stir soups, casseroles and drinks
before sewing.
cover roasts with foil and let
stand a few minutes after cooking. Remove foil if you decide
to cook longer.
remove the probe from the
oven when not cooking by
temperature.
Push the START
Button. When the
probe senses the
selected temperature, a beep
sounds, and the
oven shuts off.
pt&e
DON’T., .
let probe or probe cable touch
any pal t of the oven interior.
l let probe
touch foil (if used for
shieldirig). Foil can be kept
away fr :)m probe with wooden
toothpic: ks. Remove foil if arcing occ: cars.
0 use paf:#er, plastic wrap or plastic con1 :riners.
l use pro:)e
in regular oven.
l force
PI lobe into frozen food.
l use pro :>e for foods that need
to simn ler.
l
II
Temperature
probe
For casseroles, the tip
of the probe should be
inthecenterofthe
food. Stir foods when
recommended.
Replace the probe.
l
l
l
l
cooking
tips
For liquids, balance th !
probe on a wooden
spoon or spatula so th’
tip of the probe is in
the center of the liquic
Casseroles cooked using the
Temperature
Probe should be
made from precooked
foods. Do
not use raw meats, raw vegetables and cream sauces in
casseroles.
Dry casseroles do not work vvell.
Thaw frozen casseroles and
meats in the microwave
oven
before inserting the probe.
If you are cooking individual
servings such as mugs of soup,
l
l
For roasts, the tip of the
probe should be in the
center of the largest
muscle, but not touching fat or bone.
check t le probe setting in several oft le items- all the mugs
may nc heat at the same rate.
Dry me :t loaf mixtures don’t work
well.
Remet-r ler that roasts may vary
in size, :, lape and composition.
Use the lmings for minutes per
pound
IS a guide as well as the
Temper rture Probe.
Cleaning the probe
1. Remove probe from microwave
oven using hot p’lds.
2. Wipe probe with a hot sudsy cloth. Use plastic SO: uring pad to remove
stubborn foods.
3. Probe may be placed in the silverware basket of the dishwasher.
Bi-level cooking
A removable
Bi-Level Cooking Rack is available
as an accessory
lets you cook or reheat foods together as a meal. A! k your dealer
. RCKBOO (832848) - Bi-Level Cooking Rack Kit
10
kit. This rack
for details on...
Mi crowave oven operating safe:ty precautions
DO NOT use the3 oven until you have I,ead (2nd undj !rstand ALL the information
on safe use.
USE HOT PADS. Microwave energy
does not heat containers, but the hot
food does.
To test (.I dish for safe use, put it into
the over I with a cup of water beside
it. Cook on high Cook Power for one
minute. If the dish gets hot and
water sltavs cool. do not use.
DO NOT heat or store flammable
or inflammable
materials in or near
the oven. Fire may result.
DO NOIr OVERCOOK
POTATOES.
Fire COL d result. At the end of the
recomn lended cooking time they
should : be slightly firm. Wrap in foil
and set ‘aside for 5 minutes. They will
finish cc’oking while standing.
I
II I f-TTY--’
II I
WARNING - Use care when heating
liquids or adding ingredients to
heated liquids. Liquids heated in certain shaped containers may become overheated.
The liquid may
splash out with a loud noise during or
after heating, or when adding ingredients (instant coffee, etc.). This can
harm the oven and the hot liquid
could burn you. Do not use such containers to heat liquids again.
1
/,,,y
IL-
II 1
DO NOlr use the oven for storage. Do
not lea\<? paper products, books or
cookin<l utensils in the oven when not
in use. F81.emay result if someone accidentally
starts the oven.
Don’t let any-thing touch the top of the
oven.
continued
on next page
NEVER COOK OR REHEAT A
WHOLlii EGG. Steam build-up in
NEVER lean on the door or allow
a child to swing on it when the oven
door is open. Injury could result.
If your electric power line voltage is
less than the normal required voltage, cooking times may be longer.
Starting a microwave
oven when its
empty is not recommended.
If you
experiment,
put a container of water
in the oven.
It is normal for the inside of the oven
door to look wavy after the oven has
been running a while.
12
whole c!ggs may cause them to burst,
burn yc u and possibly damage
the
oven. Slice hard boiled eggs before
heatin<‘. In rare instances, poached
eggs have been known to explode.
Cover F:‘oached eggs and allow a
standing time of one minute before
cutting into them.
Make F:80pcorn only in poppers designed ‘or use in microwave
ovens.
Follow t.)opper directions. Results are
the poLlper manufacturer’s
responsibility
If a fire :;hould start in the oven cavity:
keep Idoor closed
0 turn oven off
l disconnect
the power supply at
the cord, fuse or circuit breaker.
l
Caring for your microwave oven
Cleaning the microwave oven
Wipe often with warm sudsy water
and a soft cloth or sponge.
Be sure to clean the areas where
the door and oven frame touch when
closed. When cleaning
these surfaces, use only mild, non-abrasive
soaps or detergents on a sponge
or soft cloth. Rinse well.
For stub1 jorn soil, boil a cup of water
in the o\#en for 2 or 3 minutes. Steam
will sofkn the soil.
CAUTION:
Abrasive cleansers, steel
wool pc 3s gritty wash cloths, etc.,
can damage
the control panel, interior and exterior oven surfaces. Use
a soft cll.)th or sponge with a mild detergent 1)r spray glass cleaner.
Replacing the microwave oven light
The microwave
oven light should come
oven is operating.
To replace
I Eye-Level Models only)
on whenevczr the door is opened or the
the light bulb:
1. Move range away from the wall.
Be very careful.
It is heavy.
2. Unplug the power cord, or turn off
the main power supply.
3. Remove holding screw on microwave oven access panel.
4. Push aside the interior cardboard
flap.
5. Remove and replace the bulb
with a 40-watt appliance
bulb.
6. Replace
the cardboard
7. Plug in the power
flap, access
panel
ant
holding
cord, or turn on the main powi?r supply.
screw
If you need service or assktance,
we suggest you follow the,sefour steps:
1. Before calling for assistance...
Performance
problems
often result
from little things you can fix yourself
without tools of any kind.
If nothing operates:
l Is the power
supply cord plugged
into a live circuit with the proper voltage? [See “Installation
InstructIons:‘)
l Have
you checked the main fuse or
circuit breaker box?
If the microwave
oven will not run:
l Is the Timer set?
l If the
Temperature
Probe is being
used, is it plugged
tightly into its
sot ket?
l Is the
door firmly
closed
and
latched?
l Did you touch
START?
l Did
you follow
the directions
exactly?
If microwave
cooking
times seem
too long:
l Is the electric
supply to your home
low or lowerthan
normal? Your electric company
can tell you if the line
voltage is too low.
l Is the Cook
Power set correctly?
l Are
you allowing
for more time
when cooking
more food at one
time?
If the microwave
oven turns off too
soon or not soon enough when using
the probe:
l Is at least 1/3of the probe
in the food?
14
l
l
l
l
l
l
Is the orobe tip in the center of the
food’,,
Is the ;>robe touching bone or fat?
Have ,,/ou allowed roasts to stand for
a fev. minutes
after cooking
to
equa ze temperatures?
Is the IIrobe plugged
tightly into its
sot ke ,?
Is the Cook Power set correctly?
Is th? Probe
Temperature
set
correiztly?
2. If you need assistance?..
Call Wlhirlpool COOL-LINE”
service
assistance
telephone
number. Dial
free from:
Contt nental U.S. . . (BOO) 253-1301
Michigan
. . . . . . . . (600) 632-2243
Alaska & Hawaii
. (800) 253-1121
and talk with one of our trained Consultants The Consultants can instruct
you in h3w to obtain satisfactory operation frl )rn your appliance
or, if service is necessary,
recommend
a
qualific?d service company
in your
area.
3.
If you need service?..
Whirloool
has
a naiionwide
network of fran- chised
TECH~ CARE” Service
~ Companies.
TEc+cARE
_FRAHCHISED
SERVICE
J
TECH-CARE
sew-
ice technicians
are trained to fulfill the product warranty and provide
after-warranty
service, anywhere in the United States.
To locate TECH-CARE service in your
area, call our COOL-LINE service assistance telephone
number (see !ltep
2) or look in your telephone
directory
Yellow Pages under:
4.
Lfwu have a
pr;llblem?..
Call our C =X)L-LINE service assistance
telephont.! number (see Step 2) and
talk with I.)ne of our Consultants, or if
you prefe I’,write to:
Mr. Sk Dhen E. Upton
Senior Vice President
WhirIF XI Corporation
Admix istrative Center
2000 1 S-33 North
Benb I Harbor, MI 49022
‘If you rnt- ;t call or write, please provide: mo lel number, serial number,
date of F,urchase, and a complete
descriptil )n of the problem. This information i: needed
in order to better
responrl
to your
request
for
assistanci?.
FSP IS a regrstered
trademark
of WhIrlpool
Corporation
for
quality parts took for thus
FSP
11,symbol of qualrty whenever
you need a replacement
part
for your Whirlpool
appliance.
0
FSP replacement
parts
wrll 111right : ind work right,, because
they are
made to the same exacting
SpeCIfICCItrOnS
used to burl, every new Whirlpool
OppllOnCe.
Whirlp001
Home
A Apl ~mces
Making your world a lIttIc easier.
Part No. 312079
81985 Whirlpool
Rev. A
Printed in U.S.A.
Corporation
Lomatlc Washers. Clothes Dryers, Freezers. Refqeratot-Freezers.
Ice Makers. Olshr,, ihers. Eullt4n Ovens and Surface Units, Ranges. MK