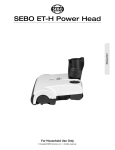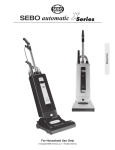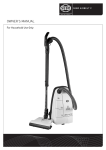
1
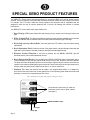
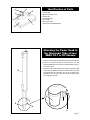
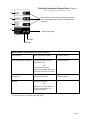
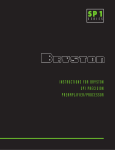
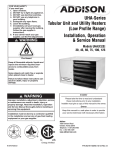
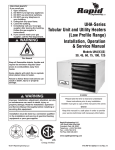
ENGLISH
SEBO ET-C Power Head
For Household Use Only
© Copyright SEBO America, LLC • All rights reserved.
SEBO ET-C Power Head Owner’s Manual
Table of Contents
Technical Details
Important Safety Instructions
Special SEBO Product Features
Identification of Parts
Attaching the Power Head to the Telescopic Tube
Operating Instructions
Starting the Machine
Operating the Machine
The Brush Information Display Panel
The Brush Control Lights
Maintenance
Changing the Brush Strip
Cleaning the Brush Strip
Clog Removal
Clogs in the Swivel Neck
Trouble-Shooting Guide
2
3
4
5
5
6
6
6
7
7
8
8
8
8
8
9
ET-C Power Head Schematic and Part Numbers
Recommended SEBO duo Carpet Cleaning System
Warranty
How To Contact SEBO
10
11
12
12
Technical Details
Brush motor
Width
Weight
Brush width
Brush strip
Brush drive
Page 2
150 Watts, 1.4 Amps
14 in.
6.0 lbs.
12 in.
Replaceable
Toothed belt with electronic
overload protection
!
IMPORTANT SAFETY INSTRUCTIONS
READ ALL INSTRUCTIONS BEFORE USING THIS MACHINE
SAVE THESE INSTRUCTIONS.
WARNING: To reduce the risk of fire, electric shock, or injury:
1. Do not leave vacuum while plugged in. Unplug from
outlet when not in use and before servicing.
2. Do not use outdoors or on wet surfaces.
3. Do not use near small children or pets. Do not allow
to be used as a toy. Use of this product by children
should always be supervised by an adult.
4. Use only as described in this manual. Use only
manufacturer-recommended attachments.
5. Do not use with a damaged cord or plug. If vacuum
is not working as it should, has been dropped,
damaged, left out-doors, or dropped into water, take it to
a SEBO service center.
6. Do not pull or carry by cord, use cord as a handle,
close a door on cord, or pull cord around sharp
edges or corners. Do not run vacuum over cord.
Keep cord away from heated surfaces.
7. Do not unplug by pulling on cord. To unplug, grasp
the plug – not the cord.
8. Do not plug in if switch is in the “I” (ON) position.
9. Do not use outlets above counters to plug in vacuum –
damage to items in the surrounding area could occur.
10. Always carry the vacuum over steps and sills.
11. Do not handle plug or vacuum handle with wet hands.
12. Do not put any object into vacuum openings. Do not use
machine with any openings blocked. Keep openings free of
lint, hair, and anything that may reduce air flow.
13. Do not re-use filter (dust) bags or wash the filters.
14. Do not remove any screws from vacuum.
15. Do not vacuum up anything that is burning or smoking,
such as cigarettes, matches, or hot ashes.
16. Do not use vacuum without dust bag and/or filters in
place.
17. Turn off all machine controls before unplugging.
18. Use extra care when cleaning on stairs.
20. Machines can cause a fire when operated near flammable
vapors or materials. Do not operate this vacuum near
flammable fluids, dust or vapors.
21. Maintenance and repairs must be done by qualified
personnel.
22. Use only original SEBO replacement parts.
23. Do not use vacuum as a step.
24. Do not leave machine standing in one place with machine
turned on.
25. While the vacuum is in use, the power cord should be
unwound from the cable reel at least two thirds of its length.
Hold plug when rewinding onto the cord reel. Do not allow
plug to whip while rewinding.
26. Keep hair, loose clothing, fingers, and all parts of body away
from vacuum openings and moving parts. Do not place
fingers or other body parts under vacuum unless it is
unplugged.
27. Do not place the power head over rug edges or fringe.
28. The vacuum has a manual reset thermal protector. The
protector is reset by switching off the vacuum. The thermal
protector needs some time to cool down after switching off!
Check the vacuum for air blockages or mechanical failures
before switching on.
29. Store the vacuum in a dry place at room temperature. When
the vacuum is not in use, the cord should be wound on the
cord reel.
30. Any other servicing should be performed by an authorized
service representative.
31. The hose contains electrical wires. Do not use if damaged,
cut, or punctured. Avoid picking up sharp objects.
32. Always unplug vacuum before connecting or disconnecting
either hose or power head.
33. Use this power head only in combination with a SEBO
vacuum cleaner.
34. Do not connect power head to a malfunctioning or damaged
vacuum.
19. Do not use machine to vacuum up flammable or
combustible liquids such as gasoline or use in areas
where they may be present.
Page 3
SPECIAL SEBO PRODUCT FEATURES
Your SEBO ET-C Power Head is designed specifically for use with the SEBO C3.1 and K3 canister vacuum
cleaners. These vacuums are among the most technically advanced canister vacuum cleaners in the world.
For example, the ET-C Power Head has warning systems and automatic shut-off capabilities that are
designed to alert the user to machine problems that, if ignored, will damage the machine or diminish
performance.
Your SEBO ET-C Power Head’s most unique features are:
1. Deep Cleaning. SEBO power heads offer deep cleaning of your carpets only a thorough brushing can
give.
2. Wider L-shaped Head. The wider head allows for optimal cleaning and maneuverability around furniture
and under cabinets, and the extension side of the head cleans and brushes right to the edge.
3. Brush Strip instead of a Brush Roller. The brush strip for the ET-C slides in and out for fast and easy
replacement.
4. Brush Information Panel. Located on the top of the power head is a brush information panel with two
lights and a quick-reference area that will tell you what the illuminated lights indicate.
5. Electronic Overload Protection. If the brush is jammed, the red “BRUSH CONTROL” light will
illuminate and the vacuum will automatically shut off.
6. Brush Deterioration Warning. The red AND green “BRUSH CONTROL” lights will illuminate (after a
10 second delay) to notify the user that the brush strip is too worn and, therefore, should be replaced.
The lights will remain illuminated until the worn brush strip is replaced, but the machine will continue to
operate in the meantime. Both lights may also illuminate if the brush doesn’t find enough resistance; for
example, when the power head is lifted from the floor or is used on hard floors.
7. Stationary Use. When the machine has its handle in the upright-locked position, it is designed to
shut off the brush roller. Both brush control lights will be off. An operating power head should not stand
stationary on the floor for inappropriate periods of time.
The control panel is located on the top side of the power head.
Quick-reference panel tells you what the
illuminated brush control lights indicate
(see page 7).
BRUSH CONTROL Lights
Red light
Green light
Page 4
4
3
Identification of Parts
2
5
7
1
1. Power head
2. Brush information panel
3. Swivel neck
4. Connection plug
5. Foot pedal
6. Brush strip cover
7. Telescopic Tube release button
6
Attaching the Power Head to
the Telescopic Tube of your
SEBO C3.1 or K3 Vacuum
1. Find the connection tab (A) at the base of the telescopic tube (B).
2. Move the connection tab (A) IN toward the tube (C). See
enlarged detail below. It will only move approximately 1/8-inch.
Proceed to step 3.
3. Insert the base of the telescopic tube (E) into the power head
swivel neck (3). Make sure that the connection tab (A) is properly aligned with the connection plug (4) in the swivel neck.
Damage to the connection may occur if the tab and the plug
are not properly aligned.
B
E
A
E
A
C
Page 5
Operating Instructions
Starting The Machine - Figures 1 & 2
A. Before turning on your canister, make sure that the vacuum handle is in its upright locked position (figure 1).
8
Figure 1
Switch Position #8, Figure 2
0 = Zero Suction
MAX = Maximum Suction
ON position - Slide the slider
down toward 0 suction till it
“clicks” out of position.
OFF position - Pull the slider
up to 0 suction then continue
pulling the slider up until it
“clicks” into the OFF position.
Figure 2
1.
With the canister main power switch in the OFF position,
and the power control slider on the handle (#8, figure 2) in
the OFF position, pull the power cord out from the base of
the canister (see canister owner’s manual). The power
cord should be unwound from the cable reel at least two
thirds of its length.
2.
Plug the polarized power cord into a 120 volt outlet
located near the floor.
3.
Press the main power switch on the base of the canister
gently with your foot or hand.
4.
Slide the Power Control Slider (#8, figure 2) to the ON
position (the slider will “click” when it is pushed out of the
OFF position). It will then slide freely between 0 suction
and MAX suction. Set the slider to the suction desired.
Release the foot pedal (#5, figure 3).
Operating The Machine - Figure 3
B. When the power head is switched on with the handle in the upright locked
position (see figure 1 above), the brush roller will not spin. To release the
power head from the upright locked position, press down on the foot pedal
(#5, figure 3) and lower the handle into the normal operating position. The
brush roller will then start spinning and the green light on the power head will
illuminate.
The handle can be lowered to a horizontal position useful for vacuuming
under beds.
You may adjust the suction control with the power control slider as you vacuum different surfaces or when using the accessory tools. For optimal cleaning and brushing, operate the machine at the maximum suction power setting and push the power head slowly over the carpet.
When the canister’s main power switch is in the ON position, you may turn
the power head off and on with the power control slider (#8, figure 2). To turn
the power head off using the power control slider, pull the slider to 0 suction,
then continue pulling the slider up until it “clicks” into the OFF position.
5
Figure 3
!
Always turn the power off on both the canister and the power head
when changing heads or unplugging the vacuum. Slide the power control slider on the power head to its OFF position, press the main power switch
on the base of the canister gently with your foot or hand, then unplug the
canister to completely shut down the power when changing heads or storing
the vacuum. Hold the plug while rewinding the cord onto the cord reel. Avoid
letting the plug whip while rewinding.
WARNING! The quality, condition, coating, texture, age and manufacturing technique of all floor surfaces vary.
Therefore, vacuums with rotating brushes, including your SEBO, may damage some floor coverings or surfaces. Some
types of high-gloss hardwood floors, cushion vinyl, berber carpets, long shag, and delicate or hand-woven carpets are particularly vulnerable to damage by rotating brushes. When possible, consult the materials supplied by your flooring manufacturer for information on proper upkeep and cleaning. To ensure that your new SEBO vacuum cleaner is compatible
with your floor, please test the vacuum cleaner on each type of flooring surface in a small inconspicuous area
to determine if any damage occurs. If damage occurs, stop using the vacuum cleaner immediately!
Page 6
The Brush Information Display Panel - Figure 4
The control panel is located on the power head.
A
Quick-reference panels tell you what the illuminated
brush control lights mean. The brush control lights are
in panel D.
B
C
D
Brush Control lights
Figure 4
Red light
Green light
BRUSH CONTROL LIGHTS (Panel D) and what they indicate:
Green light only
Brush is functioning correctly.
(reference Panel A)
Green and Red lights illuminated
Reduced brush action because:
Brush strip is worn.
(reference Panel B)
OR
Brush doesn’t find enough
resistance; for example, when lifted
from the floor or used on hard floors.
Red light only
Power brush is jammed.
No lights
Machine is powered off.
(reference Panel C)
OR
Machine is on, and the handle is in
its upright locked position; the
brush is not spinning.
For more information on the display panel, see page 4.
Page 7
Maintenance
6
!
Always unplug vacuum from outlet
before dismantling any part of machine!
Changing the Brush Strip - Figure 5
To change the brush strip, open the brush strip cover (6)
by unscrewing the attachment screw using a phillips-type
screwdriver and lifting the cover. Rotate the brush until the
end of the brush strip (9) shows in the opening. Pull the
brush strip out using your fingers, or use pliers to grasp
the edge of the brush strip and pull it out.
9
To insert the new brush strip, rotate the roller until the
brush strip slot is visible at the opening. Insert the base of
the new strip into the slot and push it all the way in. You
may help guide the strip in by grasping the strip on the
underside of the power head and pulling it along the roller.
Close the brush strip cover and replace the screw.
Figure 5
Cleaning the Brush Strip
Replacement Brush Strip
Part # 2046
Unplug the vacuum before attempting to clean the
brush. The brush should be cleaned regularly. Fibers
and hair can be pulled out of the brush while manually
rotating the roller, or the brush strip can be removed from
the power head to clean it.
Clog Removal
3
7
!
6
Always unplug vacuum from outlet
before removing any clogs!
Clogs in the Swivel Neck - Figure 6
To check for a clog in the swivel neck, remove the telescopic tube by pressing the release button (7). Pull the
tube out of the swivel neck. Then, release the foot pedal
(6), lower the swivel neck, check inside the swivel neck
channel, and clean out pathway.
For clogs not in the power head, please refer to your canister vacuum’s manual.
Figure 6
Page 8
Trouble-Shooting Guide
!
Always unplug vacuum from outlet before dismantling any part of the machine!
PROBLEM
REASON
Does not turn on
1. Telescopic tube not inserted properly. 1. See page 5.
SOLUTION
2. Not plugged into good outlet.
2. Use another outlet.
3. Cable worn.
3. Replace cable.
4. The power control slider switch is
set to “0” (“off” position).
4. Slide the power control slider
switch to “on” position.
1. Brush roller is jammed.
1. Remove brush roller obstruction.
See page 8.
2. Airflow pathway is clogged.
2. Remove clog. See page 8.
3. Overload shut down from
excessively deep but loose carpet
pile (e.g., long shag carpet).
3. If carpet pile is too deep and loose,
then use a “shag rake” attachment
instead of the ET-C power head.
1. Brush worn.
1. Replace brush strip. See page 8.
2. Reduced brush action.
2. Brush is not fully in contact with
the floor.
No lights are illuminated
1. Machine is in upright locked
position and roller is shut off.
1. Release the foot pedal and lower
the telescopic tube to operating
level. See page 6.
Does not pick up
1. Telescopic tube tube not
inserted properly.
1. See page 5.
Red light is on &
machine shuts off
Red and green lights are
both on
Check your C3.1 or K3 canister user’s manual for more trouble-shooting problems and solutions.
Page 9
SEBO ET-C Power Head
Schematic and Parts List
Pos.
1
2
3
4
5
6
7
8
9
10
11
12
13
14
15
16
17
18
19
20
21
22
Part #
Description
2002
2007
2009
2911
2010
2614
2014
0102
6145
6146
6137
1738
1737
1739
2467
0155
2466
2452
0531
2453
0141
2241
Chassis
Bumper
Axle
Foot pedal
Axle spring
Wheel
Axle clamp
Screw F 3.9 x 12 DIN 7981
Swivel neck assembly
Male contact holder
Swivel neck cover
Cap
Release button
Leaf spring
Plastic bearing inside
Washer
Swivel neck support
Switch lever
Micro switch for swivel neck
Micro switch support
Locking washer
Brush motor 120 V
DG
DG
DG
DG
UL
UL
HG
HG
HG
ER
Page 10
1
Pos.
23
24
25
26
27
28
29
30
31
32
33
34
35
36
37
38
39
40
41
42
43
44
45
Part #
Description
05095 S
2025
2566
0174
2049
2079 DG
2030 ER
2046
2091
2047
2458
0103
2584 ER
2482 HG
2058
0110 TL
2780 AM
2781 DG
2782 DG
2784
1030 UL
0117
0131
Carbon brush set / brush motor
Motor pulley
Motor mounting
Screw C 3.9 x 22 DIN 7981
Drive belt
Bearing plate
Brush assembly, cpl.
Brush strip
Bearing block, l.h.
Bearing block, r.h.
Brush roller pulley
Screw C 3.9 x 16 DIN 7981
P.C. board, 120 V
Powerhead cover
Brush strip cover
Screw AM 5 x 25 DIN 7985
Adapter 32 mm
Adapter 32 mm
Cover for adapter
Mains cable
Cable clamp
Screw AM 4 x 12, DIN 84
Nut M4, ST, DIN 562
SEBO Vacuum Cleaner Warranty
Three Years Non-Wear Parts - One Year Labor
1.
2.
Your authorized SEBO dealer or SEBO will provide
the original product purchaser with replacement of
Non-Wear Parts which fail due to a material or workmanship defect for a period of three (3) years from
the original date of purchase of new product.
Your authorized SEBO dealer or SEBO will repair (or
SEBO will cover labor charges associated with
repair) a defective SEBO power head at no cost to
the original purchaser, within one (1) year of original
purchase of new product.
3.
SEBO America, Floor Care Equipment, Ltd., or an
authorized SEBO dealer must complete all warranty
repairs.
4.
To locate an authorized SEBO dealer in your area,
or to register a warranty claim in the United States
of America, please call SEBO America at
(800) 334-6614.
5.
To locate an authorized SEBO dealer or to register a
warranty claim in Canada, please call Floor Care
Equipment, Ltd. at (800) 661-8687.
6.
The warranties provided for above apply exclusively
to SEBO power heads which are used residentially. No warranty is provided for SEBO power
heads used commercially.
7.
The Wear Parts excluded from warranty coverage
include the brush strip, the front bottom plate and
the rear bottom plate.
8.
This warranty applies only while your SEBO power
head is physically located within the United States of
America and its territories or Canada.
9.
The purchase receipt showing the date, price, and
item of purchase is the initial document of proof of
purchase and determines the validity of warranty. To
be certain that your warranty claim can be
processed as quickly and efficiently as possible,
please retain your original purchase receipt and mail
in the warranty card provided with your new SEBO
power head or vacuum cleaner.
10. This warranty gives you specific legal rights.You may
also have other legal rights, which vary from
state/province to state/province.
11. SEBO America will not process nor will it accept
responsibility for warranty claims for machines
purchased from dealers located in Canada.
Floor Care Equipment, Ltd. will not process nor will it
accept responsibility for warranty claims for
machines purchased from dealers located in the
United States.
EXCLUSIVE REMEDY:
The remedies provided under the terms of this Warranty are the purchaser’s exclusive remedies and are in lieu of any
other remedies otherwise available.
THE WARRANTY DOES NOT COVER:
LIMITATIONS AND EXCLUSIONS:
• Used or secondhand products.
• Products outside of the warranty period.
• Items not manufactured by SEBO.
• Normal maintenance service.
• Equipment damaged by improper use,
accident, other casualty or negligence.
• Machines equipped with nonauthorized
attachments or modifications.
• Machines on which the serial number has
been altered or removed.
SEBO MAKES NO OTHER REPRESENTATIONS OR WARRANTIES, EXPRESSED OR IMPLIED AND SPECIFICALLY
EXCLUDES THE IMPLIED WARRANTIES OF MERCHANTABILITY AND FITNESS FOR A PARTICULAR
PURPOSE.
To contact SEBO in the United States of America:
SEBO America, LLC
Telephone: (800) 334-6614 • (303) 792-9181
Fax: (303) 792-9196
E-mail: [email protected]
Website: www.sebo.us
To contact SEBO in Canada:
Floor Care Equipment, Ltd.
Telephone: (800) 661-8687 • (403) 250-5005
Fax: (403) 250-5057
E-mail: [email protected]
Page 12
1
SEBO WILL NOT BE LIABLE FOR INCIDENTAL OR CONSEQUENTIAL DAMAGES OF ANY KIND OR NATURE.
THIS DISCLAIMER OF IMPLIED WARRANTIES SHALL NOT
APPLY TO THE EXTENT SAID DISCLAIMER IS NOT
ALLOWED BY APPLICABLE STATE/PROVINCIAL LAW.
02/2003
06586