1
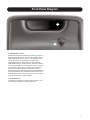
VSM-200P XT
USER MANUAL
IMPORTANT SAFETY INSTRUCTIONS
The lightning flash with an arrowhead symbol within an
equilateral triangle, is intended to alert the user to the
presence of uninsulated “dangerous voltage” within the
product’s enclosure that may be of sufficient magnitude to
constitute a risk of electric shock to persons.
The exclamation point within an equilateral triangle is
intended to alert the user to the presence of important
operating and maintenance (servicing) instructions in the
literature accompanying the product.
Read these instructions.
Keep these instructions.
Heed all warnings.
Follow all instructions.
Do not use this apparatus near water.
Clean only with dry cloth.
Do not block any ventilation openings.
Install in accordance with the manufacturer's instructions.
Do not install near any heat sources such as radiators, heat registers, stoves, or other apparatus (including amplifiers) that produce heat.
Only use attachments/accessories specified by the manufacturer.
Use only with the cart, stand, tripod, bracket, or table specified by the manufacturer, or sold with the apparatus. When a cart is used,
use caution when moving the cart/apparatus combination to avoid injury from tip-over.
Refer all servicing to qualified service personnel. Servicing is required when the apparatus has been damaged in any way, such as power-supply
cord or plug is damaged, liquid has been spilled or objects have fallen into the apparatus, the apparatus has been exposed to rain or
moisture, does not operate normally, or has been dropped.
Warning!
•
To reduce the risk of fire or electrical shock, do not expose this equipment to dripping or splashing and ensure that no objects filled with liquids,
such as vases, are placed on the equipment.
Service
•
There are no user-serviceable parts inside.
•
All service must be performed by qualified personnel.
2
Table of Contents
Introduction . . . . . . . . . . . . . . . . . . .5
Front panel diagram . . . . . . . . . . . . .7
Back panel diagram . . . . . . . . . . . . .8
Mic stand mounting procedure . . . .9
Using VoiceSoloXT . . . . . . . . . . . .13
Specifications . . . . . . . . . . . . . . . .15
Specifications, interface, and features are subject to change without notice due to continued product improvement
VoiceSolo VSM-200P XT Rev 1.0
English version
3
4
Introduction
Welcome to VoiceSoloXT
The TC-Helicon VoiceSoloXT VSM range of near field live
monitoring speakers is a new concept in personal
monitoring. TC-Helicon strives for excellence in all things
related to vocals, and the VSM range builds upon the
success and worldwide reputation of TC-Helicon's vocal
expertise.
If you can't hear yourself correctly in a live situation, it's
hard to produce a good performance. VSM monitors are
designed to integrate into a boom-style microphone stand
bringing the speaker close to the performer. This yields a
wide range of benefits over existing wedge-type or in-ear
options such as:
• Lower monitor bleed into the main PA sound
• High volume level before feedback
• Better interaction with audience; stage space is
reclaimed from floor wedges and ear plug barriers are
not required as in in-ear monitors.
The VoiceSoloXT VSM monitors use a two-way point
source ICT ™ driver that eliminates the problem of hearing
separated high and low frequencies which happens when
listening to conventional speaker systems. This is
especially important when used on a microphone stand as
the speaker is located very close to the listener and the
separation would be more evident.
About TC-Helicon
TC-Helicon’s core value is that the voice is the world's
most beautiful instrument. Therefore, everything TCHelicon does is dedicated to this instrument. TC-Helicon
envisions a world where those who work with voice are
able to bring out its very best and where the possibilities
of vocal craft are endless.
The company's mission was galvanized by a simple
question, "Isn't it time that someone finally provided
dedicated tools and solutions for voice?"
TC-Helicon is revolutionizing the vocal channel by
providing innovative tools and solutions for people who
create and work with the speaking and singing voice.
Our customers include the most demanding of live
performers, producers, broadcasters and recording
engineers.
Enjoy!
VSM-200P XT Features:
• Improved high frequency response in the critical 4 to 10
kHz range resulting in higher accuracy and smoother
sound.
• Quick mic stand set up. Integrates with boom so the
same stand is used for the monitor and microphone.
• Versatile placement options provided by dual stand
mounting holes and dual bevelled edges for floor
mounting.
• Two-way point source 6.5" ICT™ driver for optimal nearfield live monitoring.
• High power capacity: 240W peak
• Cast aluminum enclosure for maximum rigidity and
minimum cabinet resonance
• Front panel mounted volume control for easy access.
The TC-Helicon Team
a TC Group company
5
Introduction
Preliminary Recommendations
The VoiceSoloXT VSM series of monitors are capable of
very high sound pressure levels (SPLs) especially at the
close range when integrated onto a microphone stand.
They were designed this way to be able to be loud enough
to compete with live acoustic drum kits. In situations where
high monitoring volumes are required we recommend that
ear protection be used.
For continuous exposure we recommend the occasional
use of a sound level meter capable of measuring the sound
level over a period of exposure according to noise control
standards. This should be used to check that noise levels
are always within safety limits.
Unpacking
Open the box from the top and remove cabling. Lift out
styrofoam insert, then using both hands lift out
VoiceSoloXT. Remove plastic bag from VoiceSoloXT.
Nothing in your speakers should rattle. Inspect each
speaker for signs of transit damage. In the unlikely event of
this having occurred inform the carrier and the supplier.
Keep all the packaging if damage has occurred, as this will
show evidence of excessive handling forces. It is also a
good idea to keep the packaging if possible for future
transportation.
Registering VoiceSoloXT
There are two methods for registering your VoiceSoloXT:
• Online: visit www.tc-helicon.com/VoiceSolo and click
Product Registration in the left hand column.
• Mail: complete and return the registration card included
with your product
Support
If you run into technical challenges, TC-Helicon will be
more than happy to help. There are a number of sources
for product support. We've prioritized them below according
to the speed at which you will access the help information.
1. Manual: The manual for VoiceSoloXT VSM-200P is a
good source of application information and answers for
common questions.
3. On-Line: visit www.tcsupport.tc to search and ask for
answers on up to date questions about VoiceSoloXT.
4. Phone:
International: +45 8742 7000
USA & Canada: 818-665-4900
6
Front Panel Diagram
2
1
1. VOLUME level control
This detented attenuator allows you to adjust your monitor
level while staying close to your mic. This control functions
differently than the volume control on an amplifier. As you
turn up the volume on an amplifier, the amp works
successively harder to produce more volume. With the
VSM-200P XT volume control however, the amp continues
to work hard whether your VoiceSoloXT’s volume control is
turned up full or down. With a powerful amp and medium
volume level expectations, this control can be used
throughout its range. With less powerful amplifiers and high
volume expectation, the most efficient path is to leave the
VSM-200P XT volume control up full and for you to control
volume with your mixer and/or amplifier.
2. Tuned bass port
This allows VoiceSoloXT to produce low frequencies. It is
also useful as a handle when carrying the unit.
7
Back Panel Diagram
1
2
1. Speakon® combo input jacks
These jacks allow either a 1/4” speaker cable or Speakon
equipped speaker cable to connect to VoiceSoloXT. These
jacks are paralleled and can be used to chain several
VSM-200P XT units together. Thus, both jacks are
designated as IN/THRU.
A note about chaining multiple VoiceSoloXTs
Your VSM-200P XT has an impedance, or ohms rating, of
8 Ohms. Chaining two VSM-200P XTs together lowers the
impedance the amp will have to drive to 4 Ohms. Most
amps will work fine at 4 Ohms even when pushed to
produce loud volume levels.
Chaining three VSM-200P XTs will lower the impedance to
2.6 Ohms and adding a fourth VSM-200P XT will bring the
impedance to 2 Ohms. Consult your amplifier’s manual to
confirm that it is capable of driving a 2 Ohm load.
Note that all Ohm ratings are specified with the volume
control set to maximum.
8
2. Power handling legend
This legend describes the amount of power your VSM200P XT will accept with various types of program material.
60W / AVERAGE: Also known as RMS, this means that
VoiceSoloXT will accept audio of constant level e.g. a sine
wave test signal of 60 watts for an extended period of time.
120W / PROGRAM: This rating describes how many watts
VoiceSoloXT can accept over an extended period of time
with dynamic program material such as what a band or
singer would produce.
240W / PEAK: This is the maximum VoiceSoloXT can
withstand for a very brief period of time.
Mic Stand Mounting
VoiceSoloXT Placement Options
VoiceSoloXT can be placed in 4 different ways. This
versatility allows you to use it as a mic stand mounted
monitor one night, a PA system on another and then use it
at home for practice or jamming.
1. Separate the boom from the stand by unscrewing the
boom from the vertical shaft of the microphone stand. To
do this, tighten the clutch you use to raise and lower the
stand first. This makes it easier to unscrew the boom
section. Hold the base of the stand with one hand and
turn the boom counterclockwise (looking down from the
top) with the other hand.
Mic Stand Mounting
Mic Stand Integration
What you need:
• VoiceSoloXT
• Tripod microphone stand with boom - must be the style
where the boom may be unscrewed from the vertical
shaft of the microphone stand.
• VoiceSoloXT adaptor hardware including:
Mic Boom Mount Attachment
2. Screw the Mic Stand Mounting Insert on to the vertical
shaft of the microphone stand. (If your stand has 3/8",
European thread it will be necessary to use a 5/8" to 3/8"
thread adapter, commonly included with both
microphone stands and microphone clips)
Mounting
Insert
Mic Stand
Shaft
Mic Stand Mounting insert
* Tip: If you find that your VoiceSoloXT wobbles on the
stand, try wrapping the Mic Stand Shaft threads with
Teflon thread tape before screwing on the Mic Stand
Mounting Insert. Teflon thread tape can be found at
stores that sell plumbing supplies.
9
Mic Stand Mounting
3. Place VoiceSoloXT on the mic stand so the stand goes
into the hole on the bottom of the VoiceSoloXT. If you
don’t need to mount VoiceSoloXT on a boom stand, you
are finished with your setup. If you require the boom,
continue to the next step.
5. Screw the Mic Boom Mount Attachment into your boom.
6. Lift the lid on VoiceSoloXT, and while holding it open,
slide the Mic Boom Mount attachment, on the boom into
slot on top of the monitor and let the lid close.
4. The Mic Boom Mount is found in the bag of parts that
came with your VoiceSoloXT. There are two versions: a
thin one for European stands and a wider one for the
rest. This adapter connects the boom of your mic stand
with VoiceSoloXT. It is designed to fit into the top
receptacle in VoiceSoloXT.
10
Mic Stand Mounting
7. Your VoiceSoloXT should now look like this.
2. Still holding the boom so that it does not swing away,
turn the lock nut counter-clockwise until it’s snug against
the bottom of the boom. Note that it’s not possible to
completely tighten the lock nut with your fingers, the final
action is done by swinging the boom snug against the
lock nut.
Adjusting the Boom
To optimize line-of-sight and audibility it is usually better to
have the monitor situated somewhat beside the singer. To
do this it is necessary to adjust the position of the boom.
The steps required to adjust the position of the boom are
as follows:
1. With the VoiceSoloXT integrated into the mic stand and
boom, loosen the boom by rotating to the right while
holding onto a corner of VoiceSoloXT.
3. After tightening the lock nut with your fingers, swing the
boom left, tightening to the desired position. It may be
necessary to go through steps 1 - 3 a few times to get
the boom tightly where you want it. The boom must be
tight or the weight of the mic can cause it to swing out of
position.
Read the next section to learn how to connect your new
VoiceSoloXT.
11
12
Using VoiceSoloXT
Introduction
The following paragraphs should be read at least once to
learn more about safe and successful use of VoiceSoloXT.
Making Connections
Before connecting speaker cables
First of all, turn the amplifier that will drive VoiceSoloXT off.
This is a general rule when connecting any speaker to an
amp.
Plug in the speaker cable(s)
Connect a proper speaker cable between your amplifier
and VoiceSoloXT’s IN/THRU jacks. Note that speaker
cables and input cables with 1/4” jacks look alike. Do not
use input cables like the ones you would use to connect an
instrument to an amp. Only use quality speaker cables
available from your dealer.
reduced sensitivity at the back-sides of the mic, there is
more sensitivity directly at the back of the mic.
• When using handheld mics near VoiceSoloXT never
point the mic at the speaker. This seems obvious yet it
happens all the time.
• When VoiceSoloXT is fed by an amplified monitor send,
ensure that the monitor send is Pre-EQ. This allows you
to add EQ to the main PA sound on your channel but to
send a flat (no EQ) signal to VoiceSoloXT. With a good
mic and a strong singer, a flat monitor is likely to be
louder than an EQ’d one.
If you plan to chain multiple VSM-200P XTs onto a single
amplifier channel, you may connect cables from either jack
to the next speaker. Read the Back Panel Diagram note on
page 8 regarding chaining VoiceSoloXTs.
Turn down the amp
If the amp has a volume control, it’s good practice to turn it
to minimum before applying power. Also ensure that the
device driving the amplifier has its volume turned off.
Apply power to your amp
After powering up, turn up the input control on the amp if it
features this.
Raising the level
Adjust your mixer so that your mic or instrument is fed to a
monitor send. Raise the send level slowly while you sing or
say “check” into the mic until the level is sufficient.
You’re now ready to perform with VoiceSoloXT!
Overcoming feedback
As in any open speaker and mic combination, there is the
threat of feedback. For those who aren’t familiar with the
term, “feedback” describes the sudden shriek or howl that
happens when a mic hears the speaker’s sound and
amplifies it. The following tips should help you to minimize
the risk.
• Always raise the volume level slowly, singing something
into the mic as you do so. Feedback will give you a little
warning if you listen carefully. When you hear a slight
ringing while you check the mic, lower the level a little
and this will become your “safe” monitoring level.
• Consider your placement. When VoiceSoloXT is slightly
off to one side as opposed to directly in front of you, you
will hear it better and can hear well with less level. Side
placement is also optimal when using mics with a hypercardioid pickup pattern because, in exchange for
13
14
Specifications
Connectors
2 paralleled Speakon® combo jacks that accept Speakon or
1/4” connectors
Speaker
Speaker: 6.5 inch ICT custom-designed point source driver
including inductively coupled tweeter
Nominal impedance: 8 ohms
120 Watt Program / 240 Watt Peak power handling
Sensitivity (I Watt @ 1 meter): 90 dB (1 kHz octave band)
Conical dispersion: 90 degrees
Frequency response: 120 Hz– 2 kHz
Peak SPL: 116 dB @ .5 meter
Case
Enclosure of molded aluminum with integral bass port
Color: Black
Dimensions
(H x W x D): 9” x 7” x 9.75”
(23 cm x 18 cm x 25 cm)
Shipping weight: 11 lbs. (5 kg)
Net weight: 9.2 lbs. (4.2 kg)
15