1
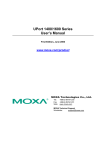
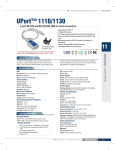
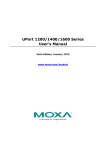
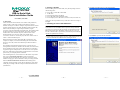
2. Package Checklist
1400/1600
USB-to-Serial Hub
Quick Installation Guide
First Edition, June 2006
2. Click Next to install the driver in the indicated folder.
Before installing the UPort 1400/1600, verify that the package contains
the following items:
•
•
•
•
•
UPort 1400 or 1600 USB-to-Serial Hub
1 USB Cable
Document and Software CD-ROM
UPort 1400/1600 Quick Installation Guide
Power Adaptor (UPort 1400/1600-8) or Power Cord (UPort 1600-16)
Notify your sales representative if any of the above items are missing or
damaged.
1. Overview
UPort is the brand name of MOXA’s new USB-to-serial product line,
which provides a wide range of products and solutions to extend
Windows COM ports via the PC’s USB port. Important features of UPort
products include support for hi-speed (480 Mbps) USB 2.0, Moxa CPU,
Moxa UART, the ability to assign COM port numbers, magnet
accessories, and mini female DB9 to terminal block. These features make
the UPort products easy to use and maintain. The UPort 1400 series
includes UPort 1410 with 4 RS-232 ports, and UPort 1450 with 4
RS-232/422/485 ports. The UPort 1600 series includes UPort
1610-8/1610-16 with 8 or 16 RS-232 ports, and UPort 1650-8/1650-16
with 8 or 16 RS-232/422/485 ports.
3. Installing the UPort 1400/1600 Driver
WARNING
If your host PC uses an nVIDIA nForce 4 processor and you find that
your host PC is not receiving the correct data, you should enter the PC’s
BIOS configuration utility and disable USB 2.0. This will cause your
host PC to use the USB 1.1 specification, which should prevent the data
transmission problem from recurring.
1. Run the Setup program located on the UPort 1400/1600 Document and
Software CD-ROM. Click Next to Start installing the driver.
3. Click Install to proceed with the installation.
Before connecting the UPort 1400/1600 USB-to-serial hubs to your
computer’s USB port, we recommend installing the UPort 1400/1600
driver first. To do this, follow the installation procedure described in
Section 3.
The installation procedure described in Section 3 was done on a PC
running Windows 2000 (x86). Windows XP and 2003 (32-bit and 64-bit)
driver installations are the same. UPort 1400/1600 can be connected to
any upstream type A USB port that is on the PC host or on an upstream
hub. UPort 1400/1600 is hot pluggable, and therefore there is no need to
power down your computer prior to installation.
After installing the driver, connect the UPort 1400/1600 to an upstream
host or hub. The Found New Hardware wizard will locate the
appropriate drivers automatically. Once the drivers are found, various
windows will pop up as UPort 1400/1600’s serial port is being installed.
When the Found New Hardware wizard finishes installing UPort
1400/1600, use the operating system’s Device Manager to check and/or
modify the port settings. The new COM port will be listed under Ports
(COM & LPT).
P/N:1802014000000
—1—
—2—
—3—
4. The next window that opens cautions you that although this software
has not passed Windows logo testing, this driver has already been
tested and shown that it can support the Windows OS. Click Continue
Anyway to proceed. Then, click Finish to complete the driver
installation.
5. Select Install the software automatically (Recommended).
7. Repeat steps 4 to 6 till all COM ports are installed.
5. Serial Port Pin Assignments
UPort 1400/1600’s serial ports use male DB9 connectors. Refer to the
following table for the RS-232 and RS-422/485 pin assignments.
4. Installing the UPort 1400/1600 Hardware
Male DB9
1. Power on UPort 1400/1600
• For UPort 1400, you can use bus power or external power. For
external power, you need to plug in the power adaptor.
• For UPort 1600-8, you need to plug in the power adaptor.
• For UPort 1600-16, you need to plug in the power cord and turn on
the power switch.
1
6
2. Connect the UPort to the PC using the USB cable.
5
9
Pin
RS-232
1
2
3
4
5
6
7
8
DCD
RxD
TxD
DTR
GND
DSR
RTS
CTS
RS-422/
4-wire RS-485
TxD-(A)
TxD+(B)
RxD+(B)
RxD-(A)
GND
-------
2-wire
RS-485
----Data+(B)
Data-(A)
GND
-------
3. After powering on your PC, Windows 2000/XP/2003 will
automatically detect the UPort 1400/1600.
4. Click Next to Start the installation.
6. The next window that opens cautions you that although this software
has not passed Windows logo testing, this driver has already been
tested and shown that it can support Windows OS. Click Continue
Anyway to proceed. Then, click Finish to complete the driver
installation.
Copyright © 2006
Moxa Technologies Co., Ltd.
All rights reserved.
Reproduction without permission is prohibited.
Tel: +886-2-8919-1230
Fax: +886-2-8919-1231
—4—
—5 —
www.moxa.com
[email protected]
—6—