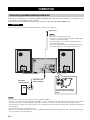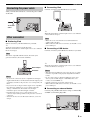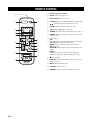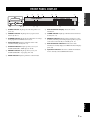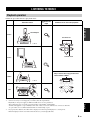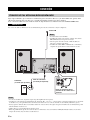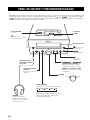
1
LV
CD RECEIVER
OWNER’S MANUAL
MANUAL DE INSTRUCCIONES
CAUTION: READ THIS BEFORE OPERATING YOUR UNIT.
1
2
3
4
5
6
7
8
9
10
11
12
13
14
15
16
To assure the finest performance, please read this manual
carefully. Keep it in a safe place for future reference.
Install this sound system in a well ventilated, cool, dry,
clean place - away from direct sunlight, heat sources,
vibration, dust, moisture, and/or cold. For proper
ventilation, allow the following minimum clearances
around CRX-332.
Top: 20 cm
Rear: 10 cm
Sides: 10 cm
Locate this unit away from other electrical appliances,
motors, or transformers to avoid humming sounds.
Do not expose this unit to sudden temperature changes
from cold to hot, and do not locate this unit in an
environment with high humidity (i.e. a room with a
humidifier) to prevent condensation inside this unit,
which may cause an electrical shock, fire, damage to this
unit, and/or personal injury.
Avoid installing this unit where foreign object may fall
onto this unit and/or this unit may be exposed to liquid
dripping or splashing. On the top of this unit, do not
place:
– Other components, as they may cause damage and/or
discoloration on the surface of this unit.
– Burning objects (i.e. candles), as they may cause fire,
damage to this unit, and/or personal injury.
– Containers with liquid in them, as they may fall and
liquid may cause electrical shock to the user and/or
damage to this unit.
Do not cover this unit with a newspaper, tablecloth,
curtain, etc. in order not to obstruct heat radiation. If the
temperature inside this unit rises, it may cause fire,
damage to this unit, and/or personal injury.
Do not plug in this unit to a wall outlet until all
connections are complete.
Do not operate this unit upside-down. It may overheat,
possibly causing damage.
Do not use force on switches, knobs and/or cords.
When disconnecting the power cable from the wall outlet,
grasp the plug; do not pull the cable.
Do not clean this unit with chemical solvents; this might
damage the finish. Use a clean, dry cloth.
Only voltage specified on this unit must be used. Using
this unit with a higher voltage than specified is dangerous
and may cause fire, damage to this unit, and/or personal
injury. Yamaha will not be held responsible for any
damage resulting from use of this unit with a voltage
other than specified.
To prevent damage by lightning, keep the power cable
and outdoor antennas disconnected from a wall outlet or
this unit during a lightning storm.
Do not attempt to modify or fix this unit. Contact
qualified Yamaha service personnel when any service is
needed. The cabinet should never be opened for any
reasons.
When not planning to use this unit for long periods of
time (i.e. vacation), disconnect the AC power plug from
the wall outlet.
Be sure to read the “TROUBLESHOOTING” section on
common operating errors before concluding that this unit
is faulty.
i En
17 Before moving this unit, press to set this unit to the
standby mode, and disconnect the AC power plug from
the wall outlet.
18 Condensation will form when the surrounding
temperature changes suddenly. Disconnect the power
cable from the outlet, then leave this unit alone.
19 When using this unit for a long time, this unit may
become warm. Turn the power off, then leave this unit
alone for cooling.
20 Install this unit near the AC outlet and where the AC
power plug can be reached easily.
21 The batteries shall not be exposed to excessive heat such
as sunshine, fire or the like.
22 Excessive sound pressure from earphones and
headphones can cause hearing loss.
This unit is not disconnected from the AC power source as long as
it is connected to the wall outlet, even if this unit itself is turned off
by . This state is called the standby mode. In this state, this unit is
designed to consume a very small quantity of power.
WARNING
TO REDUCE THE RISK OF FIRE OR ELECTRIC SHOCK, DO
NOT EXPOSE THIS UNIT TO RAIN OR MOISTURE.
LASER SAFETY
This unit employs a laser. Due to possible eye injury, only a
qualified service person should remove the cover or attempt to
service this device.
DANGER
This unit emits visible laser radiation when open. Avoid direct
eye exposure to beam. When this unit is plugged into the wall
outlet, do not place your eyes close to the opening of the disc tray
and other openings to look into inside.
LASER
Type
Wave length
Output Power
Semiconductor laser GaAs/GaAlAs
790 nm
7 mW
WARNING
DO NOT TOUCH THIS UNIT WHEN IT IS USED
CONTINUOUSLY AT HIGH VOLUME BECAUSE THE
BOTTOM OF THIS UNIT MAY BECOME HOT. IT MAY LEAD
TO INJURIES SUCH AS BURNS, ETC.
CAUTION
Danger of explosion if battery is incorrectly replaced.
Replace only with the same or equivalent type.
CAUTION
Use of controls or adjustments or performance of procedures
other than those specified herein may result in hazardous
radiation exposure.
CONTENTS
SUPPLIED ACCESSORIES ................................. 2
PLAYABLE DISCS AND FILE FORMAT......... 3
CONNECTION....................................................... 4
Connecting speakers/antenna/subwoofer................... 4
Connecting the power cable....................................... 5
Other connection........................................................ 5
REMOTE CONTROL ........................................... 6
FRONT PANEL DISPLAY ................................... 7
ADDITIONAL INFORMATION
TROUBLESHOOTING .......................................13
General..................................................................... 13
iPod/iPad.................................................................. 14
USB/iPad ................................................................. 15
Radio reception........................................................ 15
Disc playback .......................................................... 16
Remote control ........................................................ 16
OPERATION
FRONT PANEL AND BASIC OPERATION ..... 8
LISTENING TO MUSIC....................................... 9
OPERATION
HANDLING COMPACT DISCS ........................17
SPECIFICATIONS...............................................17
PREPARATION
PREPARATION
Playback operation..................................................... 9
Other operation ........................................................ 10
LISTENING TO FM RADIO STATIONS ........ 11
ADDITIONAL
INFORMATION
Tuning to radio stations ........................................... 11
Presetting radio stations........................................... 11
Selecting preset radio stations (Preset tuning)......... 11
USING USEFUL FUNCTIONS .......................... 12
Using option menu................................................... 12
Using sleep timer ..................................................... 12
■ About this manual
• “iPod” described in this manual may also refer to “iPhone”.
• This manual describes how to operate this unit using a remote control except when it is not available. Some of these
operations are also available using the front panel buttons.
• The symbol “☞” with page number(s) indicates the corresponding reference page(s).
• Notes contain important information about safety and operating instructions. y indicates a tip for your operation.
• This manual is printed prior to production. Design and specifications are subject to change in part as a result of
improvements, etc. In case of differences between the manual and the product, the product has priority.
English
1 En
PREPARATION
SUPPLIED ACCESSORIES
Make sure you have all of the following items.
Remote control
FM antenna
Dock cover
USB cap
SLEEP
CD
iPod
AUX
USB
TUNER
FOLDER
MENU
ENTER
OPTION
DISPLAY
VOLUME
MUTE
TUNING
MEMORY
PRESET
CAUTION
(With CR2032 battery)
Keep the USB cap out of the reach
of children, so that it is not
mistakenly swallowed.
■ Using the remote control
Use the remote control within 6 m of this unit and point
it toward the remote control sensor.
Notes
VOLUME
• Do not spill liquid on the remote control.
• Do not drop the remote control.
• Do not leave the remote control in the following places:
– hot or humid places such as a bathroom or near a heater
– extremely cold places
– dusty places
INPUT
PHONES
PRESET
Within 6 m
SLEEP
CD
iPod
TUNER
AUX
USB
FOLDER
MENU
ENTER
OPTION
DISPLAY
VOLUME
MUTE
TUNING
MEMORY
PRESET
Battery insulation sheet:
Remove before using.
■ Replacing the battery in the remote control
While pushing the release tab in direction , slide out
the battery holder in direction .
Change the battery when the operation range of the
remote control decreases.
1
CR2032 battery
2
3
2 En
Notes
• If the battery grows old, the effective operation range of the
remote control decreases considerably. If this happens,
replace the battery with new one as soon as possible.
• Exhausted battery may leak. If the battery have leaked,
dispose of it immediately. Avoid touching the leaked
material or letting it come into contact with clothing, etc.
Clean the battery compartment thoroughly before installing
a new battery.
• Keep the battery away from children. If the battery is
accidentally swallowed, contact your doctor immediately.
• When not planning to use the remote control for long
periods of time, remove the battery from the remote control.
• Do not charge or disassemble the supplied battery.
PLAYABLE DISCS AND FILE FORMAT
■ Playable MP3 and WMA files
Use compact discs bearing the marks below.
MP3
....
Compact discs (digital audio)
Bitrate
(kbps)
Sampling
frequency
(kHz)
MPEG 1 Audio Layer-3
32-320*1
32/44.1/48
MPEG 2 Audio Layer-3, 2
8-160*1
16/22.05/24
Format
....
CD-R,CD-RW digital audio discs
• CD-R or CD-RW discs bearing one of
the following phrases.
FOR CONSUMER
FOR CONSUMER USE
FOR MUSIC USE ONLY
• Finalized CD-R or CD-RW discs
Note
*1 Variable bitrate is supported.
WMA
• Version 8
• Version 9 (Standard and variable bitrates are supported.
Professional and Lossless are not supported.)
This compact disc player may not be able to
play some CD-R/CD-RW discs or discs on
which recording was not made correctly.
....
PREPARATION
■ Playable discs
Bitrate
(kbps)
Sampling
frequency
(kHz)
High Profile
32-320*2
32/44.1/48
Mid Profile
16-32
22.05
Profile
CD-TEXT discs
*2 Both constant and variable bitrates are supported.
Notes
To play back an 8-cm CD
Place it in the inner recessed area of the disc tray. Do not
put a normal (12-cm) CD on top of an 8-cm CD.
To prevent a malfunction of this unit:
• Do not use any nonstandard shaped
disc (heart, etc.) available on the
market because it might damage the
unit.
• Do not use a disc with tape, stickers, or paste on it. If
you use such a disc, the disc may get stuck in the
unit, or damage to the unit may result.
• Playback for Data Disc starts in alphanumeric order of files.
• Playback for USB starts in order by date and time of creation.
• Copyright-protected WMA (DRM) files cannot be played back
by this unit.
• The disc must be ISO 9660 compatible.
• The maximum file and folder numbers are as follows.
Data Disc
USB
Maximum total number of file
and folder*3
512
9,999
Maximum folder number*3
255
999
Maximum file number per
folder
511
255
*3 The root is counted as one of the folders.
Note: Do not use any lens cleaners as they may be a
cause of malfunction.
English
3 En
CONNECTION
Connecting speakers/antenna/subwoofer
Follow the procedure below to connect the speakers and FM antenna to this unit. For information on your speakers, refer
to the owner’s manual supplied for the speakers.
If a subwoofer is connected, low-frequency audio signals are output through SUBWOOFER OUT.
CAUTION
Do not connect the power cable of this unit until all cable connections are completed.
FM antenna
Notes
• The antenna should be stretched out.
• If you use an outdoor antenna instead of the supplied FM
antenna, reception will be better.
• If radio reception is poor, change the height, direction, or
placement of the antenna.
• If you use an FM antenna that is not supplied with the unit,
make sure that the base of the antenna is not threaded.
Subwoofer
(sold separately)
Subwoofer cable
(sold separately)
Be sure to remove insulation
from the end of each speaker
cable.
Notes
• If you connect a subwoofer, use a subwoofer that has a built-in amplifier.
• Be sure to connect the left channel (L), right channel (R), “+”(red) “–”(black) properly. If the connections are faulty, no sound will be
heard from the speakers, and if the polarity of the speaker connections is incorrect, the sound will be unnatural and lacks bass.
• Do not let the bare speaker wires touch each other or do not let them touch any metal part of this unit. This could damage this unit and/
or the speakers.
• Use speakers having more than 6 Ω impedance.
• There is a chance that placing speakers too close to a CRT-based (Braun tube) TV set might impair picture color. Should this happen,
move the speakers away from the TV set.
4 En
CONNECTION
Connecting the power cable
■ Connecting iPad
Connect or remove your iPad whenever you want.
PREPARATION
After you made all connections, connect the power cables
of this unit
To the wall
outlet
USB
IPod
y
When the unit is turned on and the input source is set to USB, the
connected iPad is charged.
Other connection
Note
■ Stationing iPod
Station or remove your iPod whenever you want.
y
An iPod is charged when set in the iPod dock.
When the unit is turned on and the input source is set to USB, the
iPod is not charged.
• Make sure to use a Dock Connector to USB Cable that is
supplied with your iPad.
• When an iPad or USB device is not in use, set the USB cover to
protect USB port.
■ Connecting a USB device
Connect or remove your USB device whenever you want.
Note
This unit is compatible with iPod classic, iPod nano (2nd
generation and later), iPod touch and iPhone.
USB
IPod
y
Dock Adapter
iPod dock
USB
When the unit is turned on and the input source is set to USB, the
connected USB device is charged.
Notes
IPod
Notes
• To secure the connection, attach a compatible Dock Adapter
supplied with the iPod or an iPod Universal Dock Adapter (sold
separately), and remove the protective case covering from your
iPod.
• If you do not use an adapter or if the adapter is not compatible,
the connection could be loose or poor, which could cause
damage or malfunctions. For details on dock adaptor
information, please visit official Apple’s website.
• If an iPod in protective case is connected by force, the
connector may be damaged. Remove the protective case before
connection.
• Attach the dock cover to the iPod dock whenever you are not
using it.
• This unit supports USB mass storage class devices (e.g., flash
memories or portable audio players) using FAT16 or FAT32
format.
• Do not connect devices other than USB mass storage class
devices (such as USB chargers or USB hubs), PCs, card
readers, an external HDD, etc.
• USB devices that use encryption cannot be used.
• When an iPad or USB device is not in use, set the USB cover to
protect USB port.
■ Connecting an external device
Connect your portable audio device using a commercially
available 3.5 mm mini plug cable.
English
5 En
REMOTE CONTROL
1 Infrared signal transmitter
1
2 SLEEP: Sleep setting (☞ P. 12)
3 Source buttons: Change sources.
2
0
SLEEP
4 FOLDER (during data CD/USB playback): Change folder.
5
,
: Scrolls through items on the iPod’s screen.
6 OPTION: Displays the option menu. (☞ P. 12)
CD
iPod
AUX
3
7
FOLDER
9 PRESET (during receiving radio): Select the preset radio
station (☞ P. 11)
MENU
A
ENTER
7
B
OPTION
DISPLAY
C
MUTE
D
0
A
VOLUME
E
8
TUNING
F
MEMORY
9
(Repeat) (☞ P. 10)
8 TUNING (during receiving radio): Tuning radio (☞ P. 11)
4
5
6
(Shuffle),
USB
TUNER
PRESET
B
: Standby/on
,
(during playback): Skip backward and forward/
press and hold to rewind and fast-forward
MENU: Returns to the upper level in the iPod menu.
: Play/pause
S/T/W/X (During using the option menu): Changes the
setting
ENTER
(During using the iPod): Select group/start playback
(During using the option menu): Confirms the setting
: Stop playback.
C DISPLAY: Switches the information shown on the front
panel. (☞ P. 10)
D MUTE: Mute/resume the sound.
E VOLUME: Volume control
F MEMORY: Memories preset radio stations. (☞ P. 11)
6 En
FRONT PANEL DISPLAY
2
3
4
SLEEP PRESET STEREO AUTO
TUNED MEMORY
5
6
7
SHUFFLE REPEAT
ARTISTS ALBUMS SONGS
MUTE
VOLUME
B
INPUT
PHONES
PRESET
8
9
0
A
1 SLEEP indicator: Lights up when the sleep timer is on
(☞ P. 12).
8 Multi information display: Shows the various
information.
2 PRESET indicator: Lights up when you preset radio
stations (☞ P. 11).
9 TUNED indicator: Lights up when this unit is tuned into a
station (☞ P. 11).
3 STEREO indicator: Lights up when this unit is receiving a
strong signal from an FM stereo broadcast.
0 MEMORY indicator: Flashes when searching for a radio
station by automatic preset tuning. Lights up when you preset
radio stations automatically or manually (☞ P. 11).
4 AUTO indicator: Lights up when this unit is in the
Automatic Tuning mode (☞ P. 11).
5 SHUFFLE indicator: Lights up when you set your
iPod/iPad/CD/USB to shuffle play (☞ P. 10).
6 REPEAT indicator: Lights up when you set your
iPod/iPad/CD/USB to repeat play (☞ P. 10).
PREPARATION
1
A Multi information indicators: Indicate the music
information currently displayed on Multi information display
(☞ P. 10).
B Operation indicators: Show the available menu buttons
for the currently selected OPTION menu item.
7 MUTE indicator: Lights up when the sound is muted.
English
7 En
OPERATION
FRONT PANEL AND BASIC OPERATION
y
• Press to set the unit to standby mode. All the information on the front panel display is not displayed in standby mode. This can
reduce power consumption. To turn on the unit, press ,
, or
on the front panel. If you press
, the input source
is set to CD, iPod or USB depending on which input source is used last. Playback begins if the input source is set to CD or USB.
USB port:
☞ P. 5, 9
iPod dock
USB
IPod
:
Unit standby/on
Disc tray
:
Disc tray open/close
VOLUME
INPUT
PHONES
:
PRESET
Play/pause playback
:
Stop playback
3.5 mm mini plug cable
(During playback):
Skip and search backward/forward.
PRESET (During receiving radio):
Select the preset radio station.
Remote control sensor:
Receives signals from the remote
control.
VOLUME
VOLUME
Down
INPUT button:
Press repeatedly to choose the input source.
CD
iPod
AUX
USB
FM
y
PHONES:
Connecting headphones
No sound is output from the speakers
when headphones are connected.
8 En
To listen to an external device, select AUX
and use the external device to begin
playback.
Up
LISTENING TO MUSIC
Playback operation
Follow the procedures below to play back music.
1 Set the source
2 Switch the
input
3 Select music and start playback
OPERATION
Dock Adapter
iPod
iPod*1
Scroll the list
USB
IPod
☞ P. 5
MENU
ENTER
Control menu
iPad*1
USB
USB
IPod
☞ P. 5
Skip to the first file in the previous/next
folder for MP3 or WMA*3
USB*2
USB
IPod
FOLDER
☞ P. 5
MENU
ENTER
CD
CD
VOLUME
INPUT
PHONES
PRESET
OPTION
English
*1 Some features may not be available depending on the model or the software version of your iPod/iPad.
*2 · Some devices may not work properly even if they meet the requirements.
· Playability of and power supply to all kind of USB devices are not guaranteed.
· The reading time may exceed 30 seconds depending on the number of files/folders.
· Yamaha and suppliers accept no liability for the loss of data saved on the USB devices connected to this unit.
As a precaution, it is recommended that the files are made backup copies.
*3 · If you press these buttons, the folder name is displayed on the front panel display for a certain period.
· ROOT is displayed for the root folder when the directory contains playable files.
9 En
LISTENING TO MUSIC
Other operation
■ Control playback
1
■ Switching the display
2
MENU
ENTER
You can switch the playback information shown on the
front panel display. Some special characters may not be
shown properly.
1
2
During playback
DISPLAY
OPTION
: Skip forward/Press and hold to Fast forward
: Skip backward/Press and hold to Rewind
: Play/Pause
: Stop
During playback
Press repeatedly.
For iPod/iPad
Song number and elapsed time (default setting)
↓
Song number and remaining time
Notes
• Playback for Data Disc starts in alphanumeric order of files.
• Playback for USB starts in order by date and time of creation.
• If
is pressed during playback, next time playback starts
from the beginning of the track you listened to last time. If
is pressed again while playback is stopped, next time playback
starts from the first track of the CD/USB device.
• This unit automatically switch the unit to standby mode if the
unit is left turned on for 1 hour without playback or any other
operation being performed (Automatic standby function).
■ Shuffle play
↓
Song name
↓
Artist name
↓
Album name
↓
Back to the default setting
Note
You can play back in random sequence.
Press repeatedly.
For iPod/iPad
This function is available for iPod classic, iPod nano (2nd
generation and later), iPod touch, iPhone and iPad. However,
even with these models, this function may not be available
depending on the software version of your iPod/iPad.
For CD/USB
Track/file number and elapsed time of the current
song (default setting)
*1 You cannot set SHUFFLE ALBUMS when you use an iPod
touch, iPhone or iPad.
For CD/USB
↓
Track number and remaining time of the current
song*4
↓
Total time of the disc*4
*2 If the audio format of the selected music source is MP3/
WMA, you can also select SHUFFLE FOLDER.
■ Repeat play
↓
Remaining time of the disc*4
↓
File name*5
You can play back repeatedly.
↓
Track name*6
Press repeatedly.
↓
Artist name*6
For iPod/iPad
↓
Album name*6
↓
For CD/USB
*3 If the audio format of the selected music source is MP3/
WMA, you can also select REPEAT FOLDER.
10 En
Back to the default setting
*4 Only for Audio CDs
*5 Only for MP3/WMA files
*6 Only when the selected track has information
LISTENING TO FM RADIO STATIONS
Tuning to radio stations
1
Selecting preset radio stations
(Preset tuning)
2
TUNING
TUNER
Press TUNER.
Press and hold.
Automatic tuning starts.
y
Select the preset radio station
in FM mode.
PRESET
OPERATION
If the signal received from the station you want to select is weak,
you can also tune into radio stations manually by pressing
TUNING repeatedly.
Note
If you tune to a station manually, the sound is monaural.
Presetting radio stations
You can store your favorite FM stations with the preset
function.
■ Automatic preset tuning
1
2
MEMORY
ENTER
Press and hold
MEMORY for more than
2 seconds in FM mode.
Start the automatic preset.
y
To cancel automatic presetting, press MEMORY again without
pressing ENTER in step 2.
Note
When you perform the automatic preset, all stored stations are
cleared and the new stations are stored.
■ Manual preset tuning
1
2
MEMORY
TUNING
Press MEMORY.
Tune into a favorite
radio station.
3
4
MENU
ENTER
Select the preset
number you want to
store to.
ENTER
Complete the
manual preset.
y
English
• You can preset up to 30 FM stations.
• To cancel the manual preset while choosing a preset number,
press MEMORY again.
• You can delete a preset station by pressing OPTION →
Cursor S/T → ENTER to select PRESET DELETE.
11 En
USING USEFUL FUNCTIONS
Using option menu
The option menu appears on the front panel display by pressing OPTION. You can set various useful functions with
option menu.
Option menu
Parameter or control range
Reference page
PRESET DELETE
(Displays only when the input source is set to FM.)
11
DIMMER
DIMMER OFF (brightest)/DIMMER 1/DIMMER 2 (darkest)
This page
TREBLE
–10 to +10
This page
BASS
–10 to +10
This page
BALANCE
L+5 - CENTER - R+5
This page
AUTO POWER OFF
TIME OFF/ TIME 8H/ TIME 4H
AUTO POWER OFF sets the system to standby mode whenever no
operation is performed for a preset amount of time.
This page
1
2
3
4
MENU
OPTION
ENTER
Press OPTION.
Select desired
option menu.
5
6
MENU
ENTER
ENTER
Confirm with
ENTER.
OPTION
ENTER
Change the settings.
Complete the
setting.*1
Exit option
menu.
*1 To set additional items, repeat steps 2 to 5.
y
To cancel the setting during the operation, press OPTION.
■ Setting dimmer, tone/balance
DIMMER: Changes the brightness of the front panel display.
TREBLE*2: Adjusts the high frequency response.
BASS*2: Adjusts the low frequency response.
BALANCE: Adjusts the volume level of each left and right speaker channel.
*2 Also effective when you are using headphones.
Using sleep timer
The sleep timer sets the unit to the standby mode after the specified time elapses.
SLEEP
Press repeatedly.
The SLEEP indicator lights up on the front panel display (☞ P. 7).
12 En
30min
60min
90min
120min
OFF
ADDITIONAL INFORMATION
TROUBLESHOOTING
Refer to the table below when this unit does not function properly. If the problem you are experiencing is not listed below
or if the instruction below does not help, turn off this unit, disconnect the power cable, and contact the nearest authorized
Yamaha dealer or service center.
General
Problem
This unit fails to turn
on or enters the
standby mode soon
after the power is
turned on.
Cause
Remedy
Page
Connect the power cable firmly.
5
This unit has been exposed to a strong
external electric shock (such as lightning
or strong static electricity).
Press and hold
for more than 5 seconds to reset
the system. If this does not solve the problem, set this
unit to the standby mode, disconnect the power
cable, plug it back in after 30 seconds and then use it
normally.
—
No appropriate input source has been
selected.
Select an appropriate input source with INPUT on
the front panel (or the source buttons on the remote
control).
—
Speaker connections are not secure.
Secure the connections.
4
The mute function may be on.
Cancel the mute function.
6
The volume is turned down.
Turn up the volume.
8
Signals this unit cannot reproduce are
being input from a source component,
such as a CD-ROM.
Play a source whose signals can be reproduced by
this unit.
3
The sleep timer may be set.
This is not malfunction. Turn on the unit and play the
source again.
—
AUTO POWER OFF is triggered.
Setting AUTO POWER OFF to TIME OFF enables
to play continuously.
12
Sound is heard from
the speaker on one
side only.
Incorrect cable connections.
Connect the cables properly. If the problem persists,
the cables may be defective.
4
There is noise
interference from
digital or radio
frequency
equipment.
This unit is too close to the digital or
high-frequency equipment.
Move this unit farther away from such equipment.
—
The unit does not
operate properly.
No sound.
The power is
suddenly turned off.
The unit is left turned on for 1 hour
without playback or any other operation
being performed.
ADDITIONAL
INFORMATION
The power cable is not connected or the
plug is not completely inserted.
English
13 En
TROUBLESHOOTING
iPod/iPad
Note
In case of a transmission error without a status message appearing in the front panel of this unit, check the connection to your iPod/iPad
(see page 5).
Status message
Cause
Remedy
Page
iPod Connecting
iPod Charging
This unit is in the middle of recognizing
the connection with your iPod.
If the message continues to appear in the front panel
display, disconnect and connect the iPod again.
5
Unknown iPod
There is a problem with the signal path
from your iPod to this unit.
Connect the iPod again.
5
The iPod being used is not supported by
this unit.
Only iPod classic, iPod nano (2nd generation and
later), iPod touch and iPhone are supported.
—
iPod
This unit has recognized your iPod;
however, it cannot obtain information
such as elapsed time.
iPod Unplugged
Your iPod was removed.
Connect the iPod again.
5
Over Current
The iPod being used is not supported by
this unit.
Disconnect the iPod and then turn the unit off and on
again. Then connect supported iPod again.
5
The iPod is connected at an angle.
* Messages shown above appear only when a device is connected to the iPod dock.
Problem
No sound.
Cause
Remedy
Page
The power of the unit is off.
Connect the power cable correctly.
—
The iPod/iPad software version has not
been updated.
Download the latest iTunes software to update the
iPod/iPad software version to the latest.
—
The iPod/iPad is in the process of
connecting with the unit.
Please wait for a while.
—
The iPod/iPad is not connected correctly.
Remove the iPod/iPad from the unit, then connect it
again.
5
The iPod/iPad
sounds, but you
cannot operate it with
the unit or the remote
control.
The iPod/iPad is not connected correctly.
Remove the iPod/iPad from the unit, then connect it
again.
5
You cannot operate
from the iPod/iPad.
The iPod/iPad is not connected correctly.
Remove the iPod/iPad from the unit, then connect it
again.
5
The playback
information is not
displayed on the
front panel display.
The iPod/iPad you set is not compatible
with the playback information display.
Only iPod classic, iPod nano (2nd generation and
later), iPod touch, iPhone and iPad are supported.
5
The iPod/iPad does
not charge up.
The iPod/iPad is not connected correctly.
Remove the iPod/iPad from the unit, then connect it
again.
5
Suddenly the music
being played back is
canceled and another
track starts playing
without performing
any operation.
The iPod’s Shake to Shuffle function is
turned on.
Turn off the Shake to Shuffle function in the iPod’s
settings.
—
14 En
TROUBLESHOOTING
USB/iPad
Note
In case of a transmission error without a status message appearing in the front panel of this unit, check the connection to the USB device
(see page 5).
Status message
Cause
Remedy
Page
The USB device is not connected
firmly.
Connect the USB device again.
5
Unknown USB
The connected USB device is not
playable on this unit.
Connect playable USB device.
5
The file name is too long.
The file name should be no more than 250
characters.
—
Over Current
The USB device is connected at an
angle.
Disconnect the USB device and then turn the unit off
and on again. Then connect playable USB device
again.
5
No Files
The USB device does not contain
playable files.
Use a USB device contains playable files.
3
An incompatible USB device is
connected to the unit.
Turn off the system and reconnect the USB device to
the unit. If it does not resolve the problem, the USB
device is not playable on the unit.
—
The number of files/folders exceeds the
limit.
Reduce the number of files/folders; refer to the
limitations noted in this manual.
3
USB Time Out
Problem
MP3/WMA file in the
USB device does not
play.
Cause
The USB device is not recognized.
Remedy
Page
Connect the USB device again.
5
Connect an AC adapter if supplied with the device.
—
Format the USB device and copy the files again.
—
Improper USB device connections.
Connect the USB device again.
5
The MP3 or WMA formats are not
compatible with this unit.
Replace the file with a correctly recorded file
playable with this unit.
3
If the solutions above do not resolve the
problem, the USB device is not playable
on the unit.
Try another USB device.
—
ADDITIONAL
INFORMATION
USB Unplugged
Radio reception
Problem
FM stereo reception is
noisy.
Cause
Remedy
Page
Check the antenna connections.
4
The characteristics of FM stereo
broadcasts may cause this problem
when the transmitter is too far away or
the antenna input is poor.
Try using a high-quality directional FM antenna.
—
Use the manual tuning method.
11
The desired station
cannot be tuned into
with the automatic
tuning method.
The signal is too weak.
Use a high-quality directional FM antenna.
—
Use the manual tuning method.
11
The preset selecting
function does not work.
The preset (memory) may have been
erased.
Preset radio stations again.
11
There is distortion,
and clear reception
cannot be obtained
even with a good FM
antenna or an outdoor
antenna.
Multipath reflection or other radio
interference may have occurred.
Change the height, direction, or placement of the
antenna.
—
15 En
English
The antenna is connected improperly.
TROUBLESHOOTING
Disc playback
Problem
Cause
Remedy
Page
No sound or
distorted sound
The sampling rate of an MP3 or WMA
file may not be compatible with this unit.
Check the sampling rate and bit rate of an MP3 or
WMA file are compatible with this unit.
3
Disc playback does
not start.
You may be using a CD-R/RW that is not
finalized.
Finalize the CD-R/RW.
—
The disc label may be upside down.
Check that the disc label is facing up.
—
The disc may be defective.
Try playing back another disc. If this cures the
problem, the disc you want to play back is defective.
—
MP3/WMA disc may not contain
sufficient music files to be played back.
Check that your MP3/WMA disc contains at least
5 MP3/WMA music files. If the number of files is
small, the disc may not be recognized.
—
The sampling rate of an MP3 or WMA
file may not be compatible with this unit.
Check the sampling rate and bit rate of an MP3 or
WMA file are compatible with this unit.
3
Some button
operations do not
work.
The disc loaded into the unit may not be
compatible.
Remove the disc and then check whether the unit
supports the disc or not.
3
Playback does not
start immediately
after pressing
on the unit or
on
the remote control.
The disc may be dirty.
Wipe the disc clean.
—
The disc loaded into the unit may not be
compatible.
Use a disc supported by the unit.
3
If the unit was moved from a cold to
warm place, condensation may have
formed on the disc reading lens.
Wait for an hour or two until the unit adjusts to the
room temperature, and try again.
—
“No Disc” appears in
the display even
though a disc is in
the disc tray.
The disc loaded into the unit may not be
compatible.
Use a disc supported by the unit.
3
The disc may be dirty.
Remove the disc and then wipe the disc clean.
—
Disc is loaded upside-down.
Remove the disc and then load the disc with the
labeled side facing up.
—
Remote control
Problem
The remote control
does not work nor
function properly.
16 En
Cause
Remedy
Page
The remote control may be operated
outside its operation range.
For information on the remote control operation
range, refer to “Using the remote control”.
2
The remote control sensor on this unit
may be exposed to direct sunlight or
lighting.
Change the lighting or orientation of this unit.
—
The battery may be worn out.
Replace the battery with new one.
2
There are obstacles between the sensor of
this unit and the remote control.
Remove the obstacles.
—
HANDLING COMPACT DISCS
• Always handle with care so that the playing surface is
not scratched. Do not bend discs.
• Do not wipe with a circular motion; wipe straight
outward from the center.
• To keep the playing surface clean, wipe with a clean,
dry cloth. Do not use any type of disc cleaner, spray, or
any other chemical-based liquid.
• Do not expose discs to direct sunlight, high temperature
or high humidity for a long time.
• Use a soft-tipped pen when writing on the label side of a
disc.
SPECIFICATIONS
iPod
• Supported iPod.............................................................iPod classic,
iPod nano (2nd generation and later), iPod touch, iPhone, iPad
• Standby Power consumption...................................... 0.3 W or less
• Dimensions (W × H × D)........................... 180 × 118 × 318.2 mm
• Weight ................................................................................. 2.95 kg
Specifications are subject to change without notice.
CD
• Media ...................................................................... CD, CD-R/RW
• Audio format............................................. Audio CD, MP3, WMA
LASER
• Type ........................................Semiconductor laser GaAs/GaAlAs
• Wave length .........................................................................780 nm
• Output Power .......................................................................10 mW
USB
• Audio format................................................................MP3, WMA
AUX
• Input connector .......... STEREO L/R: 3.5 mm STEREO mini Jack
AMPLIFIER SECTION
• Maximum output power ............................................20 W + 20 W
(6 Ω 1 kHz, 10% THD)
• Input impedance (AUX) ........................................................73 kΩ
• Maximum input signal (AUX)................................................2.2 V
• Total harmonic distortion
CD etc. 1 kHz/8 W............................................................... 0.04 %
iPod, iPhone, iPad
ADDITIONAL
INFORMATION
PLAYER SECTION
“Made for iPod,” “Made for iPhone,” and “Made for iPad” mean
that an electronic accessory has been designed to connect
specifically to iPod, iPhone, or iPad, respectively, and has been
certified by the developer to meet Apple performance standards.
Apple is not responsible for the operation of this device or its
compliance with safety and regulatory standards.
Please note that the use of this accessory with iPod, iPhone, or
iPad may affect wireless performance.
iPad, iPhone, iPod, iPod classic, iPod nano, iPod shuffle, and
iPod touch are trademarks of Apple Inc., registered in the U.S.
and other countries.
TUNER SECTION
• Tuning range
[U.S.A. and Canada models] ......................... 87.5 to 107.9 MHz
[Other models] ........................................... 87.50 to 108.00 MHz
GENERAL
English
• Power Supply
[Europe model] .................................................AC 230 V, 50 Hz
[U.S.A. and Canada models] ............................AC 120 V, 60 Hz
[Asia model] ........................................ AC 220-240 V, 50/60 Hz
[Taiwan model]......................................... AC 110-120 V, 60 Hz
[Australia model] ..............................................AC 240 V, 50 Hz
[U.K. model].....................................................AC 230 V, 50 Hz
[China model] ...................................................AC 220 V, 50 Hz
[Korea model]...................................................AC 220 V, 60 Hz
• Power consumption ................................................................32 W
17 En
PRECAUCIÓN: LEA LAS INDICACIONES SIGUIENTES ANTES DE
UTILIZAR ESTE APARATO
1
2
3
4
5
6
7
8
9
10
11
12
13
14
15
16
17
Para asegurar el mejor rendimiento de este aparato, lea
atentamente este manual. Y luego guárdelo en un lugar
seguro para poder consultarlo en el futuro en caso de ser
necesario.
Instale este sistema de sonido en un lugar bien ventilado,
fresco, seco y limpio, y alejado de la luz solar directa, fuentes
de calor, vibración, polvo, humedad y/o frío. Para garantizar
una ventilación correcta deberán existir las siguientes
distancias mínimas alrededor del CRX-332.
Arriba: 20 cm
Atrás: 10 cm
A los lados: 10 cm
Coloque este aparato lejos de otros aparatos eléctricos,
motores o transformadores, para evitar así los ruidos
de zumbido.
No exponga este aparato a cambios bruscos de temperaturas,
del frío al calor, ni lo coloque en lugares muy húmedos (una
habitación con deshumidificador, por ejemplo), para impedir
así que se forme condensación en su interior, lo que podría
causar una descarga eléctrica, un incendio, daños en
el aparato y/o lesiones a las personas.
Evite instalar este aparato en un lugar donde puedan caerle
encima objetos extraños y/o donde quede expuesto al goteo
o a la salpicadura de líquidos. Encima de este aparato no
ponga:
– Otros componentes, porque pueden causar daños y/o
decoloración en la superficie de este aparato.
– Objetos con fuego (velas, por ejemplo), porque pueden
causar un incendio, daños en el aparato y/o lesiones a las
personas.
– Recipientes con líquidos, porque pueden caerse
y derramar el líquido, causando descargas eléctricas
al usuario y/o dañando el aparato.
No tape este aparato con un periódico, mantel, cortina, etc.
para no impedir el escape del calor. Si aumenta
la temperatura en el interior del aparato, esto puede causar
un incendio, daños en el aparato y/o lesiones a las personas.
No enchufe este aparato a una toma de corriente hasta
después de haber terminado todas las conexiones.
No ponga el aparato al revés. Podría recalentarse
y posiblemente causar daños.
No utilice una fuerza excesiva con los conmutadores,
los controles y/o los cables.
Cuando desconecte el cable de alimentación de la toma
de corriente, sujete la clavija y tire de ella; no tire del
propio cable.
No limpie este aparato con disolventes químicos porque
podría estropear el acabado. Utilice un paño limpio y seco
para limpiar el aparato.
Utilice solamente la tensión especificada en este aparato.
Utilizar el aparato con una tensión superior a la especificada
resulta peligroso y puede producir un incendio, daños en
el aparato y/o lesiones a las personas. Yamaha no se hará
responsable de ningún daño debido al uso de este aparato con
una tensión diferente de la especificada.
Para impedir daños debidos a relámpagos, desconecte el
cable de alimentación y antenas externas de la toma
de corriente durante una tormenta eléctrica.
No intente modificar ni arreglar este aparato. Póngase
en contacto con el personal de servicio Yamaha cualificado
cuando necesite realizar alguna reparación. La caja no deberá
abrirse nunca por ninguna razón.
Cuando no piense utilizar este aparato durante mucho tiempo
(cuando se ausente de casa por vacaciones, por ejemplo)
desconecte el cable de alimentación de la toma de corriente.
Asegúrese de leer la sección “SOLUCIÓN DE
PROBLEMAS” antes de dar por concluido que su aparato
está averiado.
Antes de trasladar este aparato, pulse para ponerlo en
el modo de espera, y luego desconecte el cable de
alimentación de CA de la toma de corriente.
i Es
18 La condensación se formará cuando cambie de repente
la temperatura ambiental. Desconecte en este caso el cable
de alimentación de la toma de corriente y no utilice
el aparato.
19 El aparato se calentará cuando la utilice durante mucho
tiempo. Desconecte en este caso la alimentación y luego no
utilice el aparato para permitir que se enfríe.
20 Instale este aparato cerca de la toma de CA y donde se pueda
alcanzar fácilmente la clavija de alimentación.
21 Las baterías no deberán exponerse a un calor excesivo como,
por ejemplo, el que producen los rayos del sol, el fuego
y similares.
22 La presión acústica excesiva de los auriculares puede causar
pérdida auditiva.
Este aparato no se desconecta de la fuente de alimentación de CA si
está conectada a una toma de corriente, aunque la propia aparato
esté apagada con . A este estado se le llama modo de espera.
En este estado, este aparato ha sido diseñada para que consuma
un cantidad de corriente muy pequeña.
ADVERTENCIA
PARA REDUCIR EL RIESGO DE INCENDIO O DESCARGA
ELÉCTRICA, NO EXPONGA ESTE APARATO A LA LLUVIA
NI A LA HUMEDAD.
SEGURIDAD CONTRA LA RADIACIÓN LÁSER
Este aparato utiliza rayos láser. Debido a la posibilidad de que se
produzcan daños en los ojos, la extracción de la cubierta del
aparato o las reparaciones solamente deberán ser realizadas por
un técnico cualificado.
PELIGRO
Este aparato emite radiación láser visible cuando se abre. Evite
la exposición directa a los rayos láser. Cuando se conecte este
aparato a una toma de corriente no acerque sus ojos a la abertura
de la bandeja del disco ni a otras aberturas para mirar al interior.
LASER
Tipo
Longitud de onda
Potencia de salida
Láser semiconductor GaAs/GaAlAs
790 nm
7 mW
ADVERTENCIA
NO TOQUE ESTA UNIDAD SI SE UTILIZA DE FORMA
CONTINUA A UN VOLUMEN ELEVADO, YA QUE SU
PARTE INFERIOR PODRÍA ACUMULAR MUCHO CALOR
Y PODRÍA SUFRIR LESIONES O QUEMADURAS.
PRECAUCIÓN
Peligro de explosión si la pila se sustituye incorrectamente.
Sustitúyala por otra del mismo tipo o de un tipo equivalente.
PRECAUCIÓN
El uso de los controles, los ajustes o los procedimientos que no se
especifican enste manual pueden causar una exposición peligrosa a
la radiación.
CONTENIDO
ACCESORIOS SUMINISTRADOS ..................... 2
DISCOS Y FORMATOS DE ARCHIVO
REPRODUCIBLES............................................ 3
CONEXIÓN ............................................................ 4
Conexión de los altavoces/antena/subwoofer............ 4
Conexión del cable de alimentación .......................... 5
Otra conexión............................................................. 5
SOLUCIÓN DE PROBLEMAS...........................13
General..................................................................... 13
iPod/iPad.................................................................. 14
USB/iPad ................................................................. 15
Recepción de la radio............................................... 15
Reproducción de un disco........................................ 16
Mando a distancia .................................................... 16
MANIPULACIÓN DE DISCOS
COMPACTOS...................................................17
ESPECIFICACIONES .........................................17
FUNCIONAMIENTO
PANEL DELANTERO Y
FUNCIONAMIENTO BÁSICO........................ 8
ESCUCHAR MÚSICA .......................................... 9
INFORMACIÓN
ADICIONAL
Operaciones de reproducción .................................... 9
Otras operaciones..................................................... 10
FUNCIONAMIENTO
MANDO A DISTANCIA ....................................... 6
PANTALLA DEL PANEL DELANTERO .......... 7
INFORMACIÓN ADICIONAL
PREPARACIÓN
PREPARACIÓN
ESCUCHAR EMISORAS DE RADIO FM ....... 11
Sintonización de emisoras de radio ......................... 11
Presintonización de emisoras de radio..................... 11
Selección de emisoras de radio presintonizadas
(Preajuste de sintonización)................................. 11
UTILIZACIÓN DE FUNCIONES ÚTILES ...... 12
Uso del menú de opciones ....................................... 12
Utilización del temporizador de apagado ................ 12
■ Acerca de este manual
• Las referencias al “iPod” incluidas en este manual son aplicables también al “iPhone”.
• Este manual describe cómo utilizar esta unidad con un mando a distancia, excepto cuando este no se encuentre
disponible. Algunas de estas operaciones también pueden realizarse con los botones del panel delantero.
• El símbolo “☞” con números de página indica la página de referencia correspondiente.
• Las notas contienen información importante acerca de las instrucciones de seguridad y funcionamiento. y indica una
sugerencia de funcionamiento.
• Este manual se imprime antes de la producción. El diseño y las especificaciones están sujetos a cambios por motivo de
mejoras, etc. Si hay diferencias entre el manual y el producto, el producto tiene prioridad.
Español
1 Es
PREPARACIÓN
ACCESORIOS SUMINISTRADOS
Asegúrese de que dispone de todos los elementos siguientes.
Mando a distancia
Antena FM
Tapa para base Dock
Tapón para USB
SLEEP
CD
iPod
AUX
USB
TUNER
FOLDER
MENU
ENTER
OPTION
DISPLAY
VOLUME
MUTE
TUNING
MEMORY
PRECAUCIÓN
PRESET
(Con pila CR2032)
Mantenga el tapón para USB fuera
del alcance de los niños para evitar
que se lo traguen accidentalmente.
■ Uso del mando a distancia
Utilice el mando a distancia a una distancia máxima de
6 m de esta unidad, y apunte al sensor del mando a
distancia.
VOLUME
Notas
INPUT
PHONES
PRESET
• No vierta líquido en el mando a distancia.
• No deje caer el mando a distancia.
• No deje el mando a distancia en los lugares siguientes:
– lugares con elevada temperatura o humedad, como por
ejemplo un baño o un calefactor
– lugares muy fríos
– lugares polvorientos
Dentro de 6 m
SLEEP
CD
iPod
TUNER
AUX
USB
FOLDER
MENU
ENTER
OPTION
DISPLAY
VOLUME
MUTE
TUNING
MEMORY
PRESET
Lámina de aislamiento de la
pila: quitar antes de usar.
■ Sustitución de la pila en el mando a distancia
Mientras pulsa la lengüeta en la dirección , deslice el
soporte de la pila en la dirección .
Cambie la pila cuando la distancia de funcionamiento
del mando a distancia disminuya.
1
Pila CR2032
2
3
2 Es
Notas
• Si la pila envejece, el rango de funcionamiento efectivo del
mando a distancia se verá reducido considerablemente. En
tal caso, sustituya la pila por una nueva cuanto antes.
• Una pila agotada puede llegar a tener fugas. Si la pila tiene
fugas, tírela inmediatamente siguiendo las regulaciones.
Nunca toque el líquido que salga de la pila ni permita que
entre en contacto con la ropa. Limpie a conciencia el
compartimento de la pila antes de colocar una pila nueva.
• Mantenga la pila alejada del alcance de los niños. Si la pila
se ingiriera de forma accidental, póngase en contacto con un
doctor inmediatamente.
• Si tiene previsto no utilizar el mando a distancia durante
largos periodos de tiempo, saque la pila del mando a
distancia.
• No cargue ni desmonte la pila suministrada.
DISCOS Y FORMATOS DE ARCHIVO REPRODUCIBLES
■ Archivos MP3 y WMA reproducibles
Utilice discos compactos que presenten las marcas que
aparecen a continuación.
MP3
....
Discos compactos (audio digital)
....
Discos de audio digital CD-R,CDRW
• CD-R o CD-RW con una de las
siguientes frases.
FOR CONSUMER
FOR CONSUMER USE
FOR MUSIC USE ONLY
• Discos CD-R o CD-RW finalizados
Velocidad
de bits
(kbps)
Frecuencia
de muestreo
(kHz)
MPEG 1 Audio Layer-3
32-320*1
32/44,1/48
MPEG 2 Audio Layer-3, 2
8-160*1
16/22,05/24
Formato
*1 Es compatible con una velocidad de bits variable.
WMA
• Versión 8
• Versión 9 (Compatible con velocidades de bits estándar
y variable. Professional y Lossless no son compatibles).
Velocidad
de bits
(kbps)
Frecuencia
de muestreo
(kHz)
High Profile
32-320*2
32/44,1/48
Mid Profile
16-32
22,05
Nota
Puede que este reproductor de discos
compactos no sea capaz de reproducir algunos
discos CD-R/CD-RW o discos mal grabados.
....
Discos CD-TEXT
PREPARACIÓN
■ Discos reproducibles
Perfil
*2 Es compatible con velocidades de bits constantes y variables.
Notas
Para reproducir un CD de 8 cm
Colóquelo en la zona interior cóncava de la bandeja del
disco. No coloque un CD normal (12 cm) sobre un CD de
8 cm.
Para evitar un mal funcionamiento de esta
unidad:
• No utilice discos con formas no
estándar (corazón, etc.) disponibles
en el mercado, ya que pueden dañar
la unidad.
• No utilice discos con cinta, pegatinas o pegamento
sobre ellos. Si utiliza un disco de este tipo, puede que
quede atrapado en la unidad o cause algún daño en la
misma.
• La reproducción de discos de datos se inicia en orden
alfanumérico.
• La reproducción de USB se inicia por orden de fecha y hora de
creación.
• Los archivos WMA con protección de copyright (DRM) no se
pueden reproducir con esta unidad.
• El disco debe ser compatible con ISO 9660.
• Los números máximos de archivos y carpetas son los
siguientes.
Disco de
datos
USB
Número máximo total de
archivos y carpetas*3
512
9.999
Número máximo de carpetas*3
255
999
Número máximo de archivos
por carpeta
511
255
*3 El directorio raíz cuenta como una carpeta.
Nota: no utilice limpiadores de lentes, porque pueden
provocar fallos de funcionamiento.
Español
3 Es
CONEXIÓN
Conexión de los altavoces/antena/subwoofer
Siga el procedimiento que se muestra a continuación para conectar los altavoces y la antena FM a este aparato. Para
obtener información sobre sus altavoces, consulte el manual de instrucciones de los mismos.
Si se conecta un subwoofer, las señales de audio de baja frecuencia se emitirán a través de SUBWOOFER OUT.
PRECAUCIÓN
No conecte el cable de alimentación de esta unidad hasta que todas las conexiones se hayan completado.
Antena FM
Notas
• La antena debe estar extendida.
• Si utiliza una antena para exterior, en lugar de la antena
FM suministrada, la recepción será mejor.
• Si la recepción de radio es mala, cambie la altura, la
dirección o el lugar de la antena.
• Si utiliza una antena FM no suministrada con la unidad,
asegúrese de que la antena no tiene una base roscada.
Subwoofer
(se vende por separado)
Cable de subwoofer
(se vende por separado)
Retire el aislamiento de los
extremos de los cables de los
altavoces.
Notas
• Si conecta un subwoofer, asegúrese de que tenga un amplificador incorporado.
• Asegúrese de conectar bien el canal izquierdo (L), el derecho (R), “+”(rojo) y “–”(negro). Si las conexiones están mal, no se oirá sonido
de los altavoces, y si la polaridad de las conexiones de los altavoces no es correcta, el sonido no será natural y faltarán los graves.
• No deje que los cables de altavoces desnudos entren en contacto entre sí ni toquen otras partes metálicas de esta unidad. Esto podría
dañar la unidad o los altavoces.
• Utilice altavoces con una impedancia superior a 6 Ω.
• Existe la posibilidad de que la colocación de altavoces demasiado cerca de un televisor CRT (tubo Braun) reduzca el color de la
imagen. Si así fuera, aleje los altavoces del televisor.
4 Es
CONEXIÓN
Conexión del cable de alimentación
■ Conexión del iPad
Conecte o desconecte su iPad siempre que quiera.
PREPARACIÓN
Tras realizar todas las conexiones, conecte los cables de
alimentación de esta unidad
A la toma
de corriente
USB
IPod
y
Cuando la unidad está encendida y la fuente de alimentación se
ajusta a USB, el iPad conectado se carga.
Otra conexión
Nota
■ Colocación del iPod
Coloque o desconecte su iPod siempre que quiera.
y
Cuando el iPod está colocado en la base Dock para iPod se carga
automáticamente.
Cuando la unidad está encendida y la fuente de alimentación se
ajusta a USB, el iPod no se carga.
• Asegúrese de utilizar el Conector del acoplador al Cable USB
suministrado con su iPad.
• Cuando no utilice el iPad o dispositivo USB, coloque la tapa del
puerto USB para protegerlo.
■ Conexión de un dispositivo USB
Conecte o desconecte su USB siempre que quiera.
Nota
USB
Esta unidad es compatible con iPod classic, iPod nano
(2.ª generación y posteriores), iPod touch e iPhone.
IPod
y
Cuando la unidad está encendida y la fuente de alimentación se
ajusta a USB, el dispositivo USB conectado se carga.
Adaptador del
acoplador
USB
IPod
Acoplador de
iPod
Notas
• Para fijar la conexión, coloque un adaptador de base Dock
compatible suministrado con el iPod o un adaptador de
acoplador universal de iPod (se vende por separado), y retire la
carcasa protectora que cubre su iPod.
• Si no utiliza un adaptador o si el adaptador no es compatible, la
conexión podría ser deficiente, lo que puede provocar daños o
problemas de funcionamiento. Para mas información sobre el
Para mas información sobre el adaptador “Dock”, por favor,
informese sobre el sitio internet oficial de Apple.
• Si conecta un iPod en su funda protectora utilizando la fuerza,
puede provocar daños en el conector. Retire la funda protectora
antes de realizar la conexión.
• Fije la cubierta de la base Dock a la base Dock cuando no la
utilice.
Notas
• Esta unidad es compatible con dispositivos de clase de
almacenamiento masivo USB (por ejemplo, memorias flash o
reproductores de audio portátil) que utilicen el formato FAT16
o FAT32.
• No conecte dispositivos que no sean dispositivos de
almacenamiento masivo USB (como por ejemplo, cargadores
de USB o concentradores de USB), ordenadores, lectores de
tarjetas, una unidad de disco duro externo, etc.
• No pueden usarse dispositivos USB que utilizan codificación.
• Cuando no utilice el iPad o dispositivo USB, coloque la tapa del
puerto USB para protegerlo.
■ Conexión de un dispositivo externo
Conecte el dispositivo de audio portátil mediante un cable de
conexión de tamaño reducido de 3,5 mm de venta en tiendas.
Español
5 Es
MANDO A DISTANCIA
1 Transmisor de señales infrarrojas
1
2 SLEEP: permite ajustar el temporizador de apagado
(☞ P. 12)
2
0
SLEEP
CD
iPod
3 Botones de fuente: permite cambiar de fuente.
4 FOLDER (durante la reproducción de CD/USB de datos):
cambia de carpeta.
5
AUX
3
USB
TUNER
4
5
6 OPTION: muestra el menú de opciones. (☞ P. 12)
FOLDER
7
A
ENTER
7
B
OPTION
DISPLAY
C
MUTE
D
VOLUME
0
A
TUNING
F
MEMORY
9
(repetición) (☞ P. 10)
9 PRESET (al escuchar la radio): permite seleccionar la
emisora de radio presintonizada. (☞ P. 11)
E
8
(reproducción aleatoria),
8 TUNING (al escuchar la radio): sintoniza la radio (☞ P. 11)
MENU
6
, : desplazamiento por los elementos de la pantalla del
iPod.
PRESET
B
: modo de espera/encendido
,
(durante la reproducción): omitir hacia atrás y
delante/mantener pulsado para rebobinado y retroceso rápido
MENU: vuelve al nivel superior en el menú iPod.
: reproducción/pausa
S/T/W/X (durante el uso del menú de opciones): cambia el
ajuste
ENTER
(durante el uso del iPod): selecciona un grupo/inicia la
reproducción
(durante el uso del menú de opciones): confirma el ajuste
: detiene la reproducción.
C DISPLAY: cambia la información mostrada en el panel
frontal. (☞ P. 10)
D MUTE: permite silenciar el sonido o reanudar la
reproducción.
E VOLUME: permite ajustar el volumen.
F MEMORY: memoriza las emisoras de radio presintonizadas.
(☞ P. 11)
6 Es
PANTALLA DEL PANEL DELANTERO
2
3
4
SLEEP PRESET STEREO AUTO
TUNED MEMORY
5
6
7
SHUFFLE REPEAT
ARTISTS ALBUMS SONGS
MUTE
VOLUME
B
INPUT
PHONES
PRESET
8
9
0
A
1 Indicador SLEEP: se enciende cuando el temporizador
para dormir está activado (☞ P. 12).
8 Visualizador de información múltiple: muestra
información variada.
2 Indicador PRESET: se enciende cuando usted
presintoniza emisoras de radio (☞ P. 11).
9 Indicador TUNED: se enciende cuando esta unidad
sintoniza una emisora (☞ P. 11).
3 Indicador STEREO: se enciende cuando esta unidad está
recibiendo una señal intensa de una emisión estéreo de FM.
0 Indicador MEMORY: parpadea durante la búsqueda de una
emisora de radio mediante la sintonización de presintonías
automáticas. Se enciende cuando presintoniza emisoras de
radio automática o manualmente (☞ P. 11).
4 Indicador AUTO: se enciende cuando la unidad está en el
modo de sintonización automática (☞ P. 11).
5 Indicador SHUFFLE: se enciende cuando se configura el
iPod/iPad/CD/USB en reproducción aleatoria (☞ P. 10).
6 Indicador REPEAT: se enciende cuando se configura el
iPod/iPad/CD/USB en reproducción de repetición (☞ P. 10).
7 Indicador MUTE: se enciende cuando el sonido se silencia.
PREPARACIÓN
1
A Indicadores de información múltiple: indican la
información de la música actualmente mostrada en la
pantalla de información múltiple (☞ P. 10).
B Indicadores de funcionamiento: muestra los botones de
menú disponibles para el elemento de menú OPTION
seleccionado.
Español
7 Es
FUNCIONAMIENTO
PANEL DELANTERO Y FUNCIONAMIENTO BÁSICO
y
• Pulse para ajustar la unidad en el modo de espera. En el modo de espera no se muestra toda la información en la pantalla del panel
delantero. Esto puede reducir el consumo de energía. Para encender la unidad, pulse ,
o
en el panel frontal. Si pulsa
, la fuente de entrada se ajustará a CD, iPod o USB según la fuente de entrada que se utilizó por última vez. Si la fuente de
entrada está ajustada a CD o USB, la reproducción comenzará.
Puerto del USB:
☞ P. 5, 9
Acoplador
de iPod
USB
IPod
:
Unidad en estado
de espera/encendida
Bandeja de disco
:
Apertura/cierre de la
bandeja de disco
VOLUME
INPUT
PHONES
:
PRESET
Reproducción/pausa
:
Detener la
reproducción
Cable de conexión
de tamaño reducido
de 3,5 mm
(durante la reproducción):
Permite saltar contenidos y realizar
búsquedas hacia delante o hacia atrás.
Sensor de mando a
distancia:
PRESET (al escuchar la radio):
Permite seleccionar la emisora de radio
presintonizada.
Recibe señales del mando
a distancia.
VOLUME
VOLUME
Bajar
Botón del INPUT:
Pulse varias veces para elegir la fuente de entrada.
CD
iPod
AUX
USB
FM
y
PHONES:
Conexión de auriculares
Mientras están conectados los
auriculares, no se emite sonido a
través de los altavoces.
8 Es
Para escuchar una fuente externa, seleccione
AUX y use el dispositivo externo para
comenzar la reproducción.
Subir
ESCUCHAR MÚSICA
Operaciones de reproducción
Siga los procedimientos que se indican a continuación para reproducir música.
1 Ajustar la fuente
iPod*1
3 Seleccionar la música e iniciar la
entrada
reproducción
FUNCIONAMIENT
Adaptador del
acoplador
2 Cambiar la
iPod
Desplazamiento de lista
USB
IPod
☞ P. 5
MENU
ENTER
Menú de control
iPad*1
USB
USB
IPod
☞ P. 5
Pasar al primer archivo de la carpeta
anterior o siguiente de MP3 o WMA*3
USB*2
USB
IPod
FOLDER
☞ P. 5
MENU
ENTER
CD
CD
VOLUME
INPUT
PHONES
PRESET
OPTION
9 Es
Español
*1 Es posible que algunas características no estén disponibles en función del modelo o de la versión del software de su iPod/iPad.
*2 · Es posible que algunos dispositivos no funcionen correctamente aunque cumplan con los requisitos.
· No se garantizan la reproducción y alimentación de todos los tipos de dispositivos USB.
· El tiempo de lectura puede superar los 30 segundos en función del número de archivos/carpetas.
· Yamaha y los distribuidores no se harán responsables de las pérdidas de datos almacenados en los dispositivos USB conectados a
esta unidad.
Como medida de precaución, se recomienda realizar copias de seguridad de los archivos.
*3 · Al pulsar estos botones, el nombre de la carpeta aparece en el visualizador del panel delantero durante un cierto tiempo.
· ROOT aparece en la carpeta raíz cuando el directorio contiene archivos reproducibles.
ESCUCHAR MÚSICA
Otras operaciones
■ Control de la reproducción
■ Cambio de pantalla
1
Es posible cambiar la información de reproducción
mostrada en la pantalla del panel frontal. Algunos
caracteres especiales no se mostrarán bien.
2
MENU
ENTER
Durante la
reproducción
1
2
DISPLAY
OPTION
: saltar hacia delante/mantener pulsado para avance rápido
: saltar hacia atrás/mantener pulsada para rebobinar
: reproducción/pausa
: detener
Durante la reproducción
Pulsar varias veces.
Para iPod/iPad
Número de canción y tiempo transcurrido (ajuste
predeterminado)
↓
Notas
• La reproducción de discos de datos se inicia en orden alfanumérico.
• La reproducción de USB se inicia por orden de fecha y hora de
creación.
• Si pulsa
durante la reproducción, la próxima vez la reproducción
empezará desde el principio de la pista que escuchaba cuando detuvo
la reproducción. Si vuelve a pulsar
mientras la reproducción está
detenida, la próxima vez la reproducción empezará desde la primera
pista del CD/dispositivo USB.
• Esta unidad cambia automáticamente al modo de espera si se
deja encendida durante 1 hora sin reproducirse ni realizar
ninguna otra operación (función de espera automática).
■ Reproducción aleatoria
Es posible reproducir en una secuencia aleatoria.
Pulsar varias veces.
Para iPod/iPad
Número de canción y tiempo restante
↓
Nombre de canción
↓
Nombre de artista
↓
Nombre de álbum
↓
Vuelta al ajuste predeterminado
Nota
Esta función está disponible para iPod classic, iPod nano
(2.ª generación y posteriores), iPod touch, iPhone e iPad. Sin
embargo, incluso con estos modelos, esta función podría no estar
disponible en función de la versión de software de su iPod/iPad.
Para CD/USB
Número de pista/archivo y tiempo transcurrido de la
canción actual (ajuste predeterminado)
*1 No es posible ajustar SHUFFLE ALBUMS si se utiliza un
iPod touch, iPhone o iPad.
Para CD/USB
↓
Número de pista y tiempo restante de la canción
actual*4
↓
Tiempo total del disco*4
*2 Si el formato de audio de la música seleccionada es MP3/
WMA, también puede seleccionar SHUFFLE FOLDER.
■ Repetición de reproducción
Es posible realizar la reproducción de forma repetida.
↓
Tiempo restante del disco*4
↓
Nombre de archivo*5
↓
Nombre de pista*6
Pulsar varias veces.
Para iPod/iPad
↓
Nombre de artista*6
↓
Nombre de álbum*6
Para CD/USB
*3 Si el formato de audio de la música seleccionada es MP3/
WMA, también puede seleccionar REPEAT FOLDER.
10 Es
↓
Vuelta al ajuste predeterminado
*4 Solo para CD de audio
*5 Solo para archivos MP3/WMA
*6 Solo cuando la pista seleccionada tiene información
ESCUCHAR EMISORAS DE RADIO FM
Sintonización de emisoras de radio
1
2
TUNING
TUNER
Pulse TUNER.
Selección de emisoras de radio
presintonizadas (Preajuste de
sintonización)
Manténgalo pulsado.
Comenzará el proceso de
sintonización automática.
Si la señal recibida de la emisora que desea seleccionar es débil,
también es posible sintonizar emisoras de radio de forma manual
pulsando TUNING varias veces.
PRESET
Nota
Si sintoniza una emisora de radio manualmente, el sonido es
monoaural (mono).
FUNCIONAMIENT
Seleccione la emisora de radio
presintonizada en el modo FM.
y
Presintonización de emisoras de radio
Es posible almacenar sus emisoras FM favoritas con la
función de presintonía.
■ Presintonización automática
1
2
MEMORY
ENTER
Mantenga pulsado el botón
MEMORY durante más de 2
segundos en el modo FM.
Comenzará la presintonía
automática.
y
Para cancelar la presintonía automática, vuelva a pulsar
MEMORY sin pulsar ENTER en el paso 2.
Nota
Al realizar la presintonía automática, se borran todas las emisoras
almacenadas y se almacenan emisoras nuevas.
■ Presintonización manual
1
2
MEMORY
TUNING
Pulse MEMORY.
Sintonice su emisora
de radio favorita.
3
4
MENU
ENTER
Seleccione el número
de presintonía que
desea almacenar.
ENTER
Complete la
presintonía manual.
y
Español
• Es posible presintonizar un máximo de 30 emisoras FM.
• Para cancelar la presintonía manual mientras escoge un número
de presintonía, pulse MEMORY de nuevo.
• Es posible eliminar una emisora presintonizada pulsando OPTION
→ cursor S/T → ENTER para seleccionar PRESET DELETE.
11 Es
UTILIZACIÓN DE FUNCIONES ÚTILES
Uso del menú de opciones
El menú de opciones aparece en la pantalla del panel delantero al pulsar OPTION. Desde el menú de opciones puede
ajustar diversas funciones útiles.
Menú de opciones
Página de
referencia
Parámetro o rango de control
PRESET DELETE
(Aparece únicamente cuando la fuente de entrada está ajustada a
FM).
11
DIMMER
DIMMER OFF (más brillante)/DIMMER 1/DIMMER 2 (más
oscuro)
Esta página
TREBLE
–10 a +10
Esta página
BASS
–10 a +10
Esta página
BALANCE
L+5 - CENTER - R+5
Esta página
AUTO POWER OFF
TIME OFF/ TIME 8H/ TIME 4H
AUTO POWER OFF pone el sistema en modo de espera si no se
lleva a cabo ninguna operación durante un tiempo establecido
previamente.
Esta página
1
2
3
4
MENU
OPTION
ENTER
Pulse OPTION.
Seleccione el menú
de opciones que
desee.
5
6
MENU
ENTER
Confirme con
ENTER.
ENTER
OPTION
ENTER
Modifique la
configuración.
Complete el
ajuste.*1
Salga del
menú de
opciones.
*1 Para configurar otras opciones, repita los pasos de 2 a 5.
y
Para cancelar el ajuste durante la operación, pulse OPTION.
■ Ajuste de oscuridad de pantalla, tono/balance
DIMMER: cambia el brillo de la pantalla del panel frontal.
TREBLE*2: ajusta la respuesta de alta frecuencia.
BASS*2: ajusta la respuesta de baja frecuencia.
BALANCE: ajusta el nivel del sonido de cada canal de altavoz derecho e izquierdo.
*2 Activo también mientras utiliza los auriculares.
Utilización del temporizador de apagado
El temporizador de apagado pone la unidad en modo de espera una vez transcurrido un tiempo especificado.
SLEEP
Pulsar varias veces.
30min
60min
El indicador SLEEP se enciende en el visualizador del panel delantero (☞ P. 7).
12 Es
90min
120min
OFF
INFORMACIÓN ADICIONAL
SOLUCIÓN DE PROBLEMAS
Consulte la tabla de abajo cuando esta unidad no funcione correctamente. Si el problema no está en la lista de abajo o las
instrucciones no sirven de ayuda, apague esta unidad, desconecte el cable de alimentación y póngase en contacto con el
centro de servicio o concesionario autorizado de Yamaha.
General
Problema
Esta unidad no se
enciende o entra en
el modo de espera
poco después de
conectarse la
alimentación.
Causa
Remedio
Página
Conecte firmemente el cable de alimentación.
5
Esta unidad ha sido expuesta a una
descarga eléctrica externa intensa (rayo o
electricidad estática intensa).
Mantenga presionado
durante más de 5 segundos
para reiniciar el sistema. Si aun así no se soluciona el
problema, ponga la unidad en modo de espera,
desconecte el cable de alimentación, vuelva a
conectarlo después de 30 segundos y, a continuación,
utilícela normalmente.
—
No se ha seleccionado una fuente de
entrada apropiada.
Seleccione una fuente de entrada apropiada con el
selector INPUT del panel delantero (o los botones de
fuente del mando a distancia).
—
Las conexiones de los altavoces no están
seguras.
Asegure las conexiones.
4
Es posible que la función de silencio esté
activada.
Cancele la función de silencio.
6
El volumen está bajo.
Suba el volumen.
8
Hay señales que la unidad no puede
reproducir y que están introduciéndose
desde un componente fuente como por
ejemplo un CD-ROM.
Reproduzca una fuente cuyas señales pueda
reproducir esta unidad.
3
Es posible que esté ajustado el
temporizador de apagado.
Esta circunstancia no se trata de ningún error.
Encienda la unidad y reproduzca la fuente de nuevo.
—
AUTO POWER OFF se activa.
Si ajusta AUTO POWER OFF a TIME OFF se
establece la reproducción continua.
12
Solo se oye sonido
del altavoz de un
lado.
Los cables están mal conectados.
Conecte correctamente los cables. Si el problema
persiste, los cables podrían estar defectuosos.
4
Hay interferencia de
ruido procedente de
un equipo digital o de
radiofrecuencia.
La unidad está demasiado cerca de un
equipo digital o de alta frecuencia.
Separe más la unidad de dicho equipo.
—
La unidad no
funciona
correctamente.
No hay sonido.
La unidad se apaga
de forma repentina.
INFORMACIÓN
ADICIONAL
El cable de alimentación no está
conectado o la clavija no está bien
insertada.
La unidad ha estado encendida durante 1
hora sin reproducir ni realizar ninguna
otra operación.
Español
13 Es
SOLUCIÓN DE PROBLEMAS
iPod/iPad
Nota
En caso de producirse un error de transmisión sin que aparezca un mensaje de estado en el panel delantero de esta unidad, compruebe la
conexión de su iPod/iPad (consulte la página 5).
Mensaje de estado
Causa
Remedio
Página
iPod Connecting
iPod Charging
La unidad está reconociendo la
conexión con su iPod.
Si el mensaje sigue apareciendo en la pantalla del
panel delantero, desconecte el iPod y vuelva a
conectarlo.
5
Unknown iPod
Hay un problema con la trayectoria de
señal de su iPod a esta unidad.
Vuelva a conectar el iPod.
5
El iPod que se está utilizando no es
compatible con esta unidad.
Solo son compatibles iPod classic, iPod nano (2.ª
generación y posteriores), iPod touch u iPhone.
—
iPod
Esta unidad ha reconocido su iPod; pero
no puede obtener información tal como
el tiempo transcurrido.
iPod Unplugged
Su iPod se ha retirado.
Vuelva a conectar el iPod.
5
Over Current
El iPod que se está utilizando no es
compatible con esta unidad.
Desconecte el iPod y, a continuación, apague la
unidad y vuelva a encenderla. A continuación,
vuelva a conectar el iPod compatible.
5
El iPod está conectado en ángulo.
* Los mensajes que se muestran arriba solo aparecen cuando el dispositivo está conectado a la base Dock para iPod.
Problema
No hay sonido.
Causa
Remedio
Página
La unidad está apagada.
Conecte correctamente el cable de alimentación.
—
No se ha actualizado la versión de
software del iPod/iPad.
Descargue la versión de iTunes más reciente para
actualizar la versión de software del iPod/iPad a la
más actualizada.
—
El iPod/iPad está en proceso de conexión
con la unidad.
Espere un momento.
—
El iPod/iPad no está conectado
correctamente.
Retire el iPod/iPad de la unidad y, a continuación,
vuelva a conectarlo.
5
El iPod/iPad suena,
pero no puede
controlarlo con la
unidad ni con el
mando a distancia.
El iPod/iPad no está conectado
correctamente.
Retire el iPod/iPad de la unidad y, a continuación,
vuelva a conectarlo.
5
No es posible realizar
funciones de control
desde el iPod/iPad.
El iPod/iPad no está conectado
correctamente.
Retire el iPod/iPad de la unidad y, a continuación,
vuelva a conectarlo.
5
La información de
reproducción no se
muestra en la
pantalla del panel
delantero.
El iPod/iPad utilizado no es compatible
con la visualización de información de
reproducción.
Solo son compatibles iPod classic, iPod nano (2.ª
generación y posteriores), iPod touch, iPhone y iPad.
5
El iPod/iPad no se
carga.
El iPod/iPad no está conectado
correctamente.
Retire el iPod/iPad de la unidad y, a continuación,
vuelva a conectarlo.
5
De repente, la música
que se está
reproduciendo se
detiene y comienza a
sonar otra pista sin
que se haya realizado
acción alguna.
La función de reproducción aleatoria si se
agita el iPod’s está activada.
Desactive la función de reproducción aleatoria si se
agita el iPod’ en los ajustes del dispositivo.
—
14 Es
SOLUCIÓN DE PROBLEMAS
USB/iPad
Nota
En caso de producirse un error de transmisión sin que aparezca un mensaje de estado en el panel delantero de esta unidad, compruebe la
conexión del dispositivo USB (consulte la página 5).
Mensaje de estado
Causa
Remedio
Página
El dispositivo USB no está conectado
correctamente.
Vuelva a conectar el dispositivo USB.
5
Unknown USB
El dispositivo USB conectado no puede
reproducirse en esta unidad.
Conecte un dispositivo USB que se pueda reproducir.
5
El nombre de archivo es demasiado largo.
El nombre de archivo no debe superar 250 caracteres.
—
Over Current
El dispositivo USB está conectado en
ángulo.
Desconecte el dispositivo USB y, a continuación,
apague la unidad y vuelva a encenderla. Vuelva a
conectar un dispositivo USB que se pueda reproducir.
5
No Files
El dispositivo USB no contiene archivos
reproducibles.
Utilice un dispositivo USB que contenga archivos
reproducibles.
3
El dispositivo USB conectado a la
unidad no es compatible.
Apague el sistema y vuelva a conectar el dispositivo
USB a la unidad. Si no logra resolver el problema
con esta solución, la unidad no puede reproducir el
dispositivo USB.
—
El número de archivos/carpetas supera
el límite.
Reduzca el número de archivos/carpetas; consulte las
limitaciones enumeradas en este manual.
3
Remedio
Página
USB Time Out
Problema
El archivo MP3/WMA
del dispositivo USB
no puede
reproducirse.
Causa
No se reconoce el dispositivo USB.
Vuelva a conectar el dispositivo USB.
5
Conecte un adaptador de CA si se lo entregaron junto
con el dispositivo.
—
Formatee el dispositivo USB y vuelva a copiar los
archivos.
—
Conexiones del dispositivo USB
inadecuadas.
Vuelva a conectar el dispositivo USB.
5
Los formatos MP3 o WMA no son
compatibles con esta unidad.
Cambie el archivo por un archivo grabado
correctamente que se pueda reproducir con esta unidad.
3
Si las soluciones anteriores no resuelven
el problema, el dispositivo USB no puede
reproducirse en la unidad.
Pruebe con otro dispositivo USB.
—
INFORMACIÓN
ADICIONAL
USB Unplugged
Recepción de la radio
Problema
La recepción estéreo
por FM tiene ruido.
Causa
Remedio
Página
La antena no está correctamente
conectada.
Verifique las conexiones de la antena.
4
Las características de las emisiones
estéreo de FM pueden causar este
problema si el transmisor está muy lejos
o la entrada de la antena es mala.
Intente utilizar una antena de FM direccional de alta
calidad.
—
Utilice el método de sintonización manual.
11
La señal es demasiado débil.
La función de
selección de
presintonía no
funciona.
Hay distorsión y no se
puede obtener una
buena recepción a
pesar de utilizar una
buena antena de FM o
una antena exterior.
Utilice una antena de FM direccional de alta calidad.
—
Utilice el método de sintonización manual.
11
Es posible que se haya borrado la
presintonía (memoria).
Presintonice las emisoras de radio de nuevo.
11
Es posible que se esté produciendo
reflexión multirruta o algún otro tipo de
interferencia de radio.
Cambie la altura, dirección o ubicación de la antena.
—
15 Es
Español
La emisora deseada
no se puede sintonizar
con el método de
sintonización
automática.
SOLUCIÓN DE PROBLEMAS
Reproducción de un disco
Problema
Causa
Remedio
Página
No hay sonido o este
está distorsionado
La frecuencia de muestreo de un archivo
MP3 o WMA tal vez no es compatible
con esta unidad.
Compruebe que la frecuencia de muestreo y la
velocidad de transferencia de bits de un archivo MP3
o WMA sean compatibles con esta unidad.
3
El disco no se
reproduce.
Es posible que esté utilizando un CD-R/
RW no finalizado.
Finalice el CD-R/RW.
—
La etiqueta del disco podría estar al revés.
Compruebe que la etiqueta del disco esté hacia
arriba.
—
El disco puede estar defectuoso.
Intente reproducir otro disco. Si de esta forma se
resuelve el problema, el disco que desea reproducir
está defectuoso.
—
El disco MP3/WMA tal vez no tiene
suficientes archivos de música para poder
reproducirse.
Compruebe que su disco MP3/WMA contiene al
menos 5 archivos de música MP3/WMA. Si el
número de archivos es pequeño, puede que no se
reconozca el disco.
—
La frecuencia de muestreo de un archivo
MP3 o WMA tal vez no es compatible
con esta unidad.
Compruebe que la frecuencia de muestreo y la
velocidad de transferencia de bits de un archivo MP3
o WMA sean compatibles con esta unidad.
3
Es posible que el disco introducido en la
unidad no sea compatible.
Extraiga el disco y, a continuación, compruebe si el
disco es compatible con la unidad o no.
3
No se pueden realizar
algunas operaciones
con los botones.
La reproducción no
comienza
inmediatamente
después de pulsar
en la unidad o
en el mando a
distancia.
“No Disc” aparece en
pantalla, a pesar de
que hay un disco en
la bandeja del disco.
El disco está sucio.
Limpie el disco.
—
Es posible que el disco introducido en la
unidad no sea compatible.
Utilice un disco compatible con la unidad.
3
Si ha trasladado la unidad de un sitio frío
a otro con más temperatura, es posible
que se haya formado condensación en la
lente de lectura del disco.
Espere una hora o dos hasta que la unidad se
aclimate a la temperatura de la habitación y vuelva a
intentarlo.
—
Es posible que el disco introducido en la
unidad no sea compatible.
Utilice un disco compatible con la unidad.
3
El disco está sucio.
Extraiga el disco y límpielo.
—
El disco está cargado al revés.
Extraiga el disco y, a continuación, cárguelo con la
cara etiquetada hacia arriba.
—
Mando a distancia
Problema
El mando a distancia
no funciona bien.
16 Es
Causa
Remedio
Página
Es posible que el mando a distancia se
esté utilizando fuera de su radio de
funcionamiento.
Para obtener información sobre la distancia de
funcionamiento del mando a distancia, consulte
“Uso del mando a distancia”.
2
Puede que el sensor del mando a distancia
de esta unidad esté expuesto a la luz solar
directa o iluminación.
Cambie la iluminación u orientación de esta unidad.
—
Es posible que la pila esté agotada.
Cambie la pila por una nueva.
2
Hay obstáculos entre el sensor de esta
unidad y el mando a distancia.
Elimine los obstáculos.
—
MANIPULACIÓN DE DISCOS COMPACTOS
• Manipule el disco siempre con cuidado, para evitar
arañar la superficie de reproducción. No doble los discos.
• Para mantener limpia la superficie de reproducción,
límpiela con un paño seco y limpio. No utilice ningún
tipo de limpiador de disco, spray ni ningún otro líquido
basado en elementos químicos.
• No exponga los discos a la luz solar directa, alta
temperatura o niveles altos de humedad durante un
periodo prolongado de tiempo.
• No limpie con movimientos circulares; hágalo en línea
recta y de fuera adentro.
• Utilice un rotulador de punta suave cuando escriba en la
cara etiquetada de un disco.
SECCIÓN DEL REPRODUCTOR
iPod
• Compatibles: iPod........................................................iPod classic,
iPod nano (2.ª generación y posteriores), iPod touch, iPhone, iPad
CD
• Soportes .................................................................. CD, CD-R/RW
• Formato de audio ...................................... Audio CD, MP3, WMA
LÁSER
• Tipo........................................ Láser semiconductor GaAs/GaAlAs
• Longitud de onda .................................................................780 nm
• Potencia de salida ................................................................10 mW
USB
• Formato de audio .........................................................MP3, WMA
AUX
• Conector de entrada
........ STEREO L/R (I/D): clavija STEREO de 3,5 mm y tamaño reducido
SECCIÓN DEL AMPLIFICADOR
• Potencia de salida máxima.........................................20 W + 20 W
(6 Ω 1 kHz, 10% THD)
• Impedancia de entrada (AUX)...............................................73 kΩ
• Señal de entrada máxima (AUX)............................................2,2 V
• Distorsión armónica total
CD etc. 1 kHz/8W................................................................. 0,04%
•
•
•
•
Consumo ................................................................................ 32 W
Consumo en estado de espera ................................. 0,3 W o menos
Dimensiones (An × Al × Prof) ................... 180 × 118 × 318,2 mm
Peso ..................................................................................... 2,95 kg
INFORMACIÓN
ADICIONAL
ESPECIFICACIONES
Las especificaciones están sujetas a cambio sin previo aviso.
iPod, iPhone, iPad
“Made for iPod,” “Made for iPhone,” y “Made for iPad”
significan que un accesorio electrónico se ha diseñado para
conectarse específicamente con un iPod, iPhone o iPad,
respectivamente, y que el desarrollador ha certificado que cumple
con los estándares de rendimiento de Apple.
Apple no se hace responsable del funcionamiento de este
dispositivo ni de que cumpla con los estándares legales y de
seguridad.
Tenga en cuenta que el uso de este accesorio con un iPod, iPhone
o iPad puede afectar al rendimiento inalámbrico.
iPad, iPhone, iPod, iPod classic, iPod nano, iPod shuffle y iPod
touch son marcas comerciales de Apple Inc., registradas en los
EE. UU. y en otros países.
SECCIÓN DEL SINTONIZADOR
• Rango de sintonización
[Modelos para EE. UU. y Canadá] ..................87,5 a 107,9 MHz
[Otros modelos] ...........................................87,50 a 108,00 MHz
GENERALIDADES
Español
• Fuente de alimentación
[Modelo para Europa].......................................CA 230 V, 50 Hz
[Modelos para EE. UU. y Canadá] ...................CA 120 V, 60 Hz
[Modelo para Asia] .............................. CA 220-240 V, 50/60 Hz
[Modelo para Taiwán] .............................. CA 110-120 V, 60 Hz
[Modelo para Australia]....................................CA 240 V, 50 Hz
[Modelo para Reino Unido]..............................CA 230 V, 50 Hz
[Modelo para China].........................................CA 220 V, 50 Hz
[Modelo para Corea].........................................CA 220 V, 60 Hz
17 Es
The laser component in this product is capable of emitting radiation
exceeding the limit for Class 1.
El componente láser de este producto es capaz de emitir radiación
que sobrepasa el límite establecido para la clase 1.
DIRECT EXPOSURE TO THE BEAM
DANGER: AVOID
INVISIBLE LASER RADIATION WHEN OPEN
NOT STARE INTO BEAM
CAUTION:DO
INVISIBLE LASER RADIATION WHEN OPEN
i
© 2011 Yamaha Corporation
Printed in Malaysia WY88880