1
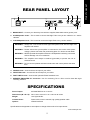
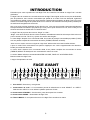
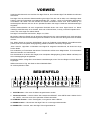
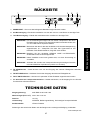
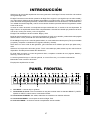
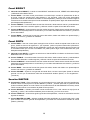
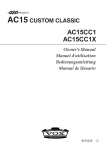
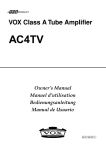
Night Train 50H G2
1
IMPORTANT SAFETY INSTRUCTIONS
• Read these instructions.
• Keep these instructions.
• Heed all warnings.
• Follow all instructions.
• Do not use this apparatus near water.
• Mains powered apparatus shall not be exposed to dripping or splashing and that
no objects filled with liquids, such as vases, shall be placed on the apparatus.
• Clean only with dry cloth.
• Do not block any ventilation openings. Install in accordance with the
manufacturer’s instructions.
• Do not install near any heat sources such as radiators, heat registers, stoves,
or other apparatus (including amplifiers) that produce heat.
• Do not defeat the safety purpose of the polarized or grounding-type plug. A
polarized plug has two blades with one wider than the other. A grounding
type plug has two blades and a third grounding prong. The wide blade or
the third prong are provided for your safety. If the provided plug does not
fit into your outlet, consult an electrician for replacement of the obsolete
outlet. (for USA and Canada)
• Protect the power cord from being walked on or pinched particularly at plugs,
convenience receptacles, and the point where they exit from the apparatus.
• Only use attachments/accessories specified by the manufacturer.
• Unplug this apparatus during lightning storms or when unused for long
periods of time.
• Turning off the power switch does not completely isolate this product from
the power line so remove the plug from the socket if not using it for extended
periods of time.
• Install this product near the wall socket and keep the power plug easily
accessible.
• WARNING—This apparatus shall be connected to a mains socket outlet with
a protective earthing connection.
• Refer all servicing to qualified service personnel. Servicing is required when
the apparatus has been damaged in any way, such as power-supply cord
or plug is damaged, liquid has been spilled or objects have fallen into the
apparatus, the apparatus has been exposed to rain or moisture, does not
operate normally, or has been dropped.
• Do not install this equipment on the far position from wall outlet and/or
convenience receptacle.
• Do not install this equipment in a confined space such as a box for the
conveyance or similar unit.
• Excessive sound pressure from earphones and headphones can cause
hearing loss.
• Use only with the cart, stand, tripod, bracket, or table specified by the
manufacturer, or sold with the apparatus. When a cart is used, use caution
when moving the cart/apparatus combination to avoid injury from tip-over.
*All product names and company names are the trademarks or
registered trademarks of their respective owners.
A ALWAYS use the supplied mains lead, if a replacement is required
please contact your authorized Vox Dealer.
B DO NOT switch the amplifier on without a loudspeaker connected.
C ENSURE that any extension cabinets used are of the correct
impedance.
D NEVER attempt to bypass the fuses or fit ones of the incorrect
values.
E DO NOT attempt to remove the amplifier chassis, there are no
user serviceable parts.
F Refer all servicing to qualified service personnel including
replacement of fuses and valves. Servicing is required when
the apparatus has been damaged in any way, such as when the
power supply cord or plug is damaged, liquid has been spilled or
objects have fallen into the apparatus, the apparatus has been
exposed to rain or moisture, does not operate normally or has
been dropped.
CAUTION: Any changes or modifications not expressly approved by
the party responsible for compliance may void the users authority
to operate the equipment.
Note: It is recommended that all audio cables, with the exception of
the speaker lead, used to connect to the Night Train is of a high
quality, screened type. These should not exceed 10 metres in length. Always use a non-screened Vox approved speaker lead with the
Night Train Amplifier and extension cabinets.
WARNING: Do not obstruct ventilation grilles and always ensure
free movement of air around the amplifier!
Notice regarding disposal (EU only)
When this “crossed-out wheeled bin” symbol is displayed on the product,
owner’s manual, battery, or battery package, it signifies that when you
wish to dispose of this product, manual, package or battery you must do
so in an approved manner. Do not discard this product, manual, package
or battery along with ordinary household waste. Disposing in the correct
manner will prevent harm to human health and potential damage to the
environment. Since the correct method of disposal will depend on the applicable
laws and regulations in your locality, please contact your local administrative
body for details. If the battery contains heavy metals in excess of the regulated
amount, a chemical symbol is displayed below the “crossed-out wheeled bin”
symbol on the battery or battery package.
THE FCC REGULATION WARNING (for USA)
NOTE: This equipment has been tested and found to comply with the limits for
a Class B digital device, pursuant to Part 15 of the FCC Rules. These limits are
designed to provide reasonable protection against harmful interference in a
residential installation. This equipment generates, uses, and can radiate radio
frequency energy and, if not installed and used in accordance with the instructions,
may cause harmful interference to radio communications. However, there is
no guarantee that interference will not occur in a particular installation. If this
equipment does cause harmful interference to radio or television reception, which
can be determined by turning the equipment off and on, the user is encouraged
to try to correct the interference by one or more of the following measures:
• Reorient or relocate the receiving antenna.
• Increase the separation between the equipment and receiver.
• Connect the equipment into an outlet on a circuit different from that to
which the receiver is connected.
• Consult the dealer or an experienced radio/TV technician for help.
The lightning flash with arrowhead symbol within an
equilateral triangle, is intended to alert the user to the
presence of uninsulated “dangerous voltage” within the
product’s enclosure that may be of sufficient magnitude
to constitute a risk of electric shock to persons.
The exclamation point within an equilateral triangle is
intended to alert the user to the presence of important
operating and maintenance (servicing) instructions in
the literature accompanying the product.
2
If items such as cables are included with this equipment, you must use those
included items.
Unauthorized changes or modification to this system can void the user’s authority
to operate this equipment.
Congratulations on your purchase of the next generation VOX Night Train 50, the latest edition to the Night
Train range.
The Night Train 50 is a further evolution of the original Night Train, meaning it’s even more versatile.. with
more power, two footswitchable channels and a much requested footswitchable Thick mode.
From the second generation model, we have also added an FX loop, an on-board studio grade Reverb and
a speaker emulated DI for those late night recording sessions.
Whether you’re a session player or a wanna-be rock God, your tone is the most important thing. This is a
fully functional 50 Watt all-tube head so diverse that you can play blues one night, country after that and
full on ROCK the next!
The Night Train 50 features two channels.. Bright and Girth.
Bright will give you chimey clean tones synonymous with VOX, but you can then kick it up a notch by
switching to “Thick” and add a whole new dimension of gain...
The Bright channel features a Gain control, a footswitchable preamp mode switch (Thick) and a fully
functional tone stack (Treble, Middle and Bass).
Girth is a whole new level of high gain, for searing lead tones that will have your ears bleeding for more!
More is now possible with the addition of the footswitchable Thick mode. Ideal for lead boosts.
The Girth channel features a Gain control, a fully functional tone stack (Treble, Middle and Bass) and a
channel volume.
The Master section features a Master Volume, Tone Cut control and Reverb Level.
Welcome aboard the Night Train to tone!!
The VOX Amplification team
FRONT PANEL LAYOUT
1. INPUT Jack – Insert guitar here!
7. Channel Switch – This switch is used to switch between BRIGHT and GIRTH channels. Set to “GIRTH”
when using the optional VFS2A footswitch.
18.STANDBY Switch – No output, just nicely warmed tubes.
19.MAINS Switch – Turns the Night Train from off to on!
20.MAINS Indicator – Lets you know if the Night Train is ....well...on or off!
3
Owner’s manual
INTRODUCTION
BRIGHT Channel
2. BRIGHT Channel Indicator – When the BRIGHT channel is selected, GREEN indicates BRIGHT Mode
and ORANGE indicates THICK Mode.
3. GAIN Control – Use this to achieve chimey cleans when set before 12 o’clock, to crunchy blues tones!
And of course everything in between! (NOTE: Because of the nature of the design of this amplifier, it
may take a few minutes until the circuit becomes stable after the power is turned on. Some noise might
occur during this time but it soon disappears.)
4. TREBLE Control – This controls the treble (high) frequencies in your sound - from soft and round
when turned down (counter-clockwise) to bright and cutting when cranked (clockwise) and all points in
between.
5. MIDDLE Control – This controls the middle (mid range) frequencies in your sound. From scooped when
turned down (counter-clockwise) to full and rich when cranked (clockwise) and all points in between.
6. BASS Control – This controls the bass (low) frequencies in your sound - from warm and light when
turned down (counter-clockwise) to dark and heavy when cranked (clockwise) and all points in between.
GIRTH Channel
8. GAIN Control – Use this to achieve Rock tones when set before 12 o’clock, to ear bleeding lead tones!
And of course everything in between! (NOTE: Because of the nature of the design of this amplifier, it
may take a few minutes until the circuit becomes stable after the power is turned on. Some noise might
occur during this time but it soon disappears.)
9. GIRTH Channel Indicator – When the GIRTH channel is selected the indicator will turn RED, ORANGE
indicates thick mode.
10.TREBLE Control – This controls the treble (high) frequencies in your sound - from soft and round
when turned down (counter-clockwise) to bright and cutting when cranked (clockwise) and all points in
between.
11.MIDDLE Control – This controls the middle (mid range) frequencies in your sound. From scooped when
turned down (counter-clockwise) to full and rich when cranked (clockwise) and all points in between.
12.BASS Control – This controls the bass (low) frequencies in your sound - from warm and light when
turned down (counter-clockwise) to dark and heavy when cranked (clockwise) and all points in between.
13.VOLUME Control – This affects the overall output level of the GIRTH channel, use this to control the
overall volume whilst retaining all the tonal characteristics. (Hey, who are we kidding here... overdrive!)
MASTER
14.THICK Switch – This switch is used to adjust the front end pre-amp of the amplifier. THICK Mode works
for both the BRIGHT and GIRTH channels - Use this to boost your gain to awesome levels! (NOTE:
when in THICK mode, BRIGHT channel Tone controls are bypassed). Set to THICK on when using the
optional VFS2A footswitch.)
15.REVERB Control – Use this to add ambience to your tone, subtle when turned down (counter-clockwise)
and “surfy” when cranked (clockwise) and everywhere in between.
16.TONE CUT Control – This controls the overall high frequencies of the amplifier, when turned clockwise,
the high frequencies are rolled off.
17.MASTER VOLUME Control – This affects the overall output level of the preamp stage, use this to
control the overall volume of the amplifier whilst retaining all the tonal characteristics.
4
1. MAINS INPUT – Connect your electricity here with the supplied, detachable mains (power) cord.
2. 8 OHM Speaker Jacks – This is used to connect the Night Train to any 8 ohm cabinet or 2 x 16ohm
cabinets.
3. 16 OHM Speaker Jack – This is used to connect the Night Train to any 16 ohm cabinet.
WARNING ! Always use a non-screened VOX approved speaker lead with the Night Train
amplifier and cabinet.
WARNING ! Please ensure that your amplifier is connected to the correct mains power
voltage—please check the rear panel rating plate. If in doubt consult dealer.
WARNING ! NEVER operate this amplifier without the loudspeaker load being connected.
Serious damage can occur otherwise.
WARNING ! This amplifier must always be earthed (grounded) to prevent the risk of
electrical shock.
WARNING ! Do not connect speaker cabinets to both 8ohm and 16ohm jacks at the same
time.
4. FX SEND Jack – Connect this to the input of your effect.
5. FX RETURN Jack – Connect this to the output of your effect.
6. FOOT SWITCH Jack – Connect the optional VFS2A footswitch here.
7. SPEAKER EMULATED D.I. Connector– Use for monitoring, DI to a PA or use for those late night
recording sessions
SPECIFICATIONS
Power Output:
50 Watts RMS into 8 or 16 ohm
Dimensions (W x H x D): 450 x 165 x 215 mm/17.72 x 6.50 x 8.46 inches
Weight:
12.2 Kg/26.90 lbs.
Included items:
Power cable, owner’s manual, high quality speaker cable
Options:
VFS2A footswitch
Specifications and appearance are subject to change without notice for improvement.
www.voxamps.com
5
Owner’s manual
REAR PANEL LAYOUT
6
7
Owner’s manual
INFORMATIONS IMPORTANTES
DE SECURITE
L’éclair dans le triangle est un symbole destiné à
attirer l’attention de l’utilisateur sur la présence
de parties non isolées et de “tension dangereuse”
à l’intérieur de l’appareil, qui posent des risques
d’électrocution pour l’utilisateur.
• Lisez attentivement ces instructions.
• Veuillez conserver ces instructions.
• Observez tous les avertissements.
• Suivez toutes les consignes à la lettre.
• N’utilisez jamais cet appareil dans un endroit humide ni à proximité d’eau.
• L’appareil alimenté par courant électrique ne peut pas être exposé à des
éclaboussures; évite en outre de placer des récipients contenant des
liquides, comme un vase (ou un verre de bière), sur l’appareil.
• Nettoyez uniquement l’appareil avec un chiffon doux et sec.
• Ne bloquez jamais les orifices de ventilation de l’appareil et installez-le
toujours conformément aux instructions du fabricant.
• N’installez jamais l’appareil à proximité d’une source de chaleur, telle
que des radiateurs, poêles ou tout autre dispositif (y compris des
amplificateurs) générant de la chaleur.
• N’essayez jamais de contourner le dispositif de sécurité d’une prise de
type polarisée ou d’une prise de terre. Une prise dite polarisée dispose
de deux broches, dont l’une est plus large que l’autre. Une prise de
terre comporte trois broches, dont une de mise à la terre. Cette broche
plus large ou broche de mise à la terre vise à assurer votre sécurité. Si
la fiche du cordon d’alimentation ne correspond pas au type de prise
de courant de votre région, faites remplacer la prise obsolète par un
électricien qualifié (pour les Etats-Unis et le Canada).
• Placez toujours le cordon d’alimentation de sorte qu’on ne risque pas de
marcher dessus ni de le pincer. Cette précaution vise tout spécialement
la fiche du cordon et sa sortie de l’appareil.
• Utilisez exclusivement les fixations/accessoires préconisés par le
fabricant.
• S’il y a risque d’orage ou que vous ne comptez pas utiliser l’appareil
pendant une période prolongée, débranchez-le du secteur.
• La mise sur OFF de l’interrupteur d’alimentation n’isole pas totalement
ce produit de la ligne secteur; aussi, retirez la fiche de la prise s’il doit
rester inutilisé pendant une période prolongée.
• Installez ce produit près de la prise électrique murale et gardez un accès
facile à la prise électrique et au cordon d’alimentation.
• ATTENTION: Cet appareil doit absolument être connecté à une prise
électrique reliée à la terre.
• Confiez tout travail de réparation uniquement à un S.A.V. qualifié.
Faites appel au S.A.V. si l’appareil a subi tout endommagement,
comme par exemple si sa fiche secteur ou son cordon d’alimentation
sont endommagés, si de l’eau ou des objets ont pénétré à l’intérieur de
l’appareil, si celui-ci a été exposé à la pluie ou à la moisissure, s’il est
tombé ou présente tout signe de dysfonctionnement.
• N’utilisez jamais d’allonge trop longue avec cet appareil et ne l’alimentez
jamais via les prises secteur équipant d’autres dispositifs.
• N’installez jamais cet appareil dans un endroit confiné comme une
caisse de transport ou tout autre récipient similaire.
• Des niveaux d’écoute trop importants lors de l’utilisation d’un casque ou
d’écouteurs peuvent entraîner des pertes d’audition.
• Utilisez l’appareil uniquement avec le chariot, stand, trépied, fixation ou
table spécifiés par le fabricant ou fourni avec l’appareil. Si vous avez
placé l’appareil sur un chariot, soyez très prudent quand vous déplacez
le chariot, afin d’éviter une chute et des blessures.
Le point d’exclamation dans un triangle est un
symbole destiné à attirer l’attention de l’utilisateur
sur des sections de ce manuel contenant des
informations importantes, liées à l’utilisation et à
l’entretien de ce produit.
*Tous les noms de produits et de sociétés sont des marques
commerciales ou déposées de leur détenteur respectif.
A Utilisez TOUJOURS le cordon d’alimentation fourni. Si
vous devez remplacer le cordon, veuillez contacter votre
revendeur agréé Vox.
B NE mettez PAS l’amplificateur sous tension quand un
haut-parleur lui est raccordé.
C ASSUREZ-VOUS que l’impédance de toutes les enceintes
supplémentaires utilisées sont correctes.
D N’essayez JAMAIS de contourner les fusibles ou mettre en
place de nouveaux dont les valeurs ne sont pas correctes.
E N’essayez JAMAIS de déposer le châssis de l’amplificateur.
Aucune partie ne peut être réparée par l’utilisateur.
F Confiez toutes les réparations à un personnel qualifié,
y compris pour le remplacement des fusibles et
des lampes. Des réparations seront nécessaires si
l’appareil est endommagé de quelque façon que ce soit,
notamment lorsque la fiche ou le cordon d’alimentation
sont endommagés, lorsqu’un liquide a été renversé
sur l’appareil ou des objets sont tombés à l’intérieur,
l’appareil a été exposé à la pluie ou à l’humidité, ne
fonctionne pas normalement ou est tombé par terre.
ATTENTION: Tout changement ou modification non
expressément autorisés par l’autorité responsable de la
conformité aux normes entraînera l’interdiction d’utiliser
l’appareil.
Remarque: Tous les câbles audio, à l’exception du câble
d’enceinte, utilisés avec le Night Train 50 doivent être de
bonne qualité et blindés. Ils ne peuvent excéder 10 mètres
de longueur. Servez-vous toujours d’un câble d’enceinte
non blindé approuvé par Vox pour relier l’ampli Night Train
50 et les enceintes d’extension.
AVERTISSEMENT: Ne bouchez pas les grilles de ventilation
et veillez à ce que l’air puisse toujours circuler librement
autours de l’amplificateur.
Note concernant les dispositions (Seulement EU)
Quand un symbole avec une poubelle barrée d’une
croix apparait sur le produit, le mode d’emploi, les
piles ou le pack de piles, cela signifie que ce produit,
manuel ou piles doit être déposé chez un
représentant compétent, et non pas dans une
poubelle ou toute autre déchetterie conventionnelle.
Disposer de cette manière, de prévenir les
dommages pour la santé humaine et les dommages
potentiels pour l’environnement. La bonne méthode
d’élimination dépendra des lois et règlements applicables
dans votre localité, s’il vous plaît, contactez votre organisme
administratif pour plus de détails. Si la pile contient des métaux
lourds au-delà du seuil réglementé, un symbole chimique est
affiché en dessous du symbole de la poubelle barrée d’une
croix sur la pile ou le pack de piles.
8
INTRODUCTION
Félicitation pour votre acquisition du VOX Night Train 50, la dernière nouveauté du “Night Train” nouvelle
génération.
Que vous soyez musicien de studio ou futur dieu du rock, votre son est primordial. Cette tête intégralement
à lampes de 50W est tellement polyvalente que vous pouvez jouer du blues une nuit, de la country la nuit
suivante et enchaîner ensuite avec un ROCK d’enfer!
Le Night Train 50 propose deux canaux: “Bright” et “Girth”.
“Bright” vous donne accès à des sons clairs cristallins, inévitablement associés à la marque VOX mais vous
pouvez activer le mode “Thick” et y ajouter une sacrée dose de gain…
Le canal “Bright” dispose d’une commande GAIN, d’un mode de préampli commutable par pédale (THICK)
et d’une palette complète de commandes de timbre (TREBLE, MIDDLE et BASS).
“Girth” est une version revue et corrigée de “High Gain” délivrant des sons lead chauffés à blanc!
L’ajout du mode Thick commutable vous permet d’appliquer une couche supplémentaire de distorsion.
Parfait pour rehausser les solos.
Le canal “Girth” dispose d’une commande GAIN, d’une palette complète de commandes de timbre
(TREBLE, MIDDLE et BASS) et d’une commande de volume du canal.
La section Master offre des commandes MASTER VOLUME, TONE CUT et REVERB LEVEL.
Bienvenue dans le Night Train!
L’équipe d’amplification de VOX
FACE AVANT
1. Prise INPUT – Branchez-y votre guitare!
7. Commutateur de canal – Ce commutateur permet de sélectionner le canal “BRIGHT” ou “GIRTH”.
Sélectionnez “GIRTH” si vous utilisez le pédalier optionnel VFS2A.
18.Commutateur STANDBY – Pas de sortie, juste des lampes bien chaudes.
19.Commutateur MAINS – Allume/éteint le Night Train.
20.Témoin MAINS – Il vous permet de savoir si le Night Train est allumé ou éteint.
9
Manuel d’utilisation
Le Night Train 50 constitue une nouvelle évolution du Night Train original et offre encore plus de flexibilité,
plus de puissance, deux canaux commutables par pédale et un mode Thick très demandé, également
commutable par pédale. Nous avons aussi ajouté à cette deuxième génération du Night Train une boucle
d’effets, une réverb intégrée de qualité studio et une sortie DI avec émulation de haut-parleur parfaite pour
les sessions d’enregistrement nocturnes.
Canal BRIGHT
2. Témoin de canal BRIGHT – Quand le canal BRIGHT est sélectionné, le témoin s’allume en VERT pour
le mode BRIGHT et en ORANGE pour le mode THICK.
3. Commande GAIN – Utilisez cette commande pour passer des sons cristallins avant 12h à des sons
blues déchirants après… en passant, bien sûr, par toute la palette intermédiaire. (Attention: De par
la nature de son design, le circuit a besoin de quelques minutes pour se stabiliser une fois l’ ampli
mis en sous tension. Il se peut que vous entendiez des bruits au cours de ce laps de temps, mais ils
disparaîtront très rapidement.)
4. Commande TREBLE – Contrôle les hautes fréquences (l’aigu) du son; vous pouvez aller d’un son
doux et rond (à gauche toute) à un son tranchant et éclatant (à fond à droite), en passant par tous les
stades intermédiaires.
5. Commande MIDDLE – Contrôle les fréquences moyennes (le médium) du son. Vous passez d’un son
creux (à gauche toute) à une sonorité pleine et riche (à droite toute) avec toutes les options intermédiaires.
6. Commande BASS – Contrôle les basses fréquences (le grave) du son; vous pouvez aller d’un son
chaud et léger (à gauche toute) à un son heavy et sombre (à fond à droite) en passant par tous les
stades intermédiaires.
Canal GIRTH
8. Commande GAIN – Utilisez cette commande pour aller de sons rock avant 12h à une distorsion féroce
après… en passant, bien sûr, par toute la palette intermédiaire. (Attention: De par la nature de son design,
le circuit a besoin de quelques minutes pour se stabiliser une fois l’ ampli mis en sous tension. Il se peut
que vous entendiez des bruits au cours de ce laps de temps, mais ils disparaîtront très rapidement.)
9. Témoin de canal GIRTH – Quand le canal GIRTH est sélectionné, le témoin s’allume en ROUGE;
ORANGE indique le mode THICK.
10.Commande TREBLE – Contrôle les hautes fréquences (l’aigu) du son; vous pouvez aller d’un son
doux et rond (à gauche toute) à un son tranchant et éclatant (à fond à droite), en passant par tous les
stades intermédiaires.
11.Commande MIDDLE – Contrôle les fréquences moyennes (le médium) du son. Vous passez d’un
son creux (à gauche toute) à une sonorité pleine et riche (à droite toute) avec toutes les options
intermédiaires.
12.Commande BASS – Contrôle les basses fréquences (le grave) du son; vous pouvez aller d’un son
chaud et léger (à gauche toute) à un son heavy et sombre (à fond à droite) en passant par tous les
stades intermédiaires.
13.Commande VOLUME – Elle détermine le niveau de sortie global du canal “GIRTH”. Utilisez-la pour
régler le volume global sans changer le son… qui sature probablement déjà!
MASTER
14. Commutateur THICK – Ce commutateur permet de régler l’étage du préampli de l’amplificateur.
Le mode THICK est disponible pour les canaux BRIGHT et GIRTH - utilisez-le pour atteindre des
sommets de distorsion! (REMARQUE: en mode THICK, les commandes de timbre du canal BRIGHT
sont contournées.) Activez la fonction THICK quand vous utilisez le pédalier optionnel VFS2A.)
15.Commande REVERB – Utilisez cette commande pour donner de l’ampleur à votre son; un réglage
modéré (commande tournée vers la gauche) produit un effet subtil et un réglage plus élevé (commande
tournée à fond à droite) produit un son “surfy”.
16.Commande TONE CUT – Cette commande détermine le timbre global de l’ampli. Plus vous la tournez
vers la droite, plus vous atténuez les hautes fréquences.
17.Commande MASTER VOLUME – Elle détermine le niveau de sortie global du préampli. Vous pouvez
donc utiliser cette commande pour régler le volume de l’amplificateur sans changer le son… qui sature
probablement déjà!
10
1. MAINS INPUT – Branchez le cordon d’alimentation fourni ici.
2. Prise pour enceinte de 8 Ω – Elle permet de brancher le Night Train à une enceinte de 8Ω ou à 2
enceintes de 16Ω.
3. Prise pour enceinte de 16 Ω – Elle permet de brancher le Night Train à une enceinte de 16Ω.
ATTENTION ! Servez-vous toujours d’un câble d’enceinte non blindé approuvé par Vox
pour relier l’ampli Night Train et les enceintes d’extension.
ATTENTION ! Assurez vous que l’ampli est bien connecté au réseau électrique qui lui
convient – Reportez vous au panneau arrière pour connaître le voltage de
votre ampli. Si vous avez le moindre doute, consultez votre revendeur.
ATTENTION ! Ne faites JAMAIS fonctionner votre ampli sans avoir branché d’enceinte. Vous
risquez, dans le cas contraire de sérieusement endommager votre ampli.
ATTENTION ! L’ampli doit toujours être relié à la terre pour prévenir tout risque de choc électrique.
ATTENTION ! Ne branchez pas des enceintes en même temps aux prises 8 ohms et 16 ohms.
4. Prise FX SEND – Reliez cette prise à l’entrée d’un processeur d’effets externe.
5. Prise FX RETURN – Reliez cette prise à la sortie d’un processeur d’effets externe.
6. Prise FOOT SWITCH – Branchez-y le pédalier VFS2A disponible en option.
7. Prise SPEAKER EMULATED D.I.– Utilisez cette prise pour l’écoute, pour envoyer un signal de boîtier
DI à une sono ou pour les sessions d’enregistrement nocturnes.
FICHE TECHNIQUE
Puissance de sortie:
50W RMS sous 8Ω ou 16Ω
Dimensions (L x H x P):
450 x 165 x 215 mm
Poids:
12,2 Kg
Accessoires fournis:
Câble d’alimentation, Manuel d’utilisation, Câble de haut-parleur
Option: pédalier VFS2A
Les caractéristiques et l’aspect du produit sont susceptibles d’être modifiés sans avis préalable en vue
d’une amélioration.
www.voxamps.com
11
Manuel d’utilisation
FACE ARRIÈRE
WICHTIGE
SICHERHEITSHINWEISE
Der als Pfeil dargestellte Blitz in einem Dreieck weist
den Anwender auf nicht isolierte, „gefährliche
Spannungen“ im Geräteinneren hin, die so stark sein
können, dass sie einen Stromschlag verursachen.
• Bitte lesen Sie sich alle Bedienhinweise durch.
• Bewahren Sie diese Bedienhinweise auf.
• Beachten Sie alle Warnungen.
• Befolgen Sie alle Instruktionen.
• Verwenden Sie dieses Gerät niemals in der Nähe von Wasser.
• Ein netzgespeistes Gerät darf niemals Regen- oder Wassertropfen
ausgesetzt werden. Außerdem darf man keine Flüssigkeitsbehälter
wie Vasen usw. darauf stellen.
• Reinigen Sie es ausschließlich mit einem trockenen Tuch.
• Versperren Sie niemals die Lüftungsschlitze und stellen Sie das
Gerät nur an Orten auf, die vom Hersteller ausdrücklich empfohlen
werden.
• Stellen Sie das Gerät niemals in die Nähe einer Wärmequelle, z.B.
eines Heizkörpers, Ofens oder eines anderen Wärme erzeugenden
Gerätes (darunter auch Endstufen).
• Versuchen Sie niemals, die polarisierte Leitung bzw. Erde
hochzulegen oder zu umgehen. Ein polarisierter Stecker ist mit
zwei flachen Stiften unterschiedlicher Breite versehen. Ein Stecker
mit Erdung weist zwei Stifte und eine Erdungsbuchse auf. Wenn
der beiliegende Stecker nicht in Ihre Steckdose passt, sollten Sie
einen Elektriker bitten, die Steckdose zu erneuern (für die USA und
Kanada).
• Sorgen Sie dafür, dass man weder über das Netzkabel stolpern
kann, noch dass es in unmittelbarer Nähe einer Steckdose, darunter
auch Zusatzsteckdosen anderer Geräte, abgeklemmt wird. Auch
am Austritt aus dem Gerät darf das Netzkabel auf keinen Fall
gequetscht werden.
• Verwenden Sie nur Halterungen/Zubehör, die/das vom Hersteller
ausdrücklich empfohlen werden/wird.
• Im Falle eines Gewitters bzw. wenn Sie das Gerät längere Zeit nicht
verwenden möchten, lösen Sie bitte den Netzanschluss.
• Durch Ausschalten des Hauptschalters wird dieses Erzeugnis nicht
vollständig vom Netz getrennt. Ziehen Sie deshalb den Stecker des
Netzkabels aus der Steckdose, wenn Sie das Erzeugnis längere
Zeit nicht verwenden.
• Stellen Sie diesen Verstärker in der Nähe einer Wand
Schutzkontaktdose auf und achten Sie auf die freie Zugänglichkeit
des Netzanschlusskabels.
• Warnhinweis: Dieser Verstärker darf nur an Steckdosen mit
Schutzleiter (Erdung) betrieben werden.
• Überlassen Sie alle Wartungsarbeiten einem erfahrenen
Wartungstechniker. Wartungsarbeiten oder Reparaturen sind
erforderlich, wenn das Netzkabel oder der Stecker beschädigt ist,
wenn Flüssigkeit oder andere Gegenstände in das Geräteinnere
gefallen sind, wenn das Gerät im Regen gestanden hat, sich nicht
erwartungsgemäß verhält oder wenn es gefallen ist.
• Stellen Sie das Gerät niemals unmittelbar neben die Steckdose und/
oder Erweiterungssteckdose eines anderen Geräts.
• Stellen Sie das Gerät während des Betriebes niemals in einen
Türschrank oder den Lieferkarton.
• Hohe Schallpegel bei Verwendung eines großen oder kleinen
Kopfhörers können Hörschäden verursachen.
• Stellen Sie das Gerät nur auf einen Wagen, Ständer, Stative,
Halterungen oder Tische, die vom Hersteller ausdrücklich empfohlen
werden oder eventuell zum Lieferumfang gehören. Seien Sie beim
Verschieben eines geeigneten Wagens vorsichtig, damit weder er,
noch das Gerät selbst umkippt bzw. hinfällt und Sie eventuell verletzt
Das Ausrufezeichen in einem Dreieck weist den
Anwender darauf hin, dass zum Lieferumfang des
Gerätes wichtige Bedien- und Wartungshinweise
(eventuell Reparaturhinweise) gehören.
*Alle Produkt- und Firmennamen sind Warenzeichen oder
eingetragene Warenzeichen der betreffenden Eigentümer.
A Verwenden Sie IMMER das mitgelieferte Netzkabel. Wenn
Austausch erforderlich ist, wenden Sie sich an Ihren VoxVertragshändler.
B Schalten Sie NICHT den Verstärker ohne angeschlossenes
Lautsprecherkabel ein.
C STELLEN SIE SICHER, dass jegliche eventuell verwendete
Gitarrenboxen die richtige Impedanz haben.
D Versuchen Sie NIEMALS, die Sicherungen zu überbrücken
oder Sicherungen falscher Impedanz einzusetzen.
E Entfernen Sie NIEMALS das Verstärkergehäuse. Im Inneren
befinden sich keine vom Anwender zu wartenden Teile.
F Überlassen Sie alle Wartungsarbeiten, einschließlich
Austausch von Sicherungen und Röhren, dem qualifizierten
Wartungspersonal. Wartung ist erforderlich, wenn das
Gerät auf jegliche Weise beschädigt wurde, wie etwa bei
Beschädigung von Netzkabel oder Stecker, bei Eindringen
von Flüssigkeiten oder Gegenständen ins Innere, wenn
das Gerät Regen oder Feuchtigkeit ausgesetzt wurde, nicht
richtig arbeitet, oder fallengelassen wurde.
VORSICHT: Jegliche Änderungen oder Modifikationen,
die nicht ausdrücklich von dem Aussteller der
Konformitätserklärung
genehmigt
wurden
können die Erlaubnis zum Betrieb des Geräts
hinfällig werden lassen.
Anmerkung: Prinzipiell sollten alle Kabel bis auf das
Lautsprecherkabel, die man an den Night Train 50
anschließt, geschirmt und von guter Qualität sein.
Verwenden Sie niemals Kabel mit einer Länge
von mehr als 10 Metern. Für die Verbindung des
Night Train 50 mit seinem Lautsprecher oder einer
Erweiterungsbox müssen nicht geschirmte Kabel
verwendet werden, die von Vox ausdrücklich
empfohlen werden.
WARNUNG: Nicht Ventilationsschlitze verdecken und
immer freien Luftstrom um den Verstärker
sicherstellen!
Hinweis zur Entsorgung (Nur EU)
Wenn Sie das Symbol mit der „durchgekreuzten Mülltonne“ auf
Ihrem Produkt, der dazugehörigen Bedienungsanleitung, der
Batterie oder dem Batteriefach sehen, müssen Sie das Produkt
in der vorgeschriebenen Art und Weise entsorgen. Dies bedeutet,
dass dieses Produkt mit elektrischen und elektronischen
Komponenten nicht mit dem normalen Hausmüll entsorgt werden
darf. Für Produkte dieser Art existiert ein separates, gesetzlich
festgelegtes Entsorgungssystem. Gebrauchte elektrische und
elektronische Geräte müssen separat entsorgt werden, um ein
umweltgerechtes Recycling sicherzustellen. Diese Produkte müssen bei
benannten Sammelstellen abgegeben werden. Die Entsorgung ist für den
Endverbraucher kostenfrei! Bitte erkundigen sie sich bei ihrer zuständigen
Behörde, wo sie diese Produkte zur fachgerechten Entsorgung abgeben
können.
Falls ihr Produkt mit Batterien oder Akkumulatoren ausgerüstet ist, müssen
sie diese vor Abgabe des Produktes entfernen und separat entsorgen
(siehe oben). Die Abgabe dieses Produktes bei einer zuständigen Stelle
hilft ihnen, dass das Produkt umweltgerecht entsorgt wird. Damit leisten
sie persönlich einen nicht unerheblichen Beitrag zum Schutz der Umwelt
und der menschlichen Gesundheit vor möglichen negativen Effekten durch
unsachgemäße Entsorgung von Müll. Batterien oder Akkus, die Schadstoffe
enthalten, sind auch mit dem Symbol einer durchgekreuzten Mülltonne
gekennzeichnet. In der Nähe zum Mülltonnensymbol befindet sich die
chemische Bezeichnung des Schadstoffes.
Cd oder NiCd steht für Cadmium, Pb für Blei und Hg für Quecksilber.
12
VORWEG
Herzlichen Glückwunsch zum Kauf des Vox Night Train 50, des neuesten Night Train Modells der nächsten
Generation.
Der Night Train 50 stellt eine Weiterentwicklung des Night Train dar und ist daher noch vielseitiger: Mehr
Leistung, zwei per Fußschalter umschaltbare Kanäle und – endlich! - einen per Fußschalter aktivierbaren
Thick-Modus. Wir haben aus dem Modell der zweiten Generation zudem noch einen Effektloop, ein
studiotaugliches Reverb und eine DI zur Speaker-Emulation bei langen nächtlichen Aufnahmesitzungen
eingebaut.
Sowohl Session-Musiker als auch angehende Rockidole finden hier einen Super-Sound vor. Dieser
vielseitige 50W-Röhrentop ist so flexibel, dass man mühelos Blues, Country und ROCK spielen kann –
wenn’s sein muss sogar am selben Abend!
Der Night Train 50 bietet zwei Kanäle: „Bright“ und „Girth“.
Mit „Bright“ haben Sie Zugriff auf die glockigen Clean-Sounds, die man unweigerlich mit VOX assoziiert.
Diese können Sie aber durch Aktivierung des Thick-Modus’ mit viel mehr Gain eine ganze Ecke herzhafter
machen…
Der „Bright“-Kanal ist mit einem GAIN-Regler, einem per Fußtaster umschaltbaren Vorverstärkermodus
(THICK) und einer kompletten Klangregelung (TREBLE, MIDDLE und BASS) ausgestattet.
Der zusätzliche per Fußschalter aktivierbare Thick-Modus eröffnet neue Möglichkeiten. Er ist besonders
ideal zum Boosten von Lead-Sounds.
Der Girth-Kanal ist mit einem Gain-Regler, einer kompletten Klangregelung (Treble, Middle und Bass) und
einem Kanalpegelregler ausgestattet.
Die Master-Sektion verfügt über einen Master-Lautstärkeregler, einen Tone Cut-Regler und einen ReverbPegelregler.
Willkommen also im Zug, der direkt ins Sound-Walhalla fährt!
Ihr VOX Amplification-Team.
BEDIENFELD
1. INPUT-Buchse – Hier muss die Gitarre angeschlossen werden.
7. Kanalwahlschalter – Hiermit wählen Sie entweder den BRIGHT- oder GIRTH-Kanal. Stellen Sie ihn
auf „GIRTH“, wenn Sie auch einen optionalen VFS2A verwenden.
18.STANDBY-Schalter – Keine Tonausgabe, nur angenehm warme Röhren.
19.MAINS-Schalter – Hiermit kann der Night Train ein- und ausgeschaltet werden.
20.MAINS-LED – Leuchtet, wenn der Night Train eingeschaltet ist.
13
Bedienungsanleitung
„Girth“ steht für „High-Gain“ in Reinkultur und folglich für sengende Lead-Sounds, bei denen kein Auge
trocken bleibt!
BRIGHT-Kanal
2. BRIGHT-LED – Wenn Sie den BRIGHT-Kanal gewählt haben, wird dies durch eine GRÜN leuchtende
LED angezeigt. Im THICK-Modus leuchtet die LED dagegen ORANGE.
3. GAIN-Regler – Mit Einstellungen vor „12 Uhr“ erzielen Sie brillante „Clean“-Sounds. Danach wird’s
dann immer bluesig-zerrender. Selbstverständlich brauchen Sie sich nicht auf diese beiden Extreme zu
beschränken… (Vorsicht: Schaltungsbedingt kann es nach Einschalten des Verstärkers einige Minuten
dauern bis der Betriebszustand erreicht ist. Währenddessen können einige Störgeräusche auftreten,
die nach kurzer Zeit wieder nachlassen.)
4. TREBLE-Regler – Hiermit können die Höhen angehoben und abgesenkt werden – von „geschmeidig
und rund“ (ganz links) bis „beißend“ (ganz rechts). Zwischenlösungen sind ebenfalls empfehlenswert.
5. MIDDLE-Regler – Hiermit regeln Sie den Mittenbereich Ihres Sounds. Drehen Sie ihn ganz links für
einen fast „hohlen“ und ganz nach rechts für einen breiten Sound. Auch die Zwischenlösungen klingen
natürlich gut.
6. BASS-Regler – Hiermit kann der Bass angehoben und abgesenkt werden – von „warm und leicht“
(ganz links) bis „druckvoll“ (ganz rechts). Zwischenlö sungen sind ebenfalls empfehlenswert.
GIRTH-Kanal
.8 GAIN-Regler – Mit Einstellungen vor „12 Uhr“ erzielen Sie „Rock“-Sounds. Danach tritt die sengende
Lead-Fraktion in Aktion.Selbstverständlich brauchen Sie sich nicht auf diese beiden Extreme zu
beschränken… (Vorsicht: Schaltungsbedingt kann es nach Einschalten des Verstärkers einige Minuten
dauern bis der Betriebszustand erreicht ist. Währenddessen können einige Störgeräusche auftreten,
die nach kurzer Zeit wieder nachlassen.
9. GIRTH-LED – Wenn Sie den GIRTH-Kanal gewählt haben, leuchtet die LED ROT. Im Thick-Modus
leuchtet die LED ORANGE.
10.TREBLE-Regler – Hiermit können die Höhen angehoben und abgesenkt werden – von „geschmeidig
und rund“ (ganz links) bis „beißend“ (ganz rechts). Zwischenlösungen sind ebenfalls empfehlenswert.
11.MIDDLE-Regler – Hiermit regeln Sie den Mittenbereich Ihres Sounds. Drehen Sie ihn ganz links für
einen fast „hohlen“ und ganz nach rechts für einen breiten Sound. Auch die Zwischenlösungen klingen
natürlich gut.
12.BASS-Regler – Hiermit kann der Bass angehoben und abgesenkt werden – von „warm und leicht“
(ganz links) bis „druckvoll“ (ganz rechts). Zwischenlö sungen sind ebenfalls empfehlenswert.
13.VOLUME-Regler – Hiermit wird der Ausgangspegel des „GIRTH“-Kanals eingestellt. Damit bestimmen
Sie die Lautheit, ändern aber nichts am Sound. (Hier ist schließlich waschechtes Overdrive angesagt!)
MASTER
14.THICK-Schalter – Hiermit können Sie den Vorverstärker einstellen. Der THICK-Modus wirkt sich sowohl
auf den BRIGHT- als auch auf den GIRTH-Kanal aus. Hiermit können Sie ihr Gain auf enorme Pegel
boosten. (Anmerkung: im THICK-Modus wird die Klangregelung des BRIGHT-Kanals umgangen).
Wählen Sie THICK, wenn Sie einen als Zubehör erhältlichen VFS2A Fußschalter verwenden.)
15.REVERB-Regler – Hiermit verleihen Sie ihrem Sound Räumlichkeit. Bei kleinen Pegeln ist der Hall
subtil, voll aufgerissen erhalten Sie den typischen Surfsound – selbstverständlich müssen Sie sich nicht
auf beide Extreme beschränken!
16.TONE CUT-Regler – Hiermit können Sie die allgemeine Klangfarbe des Verstärkers ändern. Je weiter
Sie ihn nach rechts drehen, desto stärker werden die Höhen abgeschwächt.
17.MASTER VOLUME-Regler – Hiermit wird der Ausgangspegel des Vorverstärkers eingestellt. Damit
bestimmen Sie die Lautheit, ändern aber nichts mehr am Sound. (Der wahrscheinlich schon schön brät.)
14
RÜCKSEITE
1. MAINS INPUT – Hier muss das beiliegende Netzkabel angeschlossen werden.
2. 8 Ω-Boxenausgang – Erlaubt das Anschließen von einer 8Ω- oder von 2 16Ω-Boxen an den Night Train.
3. 16 Ω-Boxenausgang – Erlaubt das Anschließen einer 16Ω-Box an den Night Train.
WARNUNG ! Bitte achten Sie darauf, dass der Verstärker an die korrekte Netzspannung
angeschlossen ist – überprüfen Sie dazu das Typenschild an der
Rückseite. Falls Zweifel bestehen, frage Sie Ihren Händler.
WARNUNG ! Betreiben Sie den Verstärker NIEMALS OHNE LAUTSPRECHER.
Andernfalls könnte er beschädigt werden.
WARNUNG ! Dieser Verstärker muss immer geerdet sein, um einen Stromschlag zu
vermeiden.
WARNUNG ! Schließen Sie niemals zwei Lautsprecherboxen gleichzeitig an Buchsen
mit unterschiedlicher Impedanz an (8 Ohm und 16 Ohm)!
4. FX SEND-Buchse – Diese Buchse muss mit dem Eingang des externen Effektgeräts verbunden
werden.
5. FX RETURN-Buchse – Schließen Sie hier den Ausgang des externen Effektgeräts an.
6. FOOT SWITCH-Buchse – Hier kann ein optionaler VFS2A Fußtaster angeschlossen werden.
7. D.I. Anschluss zur Lautsprecheremulation – Nutzbar als Monitor, als DI-Ausgang für eine PA oder
für nächtliche Aufnahmesessions.
TECHNISCHE DATEN
Ausgangsleistung:
50W RMS an 8Ω order 16Ω
Abmessungen (B x H x T): 450 x 165 x 215 mm
Gewicht:
12,2 Kg
Lieferumfang:
Netzkabel, Bedienungsanleitung, Hochwertiges Lautsprecherkabel
Sonderzubehör: VFS2A-Fußtaster
Änderungen der technischen Daten und des Designs ohne vorherige Ankündigung vorbehalten.
www.voxamps.com
15
Bedienungsanleitung
WARNUNG ! Für die Verbindung des Night Train mit seinem Lautsprecher oder einer
Erweiterungsbox müssen nicht geschirmte Kabel verwendet werden, die
von Vox ausdrücklich empfohlen werden.
INSTRUCCIONES DE
SEGURIDAD IMPORTANTES
El símbolo del rayo significa que existen voltajes peligrosos sin aislar en el interior de la unidad, que pueden ser de magnitud suficiente
para constituir un riesgo de electrocución.
• Lea todas las instrucciones antes de utilizar el producto.
• GUARDE ESTAS INSTRUCCIONES
• Cumpla estas instrucciones
• No utilice este producto cerca del agua; por ejemplo, cerca de una
bañera, lavabo, lavadero, en un sótano húmedo, o cerca de una
piscina o similar.
• Este producto sólo debe ser utilizado en el soporte recomendado
por el fabricante.
• Este producto, ya sea solo o en combinación con un amplificador y
auriculares o altavoces puede causar pérdida auditiva permanente.
No lo utilice durante largo tiempo a gran volumen, o a un volumen
que resulte incómodo. Si nota alguna pérdida de audición, consulte
con un especialista.
• El producto debe ser colocado en tal forma que no se interfiera con
su adecuada ventilación.
• El producto debe ser situado lejos de fuentes de calor, como
radiadores, calefactores u otros aparatos que produzcan calor.
• El producto debe ser conectado a una fuente de corriente eléctrica
del tipo descrito en las instrucciones de funcionamiento o tal como
esté marcado en el producto.
• El cable de alimentación debe ser desenchufado cuando no se
vaya a utilizar el aparato durante largo tiempo.
• Debe ponerse especial cuidado en que no caigan objetos o líquidos
en el interior por las aberturas.
• Debe ponerse especial cuidado en que las aberturas de ventilación
estén libres y que haya suficiente espacio de aire alrededor de la
unidad.
• El producto debe ser revisado por personal cualificado cuando: El
cable de alimentación o el enchufe se haya dañado, o Hayan caído
objetos o líquidos en el producto, o El producto haya sido expuesto
a la lluvia, o El producto no funcione normalmente o exhiba un
cambio importante de prestaciones, o El producto se haya caído, o
el chasis se haya dañado.
• No intente realizar mantenimiento de este producto más que como
se describe en las instrucciones de mantenimiento por parte del
usuario. Todas las demás tareas deben ser llevadas a cabo por
personal cualificado.
• Instale este producto cerca de un enchufe y deje el cable de
corriente accesible.
• ATENCIÓN—Este producto ha de ser conectado a un enchufe con
toma de tierra.
• Use solamente los accesorios y soportes especificados por el
fabricante.
• Desenchufe este aparato durante tormentas eléctricas o si no lo va
a utilizar durante un largo periodo.
• No instale este equipo en una posición alejada de la toma de
alimentación.
• No instale este equipo en un lugar confinado, tal como una caja o
similar.
• La presión sonora excesiva de los auriculares y los propios
auriculares pueden causar pérdida de audición.
• Use este equipo solamente con el carro, soporte, trípode o mesa
especificado por el fabricante. Si usa un carro tenga cuidado al
moverlo para evitar daños a personas si se cae del carro.
El signo de admiración indica al usuario que
existen instrucciones de funcionamiento y
mantenimiento importantes en el manual que
acompaña al producto.
*Todos los nombres de productos y compañías son marcas comerciales o marcas registradas de sus respectivos propietarios.
A Use SIEMPRE el cable de red suministrado, si es
necesario reemplazarlo, por favor póngase en contacto
con su distribuidor Vox autorizado.
B NO encienda el amplificador sin un altavoz conectado.
C ASEGÚRESE que si usa recintos acústicos de extensión
éstos sean de la impedancia adecuada.
D NO INTENTE NUNCA puentear los fusibles o usar
fusibles que no sean iguales a los suministrados.
E DO INTENTE abrir el chasis del amplificador, no existen
partes que requieran la intervención del usuario.
F Cualquier mantenimiento o reparación debe ser llevado
a cabo por personal cualificado, incluyendo el reemplazo
de fusibles y válvulas. Es necesario llevar el aparato al
servicio post venta cuando se ha dañado de cualquier
forma, por ejemplo si el cable o enchufe de alimentación
se han dañado, han caído líquidos u objetos al aparato,
el aparato ha sido expuesto a la lluvia o humedad, el
aparato no funciona normalmente o se ha caído.
PRECAUCIÓN:Cualquier cambio o modificación no
aprobado expresamente por la parte
encargada del mantenimiento puede
anular la autoridad del usuario para
operar el equipo.
Nota: se recomienda que todos los cables para conectar el
Night Train 50, a excepción del cable del altavoz, sean
apantallados y de buena calidad. No se debe superar
la longitud de 10 metros. Usa siempre un cable no
apantallado y aprobado por VOX para el amplificador
Night Train 50 y los recintos de altavoces.
AVISO: ¡No obstruya las rejillas de ventilación y asegú
rese siempre que existe libre movimiento de aire
alrededor del amplificador!
Nota respecto a residuos y deshechos (solo UE)
Cuando aparezca el símbolo del cubo de basura
tachado sobre un producto, su manual de usuario,
la batería, o el embalaje de cualquiera de éstos,
significa que cuando quiere tire dichos artículos a
la basura, ha de hacerlo en acuerdo con la
normativa vigente de la Unión Europea. No debe
verter dichos artículos junto con la basura de
casa. Verter este producto de manera adecuada
ayudará a evitar daños a su salud pública y
posibles daños al medioambiente. Cada país tiene una
normativa específica acerca de cómo verter productos
potencialmente tóxicos, por tanto le rogamos que se ponga
en contacto con su oficina o ministerio de medioambiente
para más detalles. Si la batería contiene metales pesados
por encima del límite permitido, habrá un símbolo de un
material químico, debajo del símbolo del cubo de basura
tachado.
16
INTRODUCCIÓN
Gracias por la compra del amplificador de nueva generación VOX Night Train 50, la edición más reciente
de la gama Night Train.
El Night Train 50 es una evolución posterior del Night Train original, lo que significa que es más versátil y
con más potencia, dispone de dos canales conmutables y un modo grueso “Thick” conmutable por pedal. A
partir del modelo de segunda generación, también hemos añadido un bucle de Efectos, una Reverberación
con calidad de estudio integrada y una DI con emulación de altavoz para las sesiones de grabación a altas
horas de la noche.
Ya seas un músico de sesión o un aspirante a super estrella del rock, tu sonido es lo más importante. El
Night Train es un amplificador de 50 vatios completamente a válvulas tan versátil que puedes tocar blues
una noche, country otra noche y rock a la siguiente.
El Night Train 50 dispone de dos canales: Bright y Girth.
Bright te dará el sonido limpio y claro que es sinónimo de VOX, pero, también, puedes darle más pegada
seleccionando “Thick” para toda una nueva dimensión de ganancia...
El canal Bright incorpora un control de ganancia Gain, un conmutador de modo de previo (Thick) conmutable
por pedal y completos controles de tono (Agudos, Medios y Graves).
Girth ofrece un nuevo nivel de alta ganancia, ¡para ofrecerte tonos solistas que harán que pidas más y
más!
Gracias a la incorporación del modo grueso “Thick” conmutable por pedal, ahora hay aún más funciones
disponibles. Es ideal para aumentar las distorsiones.
El canal Girth incorpora un control de ganancia Gain, completos controles de tono (Agudos, Medios y
Graves) y volumen de canal.
La sección general incluye un volumen general, un control Tone Cut y un nivel de reverberación.
Bienvenido al tren nocturno del sonido.
El equipo de amplificación de VOX
1. Jack INPUT – conecta aquí tu guitarra!
7. Conmutador de Canal – Este conmutador se usa para cambiar entre los Canales BRIGHT y GIRTH.
Ajústalo a “GIRTH” cuando uses el conmutador VFS2A.
18.Conmutador STANDBY– Sin salida, solamente se mantienen las válvulas calientes.
19.Conmutador MAINS – se usa para encender el Night Train.
20.Indicador MAINS – se ilumina cuando el amplificador está encendido.
17
Manual de usuario
PANEL FRONTAL
Canal BRIGHT
2. Indicador Canal BRIGHT – Cuando el canal BRIGHT está seleccionado, VERDE indica Modo Bright
y NARANJA indica Modo THICK.
3. Control GAIN – Use este control para obtener un sonido limpio cuando se ajusta antes de las 12
en punto, ¡hasta los sonidos blues más potentes! Y, por supuesto, ¡todos los puntos intermedios!
(Precaución: Debido a la naturaleza del diseño de este amplificador, puede que sean necesarios algunos
minutos tras su encendido hasta que el circuito se estabilice. Se puede producir algún ruido durante esta fase,
pero desaparecerá rápidamente.)
4. Control TREBLE – Controla las altas frecuencias del sonido, desde matices suaves y redondeados a
poco recorrido del botón a sonidos agudos y chillones cuando se pasa de la mitad del recorrido.
5. Control de MIDDLE – Controla las frecuencias medias del sonido. Desde suave cuando está al mínimo
(totalmente a la izquierda) hasta un sonido lleno y rico cuando está totalmente a la derecha, y todos los
puntos intermedios.
6. Control BASS – Controla las frecuencias graves del sonido, desde más cálidos con ajustes bajos y
sonidos más oscuros y pesados en adelante.
Canal GIRTH
8. Control GAIN – Usa este control para conseguir tonos de Rock cuando se ajusta antes de las 12 en
punto, ¡hasta los tonos más agresivos! Y, por supuesto, ¡todos los puntos intermedios! (Precaución:
Debido a la naturaleza del diseño de este amplificador, puede que sean necesarios algunos minutos tras
su encendido hasta que el circuito se estabilice. Se puede producir algún ruido durante esta fase, pero
desaparecerá rápidamente.)
9. Indicador Canal GIRTH – Cuando se selecciona el Canal GIRTH el indicador se ilumina en ROJO,
NARANJA indica el modo Thick.
10.Control TREBLE – Controla las altas frecuencias del sonido, desde matices suaves y redondeados a
poco recorrido del botón a sonidos agudos y chillones cuando se pasa de la mitad del recorrido.
11.Control de MIDDLE – Controla las frecuencias medias del sonido. Desde suave cuando está al mínimo
(totalmente a la izquierda) hasta un sonido lleno y rico cuando está totalmente a la derecha, y todos los
puntos intermedios.
12.Control BASS – Controla las frecuencias graves del sonido, desde más cálidos con ajustes bajos a
sonidos más oscuros y pesados en adelante.
13.Control VOLUME – Ajusta el nivel general del Canal Girth; usa este control para ajustar el volumen
general a la vez que se mantienen todas las características tonales. (Bueno, no nos engañemos...
¡overdrive!)
Sección MASTER
14.Conmutador THICK – Este conmutador se usa para seleccionar el modo del previo del amplificador.
El Modo THICK funciona para los canales BRIGHT y GIRTH - ¡Utilízalo para subir la ganancia hasta
niveles increíbles! (NOTA: en modo THICK, los controles de tono del Canal BRIGHT se omiten). Activa
THICK cuando utilices el conmutador de pedal VFS2A opcional.
15.Control REVERB – Utilízalo para añadir sonido ambiental al tono, sutil cuando se baja (hacia la
izquierda) y “surfero” de la mitad en adelante (hacia la derecha) y en todo el recorrido.
16.Control TONE CUT – Controla los agudos generales del amplificador; cuando se sube las frecuencias
agudas se atenúan.
17.Control MASTER VOLUME – Afecta a la salida global del amplificador en la sección del previo, úsalo
para controlar el volumen general del amplificador y mantener las características tonales de sonido
(Súbelo y disfruta).
18
PANEL TRASERO
1. MAINS INPUT – conecta aquí el cable de corriente suministrado.
2. Jacks Altavoz 8 OHM – Se usan para conectar Night Train a cualquier caja acústica de 8 ohmios o a
2 cajas acústicas de 16ohmios.
3. Jacks Altavoz 16 OHM – Se emplea para conectar el Night Train a una caja acústica de 16 ohmios.
¡AVISO! Usa siempre un cable no apantallado y aprobado por VOX para el amplificador Night Train
y los recintos de altavoces.
¡AVISO! Por favor asegúrese que el amplificador está conectado a una toma de corriente con
voltaje correcto. Si tiene alguna duda, consulte con su distribuidor.
¡AVISO! NUNCA utilice el amplificador sin los altavoces conectados. Si lo hace pueden producirse
graves daños.
¡AVISO! Este amplificador siempre debe estar conectado a una toma de tierra adecuada, para
prevenir el riesgo de electrocución.
¡ADVERTENCIA! No conectes los recintos acústicos de altavoces a los dos jacks (8 ohmios y 16
ohmios) al mismo tiempo.
4. Jack FX SEND – Conecta esta toma a la entrada de tu efecto.
5. Jack FX RETURN – Conecta esta toma a la salida de tu efecto.
7. Conector D.I. CON EMULACIÓN DE ALTAVOZ – Utilízalo para monitorizar, DI para un PA o utilízalo
para las sesiones de grabación hasta altas horas de la noche.
ESPECIFICACIONES
Potencia de salida:
50 Vatios RMS a 8 o 16 ohmios
Dimensiones (ancho x alto x profundo): 450 x 165 x 215 mm
Peso:
12,2 kilos.
Accesorios incluidos:
Cable de corriente, manual del usuario, cable de altavoz
Opciones: conmutador de pedal VFS2A
Las especificaciones y el aspecto están sujetas a cambios sin previo aviso por mejora.
www.voxamps.com
19
Manual de usuario
6. Jack FOOT SWITCH – Conecta aquí el conmutador de pedal opcional VFS2A.
1
2013