1
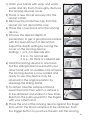
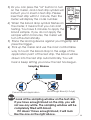
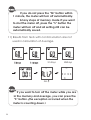
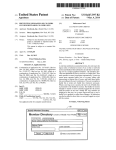
INTRODUCTION
PRINCIPLE
INDICATIONS FOR USE
INTRODUCTION
We would like to thank you for making a smart decision! The Medi+Sure
Blood Glucose Monitoring System is designed for Canadian.
The compact and portable Medi+Sure Blood Glucose Meter is easy to use,
and displays test results in only 6 seconds.
In addition, the meter automatically stores up to 960 test records with
respective dates and times, which allows you to monitor your diabetic
program efficiently.
Thanks again for your support. Before testing, please read this User's
Guide thoroughly. It contains all the information you need regarding
the Medi+Sure Blood Glucose Monitoring System. If you have questions
or need assistance, please call our Customer Assistance line at
1-855-634-7873. For customer assistance outside the operational days
and times, please contact your health care provider with questions.
TM
TM
TM
PRINCIPLE
The Medi+Sure Blood Glucose Monitoring System is designed to provide
an easy, accurate method for determining capillary blood glucose values.
This analysis is based on amperometric technology using glucose oxidase
that is specific for the blood glucose measurement. When the blood
sample is applied to the test strip, electrons are formed by the reaction
between glucose oxidase and blood glucose. The electrical current is
measured by the meter and correlates with the concentration of glucose
in the blood sample.
TM
INDICATIONS FOR USE
The Medi+Sure Blood Glucose Monitoring Systems is intended for
use in the quantitative measurement of glucose in fresh capillary whole
blood from the finger. It is intended for use by lay users and should be
used by a single patient as an aid in monitoring the effectiveness of
diabetes control program. It is not intended for the diagnosis of or
screening for diabetes mellitus, and is not intended for use on neonates.
TM
IMPORTANT SAFETY INSTRUCITONS:
● The meter and lancing device are for single patient use.
Do not share them with anyone including other family members!
Do not use on multiple patients!
● All parts of the kit are considered biohazardous and can potentially
transmit infectious diseases, even after you have performed cleaning
and disinfection.
Reference:
1. “FDA Public Health Notification: Use of Fingerstick Devices on More
than One Person Poses Risk for Transmitting Bloodborne Pathogens:
Initial Communication” (2010) http://www.fda.gov/MedicalDevices/
Safety/AlertsandNotices/ucm224025.htm
2. “CDC Clinical Reminder: Use of Fingerstick Devices on More than One
Person Poses Risk for Transmitting Bloodborne Pathogens” (2010)
http://www.cdc.gov/injectionsafety/Fingerstick-DevicesBGM.html
Medi+Sure
TM
Blood Glucose Monitoring System
2
2
4
6
Setting the Year,Date,Time,and Temperature Unit 7
Alarm setting
9
Testing Control Samples
10
Blood Sampling
11
13
16
How to Clean and Disinfect Your Device
19
2.9 Viewing Date, Time, or Temperature
22
23
23
24
26
Expected Values
28
28
1
Section 1. Contents & Specifications
1.1 Contents
Complete Starter Kit:
Medi+Sure Blood Glucose Meter ,
3-Volt Lithium Coin Battery (CR2032) ,
User's Guide( Log Book included ), Getting Started Guide ,
Medi+Sure Blood Glucose Test Strip , Test Strip Instruction,
Lancing Device, Lancing Device Instruction ,Carrying Case
TM
TM
Meter only:
Medi+Sure Blood Glucose Meter ,
3-Volt Lithium Coin Battery (CR2032) ,
User's Guide , ( Log Book included ) , Getting Started Guide ,
Carrying Case
TM
1.2 Product Specifications & Operating Conditions
Meter Specifications:
Storage Conditions
Temperature:-4°~122°F (-20~+50°C)
Humidity RH 80%
Memory Capacity
960 test results with respective
dates and times
Measurement Unit mmol/L
Display
LCD display
Reaction Time
6 seconds
Meter Dimensions
54×93×16 mm
Meter Weight
53 g (with battery)
Measuring Range
1.1~41.7 mmol/L
Power Supply
One 3V lithium battery (CR2032)
Battery Lifetime
Over 1,000 tests
2
Test Strip Specifications :
Strip Size
35 × 6 × 0.6 mm
Storage Conditions
Temperature 36~86°F (2~30°C)
Humidity:RH 80%
Blood Volume
0.6 µL
Expiration of Test Strips
See print on the top of the box
System Operation Conditions :
Test Strips
Using the Medi+Sure
Blood Glucose Test Strips only
Operation Conditions
Temperature:
50~104°F(10~40°C)
Humidity 20%~80%RH.
Sample Type
Capillary whole blood in finger
Hematocrit of
Tested Blood
25%~60%
Altitude Limit
To be used no higher than
10183 feet above sea level.
TM
√
3
The meter is calibrated to capillary whole blood
equivalent results.
1.3 About the system
Medi+Sure Blood Glucose Meter (Front) :
TM
LCD Display
Show blood glucose test results and messages
Left Arrow Button /
Time display
Button
Mem
Del
C
Setting Button
1. Setting date,
time,and
temperature unit.
2. Power off.
Main Button
1. Press to recall
memory or
average
2. Power on
M
L
S
Medi+Sure
TM
Right Arrow
Button /
Temperature
display Button
Slot Insert test strip
Medi+Sure Blood Glucose Meter (back) :
TM
Battery Cover
A4064I-09C1-0002
Serial Number
Medi+Sure Canada Inc.
31A-328 Speedvale Ave. East, Suite 160,
Guelph , Ontario, N1E 0J4, Canada.
Toll Free : 1-855-634-7873
(or 1-855-MDISURE.)
4
Medi+Sure Blood Glucose Test Strip :
TM
Sampling Window
Application Point
Apply blood or
control solution to
the application point
Black-Colored Bars
Insert this end with black bars
facing up into the test strip slot
How to assess that enough blood has been sampled ?
Sampling Window
Correct Blood
Application
Not Enough Blood
(< 0.6 µL)
Look at the sampling window on the test strip.
If you have enough blood on the strip, you will
not see any white. The sampling window will be
completely filled with blood.
If it doesn’t have enough blood, it will look
like the one on the right above.
5
Section 2. How Your System Works
2.1 Installing / Relacing the Battery
Your Medi+Sure Blood Glucose Monitoring System is
packed with one 3-volt lithium coin battery that
needs to be installed before testing. The battery
can last for more than 1,000 tests. However, it
varies because of usage, so always keep spare
batteries on hand. When the battery symbol
appears on the display, it means your battery is
low. Although the meter will still provide accurate
results, the battery should be replaced as soon as
possible. After the battery is replaced, reset the
date, time, and units.
(See Section 2.2 Setting the Date, Time, and Units.)
TM
*
Steps to Install / Replace the Battery :
1) Flip open the battery cover by
pushing the tab.
2) Use the battery cover to pull the
battery out of the battery locker.
3) Insert a new battery with the
positive (+) side up and make sure
the battery is placed under the
battery holder. Press the battery
down firmly. Slide the battery cover
back until it snaps into place.
pull
F D K
4) The LCD will display “Set” for about 1 second.
*5) Reset the date,time,and units.
6
2.2 Setting the Year, Date, Time, and
Temperature Units
*
Steps to set the Year, Date, Time, and
Temperature Units :
1) Press the “S” button(setting
button)≧3 seconds.
2) You will hear a beep, and the
meter will power on. The LCD
display shows date, time,
temperature unit, unit ,
on
thermometer symbol
the screen.
3) Press the “S” button(setting
button)years flashes on the
screen.
4) Press the “>” button(Right
arrow button)or the “<”
button(Left arrow button)
until the correct year is displayed.
5) Press the “S” button again, the
month flashes on the LCD screen.
6) Press the“>” button or “<”
button until the correct month is
displayed.
7) Press the “S” button. The day
flashes.
8) Press the “>” button or “<”
button until the correct day is
displayed.
9) Press the “S” button. The hour flashes.
7
1)
Mem
Del
C
M
L
SS
reTM
2)
3)
M
L
SS
M
10) Press the“>” button or “<”
button until the correct hour
is displayed.
11) Press the “S” button. The minutes
flash.
M
12) Press the“>” button or “<”
S
button until the correct minutes
Medi+Sure
are displayed.
13) Press the “S” button. The
unit “mmol/L” is displayed.
14) Press the “S” button. The
temperature unit (˚C) is displayed.
(Both mmol/L and ˚C are default units.)
15) Press the “S” button. The meter beeps and
shut off. All settings will be saved.
4)
L
TM
To quickly adjust a certain number, keep
pressing the “>” or “<”button until the one
you want appears.
At any steps if you want to shut the meter off,
press the “S” button for about 3 seconds and all
setting still can be automatically saved.
8
2.3 Alarm setting
*
Steps to set the alarms :
1) Press the “<” button(Left arrow
button)≧3 seconds on the front of
the meter.
2) You will hear a beep, and the meter
M
will power on. The LCD display shows
S
AL 1 (Alarm 1), time on the screen.
Medi+Sure
3) Press the “S” button(setting button)
to activate the alarm and alarm
symbol( )flashes on the screen.
You can set the alarm On or OFF by
pressing the “>” or “<” button.
4) Press the “S” button again, the hour
flashes on the LCD screen.
5) Press the“>” button or “<” button
until the correct hour is displayed.
6) Press the “S” button. The minute
flashes.
7) Press the “>” button or “<” button
until the correct minutes is displayed.
8) Press the “S” button, the meter beeps.
The LCD display shows “ok”. The AL 1
(Alarm 1) be setting finish.
9) Pressing the “S” button.You can set AL 2~4.
10) Press the “S” button ≧3 seconds, the meter
beeps. After “SAVE" display on the screen,
the meter shut off. All settings will be saved.
L
TM
9
2)
To quickly adjust a certain number, keep
pressing the “>” or “<”button until the one you
want appears.
At any steps if you want to shut the meter off,
press the “S” button for about 3 seconds and all
setting still can be automatically saved.
* Alarm :
1) The alarm duration is 30 seconds.
2) You can press any button and the alarm will stop.
3) Alarm will activate only under sleep mode;alarm
will not function while the meter is in use.
2.4 Testing Control Samples
* Steps to Test control sample :
1) Prepare the test strip and Glucose Control Solutions.
2) To Start,press the “M” buttton (main button) the
meter will power on.
3) Insert an Medi+Sure strip to the
3)
strip slot.
4) Press the “>” button.“L1”
refers to Level 1). You can
select L1, L2 or blood by pressing
M
the “>” or “<” button.
TM
L
S
Medi+Sure
R
B e s g e nA P - 1 0 0 0
TM
10
5) When the control bottle symbol
flashes on the meter, it means that
you can start testing. You have 3
minutes to apply the control solution.
If you do not apply the control solution
within 3 minutes, the meter will turn off
automatically.
6) Use a clean, wet tissue to wipe the
cap top of the closed test strip vial.
Dry thoroughly.
4)
C
M
L
S
Medi+Sure
TM
7) Gently squeeze a drop onto the strip vial cap top.
8) Let the applied point of the test strip touch the control
solution drop.
9) Allow the solution to be automatically drawn into the
reaction zone until it is completely filled.
10) After 6 seconds, the result will be shown on the screen.
11) Compare the control test result with the range printed
on the label of the test strip vial.
In the control mode (L1 or L2), the test result will not
store in the meter's memory.
For detailed information please refer to the Glucose
Control Solution instructions.
2.5 Blood Sampling
* Fingertip Blood Sampling :
For detailed information of lancing device, please
refer to the Lancing device instructions.
11
1) Wash your hands with soap and warm
water and dry them thoroughly. Remove
the lancing devices cover.
2) Place a new lancet securely into the
lancet carrier.
3) Remove the protective cap from the
lancet. Do not discard this cap.
4) Place the cover back onto the lancing
device.
5) Choose the desired depth of
penetration to get a good blood sample
with the least amount of discomfort.
Adjust the depth setting by turning the
cover on the lancing device.
Settings: 1 or 2 - for delicate skin.
3 or 4 - for normal skin.
5 or 6 - for thick or callused skin.
6) Hold the lancing device in one hand.
Pull the sliding barrel forward with your
other hand until an audible click is heard.
The lancing device is now loaded and
ready to use. The device may be
returned to the original position by
releasing the sliding barrel.
7) To obtain a better sample of blood,
lower the hand from which a sample is
to be obtained and shake it a few times.
Rub from the palm upward to the fingers
with your other hand.
8) Place the end of the lancing device against the finger
from which the blood sample is to be obtained. Push
the trigger button to puncture the skin. Set the lancing
(1)
(2)
(3)
(4)
(5)
(6)
(8)
(9)
(10)
12
device aside and proceed with your blood glucose
test according to blood glucose monitor’s directions.
9) Remove the adjustable comfort tip after the
penetration has been made. Put the protective
cover back onto the lancet in order not to expose
the needle tip.
10) Push forward the ejector, and dispose off the
lancet in an approved container. Revert the
ejector back; depress the trigger, so the lancing
device will turn back to its original state.Put back
on the adjustable comfort tip.
The blood-borne pathogen (e.g. HBV, HCV, or HIV)
may be transmitted if there is shared using of a
medical device. The lancing device is intended to be
used by a single person and should not be shared.
You should wash hands thoroughly with soap and
water after handling the meter, lancing device, or
test strips.
Please refer to the section of “ How to Clean and
Disinfect Your Device“ for more detailed information
on Cleaning and Disinfection.
2.6 Testing Your Blood Glucose
* Steps to Test your Blood Glucose :
1) Take one test strip out of the test strip
vial. Replace the vial cap immediately
and close it tightly.
1)
ure
i+S
ed
M
TM
2) Insert this test strip (with the black bars facing up)
into the test strip slot of the meter. The meter turns
on automatically.
13
3)
3) Or you can press the “M” button to turn
on the meter, and a test strip symbol will
instruct you to insert a test strip. Please
insert test strip within 1 minute, then the
meter will display the code number.
4) When the blood drop symbol flashes on
4)
the meter, it means that you can start
testing. You have 3 minutes to apply the
blood sample. If you do not apply the
sample within 3 minutes, the meter will
turn off automatically.
5) Place the lancing device against your fingertip and
press the trigger.
6) Pick up the meter and use the most comfortable
way to touch the blood drop to the edge of the
application point of the test strip. The blood will be
drawn into the test strip automatically. You will
hear a beep letting you know the test has begun.
Medi+Sure TM
M
L
S
Medi+Sure
TM
Sampling Window
Correct Blood Application
Not Enough Blood (< 0.6 µL)
Look at the sampling window on the test strip.
If you have enough blood on the strip, you will
not see any white. The sampling window will be
completely filled with blood.
If it doesn’t have enough blood, it will look
like the one on the right above.
14
7) When you hear a beep, the meter starts to count
down from 6 seconds. After countdown, the test
result is displayed with date and time and stored
in the meter's memory automatically.
If the test result is higher then 13.3 mmol/L
include 13.3 mmol/L ,exclamation point
)
will be showed on the screen.
8) Record the result in your Log Book.
9) Remove the test strip from the meter. Discard the used
test strip and lancet in a puncture-proof container.
• When result either falls in a hypoglycemic range
(<2.8 mmol/L), or in hyperglycemic range
(>13.9 mmol/L) contact your healthcare provider for
assistance.
CAUTION:
If you get a high or low reading and you do not feel ill ;
• Repeat your measurement.
• Make sure your readings are in mg/dL.
• Test your meter with control solution.
If you still get a high or low reading, contact your
health care professional.
The meter should be wiped with suitable
disinfectant by following the section of “How to
Clean and Disinfect Your Device” in User’s
Guide after using or before using in next patient.
15
2.7 How to Clean and Disinfect Your Device
STEP1: CLEAN BEFORE DISINFECTING
1.Dispense CaviWipes towelette.
2.Clean surface of your device including meter and lacing device
(not shown) with towelette to remove debris and bioburden.
3.Discard used towelette.
STEP2: DISINFECT AFTER CLEANING
1.Dispense CaviWipes towelette.
2.Disinfect precleaned surface with towelette for 2 minutes.
3.Discard used towelette.
1.The meter or lancing device should be cleaned
whenever it is visibly dirty. It should be disinfected periodically,
such as once per week.
2.The number of cleaning and disinfectant for meter and
lacing device is up to 18250 cycles that was validated for use
with the device over the life of the device. The recommended
frequency of disinfection for a single patient use device is once
per week equals two wipes per week, one for pre-cleaning and
one for disinfection.
3.Our testing was evaluated at least 5 years use life for
meter and lancing device.
4. If the meter is being operated by a second person
who is providing testing assistance to the user, the meter and
lancing device should be decontaminated prior to use by the
seconduser.
5.You should wash hands thoroughly with soap and
water after handling the meter, lancing device, or test strips.
16
*Why is the disinfection of this device required?
The FDA in the USA has issued a new regulation regarding
public health notifications highlighting the risk of
transmission of disease from shared use of fingerstick
(lancing) devices and the point of care blood testing
device (blood glucose meter). An important step in the
new regulations is to prevent a blood-borne pathogen
(e.g. HBV) transmitted if there is shared using of medical
device (e.g. Blood Glucose Meter and Lancing
Device).Hepatitis B virus (HBV) is a small-enveloped
DNA virus and a member of the family Hepadnaviridae.
The viral envelope surrounding the partially
double-stranded DNA genome consists of multiple copies
of the viral surface transmembrane proteins inserted into
a liquid bilayer derived from the host cell. Due to the
envelope of virus, it is very difficult to kill if using 70 %
ethanol only. The use of 10 % bleach solutions is effective
against the virus, but may lead to physical degradation
of our meter.Clinical studies show that with the correct
contact time, the glucometer and the lancing device
can effectively be disinfected against HBV.
What parts of the medical devices will require
*cleaning and disinfection ?
Whole Case
Housing
Display Cover
Button
Cap
17
* Information of CaviWipe disinfectant
CaviWipes Disinfecting Towelettes were purchased from METREX
RESEARCH CORP, and the EPA Reg. is 46781-8. CaviWipes are
non-woven disposable towelette pre-saturated with CaviCide,
and are intended for use in health care settings such as hospital,
dental offices, laboratories, clinics, ophthalmic offices, veterinary
facilities and in kitchens and bathrooms. CaviWipes are effective
against the Hepatitis B Virus (HBV), Hepatitis C Virus (HCV) and
Human Immunodeficiency Virus (HIV-1). The time to kill above
viruses is 2 minutes.
Diisobutyl-phenoxy-enthoxyethyl dimethyl benzyl
ammonium chloride is as the active ingredient for using in
CaviWipes Disinfecting Towelettes. It has been shown to be safe
for the use the Medi+Sure Blood Glucose Meter.
TM
Manufacturer: METREX RESEARCH CORPORATION.
Address: 28210 Wick Road Romulus, MI 48174
Tel:1-(800) 841-1428 Website: www.metrex.com
1.You can call the service line or go to the website of
METREX for purchase information.
2.If you still have question on the section of “ How to Clean
and Disinfect Your Device”, please contact our telephone
number 1-855-634-7873 for technical assistance.
18
2.8 Reviewing Results in Memory
* Steps to Recall Your Test Results in Memary :
The Medi+Sure Blood Glucose Meter automatically
stores up to 960 test results with respective dates
and time. You can review them in order, from the
newest to the oldest. Once 960 results are in
memory, the meter automatically deletes the
oldest result when a new one is added. Results
stored in memory will not be lost when you
replace the battery.
TM
1) Press the “M” button(main button)to turn on
the meter.
2) When the test strip symbol flashes, press the “M”
button again. 7 days average result will be shown
on the screen in 1 minute.
3) Press the “>” button , 14 days average result
will be shown on the screen for 1 minute.
4) Press the “>” button again, 21 days average result
will be shown on the screen for 1 minute.
5) Press the “>” button again, 28 days average result
will be shown on the screen in 1 minute.
At any steps if you want to shut the meter off,
press the “S” button.
19
6) At 7 days average result, press the “M” button
again, you can read test results in memory, the
latest test result will be shown for one minute.
Press the “>” or “<” button to review your test
result history.
To read sequence of test results in memory,
continue to press the ”>”or “<” button.
To quickly recall a certain test result, keep
holding the”>”or “<” button until the one you
want appears.
7) If you want to delete any memory from 960
memories, you can press the “S” button≧3 seconds.
You will see ”Del” flashing on the screen. Then you
can press the “S” button again. This memory will be
deleted and go to the next one automatically.
When you delete the individual memory, the
“SEt” flashes on the screen, your memories are
rebuilded.The duration is various.
8) When you see the oldest reading, The LCD display
shows “Mem Del ALL?” on the screen for 1 minute.
9) If you want to delete all the memories in the meter,
press the “S” button≧3 seconds. “----” message will
be shown on the screen which means the
memories in the meter were all deleted.
10) If you don’t want to clear anything, press the
“S” button, the meter turns off.
20
If you do not press the “M” button within
1 minute, the meter will turn off automatically.
At any steps of memory mode if you want
to shut the meter off, press the “S” button the
meter will turn off and all setting still can be
automatically saved.
11) Results from tests with control solution are not
used in calculation of Average.
Mem
Mem
Mem
mmol/L
mmol/L
mmol/L
21days
Mem
Mem
Mem
Del
mmol/L
28days
Mem
Del
ALL
If you want to turn off the meter while you are
in the memory and average, you can press the
“S” button. the exception occurred when the
meter is counting down.
21
Reset the date is a must after every single
replacement of battery; otherwise, the average
function is not going to be valid for tracing the
memory data. Once resetting is completed,”SEt”
will display on the screen, and the meter is going
to generate and reload the memories
automatically. It is going to take a minute for
completing, and the duration is various.
2.9 Viewing Date, Time or Temperature
1) Press the “<” button(Left arrow button)date,
time and clock symbol(
) will be shown on
the screen for 3 seconds and the meter will turn off
automatically.
If you had set the alarm, alarm symbol(
can be shown on the screen.
)
2) Press the “>” button(Right arrow button)
temperature, temperature unit and thermometer
symbol(
) will be shown on the screen for
3 seconds and the meter will turn off automatically.
22
Section 3. Important Notes
3.1 Caring for Your Meter
Taking care of your meter is very simple. Just
follow the guidelines shown below:
1) Do not disassemble your meter. If you have any
questions, please contact your local authorized
distributor of Medi+Sure Blood Glucose Monitoring
System.
2) Please use your meter carefully. Avoid throwing,
shaking, or dropping it, which may damage its
internal parts.
3) Clean the meter’s surface with a soft tissue slightly
dampened with water. Do not use alcohol or
abrasive solutions.
4) Do not wash or pour liquid on the meter.
TM
3.2 Handling & Storage
1) Handle your meter with care and protect it from
direct sunlight or extremely high or low temperature.
2) Do not expose your meter and test strips to an
environment of high humidity, such as in bathrooms,
kitchens, etc.
3) Keep your meter free of dust.
4) It is recommended that you use the carrying case
that is designed to store and protect your
Medi+Sure Blood Glucose Monitoring System.
TM
5) Put your system in an appropriate operating
environment at least 30 minutes before testing.
23
3.3 Explanation of Displays
• All-symbol Message :
When you press the “M” button or insert
a test strip into the meter, all symbols will
be displayed together for 2 seconds.
Then the meter turns on automatically.
Mem
Del
C
• New Meter and Test Strip Insertion Message :
The meter will instruct you to insert
a test strip into the test strip slot by flashing strip
symbol on the display.
• No Memory In The Meter Message :
If there is no memory in the meter, you
press ”M” button two times and the meter
shows “----” .
24
• Sample Application Message :
This requires you to apply the blood sample or
control solution to the test strip after inserting a
test strip.
C
C
Apply
Blood sample
Apply
Control solution L1
Apply
Control solution L2
• Test Result Message :
The meter shows results ranging from 1.1 to 41.7 mmol/L
with respective dates and times.
• HI Message
If the test result is higher than 41.7 mmol / L
the “HI” message is displayed.
• Lo Message
If the test result is lower than 1.1 mmol / L
the “Lo” message is displayed.
25
• Units of Test Result :
You can select mmol/L in setting mode.
The units will be displayed along with the
test result.
Mem
Mem
3.4 Error Messages & Troubleshooting
When you operate the meter incorrectly, error
messages are displayed. Each message is defined
below.
E-U
Cause:
(1) Test strip was removed during testing;
(2) A damp or used test strip was used;
(3) The blood sample was applied before
inserting the test strip;
(4) The blood sample or control solution
was applied without the blood drop or
control bottle symbol flashed.
Action:
(1) Do not remove the test strip before the result is
displayed;
(2) Repeat the test with a new test strip;
(3) Insert the test strip into the meter first and then
apply the blood sample.
(4) Apply the blood sample or control solution after
the blood drop or control bottle symbol flashes.
26
E-O, E-OO, E-tF, E-S
Cause:
Damaged meter.
Action:
Contact your local authorized distributor of
Medi+Sure Blood Glucose Monitoring System.
TM
E-t
Cause:
The system is operated outside the
appropriate temperature range
(50°~104°F or 10°~40°C).
Action:
Move your meter and test strips to a place where
the temperature is appropriate for running a test.
Wait at least 30 minutes and test again.
E-b
Cause:
The battery is low.
Action:
Replace the battery soon.
27
3.5 Expected Values
1
Expected blood glucose levels for people without diabetes:
Time
Range (mmol/L)
fasting
3.9-6.1
Two hours after meals
less than 7.8
1
American Diabetes Association Clinical Practice
Recommendations 2004, Diabetes Care, Vol. 27,
Supplement 1, p.S9.
3.6 Meter Warranty
MediSure Diabetes Care Canada Inc.warrants, to
the original purchasers of the Medi+Sure Blood
Glucose Meter, that your meter shall be free of
defects in materials and workmanships under a life
time warranty from the date of purchase. If the
meter does not work properly because of defects in
materials or workmanships, MediSure Diabetes
Care Canada Inc.will replace it with an equivalent
product or repair it at no cost to the purchaser.
This warranty does not apply to the battery
supplied with the meter or to a meter that has
been modified, altered, abused, or misused in any
way. MediSure Diabetes Care Canada Inc. shall not
be responsible for any incidental or consequential
damages. NO OTHER WARRANTIES, EXPRESS, OR
IMPLIED ARE MADE.
Please contact your local authorized distributor for
assistance if you have any question about the
warranty service.
TM
28
Note :
If you pick up this book, please contact above.