1
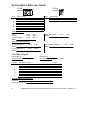
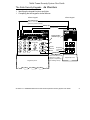
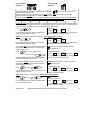
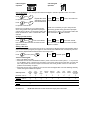
MONITOR ISM™ / AFx™ Multi-Tenant Security System User Guide V1.3 Multi-Tenant Security System User Guide Welcome New Users! There are two types of suite security keypads. Follow the instructions in the proceeding columns under the picture of the keypad that you have. But first… Be sure to ask your Security Representative – • What your temporary PIN (Personal Identification Number) is to operate your keypad and the system? Each suite is set up with a single Master User # 1 PIN like 1-2-3-4 to get you started and be able to access all the features. Later, you will read in this guide how to change it yourself to a personal one. • If you will need to use your PIN all the time? “Quick Arm” This feature allows you to enter certain commands at a keypad like turning the system ON and not always have to enter your PIN too. “Secure Arm” The system has been set up so that you will need to enter your PIN for any function / command. • How long you have to go out or come in? When you turn protection on normally, you will have a delay to go out the front door without causing an alarm and your keypad will beep while you are leaving. The same for when you open the door to come in again and turn the protection off. Find out how long these delays are to leave or come in before they end and you cause a false alarm. ? Contents System Quick Reference Guide.................................................................................................................. 2 The Suite Security Keypads, An Overview.................................................................................................. 3 Operation .................................................................................................................................................... 4 To do a “SEND HELP” Alert (to Building Security) ................................................................................. 4 If an error is made when making key presses at a keypad..................................................................... 4 Turning system OFF or Silencing an ALARM condition (keypad tones continuously)............................ 4 Turning ON (leaving).............................................................................................................................. 4 Turning to STAY remain inside the protected area ................................................................................ 5 Turning the System On Remotely ......................................................................................................... 6 Verify User (If you think you have caused a false alarm) ....................................................................... 6 Bypass a Sensor Zone........................................................................................................................... 6 Chime (Keypad warning tone that entry door has been opened.) .......................................................... 6 System Test (All keypad lights, sounder turn on for 5 seconds.)............................................................ 6 Walk Test (Protection points can be tested with this command) ............................................................ 6 Special Command (Activate a special function.) .................................................................................... 7 Change your PIN number....................................................................................................................... 7 Adding a New User ................................................................................................................................ 7 Erasing an Existing User ........................................................................................................................ 8 Additional Commands for the 8 Zone Keypad Only .................................................................................... 9 Identifying a user’s ID number................................................................................................................ 9 Grant Lobby Access ............................................................................................................................... 9 8 and 2 Zone Keypad Light Descriptions .................................................................................................... 9 8 and 2 Zone Keypad Tone Descriptions.................................................................................................. 10 ∗ 8 and 2 zone Suite Security modules are not intended for Life/Safety applications. MONITOR ISM™ and MONITOR AFx™ are trademarks of CSG Security Inc. / Sécurité CSG Inc. © Copyright 2004 CSG Security Inc. / Sécurité CSG Inc. All rights reserved. 22-9050 V1.3 (4.2004) MONITOR ISM™/AFx™ Multi-Tenant Security System User Guide 1 System Quick Reference Guide 8 Zone Keypad 1 2 3 4 5 6 7 2 Zone Keypad 8 S T 1 2 3 4 5 6 X 7 ! 8 9 f 0 Zone 1 2 3 4 5 6 7 8 Sensor Name Zone 1 2 Sensor Name Send Help Buttons Yes Yes Yes FIRE POLICE SPECIAL ALERT NAME No No No SPECIFIC ALERT NAME Yes No Special Command Button(s) Command Button # 1 Yes No NAME Command Button # 2 Yes No Special Command Button Yes No NAME NAME For Either Keypad Entry delay time Quick Arm Feature User ID 1 2 3 4 5 6 7 8 Exit delay time Yes No Secure Arm Feature (Always use PIN) Assigned to (name) Yes No PIN # (Master User) Security Department Information System ID Security Dept. Phone # 2 MONITOR ISM™/AFx™ Multi-Tenant Apartment Security System User Guide 22-9050 v1.3 Multi-Tenant Security System User Guide An Overview The Suite Security Keypads 9 Identifying the keypad’s buttons and lights. 9 Comparing the two keypad’s similar features. 8 Zone Keypad 2 Zone Keypad Area Armed Light System in STAY when on steady System Fully ON when flashing Ready Light Sensor Zones Fire Alarm Light Ì 1 STAY 2 3 4 5 6 7 Arming Buttons STAY no Entry Delay X 3 4 5 6 8 9 f Ê 7! Ê Escape Key 2 0 1 2 System Trouble Indicator Light Fully ON S T 1 8 ON THIS KEYPAD ONLY Function Key FIRE POLICE Escape Key SPECIAL ALERT Command Key 1 2 3 4 5 6 7 8 9 0 # Send Help Alert Buttons Keypad Flip Cover Press both buttons at the same time, on either keypad, to request help from building security. Keypad Flip Cover 22-9050 v1.3 MONITOR ISM™/AFx™ Multi-Tenant Apartment Security System User Guide 3 8 Zone Keypad Operation 1 2 3 4 5 6 7 2 Zone Keypad Operation 8 S 1 2 3T 4 5 6 X 7 ! 8 9 f 0 ! To do a “SEND HELP” Alert (to Building Security) Press both buttons at the same time on either side of the keypad symbols. Example: Press the and specific alert: # keys at the same time for a # for fire dept. for police Check with your Security Representative to find out the details of your specific alert. for special alert If an error is made when making key presses at a keypad X Press (escape) and start over. Press # (escape) and start over. Turning system OFF or Silencing an ALARM condition (keypad tones continuously). Enter your PIN # by pressing the respective number Enter your PIN # by pressing the respective keys. Enter PIN # only. number keys. Enter PIN # only. S Example: Example: 1 2 3T 1 2 3 1-2-3-4 1-2-3-4 4 4 Turning ON (leaving) with entry/exit delay tone. The Green light under the check mark on either of the two keypads has to be on. It means that all your sensor zones are secure. If one or more of your keypad red sensor zone lights are on, find out why and secure what is connected to them. Example: if light 1 is on, close the front door before arming to ON 1 2 3 4 5 6 7 8 The 8 Zone Keypad has 8 sensor zone lights. Press this button for Quick Arm to ON: on the keypad. Or, if programmed, Secure Arm, pressing this button and then entering your PIN. When the keypad starts beeping, leave by the front door. 4 The 2 Zone has 2 sensor zone lights. 1 2 Press these buttons for Quick Arm to ON: (Command Key) and then press 3 Or, if programmed, Secure Arm: press then 3 then entering your PIN on the keypad. When the keypad starts beeping, leave by the front door. MONITOR ISM™/AFx™ Multi-Tenant Apartment Security System User Guide 22-9050 v1.3 8 Zone Keypad Operation 1 2 3 4 5 6 7 8 2 Zone Keypad Operation S 1 2 3T 4 5 6 X 7 ! 8 9 f 0 When the system is Fully ON, the light under the key symbol on the keypad will flash. No protection point lights will be lit. When the system is in STAY, because you are STAYing inside, only the doors and windows are protected. The key symbol light is on steady and will not flash. When the system is in the STAY mode, motion detectors will detect movement and cause their keypad sensor zone light to come on but an alarm will not be generated. Motion detectors are only on when the system is Fully ON and you have left the protected area. Turning to STAY with entry/exit delay tone. A user setting the system to this level can exit while another user can remain inside the protected area. An entry delay occurs so a user can come in and turn off while a user who has been remaining inside is alerted of an entry being made. Quick Arm Press Press then 1 Or, if programmed, Secure Arm by pressing this Or, if programmed, Secure Arm by pressing these button and then entering your PIN. buttons and then entering your PIN. STAY with audible exit delay. No entry delay – instant Alarm if door opened. Quick Arm: Press Press then 2 Or, if programmed, Secure Arm by pressing this Or, if programmed, Secure Arm by pressing these button and then entering your PIN. buttons and then entering your PIN. Turn system ON with silent exit delay. Entry delay begins silent except for its last 15 seconds when warning tones turn on. Press (the “f - key” Function Key) and then press Or, if programmed, Secure Arm by pressing these buttons and then entering your PIN. Put system in STAY with silent exit delay. Entry delay begins silent except for its last 15 seconds when warning tones turn on. Press and then Or, if programmed, Secure Arm by pressing these buttons and then your PIN. ON with silent exit delay. Audible entry delay. is pressed twice. Example: Quick Arm: Press then again, then 3 Or, if programmed, Secure Arm by pressing these buttons and then entering your PIN. STAY with silent exit delay. Audible entry delay. is pressed twice. Example: Quick Arm: Press then again, then 1 Or, if programmed, Secure Arm by pressing these buttons and then your PIN. STAY, silent exit delay. No entry delay – instant Alarm if door opened. Press and then Or, if programmed, Secure Arm by pressing these buttons and then your PIN. 22-9050 v1.3 is pressed twice. Example: Quick Arm: Press then again, then 2 Or, if programmed, Secure Arm by pressing these buttons and then your PIN. MONITOR ISM™/AFx™ Multi-Tenant Security System User Guide 5 8 Zone Keypad Operation 1 2 3 4 5 6 7 2 Zone Keypad Operation 8 S 1 2 3T 4 5 6 X 7 ! 8 9 f 0 Turning the System On Remotely If you left and forgot to turn the system on, it can be remotely armed by the building security dept. Contact the guard, identify your suite and ask the guard to turn the system on. Verify User If you think you have caused a false alarm (keypad tones continuously) you can notify the Security Dept. that YOU are on the premises before contacting them by phone. If armed, turn system off with PIN #. If armed, turn system off with PIN #. Then, send Verify Code: Then, send Verify Code: Press 4 then and your PIN again. Press then 4 and your PIN again. Bypass a Sensor Zone NOTE: An entry/exit sensor zone, example: main entrance door cannot be bypassed. Press then then the Press Sensor Zone number 1 – 8 and your PIN. Only one point can be bypassed at a time. Repeat the same sequence to remove the zone’s bypass. A Master or Resident authority level User turning the system OFF will automatically remove a bypass. then 8 then the Sensor Zone number 1 or 2 and your PIN. Only one point can be bypassed at a time. Repeat the same sequence to remove the zone’s bypass. A Master or Resident authority level User turning the system OFF will automatically remove a bypass. Chime Keypad warning tone that entry door has been opened. Press 5 turns chime on. then Press then 6 once to turn feature on. Press 6 turns chime off. then Repeat to turn off. System Test All keypad lights, sounder turn on for 5 seconds. Press then Press X 7! then PIN. Press PIN. to stop sooner. 7 Press then then 2 then # to stop sooner. Walk Test Protection points can be tested with this command. After entering the command at the keypad, trip the protection points. Example: open front door and close it, the light marked 1 turns on solid. This means protection point # 1 is working OK. Do the same to test the next point, example: light marked # 2 is a motion detector. Trip it and let it reset. Light # 2 turns on solid, etc. Press then 8 then PIN. Test will last 5 minutes or press 6 X Press to stop. then 7 then PIN. Test will last 5 minutes or press MONITOR ISM™/AFx™ Multi-Tenant Security System User Guide 1 then # to stop. 22-9050 v1.3 8 Zone Keypad Operation 1 2 3 4 5 6 7 2 Zone Keypad Operation 8 S 1 2 3T 4 5 6 X 7 ! 8 9 f 0 Special Command If you had a special command arranged to activate a special function. Check with your Security Dept. Press then 1 Repeat the same sequence to turn the command off. for Special Command #1 Press then 2 Press then 5 once to turn feature on. Repeat to turn off. for Special Command #2 NOTE: If it is necessary for you to add your PIN when doing system arming procedures (example: system ON or in STAY), you will need to add it with these commands too. F and 1 and PIN or F and 2 and PIN. NOTE: If it is necessary for you to add your PIN when doing system arming procedures (example: system ON or in STAY), you will need to add it with this command too. and 5 and PIN. Change your PIN number Press then then enter old PIN, Press then enter new PIN and enter the same new PIN again to confirm it. then 0 then enter old PIN, then enter new PIN and enter the same new PIN again to confirm it. Adding a New User Groups of users 2-8 for each suite must be set as “unassigned” by Building Security Administration before user’s can be added (assigned) at a keypad. A new suite will have a Master User # 1 temporary PIN. Ask your Security Representative what the PIN is and change it later. Press and then press 9 Press and then press 9 Then for either keypad: • Enter your Master user PIN. • Now enter the new user’s identification number. (There can be 8 users in the system, 1 – 8. If you know you are Master user # 1 then that user ID position is not vacant. Press the next user ID # “2” for the new user. That position will now be occupied. The next new user would get ID # 3 and so on until all 8 ID positions are eventually occupied.) • Now enter the new user’s Authority #. The new user can be assigned with one of the following Authority Levels, limiting their abilities as required: Authority Levels MASTER enter “2” Resident enter “3” Guest enter “4” Cleaner enter “5” 22-9050 v1.3 Turn System ON Turn System OFF Turn to STAY Bypass Zones Remove Bypass Test System Edit Users Reset Alarms Special Command On / Off √ √ √ √ √ √ √ √ √ √ √ √ √ √ √ √ √ √ √ √ √ MONITOR ISM™/AFx™ Multi-Tenant Security System User Guide 7 8 Zone Keypad Operation 1 2 3 4 5 6 7 8 2 Zone Keypad Operation S 1 2 3T 4 5 6 X 7 ! 8 9 f 0 Adding a New User continued • Now enter the new user’s PIN # A Master User can not change their Authority Level • Enter the new user’s PIN # again to confirm it. The new user should now be programmed. Test the PIN by turning the system ON and use the new PIN to turn it off. ∗ To Review: Press F and 9 and Master PIN and userID (#2-8) and Authority # Level and new user’s PIN and new user’s PIN again to confirm. To Review: Press and 9 and Master PIN and userID (#2-8) and Authority # Level and new user’s PIN and new user’s PIN again to confirm. Erasing an Existing User • Follow the same procedures as adding a new user but instead of ordinarily entering a new PIN #, enter “0000” (4 zeros) twice, instead. • This will erase the old user and they will not be able to use the system with their old PIN #. • This will remove the user from the group of 8 users for the system and that user ID# will now be vacant and available for a new user. To Review: Press F and 9 and Master PIN and userID (#2-8) and Authority # Level and PIN# 0000 and PIN# 0000 again to confirm. ∗ To Review: Press and 9 and Master PIN and userID (#2-8) and Authority # Level and PIN# 0000 and PIN# 0000 again to confirm. Test the old PIN to make sure it does not work anymore by turning the system ON and trying to use the old PIN to turn the system off. It should not work. Turn the system off with your master PIN. 8 MONITOR ISM™/AFx™ Multi-Tenant Security System User Guide 22-9050 v1.3 Multi-Tenant Security System User Guide 1 2 3 4 5 6 7 8 S 1 2 3T 4 5 6 X 7 ! 8 9 f Additional Commands for the 8 Zone Keypad Only 0 Identifying a user’s ID number After this command is entered, the user’s ID # (2-8, the master user usually being 1) will display on the 8 th sensor zone lights. Example, if user’s PIN entered belongs to the 5 user, sensor zone light # 5 will turn on. This feature identifies for the master user which user locations are vacant or can have their user PIN erased, in order to add new users. Press then 0 then a Master PIN, then the User’s PIN whose user number you want to check, 2 – 8. The Ready, Armed and Trouble lights will flash and the user’s # light is on steady. X The indication will last 10 seconds or press to reset the keypad back to normal operation. Grant Lobby Access If pre-arranged with Security Management, this command can send a signal to the building security main desk, concierge, to authorize a visitor’s entrance. Press then S 3T then a Master PIN. 8 and 2 Zone Keypad Light Descriptions Light Display Meanings Slow Flash Fast Flash − System hydro mains power failure − Communication problem with building main control equipment. − Possibly keypad base lose causing tamper alert. (8 Zone Keypad only) − With fast flashing Sensor Zone(s), either keypad. − Sensor zone wiring faulty. − Incorrect sensor zone programming. – Check with your Security Representative. − Sensor Zones okay. System ready to arm. − Sensor zone(s) insecure or system is ON. − Protection off. − Protection in STAY (remaining inside, no internal motion detectors on, only doors and windows protected). − Protection Fully ON − OK or protection ON. − Insecure or system in Walk Test. − Bypassed. − With Trouble light. Example: wiring fault. Trouble Triangle On On System Okay Armed Sensor Zones 1 – 8 (8 Zone Keypad) 1 and 2 (2 Zone) 1 2 22-9050 v1.3 On Off Off On Flashing Off On Slow Flash Fast Flash MONITOR ISM™/AFx™ Multi-Tenant Security System User Guide 9 Multi-Tenant Security System User Guide Keypad Lights continued Light Display Meanings • Armed and Trouble • Sensor Zone – combined – Flashing – On • Ready, Armed and Trouble • Sensor Zone(s) – combined – Flashing – On − Indicates the system had an alarm condition, when the system is turned off. − The sensor zone that had the alarm will indicate by being on. − Stops automatically or press X to stop on 8 Zone Keypad. press # to stop on 2 Zone Keypad. − Walk Test in progress. Protection point lights will turn on as their sensor is tripped and cleared (open, close door) to indicate their working OK. Press X to stop test on 8 Zone Keypad. Press # to stop test on 2 Zone Keypad. − Identifying a User’s ID # (8 Zone Keypad only). See Additional Commands above. On 8 Zone Keypad Only Fire − A fire-sensing device (smoke sensor) has been triggered. − The sensor zone light the sensor is connected to may also be on. − Enter your PIN at the keypad to stop the keypad alarm. − When the fire condition has been cleared, the keypad fire lights should reset automatically. 8 and 2 Zone Keypad Tone Descriptions Tone Type Sound Meanings Chime Two short beeps Alarm/Trouble warning Continuous tone Fire 8 and 2 Zone Keypads Tone turns on and off Entry/Exit “Entry/Exit delay is ending” warning Pulsing tone Tone pulses rapidly − A disarmed entry zone, like the front door, is being opened and the chime is on to warn about it. − When ever a warning condition is detected. − Enter PIN at either keypad to stop. − Fire detected. − NOTE: The 2 Zone keypad does not have an actual Fire Light but example: its sensor zone #2 could have a smoke sensor connected to it. This will cause the 2 Zone to act similarly to the 8 Zone keypad when a possible fire condition is sensed. − Follow instructions for the 8 Zone keypad fire light above. − When leaving or entering by the front door. − Last 15 seconds of normal entry or exit. 10 MONITOR ISM™/AFx™ Multi-Tenant Security System User Guide 22-9050 v1.3 Multi-Tenant Security System User Guide Keypad Tones continued Tone Type Sound Meanings Exit with a sensor zone bypassed Key Protest Key feedback Eight short beeps Fast short beeps Single fast beep Key Confirmation Single long beep Alarm notification when entering main entrance Alarm occurred during the last time the system was armed Exit With Trouble High speed pulsed tone Single short beeps − Warning that arming is occurring with a protection point or points bypassed. − Incorrect key presses at keypad. − Whenever a key is pressed. − No tone when emergency keys and # are pushed together on the 8 zone keypad. − Confirms that a command sequence was correctly entered at a keypad. − There was an alarm when the system was armed. − These beeps occur when the system is being turned off and there had been an alarm while it was armed. − Arming system while trouble condition exists. 22-9050 v1.3 Single high speed beeps MONITOR ISM™/AFx™ Multi-Tenant Security System User Guide 11 #