1
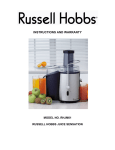
INSTRUCTIONS AND WARRANTY MODEL NO. 20360-56 DESIRE JUICE MAKER Congratulations on purchasing our Russell Hobbs Desire Juice Maker. Each unit is manufactured to ensure safety and reliability. Before using this appliance for the first time, please read the instruction manual carefully and keep it for future reference. FEATURES OF THE RUSSELL HOBBS DESIRE JUICE MAKER Centrifugal juice maker with 550W of power Extra wide 75mm feeding tube for whole fruits and vegetables Choice of 2 speeds for hard and soft fruits or vegetables 2L pulp container and 700ml juice jug Removable dishwasher safe parts for easy cleaning Safety locking arm – will not operate unless correctly secured IMPORTANT SAFEGUARDS When using any electrical appliance, basic safety precautions should always be followed including the following: 1. Please read the instructions carefully before using any appliance. 2. Always ensure that the voltage on the rating label corresponds to the mains voltage in your home. 3. Incorrect operation and improper use can damage the appliance and cause injury to the user. 4. The appliance is intended for household use only. Commercial use invalids the warranty and the supplier cannot be held responsible for injury or damage caused when using the appliance for any other purpose than that intended. 5. Avoid any contact with moving parts. 6. Do not use the juicer if the filter is damaged. 7. DO NOT operate the juicer without the pulp collector correctly fitted. 8. Only use the pusher supplied. 9. To switch the juicer off, wait for the motor to stop before switching the control to OFF (0) and then removing the plug from electrical outlet. 10. Before removing the lid, switch the unit off and wait for the filter to stop. 11. This appliance is not intended for use by persons (including children) with reduced physical, sensory or mental capabilities, or lack of experience and knowledge, unless they have been given supervision or instruction concerning use of the appliance by a person responsible for their safety. 12. Children should be supervised to ensure that they do not play with the appliance. 13. Check the power cord and plug regularly for any damage. If the cord or the plug is damaged, it must be replaced by the manufacturer or a qualified person in order to avoid an electrical hazard. 14. Do not use the appliance if it has been dropped or damaged in any way. In case of damage, take the unit in for examination and/or repair by an authorised service agent. 15. To reduce the risk of electric shock, do not immerse or expose the motor assembly, plug or the power cord to water or any other liquid. 16. Never immerse the full unit in water or any other liquid for cleaning purposes. 17. Remove the plug from the socket by gripping the plug. Do not pull on the cord to disconnect the appliance from the mains. Always unplug the unit when not in use, before cleaning or when adding or removing parts. 18. The use of accessory attachments that are not recommended or supplied by the manufacturer may result in injuries, fire or electric shock. 19. A short cord is provided to reduce the hazards resulting from becoming entangled in or tripping over a longer cord. 20. Do not let the cord hang over the edge of a table or counter. Ensure that the cord is not in a position where it can be pulled on inadvertently. 21. Do not allow the cord to touch hot surfaces and do not place on or near a hot gas or electric burner or in a heated oven. 22. Do not use the appliance on a gas or electric cooking top or over or near an open flame. 23. Use of an extension cord with this appliance is not recommended. However, if it is necessary to use an extension lead, ensure that the lead is suited to the power consumption of the appliance to avoid overheating of the extension cord, appliance or plug point. Do not place the extension cord in a position where it can be pulled on by children or animals or tripped over. 24. This appliance is not suitable for outdoor use. Do not use this appliance for anything other than its intended use. 25. DO NOT carry the appliance by the power cord. 26. Do not leave this appliance unattended during use. Always unplug the unit when not in use or before cleaning. 27. Always operate the appliance on a smooth, even, stable surface. Do not place the unit on a hot surface. 28. Ensure that the switch is in the “Off” position after each use. 29. The manufacturer does not accept responsibility for any damage or injury caused by improper or incorrect use, or for repairs carried out by unauthorised personnel. 30. In case of technical problems, switch off the machine and do not attempt to repair it yourself. Return the appliance to an authorised service facility for examination, adjustment or repair. Always insist on the use of original spare parts. Failure to comply with the above mentioned pre-cautions and instructions, could affect the safe operation of this machine. NOTE: Never put your fingers in the feeding tube. Unplug before unblocking the feed tube. PARTS DIAGRAM ① Pusher ② Extra-large feeding tube ③ lid ④ filter ⑤ filter holder ⑥ juice outlet ⑦ brush ⑧ speed control ⑨ power unit ⑩ juice jug ⑪ lid with foam separator ⑫ pulp collector ⑬ interlock latches ⑭ power cord BEFORE USING THE APPLIANCE FOR THE FIRST TIME Remove all protective packaging and clean all parts as recommended in the CLEANING AND MAINTENANCE section. OPERATING INSTRUCTIONS Preparing food 1. Wash the fruit and/or vegetables and cut them into pieces that fit into the feeding tube, if they are too large to fit into the feeding tube whole. The filter is very sharp. Wash with care. Never touch the filter with your finger. 2. Remove pips or stones from fruits and vegetables (e.g. plums, peaches, cherries etc.). 3. Remove tough skins from fruits and vegetables (e.g. melons, pineapples, cucumbers, potatoes etc.). Soft-skinned and other foods just need washing (e.g. apples, pears, carrots, radishes, lettuce, cabbage, parsley, spinach, grapes, strawberries, celery etc.) 4. Peel and remove the white pith from citrus fruits, otherwise the juice may taste bitter. Fig 1 fig2 Assembly and Use 5. Fit the filter holder ‘○ 5 ' and pulp collector 1 ○2. 6. Fit the filter ‘○ 4 ’ inside the filter holder and push down. Ensure that the filter is in the correct position. Always check the filter before use. If you detect any cracks or damage, do not use the appliance. 7. Fit the lid. Lock the lid by clipping the top of the latches (Fig.1) to the lid. Now, snap the bottom of the latches (Fig.2) into place. NOTE: Your juicer will not work if the lid is unlocked. Do not operate the juicer without the pulp collector fitted. 8. Put the juice jug under the juice outlet. The foam separator in the jug ensures that the juice is free from foam. 9. Press the On/Off speed switch to setting 1 (low speed) or 2 (high speed) to switch on the appliance (use speed 1 for softer food such as citrus fruits and strawberries). 10. Put the pre-cut pieces into the feeding tube and gently press them down towards the rotating filter with the pusher. Do not exert too much pressure on the pusher, as this could affect the quality of the end result and it could even cause the filter to come to a halt. Note: When juicing hard foods, we recommend a maximum quantity of 1.5Kg with a maximum operation time of 2 minutes. Some hard foods may make your juicer slow down or stop. If this happens switch the juicer off and unblock the filter. Note: Never insert your fingers or an object into the feeding tube. After you have processed all ingredients and the juice flow has stopped, switch off the appliance and wait until the filter has stopped rotating. 11. Clear the pulp collector regularly during use. Note that the juicer is factory lubricated and requires no further lubrication. To take your juicer apart Perform the assembly procedure in reverse in order to take the juicer apart. Hints and Tips If you need to store the juice for a few hours put it in the fridge. It will keep for longer if you add a few drops of lemon juice to it. It is recommended that you do not drink more than three 230ml glasses of juice a day unless your body is used to it. Dilute juice for children with an equal amount of water. Juice from dark green (broccoli, spinach, etc.) or dark red (beetroot, red cabbage, etc.) vegetables will be extremely strong. People with diabetes or low blood sugar should avoid drinking too much. Use fresh fruit and vegetables, as they contain more juice. Pineapples, beetroots, celery stalks, apples, cucumbers, carrots, spinach, melons, tomatoes, pomegranates, oranges and grapes are particularly suitable for processing in the juice extractor. When preparing apple juice, remember that the thickness of the apple juice depends on the kind of apple you are using. The juicier the apple, the thinner the juice. Choose a kind of apple that produces the type of juice you prefer. Apple juice turns brown very quickly. To slow down this process, add a few drops of lemon juice. Fruits that contain starch, such as bananas, papayas, avocados, figs and mangoes are not suitable for processing in the juice extractor. Use a food processor or blender to process these fruits. Leaves and leaf stalks of e.g. lettuce can also be processed in the juice extractor. Drink the juice immediately after you have extracted it. If it is exposed to air for some time, the juice will lose its taste and nutritional value. To extract the maximum amount of juice, always press the pusher down slowly. The juicer is not suitable for processing very hard and/or fibrous/starchy fruits or vegetables such as sugar cane. RECIPES Energy cocktail 2 cups carrot, trimmed 1/2 cup cucumber 12 spinach leaves 1 lime, peeled 1 cup celery, trimmed 1 apple 1 tomato 2 tablespoons honey Process all ingredients except the honey in the juicer. Add honey and mix well. Serve immediately, adding a few ice cubes as desired. Fruit potpourri 4 medium-sized apricots, seeded 2 cups cubed melon, peeled 1 large apple, stalk removed 1 orange, peeled Process the fruits in the juicer, mix well, add a few ice cubes and serve immediately. Temptation 6 apricots, seeded 2 cups melon, peeled 1/2 cup orange juice Process the fruits in the juicer. Mix the resulting extract well. Add 6 ice cubes. Serve immediately in medium-sized glasses garnished with strawberries or maraschino cherries and an orange slice. Pink cloud 1 cup strawberries 1 cored orange, peeled 1 cup cubed pear, stalk removed 1 small carrot, trimmed Process in the juicer. Mix thoroughly. Serve immediately. Add a few ice cubes. Miracle extract 1 cup pineapple cubes, peeled 1 cup cubed apple, stalk removed 2 small carrots, trimmed 1 orange, peeled 2 celery stalks, trimmed 1 lime, peeled Process the fruits in the juicer. Mix well. Add a few ice cubes. Serve immediately. Pineapple, peach & pear juice 1/2 pineapple, peeled and halved 2 peaches, halved and stoned 2 small ripe pears, stalks removed Process pineapple, peaches and pears in the juicer. Serve immediately. Surprise pineapple cake 3/4 cup pineapple extract 10 tablespoons butter 1 tablespoon powdered sugar 2 egg yolks 1 cup sweetened condensed milk 54 sponge fingers 1/4 cup water 1 cup sugar 1 can sliced pineapple. 6-10 maraschino cherries Use the juicer to obtain the pineapple extract. With a mixer, beat the butter until creamy. Slowly add the sugar, egg yolks and sweetened condensed milk. Continue beating until fluffy and then add the pineapple extract. Grease a spring mould lightly with butter and build the cake by covering the bottom and sides of the mould with sponge fingers slightly moistened with the canned pineapple syrup. Then add a layer of cream and another layer of sponge fingers and so on. Finish with a layer of cream. Cool the cake in refrigerator for three hours and then remove it from the mould. Make caramel by boiling sugar and water. Decorate the cake with pineapple slices, maraschino cherries and caramel threads. Using a spring mould will yield the best results. Carrot, apple & pineapple cake 200g carrot 200g pineapple 200g apple 1 cup coconut (grated) 3 cups flour 1 tablespoon baking soda 1 tablespoon cinnamon 1 cup sugar 1 cup honey 4 eggs 1 cup oil 1 packet vanilla sugar 1 cup chopped nuts Juice the carrot, pineapple and apple pieces. Use the pulp collected in the pulp container. Mix carrot, pineapple and apple pulp. Add honey, sugar, oil and vanilla sugar and blend well. Sift in the dry ingredients until just blended in. Stir in coconut and nuts. Pour into a greased baking tin. Bake at 160°C for approximately 45-55 minutes. This mixture also makes great muffins. Fill muffin tins 3/4 full and bake for 40 minutes. CLEANING AND MAINTENANCE This appliance is for household use only and is not user-serviceable. Do not open or change any parts by yourself. Please refer to a qualified electrical service department or return to the supplier if servicing is necessary. Always remember to unplug the unit from the electrical outlet when not in use and before cleaning. Ensure that the speed control is set to “0”. It is much easier to clean the accessories directly after they have been used. Wash them in warm, soapy water, rinse and dry well. If the filter is too tight to remove, wait a few minutes until it loosens up. The body of the appliance (motor unit) should be cleaned with a damp cloth. Do not let water enter the appliance. Clean the filter using the brush supplied. Check the filter regularly for signs of damage. Do not use the appliance if the filter is damaged. Flip the spout down fully in order to clean it properly. The spout cannot be detached from the appliance. Do not use bleach or other abrasive substance or solvents to clean your appliance as it can be damaging to the finish. Some foods, such as carrot, will discolour plastic components. Rubbing with a cloth dipped in vegetable oil helps to remove discolouring. Do not immerse the appliance in water or any other liquid, or hold it under a running tap to clean. To remove stubborn spots/marks, wipe the surfaces with a cloth slightly dampened in soapy water or mild non-abrasive cleaner. Rinse and dry a clean, dry, soft cloth. STORING THE APPLIANCE Unplug the unit from the wall outlet and clean all the parts as instructed above. Ensure that all parts are dry before storing. Store the appliance in its box or in a clean, dry place. Never store the appliance while it is still wet or dirty. Never wrap the power cord around the appliance. SERVICING THE APPLIANCE There are no user serviceable parts in this appliance. If the unit is not operating correctly, please check the following: You have followed the instructions correctly That the unit has been wired correctly and that the wall socket is switched on. That the mains power supply is ON. That the plug is firmly in the mains socket. If the appliance still does not work after checking the above: - Consult the retailer for possible repair or replacement. If the retailer fails to resolve the problem and you need to return the appliance, make sure that: The unit is packed carefully back into its original packaging. Proof of purchase is attached. A reason is provided for why it is being returned. If the supply cord is damaged, it must be replaced by the manufacturer or an authorised service agent, in order to avoid any hazard. If service becomes necessary within the warranty period, the appliance should be returned to an approved Home of Living Brands (Pty) Limited service centre. Servicing outside the warranty period is still available, but will, however, be chargeable. CHANGING THE PLUG Should the need arise to change the fitted plug, follow the instructions below. This unit is designed to operate on the stated current only. Connecting to other power sources may damage the appliance. Connect a three-pin plug as follows: The wires in this mains lead are coloured in accordance with the following code: Green/Yellow = Earth Blue = Neutral Brown = Live PLEASE AFFIX YOUR PROOF OF PURCHASE/RECEIPT HERE IN THE EVENT OF A CLAIM UNDER WARRANTY THIS RECEIPT MUST BE PRODUCED. WARRANTY 1. Home of Living Brands (Pty) Limited warrants to the original purchaser of this product (“the customer”) that this product will be free of defects in quality and workmanship which under normal personal, family or household use and purpose may manifest within a period of 1 (one) year from the date of purchase (“warranty period”). 2. Where the customer has purchased a product and it breaks, is defective or does not work properly for the intended purpose, the customer must notify the supplier from whom the customer bought the product (“the supplier”) thereof within the warranty period. Any claim in terms of this warranty must be supported by a proof of purchase. If proof of purchase is not available, then repair, and/or service charges may be payable by the customer to the supplier. 3. The faulty product must be taken to the supplier's service centre to exercise the warranty. 4. The supplier will refund, repair or exchange the product in terms of this warranty subject to legislative requirements. This warranty shall be valid only where the customer has not broken the product himself, or used the product for something that it is not supposed to be used for. The warranty does not include and will not be construed to cover products damaged as a result of disaster, misuse, tamper, abuse or any unauthorised modification or repair of the product. 5. This warranty will extend only to the product provided at the date of the purchase and not to any expendables attached or installed by the customer. 6. If the customer requests that the supplier repairs the product and the product breaks or fails to work properly within 3 (three) months of the repair and not as a result of misuse, tampering or modification by or on behalf of the customer, then the supplier may replace the product or pay a refund to the customer. 7. The customer may be responsible for certain costs where products returned are not in the original packaging, or if the packaging is damaged. This will be deducted from any refund paid to the customer. HOME OF LIVING BRANDS (PTY) LTD (JOHANNESBURG) JOHANNESBURG CAPE TOWN DURBAN TEL NO. (011) 490-9000 TEL NO. (021) 552-5161 TEL NO. (031) 792-6000 www.homeoflivingbrands.co.za www.russellhobbs.co.za www.facebook.com/RussellHobbsSA