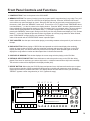
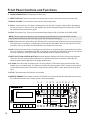
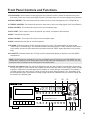
1
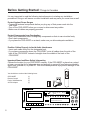
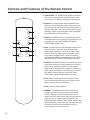
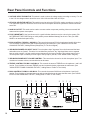
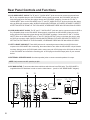
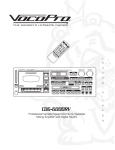
l
a
u
n
a
m
s
'
r
e
n
w
5
CDG-600RF DIGITAL KEY CONTROL CD/CD+G CASSETTE KARAOKE PLAYER
PLAYER 1
RECORDER
Open/Close
Disp
PLAY
REW
FFWD
ST/EJ
Repeat
Memory
0 0: 00
Previous
Next
B-scan
F-scan
Sensor
0
Music
level
-10 +10
Bass
Music
10
Stop
Pause
0
10
Mic 1 level
b
L
L
PLAY
+ 2
-10 +10
Treble
SHOCK RESISTANT PICK UP
POWER
REC
Remote
o
Digital key Display
Tape counter
Reset
0
10
Mic 2 level
#
DIGITAL KEY CONTROL
VOC/C
VOC/P CASSETTE
CDG
LD
DVD
AUX
Mic 1
Input
Remote
Key
Control
Mic 2
Input
CDG-600RF
250W Digital Key Control CD/CDG/Cassette Karaoke Mixing Amplifier
Congratulations! Thank you for purchasing the VocoPro CDG-600RF, with proper care and handling, this unit will continue to
provide you with years of entertainment and fun for friends and family. Please read this manual carefully before getting started.
CDG-600RF
250W Digital Key Control CD/CDG/Cassette Karaoke Mixing Amplifier
Contents
Cautions and Warnings . . . . . . . . . . . . . . . . . . . . . . . . . . . . . . . . . . . . . . . . . . . .
1-2
Welcome . . . . . . . . . . . . . . . . . . . . . . . . . . . . . . . . . . . . . . . . . . . . . . . . . . . . . . . .
3
Listening for a Lifetime . . . . . . . . . . . . . . . . . . . . . . . . . . . . . . . . . . . . . . . . . . . .
4
Before Getting Started . . . . . . . . . . . . . . . . . . . . . . . . . . . . . . . . . . . . . . . . . . . . .
5
Features and Specifications . . . . . . . . . . . . . . . . . . . . . . . . . . . . . . . . . . . . . . . .
6
Quick Start . . . . . . . . . . . . . . . . . . . . . . . . . . . . . . . . . . . . . . . . . . . . . . . . . . . . . .
7-8
Usign Effects and Change the Key . . . . . . . . . . . . . . . . . . . . . . . . . . . . . . . . . . .
9
Listening to Your Recording . . . . . . . . . . . . . . . . . . . . . . . . . . . . . . . . . . . . . . . .
10
Other Parts of the CDG-600RF . . . . . . . . . . . . . . . . . . . . . . . . . . . . . . . . . . . . . .
10
Connecting Other Components . . . . . . . . . . . . . . . . . . . . . . . . . . . . . . . . . . . . .
11
Controls and Functions of The Remote Control . . . . . . . . . . . . . . . . . . . . . . . . 12-13
Front Panel Controls and Functions . . . . . . . . . . . . . . . . . . . . . . . . . . . . . . . . . 14-18
Rear Panel Controls and Functions . . . . . . . . . . . . . . . . . . . . . . . . . . . . . . . . . 19-21
Troubleshooting Guide . . . . . . . . . . . . . . . . . . . . . . . . . . . . . . . . . . . . . . . . . . . .
22
Safety Instructions
CAUTION
RISK OF SHOCK
CAUTION: To reduce the risk of electric shock,
do not remove cover (or back). No userserviceable parts inside. Only refer servicing to
qualified service personnel.
Explanation of Graphical Symbols
The lightning flash & arrowhead
symbol, within an equilateral triangle,
is intended to alert you to the
presence of danger.
The exclamation point within an
equilateral triangle is intended to alert
you to the presence of important
operating and servicing instructions.
WARNING
To reduce the risk of fire or electric shock, do
not expose this unit to rain or moisture.
8. Ventilation - The appliance should be situated so its
location does not interfere with its proper ventilation. For
example, the appliance should not be situated on a bed,
sofa, rug, or similar surface that may block the
ventilation slots.
9. Heat - The appliance should be situated away from
heat sources such as radiators, heat registers,
stoves, or other appliances (including amplifiers)
that produce heat.
10. Power Sources - The appliance should be
connected to a power supply only of the type described
in the operating instructions or as marked on the
appliance.
11. Grounding or Polarization – Precautions should be
taken so that the grounding or polarization means of
an appliance is not defeated.
12. Power-Cord Protection – Power-supply cords
should be routed so that they are not likely to be walked
on or pinched by items placed upon or against them,
paying particular attention to cords at plugs,
convenience receptacles, and the point where they exit
from the appliance.
13. Cleaning – Unplug this unit from the wall outlet
before cleaning. Do not use liquid cleaners or
aerosol cleaners. Use a damp cloth for cleaning.
14. Power lines – An outdoor antenna should be
located away from power lines.
1. Read Instructions - All the safety and operating
instructions should be read before the appliance is
operated.
15. Nonuse Periods – The power cord of the appliance
should be unplugged from the outlet when left unused
for a long period of time.
2. Retain Instructions - The safety and operating
instructions should be retained for future reference.
16. Object and Liquid Entry – Care should be taken so
that objects do not fall and liquids are not spilled into the
enclosure through openings.
3. Heed Warnings - All warnings on the appliance and in
the operating instructions should be adhered to.
4. Follow Instructions - All operating and use
instructions should be followed.
5. Attachments - Do not use attachments not
recommended by the product manufacturer as they may
cause hazards.
6. Water and Moisture - Do not use this unit near water.
For example, near a bathtub or in a wet basement and
the like.
7. Carts and Stands - The appliance should be used
only with a cart or stand that is recommended by the
manufacturer.
7 A. An appliance and cart combination
should be moved with care. Quick stops,
excessive force, and uneven surfaces may
cause an overturn.
1
17. Damage Requiring Service – The appliance should
be serviced by qualified service personnel when:
A.
B.
C.
D.
The power supply cord or plug has been damaged; or
Objects have fallen into the appliance; or
The appliance has been exposed to rain; or
The appliance does not appear to operate normally
or exhibits a marked change in performance; or
E. The appliance has been dropped, or the enclosure
damaged.
18. Servicing – The user should not attempt to service
the appliance beyond that described in the operating
instructions. All other servicing should be referred to
qualified service personnel.
Note:
To CATV system installer’s (U.S.A.): This reminder is
provided to call the CATV system installer’s attention to
Article 820-40 of the NEC that provides guidelines for
proper grounding and, in particular, specifies that the
cable ground shall be connected as close to the point of
cable entry as practical.
CAUTION: Read this before operating your unit
CAUTION
The apparatus is not disconnected from the AC power source so long as it is connected to the
wall outlet, even if the apparatus itself is turned off. To fully insure that the apparatus is indeed
fully void if residual power, leave unit disconnected from the AC outlet for at least fifteen
seconds.
1. To ensure the finest performance, please read this manual carefully. Keep it in a safe place for future
reference.
2. Install your unit in a cool, dry, clean place – away from windows, heat sources, and too much vibration,
dust, moisture or cold. Avoid sources of hum (transformers, motors). To prevent fire or electrical shock, do
not expose to rain and water.
3. Do not operate the unit upside-down.
4. Never open the cabinet. If a foreign object drops into the set, contact your dealer.
5. Place the unit in a location with adequate air circulation. Do not interfere with its proper ventilation; this will
cause the internal temperature to rise and may result in a failure.
6. Do not use force on switches, knobs or cords. When moving the unit, first turn the unit off. Then gently
disconnect the power plug and the cords connecting to other equipment. Never pull the cord itself.
7. Do not attempt to clean the unit with chemical solvents: this might damage the finish. Use a clean,
dry cloth.
8. Be sure to read the “Troubleshooting” section on common operating errors before concluding that your unit
is faulty.
9. This unit consumes a fair amount of power even when the power switch is turned off. We recommend that
you unplug the power cord from the wall outlet if the unit is not going to be used for a long time. This will
save electricity and help prevent fire hazards. To disconnect the cord, pull it out by grasping the plug.
Never pull the cord itself.
10. To prevent lightning damage, pull out the power cord and remove the antenna cable during an electrical
storm.
11. The general digital signals may interfere with other equipment such as tuners or receivers. Move the
system farther away from such equipment if interference is observed.
12. When positioning your equipment, especially regarding speakers or other accessories, avoid positioning
them over areas where they can fall and cause injury to yourself and others.
Note:
Please check the copyright laws in your country before recording from records, compact discs, radio, etc.
Recording of copyrighted material may infringe copyright laws.
2
Welcome….
Thank you for purchasing the CDG-600RF from VocoPro, your ultimate choice in
Karaoke entertainment! With years of experience in the music entertainment business,
VocoPro is a leading manufacturer of Karaoke equipment, and has been providing
patrons of bars, churches, schools, clubs and individual consumers the opportunity to
sound like a star with full-scale club models, in-home systems and mobile units. All our
products offer solid performance and sound reliability, and to further strengthen our
commitment to customer satisfaction, we have customer service and technical support
professionals ready to assist you with your needs. We have provided some contact
information for you below.
VocoPro
1728 Curtiss Court
La Verne, CA 91750
Toll Free: 800-678-5348
TEL: 909-593-8893
FAX: 909-593-8890
VocoPro Company Email Directory
Customer Service & General Information
[email protected]
Tech Support
[email protected]
Remember Our Website
Be sure to visit the VocoPro website www.vocopro.com for the latest information on new
products, packages and promo’s. And while you’re there don’t forget to check out our
Club VocoPro for Karaoke news and events, chat rooms, club directories and even a
Service directory!
We look forward to hearing you sound like a PRO, with VocoPro, your ultimate choice in
Karaoke entertainment.
FOR YOUR RECORDS
Please record the model number and serial number below, for easy reference, in case of loss or theft. These
numbers are located on the rear panel of the unit. Space is also provided for other relevant information
Model Number
Serial Number
Date of Purchase
Place of Purchase
3
Listening For A Lifetime
Selecting fine audio equipment such as the unit you’ve just purchased is only the start of
your musical enjoyment. Now it’s time to consider how you can maximize the fun and
excitement your equipment offers. VocoPro and the Electronic Industries Association’s
Consumer Electronics Group want you to get the most out of your equipment by playing it
at a safe level. One that lets the sound come through loud and clear without annoying
blaring or distortion and, most importantly, without affecting your sensitive hearing.
Sound can be deceiving. Over time your hearing “comfort level” adapts to a higher volume
of sound. So what sounds “normal” can actually be loud and harmful to your hearing. Guard
against this by setting your equipment at a safe level BEFORE your hearing adapts.
To establish a safe level:
• Start your volume control at a low setting.
• Slowly increase the sound until you can hear it comfortably and clearly, and without
distortion.
Once you have established a comfortable sound level:
• Set the dial and leave it there.
• Pay attention to the different levels in various recordings.
Taking a minute to do this now will help to prevent hearing damage or loss in the future.
After all, we want you listening for a lifetime.
Used wisely, your new sound equipment will provide a lifetime of fun and enjoyment. Since
hearing damage from loud noise is often undetectable until it is too late, this manufacturer
and the Electronic Industries Association’s Consumer Electronics Group recommend you
avoid prolonged exposure to excessive noise. This list of sound levels is included for your
protection.
Some common decibel ranges:
Level
Example
30
40
50
60
70
80
Quiet library, Soft whispers
Living room, Refrigerator, Bedroom away from traffic
Light traffic, Normal Conversation
Air Conditioner at 20 ft., Sewing machine
Vacuum cleaner, Hair dryer, Noisy Restaurant
Average city traffic, Garbage disposals, Alarm clock at 2 ft.
The following noises can be dangerous under constant exposure:
Level
Example
90
100
120
140
180
Subway, Motorcycle, Truck traffic, Lawn Mower
Garbage truck, Chainsaw, Pneumatics drill
Rock band concert in front of speakers
Gunshot blast, Jet plane
Rocket launching pad
-Information courtesy of the Deafness Research Foundation
4
Before Getting Started: Things to Consider
It is very important to read the following instructions prior to starting any installation
procedures. Doing so will ensure a correct installation and may save you some time as well.
Protect Against Power Surges
• Connect all external components before you plug any of their power cords into the
wall outlet.
• Turn off the CDG-600RF before you connect or disconnect any cables.
• Make sure all cables are properly grounded.
Protect Components from Overheating
• Don’t block ventilation holes. Arrange any components so that air can circulate freely.
• Don’t stack components.
• If you place the CDG-600RF on a stand, make sure you allow adequate ventilation.
Position Cables Properly to Avoid Audio Interference
• Insert each cable firmly into the designated jack.
• If you place components above the CDG-600RF, route all cables down the side of the
back of the CDG-600RF instead of straight down the middle of the back of the
CDG-600RF.
Important Stand and Base Safety Information
Choose the location for your CDG-600RF carefully. If the CDG-600RF is placed on a stand
or base, ensure that it is of adequate size and strength to prevent it from being accidentally
tipped over, pushed off, or pulled off. This could cause personal injury and/or damage to the
CDG-600RF.
OPEN/CLOSE
DISPLAY
You should have received the following items:
MEMORY
REPEAT
SKIP/SEARCH
AAA
PLAY/PAUSE
AAA
STOP
(1)
(1)
(1)
(1)
CDG-600RF
Remote Control
Pack of AAA Batteries
AC/DC Adaptor
5
CDG-600RF DIGITAL KEY CONTROL CD/CD+G CASSETTE KARAOKE PLAYER
Digital key Display
Tape counter
Reset
PLAYER 1
RECORDER
Open/Close
Disp
PLAY
REW
FFWD
ST/EJ
Previous
Next
B-scan
F-scan
0
Music
level
-10 +10
Bass
Music
10
Stop
0
10
Mic 1 level
b
L
-10 +10
Treble
0
10
Mic 2 level
#
DIGITAL KEY CONTROL
5
Memory
Sensor
Pause
L
PLAY
Repeat
0 0: 00
SHOCK RESISTANT PICK UP
POWER
REC
Remote
+ 2
VOC/C
VOC/P CASSETTE
CDG
LD
DVD
AUX
Mic 1
Input
Remote
Key
Control
Mic 2
Input
The CDG-600RF Features
FEATURES:
• 125W + 125W MAXIMUM POWER OUTPUT AT 8 OHMS
• 19-STEP DIGITAL KEY CONTROLLER
• BUILT-IN CASSETTE DECK WITH RECORD LEVEL CONTROL AND LED METER
• BUILT-IN SKIP-FREE, SHOCK-RESISTANT CD/CDG PLAYER
• 2 MICROPHONE INPUTS WITH INDIVIDUAL VOLUME CONTROLS
• 3RD DJ MICROPHONE INPUT WITH ECHO BYPASS FOR DRY ANNOUNCEMENTS
• MICROPHONE BASS AND TREBLE CONTROLS
• REMOTE KEY CONTROL JACK FOR KEY CONTROLLABLE MICROPHONE
• REMOTE CONTROL FOR CD/CDG OPERATION
• DIGITAL ECHO CONTROL FOR PROFESSIONAL SOUNDING VOCALS
• VOCAL CANCEL/PARTNER MODES FOR REMOVING VOCALS ON MULTIPLEXED MEDIA
• INPUTS: 2 A/V (RCA) AND 1 AUX. (RCA)
• OUTPUTS: 2 AUDIO (REC & PRE-OUT) AND 1 VIDEO (RCA)
• MUSIC BASS AND TREBLE CONTROLS
• 110/220 SWITCHABLE
• PAL/NTSC SWITCHABLE
5
CDG-600RF DIGITAL KEY CONTROL CD/CD+G CASSETTE KARAOKE PLAYER
Digital key Display
Tape counter
Reset
PLAYER 1
RECORDER
Open/Close
Disp
PLAY
REW
FFWD
ST/EJ
Repeat
Memory
0 0: 00
Previous
Next
B-scan
F-scan
Sensor
0
Music
level
-10 +10
Bass
Music
10
Stop
Pause
0
10
Mic 1 level
b
L
L
PLAY
+ 2
-10 +10
Treble
SHOCK RESISTANT PICK UP
POWER
REC
Remote
0
10
Mic 2 level
#
DIGITAL KEY CONTROL
VOC/C
VOC/P CASSETTE
CDG
LD
DVD
AUX
Mic 1
Input
Remote
Key
Control
Mic 2
Input
Specifications
AUDIO INPUT (AT1KHZ)
MICROPHONE .......................................................
AUX/DVD/LD/CDG/CASSETTE..............................
AUDIO OUTPUT......................................................
VIDEO INPUT
CDG/LD/DVD..........................................................
FREQUENCY RESPONSE
AUX/DVD/LD/CDG/CASSETTE..............................
TONE CONTROL (MUSIC)
BASS.......................................................................
TREBLE ..................................................................
ECHO TIME DELAY.................................................
KEY CONTROL RANGE ........................................
SIGNAL TO NOISE RATIO................................................
CASSETTE MOTOR SPEED (ATT-111N 3KHZ) ..............
CASSETTE WOW-FILTER (ATT-111N 3KHZ) ..................
POWER SUPPLY, OTHERS
POWER REQUIREMENTS.....................................
POWER CONSUMPTION ......................................
VIDEO
VIDEO SYSTEMS (CDG ONLY) ............................
AC OUTLETS
UNSWITCHED .......................................................
DIMENSIONS:...................................................................
2.5mv/10k Ohms
150MV/50 Ohms
500MV
1V P-P/75 Ohms
20HZ-20KHZ+3db
+9db(100HZ)+2
+9db(10KHZ)+2
100MSEC-200 MSEC
+9/-9MUSIC INTERVALS
(19 POSITIONS)
>75db
2940HZ-3090HZ
<0.3%
AC 110V/220V SWITCHABLE
18 WATTS
PAL/NTSC SWITCHABLE
1 (TOTAL 200W)
(W X D X H) : 17” X 15 1/2” X 6”
6
Quick Start
CONNECTING A TELEVISION MONITOR
If you will be connecting the CDG-600RF to a television or monitor, use the RCA video
connector wire included. On the back of the player, locate the yellow-coded RCA connector jack labeled VIDEO
OUTPUT and connect either end of the RCA connector wire. Connect the other end to your television or monitor.
There should be an RCA connector jack, just like the one on the back of the player, labeled VIDEO INPUT.
Connecting this wire will enable your television monitor to display the graphics that are encoded on CDG Karaoke
discs.
R
-
L
+
-
3RD MIC
+
BASS
TREBLE
ECHO
SWITCH TO:
NTSC FOR U.S. TV SYSTEM
PAL FOR EURO TV SYSTEM
VIDEO ONLY
NTSC
CH3
EXT OUTPUT SPEAKER
PAL
VIDEO SYSTEM
110-120V
220-240V
VOLTAGE SELECT
AC 200W
NTSC RF OUTPUT
EXT
FUSE
AC T3A 250V
INT
SPEAKER SELECT
VIDEO
OUTPUT
VIDEO
INPUT
www.vocopro.com
AUX
Professional Equipment
nouser serviceable parts inside
DVD
LD
AUDI0 INPUT TERMINAL
L
L
R
R
PRE
OUTPUT
OUT
OUTLET
UNSWITCHED
AC 120/230v
50/60HZ
400VA MAX
TV/MONITOR
IN
EFFECT LOOP
CALIFORNIA U.S.A
VIDEO IN
NOTE: If your television does not have an RCA type connector, use the built-in RF Modulator on the
CDG-600RF to connect your TV or monitor. (See "Connection Diagram" and "Trouble Shooting Guide" for
options.)
SUPPLYING POWER TO THE CDG-600RF
IMPORTANT! Be sure all your components i.e., amplifier, TV monitor, etc. are connected to the CDG-600RF
BEFORE connecting to a power source and powering on. Be sure to use caution when plugging in any electrical
appliance. Connect the power cord attached to the back of the CDG-600RF player into any wall outlet or surge
protector.
CONNECTING A MICROPHONE
1. Connect the microphone cable’s 1/4" plug into either of the microphone jacks on the front panel of the
CDG-600RF amplifier player or use the KJ/DJ microphone input on the rear panel.
IMPORTANT! Before connecting a microphone, be sure the microphone volume is turned to a minimal setting.
When the microphone is plugged in and the unit is on do not point the microphone directly towards the speakers
or leave an unattended microphone too close to the speakers when the volume is up. This can create a loud
squeal called "feedback" which is very annoying and could possibly damage your speakers.
PLAYING CD/CDG’s
1. Locate the "OPEN/CLOSE" button on the front of the CDG-600RF player.
2. Press once to open the CD tray. The tray will open automatically after the button is pressed.
3. Lay the CD/CDG on the open tray and press the "OPEN/CLOSE" button again. The tray will close automatically
after the button is pushed. IMPOR TANT: DO NOT PUSH THE TRAY CLOSED MANUALLY, AS THIS COULD
DAMAGE THE UNIT.
STARTING THE CD PLAYER
1. Locate the "PLAY/PAUSE" button above the CD tray.
2. Press once to start the CD. Pressing the "PLAY/PAUSE" button will play song selection #1 on the CD/CDG
disc. The song will automatically begin playing after a few seconds.
TO PLAY A DIFFERENT SELECTION
1. Locate the "NEXT" button above the CD tray. Press the button until the number of the desired song selection
appears in the LCD display window .
NOTE: You may hold down the button continually to advance the song selections.
7
Quick Start
FAST FORWARD AND REVERSE
1. To advance your selection while it is playing, for example to the next verse or chorus, locate the "F-SCAN" and
hold it down until you find the desired location.
2. To rewind your selection whiled it is playing, locate the "B-SCAN" key and hold down until you find the desired
location.
NOTE: When using this feature the words may become jumbled on your TV monitor if a CDG track is in
progress. In this scenario, digital graphics information does not process as rapidly as audio signals. Therefore,
the video signal will have to "catch up" to the audio signal. The screen will "refresh" on it’s own.
BALANCING YOUR MIX
1. It is best to begin by first setting the music volume at a comfortable level for the room in which you are using
your CDG-600RF . The number of people in a room will generally have an effect on the acoustics and how
much volume will be needed.
2. Once the desired music volume is achieved, test each microphone volume individually by speaking or singing
into the microphone, holding it approximately two inches away from your mouth.
3. Adjust the volume control(s) for each microphone until an equal mix of music and vocals can be heard.
Remember to allow for vocal variances in each song where it may be necessary to sing louder or softer .
TURN ON THE CDG-600RF
1. Locate the power switch on the front of the CDG-600RF player. Press the power switch once to turn on the
machine.
2. Locate the CDG button below the CDG tray. This selects the mode you will use the player in.
3. Carefully increase the volume by turning the large volume knob clockwise until the desired volume is reached.
4. Carefully increase the microphone volume until desired volume is reached.
ADDING BASS OR TREBLE TO THE MUSIC
1. Locate the small MUSIC BASS and TREBLE control knobs on the front panel of the CDG-600RF.
2. To add bass to the music, turn the MUSIC BASS knob clockwise until you have added the desired amount of
bass to the music. Likewise to remove bass, turn the knob counter-clockwise.
3. Perform the steps above for MUSIC TREBLE adjustments.
ADDING BASS OR TREBLE TO THE VOCALS
1. To increase the bass on the vocal signal(s) turn the MIC BASS control knob in a clockwise motion until the
desired amount of bass is achieved. Likewise to decrease the amount of bass on the vocal signal(s), turn in a
counter-clockwise motion.
2. Perform the steps above for MIC TREBLE adjustments.
ADDING ECHO TO THE VOCAL SIGNAL
1. The "ECHO" control knob is located on the back of the CDG-600RF player. (See diagram). Turn the knob in a
clockwise motion until the desired amount of ECHO is achieved on the vocal signal. This is usually a
preference by the singer . The more ECHO that is used the "thinner" the voice sounds.
8
Using Effects and Changing the Key
CHANGING THE KEY OF THE MUSIC
Sometimes a singer would like to sing a particular song but will find it may not be written within a key or range
comfortable for them. In this case you can raise or lower the pitch or key of the music to make it easier to sing.
The key controller works for both CD/CDG and cassette audio signals.
NOTE: When raising or lowering the key of the music the tempo will remain the same.
1. First, locate the KEY CONTROL buttons on the front of the CDG-600RF player. There are three buttons under
which are the words KEY CONTROL. There is a button for each of the following three functions:
a. Sharp - Used to raise the pitch or key of the music.
b. Natural - Used to return the music to it’s "natural" or "original" pitch or key.
c. Flat - Used to lower the pitch or key of the music.
RAISING OR LOWERING THE PITCH (OR KEY) OF THE MUSIC
1. To raise the pitch or key of the music, press the SHARP (#) button once for each 1/2 step you would like the
music raised.
2. To lower the pitch or key of the music, press the FLAT (b) button once for each 1/2 step you would like the
music
lowered.
3. To return the music to its "natural" or "original" key, simply press the NATURAL button once.
NOTE: The digital display will show how many half steps a song is raised or lowered by indicating a (+) or (-)
before a number to indicate raised or lowered values. It will display (+0) if the current song selection is being
played in the natural key.
Using the Cassette Deck
CASSETTE DECK PLAYBACK
1. Locate the CASSETTE button under the CD tray on the front of the unit and press to make the cassette deck
the active channel.
2. Locate the ST/EJ button on the front panel of the cassette deck and press to open cassette door.
4. Insert a cassette tape with the side you want to play facing you and carefully close the cassette door, never
force.
5. To rewind the cassette press the REW button until the tape rewinds to the desired location.
6. To advance the cassette press the F-FWD button until the tape advances to the desired location.
7. To stop either function, press the "STOP" button. This will stop advancing, rewinding or playing the cassette
tape.
8. To play the desired track press the "PLAY" button.
9
Listening to Your Recording
CASSETTE DECK RECORDING
You can record yourself singing with a Karaoke CD/CDG track for demos, practicing or just plain fun.
1. Follow the instructions for playing a CD/CDG, select the desired "track" (song), and make sure a microphone is
connected. Also set the mic echo, bass and treble settings now if they need to be changed.
2. Begin the CD/CDG track and sing to it at the level you will be singing when recording.
3. After a desired mix of music and vocals is reached, restart the track and sing as you did previously. This time
you will need to set the RECORDING INPUT LEVEL of the cassette deck to a desired level for great quality
recordings. Using the LED METER to gauge the signal level, turn the RECORD LEVEL CONTROL clockwise to
increase the signal gain, or counter-clockwise to decrease the signal gain. Most audio professionals shoot for a
recording level that remains above the top GREEN LED and below the first RED LED.
4. Be sure the blank cassette tape is placed in the cassette deck and the cassette door closed.
5. Set the Tape counter to zero by pushing the "RESET" button located next to the "COUNTER" on the front of the
unit. This will help you keep track of your place on the tape if you are recording multiple songs but not starting
from the beginning of the tape.
NOTE: If you have rewound the cassette tape all the way to the beginning note that there are a few seconds of
"leader" tape at each end of the cassette on which you cannot record.
4. Locate the REC and PLAY buttons on the cassette deck and press them simultaneously until they stay in the
down position.
5. View the advancing cassette through the cassette door window and let tape run until it has passed the "leader"
tape. If it is not visible, allow approximately 10 seconds to let the tape "roll" then locate and press the PAUSE
key. This will stop the cassette from advancing but it will still be in the "record" mode. Leave the PAUSE button
pressed.
6. Press the PLAY on the CD/CDG controls to start the CD/CDG track selection.
7. At the same time, release the PAUSE button on the cassette deck and the tape will start "rolling". Your selection
and voice is now being recorded.
NOTE: Be careful not to "thump" the microphone while holding it or while singing. This will create noise that will
be noticeable on your recording. Tip: When recording, be careful not to "pop" the microphone with "plosive"
consonants like "P" and "T". Excessive breath on these consonants will create an undesirable "pop" sound on
your recording.
Other Parts of the CDG-600RF
DJ MICROPHONE INPUT JACK
There is a third microphone input located on the back of the CDG-600RF amplifier next to the speaker jacks.
This microphone channel is best used as a KJ/DJ microphone as it is echo-bypassed. The volume control for the
third microphone input is located just to the right of the jack itself.
VOLTAGE SELECT
This toggle is used to select between 110V/220V power requirements. For European-based power settings, select
220V. For North American-based power settings, select 110V.
VIDEO SYSTEM (NTSC/PAL)
This is used to select the video system according to country. In European video environments, select the PAL
video mode. In North American video environments, select the NTSC video mode.
AC OUTLET
The AC outlet can be used to connect an additional component with a power requirement no more than 200W.
FUSE: IMPORTANT! IF THE FUSE BLOWS OUT, IT IS AN IMPORTANT INDICATION THERE MAY BE A SHORT
SOMEWHERE IN THE SYSTEM. DO NOT REPLACE THE FUSE! TAKE YOUR CDG-600RF TO AN AUTHORIZED REPAIR
FACILITY. REPLACING THE FUSE COULD POSSIBLY CAUSE ADDITIONAL DAMAGE THAT MAY NOT BE COVERED BY
THE WARRANTY
10
Connecting Other Components
CONNECTING OTHER COMPONENTS TO THE CDG-600RF
The CDG-600RF is designed so you can connect other components to it, utilizing the Karaoke features the
CDG-600RF contains.
CONNECTIONS FROM EXTERNAL PLAYBACK DEVICES (DVD, LD, VCR etc.)
Using and RCA patch cable, connect one set of RCA plugs to the L/R jacks on an available AUDIO INPUT channel on
the CDG-600RF. (Available AUDIO INPUT channels are LD, DVD and AUX) Connect the other set of RCA plugs to the
AUDIO OUTPUT jacks on your external playback device (check manufacturer’s instructions). Repeat above instructions
for any other external playback devices to be connected, only use the remaining AUDIO INPUT channels on the
CDG-600RF.
110-120V
SWITCH TO:
NTSC FOR U.S. TV SYSTEM
PAL FOR EURO TV SYSTEM
NTSC
220-240V
PAL
VOLTAGE SELECT
ECHO BYPASS
VIDEO ONLY
VIDEO SYSTEM
AC 200W
+
L
DJ MIC
DJ MIC VOL
BASS
TREBLE
-
CH3
ECHO
-
DVD
LD
VIDEO
INPUT
R
VCR, DVD, ETC..
NTSC RF OUTPUT
MIC 1-2 CONT
AUX
VIDEO
OUTPUT
L
L
R
R
+
AUDI0 INPUT TERMINAL
OUTLET
UNSWITCHED
VCR
www.vocopro.com
AUDI0 OUTPUT
CALIFORNIA U.S.A
TO LD, DVD OR AUX
AUDIO INPUT
TO AUDIO OUTPUT
CONNECTIONS TO EXTERNAL DEVICES (AMP, MIXER, PROCESSOR etc.)
Using and RCA patch cable, connect one set of RCA plugs to the PRE-OUT jacks on the CDG-600RF. Connect the
other set of RCA plugs to the AUDIO INPUT, LINE IN or CH. A-B jacks on your external device (check manufacturer’s
instructions).
110-120V
SWITCH TO:
NTSC FOR U.S. TV SYSTEM
PAL FOR EURO TV SYSTEM
NTSC
220-240V
PAL
VOLTAGE SELECT
ECHO BYPASS
VIDEO ONLY
VIDEO SYSTEM
AC 200W
+
L
DJ MIC
DJ MIC VOL
BASS
TREBLE
-
CH3
ECHO
NTSC RF OUTPUT
MIC 1-2 CONT
AUX
-
DVD
LD
PRE
VIDEO
INPUT
R
VIDEO
OUTPUT
+
L
L
R
R
AUDI0 INPUT TERMINAL
OUTLET
UNSWITCHED
AMP
AUDI0 OUTPUT
www.vocopro.com
CALIFORNIA U.S.A
TO PRE-OUT JACKS
TO AUDIO OUTPUT
RECORD TO THE CDG-600RF FROM AN ADDITIONAL CASSETTE DECK
To record music from the additional cassette deck to the CDG-600RF cassette deck, play the additional tape deck and
follow the directions for recording on the CDG-600RF cassette deck under "Cassette Deck Playback" and "Cassette
Deck Recording".
CONNECTING AN ADDITIONAL RECORDING DEVICE TO THE CDG-600RF
TO RECORD MUSIC ONLY FROM THE CDG-600RF ONTO AN ADDITIONAL RECORDING DEVICE, using an RCA
connector cable, connect the "L" and "R" "REC" OUTPUT jacks on the CDG-600RF to the "L" and "R" "AUDIO INPUT
OR REC IN" jacks on the recording device (Check manufacturer’s instructions). Music ONLY will be recorded onto the
additional tape deck. TO RECORD MUSIC AND VOCALS FROM THE CDG-600RF ONTO AN ADDITIONAL
RECORDING DEVICE, using an RCA connector cable, connect the "L" and "R" "PRE" OUTPUT jacks on the
CDG-600RF to the "L" and "R" "AUDIO INPUT OR REC IN" jacks on the recording device (check manufacturer’s
instructions).
SWITCH TO:
NTSC FOR U.S. TV SYSTEM
PAL FOR EURO TV SYSTEM
NTSC
110-120V
220-240V
PAL
VOLTAGE SELECT
ECHO BYPASS
VIDEO ONLY
VIDEO SYSTEM
AC 200W
+
L
DJ MIC
DJ MIC VOL
BASS
AUX
R
DVD
ECHO
CH3
RECORDING DEVICE
NTSC RF OUTPUT
LD
VIDEO
INPUT
+
VIDEO
OUTPUT
L
L
R
R
AUDI0 INPUT TERMINAL
TO "L" AND "R"
REC OUTPUT JACKS
11
TREBLE
MIC 1-2 CONT
AUDI0 OUTPUT
OUTLET
UNSWITCHED
www.vocopro.com
CALIFORNIA U.S.A
TO AUDIO INPUT OR
REC IN
Controls and Functions of The Remote Control
USING THE REMOTE CONTROL
The CDG-600RF comes with a handy remote control to allow the user to operate the Karaoke functions from up to
twenty-five feet from the unit. The remote control offers the user fast forward, rewind, skip, search, programmable
memory, play/pause, open/close for the CD/ CDG tray and stop. The memory function can be used with the
remote control to program specific song selections when using the CD/CDG player. The remote control will not
work with the tape deck. Be sure not to block the infrared eye on the CDG-600RF (See #15 FRONT PANEL
diagram) or the sensor on the hand held remote control (#1 REMOTE CONTROL diagram). If either of these parts
is covered while attempting to use the remote control, it will not function. (Also, see PARTS AND FUNCTIONS,
FRONT PANEL, #8 for detailed instructions about programming the CDG-600RF). All the parts on the remote
control correspond to the same parts on the front panel of the CDG-600RF.
MEMORY
OPEN/CLOSE
DISPLAY
REPEAT
PLAY/PAUSE
SKIP/SEARCH
STOP
BATTERY COMPARTMENT: On the back of the hand held remote control there is a cover that slides off to
expose the battery compartment. Push cover down with thumb and slide off. The hand held remote control uses
two "AAA" size batteries.
INFRARED REMOTE SENSOR: The sensor on the top of the hand held remote control communicates with the
infrared sensor on the front panel of the CDG-600RF and should not be covered or the remote control will not
work properly.
Avoid dust
12
Controls and Functions of The Remote Control
1. OPEN/CLOSE: The OPEN/CLOSE button on the hand
held remote control operates the CD/CDG tray. Press
once to open the CDG tray and again to close the tray.
OPEN/CLOSE
1
2. DISPLAY: The display button when pressed once will
show the user the remaining number of played-played
song selections on the CD/CDG disc and the amount of
time left to play them. It serves the same function as the
"DISPLAY" button on the front panel of the CDG-600RF.
(See PARTS AND FUNCTIONS, #5)
DISPLAY
2
MEMORY
REPEAT
3
8
4
SKIP/SEARCH
5
STOP
7
3. REPEAT: The REPEAT button on the hand held remote
control allows the user to repeat one song selection or all
song selections. (See PARTS AND FUNCTIONS,
FRONT PANEL diagram, #6)
PLAY/PAUSE
6
4. SKIP: The SKIP button on the hand held remote control
allows the user to "skip" back to the previous song.
When a song is playing, it serves as a "rewind" button
and will "SCAN" the song selection in reverse. On the
front panel of the CDG-600RF, it is the same as the
"B-SCAN" and "PREV" buttons combined. (See PARTS
AND FUNCTIONS, FRONT PANEL diagram, #9, #12)
5. SEARCH: The SEARCH button on the hand held remote
control allows the user to "skip" ahead to the next song.
When a song is playing, it serves as a "fast-forward"
button and will "SCAN" the song selection. On the front
panel of the CDG-600RF it is the same as the "F-SCAN"
and "NEXT" buttons combined. (See PARTS AND
FUNCTIONS, FRONT PANEL diagram, #11, #13)
6. PLAY: Starts and pauses the CD/CDG player. Press
once to start song selection and once to pause. Press
again to resume playing song selection.
7. STOP: Stops the CD/CDG player.
8. MEMORY: The MEMORY button allows the user to
program song selections from the hand held remote
control. To program the CDG-600RF player with the
remote control the steps are the same as to program the
player from the front panel of the CDG-600RF. (See
PARTS AND FUNCTIONS, FRONT PANEL diagram, #8).
When programming song selections, instead of pressing
the memory button on the CDG-600RF, press the
memory button on the remote control.
13
Front Panel Controls and Functions
1. POWER BUTTON: Turns on the power to the CDG-600RF.
2. MEMORY BUTTON: The memory function is used to program specific song selections in any order. First, you’ll
need to clear the memory. If there is a CD/CDG in the player press stop. Press the "OPEN/CLOSE’ button
once until the tray opens and again to close it. Doing this will clear out any previously stored program(s) from
the memory. Next, press the "MEMORY" button once. There will be a "P:01" with the word "PROGRAM" above
it and two dashes (- -) to the left, shown in the display window . Press the "NEXT" button the desired amount of
times to display the song selection number you wish to program first in your program order. The song selection
number will be displayed where the two dashes were (- -). Proceed to program the next song selection by
pressing the "MEMORY" button again. Doing so will store your first song selection and display a "P:02" and two
dashes (- -) to the left. Repeat the process as above to program up to twenty song selections. When finished,
press "PLAY/PAUSE" to begin playing your selections. The program
order will be stored until the "OPEN/CLOSE" button is pressed again.
3. TAPE COUNTER: Use the tape counter when playing or recording cassettes to keep track of your location on
the tape.
4. DISPLAY BUTTON: When playing a CD/CDG disc and pressed once this button displays the remaining
number of songs to play on the disc, and time remaining in minutes and seconds to play them, in the CDG
Display Window (#10). This feature works only with the CD/CDG player. When pressed again the window
displays the song selection number and the elapsed time in minutes and seconds.
5. CDG DISPLAY WINDOW: This window displays the current song selection playing on the CDG disc.
6. PREVIOUS SELECTION BUTTON: Press this button to select the previous song on the CDG disc being
played. Press once for each song you want to skip back to, or hold the button down to skip back continually.
The selection number will be displayed in the display window (#10).
7. REPEAT BUTTON: When using the CD/CGD player and pressed once, this feature allows the user to repeat
the current song selection. When pressed twice all the songs on the disc will repeat once each. Songs will
repeat until the button is pressed a third time. The display window will show which function you have selected,
"REPEAT" (repeats current song selection) or "ALL" (repeats all songs).
3 1 4
7
2
6
5
5
CDG-600RF DIGITAL KEY CONTROL CD/CD+G CASSETTE KARAOKE PLAYER
Digital key Display
Tape counter
Reset
PLAYER 1
RECORDER
Open/Close
Disp
PLAY
REW
FFWD
ST/EJ
Repeat
Memory
0 0: 00
Previous
Next
B-scan
F-scan
Sensor
0
Music
level
-10 +10
Bass
Music
10
Stop
Pause
0
10
Mic 1 level
b
L
L
PLAY
+ 2
-10 +10
Treble
SHOCK RESISTANT PICK UP
POWER
REC
Remote
0
10
Mic 2 level
#
DIGITAL KEY CONTROL
VOC/C
VOC/P CASSETTE
CDG
LD
DVD
AUX
Mic 1
Input
Remote
Key
Control
Mic 2
Input
14
Front Panel Controls and Functions
8. OPEN/CLOSE BUTTON: To open/close CD/CDG tray.
9. RESET BUTTON: Push the reset button to reset the tape counter to zero when using the cassette deck.
10. MUSIC VOLUME: This controls the volume of the music being played.
11. VOC/C: Vocal Cancel key. This feature is designed to work only with "multiplex" karaoke discs. By pressing
this key the "guide" or "lead" vocal on the multiplex disc will be removed throughout the entire song. To hear
the guide/lead vocal press the key again.
12. CDG: CDG selector key. This key must be pressed when playing a CD or CDG disc in the CDG-600RF.
NOTE: This key must be pressed if you are recording from the CDG player in the CDG-600RF onto the
cassette deck otherwise you will not be able to hear the CDG disc that is playing.
13. DVD: Digital video disc input selector key. Pressing this key will select the component that is connected to the
DVD input jacks. For example, if a DVD player is used with the CDG-600RF and it is connected to the "DVD"
input jacks, this key will need to be selected before the component can be used.
14. AUX: Auxiliary input selector key. Pressing this key will select the component that is connected to the auxiliary
input. For example, if an additional tape deck or CD player is used with the CDG-600RF, and it is connected to
the "AUX" input jacks, this key will need to be selected before the component can be used.
15. NEXT SELECTION CONTROL BUTTON: Press this button to advance the CDG to the next song selection
Press once for each song you want to advance to, or hold the button down to advance continually. The
selection number will be displayed in the display window (#10).
16. F-SCAN: Press this button to forward "scan" the song selection. This feature works the same as the "fastforward" key on a cassette deck. The difference between this feature and the "NEXT" selection control button
is this feature advances the CDG within the song selection and the "NEXT" button skips forward to the next
song.
17. STOP: This button stops the CDG disc from playing.
18. REMOTE SENSOR: This window allows the CDG-600RF to communicate with the hand held remote control.
Do not block the window or the remote control will not work properly.
8
9
11 12 15
10
16 13 17 18 14
5
CDG-600RF DIGITAL KEY CONTROL CD/CD+G CASSETTE KARAOKE PLAYER
Digital key Display
Tape counter
Reset
PLAYER 1
RECORDER
Open/Close
Disp
PLAY
REW
FFWD
ST/EJ
Repeat
Previous
Next
B-scan
F-scan
Sensor
0
Music
level
-10 +10
Bass
Music
10
Stop
0
10
Mic 1 level
b
L
-10 +10
Treble
0
10
Mic 2 level
#
DIGITAL KEY CONTROL
15
Memory
0 0: 00
Pause
L
PLAY
+ 2
SHOCK RESISTANT PICK UP
POWER
REC
Remote
VOC/C
VOC/P CASSETTE
CDG
LD
DVD
AUX
Mic 1
Input
Remote
Key
Control
Mic 2
Input
Front Panel Controls and Functions
19. PLAY/PAUSE: Use this button to start playing the song selection and/or to pause the selection at any time
during play. Press once to play, press again to pause. If paused, press once to resume playing song selection.
20. BASS CONTROL: This controls the amount of bass tone in the music being played. (See "Using Effects")
21. TREBLE CONTROL: This controls the amount of treble tone in the music being played. (See "Using Effects")
22. MIC VOLUME 2: This controls the volume for the 2nd microphone input.
23. KEY CONT.: This is used to connect the optional "key control" microphone. (Not included)
24. MIC 1: Microphone input jack.
25. MIC VOLUME 1: This controls the volume for the microphone input.
26. MIC 2: Microphone input jack for a 2nd microphone.
27. B-SCAN: Press this button to "scan" the song selection in reverse. This feature works the same as the
"rewind" key on a cassette deck. The difference between this feature and the "PREV" selection control button
is this feature reverses the CDG within the song selection and the "PREV" button skips back to the previous
song.
28. CASSETTE: Cassette selector key. This key must be pressed when playing a cassette in the CDG-600RF
cassette deck.
NOTE: DO NOT press the cassette key if you are recording from the CDG player in the CDG-600RF onto the
cassette deck, otherwise you will not be able to hear the CDG disc that is being played. (The "CDG" key must
be pressed when recording from the CDG player to the cassette deck.
29. VOC/P: Vocal Partner key. This feature is designed to work only with "multiplex" karaoke discs. By pressing
this key the "guide" or "lead" vocal on the multiplex disc will be removed when you are singing. When you stop
singing the "guide/lead" vocal will again become audible, so it’s like having a "vocal partner". For example, if
you want to sing every other verse in a song you may do so when using this feature. The "guide/lead" vocal
will automatically begin a second after you stop singing and become inaudible when you resume singing until
the VOC/P key is pressed again.
27
20
19
21
5
CDG-600RF DIGITAL KEY CONTROL CD/CD+G CASSETTE KARAOKE PLAYER
Digital key Display
Tape counter
Reset
PLAYER 1
RECORDER
Open/Close
Disp
PLAY
REW
FFWD
ST/EJ
Repeat
Memory
0 0: 00
Previous
Next
B-scan
F-scan
Sensor
0
Music
level
-10 +10
Bass
Music
10
Stop
Pause
0
10
Mic 1 level
b
L
L
PLAY
+ 2
-10 +10
Treble
SHOCK RESISTANT PICK UP
POWER
REC
Remote
0
10
Mic 2 level
#
DIGITAL KEY CONTROL
VOC/C
VOC/P CASSETTE
29 28
CDG
LD
DVD
AUX
Mic 1
Input
Remote
Key
Control
Mic 2
Input
25 24 23 26
22
16
Front Panel Controls and Functions
30. LD: Laser disc input selector key. Pressing this key will select the component that is connected to the "LD"
input jacks. For example, if a DVD player is used with the CDG-600RF, and it is properly connected to the
"LD" input jacks, this key will need to be selected before the component can be used.
CASSETTE DECK PARTS AND FUNCTIONS
31. REW: "REWIND" When playing a cassette, this key can be used to rewind the cassette to the previous
location. To advance the tape, press the "ST/EJ" (STOP) key first to stop the tape, then press "F. FWD".
32. SHARP KEY: Press this key to RAISE the pitch of the song selection being played. This feature raises the
pitch of the song one half-step for each time it is pressed, up to nine half-steps. The sharp key is part of the
"key control" feature and will work with the CDG player and cassette deck. The key control feature will also
work with external players when properly connected to the CDG-600RF. (See "Using Effects and Changing
the Key" and "Connecting Other Components to the Twister") Note: The key control feature will not change
the tempo of the song being played.
33. NATURAL KEY: Press the natural key once to RETURN the pitch of the song selection being played to it’s
"natural key" or pitch . The natural key is part of the "key control" feature and will work with the CDG player
and cassette deck. The key control feature will also work with external players when properly connected.
(See "Using Effects and Changing the Key" and "Connecting Other Components to the CDG-600RF")
NOTE: The key control feature will not change the tempo of the song being played.
34. FLAT KEY: Press this key to LOWER the pitch of the song selection being played. This feature lowers the
pitch of the song one half-step for each time it is pressed, to as many as nine half-steps. The flat key is part of
the "key control" feature and will work with the CDG player and cassette deck. The key control feature will
also work with external players when properly connected to the CDG-600RF. (See "Using Effects and
Changing the Key" and Connecting Other Components to the CDG-600RF")
NOTE: The key control feature will not change the tempo of the song being played.
5
CDG-600RF DIGITAL KEY CONTROL CD/CD+G CASSETTE KARAOKE PLAYER
Digital key Display
Tape counter
Reset
PLAYER 1
RECORDER
Open/Close
Disp
PLAY
REW
FFWD
ST/EJ
Repeat
L
Next
B-scan
F-scan
0
Music
level
-10 +10
Bass
Music
10
Stop
-10 +10
Treble
0
10
Mic 2 level
#
DIGITAL KEY CONTROL
17
Previous
Sensor
0
10
Mic 1 level
b
31
Memory
0 0: 00
Pause
L
PLAY
+ 2
SHOCK RESISTANT PICK UP
POWER
REC
Remote
34 33 32
VOC/C
VOC/P CASSETTE
CDG
LD
30
DVD
AUX
Mic 1
Input
Remote
Key
Control
Mic 2
Input
Front Panel Controls and Functions
35. CD/CGD TRAY: Press the "OPEN/CLOSE" button (See #3 on diagram) to open the CD/CDG tray. Carefully
set your CD/CDG disc onto the tray and press the OPEN/CLOSE button again to
close tray. Never push or force tray closed manually.
36. PAUSE: Press the "PAUSE" key once to momentarily stop the cassette tape from playing or recording. Press
again to continue playing or recording.
37. ST/EJ: "STOP/EJECT" Press this key once to stop a cassette from playing or recording, press again to eject.
When the cassette door opens insert or remove a tape.
38. F-FWD: "FAST FORWARD" When playing a cassette, this key can be used to advance the cassette to the
next desired location. To advance the tape, press the "ST/EJ" (STOP) key first to stop the tape, then press
"F-FWD".
39. PLAY: After a cassette tape has been inserted into the cassette player, press this key to begin playing. When
recording, press this key together with the "REC" (RECORD) key to begin recording. (See "USING THE
CASSETTE DECK", "To Record With The Cassette Deck")
40. CASSETTE DOOR: This compartment holds a cassette tape for playing or recording. To open the cassette
door, press "ST/EJ" (STOP/EJECT). After inserting or removing a cassette tape gently push the cassette door
closed. Never force the door closed.
41. REC: "RECORD" To record press the "PLAY" key and the "REC" key together and the cassette will begin
recording. For detailed instructions: (See "USING THE CASSETTE DECK" under "To Record With The
Cassette Deck")
42. REC. LEVEL CONTROL: When recording to the cassette deck, use this control to increase or decrease the
incoming signal level for precise recording results.
43. REC. LED METER: This LED meter reflects the record signal level in "real-time" to allow for accurate record
level adjustment
NOTE: should not surpass record levels should be kept below the first red LED, as distortion may occur
beyond that point.
5
CDG-600RF DIGITAL KEY CONTROL CD/CD+G CASSETTE KARAOKE PLAYER
Digital key Display
Tape counter
Reset
PLAYER 1
RECORDER
Open/Close
Disp
PLAY
REW
FFWD
ST/EJ
Repeat
L
Next
B-scan
F-scan
38 37 36 40
0
Music
level
-10 +10
Bass
Music
10
Stop
-10 +10
Treble
0
10
Mic 2 level
#
DIGITAL KEY CONTROL
42 41 39
Previous
Sensor
0
10
Mic 1 level
b
43
Memory
0 0: 00
Pause
L
PLAY
+ 2
SHOCK RESISTANT PICK UP
POWER
REC
Remote
VOC/C
VOC/P CASSETTE
CDG
LD
DVD
AUX
Mic 1
Input
Remote
Key
Control
Mic 2
Input
35
18
Rear Panel Controls and Functions
1. VOLTAGE SELECTOR SWITCH: This switch is used to select the voltage setting according to country. For use
in the U.S. the voltage selector should be set to 110v-120v and 220v-240v in Europe.
2. NTSC/PAL SELECTOR SWITCH: This switch is used to select the NTSC/PAL setting according to country. For
U.S. televisions systems it should be set to NTSC and for European television systems the selector should be
set to PAL.
3. 200W AC OUTLET: This outlet can be used to connect another component providing it does not exceed 200
watts maximum power consumption.
4. FUSE: IMPORTANT! If the fuse blows out it’s a good indication that there may be a short in the system. DO
NOT REPLACE THE FUSE! Doing so could possibly cause additional damage to the unit. Take your CDG600RF to an authorized repair facility.
5. ECHO CONTROL FOR MIC-1 AND MIC-2: This controls the amount ECHO microphones 1 and 2 will receive.
Turn clockwise to increase echo and counterclockwise to decrease echo. (See "USING EFFECTS AND
CHANGING THE KEY", Adding Effects (Delay/Echo) To The Vocal Signal )
6. 3RD MICROPHONE/DJ/KJ INPUT JACK: This microphone input "bypasses" the echo feature and the bass
and treble tones are "preset". Therefore it is considered to produce a "dry" signal and there are no separate
bass or treble controls. It is best used for announcements by the host or hostess. The volume control for the
3rd microphone input is located just to the right of the input jack. (See #5, of the "REAR PANEL" diagram).
7. 3RD MICROPHONE INPUT VOLUME CONTROL: This controls the volume for the 3rd microphone input. Turn
clockwise to increase volume, counterclockwise to decrease.
8. TREBLE CONTROL FOR MIC-1 AND MIC-2: This controls the amount TREBLE tone microphones 1 and 2 will
receive. Turn clockwise to increase TREBLE tone and counterclockwise to decrease the treble tone. (See
"USING EFFECTS AND CHANGING THE KEY", Adding Bass or Treble To The Vocals)
9. BASS CONTROL FOR MIC-1 AND MIC-2: This controls the amount BASS tone microphones 1 and 2 will
receive. Turn clockwise to increase bass tone and counterclockwise to decrease the bass tone. (See "USING
EFFECTS AND CHANGING THE KEY", Adding Bass or Treble To The Vocals)
6
7
9
8
5
2
3
SWITCH TO:
NTSC FOR U.S. TV SYSTEM
PAL FOR EURO TV SYSTEM
NTSC
1
110-120V
4
220-240V
PAL
VOLTAGE SELECT
ECHO BYPASS
VIDEO ONLY
VIDEO SYSTEM
AC 200W
+
L
DJ MIC
DJ MIC VOL
BASS
AUX
-
DVD
ECHO
NTSC RF OUTPUT
LD
VIDEO
INPUT
VIDEO
OUTPUT
R
+
AUDI0 INPUT TERMINAL
19
TREBLE
MIC 1-2 CONT
CH3
L
L
R
R
AUDI0 OUTPUT
OUTLET
UNSWITCHED
www.vocopro.com
CALIFORNIA U.S.A
Rear Panel Controls and Functions
10. REC AUDIO OUTPUT JACKS: These outputs can be used to connect an additional tape deck or other
recording device. Connect the left and right REC outputs to the respective left and right ("R") record (REC) input
jacks on the back of your external tape deck. Only the music being played on the CDG-600RF will record onto
your external tape deck. (Follow instructions for using either player on the CDG-600RF) Play the desired CD/CDG
or cassette on the CDG-600RF and record it on your external tape deck. Vocals from the CDG-600RF will not be
recorded using these jacks. To record music and vocals from the CDG-600RF to an external tape deck connect
your external tape deck to the "L" AND "R" "PRE" output jacks of the "AUDIO OUTPUT" section.
(See #16 on REAR PANEL diagram. Also see "CONNECTING OTHER COMPONENTS TO THE CDG-600RF ",
"Expanding Your System")
11. AC POWER CORD: Plugs into any AC wall outlet.
12. AUDIO PRE-OUT JACKS: These two output jacks can be used to connect an external tape deck on which to
record music AND vocals, being played on the CDG-600RF. Connect the left and right "PRE" output jacks of the
CDG-600RF to the respective left and right input jacks (usually "REC IN" on most tape decks) on the back of your
external tape deck. (Follow instructions for using either player on the CDG-600RF) Play the desired CD/CDG or
cassette on the CDG-600RF and record it on your external tape deck.
13. VIDEO OUTPUT JACK: The video output jack is used to connect the CDG-600RF to a television monitor.
When properly connected, the television monitor will display lyrics and graphics from CDG discs being played on
the CDG-600RF. There are three ways to connect a television monitor to the CDG-600RF. 1) Connect the "VIDEO
OUTPUT" jack to the "VIDEO IN" on the back of the television monitor. There is an RCA connector cord provided
with the CDG-600RF for this type of connection. BE SURE TO SWITCH YOUR TELEVISION MONITOR TO
"VIDEO" MODE, OTHERWISE LYRICS AND GRAPHICS WILL NOT APPEAR. 2) If your television monitor does
not have and RCA type connector and only has a coaxial connector, you can use a VCR to connect the CDG600RF to your television monitor. To do this, connect the "VIDEO OUTPUT" jack on the back of the CDG-600RF
to the "VIDEO IN" on the VCR. (See diagram on opposite page). BE SURE THE TELEVISION MONITOR IS SET
TO " VIDEO" MODE AND THE VCR SETTING CORRESPONDS TO THE JACKS YOU HAVE CONNECTED THE
PLAYER TO, OTHERWISE LYRICS AND GRAPHICS WILL NOT APPEAR. If you are unsure of which setting on
the VCR should be used, see manufacturer’s instructions provided with the VCR. 3) If you do not have a VCR, or
RCA connectors on the back of your television monitor. You will need an "RF" modulator. To use an "RF"
modulator, connect the "VIDEO OUTPUT" jack on the back of the CDG-600RF to the "VIDEO IN" jack on the "RF"
modulator. Next, Connect the "OUTPUT" of the "RF" modulator, with a coaxial cable (not provided) , to the
"ANTENNA INPUT" of the television monitor. BE SURE TO SET THE TELEVISION MONITOR TO "CHANNEL 3",
OTHERWISE LYRICS AND GRAPHICS WILL NOT APPEAR. (Refer to diagram on opposite page)
14. VIDEO INPUT JACKS: There are two video input jacks on the back of the CDG-600RF. They both serve the
same purpose and can be used to connect two external players at a time. They are labeled separately, "DVD"
(digital versatile disc) and "LD" (laser disc), to allow you to easily identify which jack you have connected to which
player. When a DVD or LD player has been properly connected, (See "CONNECTING OTHER COMPONENTS
TO THE CDG-600RF"), the television monitor connected to the CDG-600RF will display lyrics and graphics from
the discs being played on the external player(s). To connect an external player use an RCA connector
cable. Connect either the DVD or LD VIDEO INPUT jack on the back of the CDG-600RF to the "VIDEO OUTPUT"
jack on the external respective player. The basic rule is "INPUT" connected to OUTPUT". WHEN PLAYING AND
EXTERNAL DVD OR LD PLAYER, BE SURE TO SELECT THE DVD OR LD SETTING ON THE FRONT OF THE
CDG-600RF, OTHERWISE THERE WILL BE NO AUDIO OR VIDEO. (See FRONT PANEL diagram, #26, #27)
20
Rear Panel Controls and Functions
15. (LD) AUDIO INPUT JACKS: The "R" and "L" "AUDIO INPUT" jacks are used to connect an external laser
disc or any compatible player to the CDG-600RF. When properly connected, the CDG-600RF will play the
music being played on the laser disc player through the CDG-600RF speakers. Connect the "R" and "L"
"AUDIO INPUT" jacks on the CDG-600RF to the "L" and "R" "AUDIO OUTPUT" jacks on the laser disc player,
using an RCA type connector cable. WHEN PLAYING AND EXTERNAL LD PLAYER, BE SURE TO SELECT
LD SETTING ON THE FRONT OF THE CDG-600RF, OTHERWISE THERE WILL BE NO AUDIO OR VIDEO.
16. (DVD) AUDIO INPUT JACKS: The "R" and "L" "AUDIO INPUT" jacks are used to connect an external DVD or
any compatible player to the CDG-600RF. When properly connected, the CDG-600RF will play the music
being played on the laser disc player through the CDG-600RF speakers. Connect the "R" and "L" "AUDIO
INPUT" jacks on the CDG-600RF to the "L" and "R" "AUDIO OUTPUT" jacks on the laser disc player, using
an RCA type connector cable. WHEN PLAYING AND EXTERNAL LD PLAYER, BE SURE TO SELECT LD
SETTING ON THE FRONT OF THE CDG-600RF, OTHERWISE THERE WILL BE NO AUDIO OR VIDEO.
17. LEFT & RIGHT AUX INPUT: These AUX jacks are for connecting an external device with RCA line-level
outputs to the CDG-600RF. After connecting, the external device can utilize the CDG-600RF unique Karaoke
functions. Using a stereo (L/R) RCA patch cable, connect one pair of RCA plugs to the AUX jacks on the rear
of the CDG-600RF and connect the remaining pair of RCA plugs to the audio output jacks on your external
device.
18. EXTERNAL SPEAKER JACKS: Use these speaker jacks to connect external speakers for output.
NOTE: Only connect one 8Ω
speaker per jack.
19. RF MODULATOR: To accommodate those televisions which do not have RCA jacks, The CDG-600RF is
supplied with an RF Modulator in order to use the video feature... (see #1 of the "REAR PANEL" diagram).
14
13
19
11
SWITCH TO:
NTSC FOR U.S. TV SYSTEM
PAL FOR EURO TV SYSTEM
NTSC
110-120V
220-240V
PAL
VOLTAGE SELECT
ECHO BYPASS
VIDEO ONLY
VIDEO SYSTEM
AC 200W
+
L
DJ MIC
DJ MIC VOL
BASS
AUX
-
DVD
+
CH3
NTSC RF OUTPUT
VIDEO
OUTPUT
L
L
R
R
AUDI0 INPUT TERMINAL
21
ECHO
LD
VIDEO
INPUT
R
18
TREBLE
MIC 1-2 CONT
17 16 15
AUDI0 OUTPUT
12 10
OUTLET
UNSWITCHED
www.vocopro.com
CALIFORNIA U.S.A
Troubleshooting Guide
PROBLEMS
CAUSES
SOLUTIONS
No video signal. Words
don’t appear on the TV
monitor.
The television may not be
switched to the proper
video input channel.
1. The television may not be switched to the
proper video input channel.
There is a loud
"squealing" noise
coming from speakers.
Feedback can occur if
the microphone is held
too closely to, or pointed
directly at, the
speakers, or because
too much treble and
echo is set for the
microphone channels.
1. Turn down the microphone volume.
Not all
televisions/monitors have
"RCA" connector jacks.
1. You will need an "RF Modulator", or VCR to
connect video.
Unable to connect the
CDG-600RF to my
television monitor with
the "RCA" cable
provided.
2. Be sure the "VIDEO OUTPUT" jack (See
PARTS AND FUNCTIONS diagram) on the rear
panel of the CDG-600RF is connected to the
"VIDEO INPUT" section of the TV monitor.
2. Turn down the treble control.
3. Hold the microphone away from the
speakers.
22