1
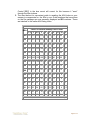
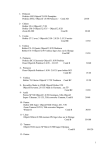
35mm YASHICA ELECTRO
RANGE-FINDER MANUAL
This Document was Updated on January 2, 2005
This Update adds Support to Questions Most Frequently Asked Since the Last
Revision
Entire Contents © 1999 – 2005 by Joe Marcel Wolff
All Rights Reserved. Copies May be Printed Out for Personal Use
Page 1 of 1
35mm YASHICA ELECTRO
RANGE-FINDER MANUAL
KEY STEPS FOR AUTOMATIC PHOTOGRAPHY
WITH THE G SERIES
1. Load and Check Battery
2. Unlock Shutter Release Button
3. Load Film
4. Set ASA Film Speed
5. Set Camera for Automatic Operation
6. Select Appropriate Exposure Symbol
7. Focus
8. Control Exposure -- using “Over - Under” Lamps....SHOOT!
Page 2 of 2
BATTERY LOADING AND CHECKING
1. Unscrew the Battery Compartment Cover with the edge of a coin.
2. Mercury battery sales are prohibited. Therefore use of the Yashica Guy Pro
Battery Adapter is suggested to replace the original types Mallory TR 164,
Eveready E164 or discontinued Duracell PX 32 Alkaline battery.
3. When the camera will not be in use for a while, be sure to remove the
battery and store it in a dry cool place, to avoid a battery leak that could ruin
your camera.
4. Check battery before picture-taking. Press Battery Check Button. If the
green light comes on in the Film Exposure Counter, the battery power is
sufficient. If not, the battery should be replaced.
FILM LOADING (Always load in subdued light)
1. Pull out Film Rewind Knob, and Back Cover will pop open. The Film
Exposure Counter is automatically set at "S" (Start).
2. Place a 35mm film cassette into film chamber and push down the Film
Rewind Knob.
3. Insert film leader into Take-up Spool and advance film with the Film
Advance Lever, making sure the perforations properly engage the sprocket
teeth. Close Back Cover.
4. Gently wind the film rewind crank-handle on Film Rewind Knob, until a slight
resistance is felt, to remove film slack.
5. Advance film, then press shutter Release Button, and repeat until the figure
"1" appears in the Film Exposure Counter.
6. Make sure the film is properly loaded. As you advance the film, the Film
Rewind Knob should rotate counter-clockwise.
ASA FILM SPEED SETTING
Align the mark on the ASA Film Speed Index Setting Ring with the ASA / ISO
rating of the film in use. The Film rating is shown on the box or the instructions that
come with the film. (DIN film speed rating conversion table is given inside the
camera).
SHUTTER RELEASE BUTTON
To lock the Shutter Release Button, align the mark on the Shutter Release LOCK
with the letter "L". To unlock, give Lock ¼ turn clockwise. When camera is not in
use, the shutter should not be left cocked, and the Shutter Release Lock should be
in the locked position.
Page 3 of 3
AUTOMATIC OPERATION
For automatic operation, set the Exposure Control Ring to AUTO position. (With
the use of exclusive Lens Shade provided with the GT model, the Exposure
Control Ring will lock at the AUTO position.)
EXPOSURE SYMBOLS
Select the appropriate Exposure Symbol and set it opposite the mark by turning the
Aperture Ring.
SUN or CLOUD symbol - for outdoor photography.
WINDOW symbol - for indoor and night photography.
This should bring you close to the correct exposure with 100 ASA / ISO film. Use
the “Over - Under” lamps to zero in.
FOCUSING
1. Sight through the Viewfinder and turn the Focusing Ring until the two
images in the center focusing area form one clear image.
2. Compose picture within the bright frame that, during focusing, in particular at
short distances, moves diagonally for automatic parallax correction.
EXPOSURE CONTROL
1. The RED and YELLOW warning arrows in the Viewfinder and on the
camera top are actuated when the Film Advance Lever is wound and the
Shutter Release Button is pressed in half way. Practice this without film in
the camera.
2. The absence of both arrows signifies hand-held photography is possible. All
you need do for a perfect picture is FOCUS and PRESS the Shutter
Release Button down all the way. The appearance of the RED arrow ( when
the Shutter Release Button is half - pressed ) signifies too much light. Turn
the aperture Ring in the direction of the arrow until it disappears.
If it fails to disappear, a neutral density filter should be used and the ASA
Film speed Setting Ring reset accordingly. If the original setting was ASA
100, reset to ASA 25 when an ND4 Neutral Density filter is used. With The
MG-1 and the GL models, do not reset the ASA. The Electronic Exposure
Page 4 of 4
Control [EEC] in the lens mount will correct for this because it "sees"
through the filter in place.
3. The chart below is a convenient guide to resetting the ASA Index on your
camera to compensate for the filter in use. Guide numbers that are shown
on the film package are now generally displayed as ISO numbers. These
are identical to the earlier ASA rating Index.
Convert ASA / ISO Index to FILTER FACTOR
ASA
Colour or Neutral Density Filter Factor
1.5
2
2.5
3
4
5
8
12
16 32
1000 650 500 400 320 250 200 125 80 64
40
800 500 400 320 250 200 160 100 64 50
32
650 400 320 250 200 160 125 80 50 40
25
500 320 250 200 160 125 100 64 40 32
20
400 250 200 160 125 100
80
50 32 25
16
320 200 160 125 100 80
64
40 24 20
12
250 160 125 100 80 64
50
32 20 16
10
200 125 100 80
64 50
40
25 16 12
8
160 100 80 64
50 40
32
20 12 10
6
125
80 64
50
40 32
25
16 10
8
5
100
64 50
40
32 25
20
12
8
6
4
80
50 40
32
25 20
16
10
6
5
3
64
40 32
24
20 16
12
8
5
4
2.5
50
32 25
20
16 12
10
6
4
3
2
40
25
16
12 10
8
5
3 2.5 1.6
20
Yashica Guy has rounded off results to the nearest ASA setting
Page 5 of 5
EXPOSURE INDICATORS
The appearance of the YELLOW arrow signifies too little light for hand-held
photography, since the exposure speed will be slower than 1/30 second. Turn
the Aperture Ring in the direction of the arrow until it disappears. If it fails to
disappear, use a tripod. (Yashica convertible Grip/Tripod ST-7 is handy to lean
up against a wall or post for support ). Whether the YELLOW arrow disappears
or not, the precise exposure speed will be determined and set automatically to
a maximum of 30 seconds.
CONTROL OF SHUTTER SPEED
The Electro Exposure control system is of the Aperture Priority type. You select the
lens opening and it sets the shutter speed for the correct exposure. This normally
works out very well
You can however overcome this and control the shutter speed, for sporting events
for example.
When you understand the relationship between the aperture stops and the
percentage of light between them, it actually becomes quite simple to select the
shutter speed best suited for your shots.
Each ƒ stop on the lens barrel, namely, 16 - 11 - 8 - 5.6 - 4 - 2.8 - 2 - 1.4
represents a 100% change from the adjoining setting. As the numbers get larger,
the amount of light transmitted by the lens becomes LESS, because this number is
NOT the size of the lens opening but is the ratio of the size of the lens opening
[aperture] to the focal length of the lens. With this in mind, it is not difficult to follow
the procedure.
In daylight photography, set the lens opening to maximum for the sake of
simplicity. This is 1.7 on the 'G' series. Now slowly press the shutter release button
until you see the red over exposure lamp. Then adjust the lens opening until both
the red and yellow lamps are out. At this point your camera is set for the correct
exposure with the shutter set at 1/500th sec. If you wish to cut the shutter speed in
half to 1/250th second for the sake of greater depth of focus, move the indicated
lens opening on the barrel to the next 100% smaller aperture setting. For example
if the lamp went out at ƒ 5.6, decrease the lens opening by 100% to ƒ 8.0
Obviously you can move from one mid point to the next. To obtain an exposure of
1/125th second, you would move the lens by two increments to ƒ11. Try this
without film in the camera to get the hang of it.
Page 6 of 6
It is also possible to use an Exposure Meter to determine the correct Aperture to
get the Shutter Speed that you would like the camera to use. Just set the Exposure
Meter’s selected Aperture for that speed on the camera, and the Electro Shutter
will automatically match the correct Shutter Speed. Use of an Incident Light meter
is highly desirable.
FILM UNLOADING (ALWAYS UNLOAD IN SUBDUED LIGHT)
1. After the last exposure, DO NOT try to advance the film further as it may
tear or come loose, making it impossible to rewind the film into the cassette.
2. Before removing it from the camera, the film should be rewound into its
cassette. Press the Film Rewind Release Button on the bottom plate of the
camera. If you fail to do this, you may tear the film perforations or even
damage the camera mechanism.
3. Unfold the crank handle on the Film Rewind Knob and very slowly turn it in
the direction of the arrow until a slight resistance is felt. Continue slowly
winding until you feel it turning freely. Caution. If you wind too quickly under
conditions of low humidity, you may cause static-electricity to discharge onto
your film, resulting in light streaks on the negative. Gently allow the rewind
handle to turn as the film may unwind itself within the cassette. If the film
turns too quickly, static marks will fog and ruin your negatives.
4. Open the Back Cover, remove the cassette and send for processing.
DEPTH OF FIELD
1. Depth of field is the area in front and behind the subject on which the
camera is focused. within which all objects also appear acceptably sharp in
the picture. It varies with the aperture and is more extensive.
a. When the lens is stopped down
b. When the camera is focused on a distant subject
c. In the background rather than the foreground
2. The depth of field can be determined by reference to the depth-of-field scale
on the lens barrel. With the camera focused on 2 meters and an aperture of
f/16, the depth of field will be from 1.4 to 3.8 meters, i.e. the range enclosed
by the number 16 on both sides of the red index mark.
Page 7 of 7
SELF-TIMER
1. If you want to include yourself in the picture, use the Self-Timer and proceed
as follows:
a. Advance the film
b. Move Self-Timer Lever down all the way in the direction of the arrow
c. Press Shutter Release Button and the shutter will click about 8
seconds later.
“B” SETTING
Since the shutter will operate automatically for long time exposures, “B” setting
[ Bulb ] is used only very occasionally, mainly for special effects. At “B” setting the
shutter will remain open for as long as the Shutter Release Button is kept
depressed. This function requires a battery in the camera.
1. Align the “B” symbol on the Exposure Control Ring with the red triangular
mark.
2. The use of a tripod and cable release is essential.
Page 8 of 8
FLASH EXPOSURE
To stop movement in dim light, use flash.
The Electro G's require that the camera battery be installed to trigger flash
exposures. Mount a Strobe Flash Gun in the Accessory Shoe and connect the
synchro cord to the Flash Sync. [PC] Terminal. The GSN / GTN and GL have both
a Hot Shoe and PC terminal. Flashbulbs can be used when the indicator on the
lens is set at the lightening bolt symbol. Some models have an M & X selector. X is
for Strobe [Electronic Flash]. All these models in the G group will synch Strobe in
the AUTO setting at all but the highest shutter speeds for outdoor fill light.
If you plan to use a strobe flash with the Electro 35, G or GS that does not have a
hot shoe, you need to place insulation tape on the base of the shoe to prevent the
flash from shorting out.
If you do not follow this, a charged flash will fire as soon as it is installed, or simply
drain it's batteries when switched on after it is installed. The use of one of the older
strobe flash units without a hot shoe contact will avoid this problem as well as the
use of a Flash Bracket [highly recommended].
If you still have flashbulbs and want to have some fun, align the Flash Symbol on
the exposure Control Ring with the red triangular mark. The shutter speed is
automatically set at 1/30 sec. [ “M” type, flash-bulb synch ]. Focus the camera and
divide the guide number of the strobe flash or flash bulb by the flash-to-subject
distance. The figure thus obtained should be set by turning the Aperture Ring.
Example: ASA 100 film - guide number 84 - divide by distance (15 ft.) equals f/5.6
aperture. NOTE: The guide number differs with ASA film speeds.
Page 9 of 9
FOR BETTER PICTURES
1. For better color pictures, shoot in soft, diffused light.
2. When shooting by available light indoors, be aware that the colour of nearby
objects or walls, will be reflected onto the subject. This can result in
undesirable colour tints that cannot be compensated for in printing. Also pay
attention to your clothing that can reflect colour particularly while shooting
close-ups.
3. When the YELLOW arrow in ON, use a tripod (also with B and Self-Timer).
4. When the main subject is the point of interest, use the largest aperture
suited for the prevailing light. If a greater depth of field is required, stop
down the aperture as necessary.
5. When it is necessary to stop action in outdoor photography, turn the
Aperture Ring to where the RED arrow just disappears. At this point, the
shutter is about 1/500 sec.
6. When photographing spot-lighted subjects or against light, reset the ASA
Film Speed Index Setting Ring.
Example with ASA 100 film:
9Strong spot-lighted subject - reset to ASA 200-400.
9Against light - reset to ASA 50 or 25.
9The use of a Neutral Density [ND] or Polarizing filter when shooting in
blazing sunlight, snow or beach scenes is recommended. Reset the
ASA Film Speed Index Setting Ring according to filter factor, unless
you are using one of the models that have the Exposure sensor
within the lens mount. e.g. MG-1, GL. For night photography,
WITHOUT FLASH, set the Exposure Control Ring at the AUTO
position and the Aperture Ring at the INDOORS (window) symbol. In
all cases, the shutter speed will be determined and set
AUTOMATICALLY. However, when shooting with the YELLOW arrow
on, use a tripod.
Page 10 of 10
ACCESSORIES
LENS SHADE
The lens shade serves to ward off flare on the lens. Its’ use is always
recommended for better results. It is the single most valuable camera accessory.
FILTER
Filters are handy for special photographic effects. Many kinds of 55mm screw-in
type filters are available for colour and B&W film.
AUTO-UP LENS
Auto-Up Lenses are available designed for the Yashica ELECTRO 35 G, GT, GS ,
GSN and GTN, and some earlier models. It enables photography of subjects
between the distance of 80cm (32 inches) and 45cm (18 inches).
GRIP/TRIPOD ST-7 or SIMILAR.
This is a “must” for sharper, clearer pictures under any condition. It is essential for
night photography, time exposure, self-portraits, etc. to prevent camera shake.
AUXILIARY LENS SET
The Auxiliary Lens Set consists of an auxiliary telephoto lens that extends the focal
length of the camera lens to 58.4mm and an auxiliary wide angle lens which
reduces the focal length of the camera lens to 37.7mm. To make picture
composition easier and more accurate, an exclusive viewfinder is supplied to serve
both lenses. Be sure to read the limitations and instructions required in order to use
these lenses on the Yashica Guy web site, before deciding to purchase this item.
These lenses function within a limited aperture range and require that the distance
as indicated by the rangefinder, be recalculated.
Page 11 of 11
CARE OF YOUR CAMERA
1. Keep both the inside and outside of your camera clean. Use a soft, clean
cloth.
2. To clean the lens, first blow away any dust or grit, then clean with a lens
brush or soft, clean lint-less cloth.
3. Avoid storing the camera with the shutter charged.
4. Do not leave the camera in the glove compartment or trunk of a car, or in
direct sunlight, as heat may affect the film, battery, light seals, etc.
5. When the camera is not in use for a long period of time, remove the battery
and store in a cool, dry place. It is advisable to carry a spare battery.
6. Do not dismantle the camera or the lens for cleaning.
7. Do not store the camera in it’s leather carrying case. This may trap moisture
and lead to the eventual penetration of microscopic flaws in the chrome
plating. Specks of green oxide from the brass below could come to the
surface and permanently damage the cosmetics of your camera. This is
most important in coastal locations that have salt air.
Page 12 of 12
SPECIFICATIONS
Apply only to G, GS, GSN. Download data on other models from the Yashica Guy site.
•
Lens: COLOR-YASHINON DX f/1.7 45mm; 6 elements in 4 groups, stops
down to f/16.
•
Shutter: Electronic shutter with an infinite range of speeds from l/500 sec. to
30 seconds; B setting; built-in self-timer; M and X sync; shutter release lock;
automatic setting.
•
Focusing: Coupled range/viewfinder focusing; 0.8 meter (2’6”) to infinity;
bright frame with automatic parallax compensation.
•
Exposure Control: Solid-state “Electronic Brain” controls the electronic
shutter according to light intensity measured by the CdS sensor; precise
shutter speed for correct exposure in any light is determined and set
AUTOMATICALLY; exposure symbols for easy selection of aperture, arrows
warn against over exposure and signal slow shutter speed and advisability
of using a tripod; ASA / ISO range varies with model from 25 to 1000.
•
Original power source - Mercury 5.6 V Mallory TR164, Eveready E164.
An Alkaline / Lithium battery type converter is available from Yashica Guy.
•
Other Features:
9Single-stroke film advance lever charges shutter, sets electronic
exposure control to standby condition, registers count of exposed
frames and prevents double exposure, automatic resetting exposure
counter;
9Fold-away crank-handle for rapid film rewind;
9Multi-slot take-up spool for easy film loading; battery checker
incorporated in the exposure counter window.
9Lens Shade: 57mm slip-on type.
9Filters: 55mm screw-in type.
9Dimensions: Approx Metric: Length 142mm, Width 33mm, Height
from base to top of shutter release 86mm, width from front of lens
ring at INF to Test Switch frame 78mm.
9Dimensions as above Imperial: L 55/8”, W 11/4”, H 311/32”, front of lens
to back 31/16”.
Weight: 750 grams (1.65 lbs).
This Document is © Copyright 1999 – 2005 by Joe Marcel Wolff
It may not be uploaded to any other website. If you wish to make this document
available to your site visitors, kindly provide a link to this Yashica-Guy.com page.
Page 13 of 13