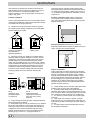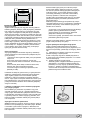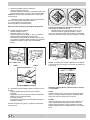
1
Cucina SU DUJINE ORKAITE IR DUJINIU GRILIUMI VIRYKLĖ Installazione e uso MONTAVIMO IR NAUDOJIMO INSTRUKCIJA Cooker Installation and use oa Konyhabútor Beépítés és használat K3G21/R K3G21S/R K3G21SX K3G21SW Important safety warnings SVARBIOS SAUGUMO NUORODOS To maintain the EFFICIENCY SAFETY ofmes thisrekomenduojame: appliance, we recommend: Kad šį prietaisą išlaikyti SAUGŲand ir EFEKTYVŲ, • call •only the Service Centers authorized the manufacturer Skambinti tiktai gamintojo įgaliotiems by techninio aptarnavimo centrams. • always use original Spare Parts • Visada naudoti tiktai originalias atsargines detales. Šisappliance prietaisas skirtas ne profesionaliam, buitiniam 11. This isintended fornonprofessional usewithinothe home. naudojimui namuose. 2 Theseinstructionsareonlyforthosecountrieswhosesymbolsappearinthe 2. Ši instrukcija skirta tik toms šalims, kurių simboliai yra ant bookletandontheserialno.plateoftheappliance. instrukcijos ir ant prietaiso plokštelės su serijiniu numeriu. 33. This owner’s manual is for a class (insulated) or Ši naudojimo instrukcija skirta11appliance klasės prietaisams class 2, subclass 1 appliances (installed between two cabinets. (izoliuoti) arba 2 klasės 1 poklasio prietaisams (įmontuoti 4tarp Before usingspintelių). yourappliance,readtheinstructionsinthisowner’smanualcarefully dviejų itprovides alltheinformation youneed toensureperskaitykite safeinstallation,šioje useand 4. since Prieš naudodamiesi prietaisu, atidžiai instrukcijoje pateiktą informaciją. pateikta reikamaintenance. Alwayskeep thisowner’sČia manual closetovisa handjums sinceyou may linga informacija, need to refer to it insusijusi the future.su saugiu montavimu, naudojimu ir priežiūra. Šią the instrukciją visada laikykite priein5technine Whenyou haveremoved packing,check thatthe appliancelengvai isnotdamaged. amoje vietoje, nes ja gali tekti remtis ateityje. If you have any doubts, do not use the appliance and contact your nearest 5. Nuėmę prietaiso pakuotę, patikrinkite ar viryklė nepažeista. AristonServiceCentre.Neverleavethepackingcomponents(plasticbags, Jeigu abejojate, nenaudokite prietaiso ir susisiekite su artimiaunails,etc.)within thereach ofchildrenmedžiagų sincetheyare(plastikiasource siu polystyrene techniniofoam, aptarnavimo centru. Pakuotės potentialdanger. niaiofmaišeliai, polistirolio putos, vinys ir t.t.) niekada nepalikite 6vaikams The appliance mustvietoje, be installed by apavojaus qualified šaltinis. technician in prieinamoje nes only jos yra withsumontuoti the instructions provided. Thetechninis manufacturer 6. compliance Prietaisą gali tiktai kvalifi kuotas darbuotojas šioje instrukcijoje pateiktų nuorodų. Jeigu declines alllaikantis liability for improper installation, which may result in prietaisas neteisingai sumontuotas, personalbuvo injury and damage to property. gamintojas neprisiima sumontuotas keliaif 7jokios Theatsakomybės. electrical safetyNeteisingai of this appliance can onlyprietaisas be guaranteed pavojų žmonėms ir gali sugadinti turtą. it is correctly and efficiently earthed, in compliance with regula7. Elektrinis prietaiso saugumas garantuojamas tik tuo atveju, tions on electrical safety. Always ensure that the earthing is efjeigu jis yra teisingai ir efektyviai įžemintas, laikantis elektrinio ficient. Ifreikalavimų. you have any doubts, contact a qualified technician saugumo Visada užtikrinkite, kad įžeminimas yrato check the system. Theabejojate, manufacturer declinessu all liability for damveiksmingas. Jeigu jūs susisiekite kvalifikuotu age resulting from a system which has not been earthed.jokios techniku, kuris patikrins sistemą. Gamintojas neprisiima 8atsakomybės, Before plugging appliance the įžeminta. mains, check that the jeiguthe sistema buvointo blogai 8. specifications Prieš prijungdami prietaisą prie maitinimo įtampos, pa-and/ indicated on the date plate (on the appliance tikrinkite ar duomenų lentelėje (ant prietaiso ant pakuotės) or packaging) correspond with those of thearba electrical and gas pateiktos specifi kacijos systems in your home.atitinka jūsų namo elektros ir dujų sistemą. 9 Check that the electrical capacity of the system and sockets will 9. Patikrinkite ar sistemos ir lizdų elektrinė galia atlaikys support the maximum power of the appliance, as indicated on maksimalią prietaiso galią, kuri nurodyta duomenų lentelėje. theabejojate, data plate.susisiekite If you have su anykvalifi doubts, contact a qualified techJeigu kuotu techniku. 10.nician. Daugiapolis jungiklis su mažiausiai 3 mm ar didesnėmis 10 An omnipolar switch with a contact opening of at least 3 mm or kontaktų skylėmis reikalingas mašinos sumontavimui. is elektros required lizdas for installation. 11.more Jeigu ir prietaiso maitinimo įtampos laido kištukas neatitinka, kvalifikuotas 11 If the socket and elektros appliancelizdą plugturi arepakeisti not compatible, have the technikas, kuris taip pata turi patikrinti arby elektros lizdotechnician, kabelio socket replaced with suitable model a qualified skerspjūvis yraalso pakankamas galiai. Nerekomenduowho should check thatprietaiso the cross-section of the socket cajame naudoti adapterius, daugialypius elektros ir/arba ble is sufficient for the power absorbed by thelizdus appliance. The prailginimo kabelius. Jeigu jie yra būtini, naudokite tiktai vienuse of adaptors, multiple sockets and/or extensions, is not recgubus arba daugialypius adapterius bei prailginimo kabelius, ommended. If their usesaugumo cannot bereikalavimus. avoided, remember to use atitinkančius galiojančius Tokiu atveju only single or multiple adapterssrovės, and extensions which comply niekada neviršykite maksimalios nurodytos ant atskiro with current regulations. cases, never adapterio arba safety prailginimo kabelioInir these maksimalios galiosexceed ant the maximum current capacity indicated on the individual adapdaugialypio adapterio. 12.torPrietaiso nepalikite prijungto prie maitinimo įtampos, or extension and the maximum power indicated on thejeigu muljis nenaudojamas. tiple adapter. Išjunkite pagrindinį jungiklį ir uždarykite dujų padavimą, kai prietaiso nenaudojate. 12 Do not leave the appliance plugged in if it is not in use. Switch 13.offVentiliacinės ir šilumos ir skylės niekada the main switch and gaspaskirstymo supply whenangos you are not using the neturi būti uždengtos. appliance. 13 The openings and slots used for ventilation and heat dispersion must never be covered. 14 Theusermustnotreplacethesupplycableofthisappliance.Alwayscontactan after-salesservicecentrewhichhasbeenauthorisedbythemanufacturerifthe cablehasbeendamagedorneedsreplacement. 15 Thisappliancemustbeusedforthepurposeforwhichitwasexpresslydesigned. Anyotheruse(e.g.heatingrooms)isconsideredtobeimproperandconse- 15 14. quently Vartotojas negali šio declines prietaiso maitinimo įtampos dangerous. Thepakeisti manufacturer allliability fordamage resulting kabelio. Jeigu kabelis buvo pažeistas arba jį reikia pakeisti, fromimproperandirresponsibleuse. visada susisiekite su gamintojo įgaliotu techninio aptarnavimo 16 Anumberoffundamentalrulesmustbefollowedwhenusingelectricalappliances. centru. Thefollowingareofparticularimportance: 15. Šis prietaisas turi būti naudojamas išskirtinai tik pagal jo • Do touch thevartojimas appliance(pvz. whenkambarių your hands or feet are paskirtį. Betnot koks kitas šildymas) wet. netinkamas ir pavojingas. Gamintojas neprisiima yra laikomas • atsakomybės Do not use theužappliance barefooted. jokios nuostolius, padarytus prietaisą neteis• ir Do not use extensions, ingai neatsakingai naudojant.but if they are necessary, caution 16. Naudojantis elektriniais prietaisais reikia laikytis kelių must be exercised. fundamentalių taisyklių: • Never pull the power supply cable or the appliance to un• Prietaiso plug thenelieskite appliancešlapiomis plug fromrankomis the mains.arba kojomis. • Prietaiso nenaudokite stovėdami basomis kojomis. • Never leave the appliance exposed to atmospheric agents • Nenaudokite prailginimo kabelių, tačiau jeigu jie yra (rain, sun etc.) neišvengiami, laikykitės atsargumo priemonių. •• Prietaisą Do not norėdami allow children or persons who areįtampos not familiar with atjungti nuo maitinimo the appliance to už usekabelio it, without supervision. niekada netraukite arba už pačio prietaiso. 17 •Always unplug the appliance the mains or switch off the Prietaiso niekada nepalikitefrom atmosferiniam poveikiui main switch (lietus, saulėbefore ir t.t.).cleaning or carrying out maintenance. priežiūros prietaisu naudotis arba 18 •IfNeleiskite you are nobe longer using an appliance of thisvaikams type, remember asmenims nemokančiais juo dirbti. to make it unserviceable by unplugging the appliance from the 17. mains Prieš and valydami techninę cuttingarba the atlikdami supply cable. Also priežiūrą, make all potentially prietaisą visada atjunkite nuo maitinimo įtampos arba išjunkite dangerous parts of the appliance safe, above all for children pagrindinį jungiklį. who could play with the appliance. 18. Jeigu jūs daugiau nebenaudojate šio prietaiso, padarykite 19 To avoid accidental spillage do notišuse cookware with uneven jį neveiksmingu ištraukdami kištuką maitinimo įtampos lizdo or deformedkabelį. bottoms onpat thepašalinkite burners. Turn thepavojingas handles of pots ir nupjaudami Taip visas and pans inwards avoidnegalėtų knockingžaisti them vaikai. over accidentally. prietaiso dalis, kad sutojomis 20 Never use flammable liquids such asnenaudokite alcohol or gasoline, 19. Kad išvengti atsitiktinio išsipylimo, virtuvėsetc. reikmenų suappliance nelygiu arba deformuot near the when it is in use.dugnu. Puodų ir kaistuvių rankenėles nusukite vidų, kad jų atsitiktinai 21 When using smallį electric appliances nearneišverstumėte. the hob, keep the 20. supply Šalia prietaiso jo veikimo metu niekada nenaudokite degių cord away from the hot parts. skysčių, tokių kaip alkoholis arba benzinas ir t.t. 22 Make sure the knobs are in the “•”/”�” position when the appli21. Naudodami mažus elektrinius prietaisus šalia dujų degikance is not in use. lio, jų maitinimo įtampos kabelį laikykite atokiau nuo karštų 23 When the appliance is in use, the heating elements and some vietų. of the oven door become extremely hot.kad Make sure you 22. parts Kai prietaisas nenaudojamas, užtikrinkite, pasukamos don’t touch and keep children well away. rankenėlės yrathem “o/i” padėtyje. 24 Gas require regular air exchange to ensure trou23. Kai appliances prietaisas naudojamas, kaitinimo elementai ir kai kuriosble-free orkaitėsperformance. durelių dalysWhen labai įkaista. Jokiu jų follow nelieskite installing the būdu cooker, the ir neleiskite vaikams prisiartinti. instructions provided in the paragraph on “Positioning” the 24. appliance. Dujiniams prietaisams reikalingas reguliarus oro pasikeitimas, kad užtikrinti darbą be trukdžių. Montuo25 The glass top (only on certain models) can shatter if it is overdami prietaisą laikykitės skyriuje “Prietaiso pastatymas” heated. Therefore, all of the burners or hot plates must be turned pateiktų instrukcijų. before the top is closed. 25. off Jeigu stiklinis viršus (tiktai tam tikruose modeliuose) 26 If the cookerjisisgali placed on Todėl a pedestal, take theviršų necessary perkaitinamas, suskilti. prieš uždarant precautions prevent arba the same from sliding off the pedestal visada išjunkite to degiklius karštas plyteles. 26. itself. Jeigu viryklė pastatoma ant pagrindo, užtikrinkite, kad viryklė nuo jo nenuslystų. 27 Warning: never place hot containers or items and 27. flammable Įspėjimas:materials Niekada nedėkite karštų konteinerių arba inside the dishwarmer drawer. talpų su degiais skysčiais patiekalų pašildymo skyriuje. LT Installation MONTAVIMAS Visas sekančiuose puslapiuose instrukcijas turi out All instruction on the following aprašytas pages must be carried kvalifikuotas asmuo(corgi (atestuotas) atitinkamai dujų saubyatlikti a competent person registered) in compliance gumo (montavimas ir naudojimas) taisyklėms 1984.1984. with gas safety (installation and use) regulation Svarbu: Reguliavimo metu viryklę atjunkite nuo elektros enImportant: disconnect the cooker from the electrycity ergijos ir dujų įvado. and gas supply when any adjustment, etc. tušti arba pustuščiai. Patalpoje tiktai only partially full. It is advisable to patartina keep in laikyti the room naudojamą balioną. Balionas turi būti pastatytas atokiau the can which is being used, and it must be placed nuo tiesioginių šilumos šaltinių (orkaitė, ugnis, krosnis ir away frombalioną direct galėtų heat įkaitinti sources (ovens, fireplaces, t.t.), kurie iki aukštesnės nei 50OC stoves, etc.) that could make the can reach temperatūros. temperatures higher than 50°C. Prietaiso pastatymas Positioning your appliance Important: this appliance may be installed and used only Šį prietaisą galimarooms montuoti ir naudoti tiktai inSvarbu: permanently ventilated in compliance withnuolatos current ventiliuojamose patalpose, atitinkančiose galiojančias direktydirectives. The following precautions should be taken: vas. Reikia imtis šių saugos priemonių: a) The room must be provided with an external exhaust a) system Patalpaobtained turi turėti išorinę sistemą, with aišmetimo hood or with jungiamą an electric per surinktuvą arba elektrinį ventiliatorių, kuris ventilator that goes on automatically eachautomatiškai time the unit pradeda veikti įjungus viryklę. is switched on. Levelling your appliance (only on a few models) Jūsų viryklėje įrengtos kojelės prietaiso niveliavimui. Your cooker is supplied with feet for įsukti levelling the appliance. Jeigu reikia, šias kojeles galima į korpusą viryklės If necessary, these feet can be screwed into the housings pagrindo kampuose. in the corners of the cooker base. In the case of chimneys or flues Prietaiso niveliavimas (tiktai keliuose modeliuose) Mounting the legs (only (tiktai on a few models) Kojelių montavimas keliuose modeliuose) Press-fit legs are supplied which fit under the basekartu of your Paspaudimu pritvirtinamos kojelės yra tiekiamos su cooker. virykle. Jos tinka jūsų viryklės pagrindui. Directly to the Atvejis kai yra (for kaminai Tiesiai į lauką with branches cookers) exterior arba dūmtakiai su b) The room must be provided with a system for air inflow atšakomis (viryklėms) which is necessary for a regular combustion. The air flow necessary for the combustion should be at least 2 b) 3Kambaryje turi būti oro, reikalingo normaliam degimui m /h forsistema. kW of Degimui installedreikalingo power. The systemturimay padavimo oro srautas būti be realized 2by drawing the air directly from mažiausiai m3/h kiekvienam įdiegtos galios kW.outside Sistemathe building through a pipe that hasišatlauko least a 100 cm2 gali būti išpildyta orą paduodant tiesiai į pastatą useable section and which must not be accidently ortakiu, turinčiu mažiausiai 100 cm2 naudingo ploto. Ortakis negali būti atsitiktinai užblokuotas (pav. A). Oras be taiprealized pat gali obstructed (Fig. A). And further it may būti paduodamas netiesiogiai iš kitų patalpų, kuriuose yra indirectly from other adjacent rooms which are provided ventiliaciniai ortakiai dūmų pašalinimui iš pastato į lauką ir to with a ventilation pipe for the expulsion of the fumes kurie nėra bendro naudojimo patalpų dalis arba sprogimui the outside of the building as foresaid, and which must pavojingų patalpų arba vonios kambario dalis (pav. B). not be part of the building in common use or rooms with Arisk of fire, or bedrooms (Fig. B). Detalė Detail A Adjacent room Installation the cooker Viryklėsofmontavimas The appliance can be installed next to furniture units which Viryklė pagaminta su x klasės apsauga nuo perkaitimo, are no taller than the topmontuoti of the cooker hob. The wall in todėl prietaisą galima greta spintelių. Prietaisas būti montuojamas greta spintelių, jų aukštis directgali contact with the back panel of thejeigu cooker must be viryklės kaitinimo paviršiaus aukščio. Viryklėsthe madeneviršija of non-flammable material. During operation galinę sienelę liečianti siena turėtų būti nedegi. Atsiminkback panel of the cooker could reach a temperature of ite, kad naudojimo metu galinė viryklės sienelė gali 50°C above roomO temperature. For proper installation of pasiekti iki 50 C didesnę temperatūrą negu kambario. the cooker, the following precautions must be taken: Norėdami teisingai sumontuoti viryklę laikykitės žemiau a) The appliance can priemonių: be placed in a kitchen, dining room pateiktų saugumo or bedsit, but not in a bathroom. b) Alla)furniture the appliance must be placed at Viryklė around gali būti statoma virtuvėje, valgomajame arba least 200 mm the top ofdušo the cooker, should the svetainėje, betfrom ne vonios arba patalpose. b) Užofviryklės aukštį didesnės virtuvinės spintelės, surface the appliance be higher than the worktop of pastatytos šalia viryklės, turi būti mažiausiai 200 mm atsthis furniture. Curtains should not be placed behind tumu nuo gaubto krašto. Užuolaidų negali būti už viryklės the cooker or less than 200 mm away from the sides mažesniu nei 200 mm atstumu nuo viryklės šonų. ofarba the appliance. c) Oro surinkimo gaubtas turi būti sumontuotas pagal c) Any hoods must be installed according to the requireinstrukciją. ments in the installation manual for the hoods themd) Jeigu viryklė montuojama po spintele, ji turi būti selves. mažiausiai 420 mm virš viryklės dangčio. Minimalus atsd) If tumas the cooker installed beneath wall cabinet, kuriuo is gali būti statomi degūsavirtuviniai daiktai the yra latter 700 must mm. be situated at a minimum of 420 mm above e) hob. Su The virykles galine sienele kontaktuojanti siena turi the minimum distance between the worktop būti iš nedegios medžiagos. and kitchen units made of combustible material is 700 mm. e) The wall in direct contact with the back panel of the cooker must be made of non-flammable materials. Room to be ventilated A Fig. A Pav. A Examples of ventilation openings Ventiliacinių angų air for the comburent c)pavyzdžiai During degimo prolonged use oro padavimui. Fig. B Pav. BIncreased opening between Gretutinis thekambarys door and and floor Ventiliuojamas kambarys of the appliance you may Tarpo tarp durų ir grindų consider it necessary to open a window to the outside pavyzdys to improve ventilation. Jeigu prietaisą naudojategases, ilgą laiką, galiare prireikti atidaryti d)c) The liquefied petroleum which heavier than langą, kad pagerinti ventiliaciją. air, stagnate towards the ground. Therefore, the rooms d) containing Suskystintos dujos, sunkesnės užtowards orą, leidžiasi LPG canskurios mustyra have openings the link grindų. Todėl patalpos su suskystintų dujų balionas turi of outside in order to allow the venting from the ground turėti angas į išorę, kad nuo grindų galėtų būti išventiliuotos eventual gas leak. Thus, the LPG cans must not be nutekėjusios dujos. Dėl šios priežasties suskystintų dujų installed or settled in rooms that arepatalpose below the ground balionai negali būti padėti ar sumontuoti žemiau level, (cellar, etc.) whether the cans are empty or žemės lygio (pvz. rūsiai ir t.t.), netgi jeigu balionai yra LT 16 Elektros kabelio prijungimas prie maitinimo įtampos Tight control Sumontuokite kištuką, atitinkamai apkrovai, nurodytai Important: when installation been completed, check ant duomenų lentelės. Kabelį has prijungdami tiesiogiai prie themaitinimo pipe fitting for leaks with a soapy solution. Never įtampos, sumontuokite daugiapolį jungiklį use a flame. Once connection has been made, ensure that (automatinįthe pertraukiklį) su minimalia 3 mm kontaktų theertme flexible tube does notlizdo. touchDaugiapolis any moving parts tarpmetal prietaiso ir maitinimo turėtų būti parinktas pagal apkrovą ir turi atitikti andjungiklis is not crushed. 420 mm. 420 mm. Min. 600 mm. Min. Min. min. 650 mm. with hood min. 700 mm. without hood HOOD galiojančias taisykles (automatinis pertraukiklis neturi Connecting the supply cable to the mains atjungti įžeminimo). Install a normalised plugturi corresponding tokad thejisload Maitinimo įtampos kabelis būti padėtas taip, indicated on didesnės the data nei plate. When connecting the cable nepasiektų 50OC temperatūros, atsižvelgiant į kambario Prieš sujungimus padirectly to thetemperatūrą. mains, install anatlikdami omnipolar circuit-breaker tikrinkite šiuos veiksnius: with a minimum contact opening of 3 mm between the appliance and the mains. The omnipolar circuit breaker ir namuose sistema gali atlaikytų should• Ar beribotuvas sized according to įdiegta the load and should comply prietaiso apkrovą (žiūrėkite duomenų lentelę). with current regulations (the earth wire should not be • Įtampos tinklas yra gerai įžemintas, atitinkamai interrupted by the circuit breaker). galiojančioms direktyvoms ir taisyklėms. The supply cable should be positioned so that it does not • Sumontavus gaubtą, prie elektros lizdo ir automatinio reach pertraukiklio a temperature of lengvai more than 50°C with respect to galima prieiti. the room temperature, along its length. Before making the Niekada nenaudokite connection, check that:adapterių, perėjimų arba šuntų, nes sukelti perkaitimą arba gaisrą. • jie thegali limiter valve and the home system can support the appliance load (see data plate); pritaikymas skirtingiems tipams • Viryklės the mains is properly earthed dujų in compliance with Viryklę norėdami pritaikyti skirtingiems dujų tipams, current directives and regulations; atsižvelgiant į dujų tipus kuriems ji buvo pagaminta (nuro• dyta there is easy access the socket ant anddangčio), omnipolar circuit duomenų lentelėje,topritvirtintoje elkitės breaker, once the hob has been installed. taip: N.B: use reducers, adaptors or shunts since they a) never Pakeiskite žarnos laikiklį, sumontuotą ant prietaiso, canpateiktu cause krepšelyje heating or“viryklės burning. priedai”. Connecting the gas Dujų prijungimas The appliance should be connected thedujų mains or to a Viryklė turi būti prijungta prie dujų įvado to arba baliono gas cylinder in compliance with current directives. Before laikantis galiojančių direktyvų. Prieš prijungdami, patikrinkite making the būtų connection, check that the cookerdujų is regulated kad viryklė sureguliuota jūsų naudojamam tipui. for theviryklė gas nesureguliuota, supply you are using.skyrių If not, follow the Jeigu skaitykite “Pritaikymas skirtingoms dujų rūšims”. in Kaithe kuriuose modeliuose dujos galito instructions indicated paragraph “Adapting būti prijungiamos kairės arba iš dešinės pusės, atitinkamai different types ofišgas”. On some models the gas supply pagal Norėdami sujungimą, žarnos atvamzdį can beporeikį. connected on thepakeisti left or on the right, as necessary; akle ir pakeiskite tarpinę (tiekiama kartu su touždarykite change the connection, reverse the position of the hose prietaisu). Naudodami suskystintas dujas iš baliono, sumonholder with that of the cap and replace replace the gasket tuokite slėgio reguliatorių, atitinkantį galiojančias direktyvas. (supplied with the When liquid gasnurofrom Svarbu: Patikrinkiteappliance). ar dujų įvado slėgisusing atitinka vertes, adytas cylinder, install a pressure regulator which complies with lentelėje nr.1 “Degiklių ir purkštukų charakteristikos”, current directive. nes tai užtikrins saugų darbą, teisingą dujų suvartojimą ir Important: check that the supply ilgesnį jūsų prietaiso tarnavimo laiką.pressure complies with the values indicated in table 1 “Characteristics of the Žarnos and prijungimas burners nozzles” since this will ensure safe operation, Sujungimą padarykite naudodami dujųažarną, atitinkančią correct consumption and ensure longer life to your vietinius reikalavimus. Montuodami žarną laikykitės šių sauappliance. Svarbu: suskystintų dujų žarnos laikiklis pažymėtas nr. gumo priemonių: Adapting the cooker to different types of gas 8, gamtinių dujų žarnos laikiklis pažymėtas nr.13. Visada In order to adapttarpinę. the cooker to a different type of gas with sumontuokite respect to the gas for which it wasviršuje: produced (indicated on b) Degiklių pakeitimas viryklės the label attached to their lid), follow these steps: • Nuimkite groteles degiklius ištraukite iš jų korpuso. • Naudodami 7 mm atsuktuvą išsukite purkštukus ir with a) replace the hose holder mounted on the appliance naujo dujų tipo purkštukais. (žiūrėkite thatpakeiskite suppliedjuos in the bag of “cooker accessories”. lentelęthe nr.1hose “Degiklių ir purkštukų Important: holder for liquidcharakteristikos”). gas is marked 8, the • Sumontuokite visus gas komponentus kartodami aukščiau hose holder for methane is marked 13. Always fit the pateiktus žingsnius atvirkštine tvarka. sealing gasket. b) Replacing the burner nozzles on the hob: • remove the grids and slide the burners from their housings; • unscrew the nozzles using a 7 mm socket spanner, and replace them with nozzles for the new type of gas (see table 1 “Burner and nozzle characteristics”). • replace all the components by repeating the steps in reverse order. • Jokia žarnos negali liesti daiktų, kurių temperatūra Connection withdalis hose O viršija C. Make the 50 connection using a gas hose complying with • Žarnos ilgis turėtų būti trumpesnis nei 1500 mm. the the characteristics provided in current directive. The • Žarna neturi būti sukama ir traukiama, bei neturėtų būti internal diameter of the pipe used is as follows: sulenkta. - 8mm for liquid gas; • Žarna neturėtų liestu daiktų su aštriomis briaunomis, - judančių 13mm for methane gas. būti suspausta. dalių. Žarna negali When installing hose, remember to take thekad following • Visas žarnosthe ilgis turi būti lengvai prieinamas, precautions: apžiūrėti jos būklę. • No part of the hose should touch parts whose tempePatikrinkite ar abiejuose galuose žarna yra gerai pritvirtinta rature exceeds 50°C; atitinkančiomis vietines taisykles. • apkabomis, The length of the hose galiojančias should be less than 1500 mm; Jeigu negalite įvykdyti kurio nors iš aukščiau pateiktų • The hose should not be subject to twisting or pulling, reikalavimų, turėtų naudojamos metalinės lanksčios and should not būti have bends or kinks. žarnos. Jeigu viryklė montuojama atitinkamai 2 klasės 1 pok• The hose should not touch objects with sharp edges, lasio reikalavimams, ypač rekomenduojame dujų sujungimą any moving parts, and it should be crushed; padaryti iš lanksčios metalinės žarnosnot laikantis galiojančių • saugumo The fullstandartų. length of the hose should be easy to inspect in order to check its condition; Check that the hose fits firmly place atprijungimas the two ends Lankstaus, nerūdijančio plienointo vamzdelio priefix įsriegtos jungties and it with clamps complying to current directive.If any laikiklis yra pritvirtintas ant prietaiso. Dujų įvadoflexible ofŽarnos the above recommendations can not be adopted, vamzdžio jungiamoji mova yra ½ įsriegta kūginė išorinio metal pipes should be used. sriegio jungtis. Naudokite tiktai galiojančius vietinius standarShould the cooker be installed according to the conditions tus atitinkančius vamzdžius ir tarpines. Visas vamzdžio ilgis of Class 2, subdivision 1, only a flexible metal pipe which negali viršyti 2000 mm. Atlikus sujungimą, įsitikinkite, kad islankstus in compliance current safetyjokių standards metaliniswith vamzdelis neliečia judančiųshould dalių ir be used make the connection to the gas mains. nėra to suspaustas. Connecting a flexible jointless stainless steel pipe Sujungimo sandarumo patikrinimas to a threaded attachment Svarbu: Pabaigus montavimą, skysčiu su ištirpintu muilu paRemove hose holder fitted the appliance. The gas tikrinkite the ar nėra pratekėjimų pro on vamzdelio jungtis. Niekada supply pipe fitting is a threaded 1/2 gas cylindrical nenaudokite ugnies. Atlikus sujungimus, užtikrinkite, kadmale attachment. Only pipes and gaskets with current lankstus metalinis vamzdelis neliečia complying judančių dalių ir negali directives. The full length of the pipe must not exceed 2000 būti suspaustas. mm. 17 LT c) Minimum Minimalaus degiklio našumo nustatymas: c) regulation of the hob burners: • Ventilį iki minimumo. • turn thenusukite tap to minimum; • Nuimkite reguliuokitescrew, varžtą,which kuris • remove thepasukamą knob andrankenėlę adjust theirregulation šalia ventilio kaiščio, kol liepsna bus maža bet stabili. isyra positioned in or next to the tap pin, until the flame is Pastaba: suskystintų dujų atveju reguliavimo varžtą reikia small but steady. nusukti iki galo. N.B.: in the case of liquid gas, the regulation screw be screwed in toneužgęsta, the bottom. • must Patikrinkite ar liepsna kai ventilį greitai pasu•kate check that the flame does notpadėties. turn off when you turn nuo mažiausios iki didžiausios tap quickly from to low. d) the Pirminio degiklių oro high reguliavimas. Pirminio degikliųthe oroprimary nereikia air reguliuoti. d) Regulating of the burners: The primary air of the burners requires no regulation. Dujinės orkaitės pritaikymas skirtingiems dujų tipams Dujinio grilio pritaikymas skirtingiems dujų tipams Adapting the gas oven to different types of gas a) the oven orkaitėje: burner nozzle: a) Replacing Degiklių pakeitimas • Išimkitethe pašildymo skyrių. • remove warming drawer; • Nuimkite apsaugą (C pav.). “A” (see Fig.C); • remove the sliding“A” protection • Išimkite varžtą ir tuomet degiklįthe “V” oven (D pav.). Nuimkite • remove the screw and then burner “V”(see orkaitės dureles, kad palengvinti šią operaciją. Fig. D). Remove the oven door to facilitate this • Naudodami specialų purkštukų atsuktuvą (E pav.) arba operation. 7 mm atsuktuvą atsukite orkaitės purkštukus ir pakeiskite • unscrew thetinkamais oven burner using the special purkštukais, naujamnozzle dujų tipui (žiūrėkite 1 socket spanner for the nozzles (see Fig. E), or better lentelę). still a 7 mm socket spanner, and replace it with a nozzle suited to the new type of gas (see table 1). Adapting the gas grill topakeitimas: different types of gas Grilio degiklio purkštuko Replacing the varžtą nozzleiroftuomet the grillišstumkite burner: grilį “V” (F pav.). • Atsukite • • remove the screw andpurkštukų then slideatsuktuvą out the (G grillpav.) burner “V” Naudodami specialų arba 7 mm atsukite grilio purkštukus ir pakeiskite (see Fig.atsuktuvą F); tinkamais naujam dujų tipui 1 lentelę). • purkštukais, unscrew the grill burner nozzle using(žiūrėkite the special socket spanner for the nozzles (see Fig. G) or better still a 7 mm socket spanner; replace the nozzle with a nozzle for the new type of gas (see table 1). V V I F pav. Fig. F Fig. G Important: when mounting the grillpatikrinkite burner check thatdegiklio there is a Svarbu: Judindami grilio degiklį, ar tarp ir apsauginės termoporos (jeigu sumontuota) yra mažiausiai(if space of at least 4 mm between the security thermocouple 4 mm tarpas. installed) and the burner. A C pav. D pav. Fig. C G pav. Fig. D 4 mm E pav. Pay particular attention to the plug wires and Atkreipkite ypatingą dėmesį į kištuko laidus ir termopothermocouple tubes. ros vamzdelius. Important On completion of the operation, replace the old rating Svarbu sticker with one indicating new type of gas used. This Pabaigę operaciją, seną dujųthe duomenų lipduką pakeiskite nauju, su nurodytu naudojamų dujų tipu.Centres. Šį lipduką galite sticker is available from our Service Fig.E b) Minimum regulation of the gas oven burner b) Minimalaus orkaitės degiklio našumo nustatymas su with terthermostat (see fig.): mostatu: • light the burner described the paragraph • Degiklį uždekiteaskaip aprašytainskyriuje “Orkaitės“the oven rankenėlė”. knob” of the instruction booklet. • Apytiksliai 10 minučių į maksimalią • turn the knob to Maxrankenėlę for aboutnusukite 10 minutes and then padėtį ir tuomet į minimalią padėtį. turn the knob to the Min setting; • Nuimkite rankenėlę. • remove the knob; • Reguliuokite varžtą šalia termostato kaiščio kol liepsna • regulate the screw positioned outside the thermostat bus maža bet stabili. pin until the flame is small but steady. N.B.: in the case dujų of liquid gas, the regulation screw Pastaba: Suskystintų atveju, reguliavimo varžtą reikia mustikibegalo. screwed in to the bottom. nusukti įsigyti mūsų techninio aptarnavimo centruose. Note Should the pressure of the gas used be different (or vary) Pastaba from the recommended pressure, it (arba is necessary to fit a Jeigu naudojamų dujų slėgis yra kitoks skiriasi) nuo suitable pressure regulator onto the inlet pipe in mūsų rekomenduojamo dujų slėgio, būtina sumontuoti tinkamą slėgio reguliatorių ant dujų padavimo vamzdžio, compliance with current National Regulations relative to laikantis galiojančių vietinių taisyklių “regulators for channelled gas”. liečiančių “Dujų reguliatorius”. LT 18 and nozzle characteristics DEGIKLIŲBurner IR PURKŠTUKŲ CHARAKTERISTIKOS Table 1 Liquid Gas Suskystintos dujos ŠunPurkDiameter ThermalŠiluminė Power By-Pass Nozzle Diame- Šiluminė galia tavimas štukas tras (mm) galiakW (p.c.s.*) 1/100 1/100 (kW*) Burner Degiklis (mm) (kW*) 1/100 SumaNominal žinta Reduced (mm) (mm) Nominali 1/100 (mm) (mm) Natural Gas Gamtinės dujos PurkSrau- Flow*SrauNozzle štukas tas* g/h tas* 1/100 (g/val.) (g/val.) 1/100 *** ** (mm) (mm) Srautas* Flow* (l/val.) l/h PurkNozzle SrauFlow* štukas 1/100 tas* l/h 1/100 (l/val.) (mm) (mm) Fast Greitas (didelis) (R) (Large)(R) 100 3.00 0.7 41 87 218 214 128 286 143 286 Semi PusiauFast greitas (Medium)(S) (vidutinis) (S) 75 1.90 0.4 30 70 138 136 104 181 118 181 Auxiliary Papildomas (Mažas) (A) (Small)(A) 51 1.00 0.4 30 52 73 71 76 95 80 95 Oven Orkaitė - 3.10 1.0 46 85 225 221 132 295 148 288 Grill Grilis - 2.50 - - 80 182 179 122 238 139 227 28-30 20 35 37 25 45 Įvadinis slėgis Nom.Nominal (mbar) (mbar) Min.Minimum (mbar) (mbar) Maks. (mbar) (mbar) Maximum Supply Pressures 20 17 25 13 6,5 18 * * Prie At and mbar 1013–mbargas 15O15°C C ir 1013 sausosdry dujos. = 50,37 MJ/Kg **** Propanas Propane P.C.S.P.C.S = 50,37 MJ/Kg *** Butanas = 49,47 MJ/m3 *** Butane P.C.S.P.C.S = 49,47 MJ/Kg 3 Gamtinės P.C.S = 37,78 MJ/m3 Natural P.C.S. = 37,78 MJ/m Table1 (For Hungary) G 20 Burner Diameter (mm) By-pass Thermal 1/100 (mm) power kW Reduced Fast (R) 100 41 Semi Fast (S) 75 30 Auxiliary (A) 51 Oven - Grill - G 30 Thermal power kW Nominal Flow* l/h Nozzle 1/100 (mm) Thermal power kW Flow* l/h Nozzle 1/100 (mm) Thermal power kW Nominal Flow* g/h 0.80 128 3,30 314 128 2,85 262 87 3,00 218 0.50 104 2,10 200 104 1,95 179 70 1,90 138 30 0,50 76 1,15 109 76 1,05 97 52 1,00 73 46 1,00 132 3,50 333 132 3,00 276 85 3,10 225 - - 122 2,80 267 122 2,20 202 80 2,50 182 Nominal (mbar) Minimum (mbar) Maximum (mbar) Supply pressures G 25.1 Nozzle 1/100 (mm) 25 20 30 25 20 30 30 20 35 * At 15°C and 1013 mbar-dry gas P.C.S. G20 37,78 MJ/m3 P.C.S. G25.1 39,11 MJ/m3 P.C.S. G30 49,47 MJ/kg S S A R K3G21/R K3G21S/R 19 LT TechnicalSPECIFIKACIJOS Specifications TECHNINĖS Vidiniai orkaitės matmenys Inner dimensions of the oven: Plotis: Ilgis: Aukštis: 39 cm 44 cm 34 cm � Width: 39 cm Depth: 44 cm Height: 34 cm This appliance the following Prietaisas atitinka conforms šias Europoswith Sąjungos direktyvas: European Economic Community directives: • 19/02/73 datos 73/23/EEC direktyva (Žema įtampa) Vidinis orkaitės Inner Volume oftūris the Oven: 58 l 58 lt Inner Dimensions of the Food Warmer: Vidiniai maisto pašildytuvo matmenys Plotis: Ilgis: Aukštis: 42 cm 44 cm 17 cm ir vėlesni papildymai. datosof89/336/EEC direktyva (Elektromag-• 03/05/89 73/23/EEC 19/02/73 (Low Voltage) and subsequent netinis suderinamumas) ir vėlesni papildymai. modifications; datos of 90/396/EEC (Dujos) ir -• 29/06/90 89/336/EEC 03/05/89 direktyva (Electromagnetic vėlesni papildymai. Compatibility) and subsequent modifications; • 22/07/93 datos 93/68/EEC direktyva ir vėlesni -papildymai. 90/396/EEC of 29/06/90 (Gas) and subsequent modifications; - 93/68/EEC of 22/07/93 and subsequent modifications. Width: 42 cm Depth: 44 cm Height: 17 cm Voltage and Frequency of Power Supply: Maitinimo įtampa ir dažnis Žiūrėkite duomenų lentelę see data plate Degikliai Burners: Tinkami naudojimui su visomis dujų rūšimis, nurodytomis adaptable for use with all the types of gas indicated on duomenų lentelėje, esančioje dangčio vidinėje pusėje, mathe data plate situated inside the flap or, once the isto pašildymo nišos kairės pusės panelės vidinėje sienelėje. dishwarmer drawer has been opened, on the inside wall of the left-hand side panel. 104 60 50 85/90 Senų elektrinių išmetimas Disposal of oldprietaisų electrical appliances Elektrinių ir elektroninių prietaisų (WEEE) on atliekų The European Directive 2002/96/EC Waste Electrical Europos direktyva Equipment 2002/96/EC reikalauja, seni that old and Electronic (WEEE), kad requires buitiniai elektriniai prietaisai nebūtų išmesti į įprastą household electrical appliances must not be disposed of nerūšiuotą buitinių atliekų srautą. Seni prietaisai turi in the normal unsorted municipal waste stream. Old būti atskirai surinkti, kad optimizuoti juose esančių appliances must be collected separately in order to optimise medžiagų perdirbimą ir sumažinti žalingą poveikį the recovery and recycling of the materials žmonių sveikatai ir aplinkai. Perbraukto šiukšlių they contain and reduce the impact health and the konteinerio su ratukais simbolison anthuman gaminio primena environment. The atitinkamai crossed out “wheeled bin” symbol on the jūsų įsipareigojimą prietaisą išmesti. Vartotojai turėtų susisiekti vietine valdžia arba product reminds you ofsuyour obligation, that when you mažmenininku teisingo senų buitinių prietaisų collected. dispose of thedėl appliance it must be separately išmetimo informacijos. Consumers should contact their local authority or retailer for information concerning the correct disposal of their old appliance. LT 20 with gas oven IR and gas grill GRILIU VIRYKLĖThe SUcooker DUJINE ORKAITE DUJINIU A. Tray for Catching Overflowsproduktams. A. Padėklas, skirtas išsipilantiems B. DujųBurner degiklis. B. Gas C. Liepsnos užgesimo stebėjimo prietaisas Burners viršutiniams degikC. Flame Failure Device for Cooktop (only a liams (tiktai kai kuriuose modeliuose) few models) D. Viršutinės D. Top Grategrotelės E. Valdymo panelė E. Control Panel F. Reguliuojamos kojelės. F. Adjustable Feet or Legs G. Kepimo skarda. G. Dripping Pan or Baking Sheet H. Elektroninis uždegimo prietaisas (tiktai kai kuriuose modH. Electronic Lighting Device (only a few models) eliuose). K. Orkaitės Oven Rack K. rėmas L. uždegimo prietaisas (tiktai (only kai kuriuose L. Elektroninis Electronicdegiklių Lighting for Hob Burners a few modeliuose). models) M. ir grilio valdymo rankenėlė. M. Orkaitės Oven and Grill Control Knob N. Viršutinių dujinių degiklių valdymo rankenėlės. N. Control Knobs for Gas Burners on Hob O. Orkaitės ir besisukančio iešmo šviesos mygtukas (tiktai kai O. Button for Oven and Rotisserie Light (only a few kuriuose modeliuose). models) rankenėlė (tiktai kai kuriuose modeliuose). P. Laikmačio C H A B P. Timer Knob (only a few models) E D K L P M O N G F different functions and usesJOS of the oven ORKAITĖSThe FUNKCIJOS IR SKIRTINGAS PANAUDOJIMAS Įvairios viryklės funkcijos pasirenkamos valdymo prietaisais, metu spauskite atitinkamo degiklio rankenėlę ir sukite prieš Electronic Ignitionkol fordegiklis the Gas Hob Norėdami degiklį laikrodžio rodyklę, užsidegs. Some of iš thekarto, models are provided with instant electronic uždegti iš pradžių paspauskite mygtuką o lighting paskui pasukite rankenėlę. Kai kurieare modeliai gaminami of the hob gas burners; these models identified by the pressu elektriniu starteriu, integruotu pasukamoje ence of a lighting device (see detail H). This rankenėlėje. device operates Tokiu atveju nėra, yra uždegimo when a slightmygtuko, pressurepažymėto is applied“T” to the “L”obutton marked with The various functions included in the cooker are selected by esančiais viryklės valdymo panelėje. operating the control devices located on the cooker control Viršutinių dujinių degiklių valdymo pasukamos panel. rankenėlės. Control the Gas Burners on the Hob (N) KiekvienoKnobs atskiro for degiklio, priskirto konkrečiai valdymo The position of the pažymėta gas burner controlled by each one of the rankenėlei, padėtis tamsiu skrituliu. Norėdami prietaisas pažymėtas raide “C”. Norėdami uždegti konkretų symbol. To light rankenėlę, a specific burner justikipress the button la� degiklį, paspauskite pasukite maksimalios • uždegtiisdegiklį laikykite uždegtą arba žiebtuvėlį . To light one of knobs shown by a symbol of degtuką a solid ring: šalia degiklio. Paspauskite žemyn ir prieš laikrodžio rodyklę the burners, hold a lighted match or lighter near the burner. pasukite atitinkamą rankenėlę iki maksimalios padėties. Press down and turn the corresponding knob in the Kiekvienas degiklis gali būti naudojamas maksimalios,counterminimaliosdirection ir vidutinės Ant rankenėlės parodyti clockwise to galios. the maximum � setting. Each burner skirtingi išjungimo, maksimalios ir minimalios galios simboliai can be operated at its maximum, minimum or intermediate (pasukama rankenėlė nustatomą į atitinkamą padėtį, kai simbolisShown atsiduria linijoje su rodykle). power. onvienoje the knob are the different symbols for off Norėdami degiklį reguliuoti, pasukite prieš (the knob is on this setting when therankenėlę symbol lines uplaikrodžio with the rodyklę, atsižvelgiant į išjungimo padėtį. Norėdami degiklį reference mark onsukite the control panel), for maximum išjungti, rankenėlę pagal laikrodžio rodyklę tol, kol�ji and sustos (turi atitikti “o” simbolį). minimum �. belled “L” irwhile pushing the corresponding knob all the way in reikšmės laikykite nuspaustą kol degiklis užsidegs. and turning it counter-clockwise until it lights. For immediate Svarbu: Jeigu degiklio liepsnaand atsitiktinai pasklistų, lighting, first press the button then turn the knob. užsukite valdymo ir palaukite mažiausiaigo 1 out, Important: Shouldrankenėlę the burner flames accidentally minutę vėl mėginant uždegti. turn off prieš the control knob and wait at least 1 minute before trying to relight. • Models with Hob Gas Burner Safety Devices to Prevent Leaks (only on certain models) These models can be identified by the presence of the device itself (see detail C). Important: Since the hob burners are equipped with a safety device, you must hold the control knob in for about 6 seconds after the burner has been lighted to allow the gas to pass until the safety thermocouple has heated. To obtain these settings, turn the knob counter-clockwise Elektroninis degiklių uždegimas with respect to the off position. To turn the burner, turn the Kai kurie viryklių modeliai gaminami su off elektroniniu degiklių uždegimu. Šie modeliai atskiriami pagal uždegimo prietaisą knob clockwise until it stops (corresponding again with the • (žiūrėkite detalę C). Šis prietaisas veikia, kai mygtukas “T”, symbol). pažymėtas simboliu, silpnai paspaudžiamas. Norėdami uždegti atskirą degiklį, paspauskite “T” mygtuką ir tuo pačiu 21 LT Notice: first time you use your appliance, we recomModeliaiThe su viršutinių degiklių apsaugos nuo pratekėjimų mend that (sumontuota you set thetiktai thermostat to the highest setting prietaisas kai kuriuose modeliuose) and leave the oven on for aboutjeigu half matomi an hoursumontuoti with nothing Šiuose modelius galima atpažinti, in it, with (žiūrėkite the ovendetalę door C). shut. Then, open the oven door prietaisai Svarbu: kadangi degikliai sumontuoti su apsaugos and let the room viršutiniai air. The odour that is often detected durprietaisu, valdymo jūs turite palaikytiof nuspaustą ing this initial use rankenėlę is due to the evaporation substances apytiksliai 6 sekundes po degiklio kad until dujositgalėtų used to protect the oven duringuždegimo, storage and is inpraeiti ir sušiltų termopora. stalled. D Besisukantis iešmas (tiktai keliuose modeliuose) The rotisserie (only a few models) To operate the rotisserie, proceed as follows: Besisukantį iešmą naudokitės taip:rack; a) place the dripping-pan on the 1st a) ant pirmos lentynėlės padėkite riebalų surinkimo b) insert the special rotisserie support on the 4th rack padėklą. and position the spit by inserting it through the special b) Įdėkite specialią iešmo atramą į ketvirtą rėmelį hole into the iešmą rotisserie at thejįback of the oven; ir uždėkite įstatydami per specialią skylę c) to start the spit, press the button “O”. orkaitės gale. Attention: Only use the bottom shelf of the oven when using the rotisserie to cook (where present). For all other types of cooking, never use the bottom shelf and never place anything on the bottom of the oven when it is in operation because this could damage the enamel. Always place your cookware (dishes, aluminium foil, etc. etc.) on the grate provided with the appliance inserted especially along Orkaitės ir grilio valdymo rankenėlė (M)the oven guides. c) Šia rankenėle pasirinkti įvairias orkaitės funkcijas ir Oven and Grillgalima Control Knob (M) nustatyti reikiamą kepimo temperatūrą, tarp nurodytų ant oven This knob allows you to select the various features of the pačios rankenėlės (tarp min. ir max. verčių). Norėdami uždegti and to set the most appropriate cooking temperature from among orkaitės degiklį, uždegtą degtuką arba žiebtuvėlį laikykite šalia those indicated on the knob itself (between Min and Max). “F” skylės, tuo pačiu metu paspauskite ir pasukite orkaitės To light the prieš oven laikrodžio burner, hold a lighted match or lighter near the rankenėlę rodyklę iki Max. padėties. “F” hole and, at the same time, press down and turn the oven knob counter-clockwise to the Max setting. Paspauskite “O” mygtuką, kad įjungtumėte. Oven Light Button (O) Orkaitės apšvietimo mygtukas � This button is marked by the andšviesą switches on Šis mygtukas pažymėtas .symbol Jis uždega orkaitės kad so jūsthat galėtumėte kepimo the light insideviduje, the oven you canstebėti monitor the cookprocesąwithout neatidarant durelių. ing process opening the door. F Since the cooker is equipped with a safety device which Kadangi viryklėje sumontuotas saugumo prietaisas, makes it necessary to keep the knob pressed in for about 6 užsidegus degikliui rankenėlę reikia palaikyti nuspaustą seconds after the burner has been lighted to allow the gas apytiksliai 6 sekundes, kad dujos galėtų laisvai praeiti. to pass through freely. Kepimo temperatūra pasirenkama rankenėlės rodyklę nustatant The cooking temperature is selected by matching the desired į atitinkamą vietą ant panelės. Pilnas temperatūrų diapazonas temperature with the reference mark on the panel; the complete parodytas apačioje. range of temperatures is shown below. Min Min 140 140 • • 145 145 150 150 • • 160 160 180 180 • • 200 200 220 220 Max Max 250 250 metu. Rankenėlę “P” jūs turite pasukti vieną pilną �;Then, turn the prieš knob in the clockwise direction �, to set the apsisukimą laikrodžio rodyklę, kad galėtumėte time bynaudoti matching the indicator the control panel with šią up funkciją. Tuometon rankenėlę pasukite pagalthe laikrodžio rodyklę nustatykite laiką indikatorių ant number of minutes on their knob. panelės sutapatindami su minutėmis ant rankenėlės. Caution Keep children Dėmesio away from the oven door when in use becauseOrkaitės it becomes verymetu, hot. prie prietaiso neprileiskite veikimo vaikų, nes orkaitės durelės labai įkaista. The temperature is then yra automatically reached and kept Tuomet nustatytasetting temperatūra automatiškai pasiekiama constant by thejąthermostat (which(termostatas is controlled by the knob). ir termostatas palaiko pastovią reguliuojamas rankenėle). naudoti rankenėlę pasukite To use the Norėdami grill, turn the knobgrilį, clockwise till to settingpa- , gal laikrodžio rodyklę iki simbolio ir šalia grilio degiklio after holding a lighted match or a lighter close to the grill burner. laikykite uždegtą degtuką arba žiebtuvėlį. In the grill burner equipped with a safety device, the knob must be held pressed in for about 6 seconds in order to Jeigu grilio degiklis turi apsauginį prietaisą, rankenėlę reikia activate the flame failure device. In this way the infrared ray palaikyti nuspaustą apytiksliai 6 sekundes, kad įjungti liepsnos comes on for browning the food or cooking roast, chops, užgesimo prietaisą. Tokiu būdu infraraudonieji spinduliai apskrusausages, roast-beef, etc.; for grill cooking, drip-pangrilyje under dina maistą, kepsnius, kotletus, dešrelesplace ir t.t. a Kepdami the grill topadėkite catch theriebalų grease. po griliu surinkimo skardą. Important Notice: In the event the flame for the oven accidentally goes out, turn the control knob for the burner to the off position and do not relight the burner for at least one minute. Important: when using the grill, the oven door must be left partly open by positioning the deflector “D” between door and panel to prevent the cooker knobs from overheating. LT Cooking Control Timer Knob (only a(tiktai few models) Kepimo laikmačio rankenėlė keliuose modeliuose)are equipped with a timer program to control when Some models Kaishuts kuriuose modeliuose yraTosumontuota laikmačio the oven off during cooking. use this feature, you must programa, orkaitės išsijungimą kepimo wind the “P” knob kuri one valdo full turn in the counter-clockwise direction 22 Practical advice for burner use In order to get the maximum yield it is important to remember the following: Praktiniai degiklių naudojimo patarimai • Use appropriate each burner (see table) Norėdami gauti cookware maksimalųfor efektyvumą, atsiminkite: so as •toKiekvienam avoid flames overshooting the edges. degikliui naudokite tinkamus indus (žiūrėkite liepsnos nesklistų per jų • At boiling pointlentelę), turn thekad knob to minimum. kraštus. with lids. • Use cookware • Virimo taške rankenėlę nusukite į minimalią • Always use cookware with flat bottoms. padėtį. • Naudokite maisto ruošimo indus su dangčiais. Burner ø Cookware diameter (cm) • Naudokite maisto ruošimo indus plokščiais dugnais. Fast (R) 24 - 26 Semi Fast (S) 16 - 20 Degiklis Indo diametras (cm) Pusiau greitas (S) 16 – 20 Papildomas (A) 10 – 14 Auxiliary (A) (R) Greitas 10 - 14 24 – 26 Cooking advice PRAKTINIAI KEPIMO PATARIMAI Cooking fish and meat Žuvies ir mėsos kepimas Kepant mėsą,white paukštieną ir žuvį, naudokite žemą When baltą cooking meat, fowl and fish use low O temperatūrą (150(150°C-175°C). C – 175OC). Kai When mėsa turi būti paviršiuje temperatures. red meat must be gerai iškepta o viduje sultinga, rekomenduotina pradžių it is superficially well-cooked but succulentOišinside, trumpą laiką kepti aukšta temperatūra (200-220 C) ir vėliau advisable to start with a high temperature (200-220°C) ją sumažinti. Bendru atveju kuo didesnis mėsos gabalas tuo for a short time, and then to reduce it at a later point. turi būti kepama mažesne temperatūra ilgesnį laiką. Mėsą Generally speaking, more meat therepadėklą, is, the lower padėkite grotelių centrethe ir apačioje padėkite kad the temperature andriebalus. the longer theįdėkite cooking time vidurį. should surinkti varvančius Groteles į orkaitės be.Place meat šilumos in the centre of thenaudokite grid andapatinę put a spillJeigu reikiathe daugiau iš apačios, traylentynėlę. underneath to catch grease drips. Insert the grid so nr.1 Orkaitė turi offers platų alternatyvų diapazoną, kas leidžia ruoštiallow visų The oven a wide range of alternatives which rūšių laiku jūs išmoksite you tomaistą cook geriausiu any type galimu of foodbūdu. in theSu best possible way. With efektyviai maisto ruošimo time you naudotis will learnšiuo to įvairiapusiu make the best use of thisprietaisu. versatile Žemiau pateiktos nuorodos yra tiktai gairės, kurias galima cooking appliance and the following directions are only a keisti priklausomai nuo jūsų pačių patirties. guideline which may be varied according to your own personal experience. Pyragų kepimas Prieš įdedant pyragus, orkaitė visada turi būti šilta. Todėl palBaking cakes aukite kol pasibaigs pakaitinimo fazė (apytiksliai 10 – in 15cakes min). The oven should always be warm before putting Pyragų kepimo temperatūra yra įprastai apie 160OC / 200OC. wait till the end of preheating (about 10-15 min.). CakeNeatidarykite orkaitės durelių kepimo metu, nes tai gali įtakoti bakingsusitraukimą. temperatures are normally pyrago Bendru atveju: around 160°C/200°C. that it is in the middle of the oven. If more heat from below is required, use the 1° bottom shelf. Do not open the oven door during the baking process as this could cause the cake to sink.In general: Pyragasisyra sausas Pastry tooper dry Increase the padidinkite temperature and reduce Temperatūrą 10Oby C ir10°C sumažinkite kepimothe laiką. cooking time. Pyragasdropped yra susmukęs Pastry Naudokite mažiau skysčio arba 10OC sumažinkite Use less liquid or lower the temperature by 10°C. temperatūrą. Pyragasislabai Pastry too tamsus dark onviršuje top Pyragąit padėkite ant žemesnės lentynėlės, pamažinkite Place on a lower rack, lower the temperature, and temperatūrą padidinkite kepimo laiką. increase theircooking time. Cooked well on the inside but sticky on the Pyragas gerai iškepęs viduje per lipnus išorėje outside Naudokite mažiaulower skysčio, temperatūrą ir paUse less liquid, thesumažinkite temperature, and increase didinkite kepimo laiką. the cooking time. Pyragas prikimba kepimo The pastry sticksprie to the panlentos Grease the pankepimo well and it with miltais a dusting Gerai sutepkite lentąsprinkle ir pabarstykite arbaof naudokite riebalams atsparų popierių. flour. 23 LT VIRYKLĖS PRIEŽIŪRA VALYMAS CookerTECHNINĖ routine maintenance and IR cleaning Orkaitės lemputės pakeitimas Prieš kiekvieną operaciją atjunkite viryklę nuo maitinimo Before įtampos.each operation, disconnect the cooker from the electricity.To assure the long life ofji the cooker, it must be Kad užtikrinti viryklės ilgaamžiškumą, turi būti dažnai thoroughly cleanedlaikantis frequently, keeping in mind that: kruopščiai išvaloma, šių taisyklių: • • Replacing the oven lamp • Orkaitę atjunkite nuo maitinimo įtampos. • Unplug the ovenlaikiklio from the mains; • Nuo lemputės nuimkite stiklinį dangtelį. • Išimkitethe lemputę pakeiskite lempute, atsparia • Remove glass ircover of thenauja lamp-holder; O aukštoms temperatūroms (300 C) su charakteris• Remove the lamp and replace with ašiomis lamp resistant to tikomis: high temperatures (300°C) with the following o Įtampa 230 V characteristics:: o Galia 25 W - Voltage 230V o Tipas E14 - Wattage • Uždėkite25W stiklinį dangtelį ir prijunkite orkaitę prie - Type E14 įtampos. maitinimo • Replace the glass cover and reconnect the oven to the mains. • Prietaiso valymui nenaudokite valymo garais įrangos. Do not use steam equipment to clean the appliance. • Emaliuotas dalis ir savaime nusivalančias paneles reikia the enamelled parts and the self-cleaning panels plauti šiltu vandeniu nenaudojant jokių abrazyvių milteliųare washed with warm water without using any arba koroziją keliančių cheminių medžiagų, kuriosabrasive ją galėtų powders sugadinti. or corrosive substances which could ruin them; • Orkaitės vidus turi būti dažnai išvalomas dar šiltas, naudojant šiltą vandenį ir dezinfekavimo Išvalius • the inside of the oven should be priemones. cleaned fairly often reikia kruopščiai nuskalauti nusausinti. while it is still warm usingir warm water and detergent, • Liepsnosby paskirstymo prietaisus dažnai valyti karštu followed careful rinsing andreikia drying; vandeniu ir dezinfekavimo priemonėmis, kruopščiai nu• the flame spreaders should be washed frequently with valant bet kokias nuosėdas. hot water and detergent taking care to eliminate any • Viryklėse su automatiniu uždegimu, elektroninio uždegimo scale; prietaiso elektrodai turi būti dažnai valomi. Liepsnos • in cookers dujų equipped with automatic lighting,ir the paskirstymo išėjimo skylutės turi būti patikrintos terminal of the electronic užtikrinta, part kad nėra jokių trukdžių. instant lighting devices should be cleaned frequently andskudurėliu. the gas outlet holes • Elektrinės plytelės valomos drėgnu Dar šiltos plytelės turėtų būti suteptosshould trupučiube aliejaus. of the flame spreaders checked to make • Ant nerūdijančio plieno galiobstructions; likti žymės, jeigu jis ilgai sure they are free of any kontaktuoja su labai kietu vandeniu arba stipriomis • Stainless steel may become marked if it comes into dezinfekavimo priemonėmis (turinčios fosforo). Nuvalius contact with very hard water or harsh detergents nerūdijantį plieną, patartina jį gerai nuskalauti ir nusaus(containing phosphorous) for long periods of time. After inti. Taip pat rekomenduojama nusausinti visus vandens cleaning, it is advisable to rinse thoroughly and dry. It lašelius. is also recommended dry any water drops; • Modeliuose su stikliniaistodangčiais, dangčiai turėtų • On modelskarštu with vandeniu. glass covers, the naudoti coversšiurkščių should be būti valomi Negalima cleaned water;priemonių. the use of rough cloths or skudurėliųwith arba hot abrazyvių Pastaba: abrasives is to be avoided. Stiklinio dangčio stenkitės neuždaryti kolgas dujųburners degikN.B: avoid closing the cover whiletol, the liai yra šilti. Prieš atidarydami dangtį nuvalykite nuo jo are still warm. Remove any liquid from the lid before skystį. opening it. Svarbu: Periodiškai patikrinkite dujų žarnos nusidėvėjimą ir Important: periodically check the wear of the gas hose pakeiskite jeigu ji turi defektų. Mes rekomenduojame žarną and substitute pakeisti kasmet.it if there are any defects; we recommended changing it every year. LT Greasing the Taps Dujų ventilio techninė priežiūra The taps may in time or they may to Laiku bėgant jam ventiliai gali užsikimšti arbabecome juos galidifficult būti turn. If so, the tap itself be replaced. sunku pasukti. Jeigu taipmust atsitinka, reikia pakeisti ventilį. Pastaba: Šią operaciją turi gamintojo N.B.: This operation must beatlikti performed by aįgaliotas technician technikas. by the manufacturer. authorised Removing the lid Dangčio nuėmimas Viryklės dangtį galima nuimti, kad palengvinti valymą. The cooker lid can be removed to facilitate cleaning. To Norėdami nuimti dangtį, iš pradžių jį pilnai atidarykite ir tada remove the lid, first open it completely and pull it patraukite į viršų (žiūrėkite paveikslėlį). upwards (see figure) 24 Cooking advice PRAKTINIAI KEPIMO PATARIMAI Kepamas maistas Food to be cooked Svoris Wt. (Kg) (Kg) Cooking position Kepimo padėtis nuo of shelves from apačios Temperatūra Temperature (OC) bottom (°C) Pašildymo laikastime Pre-heating (min) Kepimo laikas (min) Cooking time (min) (min.) Pasta Makaronai Lasagne Lazanija Cannelloni Cannelloni Makaronai auau gratin Pasta bakes gratin 2.5 2.5 2.5 3 3 3 210 200 200 10 10 10 60-75 40-50 40-50 Mėsa Meat Veršiena Veal Vištiena Chicken Antiena Duck Zuikiena Rabbit Pork Kiauliena Lamb Ėriena 1.7 1.5 1.8 2.0 2.1 1.8 3 3 3 3 3 3 200 220 200 200 200 200 10 10 10 10 10 10 85-90 90-100 100-110 70-80 70-80 90-95 Žuvis Fish Skumbrė Mackerel Dentex Dentex Trout baked in paper Upėtakis kepamas popieriuje 1.1 1.5 1.0 3 3 3 180-200 180-200 180-200 10 10 10 35-40 40-50 40-45 Pizza Pica Napolitan Napolitan 1.0 3 220 15 15-20 Pyragai Cake Biskvitas Biscuits Tortai Tarts Savoury Kvapnus pie pyragas Raised Cakes Iškilęs pyragas 0.5 1.1 1.0 1.0 3 3 3 3 180 180 180 165 15 15 15 15 30-35 30-35 45-50 35-40 Kepimas grilyje Grill cooking Veršienos kepsniai Veal steaks Kotletai Cutlets Mėsainiai Hamburgers Mackerels Skumbrė Toast sandwiches Skrudinti sumuštiniai 1 1,5 1 1 n.° 4 4 4 3 4 4 5 5 5 5 5 15-20 20 7 15-20 5 Kepimas grilyje su Grill cooking with besisukančiu iešmu rotisserie Veal on the Veršiena ant spit iešmo Chicken on iešmo the spit Vištiena ant 1 2 - 5 5 70-80 70-80 1,0 0,8 - 5 5 40-45 25-30 Kepimas grilyje su Grill cooking with keliais besisukančiais multi-skewer iešmais (tiktai keliuose rotisserie (only a few models) modeliuose) Meat kebabs Mėsos kebabai Vegetable kebabs Daržovių kebabai NB: cooking times are approximate and may vary according to personal taste. When cooking using the grill, the dripping-pan must always be placed on the 1st oven rack from the bottom. 25 LT