1
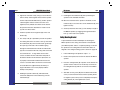
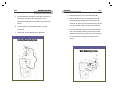
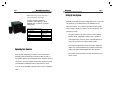
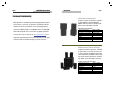
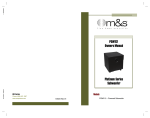
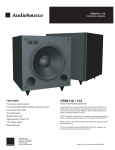
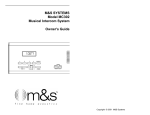
MNCX/MNCXS
Owners Manual
Platinum Series
Mini-Cube Speakers
Models
M&S Systems
(800) 421-1587
www.mssystems.com
MNCX/MNCXB – Mini-Cube Speakers
115933 B
MNCXS/MNCXSB/MNCXSM – Home Theater Package
MNCXSUB/MNCXBSUB – Mini-Cube Speakers and
Subwoofer
MNCXCB – Center Channel Speaker
MNCX/MNCXS Owners Manual
Page 2
Introduction
M&S Systems
Page 15
Warranty
M&S SYSTEMS Limited 2-Year No-Fault Product Warranty
Thank you for purchasing M&S Systems Home Audio
products. Your M&S Platinum Series speakers will bring you
years of listening enjoyment. The MNCX and MNCXS
products offer the finest quality compact home theater and
delivers superior performance at an affordable price. In
addition, their compact size and elegant style discreetly
blends with any décor and lifestyle.
Key Features
90 swivel speaker allows for full area coverage
A complete frequency range when a subwoofer is added
3/8” MDF (Medium Density Fiberboard) which drastically
reduces resonance
Magnetic shield in cubes and center channel to prevent
unwanted TV interference
Same speaker type used in cubes and center channels
for best acoustic matching
Ceiling or wall mount for maximum versatility (for the
Mini-cube speakers only)
Mounting brackets included
M&S SYSTEMS warrants for 2 years all products to be free of defects (M&S
SYSTEMS honors the 10-Year No-Fault warranty for AirVac Gold power
units). The warranty period begins from either (1) the date of “first user”
purchase of this product or (2) the first close of escrow date on a residence in
which this new product was originally installed. This warranty extends to the
original user of the product and to each subsequent owner of the product during
the term of this warranty. M&S SYSTEMS will repair or replace, at its option,
parts and materials at no charge. Parts supplied under this warranty may be new
or rebuilt at the option of M&S SYSTEMS.
If, during the limited warranty period, it appears as though this product contains
a defect, which is covered by this limited warranty, call our toll free service
number before dismantling the product (1-800-366-9422). Remember to
attain a Return Authorization Number (RAN) before returning any product
to M&S SYSTEMS. Send the product freight pre-paid and insured to our
service center for warranty repair. You will be advised on shipping
instructions when you call the toll free service number. M&S Systems will return
the repaired product freight pre-paid within the U.S.A. The installing dealer or
distributor may assist you, at your choice and expense, with returning product
for repair. Please include a brief description of the problem and a dated proof-ofpurchase receipt with any product that is returned for warranty repair. ANY
PRODUCT RETURNED WITHOUT A RETURN AUTHORIZATION
NUMBER WILL BE REFUSED.
THIS LIMITED WARRANTY IS IN LIEU OF ANY OTHER
WARRANTIES, EXPRESS OR IMPLIED, INCLUDING ANY IMPLIED
WARRANTY OF MERCHANTABILITY OR FITNESS FOR A
PARTICULAR PURPOSE OR OTHERWISE, AND OF ANY OTHER
OBLIGATIONS OR LIABILITY ON THE SELLER’S PART. THIS
LIMITED WARRANTY DOES NOT COVER DAMAGE CAUSED BY
IMPROPER INSTALLATION, THE VIOLATION OF APPLICABLE
BUILDING OR ELECTRICAL CODES OR THE USE OF NONM&S/NON-AIRVAC WIRE, CABLE OR WALL HOUSINGS. THIS
LIMITED WARRANTY APPLIES ONLY TO PRODUCTS INSTALLED
IN A PRIVATE RESIDENCE.
UNDER NO CIRCUMSTANCES SHALL THE SELLER BE LIABLE FOR
CONSEQUENTIAL, INCIDENTAL OR SPECIAL DAMAGES ARISING
IN CONNECTION WITH USE OR INABILITY TO USE THIS
PRODUCT. IN NO EVENT SHALL SELLER’S LIABILITY, FOR
BREACH OF WARRANTY, BREACH OF CONTRACT, NEGLIGENCE
OR STRICT LIABILTY, EXCEED THE COST OF THE PRODUCT
COVERED HEREBY. NO PERSON IS AUTHORIZED TO ASSUME FOR
US ANY OTHER LIABILITY IN CONNECTION WITH THE SALE OF
THIS PRODUCT.
Some states do not allow the exclusion or limitation of consequential, incidental
or special damages, so the above limitation or exclusion may not apply to you.
This limited warranty gives you specific legal rights, and you may also have
other rights, which vary from state to state.
Page 14
MNCX/MNCXS Owners Manual
Service and Troubleshooting
M&S Systems is committed to producing high quality products
for the home. If you have any questions or problems with the
M&S Systems
Page 3
MNCX Mini-Cube Speaker
Contains one pair of speakers, available
in white (MNCX) or black (MNCXB).
MNCX units have dual 3” speakers with
paper cones and rubber surround.
speaker system or the speakers are not operating properly,
contact your M&S installer or call M&S Systems at 1-800-3669422 and speak with one of our technical support specialists.
You may also visit our web site at www.mssystems.com for a
frequently asked questions list that may provide you with quick
assistance with any troubleshooting or service concerns.
Mini-Cube Specifications
Frequency Response
Maximum Power Rating
Continuous Power Rating
Impedance
Height
Width
Depth
Weight
150Hz to 20kHz
100 Watts
50 Watts RMS
8 ohms
8 ¾”
4”
4”
3.6 lbs.
MNCXS Home Theater Package
Contains two pairs of speakers, available
in white, black, or one pair of each color,
a center channel (available in black only)
and a subwoofer (available in black only).
The center channel has dual 3” speakers
with paper cones with rubber surround.
Center Channel Specifications
Frequency Response
Maximum Power Rating
Continuous Power Rating
Impedance
Height
Width
Depth
Weight
150Hz to 20kHz
100 Watts
50 Watts RMS
8 ohms
4”
9½“
4”
3.3 lbs.
MNCX/MNCXS Owners Manual
Page 4
MNCXSUB Mini-Cube Speakers
with Subwoofer Package
Contains one pair of speakers,
available in white (MNCX) or black
(MNCXB) and a subwoofer (available
in black only).
M&S Systems
Page 13
Setting Up Your System
The MNCXS system will require setting up the front, center, and
rear speakers as recommended in your amplifier/receiver
instruction manual. The subwoofer provided with this system
Subwoofer Specifications
Frequency Response
Power Rating
Crossover
Height
Width
Depth
Weight
30Hz/140Hz
100 Watts RMS
40Hz/140Hz
(adjustable)
15 ¾”
14”
16”
33.5 lbs
allows setting of the phase, volume, crossover frequency, and
auto power control.
The phase switch is set for the best bass sound. Switch
between the 0 - 180 position until the bass is loudest. In
some applications, there may be no noticeable difference
and in this case leave the switch in the 0 position.
The frequency adjustment can be set between 40Hz and
140Hz. It is recommended that the control be set between
Unpacking Your Speakers
After carefully unpacking your speakers, the carton and the
packaging material should be saved for possible use later. If
any speaker appears to be damaged, do not attempt to repair or
connect the unit to the amplifier. Repack the speaker and notify
your distributor or M&S Systems for replacement or repair.
You can contact the M&S Customer Service team at 1-800-4211587.
120Hz and 140Hz with the MNCX mini-cube speakers.
The volume control should be set to the desired bass level
for the system.
MNCX/MNCXS Owners Manual
Page 12
The MNCXS system may be connected two ways depending on
M&S Systems
Page 5
Speaker Placement
the amplifier used with the system. The major difference is the
subwoofer connections.
The mini-cube speakers can be mounted on the ceiling or
walls, allowing you to select the location that provides the best
1. An amplifier with a subwoofer output connection, usually
sound quality in each room. When placing your speakers the
an RCA type connector would be the preferred
front and rear speakers should be separated by 6 to 8 feet for
connection when used with the MNCXS subwoofer. A
good stereo separation and should not be closer than 2 feet to
shielded audio cable is required for this setup with a Y-
any adjacent surface (wall or ceiling).
adapter connecting the audio cable to “Left and Right
Important! Never mount the brackets to sheetrock without
Line Level Inputs” on the subwoofer.
some type of anchor.
2. The other option requires the front left and right speaker
cables be routed from the amplifier through the
subwoofer to the speakers. The wires from the amplifier
The center channel is best located on top of the TV cabinet or
on a shelf above the TV and centered between the mini-cube
speakers.
should be connected to the “Speaker Level Inputs” and
the cables going to the speakers should be connected to
the “Speaker Level Outputs” on the subwoofer.
IMPORTANT! Make sure there are no loose strands
of wire touching each other across the speaker or
amplifier terminals. This can create a short circuit
and damage your electronics.
Refer to the PSW112 Subwoofer Owners Manual for additional
information on setting up your subwoofer.
Plug your amplifier or receiver in, turn it on, and enjoy your new
music system.
Speaker Placement
MNCX/MNCXS Owners Manual
Page 6
The MNCX unit is designed with a swivel joint between the two
speakers allowing each speaker to be individually aimed. The
unit also comes with a mounting bracket for attachment to a
M&S Systems
Page 11
Speaker Connections
To connect your new speakers to your stereo or home theater
system, please follow these instructions.
wall or ceiling. The bracket screws into the threaded socket on
the back of the top speaker, and may be adjusted so that the
speakers point in the desired direction.
1. Turn off the receiver or amplifier and unplug it from the
power outlet.
2. Use a 2-conductor, 16-gauge speaker wire (M&S part
Mounting Your Speakers
number MS16X) for best results.
Note: Remove about 2 inches of the outside jacket from both ends of
Important Safety Note: Proper selection of mounting
the wire then strip approximately ½ inch of the insulation from each
hardware not included herein and proper assembly and
conductor at the speaker end. Use the recommended strip length as
installation of brackets, including but not limited to
specified in the amplifier/receiver installation manual for the other end
of the wire.
selection of appropriate weight bearing support and bracket
use with the specified speaker only is the exclusive
responsibility of the customer. M&S Systems disclaims any
liability for the selection of mounting hardware and/or
proper bracket installation.
3. Proper connection of the speaker wire is very important
to ensure full range sound. Most amplifiers and speakers
use red (for +) and black (for -) as the polarity markings.
Using the MS16X wire makes connections easy. The red
wire should be connected to the red terminal and the
Please follow the instructions below and refer to the diagram
black wire to the black terminal at the speakers and the
when mounting the MNCX mini-cube speakers to your wall or
amplifier.
ceiling.
Note: When using another type of wire, such as a flat ribbon, you will
1. Loosen and remove the molded nut (B) by turning it
counter clockwise. Use the supplied metal bar (E) if
necessary by inserting it in one of the holes on the
molded nut (B).
need to determine how the wire denotes one lead from another. This
usually takes the form of a rib or a color stripe in the insulation.
4. Repeat these steps for connection of all speakers to the
system.
MNCX/MNCXS Owners Manual
Page 10
5. Insert the ball/shaft assembly (C) through the hole on the
bracket (N). Then place the locking nut (P) on the
M&S Systems
Page 7
2. Pull the ball/shaft (C) out of the wall bracket (D).
3. Slide the molded nut (B) onto the ball/shaft (C) with
ball/shaft assembly with the “knurled” surface toward the
threaded opening facing the ball, and thread on the
bracket.
metal nut (A) all the way onto the ball/shaft (C) with the
6. Feed the speaker wire through hole (M) on the wall
bracket (D).
7. Follow Step 7 under “Mounting Your Speakers”.
nut’s (A) “knurled” surface facing away from the ball.
4. Screw the ball/shaft (C) into the threaded insert on the
back of the speaker cabinet (F) until it is fully seated
against the bottom of the insert. Please refer to page 9
for information on mounting your speakers on the
Ceiling Mounting System
ceiling.
Wall Mounting System
MNCX/MNCXS Owners Manual
Page 8
5. Tighten the “knurled” nut (A) using a crescent wrench
until it is firmly seated against the back of the speaker
and has fully locked the ball/shaft (C) and the speaker
cabinet together. Please note that once the nut is
tightened, it may embed some marks on the back of
M&S Systems
Page 9
9. Hand tighten the molded nut (B) while positioning the
speaker for the intended orientation.
10. Once the orientation of the speaker is finalized, use the
metal bar (E) in one of the holes on the molded nut (B) and
tighten securely.
the speaker where the attachment is made. The nut
(A) will cover these marks.
11. Securely attach the other end (J) of the backup cord (H) to
the MNCX speaker, by engaging it through the bracket
6. Feed the speaker wire through hole (M) on the wall
bracket (D).
hole (L) on the back of the speaker.
Ceiling Mounting Bracket
7. The safety cord (H) is provided to prevent the speaker
from falling. One of the two lower screws (I) that attach
the wall bracket (D) to the wall will need to go through
the eyelet (K) at the end of the cord before going
through the wall bracket hole. Mount the wall bracket
(D) onto a wood stud in the wall, using #10 screws that
are a minimum of 1 ¼” long. Make sure that all 4
screws are driven into the stud and not in drywall. If
the bracket needs to be mounted on drywall, the use
A special bracket must be installed prior to mounting the
MNCX speaker to the ceiling. This bracket is included with
your MNCX speaker and is in a separate package. To mount
the speakers to the ceiling follow the instructions below. A
diagram of the ceiling mounting system is shown on page 10.
1. Follow “Mounting Your Speakers” steps 1 – 3.
2. Remove the top black screw from the back of the MNCX
speaker.
of properly selected and installed wall-anchors and
screws is essential. Make sure that the screw head is
3. Place the ceiling bracket (N) in position on the back of the
at least 0.36 inches (approximately 3/8 inches) or
speaker. Please make sure to line the top screw hole on
larger in diameter so that it can properly hold the
the ceiling bracket (N) with the screw hole on the MNCX
backup cord eyelet (K).
speaker.
8. Holding the speaker cabinet (G) with both hands,
4. Start both screws [screw (O) from the bracket kit and the
reinsert the ball portion of the ball/shaft (C) into the
screw you removed from the back of the speaker] but do
wall bracket (D).
not tighten in place until you have completely lined up the
ceiling bracket (N). Then tighten both screws.
MNCX/MNCXS Owners Manual
Page 10
5. Insert the ball/shaft assembly (C) through the hole on the
bracket (N). Then place the locking nut (P) on the
M&S Systems
Page 7
2. Pull the ball/shaft (C) out of the wall bracket (D).
3. Slide the molded nut (B) onto the ball/shaft (C) with
ball/shaft assembly with the “knurled” surface toward the
threaded opening facing the ball, and thread on the
bracket.
metal nut (A) all the way onto the ball/shaft (C) with the
6. Feed the speaker wire through hole (M) on the wall
bracket (D).
7. Follow Step 7 under “Mounting Your Speakers”.
nut’s (A) “knurled” surface facing away from the ball.
4. Screw the ball/shaft (C) into the threaded insert on the
back of the speaker cabinet (F) until it is fully seated
against the bottom of the insert. Please refer to page 9
for information on mounting your speakers on the
Ceiling Mounting System
ceiling.
Wall Mounting System
MNCX/MNCXS Owners Manual
Page 6
The MNCX unit is designed with a swivel joint between the two
speakers allowing each speaker to be individually aimed. The
unit also comes with a mounting bracket for attachment to a
M&S Systems
Page 11
Speaker Connections
To connect your new speakers to your stereo or home theater
system, please follow these instructions.
wall or ceiling. The bracket screws into the threaded socket on
the back of the top speaker, and may be adjusted so that the
speakers point in the desired direction.
1. Turn off the receiver or amplifier and unplug it from the
power outlet.
2. Use a 2-conductor, 16-gauge speaker wire (M&S part
Mounting Your Speakers
number MS16X) for best results.
Note: Remove about 2 inches of the outside jacket from both ends of
Important Safety Note: Proper selection of mounting
the wire then strip approximately ½ inch of the insulation from each
hardware not included herein and proper assembly and
conductor at the speaker end. Use the recommended strip length as
installation of brackets, including but not limited to
specified in the amplifier/receiver installation manual for the other end
of the wire.
selection of appropriate weight bearing support and bracket
use with the specified speaker only is the exclusive
responsibility of the customer. M&S Systems disclaims any
liability for the selection of mounting hardware and/or
proper bracket installation.
3. Proper connection of the speaker wire is very important
to ensure full range sound. Most amplifiers and speakers
use red (for +) and black (for -) as the polarity markings.
Using the MS16X wire makes connections easy. The red
wire should be connected to the red terminal and the
Please follow the instructions below and refer to the diagram
black wire to the black terminal at the speakers and the
when mounting the MNCX mini-cube speakers to your wall or
amplifier.
ceiling.
Note: When using another type of wire, such as a flat ribbon, you will
1. Loosen and remove the molded nut (B) by turning it
counter clockwise. Use the supplied metal bar (E) if
necessary by inserting it in one of the holes on the
molded nut (B).
need to determine how the wire denotes one lead from another. This
usually takes the form of a rib or a color stripe in the insulation.
4. Repeat these steps for connection of all speakers to the
system.
MNCX/MNCXS Owners Manual
Page 12
The MNCXS system may be connected two ways depending on
M&S Systems
Page 5
Speaker Placement
the amplifier used with the system. The major difference is the
subwoofer connections.
The mini-cube speakers can be mounted on the ceiling or
walls, allowing you to select the location that provides the best
1. An amplifier with a subwoofer output connection, usually
sound quality in each room. When placing your speakers the
an RCA type connector would be the preferred
front and rear speakers should be separated by 6 to 8 feet for
connection when used with the MNCXS subwoofer. A
good stereo separation and should not be closer than 2 feet to
shielded audio cable is required for this setup with a Y-
any adjacent surface (wall or ceiling).
adapter connecting the audio cable to “Left and Right
Important! Never mount the brackets to sheetrock without
Line Level Inputs” on the subwoofer.
some type of anchor.
2. The other option requires the front left and right speaker
cables be routed from the amplifier through the
subwoofer to the speakers. The wires from the amplifier
The center channel is best located on top of the TV cabinet or
on a shelf above the TV and centered between the mini-cube
speakers.
should be connected to the “Speaker Level Inputs” and
the cables going to the speakers should be connected to
the “Speaker Level Outputs” on the subwoofer.
IMPORTANT! Make sure there are no loose strands
of wire touching each other across the speaker or
amplifier terminals. This can create a short circuit
and damage your electronics.
Refer to the PSW112 Subwoofer Owners Manual for additional
information on setting up your subwoofer.
Plug your amplifier or receiver in, turn it on, and enjoy your new
music system.
Speaker Placement
MNCX/MNCXS Owners Manual
Page 4
MNCXSUB Mini-Cube Speakers
with Subwoofer Package
Contains one pair of speakers,
available in white (MNCX) or black
(MNCXB) and a subwoofer (available
in black only).
M&S Systems
Page 13
Setting Up Your System
The MNCXS system will require setting up the front, center, and
rear speakers as recommended in your amplifier/receiver
instruction manual. The subwoofer provided with this system
Subwoofer Specifications
Frequency Response
Power Rating
Crossover
Height
Width
Depth
Weight
30Hz/140Hz
100 Watts RMS
40Hz/140Hz
(adjustable)
15 ¾”
14”
16”
33.5 lbs
allows setting of the phase, volume, crossover frequency, and
auto power control.
The phase switch is set for the best bass sound. Switch
between the 0 - 180 position until the bass is loudest. In
some applications, there may be no noticeable difference
and in this case leave the switch in the 0 position.
The frequency adjustment can be set between 40Hz and
140Hz. It is recommended that the control be set between
Unpacking Your Speakers
After carefully unpacking your speakers, the carton and the
packaging material should be saved for possible use later. If
any speaker appears to be damaged, do not attempt to repair or
connect the unit to the amplifier. Repack the speaker and notify
your distributor or M&S Systems for replacement or repair.
You can contact the M&S Customer Service team at 1-800-4211587.
120Hz and 140Hz with the MNCX mini-cube speakers.
The volume control should be set to the desired bass level
for the system.
Page 14
MNCX/MNCXS Owners Manual
Service and Troubleshooting
M&S Systems is committed to producing high quality products
for the home. If you have any questions or problems with the
M&S Systems
Page 3
MNCX Mini-Cube Speaker
Contains one pair of speakers, available
in white (MNCX) or black (MNCXB).
MNCX units have dual 3” speakers with
paper cones and rubber surround.
speaker system or the speakers are not operating properly,
contact your M&S installer or call M&S Systems at 1-800-3669422 and speak with one of our technical support specialists.
You may also visit our web site at www.mssystems.com for a
frequently asked questions list that may provide you with quick
assistance with any troubleshooting or service concerns.
Mini-Cube Specifications
Frequency Response
Maximum Power Rating
Continuous Power Rating
Impedance
Height
Width
Depth
Weight
150Hz to 20kHz
100 Watts
50 Watts RMS
8 ohms
8 ¾”
4”
4”
3.6 lbs.
MNCXS Home Theater Package
Contains two pairs of speakers, available
in white, black, or one pair of each color,
a center channel (available in black only)
and a subwoofer (available in black only).
The center channel has dual 3” speakers
with paper cones with rubber surround.
Center Channel Specifications
Frequency Response
Maximum Power Rating
Continuous Power Rating
Impedance
Height
Width
Depth
Weight
150Hz to 20kHz
100 Watts
50 Watts RMS
8 ohms
4”
9½“
4”
3.3 lbs.
MNCX/MNCXS Owners Manual
Page 2
Introduction
M&S Systems
Page 15
Warranty
M&S SYSTEMS Limited 2-Year No-Fault Product Warranty
Thank you for purchasing M&S Systems Home Audio
products. Your M&S Platinum Series speakers will bring you
years of listening enjoyment. The MNCX and MNCXS
products offer the finest quality compact home theater and
delivers superior performance at an affordable price. In
addition, their compact size and elegant style discreetly
blends with any décor and lifestyle.
Key Features
90 swivel speaker allows for full area coverage
A complete frequency range when a subwoofer is added
3/8” MDF (Medium Density Fiberboard) which drastically
reduces resonance
Magnetic shield in cubes and center channel to prevent
unwanted TV interference
Same speaker type used in cubes and center channels
for best acoustic matching
Ceiling or wall mount for maximum versatility (for the
Mini-cube speakers only)
Mounting brackets included
M&S SYSTEMS warrants for 2 years all products to be free of defects (M&S
SYSTEMS honors the 10-Year No-Fault warranty for AirVac Gold power
units). The warranty period begins from either (1) the date of “first user”
purchase of this product or (2) the first close of escrow date on a residence in
which this new product was originally installed. This warranty extends to the
original user of the product and to each subsequent owner of the product during
the term of this warranty. M&S SYSTEMS will repair or replace, at its option,
parts and materials at no charge. Parts supplied under this warranty may be new
or rebuilt at the option of M&S SYSTEMS.
If, during the limited warranty period, it appears as though this product contains
a defect, which is covered by this limited warranty, call our toll free service
number before dismantling the product (1-800-366-9422). Remember to
attain a Return Authorization Number (RAN) before returning any product
to M&S SYSTEMS. Send the product freight pre-paid and insured to our
service center for warranty repair. You will be advised on shipping
instructions when you call the toll free service number. M&S Systems will return
the repaired product freight pre-paid within the U.S.A. The installing dealer or
distributor may assist you, at your choice and expense, with returning product
for repair. Please include a brief description of the problem and a dated proof-ofpurchase receipt with any product that is returned for warranty repair. ANY
PRODUCT RETURNED WITHOUT A RETURN AUTHORIZATION
NUMBER WILL BE REFUSED.
THIS LIMITED WARRANTY IS IN LIEU OF ANY OTHER
WARRANTIES, EXPRESS OR IMPLIED, INCLUDING ANY IMPLIED
WARRANTY OF MERCHANTABILITY OR FITNESS FOR A
PARTICULAR PURPOSE OR OTHERWISE, AND OF ANY OTHER
OBLIGATIONS OR LIABILITY ON THE SELLER’S PART. THIS
LIMITED WARRANTY DOES NOT COVER DAMAGE CAUSED BY
IMPROPER INSTALLATION, THE VIOLATION OF APPLICABLE
BUILDING OR ELECTRICAL CODES OR THE USE OF NONM&S/NON-AIRVAC WIRE, CABLE OR WALL HOUSINGS. THIS
LIMITED WARRANTY APPLIES ONLY TO PRODUCTS INSTALLED
IN A PRIVATE RESIDENCE.
UNDER NO CIRCUMSTANCES SHALL THE SELLER BE LIABLE FOR
CONSEQUENTIAL, INCIDENTAL OR SPECIAL DAMAGES ARISING
IN CONNECTION WITH USE OR INABILITY TO USE THIS
PRODUCT. IN NO EVENT SHALL SELLER’S LIABILITY, FOR
BREACH OF WARRANTY, BREACH OF CONTRACT, NEGLIGENCE
OR STRICT LIABILTY, EXCEED THE COST OF THE PRODUCT
COVERED HEREBY. NO PERSON IS AUTHORIZED TO ASSUME FOR
US ANY OTHER LIABILITY IN CONNECTION WITH THE SALE OF
THIS PRODUCT.
Some states do not allow the exclusion or limitation of consequential, incidental
or special damages, so the above limitation or exclusion may not apply to you.
This limited warranty gives you specific legal rights, and you may also have
other rights, which vary from state to state.
MNCX/MNCXS
Owners Manual
Platinum Series
Mini-Cube Speakers
Models
M&S Systems
(800) 421-1587
www.mssystems.com
MNCX/MNCXB – Mini-Cube Speakers
115933 B
MNCXS/MNCXSB/MNCXSM – Home Theater Package
MNCXSUB/MNCXBSUB – Mini-Cube Speakers and
Subwoofer
MNCXCB – Center Channel Speaker