1
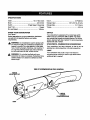
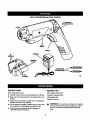
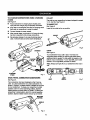
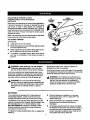
Operator's Manual
3.6 VOLT CORDLESS
SCREWDRIVER
Single Speed / Reversible
Model No.
315.111371
Save this manual for
future reference
_li CAUTION:
ReEl and follow all
Safety Rules and Operating Instructions
before first use of this product.
Customer
Help Line: 1-800-932-3188
Sears, Roebuck and Co., Hoffman Estates, IL 60179 USA
Visit the Craftsman web page: www.sears.com/craftsman
98,.3000-366
8-03
• Safety
• Features
• OperaUon
• Maintenance
• Parts List
......................
2
•
Warranty
,; .................................................................................................................................................
•
Ir=roductlon.....................................................................................................................................................................
•
General Safety Rules .................................................................................................................................................
•
SpecificSafety Rules......................................................................................................................................................
2
3-4
4
•
ImportantSafety Instructionsfor Charger.......................................................................................................................
5
•
Symbo[s..........................................................................................................................................................................
6
•
Features .....................................................................................................................................................................
•
Specifications.................................................................................................................................................................
7
•
Unl_d(ing .......................................................................................................................................................................
8
•
Ogemdon ...................................................................................................................................................................
•
Mai_enanco .................................................................................................................................................................
11
•
Ba_ow Removal ...........................................................................................................................................................
12
•
Accessories ..................................................................................................................................................................
12
•
Ex_oded _ew and Pa_s List.......................................................................................................................................
13
•
PaRs Ordedng/ Service ...............................................................................................................................................
14
7-8
9-11
FULL ONE YEAR WARRANTY ON COMPANION CORDLESS SCREWDRIVER
ff this Sears Screwdriverfalls to give completesatisfactionwithin one year from the date of purchase, RETURN IT TO
THE NEAREST SEARS STORE OR SEARS SERVICE CENTER IN THE UNITED STATES, and Sears will replace It,
free of charge.
If this Sears ScrewdriverIs used for commercialor rentalpurposes, this warranty appllasfor only 90 days from the date
of purchase,
This warranty gives you specificlegal dghts, and you may also have other rightswhichvery from state to state.
Sears, Roebuck
and Co., Dept. 817 WA, Hoffman
Estates, IL 60179
Your cordless screwdriverhas many features for making
the use of this productmore pleaser= and enjoyable.
Safety, performance, and dependabilityhave been given
top prlodtyIn the design of this productmakingIt easy to
maintainand operate.
_.
,_
Look for this symbol to point out important
attention!!!
Your safety is involved.
WARNING: Do not attempt to use this productuntil
you thoroughly read and completelyunderstandthe
operator'smanual. Pay close attentionto the safety
rules, IncludingDangers,Warnings,and Cautions. If
you use thls productproperlyand only as Intended,
you will enjoy years of safe, rellal:_eservtce.
safety
precautions.
It means
WARNING:
O
The operation of any screwdriver can result In foreign objects betngthrown Into your eyes, w hlch
can result In severe eye damage. Before beginning power tool operation, always wear safety
goggles or safety glasses with side shields and a full face shield when needed. We recommend
Wide Vision Safety Mask for use over eyeglasses or standard safety glasses with side shields.
Always wear eye protection which Is marked to comply with ANSI Z87.1.
2
•
_WARNING:
Read and understand ell Instructions. Failureto
followall instructionslisted below, may result in
electricshock,fire and/or seflouspersonal Injury.
Do not evenresuh. Keep proper footing and balance
at all times. Proper footingand ba_.nceenable better
controlof the too_In unexpectedsituations.
SAVE THESE INSTRUCTIONS
• Dee eefaty equipment. Always wear aye protecUcn.
Dust mask, son-skid safety shoes,hard hat, or hearing
protectionmust be used for appropriateconditions.
WORK AREA
TOOL USE AND CARE
• Keep your work area claa• and well lit. Cluttered
benches and dark areas Inviteaccidents.
• Use clamps or other practical way to secure and
suppod the workplace to a stable platform. Holding
the work by hand or againstyour bodyIs unstableand
may lead to lossof control,
• Do not fores tool. Use tba correct tool for your
application. The correcttool will do the Jobbetter and
saferat the rate for which it Is designed.
• Do not use tool If swIfch does not tum it on or off. A
toolthat cannot be controlledwith the switch is dangercue and musthe repaired.
• Disconnect battery packfromtool or plaoethe
switch In the locked or off position before making
any adjustments, changing asoeesodee, or stodng
the tool. Such preventivesafety measures reducethe
riskof startingthe tool accidentally.
• Store Idle tools out of reach of children and other
untrained persona. Tools are dangerousIn the hands
of untrainedusers,
• When battery pack Is not In use, keep It away from
other metal objects like: paper clips, coins, keys,
nails, screws, or other small metal objects that can
make a €onnoctlon from one termlnel to another.
Shottingthe battery terminalstogether may cause
sparks,bums, or afire.
• Maintain tools with care. Keep cutting tools sharp
and clean. Properly maintained toolswith sharp cutting
edges are less likely to bind and axe easier to control.
• Do not operate power tools in explosive atmospheres, such as In the presence of flammable
liquids, gases, or dust. Power toolscreate sparks
which may Ignitethe dust or fumes.
• Keep bystanders, children, and visitors away while
operstlng a power tool. Distractionscan cause you to
lose control.
ELECTRICAL
SAFETY
• A battmryoperated tool with Integral battarlse or a
separate battery pack n_ustbe recharged o•ly with
the spsuifled cbarger far the battery. A charger thst
may be suitablefor one type of battery may create a
riskof fire when used with another battery.
•
Use battary opersted tool only with speclfioelly
designated battery pack. Use of any other batteries
may create a riskof fire,
• Use battery only with charger listed,
MODEL
CHARGER
CHARGER STAND
315.111371
7221701
5573501
•
Do not abuse the cord. Never use the cord to carry
the charger. Keep cord away from heat, ell, sharp
edges, or moving parts. Replace damaged cords
Immndlately. Damaged cords may create a fire.
PERSONAL SAFETY
•
Chsukfor mleellgnment or binding of moving parts,
breakage of parts, and any other condition that may
affect the tool's operation. If damaged, have the
tool eendced before using. Many ascldents are
caused by poorlymalrtalnad tools,
• Use only ecceeeodse that are recommended by the
manufacturer for your model. Accessoriesthat may
be suitablefor one too[ may create a risk of Injurywhen
used on another tool.
• Stay alert, watch what you are doing and use
comma• sense when operating a power tool. Do
not use tool while tired or under the Intlumtce of
drugs, alcohol, or medloetlon. A moment of Inattention while operatingpower tools may resultIn sedous
personal Injury,
• Dress progedy. Do not wear loose clothing or
Jewelry.Contain long balr. Keep your heir, clolhlng,
and gloves away from moving parts. Looseclothes,
Jewelry,or long hair can be naught In moving parts.
• Avoid accldlental starting. Be sure switch Is In the
locked or off position before Inserting battery pack.
Carryingtools with your finger on the switchor Insortlng
the batterypack Intoa too_with the switchon Invites
accidents.
•
• Keepthetool end Its handle dry, clean end free
from oil and grease. Always usea clean clothwhen
cleaning.Never use brake fluids,g=sollne, petroleumbased products,or any strong solventsto clean your
tool. Followingthis rulewill reducethe dsk of loss of
controland detadorstlonof the enclosure ptastlc.
Remeve adjusting keys or wrencbes bar ors t umlng
the tool on. A wrench or =,key that Is left attachedto a
rotmlng part of the tool may resultIn personal Injury.
3
SERVICE
• When smvlclng a tool, use only Idemlcal replacemerit parts. Follow Instructions In the Maintenance
sootlon of thie manual. Use of unauthodzedparts or
failure to follow Malnteuance Instructlo_ls
may create a
risk of shockor Injury,
• Tool sorvlce must be pedormed only by qualified
repair personnel. Service or maintenanceperformed
by unqualifiedpersonnel may resultIn a risk of Injury.
•
Hold t ool by insolated gripping surfaces when performing an operation where the cutting tool may €ontact hidden
wiring. Contactwith a "live"wire willalso make exposed metal pats of the tool "live"and shock the operator.
ADDITIONAL
RULES FOR SAFE OPERATION
•
Batteriesvent hydrogen gas and can explode In the
presence of a source of ignition,such as a Idiot light.
To reducethe dskof sedous persona]Injury, never use
any cordless productIn the presence of open flame. An
exploded battery can propel debris and chemluals.H
exposed, flush with water Immediately.
•
Do not charge battery tool In a damp or wet location. Folk_Nlngthis rulewill reduce the risk of electric
shock.
• Know your power tool. Read operator's manual
carefully. Learn Its appl.lcatlons and IImItstlone, as
well astbe specific potential h_Eards related to this
tool. Followingthis rulewill reducethe dsk of electric
shock,fire, or serious injury.
•
wear acfsty glasses wIth side shields.
Everyday glasses have only impact resistantlenses.
They are NOT safety glasses. Followingthis rule will
reduce the risk of eye Injury.
IMPORTANT RULES FOR BATTERY TOOLS
Always
• For best results, your battew tool should be charged
In a location where the temperatura Is more than 50°F
but less then IO0°F. Do not store outside or In
vehk:les,
• Batte W tools do not have to be plugged Into an
electrical outlet; therefore, they are always In
operating condition. Be aware of possible hazards
when not using your batter/tool or when changing
aocsosorles, Followingthis rule will reducethe risk of
electdc shock,fire, or serious personal Injury.
• Do not place battew tools or their batteries near fire
or heat. This will reduce the riskof explosionand
possiblyInjury.
• Under Etreme usoge or temperstura condRlone,
battery leakage may occur, It llquld comes In
contact wIth your skln, wash Immedlstely wIth soap
and water, then neutralize wIth lemon Juice or
vinegar. If liquid gets Into your ayes, flush them
with clean wster for at least 10 minutes, then seek
Immediate medical attention. Followingthis rule will
reducethe flskof serious personalInjury.
4
_,
c. That wire size Is largeenoughforAC ampere
rating of charger as specifiedbelow:
WARNING
Read and understand all Instructions. Failureto
followall ]nstruotionslistedbelow, may result in
electricshock,fire and/or sedouspersonal injury.
Cord Length (Feet)
25'
50'
Cord Size (AWG)
16
16
Note: AWG = AmedcanWire Gage
•
Never use a batter/that has I_n dropped or
racefved a sharp blow. A damaged battery Is subject
to explosion.Properly dlspeseof a dropped battery
Immediately.Failure to heed this warning can resultIn
serious personal Injury. "
• Save these Instructions. This manuel contains
Important safety and operating Instructions for
charger.
100'
16
•
•
Do not operate charger with a damaged cord or
plug. If damaged, have replaced Immedlutaty by a
qualified serviceman. Followingthis rulewill reduce
the risk of elecMc shock,fire, or seflouspersonal Injury,
• Do not operate charger If it has received a sharp
blow, been dropped, or cthelwlea damaged In any
way; take it to a qualified serviceman. Followingthis
rulewill reduce the risk of electdc shock,fire, or serious
personal Injury.
•
• Do not dlsaseambic charger; take It to a qualiticd
serviceman when sen/Ice or repair Is required.
Incorrect reeasombly may result In a risk of electric
shock or fire. Followingthis rulewill reducethe risk of
electric shock,tim, or sedous personal Injury.
• To reduce the risk of electric shock, unplug charger
from outlet before attempting any maintenance or
cleaning. Turning off controls will not reduce this
risk. Followingthis rulewill reduce the riskof electric
shock,fire, or serious personal Injury.
Before using battery charger, read all Instructions
and cactlonary marldngs In this manual, on battery
charger, and product using battery charger. FollowIngthis rulewill reducethe risk of electricshock,fire, or
serious personal Injury.
• To reduce risk of Injury, charge only nickel-cadmium type rechergeable batteries. Other types of
batteries may burst ceualng personal injury and
damage. Followingthis rule will reducethe risk of
electricshock,fire, or seriouspersonal Injury.
Doest expoeachargertowct or dampooedltlona.
Followingthis rulewill reduce the dsk of eiestric shock,
fire, or serlous personalInjury.
• Use of an attachment not recommended or sold by
the battery charger manufacturer may result in a
risk of fire, electric shock, or Injury to persons.
Followingthis rule will reducethe risk of electricshock,
fire, or serious personalInjury.
• Dl_onnect charger from power supply when not In
use. Followingthis rule will reducethe risk of electflc
shock,fire. or seriouspersonalInjury.
• 5avetheaelnstructions, Raler tothern froqceutly
and use them to Instruct others who may use this
tool. If you loan someone this tool, loan them these
Instructions also. Followingthis rule will reducethe
risk of electricshock,fire, or seflous personal Injury.
• To reduce risk of damageto charger body and
cord, pull by charger plug refher then cord when
dlaconrmctlng charger. Followingthis rule will reduce
the riskof electdc shock,fire, or sedous personal injury.
• Make sure cord Is located so that It will not be
stepped on, fdpped over, or otherwise subjected to
damage or stress. Followingthis rule wilt reducethe
risk of serious personalinjury.
_l,
WARNING:
Some dust created by powersanding, sawing,
grinding,drilling,and other constrL_ionactivities
containschemicalsknownto cause cancer, birth
defects or other reproductive harm. Some examples
of these chemicalsare:
lead from lead-based points,
crystatllnesilica from bricksand cement and
other masonryproducts,and
arsenicand chromiumfrom chemically-treated
lumber.
Your riskfrom these exposuresvaries, dependingon
how often you do this type of work. To reduceyour
exposureto these chemicals:work in a well ventilated
area, and work with approved safety equipment,such
as those dust masks that are spedally designedto
filter out mloroscoplcparticles.
• Do not abuse cord. Never carry tool by cord or
yank it to disconnect from receptacle. Keep cord
from heat, o]1and sharp edges, Followingthis rule
will reduce the dsk of electric shockor fire.
• An extension cord should not be used unless
absolutely necessary. Use of Improper extension
cord could resultIn a risk of fire and electricshock. If
extension cord must be used, make sure:
a. That pinson plug of extensioncordare the
same number, size and shape as those of
plug on charger.
b. That extension cord Is properlywired and in
good eioctricaJcondition;and
SAVE THESE INSTRUCTIONS
5
Important:
Someofthefollowing
symbols
maybeusedonyourtool.Pleasestudythemandleamtheirmeaning.
Proper
Interpretation
ofthesesymbols
willallowyoutooperate
the ool better and safer.
SYMBOL
NAME
V
Volts
Voltage
A
Amperes
Current
Hz
Hertz
Frequency(cycles per second)
W
Watt
Power
mln
Minutes
Time
AlternatingCurrent
Type of current
Direct Current
Type or a characteristicof current
no
No Load Speed
Rotationalspeed, at no load
[]
Class II Construction
Dooble-lnsulated construction
Per.Minute
Revolutions,strokes, suface speed,odorsetc., per minute
Safety Alert
Precautionsthat Involveyoursafoty
Eye Protection
Always
and
a full
wear
facesafety
shieldwhen
goglesor
operatingthis
safety glasseswith
product.side shields
Wet ConditionsAlert
Do not expose to rain or use In damp locations.
=
...Imln
O
DESIGNATIO N/EX PLANATION
The purposeof safety symbols Is to attract yourattentionto possibledangers.The safetysymbols, and the explanations
with them, deserve your careful attentionand understanding.The safety warningsdo not by themselves allmlnate any
danger. The Instructions or warningsthey give are not substitutesfor proper accident preventionmeasures.
A
&
&
DANGER: Indioatesan Imminently hazardous situation,which, If not avoided, will result In death or
serious Injury.
WANNING: Indicates a potentiallyhazardous situation,which, If not avoided, could resultIn death or
seriousInjury.
CAUTION: Indicates a potentiallyhazardous situation,which, ff no_avoided, may resultin minor or
moderateInjury.itmay also be usedto alert against unsafe practicesthat may cause property damage.
Note: Advises you of additionalInformation ooncernlng the operation or maintenance of the equipmect,
SPECIFICATIONS
Collet ...................................................... 1/4 In. Hsx shank
Clutch ............................................................. 22 Positions
Motor ................................................................ 3.6 Volt DC
Charger Input ................................. 120 V, 60 Hz, AC only
Charge Rate ................................................... 10-1 2 Hours
Torque ..................................................................... 50 InJb
Switch ....................................... Single Speed / Reverside
Gear Train ............................................................. 1 Speed
No Load Speed .................................................... 180/mln.
KNOW YOUR SCREWDRIVER
See Figure 1.
SWITCH
Your screwdriveris equippedwth a rockertype switch
whichturnsyour screwdriverON and OFF. This switch
alsocontrolsthe forward and reverse feature. For driving
screws,depress right side of switch.For removingscrews,
depress left side of switch.
Before attemptingto use your screwdriver,familiarize
yourselfwith all operating features and safety
requirements,
,_, WARNING: Do not attem_ to use this producturXll
you read thoroughly and understandcompletelythe
operator'smanual. Pay close atl:entlonto the safety
rules, Including Dangers, Warnings,and Cautions. ff
you use this productproperlyand only as ]mended,
you will enjoy years of safe, reliableservice.
STICK/PISTOL
COMBINATION
SCREWDRIVER
Your screwdriver has been designed so that it can be
operated as a stick screwdriveror a pistolscrewdriver.
LIGHT
Your screwdriverhas a bulit In light. This feature is
convenientwhen workingIn close or tight areas where
WARNING: Do not allow farnflladtywith your
screwdriverto make you samless. Remember that a
careless fractionof a second Is sufficientto Inflict
severe Injury.
additional
light Is needed.
VIEWOF SCREWDRIVERINSTICKPOSITION
TORQUE
ADJUSTMENTCAP
O
SWITCH
(ON/OFR
(FQRWAFJ_/RBVERSE)
UGHT
7
VIEW OF SCREWDRIVER IN PISTOL POSITION
S1"lC
K/PISTOL
ROTATION
BUTTON
COLLEr
UGI.n"
SWITCH
SWITCH
CHARGER
BIT
STORAGE
CHARGING
STAND
SCREWDRIVER
BITS(INCLUDED)_--_.._,
BIT
STORAGE
Fig, 1
INSTRUCTIONS
PACKING
When unpacklngthe tool:
3.6V CordlessScrewdriver
• Carefullyremove the tool and accessories from the box.
Charger & ChargingStand
2 ScrewdriverBits
• Make sure that all Items listed In the packing list are Included.
LIST
Operator'sManual
•
Inspectthe tool carefully to make sure no breakage or
damage occurredduringshipping.
• Do not discardthe packing matefla( untilyou have carefullyInspected and satts'factoflly
operated the tool.
• Ifany parts
aredamaged ormissing,
pleasecaJl
1-800-932-3188
forasslstance,
A
WARNING: ff any partsare missingdo not operate
thetool untilthe missing parts are replaeed.Failure
to do so could resultIn possibleseriouspersonal
InJuP/.
8
,_
TO MOUNT CHARGING STAND
See Figure 3.
• Locate close to an electrical outlet. Note: With
screwdriverIn stick pasitlon, temporarilyptace
screwdriverIn ch=_rglngstand. Checkto make sure It
will not Interferewith the charger or electrical outlet.
•
Insertcharger plug Into heck of charging stand
arranging wire and plug as shownIn Figure3.
•
Drilltwo (2) pilotholesthen Insertthe two (2) wail
anchors provided. Note: Pilot holes shouldbe 2-5/8
Inchesapart. See Figure 3.
WARNING: Always wear safety goggles or setety
glasses with side shieldswhen operating tools.
Failure to do so could resultIn objectsbeing thrown
Intoyour eyes, resulting In possible serious Injury.
CHARGING
YOUR SCREWDRIVER
This tool has been shipped In a low charge conditionto
prevent possibleproblems.Therefore, you shouldcharge
it overnight pdor to use,
Note= Batterieswill not reach full charge the first tlree they
are charged. Allow several cycles (drivingscrewsfollowed
by recharging)for there to become fully charged.
If the charger does not charge your screwdriverunder
normal circumstances,return both the screwdriverand
charger to your nearest Sears Service Center for electrical
check.
•
•
TO CHANGE SCREWDRIVER WITHOUT USING
CHANGING STAND
See Figure 2.
•
•
•
•
•
Positioncharging stand on wail =llgningholes In
charging stand with pilot holes.
Secure chargingstand with the two (2) screws
provided.
CHARGER
CHARGING
STAND
Insert charger plug Into InputJackmaking sure they
am properlyconnected.
Charger can ha used with normal household
voltage of 120 volts, 60 Hz, AC only.
Connect charger to power supply.
After normal usage, a mlnlmureof 10 hours of chargIng time Is required to fully charge screwdriver.
Do not place charger In an area of extreme heat or
cold. it will work best at normal roomtemperature.
BACKSIDEOFCHARGING
STAND
I_."
INPUT
BITSTORAGE
\\
JACK
SCREWS
CHARGERPLUG
Fig, 2
CHARGING
STAND
As previously mentioned,a charging stand is packed with
your screwdriver. If you decideto use charging stand, it
must be mounted to a wall, The charging standalso has
four slotsto store bits.Two I_ts are Included with your
screwdriver.
WALL
ANCHORS
CHARGINGSTAND
9
Fig. 3
TO CHARGE SCREWDRIVER USING CHARGING
STAND
See Figure 4.
•
Place screwdriverIn charging stand malting sure
InputJackand charger plug are propedyconnected.
•
Align slotson screwdriverwith tabs on charging stand
then push on screwdriverto snap into place.
•
•
Connect charger to power supply.
A_er normal usage, a minimum of 10 hoursof chargIng time Is required to fully charge screwdriver.
Do not place charger In an area of extreme heat or
cold. It will work best at normal roomtemperature.
•
COLLET
The coUetonyour screwdriverhas been designedto accept
1/4 In. hex bits.See Figure 6.
TO INSERT BIT
See Figure 6,
Insert bit Into collet as far as ppsslbTB.
BIT
COL_
SLOTS
Fig, 6
LIGHT
CHARGER
See Figure7.
Your screwdriverhas a built In light. This feature Is
convenientwhen worldng In dose or tight areas where
additionallight Is needed. A slide switchis Iocatad on the
bottomof your sorewddver,To turn lightON, push switch
forward,To turn lightOFF, peUback on switch.
Note: Always tum light off on our screwdriverwhen not In
use,
CHARGING
STAND
STICK/PISTOL
Fig. 4
COMBINATION SCREWDRIVER
LIGHT
See Figure 5,
Your screwdriverhas been designed sothat Itcan be
used as a stickscrewdriveror a pistolscrewdriver.As
shown In Figure 5, a rotationbutton is located on the side
of your screwdriver.To pl,_ceyour screwdriverIn pistol
position,hold It In normal operating position,depress
rotationbuttonand pushdown on handle. To place your
screwdriverIn stick position,held it In normal opermlng
position,depress rotationbuttonand pull up on handle.
ROTATION
BuTroN
\
Fig .5
10
UGHT
SWITCH
Fig. 7
ADJUSTABLE TORQUE CLUTCH
(TlgMening Power of Your Screwdriver)
See Figure 8.
TO
INCREASE
TORQUE
When usingyour screwdriverforvaifcus drivingapplications,
it becomes necessary to Increase or decrease the power
and torque In order to help prevent the possibility of
damaging scmwheads,threads, workplese,etc. In general,
power and torque shouldcorrespondto the difficultyof the
screw to be driven. If torque Is too high the screws may be
damaged or broken.
TOROUE
ADJUSTMENI"
CAP
ARROW
Note: Your screwdriverhas been shippedwiththe adjustable
torque clutchset at the lowest torque setting.
TO ADJUST TORQUE
See Figure 8.
•
•
Locate arrow on front of housing.
Identifythe twenty two torque Indicator settings Ioceted
on torque adjustment cap.
•
Rotate adjustment cap to desired settingaligningnumber on adjustment sap with arrow on housing.
•
To increase or decrease torque, rotate torque adjustment cap In the direction of the an'ows as shown In
Figure 8.
TO
DECREASE
TORQUE
Do not abuse powertcols. Abusive practices
damage tool as well as workplece.
WARNING: When smvlclng, ua only Identical
Craftsman replacement parts. Use of any other
pert may create a haz.ardor cause productdamage.
Only the parts shownon parts list, page 13, are intended
to be repaired or replaced by the customer. All other parts
shouldbe replaced at a Sears Servlca Center.
Avoid using solventswhen cleaning plasticparts. Most
plasticsare suscaptlbleto damage from varioustypes of
commerdai solventsand may be damaged by their use.
Use clean clothsto remove dirt, dust, o11,grease, atc.
A
Fig. 8
,_
WARNING: Do not attempt to modifythis tool or
crea_eaccessories not recommendedfor usewith
this tool. Any such alteration or modificationis
misuse and could result In a hazardouscondition
leadingto possible seifous personalInjury.
•
Store and charge your batteriesIn a coularea.
Temperaturesabove 1O0° F or below 50 ° F will
shorten battery life,
•
Never store potteries in a dischargedcondition.
Recharge them Immediately after they are
discharged.
•
All hattedes gradually lose theircharge, The higher
the temperature the quickerthey lose theircharge, if
you store your too_for long pedodsof time without
using it, recharge the batteriesevery month or two.
This prectlcawill prolongbattery life.
WARNING: Do not at any time let brake fluids,
gasoline, petroleum-basedproducts, penetrating oils,
etc. come In contactwith plasticparts. They contain
chemicalsthat can damage, weaken or destroy
plastic.
BATTERIES
Your screwdriverIs equippedwith 3 nickel-cadmium
rechargeable batteries. Length of service from each
cbarglngwill depend co the type ofwork you are doing.
The bettedes In this tool have been deslgnod to provide
maximumtroublefree life. However, like all bettedes, they
will eventually wear out. To remove batteries, follow
BA'n'ERY REMOVAL Instruotlons. Handlingof these
bettedes, especiallywhen v_earingrings and jewelry,
could result In a serious bum,
To obtain the longest possible battery life,we suggestthe
following:
11
Topreservenaturalresources,please
recycleor disposeof batteriesproperty.
This productcontains nickel-cadmium
battefles. Local, state or federel laws
may prohibitdisposalof nickel-cadmium
batteries In ordinarytrash,
COVER
\
BATrERIES
SCREW(S)
Consult your localwaste authorityfor Information
regardingavailable recyclingand/or disposaloptions.
BATTERY REMOVAL, PREPARATION
CLING
See Figure 9.
T
FOR RECY-
TO REMOVE:
•
Remove the three screwssecudng motor housing
cover then remove cover.
BAI"rERY
LEAD
Lift battefles from motorhousingenough to expose
leads and battery terminals. Disconnectleads from
batteryterminals, Note: Be careful not to break
battery leads when disconnectingleads.
WARNING: Upon removal, cover the batter/
terminals with heavy duty adhesivetape. Do not
attemlXto destroy or disassemble battedes or
remove any of its components. Nickel-cadmium
batteries mustbe recycledor disposedof properly.
Also, never touch bothterminals with metal objects
and/or body parts as short circuitmay result. Keep
away from children.Failure to comply with these
warningscould result In fire and/or sedous Injury.
MOTOR
HOUSING
BATrERY
LEAD
Fig. 9
The followingrecommendedaceessofles are currentlyavailable at Sears Retail Stores,
•
No. 2 Phillips/ 8-10 Slotted, 2 Ea.
•
7-Pc. Screwdriver Bit Set and Case
•
No. 3 Phillips/ 6-8 Slotted, 2 Ea.
•
13-Pc. Power Screwdriver/NutddvarSet and Case
•
5-Pc. Hex Shank Ddll Bit Set
•
17-Pc. Power ScrewdrlverlNutdrlverSet and Case
•
6-Pc. Extra Length Magnlte Power Bit Set
•
30-Pc. Power Screwddver/NutddverSet and Case
AWARNING:
The use of attachmentsor acsessodes not listedmight be hazardous.
12
CRAFTSMAN
[
3.6 VOLT CORDLESS SCREWDRIVER
MODEL NO. 315.111371
The modelnumberwlllbefoundon a plateattached to the motorhousing.Alwaysmentionthe modelnumber
in all correspondenceregardingyour3,6 VOLT CORDLESS SCREWDRIVER orwhen ordedngrepair parts,
SEE BACK PAGE FOR PARTS ORDERING
INSTRUCTIONS
PARTS UST
Key
No.
Part
Number
1
2
5573501
7221701
983000-366
Description
Quan.
ChargingStand ................................................................. 1
Charger ............................................................................. 1
Operator'sManual
13
}
Your Home
For repair-in
your home-of all major brand appliances,
lawn aqd garden equipment, or heating and cooling systems,
no matter who made it, no matter who sold itl
For the replacement parts, accessories and
owner's manuals that you need to do-it-yourself.
For Sears professional installaUon of home appliances
and items like garage door openers and water heaters.
1-800-4-MY-HOME
®
(1400,-469-4663)
Call anylJme, day or night(U.S.A,
www.sears.com
and Canada)
www, sears.ca
Our Home
For repair of carry-in items like vacuums, lawn equipment,
and electronics, call or go on-line for the Ioca6on of your nearest
Sears Parts & Repair Center.
1-800-488-1222
Call anytime, day or night (U.S.A. only)
www.sears.com
To purchase a protecl_on agreement (U.S.A.)
or maintenance agreement (Canada) on a product serviced by Sears:
1-800-827-6655
(U.S.A.)
Para pedir servicio de reparacibn
a domicilio, y para ordenar piezas:
1-888-SU-HOGAR
s"
(1-888-784-6427)
1-800-361-6665
Au Canada
(Canada)
pour service en fran_:ais:
1-800-LE-FOYER
_c
(1-800"533-6937)
www.sears.ca
6E/ 8
® Reglmtered Tradernfk i TMTrademark i aM Sendce Mad_ d Sears, R_d_uck and Co.
® M an:.a Re_atrada / _U Marca de Fhbdca l aM Marca de Senddo de Se=rs. Roebud_ mld Co,
MCM arcpJe de commeme / u° Marque dtpos6e de Sears, Roebuck and Co.
® Sears, RoGbuck and Co.