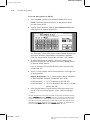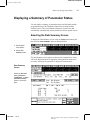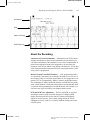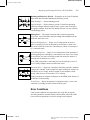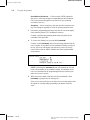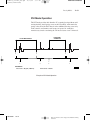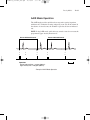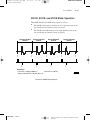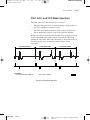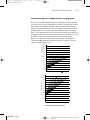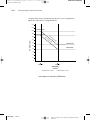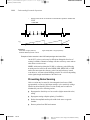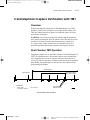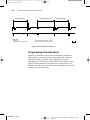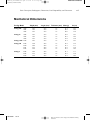
1
Medtronic Confidential 7 x 9 inches (178 mm x 229 mm) m1bfile10/WW1/Techcom/Department/ElecPub/TempXchg.EP/CD-Rom files/Finished/EN/Priority 3/196407001B_view.pdf 1 PROGRA M M ER Pacemaker Information and Programming Guide 9879E Software Use to program the following pacemakers: PRODIGY ™ DR PRODIGY ™ D PRODIGY ™ VDD PRODIGY ™ SR PRODIGY ™ S 196407001 Rev A Refer to the “Reference man.” category in doc#163256 for Printing Instructions. Medtronic Confidential 7 x 9 inches (178 mm x 229 mm) CAUTION: The Prodigy™ VDD pacemaker is not currently approved by the FDA. 196407001 Rev A Refer to the “Reference man.” category in doc#163256 for Printing Instructions. Medtronic Confidential 9879EN-TOC_9501043EN/CTC.qxd 5/10/99 11:49 Page i 7 x 9 inches (178 mm x 229 mm) Medtronic® PRODIGY™ Pacemaker Information And Programming Guide A Guide To Understanding Prodigy™ Pacemakers And Using The 9760 and 9790 Programmers © Medtronic, Inc. 1995 All Rights Reserved Printed In USA 196407001 Rev A Refer to the “Reference man.” category in doc#163256 for Printing Instructions. Medtronic Confidential 7 x 9 inches (178 mm x 229 mm) 196407001 Rev A Refer to the “Reference man.” category in doc#163256 for Printing Instructions. 9879EN-TOC_9501043EN/CTC.qxd 5/10/99 11:49 Page iii Medtronic Confidential 7 x 9 inches (178 mm x 229 mm) How To Use This Guide The 9879 Pacemaker Information and Programming Guide is the reference manual of the two-manual set supporting Prodigy* pacemakers. Each Prodigy pacemaker also has its own product information manual packaged with the device. This guide provides comprehensive information about the Prodigy pacing system: Medtronic® Prodigy pacemakers, 9760 and 9790 Programmers, and leads.** Organization of this guide divides information about the Prodigy pacing system into three major parts as follows: Part I — This part describes the programmer capabilities. It provides instructions on how to set up the programmer and apply its functions for programming applicable pacemaker features and retrieving data. Part II — This part describes all pacemaker parameters and features, including pacing modes, rate response options, special therapy options, diagnostic reporting features, and information for troubleshooting the pacing system. It supplements the product information manual, which gives information needed primarily at pacemaker implantation. In this part, the clinical intent of Prodigy-specific features is described, as well as illustrations of operation and programming considerations useful in the follow-up setting. NOTE: Part II provides all possible pacing and programming features for the Prodigy pacemaker family without any specific reference to the Prodigy models. Refer to Part III to determine which features apply to specific Prodigy pacemaker models. Part III — This part includes quick-reference information organized by topic or feature. To find information on a specific pacemaker model, look under each topic. Of particular help are “Modes and Parameters” and “Diagnostics,” which identify which features (presented in Part II) are applicable to each Prodigy pacemaker model. * Prodigy, CapSure, Marker Channel, Medtronic, MemoryMod, and Teletrace are all trademarks of Medtronic, Inc. ** Lead information provided describes pacemaker compatibility. Details are provided in the applicable lead technical manual. iii 196407001 Rev A Refer to the “Reference man.” category in doc#163256 for Printing Instructions. Medtronic Confidential 7 x 9 inches (178 mm x 229 mm) 196407001 Rev A Refer to the “Reference man.” category in doc#163256 for Printing Instructions. Medtronic Confidential 9879EN-TOC_9501043EN/CTC.qxd 5/10/99 11:49 Page v 7 x 9 inches (178 mm x 229 mm) Table of Contents Part I Using the Programmer Chapter 1 - Using the Programmer with Prodigy™ Pacemakers 1-1 When to Use Part I of this Manual . . . . . . . . . . . . . . . . . . . . . . . . . . . . . . . . . . . 1-2 Conventions Used in Part I of this Manual. . . . . . . . . . . . . . . . . . . . . . . . . . . . . . 1-3 General Warnings and Precautions . . . . . . . . . . . . . . . . . . . . . . . . . . . . . . . . . . . 1-4 Display Screen Format and Interactive Features. . . . . . . . . . . . . . . . . . . . . . . . . . 1-5 A Guide to Using the Menu and Command Buttons . . . . . . . . . . . . . . . . . . . . . . . 1-8 Chapter 2 - Procedures to Know Before You Begin 2-1 Using the Programming Head. . . . . . . . . . . . . . . . . . . . . . . . . . . . . . . . . . . . . . . 2-2 Programming Emergency Parameters . . . . . . . . . . . . . . . . . . . . . . . . . . . . . . . . . 2-6 Interrogating the Pacemaker . . . . . . . . . . . . . . . . . . . . . . . . . . . . . . . . . . . . . . . . 2-7 Canceling the Programming Head Magnet. . . . . . . . . . . . . . . . . . . . . . . . . . . . . . 2-9 Printing Reports During a Patient Session . . . . . . . . . . . . . . . . . . . . . . . . . . . . . 2-10 Printing Reports After a Session Has Ended. . . . . . . . . . . . . . . . . . . . . . . . . . . . 2-13 Transferring Session Data to a Diskette . . . . . . . . . . . . . . . . . . . . . . . . . . . . . . . 2-13 Using the HELP Options . . . . . . . . . . . . . . . . . . . . . . . . . . . . . . . . . . . . . . . . . 2-16 Chapter 3 - Starting and Ending a Patient Session 3-1 Before You Begin . . . . . . . . . . . . . . . . . . . . . . . . . . . . . . . . . . . . . . . . . . . . . . . 3-2 Turning the Programmer ON . . . . . . . . . . . . . . . . . . . . . . . . . . . . . . . . . . . . . . . 3-3 Selecting the Pacemaker Model . . . . . . . . . . . . . . . . . . . . . . . . . . . . . . . . . . . . . 3-4 Selecting the Desired Function . . . . . . . . . . . . . . . . . . . . . . . . . . . . . . . . . . . . . . 3-7 Ending a Patient Session . . . . . . . . . . . . . . . . . . . . . . . . . . . . . . . . . . . . . . . . . . 3-9 Chapter 4 - Retrieving Pacing System Data 4-1 Displaying Present Parameter Settings . . . . . . . . . . . . . . . . . . . . . . . . . . . . . . . . 4-2 Displaying a Summary of Pacemaker Status . . . . . . . . . . . . . . . . . . . . . . . . . . . . 4-5 Displaying Battery and Lead Information . . . . . . . . . . . . . . . . . . . . . . . . . . . . . . 4-9 Displaying a Graph of Recorded Diagnostic Data. . . . . . . . . . . . . . . . . . . . . . . . 4-12 Chapter 5 - Displaying and Printing the Patient’s ECG and EGM 5-1 Printing the Patient’s ECG and EGM . . . . . . . . . . . . . . . . . . . . . . . . . . . . . . . . . 5-2 Displaying the Patient’s ECG and EGM . . . . . . . . . . . . . . . . . . . . . . . . . . . . . . . 5-5 v 196407001 Rev A Refer to the “Reference man.” category in doc#163256 for Printing Instructions. Medtronic Confidential 9879EN-TOC_9501043EN/CTC.qxd 5/10/99 11:49 Page vi 7 x 9 inches (178 mm x 229 mm) Freezing the ECG Trace . . . . . . . . . . . . . . . . . . . . . . . . . . . . . . . . . . . . . . . . . . 5-10 Displaying a Marker Channel™ Diagram . . . . . . . . . . . . . . . . . . . . . . . . . . . . . 5-14 Chapter 6 - Programming Pacing Parameters 6-1 Programming Pacing Parameters . . . . . . . . . . . . . . . . . . . . . . . . . . . . . . . . . . . . 6-2 Programming Additional Parameters. . . . . . . . . . . . . . . . . . . . . . . . . . . . . . . . . . 6-7 Chapter 7 - Determining and Evaluating Parameter Settings 7-1 Measuring Stimulation Thresholds . . . . . . . . . . . . . . . . . . . . . . . . . . . . . . . . . . . 7-2 Determining a Setting for Sensitivity. . . . . . . . . . . . . . . . . . . . . . . . . . . . . . . . . 7-15 Determining Rate Response Parameter Settings . . . . . . . . . . . . . . . . . . . . . . . . . 7-21 Programming Temporary Parameter Values. . . . . . . . . . . . . . . . . . . . . . . . . . . . 7-30 Measuring Rate and AV Interval. . . . . . . . . . . . . . . . . . . . . . . . . . . . . . . . . . . . 7-33 Chapter 8 - Collecting and Retrieving Diagnostic Data 8-1 About the Diagnostics Function . . . . . . . . . . . . . . . . . . . . . . . . . . . . . . . . . . . . . 8-2 Types of Data You Can Record . . . . . . . . . . . . . . . . . . . . . . . . . . . . . . . . . . . . . 8-3 Programmable Parameter Options. . . . . . . . . . . . . . . . . . . . . . . . . . . . . . . . . . . . 8-8 About the Setup Options . . . . . . . . . . . . . . . . . . . . . . . . . . . . . . . . . . . . . . . . . 8-11 Programming the Pacemaker to Record Data . . . . . . . . . . . . . . . . . . . . . . . . . . . 8-13 Displaying a Graph of the Recorded Data . . . . . . . . . . . . . . . . . . . . . . . . . . . . . 8-17 Printing the Diagnostic Data . . . . . . . . . . . . . . . . . . . . . . . . . . . . . . . . . . . . . . . 8-19 Clearing Recorded Data From the Pacemaker . . . . . . . . . . . . . . . . . . . . . . . . . . 8-20 Chapter 9 - Programmer Setup Options 9-1 Setting the Time and Date . . . . . . . . . . . . . . . . . . . . . . . . . . . . . . . . . . . . . . . . . 9-2 Connecting an External Recorder or Monitor. . . . . . . . . . . . . . . . . . . . . . . . . . . . 9-3 Using the CALIBRATE Option . . . . . . . . . . . . . . . . . . . . . . . . . . . . . . . . . . . . . 9-4 Setting Up Site Nominal Parameter Values . . . . . . . . . . . . . . . . . . . . . . . . . . . . . 9-6 Setting the Artifact Display . . . . . . . . . . . . . . . . . . . . . . . . . . . . . . . . . . . . . . . 9-10 Part II Understanding Pacemaker Operation Chapter 10 - Pacing Modes 10-1 Introduction . . . . . . . . . . . . . . . . . . . . . . . . . . . . . . . . . . . . . . . . . . . . . . . . . . 10-3 Mode Selection Decision Tree . . . . . . . . . . . . . . . . . . . . . . . . . . . . . . . . . . . . . 10-5 Mode Pertinency Tables. . . . . . . . . . . . . . . . . . . . . . . . . . . . . . . . . . . . . . . . . . 10-6 DDDR Mode. . . . . . . . . . . . . . . . . . . . . . . . . . . . . . . . . . . . . . . . . . . . . . . . . . 10-8 DDD Mode . . . . . . . . . . . . . . . . . . . . . . . . . . . . . . . . . . . . . . . . . . . . . . . . . . 10-10 vi 196407001 Rev A Refer to the “Reference man.” category in doc#163256 for Printing Instructions. Medtronic Confidential 9879EN-TOC_9501043EN/CTC.qxd 5/10/99 11:49 Page vii 7 x 9 inches (178 mm x 229 mm) DDIR Mode . . . . . . . . . . . . . . . . . . . . . . . . . . . . . . . . . . . . . . . . . . . . . . . . . 10-12 DDI Mode. . . . . . . . . . . . . . . . . . . . . . . . . . . . . . . . . . . . . . . . . . . . . . . . . . . 10-14 DVIR Mode . . . . . . . . . . . . . . . . . . . . . . . . . . . . . . . . . . . . . . . . . . . . . . . . . 10-16 DVI Mode. . . . . . . . . . . . . . . . . . . . . . . . . . . . . . . . . . . . . . . . . . . . . . . . . . . 10-18 VDD Mode . . . . . . . . . . . . . . . . . . . . . . . . . . . . . . . . . . . . . . . . . . . . . . . . . . 10-20 AAIR Mode . . . . . . . . . . . . . . . . . . . . . . . . . . . . . . . . . . . . . . . . . . . . . . . . . 10-22 AAI Mode. . . . . . . . . . . . . . . . . . . . . . . . . . . . . . . . . . . . . . . . . . . . . . . . . . . 10-24 VVIR Mode . . . . . . . . . . . . . . . . . . . . . . . . . . . . . . . . . . . . . . . . . . . . . . . . . 10-26 VVI Mode. . . . . . . . . . . . . . . . . . . . . . . . . . . . . . . . . . . . . . . . . . . . . . . . . . . 10-28 AAT/VVT Modes . . . . . . . . . . . . . . . . . . . . . . . . . . . . . . . . . . . . . . . . . . . . . 10-30 DOOR/AOOR/VOOR Modes. . . . . . . . . . . . . . . . . . . . . . . . . . . . . . . . . . . . . 10-32 DOO/AOO/VOO Modes . . . . . . . . . . . . . . . . . . . . . . . . . . . . . . . . . . . . . . . . 10-34 ODO/ OAO/ OVO Modes . . . . . . . . . . . . . . . . . . . . . . . . . . . . . . . . . . . . . . . 10-36 Chapter 11 - Rate Response Therapy Options 11-1 Rate Responsive Pacing . . . . . . . . . . . . . . . . . . . . . . . . . . . . . . . . . . . . . . . . . . 11-2 Activity Threshold. . . . . . . . . . . . . . . . . . . . . . . . . . . . . . . . . . . . . . . . . . . . . . 11-4 Activity Rate Response . . . . . . . . . . . . . . . . . . . . . . . . . . . . . . . . . . . . . . . . . . 11-6 Acceleration and Deceleration Times . . . . . . . . . . . . . . . . . . . . . . . . . . . . . . . . 11-8 Chapter 12 - Pacemaker Timing 12-1 Rates . . . . . . . . . . . . . . . . . . . . . . . . . . . . . . . . . . . . . . . . . . . . . . . . . . . . . . . 12-2 AV Intervals . . . . . . . . . . . . . . . . . . . . . . . . . . . . . . . . . . . . . . . . . . . . . . . . . . 12-8 Blanking Periods . . . . . . . . . . . . . . . . . . . . . . . . . . . . . . . . . . . . . . . . . . . . . . 12-14 Refractory Periods . . . . . . . . . . . . . . . . . . . . . . . . . . . . . . . . . . . . . . . . . . . . . 12-16 High Rate Atrial Tracking . . . . . . . . . . . . . . . . . . . . . . . . . . . . . . . . . . . . . . . 12-23 Chapter 13 - Lead/Cardiac Tissue Interface 13-1 Selecting Pacing Parameters . . . . . . . . . . . . . . . . . . . . . . . . . . . . . . . . . . . . . . . 13-2 Selecting Sensing Parameters . . . . . . . . . . . . . . . . . . . . . . . . . . . . . . . . . . . . . . 13-5 Monitoring Lead Stability . . . . . . . . . . . . . . . . . . . . . . . . . . . . . . . . . . . . . . . . 13-8 Transtelephonic Capture Verification with TMT . . . . . . . . . . . . . . . . . . . . . . . 13-11 Chapter 14 - Special Therapy Options 14-1 Mode Switch . . . . . . . . . . . . . . . . . . . . . . . . . . . . . . . . . . . . . . . . . . . . . . . . . . 14-2 Non-Competitive Atrial Pacing. . . . . . . . . . . . . . . . . . . . . . . . . . . . . . . . . . . . . 14-5 PMT Intervention . . . . . . . . . . . . . . . . . . . . . . . . . . . . . . . . . . . . . . . . . . . . . . 14-7 Ventricular Safety Pacing. . . . . . . . . . . . . . . . . . . . . . . . . . . . . . . . . . . . . . . . . 14-9 Single Chamber Hysteresis . . . . . . . . . . . . . . . . . . . . . . . . . . . . . . . . . . . . . . . 14-11 vii 196407001 Rev A Refer to the “Reference man.” category in doc#163256 for Printing Instructions. Medtronic Confidential 9879EN-TOC_9501043EN/CTC.qxd 5/10/99 11:49 Page viii 7 x 9 inches (178 mm x 229 mm) Chapter 15 - Telemetry Data 15-1 Parameter Summary. . . . . . . . . . . . . . . . . . . . . . . . . . . . . . . . . . . . . . . . . . . . . 15-2 Battery and Lead Information . . . . . . . . . . . . . . . . . . . . . . . . . . . . . . . . . . . . . . 15-4 Marker Channel™ Telemetry . . . . . . . . . . . . . . . . . . . . . . . . . . . . . . . . . . . . . . 15-6 Intracardiac Electrogram (EGM). . . . . . . . . . . . . . . . . . . . . . . . . . . . . . . . . . . . 15-8 Extended Telemetry . . . . . . . . . . . . . . . . . . . . . . . . . . . . . . . . . . . . . . . . . . . . 15-10 Chapter 16 - Miscellaneous Operations 16-1 Magnet Mode Operation . . . . . . . . . . . . . . . . . . . . . . . . . . . . . . . . . . . . . . . . . 16-2 Temporary Programming . . . . . . . . . . . . . . . . . . . . . . . . . . . . . . . . . . . . . . . . . 16-5 Electrical Reset . . . . . . . . . . . . . . . . . . . . . . . . . . . . . . . . . . . . . . . . . . . . . . . . 16-6 Elective Replacement Indicator (ERI) . . . . . . . . . . . . . . . . . . . . . . . . . . . . . . . . 16-8 Emergency Pacing . . . . . . . . . . . . . . . . . . . . . . . . . . . . . . . . . . . . . . . . . . . . . . 16-9 Chapter 17 - Diagnostics 17-1 Introduction to Prodigy™ Diagnostics. . . . . . . . . . . . . . . . . . . . . . . . . . . . . . . . 17-2 Event Summary. . . . . . . . . . . . . . . . . . . . . . . . . . . . . . . . . . . . . . . . . . . . . . . . 17-4 Rate Histogram . . . . . . . . . . . . . . . . . . . . . . . . . . . . . . . . . . . . . . . . . . . . . . . . 17-6 High Rate Episode . . . . . . . . . . . . . . . . . . . . . . . . . . . . . . . . . . . . . . . . . . . . . . 17-8 Chapter 18 - Troubleshooting the Pacing System 18-1 Troubleshooting Strategy . . . . . . . . . . . . . . . . . . . . . . . . . . . . . . . . . . . . . . . . . 18-2 Troubleshooting Electrical Problems. . . . . . . . . . . . . . . . . . . . . . . . . . . . . . . . . 18-3 Troubleshooting Hemodynamic Problems . . . . . . . . . . . . . . . . . . . . . . . . . . . . . 18-5 Handling, Storage, and Resterilization. . . . . . . . . . . . . . . . . . . . . . . . . . . . . . . . 18-7 Pacemaker Longevity. . . . . . . . . . . . . . . . . . . . . . . . . . . . . . . . . . . . . . . . . . . . 18-8 Replacing the Pacemaker . . . . . . . . . . . . . . . . . . . . . . . . . . . . . . . . . . . . . . . . 18-10 Patient Information and Service . . . . . . . . . . . . . . . . . . . . . . . . . . . . . . . . . . . 18-11 PART III Prodigy™ Reference Information Section A - Basic Description, Radiopaque Identification, Mechanical Dimensions, Lead Compatibility, and Pacemaker Connectors A-1 Basic Description . . . . . . . . . . . . . . . . . . . . . . . . . . . . . . . . . . . . . . . . . . . . . . . A-2 Radiopaque Identification . . . . . . . . . . . . . . . . . . . . . . . . . . . . . . . . . . . . . . . . . A-4 Mechanical Dimensions . . . . . . . . . . . . . . . . . . . . . . . . . . . . . . . . . . . . . . . . . . A-5 Lead Compatibility . . . . . . . . . . . . . . . . . . . . . . . . . . . . . . . . . . . . . . . . . . . . . . A-6 Pacemaker Connectors . . . . . . . . . . . . . . . . . . . . . . . . . . . . . . . . . . . . . . . . . . . A-7 viii 196407001 Rev A Refer to the “Reference man.” category in doc#163256 for Printing Instructions. Medtronic Confidential 9879EN-TOC_9501043EN/CTC.qxd 5/10/99 11:49 Page ix 7 x 9 inches (178 mm x 229 mm) Section B - Shipping, Nominal, Electrical Reset, and Emergency Parameters Shipping Parameter Settings . . . . . Nominal Parameter Settings. . . . . . Electrical Reset Parameter Settings Emergency Parameter Settings. . . . . . . . . . . . . . . . . . . . . . . . . . . . . . . . . . . . . . . . . . . . . . . . . . . . . . . . . . . . . . . . . . . . . . . . B-1 . . . . . . . . . . . . . . . . . . . . . . . . . . . . . . . . . . . . . . . . . . . . . . . . . . . . . . . . Section C - Longevity Projections, Elective Replacement Indicator, and Battery Specifications . . . . . . . . . . . . B-2 B-4 B-6 B-8 C-1 Longevity Projections . . . . . . . . . . . . . . . . . . . . . . . . . . . . . . . . . . . . . . . . . . . . C-2 Elective Replacement Indicator (ERI). . . . . . . . . . . . . . . . . . . . . . . . . . . . . . . . . C-6 Battery Specifications . . . . . . . . . . . . . . . . . . . . . . . . . . . . . . . . . . . . . . . . . . . . C-7 Section D - Magnet Mode Operations, Telemetry Functions, Diagnostics, and Event Summaries D-1 Magnet Mode Operations . . . . . . . . . . . . . . . . . . . . . . . . . . . . . . . . . . . . . . . . . D-2 Telemetry Functions . . . . . . . . . . . . . . . . . . . . . . . . . . . . . . . . . . . . . . . . . . . . . D-3 Dual Chamber Pacemaker Diagnostics . . . . . . . . . . . . . . . . . . . . . . . . . . . . . . . . D-4 Single Chamber Pacemaker Diagnostics . . . . . . . . . . . . . . . . . . . . . . . . . . . . . . . D-6 Event Summaries . . . . . . . . . . . . . . . . . . . . . . . . . . . . . . . . . . . . . . . . . . . . . . . D-7 Section E - Modes and Parameters, Programming Requirements and Restrictions, and Timing Reference Table E-1 Dual Chamber Pacemaker Permanent Programmable Modes and Parameters . . . . . . . . . . . . . . . . . . . . . . . . . . . . . . . . . . . . . . . . . . . . . . . . E-2 Single Chamber Pacemaker Permanent Programmable Modes and Parameters. . . . E-6 Programming Requirements and Restrictions . . . . . . . . . . . . . . . . . . . . . . . . . . . E-8 Nonprogrammable Parameters . . . . . . . . . . . . . . . . . . . . . . . . . . . . . . . . . . . . . E-10 Temporary Modes and Parameters . . . . . . . . . . . . . . . . . . . . . . . . . . . . . . . . . . E-11 Timing Reference Table . . . . . . . . . . . . . . . . . . . . . . . . . . . . . . . . . . . . . . . . . E-12 Section F - General Warnings and Precautions F-1 General Warnings . . . . . . . . . . . . . . . . . . . . . . . . . . . . . . . . . . . . . . . . . . . . . . . F-2 General Precautions. . . . . . . . . . . . . . . . . . . . . . . . . . . . . . . . . . . . . . . . . . . . . . F-5 ix 196407001 Rev A Refer to the “Reference man.” category in doc#163256 for Printing Instructions. 9879EN-TOC_9501043EN/CTC.qxd 5/10/99 11:49 Page x Medtronic Confidential 7 x 9 inches (178 mm x 229 mm) Section G - Hospital, Medical, Home, and Job Environment Interference G-1 Hospital or Medical Environment Interference . . . . . . . . . . . . . . . . . . . . . . . . . . G-2 Home and Job Environment Interference . . . . . . . . . . . . . . . . . . . . . . . . . . . . . . G-5 General Recommendations . . . . . . . . . . . . . . . . . . . . . . . . . . . . . . . . . . . . . . . . G-6 Section H - General Pacing Indications H-1 Indications for Permanent Pacing in Acquired Atrioventricular Block in Adults . . H-2 Indications for Permanent Pacing After Myocardial Infarction . . . . . . . . . . . . . . . H-4 Indications for Permanent Pacing in Bifascicular and Trifascicular Block . . . . . . . H-5 Indications for Permanent Pacing in Sinus Node Dysfunction . . . . . . . . . . . . . . . H-6 Indications for Permanent Pacing in Hypersensitive Carotid Sinus Syndrome and Neurovascular Syndromes . . . . . . . . . . . . . . . . . . . . . . . . . . . . . . . . . . . . . . . . H-7 Indications for Permanent Pacing in Children . . . . . . . . . . . . . . . . . . . . . . . . . . . H-8 Glossary I-1 Index J-1 x 196407001 Rev A Refer to the “Reference man.” category in doc#163256 for Printing Instructions. Medtronic Confidential 9879EN-I-T_9501043EN/CTC.qxd 5/10/99 11:44 Page I-1 7 x 9 inches (178 mm x 229 mm) PART I USING THE PROGRAMMER Part I provides instructions for using the programmer with Prodigy pacemakers. Sections describe each of the applicable programmer functions and present step-by-step procedures for using these functions. The information in this section is organized in the following order. ■ Introductory information ■ General procedures ■ Starting and ending a patient session ■ Retrieving pacing system data ■ Displaying and printing the patient’s ECG and EGM ■ Programming pacing parameters ■ Determining and evaluating parameter settings ■ Using the diagnostic data recording function ■ Programmer setup options, such as setting the time and date Refer to Parts II and III for information about the operation of Prodigy pacemakers. Part I Using the Programmer 196407001 Rev A Refer to the “Reference man.” category in doc#163256 for Printing Instructions. Medtronic Confidential 7 x 9 inches (178 mm x 229 mm) 196407001 Rev A Refer to the “Reference man.” category in doc#163256 for Printing Instructions. Medtronic Confidential 7 x 9 inches (178 mm x 229 mm) CHAPTER 1 Using the Programmer with Prodigy™ Pacemakers About This Chapter This chapter introduces you to using the 9760 and 9790 programmers with the Prodigy™ family of pacemakers by providing the following information: When to use Part I of this manual (see page 1-2). The text format conventions used in Part I of this manual (see page 1-3). General warnings and precautions (see page 1-4). The display screen format and interactive features (see page 1-5). A guide to using the menu and command buttons (see page 1-8). 1-1 196407001 Rev A Refer to the “Reference man.” category in doc#163256 for Printing Instructions. Medtronic Confidential 7 x 9 inches (178 mm x 229 mm) 1-2 Using the Programmer When to Use Part I of this Manual Installation of the 9879E software adds several pacemaker family groups to the programming and follow-up capabilities of your 9760 or 9790 programmer. Several manuals now cover the use of your programmer, each covering a specific set of pacemaker families and models. Prodigy™ Pacemakers — If you select one of the following Prodigy pacemaker models (note that they are listed on the front cover), refer to Part I of this manual for instructions on using the programmer. Refer to Parts II and III for specific Prodigy pacemaker information. Prodigy™ DR Prodigy™ D Prodigy™ VDD Prodigy™ SR Prodigy™ S 7860, 7861, 7862 7864, 7865, 7866 8168 8158, 8160, 8161, 8162 8164, 8165, 8166 Other Pacemaker Models — If you select a pacemaker other than a Prodigy model, refer to the appropriate programming guide supplied with the software presently installed in your programmer. Refer to the front cover of the manual for a list of the pacemaker families covered in that manual. For detailed information on setting up the 9760 or 9790 programmer, refer to the respective instruction manual, Programmer Description and Setup, supplied with the programmer. 196407001 Rev A Refer to the “Reference man.” category in doc#163256 for Printing Instructions. Medtronic Confidential 7 x 9 inches (178 mm x 229 mm) Using the Programmer with Prodigy™ Pacemakers 1-3 Conventions Used in Part I of this Manual Part I uses the following text format conventions in the instructions for using the programmer. [INTERROGATE] Boldface small capitals within brackets denote an on-screen button. THRESHOLD TEST Boldface capitals without brackets denote a selectable screen option other than a button. 1., 2., 3. Boldface numbers at the left column margin identify instructional steps. This symbol identifies a single instructional statement. This symbol is used as a bullet indicating itemized statements or paragraphs. Small italics 196407001 Rev A Small italics are used in side notes that pertain to an adjacent figure. Refer to the “Reference man.” category in doc#163256 for Printing Instructions. Medtronic Confidential 7 x 9 inches (178 mm x 229 mm) 1-4 Using the Programmer General Warnings and Precautions These warnings and precautions apply in general to using the 9760 and 9790 programmers. Warnings Pacemaker programming should be done only after careful study of the pacemaker technical manual and the applicable portions of this manual and after careful determination of appropriate parameter settings. Improper use of the programmer could result in erroneous or inadvertent programming and improper operation of the telemetry and measurement functions. The 9760 and 9790 programmers must be used only for programming Medtronic pacemakers listed as applicable units for the software being used. Direct stimulation via energy coupling may occur if either programmer is used on other implanted devices. These programmers are not compatible with programmable devices of other manufacturers. Precautions Loss of Power — If power to the programmer is unexpectedly lost, lifting the programming head from over the patient’s pacemaker cancels any temporary parameters or functions in effect and restores the pacemaker to its permanently programmed state. Unresponsive Screen — In the unlikely event the programmer display screen becomes unresponsive or “locked,” turn the programmer off, wait 5 seconds, then turn the programmer on. Normal programmer operation should resume. Following successful completion of the self test, reselect the pacemaker model to continue with the application. Programming Head — Failure to correctly align the programming head over the pacemaker could result in failure of a programming transmission and failure to receive telemetry. The programming head should not be positioned over an implanted pacemaker during electrocautery or defibrillation procedures. Refer to “Using the Programming Head” in Chapter 2 and “Magnet Mode Operation” in Chapter 16 for specific information about using the programming head. 196407001 Rev A Refer to the “Reference man.” category in doc#163256 for Printing Instructions. Medtronic Confidential 7 x 9 inches (178 mm x 229 mm) Using the Programmer with Prodigy™ Pacemakers 1-5 Display Screen Format and Interactive Features This section describes the appearance of the programmer display screen and the scheme for selecting a function when you have selected one of the model groups from the Prodigy family of pacemakers. Display Screen Example Below is an example of the screen format you will see when you use the programmer with a Prodigy pacemaker. Menu Buttons Pacemaker ID Screen Title ECG Display Function Display Area Command Buttons Message Box The main elements of this screen format are as follows: Menu Buttons — The menu buttons, which appear across the top of each screen, provide direct access to the programmer functions. These buttons replace the Main Menu screen, which applies to other pacemaker models. Pacemaker ID — Displays the pacemaker family name and model number. Screen Title — Title of the current screen generally appears in this location. 196407001 Rev A Refer to the “Reference man.” category in doc#163256 for Printing Instructions. Medtronic Confidential 7 x 9 inches (178 mm x 229 mm) 1-6 Using the Programmer ECG Display — This box continuously displays a low-resolution trace of the patient’s ECG. Function Display Area — This area of the screen changes according to the selected function. It displays the data, buttons, and options that apply to the selected function. Command Buttons — Location of the [EMERGENCY], [CANCEL MAGNET], [INTERROGATE], and [PROGRAM] buttons is the same for all pacemaker applications. The [EMERGENCY] programming button appears on all screens; other buttons appear when the command is applicable. Message Box — The message box continuously displays procedural prompts and status messages including warnings and precautions, when appropriate. It is important to read the information presented in the Message Box whenever you are operating the programmer. Interactive Screen Features The interactive display screen features that respond to application of the “selector pen” are: 1) on-screen buttons and 2) options that appear in boldface type.* The following are some examples of buttons and options. Buttons appear as boldface words or symbols enclosed within a heavy, black rectangular border. Buttons with labels ending in an ellipsis (...) open a window of additional options. Selectable options, which appear in boldface type, include pacemaker models, parameters, parameter values, and menu options. INTERROGATE PROGRAM SETUP... PARAMETERS Prodigy DR 7860, 7861, 7862 Lower Rate 40 70 100 To select a button: Without touching the screen, move the tip of the selector pen to a position directly over the button; then press the pen against the screen. If the button is a “locking” button (one that remains selected), the button label will change to reverse video to indicate that it is selected. If a procedure directs you to “press and hold” a button, you must press the selector pen against the button and continue to press for as long as you want the related operation to continue. *The term “selector pen” refers to both the “light pen” used with the 9760 programmer and the “touch pen” used with the 9790 programmer. 196407001 Rev A Refer to the “Reference man.” category in doc#163256 for Printing Instructions. Medtronic Confidential 7 x 9 inches (178 mm x 229 mm) Using the Programmer with Prodigy™ Pacemakers 1-7 To select an option: Without touching the screen, move the tip of the selector pen to a position directly over any part of the boldface option label (may be a word or number); then press the pen against the screen. Audible Signals Certain events in the operation of the programmer will result in an audible signal of one or two tones, or “beeps.” These signals are intended to alert the user to the success or failure of an action. Single Beep = Success A single beep following an Interrogate command indicates that the interrogation was successful. A single beep following a Program command indicates that the programming was confirmed. Two Beeps = Failure Two beeps following an Interrogate command indicate that the interrogation was not successful. Two beeps following a Program command indicate that the programming was not confirmed. Two Low-Tone Beeps Two low-tone beeps sound when the selected command cannot be executed. Single Short Beep A short beep that coincides with pressing the INTERROGATE or PROGRAM key on the programming head indicates that the programmer acknowledges the keystroke. If the keystroke is inappropriate, two low-tone beeps will sound. 196407001 Rev A Refer to the “Reference man.” category in doc#163256 for Printing Instructions. Medtronic Confidential 7 x 9 inches (178 mm x 229 mm) 1-8 Using the Programmer A Guide to Using the Menu and Command Buttons Using the Menu Buttons Except for [END SESSION] and [FREEZE], selecting a menu button at the top of the screen displays a menu of related function options. A check mark (ê) next to a displayed option (see example at right) indicates that option is currently selected. NOTE: To close the menu without making a selection, “click” the selector pen anywhere on the display screen outside the menu box. Listed below is a description of the options accessible with each of the menu buttons. Refer to the listed chapter for the procedure associated with each option. Menu Buttons DATA Retrieving Pacing System Data — See Chapter 4. Selecting the [DATA] menu button displays options for: Viewing a summary of interrogated data. Viewing measured real-time values of battery and lead data. Viewing a graph of accumulated diagnostic data. TESTS/ECG Displaying the Patient’s ECG and EGM — See Chapter 5. Selecting the [TESTS/ECG] menu button displays an option for viewing and adjusting the patient’s ECG and the EGM and Marker Channel™ signals received from the pacemaker via telemetry. The ECG display includes an option for inhibiting the output of the patient’s pacemaker. TESTS/ECG Conducting Pacing System Tests — See Chapter 7. Selecting the [TESTS/ECG] menu button also displays options for: Measuring stimulation thresholds. Determining a setting for pacemaker sensitivity. Determining a setting for Activity Threshold and Rate Response. Programming temporary parameter settings. 196407001 Rev A Refer to the “Reference man.” category in doc#163256 for Printing Instructions. Medtronic Confidential 7 x 9 inches (178 mm x 229 mm) Using the Programmer with Prodigy™ Pacemakers 1-9 Measuring rate and AV interval. Conducting electrophysiologic studies if 9877A software is installed. Instructions are covered in a supplement supplied with the software. PARAMETERS Programming Parameter Settings — See Chapter 6. Selecting the [PARAMETERS] menu button displays options for: Programming pacing parameters and viewing present settings. Accessing additional parameter options including Extended Telemetry, Transtelephonic Monitor, Serial Number, and Status Reset. PARAMETERS Setting Up the Diagnostics Function — See Chapter 8. Selecting the [PARAMETERS] menu button also displays an option for programming the pacemaker to record the selected type of diagnostic data. END SESSION Ending the Patient Session — See Chapter 3. Selecting the [END SESSION] menu button lets you end the patient session and return to the pacemaker model selection screen. SPECIAL Special Options — See Chapters 2 and 9. Selecting the [SPECIAL] menu button provides access to the following options: A Position Head Assist option related to using the programming head (Chapter 2). A Calibrate option that sends a Marker Channel or EGM reference signal to an externally connected recorder or monitor (Chapter 9). FREEZE Freezing the ECG Trace — See Chapter 5. Selecting the [FREEZE] menu button freezes a 10-second segment of the patient’s ECG and provides the option for viewing a Marker Channel diagram if the pacemaker is operating in a permanently programmed dual chamber or VDD mode. PRINT Printing Reports — See Chapter 2. Selecting the [PRINT] menu button displays options for printing the various data reports generated during the patient session. HELP Viewing Help Information — See Chapter 2. Selecting the [HELP] menu button displays options for viewing information about the currently displayed screen and other subjects related to using the programmer. 196407001 Rev A Refer to the “Reference man.” category in doc#163256 for Printing Instructions. Medtronic Confidential 7 x 9 inches (178 mm x 229 mm) 1-10 Using the Programmer Using the Command Buttons Listed below is a description of each of the command buttons located at the bottom of the display screen. Refer to the listed chapter for the procedure associated with using a particular command button. Programming Emergency Parameters — See Chapter 2. EMERGENCY Selecting the Emergency command overrides any function and immediately programs the pacemaker to a fixed set of permanent values that provide high output pacing in the VVI mode. Canceling the Programming Head Magnet — See Chapter 2. CANCEL MAGNET INTERROGATE Selecting the Cancel Magnet command cancels the effect of the programming head magnet and allows the pacemaker to operate in its permanently programmed state while the programming head is in position. For example, operation of a pacemaker permanently programmed to the DDD mode will change from the DOO magnet mode to the DDD mode when this command is executed. Interrogating the Pacemaker — See Chapter 2. Selecting the Interrogate command from a particular function screen retrieves from the pacemaker the data related to that function. INTERROGATE ALL Interrogating All Data — See Chapter 2. The Interrogate All command retrieves all data (parameter, battery/lead, and diagnostic) from the pacemaker. This button appears only on the Pacing Parameters screen. PACING PARAMETERS Returning to the Pacing Parameters Screen (not pictured) On screens other than the Pacing Parameters screen, this button appears in place of [INTERROGATE ALL]. Selecting this button returns you directly to the Pacing Parameters screen. Programming Command — (Covered in the respective procedures). PROGRAM 196407001 Rev A This command executes a temporary or permanent programming transmission based on the procedure being conducted. This button appears only when programming is allowed. Refer to the “Reference man.” category in doc#163256 for Printing Instructions. Medtronic Confidential 7 x 9 inches (178 mm x 229 mm) CHAPTER 2 Procedures to Know Before You Begin About This Chapter This chapter covers some procedures that you might use at any point during a patient session. You should be familiar with these procedures before you begin a patient session. These procedures include: Using the programming head (see page 2-2). Programming Emergency parameters (see page 2-6). Interrogating the pacemaker (see page 2-7). Canceling the effect of the programming head magnet (see page 2-9). Printing reports during a patient session (see page 2-10). Printing reports after a patient session has ended (see page 2-13). Transferring session data to a computer diskette (see page 2-13). Using the HELP options (see page 2-16). 2-1 196407001 Rev A Refer to the “Reference man.” category in doc#163256 for Printing Instructions. Medtronic Confidential 7 x 9 inches (178 mm x 229 mm) 2-2 Using the Programmer Using the Programming Head In many of the procedures described in the following chapters, you will be directed to position the programming head over the patient’s pacemaker. Always position the programming head prior to executing any command that results in a programming or telemetry interaction between the programmer and the pacemaker. Improper positioning of the programming head could result in the inability to program the pacemaker or to receive telemetry. Positioning the Programming Head CAUTION: Do not position the programming head over an implanted pacemaker during electrocautery or defibrillation procedures. IMPORTANT: Pacemaker operation will return to its permanently programmed settings about 2 seconds after you remove the programming head from its position over the pacemaker. For an implanted pacemaker, the programming head should be held directly against the patient’s skin with the face of the programming head parallel to the pacemaker. Optimum position of the programming head may not be directly centered over the pacemaker. 9760 Programmer Position Head Indicator Light Position the programming head over the pacemaker such that the Position Head indicator light on the head goes out. Refer to “Magnet Mode Operation” in Chapter 16 for specific information about positioning the programming head. 9790 Programmer Light Array 196407001 Rev A Position the programming head so that the amber light in the light array on the head goes out and one or more green lights come on. Move the head to the position that lights the greatest number of green lights. This is the optimum position. Refer to the “Reference man.” category in doc#163256 for Printing Instructions. Medtronic Confidential 7 x 9 inches (178 mm x 229 mm) Procedures to Know Before You Begin 2-3 NOTE: Both programmers also have a programming head position indicator light located near the display screen: On the 9760 programmer, this indicator light is located above the upper right corner of the screen. This indicator light goes out when a telemetry link with the pacemaker has been established. On the 9790 programmer, the indicator light is located near the upper left corner of the screen. This indicator light also goes out when a telemetry link with the pacemaker has been established — or it may change from amber to green — see Using the POSITION HEAD ASSIST Option below). Using the POSITION HEAD ASSIST Option The Position Head Assist function facilitates using the programming head position lights to locate the optimum head position over the patient’s pacemaker. This function is particularly useful under conditions that adversely affect the communication link between the programmer and pacemaker. NOTE: When the Assist function is enabled (“Enhanced” option), continuous interaction between the programmer and pacemaker can cause extraneous artifacts to appear at 250 ms intervals on the patient’s ECG trace. The 9790 programmer automatically filters these artifacts so they do not appear; the 9760 programmer does not. Although these artifacts can obscure pacing artifacts or small details on the ECG trace, they have no effect on the pacing operation of the pacemaker. 9790 Programmer If you are using a 9790 Programmer, the default setting for the Assist function is Enhanced. That is, the Assist function will already be in effect when you start a patient session. If this function results in extraneous artifacts on other monitoring devices connected to the patient, you can turn the Assist function off by selecting the “Normal” option as described below. NOTE: If the Assist function is enabled, the programming head position indicator on the 9790 programmer display panel changes from amber to green when the programming head is properly positioned. If the Assist function is disabled, the amber light goes out when the programming head is positioned. The light array on the programming head operates the same with or without the Assist function. 196407001 Rev A Refer to the “Reference man.” category in doc#163256 for Printing Instructions. Medtronic Confidential 7 x 9 inches (178 mm x 229 mm) 2-4 Using the Programmer 9760 Programmer If you are using a 9760 Programmer, the default setting for the Assist function is Normal. That is, the Assist function will not be in effect when you start a patient session. If you have trouble receiving telemetry or obtaining a programming confirmation, enabling the Assist function can facilitate locating a proper programming head position. As stated above, this function results in the appearance of extraneous artifacts on the patient’s ECG. Procedure for Selecting the Position Head Assist Setting 1. Select [SPECIAL] from the menu buttons at the top of the screen. 2. Select POSITION HEAD ASSIST from the options displayed. 3. From the window showing two buttons: Select [ENHANCED] to enable the Assist function. Or select [NORMAL] to disable the Assist function. Position Head Assist Option 196407001 Rev A Refer to the “Reference man.” category in doc#163256 for Printing Instructions. Medtronic Confidential 7 x 9 inches (178 mm x 229 mm) Procedures to Know Before You Begin 2-5 Using PROGRAM and INTERROGATE Keys The PROGRAM and INTERROGATE keys on the programming head have the same function as the [PROGRAM] and [INTERROGATE] buttons that appear on the display screen. Whenever the instructions in this manual direct you to select the [PROGRAM] or [INTERROGATE] button on the screen, you can press the corresponding key on the programming head instead, if it is more convenient. Programming Head 9760 Programmer Programming Head 9790 Programmer 196407001 Rev A INTERROGATE Key INTERROGATE Key PROGRAM Key PROGRAM Key Refer to the “Reference man.” category in doc#163256 for Printing Instructions. Medtronic Confidential 7 x 9 inches (178 mm x 229 mm) 2-6 Using the Programmer Programming Emergency Parameters The Emergency programming command is a safety feature that overrides all other functions and immediately programs the pacemaker to preset emergency values intended to provide pacing support under a variety of conditions. This programming cancels any temporary function in effect and restores magnet mode operation. Emergency values are permanent settings that provide higher-than-normal energy output. It is not intended that the pacemaker be left at these settings. Emergency Values Pacing Mode Rate V. Refractory Period V. Pulse Amplitude V. Pulse Width V. Sensitivity V. Pace Polarity V. Sense Polarity Single Chamber Hysteresis VVI 70 ppm 330 ms 7.5 V 1.5 ms 2.8 mV Unipolar Unipolar OFF The [EMERGENCY] button appears in the lower left corner of all function screens.* Emergency Button Ï To program Emergency parameters: 1. Position the programming head over the pacemaker. 2. Select the [EMERGENCY] button.* 3. Hold the programming head steady until a confirmation message appears. If programming is not confirmed, verify that the programming head is properly positioned and then reselect [EMERGENCY]. *If you are using a 9790 programmer, you can press the square red button on the left side of the display panel as an alternative to the on-screen [EMERGENCY] button. 196407001 Rev A Refer to the “Reference man.” category in doc#163256 for Printing Instructions. Medtronic Confidential 7 x 9 inches (178 mm x 229 mm) Procedures to Know Before You Begin 2-7 Interrogating the Pacemaker Before the programmer can display any information about the status of the patient’s pacing system, you must interrogate the pacemaker. The information you can retrieve by interrogating the pacemaker falls into three categories: 1. 2. 3. Parameter settings Real-time measurements of battery and lead data Diagnostic data. As described below, you can retrieve this information all at once or separately as it is needed. The INTERROGATE ALL Function The Interrogate All feature retrieves all three types of information for use during the patient session. This feature may be most helpful at the start of a patient session, but it can be used at anytime during the session. Interrogate All Button Available on the Pacing Parameters Screen Ï To execute the Interrogate All command: 1. Select the Pacing Parameters screen (see page 4-2 or 6-2). NOTE: The Pacing Parameters screen is the first screen to appear following model selection at the start of a patient session. 2. Position the programming head over the pacemaker. 3. Select the [INTERROGATE ALL] button. Continue to hold the programming head steady until success of the interrogation is confirmed. Auto Printout — An Interrogate All command automatically initiates printing of the following data: 1) the present programmed pacing and diagnostic parameter settings, 2) a data summary report which includes an Event Summary, and 3) Battery/Lead status data. Accumulated diagnostic data is not included in this printout. 196407001 Rev A Refer to the “Reference man.” category in doc#163256 for Printing Instructions. Medtronic Confidential 7 x 9 inches (178 mm x 229 mm) 2-8 Using the Programmer NOTE: Executing an Interrogate All command automatically saves the present programmed parameter settings. From a parameter programming screen, you can view the saved values applicable to that screen (select the [SHOW SAVED] button) or you can recall the values to the screen as pending values for programming (select the [SAVE/NOMINAL OPTIONS...] button, then select the [SAVED VALUES] button). The INTERROGATE Function From most function screens, you can interrogate the pacemaker for the data associated with that screen. Even when you have used the Interrogate All feature, it may be necessary to perform additional interrogations to update the programmer as you conduct the patient session. Interrogate Button Ï To execute the Interrogate command: 196407001 Rev A 1. Position the programming head over the pacemaker. 2. Select the [INTERROGATE] button. Continue to hold the programming head steady until success of the interrogation is confirmed. Refer to the “Reference man.” category in doc#163256 for Printing Instructions. Medtronic Confidential 7 x 9 inches (178 mm x 229 mm) Procedures to Know Before You Begin 2-9 Canceling the Programming Head Magnet “Cancel Magnet” is a temporary programming command that cancels the effect of the programming head magnet. It allows the pacemaker to operate in its permanently programmed mode (such as the DDD mode) while the programming head is held in position. The [CANCEL MAGNET] button appears near the lower right corner of all function screens except the Battery/Lead screen described in Chapter 4. Cancel Magnet Button Ï To execute the Cancel Magnet command: 1. While the programming head is positioned over the pacemaker, select the [CANCEL MAGNET] button. 2. Watch for the “Magnet cancelled” message. Continue to hold the programming head in place for as long as you want the magnet canceled. Lifting the programming head terminates the Cancel Magnet function. 196407001 Rev A Refer to the “Reference man.” category in doc#163256 for Printing Instructions. Medtronic Confidential 7 x 9 inches (178 mm x 229 mm) 2-10 Using the Programmer Printing Reports During a Patient Session The [PRINT] menu button lets you select and print various reports of the data generated during a patient session. Most data is temporarily stored for the duration of the patient session and can be printed at any time during the patient session. However, some types of data, particularly graphic data, must be printed while it is displayed on the screen. All data stored in programmer memory is cleared when you start a new patient session. Selecting a Print Option Selecting a Print option may cause on-screen buttons, except [EMERGENCY], to be unresponsive for several seconds while data is being formatted for printing. (The formatting of Diagnostic graphs may take about half a minute.) Selecting a Print option will cancel an ECG recording in progress. To print a report, select the [PRINT] menu button, and then select the appropriate print option from the drop-down menu. All possible options will be listed, but only those in bold face type are selectable. A report cannot be selected until data for that report has been generated. Print Options About the Print Options Current Screen Report — If data is available, selecting this option prints the report for the function associated with the presently displayed screen. For example, selecting this Print option while the Pacing Parameters screen is displayed results in the printing of a Parameter Values report. Use this option to print graphic reports, which are available only while the data is displayed. These reports include the Diagnostic Graph, Strength-Duration Curve, Activity Exercise Test results graph, and Marker Channel Diagram. Parameter Values — Selecting this option initiates a printout of all pertinent parameter values presently programmed and confirmed in the pacemaker. 196407001 Rev A Refer to the “Reference man.” category in doc#163256 for Printing Instructions. Medtronic Confidential 7 x 9 inches (178 mm x 229 mm) Procedures to Know Before You Begin 2-11 Data Summary — Selecting this option prints a summary of the interrogated data. Included are the event data accumulated since the last patient session. Battery/Lead Data — Selecting this option initiates a printout of the real-time measurements associated with the Battery/Lead data function. Diagnostics Data Table — This option prints the recorded Diagnostic data in tabular form. This is the same data the programmer uses to create and display the Diagnostic Graph. Threshold Results — Selecting this option prints the data accumulated during a patient session from the use of the Threshold Test function. The programmer can store up to 32 test reports for printing during a patient session. Sensing Results — Selecting this option prints the data accumulated from the most recent use of the Sensing Test function. Activity Thld Results — Selecting this option prints the results of an Activity Threshold test. Activity Exercise Test — While the test results screen is displayed following an Activity Exercise test, selecting this option will print the displayed test results, including the test graph. If the test results screen is not displayed, the printout will not include the graph. (Selecting Current Screen Report will also print the displayed test results and graph.) Measured Values — Prints the most recent parameter values obtained from using the Measure ECG function. Waveforms — Available only if the current screen is the Freeze screen. This option prints a 10-second chart of frozen ECG and telemetry traces. Waveform Segment — Available only if the current screen is the Freeze screen. This option initiates a printout of only that portion of the 10-second frozen traces selected with the on-screen calipers. Full Report — Prints the data accumulated for printing during the patient session. Reports included in this printout (if the data is available) are Parameter Values, Data Summary, Battery/Lead Data, Threshold Results, Sensing Results, Activity Threshold and Exercise Test results, and Measured Values. This printout does not include data, such as waveforms or graphs, which can only be printed while the respective screen is displayed. Trace ... — Selecting this option displays two buttons that let you turn the printer “Trace” mode on or off. The following section describes the printer Trace mode. 196407001 Rev A Refer to the “Reference man.” category in doc#163256 for Printing Instructions. Medtronic Confidential 7 x 9 inches (178 mm x 229 mm) 2-12 Using the Programmer Automatic Printing with the Printer Trace Mode To turn the printer Trace mode ON or OFF: 1. Select TRACE ... from the Print menu options. 2. From the Trace window, select [TRACE MODE ON] or [TRACE MODE OFF] as desired. 3. Select [EXIT] to close the window. Turning the Trace mode on causes the printer to automatically print information as it is generated during a patient session. The use of such commands as Program, Interrogate, Cancel Magnet, Emergency, or Measure ECG are documented on the printout if confirmation of the command execution is received. The parameters and values included in a programming, interrogation, or measurement are printed as shown in this example. Graphic information such as a Diagnostic report is not printed by the Trace mode. Using the Trace mode does not affect the option to print specific reports manually. During the printing of a real-time ECG recording, the Trace mode does not function. However, data generated while the programmer is printing frozen waveforms will be saved and printed when the frozen waveform printout has completed. Turning the Trace mode off disables this automatic printing feature. Printing will occur only when you select a specific Print option. 196407001 Rev A Refer to the “Reference man.” category in doc#163256 for Printing Instructions. Medtronic Confidential 7 x 9 inches (178 mm x 229 mm) Procedures to Know Before You Begin 2-13 Printing Reports After a Session Has Ended CAUTION: Selecting a pacemaker model to begin a new patient session or turning the programmer off will clear all data accumulated in programmer memory from the last patient session. Procedure Once you have ended a patient session, but before you select a new pacemaker model or turn the programmer off, you can print the reports accumulated during that session. To print the data reports: 1. Select the [PRINT...] button on the Automatic Model Select screen. This button appears only if there is data present from the previous patient session. 2. Select [PREVIOUS PATIENT DATA] from the option window. Do not select a pacemaker model until printing of the previous session data is complete. Transferring Session Data to a Diskette CAUTION: Selecting a pacemaker model to begin a new patient session or turning the programmer off will clear any data accumulated in programmer memory from the last patient session. Procedure Once you have ended a patient session, but before you select a new pacemaker model or turn the programmer off, you can transfer the data reports accumulated during the session to a computer diskette as described below. NOTE: When you end a patient session, the Data Transfer To Disk window (see next page) automatically may appear on the Automatic Model Select screen. If this window shows, skip steps 1 and 2 of the procedure. If you do not wish to use this function, select the [CANCEL] button. 196407001 Rev A Refer to the “Reference man.” category in doc#163256 for Printing Instructions. Medtronic Confidential 7 x 9 inches (178 mm x 229 mm) 2-14 Using the Programmer To save the data reports to a diskette: 1. Select the [PRINT...] button on the Automatic Model Select screen. NOTE: This button appears only if there is data present from the previous patient session. 2. From the options displayed, select the [DATA TRANSFER TO DISK] button, which displays the window shown below. The “Patient ID,” which will be used in a printed header identifying the data reports, defaults to the pacemaker serial number if applicable. Otherwise, the pacemaker model number will show if it is available. 3. To enter a different patient identifier, select each character of the desired ID from the on-screen keyboard. Select the [‹- DELETE] button to delete an entered character. Up to six characters of the patient ID will be used in the name of the recorded data file.* 4. Insert a 3.5-inch computer diskette into the disk drive on the right side of the programmer. Diskette Requirements: Use a 3.5-inch computer diskette formatted to be IBM compatible (formatted with MS-DOS or PC-DOS). 9760 Programmer → Use a 720 Kb diskette (DS, DD) only 9790 Programmer → Use a 720 Kb diskette (DS, DD) or a 1.44 Mb diskette (DS, HD) 5. Select the [OK] button to copy the patient session data reports to the diskette. If an error message appears, refer to “Disk Error Message” below. *The name automatically assigned to the session file on the diskette will take the following format: DS######.MDS, where “######” are the first six characters of the patient ID. If less than six characters are available, the extra spaces will be filled with zeros. If you save more than one file for the same patient on the same diskette, letters of the alphabet will be added to the file name to identify the order of each file. For example, the second file will have the name DS#####A.MDS, the third DS#####B.MDS, and so on. 196407001 Rev A Refer to the “Reference man.” category in doc#163256 for Printing Instructions. Medtronic Confidential 7 x 9 inches (178 mm x 229 mm) Procedures to Know Before You Begin 2-15 NOTE: Do not select a pacemaker model or remove the diskette until the file transfer process is complete. The message box will state when data has been successfully transferred. 6. To remove the diskette, press the small, rectangular eject button near the disk drive opening. Disk Error Message If a disk error message occurs at step 5, check the following: Is the diskette the proper capacity and format? See step 4. Is the diskette full or faulty? Try a new diskette. Is the diskette write protected? Check the write-protect switch on the back of the diskette. Is the programmer in the process of printing? Selecting [OK] in this case may result in an error message. Wait until printing has stopped. File Format When you select the [OK] button, all available text reports from the last patient session are saved to a file on the diskette in ASCII format. Included in the file are all the character spacing, line feeds, and form feeds required to print the saved reports in the same format used by the programmer. An ASCII “Control-Z” code will mark the end of the file. The report file will include a header page showing the patient ID, file format type (which will always be “1” until other formats become available), and the pacemaker model number. The saved file can be printed from an IBM-compatible computer using the MS-DOS or PC-DOS PRINT command, or the file can be imported into a word processing or data base program as an ASCII or DOS text file. Using the Auto Prompt Feature The “Auto Prompt” options (OFF and ON) displayed in the Data Transfer to Disk window allow you to choose whether or not you want this window to appear automatically when you end a patient session. If you want the window to appear automatically as a reminder to save the session data, select the Auto Prompt [ON] button. If you do not want the window to appear automatically, select the Auto Prompt [OFF] button. 196407001 Rev A Refer to the “Reference man.” category in doc#163256 for Printing Instructions. Medtronic Confidential 7 x 9 inches (178 mm x 229 mm) 2-16 Using the Programmer Using the HELP Options Selecting the [HELP] Menu button displays options for viewing information about using the programmer. You can select the [HELP] button at any time during the patient session. Help Options Selecting one of these Help options opens a text window of pertinent information: Current Screen — Information about the function screen that is presently displayed. Replacement Indicators — Definitions of the battery status messages that can appear for the selected pacemaker model. Magnet Modes — Information about the magnet modes and related pacing rates for the Prodigy family of pacemaker models. Programmer Info — Information about display conventions used to convey information on the programmer display screen. How to Program — General instructions on how to program parameter settings from the Pacing Parameters, Diagnostic Parameters, and Additional Parameters screens. How to Interrogate — General instructions on how to interrogate the pacemaker when it is required to display pacing data or parameter settings. NOTE: A [HELP] button also appears in the value selection window for certain programmable parameters. Select this button to view information about that parameter. 196407001 Rev A Refer to the “Reference man.” category in doc#163256 for Printing Instructions. Medtronic Confidential 7 x 9 inches (178 mm x 229 mm) CHAPTER 3 Starting and Ending a Patient Session About This Chapter This chapter describes how to start a patient session, which involves: Verifying the programmer setup and turning the programmer on (see pages 3-2 and 3-3). Selecting the pacemaker model (see page 3-4). Using the menu buttons to proceed to a desired function (see page 3-7). This chapter also describes how to properly end a patient session (see page 3-9). 3-1 196407001 Rev A Refer to the “Reference man.” category in doc#163256 for Printing Instructions. Medtronic Confidential 7 x 9 inches (178 mm x 229 mm) 3-2 Using the Programmer Before You Begin Prior to using the programmer in a patient session, verify that the programmer is properly set up. Refer to Chapters 2 and 3 in the “Programmer Description and Setup” guide supplied with your 9760 or 9790 programmer for detailed instructions on setting up the programmer and preparing for a patient session. Programmer Setup Checklist Verify that the following components are properly connected: 1. Programming head 2. Light pen (9760 programmer) or touch pen (9790 programmer) 3. ECG cable 4. Power cord (Connect the programmer to an appropriate power outlet.) Connecting an External Monitor or Recorder To connect an external monitor or recorder to the programmer, refer to the instructions provided in Chapter 9 of this manual. Connecting Skin Electrodes For operation of the ECG measurement and display functions, the programmer must be connected to skin electrodes on the patient. Use an electrode lead to connect each skin electrode to the appropriate port on the ECG cable. Typical electrode placement is shown below. RA (R) LA (L) C* (C) ( ) = IEC Coding RL (N) 196407001 Rev A LL (F) * Lead does not apply to 9760 programmer. Refer to the “Reference man.” category in doc#163256 for Printing Instructions. Medtronic Confidential 7 x 9 inches (178 mm x 229 mm) Starting and Ending a Patient Session 3-3 Turning the Programmer ON Procedure If the programmer is not operating, turn it on by pressing inward on the top of the power switch. 9760 programmer: The power switch is located on the right side next to the power cord. 9790 programmer: The power switch is located on the left side near the back of the programmer. System Self Test Turning the programmer on results in a self test that takes about a minute or less. Successful completion of the self test results in the Automatic Model Select screen (see next page). System Test Failure — If during the self test the programmer displays a “System Test Failure” message, contact your Medtronic representative. This message indicates that programmer service is required. Printer Test Failure — If the self test discovers a fault within the printer, the programmer will continue to operate, but the printer will be disabled. Printer service may be required. Contact your Medtronic representative. System Setup Options Refer to Chapter 9 of this manual for information about the system setup options that are accessible from the Automatic Model Select screen, which is displayed upon successful completion of the self test. The system setup information covered in Chapter 9 includes: Setting the time and date of the programmer’s clock/calendar function. Connecting an external recorder or monitor and using the Calibrate option. Setting up Site Nominal (user selected) parameter values for each of the Prodigy pacemaker groups. Setting the pacing artifact display function to on or off. 196407001 Rev A Refer to the “Reference man.” category in doc#163256 for Printing Instructions. Medtronic Confidential 7 x 9 inches (178 mm x 229 mm) 3-4 Using the Programmer Selecting the Pacemaker Model The procedure for starting a patient session begins at the Automatic Model Select screen shown in the example below. This screen appears after you turn the programmer on as described in the previous section (or after you select the [END SESSION] button to end a patient session). To start a patient session, you must select the appropriate pacemaker model. Automatic Model Select Screen With the programming head in position, select this button for automatic model selection. For manual model selection, select proper button to display model options. NOTE: When you end a patient session, the Data Transfer to Disk window may be superimposed on the Automatic Model Select screen. If you do not wish to use the Data Transfer feature, select [CANCEL] to close the window (see CAUTION below). CAUTION: Selecting a pacemaker model or turning the programmer off will automatically clear all data reports accumulated in memory during the previous patient session. If you wish to print these reports, refer to “Printing Reports After a Session Has Ended” on page 2-13. If you wish to transfer these reports to a computer diskette, refer to “Transferring Session Data to a Diskette” on page 2-13. 196407001 Rev A Refer to the “Reference man.” category in doc#163256 for Printing Instructions. Medtronic Confidential 7 x 9 inches (178 mm x 229 mm) Starting and Ending a Patient Session 3-5 Automatic Model Selection To use the automatic model selection feature: 1. Position the programming head over the patient’s pacemaker. 2. Select the [AUTOMATIC MODEL SELECT] button on the screen or the INTERROGATE key on the programming head. NOTE: It is not necessary to select the applicable chamber. The [ATRIUM] and [VENTRICLE] buttons on the Automatic Model Select screen do not apply to Prodigy pacemakers. 3. Continue to hold the programming head steady until a message at the center of the screen confirms pacemaker identification. Model Identified — Upon automatic identification of the pacemaker model (which takes a few seconds), the programmer begins “loading” the appropriate application program. This process may take up to 15 seconds. Display of the Pacing Parameters screen (see next section) indicates that model selection is complete and you may proceed. NOTE: If the pacemaker model identified is not a model from the Prodigy family of pacemakers, refer to the appropriate programming guide supplied with the software installed in your programmer. The front cover of each guide lists the pacemaker families covered in that guide. Model Not Identified — If a message states that the pacemaker model cannot be identified, reposition the programming head and repeat step 2 above or use the Manual Model Selection procedure described below. Automatic identification of the pacemaker model will not occur if the programming head is not properly positioned or if the presence of strong electrical interference interrupts telemetry between the programmer and pacemaker. Manual Model Selection If the pacemaker model cannot be identified by the automatic model selection feature, select the pacemaker manually as follows: 1. From the Automatic Model Select screen, select the pacemaker type: [SINGLE CHAMBER MODELS] or [DUAL CHAMBER MODELS]. 2. From the list of options displayed, select the desired Prodigy group. If there are more model options than can be displayed on one screen, a [MORE>>] button appears in the lower right corner of the option window. Select this button to view more options. 196407001 Rev A Refer to the “Reference man.” category in doc#163256 for Printing Instructions. Medtronic Confidential 7 x 9 inches (178 mm x 229 mm) 3-6 Using the Programmer NOTE: It is not necessary to select the applicable chamber. The [ATRIUM] and [VENTRICLE] buttons on the Manual Model Select screen do not apply to Prodigy pacemakers. Selecting the pacemaker model initiates loading of the appropriate application program. This process may take up to 15 seconds. Display of the Pacing Parameters screen (see next section) indicates that model selection is complete and you may proceed. 196407001 Rev A Refer to the “Reference man.” category in doc#163256 for Printing Instructions. Medtronic Confidential 7 x 9 inches (178 mm x 229 mm) Starting and Ending a Patient Session 3-7 Selecting the Desired Function Selecting the pacemaker model displays the Pacing Parameters screen shown in the example below. This screen allows you to: View the present pacing parameter settings (see Chapter 4). Program new pacing parameter settings (see Chapter 6). Proceed to another function. To proceed to another function, select the appropriate button from the “menu” buttons displayed across the top of the screen. These buttons, which appear on all screens, let you quickly and easily access all functions applicable to the selected model. Menu buttons provide easy access to all applicable functions. These buttons always appear at the top of every screen. Î To display the present parameter settings as shown in this example, you must interrogate the pacemaker: Position the programming head and press [INTERROGATE] or [INTERROGATE ALL]. Navigating with the Menu Buttons Except for the [END SESSION] and [FREEZE] buttons, selecting a Menu button displays a list of function options as described on the following page. 196407001 Rev A Refer to the “Reference man.” category in doc#163256 for Printing Instructions. Medtronic Confidential 7 x 9 inches (178 mm x 229 mm) 3-8 Using the Programmer Menu Button Description and Chapter Reference Possible Options DATA Select this button to display options for viewing data retrieved from the pacemaker by interrogation, including: a pacing data summary, battery and lead information, and a graph of Diagnostic data. Refer to Chapter 4. Data Summary (Ch 4) Battery/Lead Show Diagnostics Graph TESTS/ECG Select this button to display options for viewing the patient’s ECG and EGM and for conducting various tests such as determining the patient’s stimulation threshold. Refer to Chapters 5 and 7.* ECG/Markers/EGM Threshold Test Sensing Test Temporary Test Measure ECG Activity Test PARAMETERS Select this button to display options for programming pacing parameter values and for programming and using the Diagnostic function. Refer to Chapters 6 and 8. Pacing Parameters (Ch 6) Diagnostic Parameters (Ch 8) Additional Parameters (Ch 6) END SESSION Select this button to end a patient session. SPECIAL Select to access the Calibrate option, which applies to using an external recorder, or to access the Position Head Assist option, which applies to using the Programming Head. Refer to Chapters 9 and 2, respectively. FREEZE Select this button to freeze a 10-second segment of the patient’s ECG. Refer to Chapter 5. PRINT Select this button to display options for selecting the type of report you want to print or the printer Trace mode. Refer to Chapter 2. HELP Select this button to display options for selecting informational help screens. Refer to Chapter 2. Current Screen Report Parameter Values Data Summary Battery/Lead Data Diagnostics Data Table Threshold Results Sensing Results Calibrate Position Head Assist (Ch 5) (Ch 7) (Ch 7) (Ch 7) (Ch 7) (Ch 7) (Ch 9) (Ch 2) Activity Thld Results (Ch 2) Activity Exercise Test Measured Values Waveforms Waveform Segment Full Report Trace ... Current Screen (Ch 2) Replacement Indicators Magnet Modes Programmer Info How to Program *An “EPS” option for conducting electrophysiologic studies also will be listed if 9877A software has been installed. Instructions for using this function are covered in a programming guide supplement supplied with the 9877A software. 196407001 Rev A Refer to the “Reference man.” category in doc#163256 for Printing Instructions. Medtronic Confidential 7 x 9 inches (178 mm x 229 mm) Starting and Ending a Patient Session 3-9 Ending a Patient Session The programmer accumulates and temporarily stores certain data generated during a patient session. This data facilitates parameter programming and provides for the display of session-related information. It is important to properly end each patient session so that this data will clear from programmer memory when you select a pacemaker model to begin a new patient session. To end a patient session, select [END SESSION] from the Menu buttons at the top of the screen. 1. Select [END SESSION] Menu button. 2. Select [OK] button to end patient session. This action displays a window that allows you to verify your choice. Select [OK] to end the session, or select [CANCEL] to continue the session. Ending the session returns you to the Model Selection screen, which is the starting point for the next patient session. NOTE: Once you end a patient session, you have two options to retrieve the data reports generated during that session. You can print the reports or transfer the reports to a computer diskette (see page 2-13). Selecting a pacemaker model to start a new patient session or turning the programmer off will erase all accumulated data from the programmer memory. 196407001 Rev A Refer to the “Reference man.” category in doc#163256 for Printing Instructions. Medtronic Confidential 7 x 9 inches (178 mm x 229 mm) 196407001 Rev A Refer to the “Reference man.” category in doc#163256 for Printing Instructions. Medtronic Confidential 7 x 9 inches (178 mm x 229 mm) CHAPTER 4 Retrieving Pacing System Data About This Chapter This chapter describes how you can display information retrieved from the pacemaker by interrogation. You can use the four procedures presented in this chapter to display the following pacemaker information: The present programmed parameter settings (see page 4-2). A summary of battery and lead status and the programmed status of the Diagnostics function. Included is a summary of certain event data automatically collected in pacemaker memory (see page 4-5). Real-time measurements of pacemaker battery condition and of parameters related to pacemaker output and lead system status (see page 4-9). A graphic display of the event data accumulated in pacemaker memory by the Diagnostics function if it has been programmed to collect data (see page 4-12). 4-1 196407001 Rev A Refer to the “Reference man.” category in doc#163256 for Printing Instructions. Medtronic Confidential 7 x 9 inches (178 mm x 229 mm) 4-2 Using the Programmer Displaying Present Parameter Settings You can quickly display the parameter settings to which the patient’s pacemaker is programmed by selecting the appropriate parameter screen. There are three such screens: 1) The Pacing Parameters screen, 2) The Diagnostic Parameters screen, and 3) The Additional Parameters screen. Displaying Pacing Parameter Settings To display the Pacing Parameters screen, select the [PACING PARAMETERS] button if it is displayed in the lower right corner of the present screen, otherwise select the [PARAMETERS] menu button as illustrated below. 1. Select [PARAMETERS] menu button. 2. Select PACING PARAMETERS option. Parameter settings will not show unless an appropriate interrogation has occurred. Interrogate the pacemaker, if necessary, to display the settings. Pacing Parameters Screen If the pacemaker has been interrogated, this screen displays the presently programmed pacing parameter settings. To use this screen to program new pacing parameter settings, refer to the instructions 196407001 Rev A Refer to the “Reference man.” category in doc#163256 for Printing Instructions. Medtronic Confidential 7 x 9 inches (178 mm x 229 mm) Retrieving Pacing System Data 4-3 A Note About Mode Switch — The subordinate parameter Detect Rate associated with programming Mode Switch does not show on the Pacing Parameters screen. To view the setting of this parameter, select Mode Switch to open its value window. If Mode Switch is set to ON, the present value for Detect Rate will show in the Mode Switch value window. Displaying Diagnostic Parameter Settings To display the present programmed parameter settings controlling the Diagnostics function, select the [PARAMETERS] menu button, and then select the DIAGNOSTIC PARAMETERS option as illustrated below. 1. Select [PARAMETERS] menu button. 2. Select DIAGNOSTIC PARAMETERS option. The Diagnostic Parameters screen appears as shown in the example below. If the Diagnostics function has not been programmed to collect data, the Type parameter will show a value of OFF. Diagnostic Parameters Screen Interrogate the pacemaker, if required, to display settings. Refer to Chapter 8 for instructions on using the Diagnostics function. 196407001 Rev A Refer to the “Reference man.” category in doc#163256 for Printing Instructions. Medtronic Confidential 7 x 9 inches (178 mm x 229 mm) 4-4 Using the Programmer Displaying Additional Parameters Settings The Additional Parameters screen displays the present settings for the following parameters and provides access to the Status Reset command. Transtelephonic Monitor Extended Telemetry Pacemaker Serial Number Status Reset (See Chapters 6 and 13) (See Chapters 6 and 15) (See Chapter 6) (See Chapter 6) To display the Additional Parameters screen, select the [PARAMETERS] menu button, and then select the ADDITIONAL PARAMETERS option as illustrated below. 1. Select [PARAMETERS] menu button. 2. Select ADDITIONAL PARAMETERS option. The Additional Parameters screen appears as shown in the example below. Additional Parameters Screen Interrogate the pacemaker, if required, to display settings. To use this screen for programming these parameters, refer to Chapter 6. For more about Transtelephonic Monitor and Extended Telemetry, refer to Chapters 13 and 15, respectively. 196407001 Rev A Refer to the “Reference man.” category in doc#163256 for Printing Instructions. Medtronic Confidential 7 x 9 inches (178 mm x 229 mm) Retrieving Pacing System Data 4-5 Displaying a Summary of Pacemaker Status You can display a summary of pacemaker battery and lead status and the programmed status of the Diagnostics function by selecting the Data Summary screen. This screen includes a display of certain event data automatically accumulated by the pacemaker since the last patient session. Selecting the Data Summary Screen To display the Data Summary screen, select the [DATA] menu button, and then select the DATA SUMMARY option as illustrated below. 1. Select [DATA] menu button. 2. Select DATA SUMMARY option. The Data Summary screen appears as shown in the example below. Data will not be displayed unless an appropriate interrogation has occurred. If necessary, interrogate the pacemaker to display the summary data. Data Summary Screen Select the [BATTERY/ LEAD], [DIAGNOSTIC PARAMETERS], or [SHOW DIAGNOSTICS GRAPH] button to view more data. 196407001 Rev A Refer to the “Reference man.” category in doc#163256 for Printing Instructions. Medtronic Confidential 7 x 9 inches (178 mm x 229 mm) 4-6 Using the Programmer Battery/Lead This section of the screen includes a summary of pacemaker battery and lead status. Estimated Time to Replacement “Estimated Time to Replacement” is a calculated estimate of the time (in months) remaining until pacemaker replacement will be required. This calculated estimate is an average value based on the programmed parameter settings and the event summary data accumulated by the pacemaker since the previous patient session. Select the [MORE INFO] button for information about estimated time to replacement and the estimated maximum, average, and minimum values. Refer to page 4-11 for information about the messages that can appear in place of the estimated time value. IMPORTANT: Elective pacemaker replacement should not be based on the estimated time to replacement. For this decision, use only the elective replacement indicators or the battery status “Replace Pacer” message. When battery voltage indicates that pacemaker replacement is required, the “Replace Pacer” message automatically appears on the screen in place of the estimated time to replacement value. Lead Impedance “Lead Impedance” is the measured electrical impedance presented by the pacing lead and electrode/tissue interface. If the pacing mode is a dual chamber mode, the measured impedance for both lead systems is displayed. Diagnostic Parameters This section of the screen indicates the programmed status of the Diagnostics function by displaying the present settings of the Setup and Type parameters. No value for Setup will be displayed if any changes were made to the default settings established by the Setup option. A setting of “Off” for the Type parameter indicates that the Diagnostics function has not been programmed to collect data. 196407001 Rev A Refer to the “Reference man.” category in doc#163256 for Printing Instructions. Medtronic Confidential 7 x 9 inches (178 mm x 229 mm) Retrieving Pacing System Data 4-7 Event Summary Data Event Summary is a non-programmable pacemaker function that operates continuously to collect the data described below. You can view this event data only on the Data Summary screen and the Data Summary printout. Event Summary shows data collected since the last patient session. This data is automatically cleared from pacemaker memory during each patient session and cannot be recalled once the session has ended. The listed dates, which show the period during which the event data was collected, are based on the current setting of the programmer’s calendar function. Data collection stops when ERI occurs. In this case, the ending date is labeled as the “ERI” date. Under unusual circumstances, if a data error is detected, “invalid data” can show in place of certain event values. This condition should clear itself by the next patient session. % Total Events The data under this heading shows the percentage of the total number of recorded beats that fall into each of the displayed pace/sense event sequence categories. For dual chamber pacing modes, the event sequence categories are as follows: AS-VS AS-VP AP-VS AP-VP (Atrial Sense - Ventricular Sense) (Atrial Sense - Ventricular Pace) (Atrial Pace - Ventricular Sense) (Atrial Pace - Ventricular Pace) For the VDD mode, the event sequence categories are: AS-VS AS-VP VS VP (Atrial Sense - Ventricular Sense) (Atrial Sense - Ventricular Pace) (Ventricular Sense preceded by a ventricular event) (Ventricular Pace preceded by a ventricular event) For single chamber modes, two event categories are used: Paced Sensed 196407001 Rev A Refer to the “Reference man.” category in doc#163256 for Printing Instructions. Medtronic Confidential 7 x 9 inches (178 mm x 229 mm) 4-8 Using the Programmer PVCs If the pacemaker has been operating in a dual chamber mode, Event Summary displays the counted number of PVC “singles” and “runs.” A PVC (premature ventricular contraction) is defined by the pacemaker as a ventricular sense that follows a ventricular pace or sense without an intervening atrial pace, atrial sense, or atrial refractory sense. Singles — Show the number of singly-occurring PVCs. Runs — Show the number of runs consisting of two or more PVCs. A greater-than symbol (>) appearing in front of the displayed value indicates memory for this data is full and data collection has stopped. Since PVC data collection applies only to dual chamber modes, this feature will not be displayed if a single chamber mode was in effect during the monitoring period. Mode Switch Episodes “Mode Switch Episodes” is displayed in the Event Summary if the Mode Switch parameter (see Chapter 14) applies to the pacing mode in effect during the monitoring period. If Mode Switch is programmed ON, the number of mode switch episodes occurring during the monitoring period is displayed. If the number of episodes exceeds the range maximum (255), data collection stops, and a greater-than symbol (>) appears in front of the displayed value. If Mode Switch is programmed OFF, the display shows “Off” in place of a value. Displaying More Data To display more data, select the appropriate button as follows: Select [BATTERY/LEAD] to view all battery and lead measurements. See next section, “Displaying Battery and Lead Information.” Select [DIAGNOSTIC PARAMETERS] to view the programmed status of all Diagnostic parameters. Refer to Chapter 8. Select [SHOW DIAGNOSTICS GRAPH] to display a graph of the diagnostic data recorded in pacemaker memory. (If the setting for Type is displayed as “OFF,” no data has been collected for display.) Refer to Chapter 8. 196407001 Rev A Refer to the “Reference man.” category in doc#163256 for Printing Instructions. Medtronic Confidential 7 x 9 inches (178 mm x 229 mm) Retrieving Pacing System Data 4-9 Displaying Battery and Lead Information By selecting the Battery/Lead screen, you can display information about the pacemaker battery and lead system based on real-time measurements and calculations made at the time of pacemaker interrogation. This information provides a detailed status of the pacemaker battery and the output conditions pertaining to the pacing lead system. Selecting the Battery/Lead Screen To display the Battery/Lead screen, select the [DATA] menu button, and then select the BATTERY/LEAD option as illustrated below. 1. Select [DATA] menu button. 2. Select BATTERY/ LEAD option. Data will not appear unless an appropriate interrogation has occurred. Interrogate the pacemaker, if necessary, to display or update the battery and lead data. Interrogation may require several seconds to complete. Battery/Lead Screen Interrogate the pacemaker if measurements are not displayed. This process may take several seconds to complete. 196407001 Rev A Refer to the “Reference man.” category in doc#163256 for Printing Instructions. Medtronic Confidential 7 x 9 inches (178 mm x 229 mm) 4-10 Using the Programmer NOTE: During the measurement process, the pacemaker paces at 100 ppm for several beats. (During these beats in a dual chamber mode, the AV interval will be 100 ms.) Parameter Measurements The Battery/Lead screen displays a battery status message and real-time measurements and calculations for the pacemaker parameters listed below. Battery Status “OK” or “Replace Pacer” Estimated Time To Replacement Calculated estimate of the average time remaining until pacemaker replacement will be required. See explanation below. Battery Voltage Present voltage of the pacemaker battery. Battery Current Present current drain on the pacemaker battery averaged over a pacing cycle. Battery Impedance Internal electrical impedance of the pacemaker battery. Pulse Duration Present programmed value of the pacing pulse width. Pulse Amplitude Present value of the pacing pulse amplitude. Output Energy Output energy contained in a single pacing pulse. Lead Current Current delivered during a pacing pulse. Lead Impedance Electrical impedance presented by the pacing lead and electrode/tissue interface. Pacing Configuration Present programmed pacing configuration (unipolar or bipolar). Estimated Time to Replacement “Estimated Time to Replacement” is a calculated estimate of the average time (in months) remaining until pacemaker replacement will be required. This calculated estimate is based on the programmed parameter settings and event summary data accumulated by the pacemaker since the previous patient session. 196407001 Rev A Refer to the “Reference man.” category in doc#163256 for Printing Instructions. Medtronic Confidential 7 x 9 inches (178 mm x 229 mm) Retrieving Pacing System Data 4-11 Select the [MORE INFO] button for information about estimated time to replacement and the estimated maximum, average, and minimum values. IMPORTANT: Elective pacemaker replacement should not be based on the estimated time to replacement. For this decision, use only the elective replacement indicators or the battery status “Replace Pacer” message. When battery voltage indicates that it is time for pacemaker replacement, the “Replace Pacer” message automatically appears on the screen in place of the estimated time to replacement value. The following messages can appear in place of the estimated time value: “Select MORE INFO ===>>>” — Estimated time to replacement information is available only by selecting the [MORE INFO] button. This message appears when additional factors that affect the time estimate are present and require an explanation. If less than 24 hours have elapsed since the previous patient session, a message will state that there is “insufficient event summary data accumulated in the pacemaker.” In this case, the estimated time to replacement calculations assume that the patient is paced 100 percent of the time. “Replace Pacer” — Low battery voltage in the patient’s pacemaker has tripped the ERI (elective replacement indicator). Elective replacement of the pacemaker is now recommended. 196407001 Rev A Refer to the “Reference man.” category in doc#163256 for Printing Instructions. Medtronic Confidential 7 x 9 inches (178 mm x 229 mm) 4-12 Using the Programmer Displaying a Graph of Recorded Diagnostic Data If the pacemaker has been previously programmed to record data for the Diagnostics function, a graph of the data collected to date may be viewed by selecting a Data option as described below. You can also display this graph from the Diagnostic Parameters screen (see Chapter 8) or from the Data Summary screen (see page 4-5). Selecting the Graph Display Screen To display the Diagnostics graph screen, select the [DATA] menu button, and then select the SHOW DIAGNOSTICS GRAPH option as shown below. 1. Select [DATA] menu button. 2. Select SHOW DIAGNOSTICS GRAPH The graph will not be displayed unless an appropriate interrogation has occurred. Interrogate the pacemaker, if necessary, to display the graph. Diagnostics Graph The type of information displayed by the graph depends on the programmed status of the Diagnostics function. Refer to Chapter 8 for information about the Diagnostics function and viewing the graph. To print the graph, you must select CURRENT SCREEN REPORT from the Print options while the graph is displayed (refer to Chapter 2). 196407001 Rev A Refer to the “Reference man.” category in doc#163256 for Printing Instructions. Medtronic Confidential 7 x 9 inches (178 mm x 229 mm) CHAPTER 5 Displaying and Printing the Patient’s ECG and EGM About This Chapter The procedures presented in this chapter describe using the programmer’s ECG display and recording functions. The procedures describe: How to print a real-time recording of the patient’s ECG accompanied by traces of Marker Channel™ and EGM telemetry (see page 5-2). How to select a high resolution display of the ECG and the Marker Channel and EGM traces when present (see page 5-5). How to inhibit pacemaker output to observe the patient’s underlying rhythm (see page 5-9). How to freeze a 10-second segment of the patient’s ECG and how to use the on-screen calipers (see page 5-10). How to select a Marker Channel Diagram to view more detailed information about pacemaker operation (see page 5-14). 5-1 196407001 Rev A Refer to the “Reference man.” category in doc#163256 for Printing Instructions. Medtronic Confidential 7 x 9 inches (178 mm x 229 mm) 5-2 Using the Programmer Printing the Patient’s ECG and EGM At any time during a patient session, you can initiate a continuous, real-time recording of the patient’s ECG as described below. Procedure The procedure is slightly different depending on whether you are operating a 9760 or 9790 programmer. NOTE: Step 1 will interrupt any report being printed. Likewise, selecting a Print option from the display screen will interrupt and cancel an ECG recording in progress. 9760 Programmer 9790 Programmer 1. To start a recording of the patient’s ECG: 9760 — Press the printer RECORD button. 9790 — Press the desired paper speed button. 2. To stop the recording, press the same button again. 3. Before you tear off the ECG strip, press the PAPER ADVANCE button to advance the paper to a perforation. To change the recording speed on a 9760 programmer, press the desired PAPER SPEED button. This can be done prior to or during the recording process. NOTE: Because the printed waveform recording provides a higher resolution, it may show artifacts and events that do not appear on the display screen. 196407001 Rev A Refer to the “Reference man.” category in doc#163256 for Printing Instructions. Medtronic Confidential 7 x 9 inches (178 mm x 229 mm) Displaying and Printing the Patient’s ECG and EGM 5-3 Annotations ECG Marker Telemetry EGM Telemetry ECG Printout Example with Markers and EGM (9760 Programmer Recording) About the Recording Annotation of Executed Commands — Information on the ECG printout includes an indication of when certain commands to the pacemaker occurred. When confirmation of the command is received, the command name is printed at the appropriate point in the margin above the waveform grid. Parameter values are not printed except during a threshold test. A recording made during threshold measurement will show each programmed test value at the point it is programmed. Marker Channel™ and EGM Telemetry — If the programming head is over the patient’s pacemaker, the recording will include a trace or traces of the telemetry being received from the pacemaker. In the example above, the patient’s ECG is accompanied by “Marker” telemetry and EGM telemetry. This combination of Marker and EGM telemetry (atrial EGM if the pacing mode is dual chamber) is the default setting and occurs automatically when you position the programming head. As described later in this chapter, you can select other types of telemetry to be displayed and recorded. ECG and EGM Trace adjustment — The ECG and EGM are recorded according to control settings accessible from the ECG/Markers/EGM display described in the next section (the ECG/Markers/EGM display appears on several screens). These control settings include ECG lead configuration (Lead I, Lead II, or Lead III), amplitude scaling, and a filter ON/OFF option. 196407001 Rev A Refer to the “Reference man.” category in doc#163256 for Printing Instructions. Medtronic Confidential 7 x 9 inches (178 mm x 229 mm) 5-4 Using the Programmer Missing Markers — A programming command or interrogation momentarily interrupts the transmission of Marker Channel telemetry. This interruption can result in missing markers. The point at which the command occurred is marked above the ECG trace by a “down” and/or “up” arrow. The down arrow (W) indicates a transmitted command from the programmer; the up arrow (V) indicates a telemetry response from the pacemaker. Displaying Pacing Artifacts During processing and amplification of the patient’s ECG signal, the programmer automatically detects and enhances pacing artifact so that they appear on the ECG display and printout. Under certain conditions, some types of interference can trigger artifact detection causing false artifacts to appear on the patient’s ECG. 9790 Programmer With the 9790 programmer, you can turn the artifact display on or off. Turning the artifact display off allows you to monitor the patient’s ECG without the appearance of pacing artifacts. Disabling this function may be advantageous in the presence of troublesome interference. For instructions on turning the artifact display on or off, refer to “Setting the Artifact Display” in Chapter 9. The Artifact Display options are accessible via the [SETUP...] button on the Automatic Model Select screen. NOTE: With the artifact display turned off, pacing artifacts will not show on the programmer ECG display or printout. Once you turn the artifact display off, it will remain off until you repeat the procedure to turn it back on. 196407001 Rev A Refer to the “Reference man.” category in doc#163256 for Printing Instructions. Medtronic Confidential 7 x 9 inches (178 mm x 229 mm) Displaying and Printing the Patient’s ECG and EGM 5-5 Displaying the Patient’s ECG and EGM By selecting the ECG/Markers/EGM screen, you can display a high resolution view of the patient’s ECG. The ECG will be accompanied by a trace of Marker Channel telemetry and EGM telemetry if such telemetry is being received from the pacemaker. This screen provides waveform trace adjustment controls and an option for inhibiting pacemaker output. Selecting the ECG/Markers/EGM Screen To display this screen, select the [TESTS/ECG] menu button, and then select the ECG/MARKERS/EGM option as illustrated below. 1. Select the [TESTS/ECG] menu button. 2. Select the ECG/MARKERS/EGM option. If the programmer is connected to skin electrodes on the patient, the screen displays the patient’s ECG as shown below. In this example, Marker and ventricular EGM telemetry are being received from the pacemaker. ECG/Markers/EGM Screen These buttons allow adjustment of the ECG and EGM traces and selection of the desired telemetry type. 196407001 Rev A Refer to the “Reference man.” category in doc#163256 for Printing Instructions. Medtronic Confidential 7 x 9 inches (178 mm x 229 mm) 5-6 Using the Programmer Adjusting the ECG and EGM Traces The control buttons at the left of the trace display (see below) let you adjust the displayed ECG and EGM. To make an adjustment: 1. Select the appropriate button (see descriptions below). 2. Select the desired option from the displayed window of options. Select to choose a different ECG Lead configuration. Options: Lead I, Lead II, Lead III (Lead II is the default setting.) ____________________________ Select to change the ECG amplitude scaling. ECG LEAD II Options: 1.0, 0.5, 0.2, 0.1, 0.05 mV/mm and Automatic. “Automatic” sets scaling to the highest value that does not result in clipping of the waveform peaks. Automatic is the default setting. ____________________________ Select to turn the ECG filter ON or OFF. 1.0 mV/mm Filter ON 75 bpm V. EGM 1.0 mV/mm Options: Filter OFF (Bandwidth = 0.05 to 100 Hz) Filter ON (Bandwidth = 0.5 to 40 Hz) The ON setting may improve clarity of the displayed and printed ECG in the presence of interference. “ON” is the default setting. ____________________________ Indicates the patient’s present heart rate. This is not a control. The displayed value is a beat-by-beat measurement derived from Marker Channel telemetry. For ventricular and dual chamber modes, the value will be the ventricular rate; for atrial modes, the value will be the atrial rate. _______________________________ Select to display programmable waveform telemetry options. (See telemetry programming procedure next page). ____________________________ Select to change the EGM amplitude scaling. Options for: A. EGM = 1.0, 0.5, 0.2, 0.1, 0.05 mV/mm and Automatic V. EGM = 5.0, 2.0, 1.0, 0.5, 0.2 mV/mm and Automatic “Automatic” sets scaling to the highest value that does not result in clipping of the waveform peaks. Automatic is the default setting. ____________________________________________________________ 196407001 Rev A Refer to the “Reference man.” category in doc#163256 for Printing Instructions. Medtronic Confidential 7 x 9 inches (178 mm x 229 mm) Displaying and Printing the Patient’s ECG and EGM 5-7 Programming the Trace Telemetry Type Default Telemetry — Positioning the programming head over the patient’s pacemaker automatically causes the pacemaker to transmit both Marker telemetry and EGM telemetry (atrial EGM for dual chamber modes). The combination of Marker telemetry and EGM telemetry is displayed in the examples on pages 5-3 and 5-5. Programming Procedure — Use the following procedure to temporarily program the telemetry to another type: ECG LEAD II 1. With the programming head in position over the pacemaker, select this button. 2. Select the desired telemetry type from the options displayed (see below). 3. Continue to hold the programming head in place for as long as you want to view the programmed telemetry. 1.0 mV/mm Filter ON 75 bpm V. EGM The telemetry type will return to its default setting if the programming head is removed from the pacemaker site for over 30 seconds. Telemetry Options — The programmable options for the type of telemetry that can be displayed and recorded with the patient’s ECG are as follows: 1.0 mV/mm 196407001 Rev A A. EGM This option displays atrial EGM and Marker telemetry. V. EGM This option displays ventricular EGM and Marker telemetry. MARKER This option displays Marker telemetry only. The Marker trace appears in a larger format on the lower trace display in place of the EGM. SENSOR This option displays Sensor telemetry only. The Sensor trace appears on the lower trace display in place of the EGM. Refer to the “Reference man.” category in doc#163256 for Printing Instructions. Medtronic Confidential 7 x 9 inches (178 mm x 229 mm) 5-8 Using the Programmer More About Marker Channel™ Telemetry NOTE: An interrogation or programming command momentarily interrupts Marker Channel telemetry. If this interruption occurs at the moment a marker is scheduled, the marker is not displayed. MARKER Telemetry — A trace of Marker telemetry depicts pacemaker operation by showing Pace, Sense, and Refractory Sense events as they occur within the pacemaker. Markers also depict triggered pacing in the AAT or VVT mode and the beginning and end of a Mode Switch episode when it occurs. These markers are intended to facilitate interpretation of the ECG. Each Marker is coded as follows: Dual Chamber Models Single Chamber Models AP = Atrial Pace VP = Ventricular Pace P = Pace AS = Atrial Sense VS = Ventricular Sense S = Sense AR = Atrial Sense VR = Ventricular Sense SR = Sense during during refractory during refractory refractory ___________________________________________________________________ TP = Triggered Pace (AAT or VVT pacing mode) MS = Mode Switch Episode (marks the beginning and the end) ER = Error Marker (indicates a Marker signal that could not be decoded) SENSOR Telemetry — Sensor telemetry transmits a single type of marker to show “Sensor-Detect” events. A Sensor-Detect event occurs each time the detected level of physical activity exceeds the programmed Activity Threshold setting. Sensor markers thus show response of the Activity sensor to physical activity of the patient and are intended to facilitate evaluation of the Activity Threshold setting. Sensor markers appear on the lower trace display as shown in the example below. These markers are not annotated with letter codes. Example Display Showing Sensor Markers While Sensor markers are displayed, heart rate is not measured. This number remains fixed. 196407001 Rev A Refer to the “Reference man.” category in doc#163256 for Printing Instructions. Medtronic Confidential 7 x 9 inches (178 mm x 229 mm) Displaying and Printing the Patient’s ECG and EGM 5-9 Inhibiting Pacemaker Output INHIBIT This button, which also appears on other screens that show the ECG/Markers/EGM display, lets you temporarily stop the pacing output of the patient’s pacemaker for such purposes as observing the underlying rhythm. CAUTION: The Inhibit function is intended for diagnostic and test purposes. It should be used only under conditions of careful patient monitoring and control. IMPORTANT: At any point during use of the Inhibit function, releasing the [PROGRAM] button or lifting the programming head away from the site of the pacemaker for at least two seconds will restore pacing output. In the event of a programmer malfunction or loss of power, lift the programming head immediately. Pacemaker blanking periods are minimized during use of the Inhibit function to increase the window during which cardiac events can be sensed. Sense markers appearing below the ECG will indicate each sensed event. Inhibit Procedure — To inhibit pacemaker output: 1. Make any desired ECG trace adjustments before selecting [INHIBIT]. 2. Position the programming head and hold it steady for the remainder of this procedure. NOTE: To observe Sense markers and a display of the sensed rate while you use the Inhibit function, select the [CANCEL MAGNET] button. (If pacemaker operation is not changed from the magnet mode, Sense markers and the patient’s intrinsic rate cannot be displayed.) 3. Select [INHIBIT] to prepare the programmer. 4. To inhibit pacemaker output, press and hold [PROGRAM]. A message indicates that the command is causing inhibition. The ECG trace should show the absence of any pacing stimuli. To obtain an ECG recording, press the printer RECORD key (9760 programmer) or the desired paper speed key (9790 programmer). 5. To restore pacing output, release [PROGRAM]. Watch for confirmation that pacing output has been restored. If confirmation is not received, lift the programming head to ensure that pacing is restored. 196407001 Rev A Refer to the “Reference man.” category in doc#163256 for Printing Instructions. Medtronic Confidential 7 x 9 inches (178 mm x 229 mm) 5-10 Using the Programmer Freezing the ECG Trace At any time during a patient session, you can freeze and display 10 seconds of the patient’s ECG and the accompanying telemetry traces. On-screen calipers let you accurately measure time intervals on these traces. Selecting the FREEZE Button To freeze and display a 10-second segment of the ECG and telemetry trace, select the [FREEZE] menu button as shown below. To freeze 10 seconds of the patient’s ECG, select the [FREEZE] menu button. This action displays the Freeze screen shown in the example below. The frozen trace will begin to appear immediately or after a pause of 5 or 10 seconds, depending on the selected Freeze Option (see next page). Freeze Screen Buttons below the trace display control the two vertical cursors to provide an on-screen caliper function. 196407001 Rev A Refer to the “Reference man.” category in doc#163256 for Printing Instructions. Medtronic Confidential 7 x 9 inches (178 mm x 229 mm) Displaying and Printing the Patient’s ECG and EGM 5-11 Selecting a Freeze Option FRZ OPTION... Timing of the 10-second window during which ECG and telemetry signals are frozen depends on the present Freeze Option setting. Procedure — To change the present Freeze Option: 1. Select the [FRZ OPTION...] button to display the options and the present setting. 2. Select the desired timing option (see below). The selected setting takes effect the next time you use the Freeze function and remains in effect until you change it. Freeze Options — Selecting the [FRZ OPTION...] button displays the following options: Freeze Previous 10 Seconds — Freezes the 10 seconds of trace that occurred just prior to selection of the [ FREEZE] button. Freeze Next 10 Seconds — Freezes the 10 seconds of trace that occurs just after selection of the [FREEZE] button. Freeze Previous 5 + Next 5 Seconds — Freezes the 5 seconds of trace that occurred prior to selection of the [ FREEZE] button plus the 5 seconds that occurs after the button selection. Printing the Frozen Traces Before you exit the Freeze screen, you can print the frozen 10-second trace (WAVEFORMS print option) or the portion of the trace between the on-screen calipers (WAVEFORM SEGMENT print option). Refer to Chapter 2 for information on printing reports. Displaying a Marker Channel™ Diagram SHOW DIAGRAM If the selected pacemaker is a Prodigy™ DR, Prodigy™ D, or Prodigy™ VDD model, this button appears on the Freeze screen. This button lets you display a Marker Channel Diagram if the pacemaker is programmed to a dual chamber or VDD mode and Marker Channel telemetry is being received. Refer to the last section in this chapter for information about this diagram. 196407001 Rev A Refer to the “Reference man.” category in doc#163256 for Printing Instructions. Medtronic Confidential 7 x 9 inches (178 mm x 229 mm) 5-12 Using the Programmer Adjusting the Trace Displays The control buttons at the left of the trace display let you individually adjust the magnification of the frozen ECG and EGM waveforms and change the time scale of trace display. To make an adjustment: 1. Select the appropriate button (see below) to display a window of options. 2. Select the desired option from the displayed window. ____________________________________________________________ ECG LEAD II 1.0 mV/mm Magnify 1x 25 mm/sec V. EGM 1.0 mV/mm Magnify 1x Indicates the present ECG Lead configuration and ECG amplitude scaling. This is not a control. ____________________________ Select to change the frozen ECG magnification factor. Options: 1X, 2X, and 4X (1X is the default setting.) ____________________________ Select to change the frozen display time scale. Options: 25, 50, 100 mm/sec (25 mm/sec is the default setting.) ____________________________ Indicates the telemetry type displayed on the lower trace display and the EGM amplitude scaling when applicable. This is not a control. ____________________________ Select to change the frozen EGM magnification factor.* Options: 1X, 2X, and 4X (1X is the default setting.) ____________________________________________________________ *This button does not appear if the present telemetry type shown in the box above it is “MARKER” or “SENSOR.” 196407001 Rev A Refer to the “Reference man.” category in doc#163256 for Printing Instructions. Medtronic Confidential 7 x 9 inches (178 mm x 229 mm) Displaying and Printing the Patient’s ECG and EGM 5-13 Using the On-Screen Calipers The position and scroll buttons below the trace display let you control the position of two vertical cursors appearing on the trace display. With these controls, you can use the cursors as on-screen calipers to measure the time interval between events on the displayed traces. The small window above the POSITION LEFT CURSOR buttons displays the interval between the cursors in milliseconds. Left Cursor Ð Ð Right Cursor Freeze Screen — Caliper Cursors and Controls • ýýý➊ ýýý➋ ýýýýýýýýýýý➌ ýýýýýý➍ To use the caliper position and scroll buttons: Alternately press and release the appropriate button to effect small movements or press and hold the button to effect larger movements. Button action reference: ➊ These two buttons move the left cursor to the right or left. ➋ These two buttons move the right cursor to the right or left. ➌ These buttons scroll the calipers to the right or left without changing the space between them. Select the [HOME] button to center the calipers on the screen one second apart. You can use this button to retrieve the calipers if they have been scrolled off the screen. ➍ To view the portion of the frozen traces not showing on the display, use these two buttons to scroll the waveform traces to the right or left. ➎ This box displays the time interval between the cursors. 196407001 Rev A Refer to the “Reference man.” category in doc#163256 for Printing Instructions. Medtronic Confidential 7 x 9 inches (178 mm x 229 mm) 5-14 Using the Programmer Displaying a Marker Channel™ Diagram If the selected pacemaker is a Prodigy DR, Prodigy D, or Prodigy VDD model, the Freeze screen includes the [SHOW DIAGRAM] button as shown in the example on page 5-10. Under the proper conditions (see NOTE below), selecting this button displays a Marker Channel Diagram. NOTE: A Marker Channel Diagram can be displayed only if the pacing mode is dual chamber or VDD and the display includes Marker telemetry annotations (the selected telemetry type can be either Marker or EGM). Selecting the Marker Channel™ Diagram SHOW DIAGRAM To display a Marker Channel Diagram, select the [SHOW DIAGRAM] button on the Freeze screen. The diagram will be drawn on the lower trace display as shown in the example below. Freeze Screen with Marker Channel™ Diagram To print the ECG trace and diagram, select the [PRINT] menu button, and then select the CURRENT SCREEN REPORT option. SHOW MARKERS/EGM 196407001 Rev A To return to the trace of Marker or EGM plus Marker telemetry, select the [SHOW MARKERS/EGM] button, which appears in place of the [SHOW DIAGRAM] button. Refer to the “Reference man.” category in doc#163256 for Printing Instructions. Medtronic Confidential 7 x 9 inches (178 mm x 229 mm) Displaying and Printing the Patient’s ECG and EGM 5-15 About the Marker Channel™ Diagram The Marker Channel Diagram (see example below) shows more details of pacemaker operation by depicting the various timing intervals, including blanking and refractory periods. The diagram is intended to further clarify operation of the pacemaker and simplify analysis of the patient’s ECG. Example of a Marker Channel™ Diagram Printout NOTE: If events portrayed on the diagram occur in very rapid succession, the Pace and Sense marker annotations (P, S, R) may not appear, and the supplemental labels (Act., Safe, PVC, and NCAP) that define certain events may overlap. Overlapping characters or labels displayed on the screen may not appear exactly the same on the printout. NOTE: In situations where the event rate is unusually high, the Marker Channel Diagram may be less than 10 seconds in length due to processing limitations. Using the On-Screen Calipers Operation of the POSITION LEFT/RIGHT CURSOR, CALIPER SCROLL, and WAVEFORM SCROLL buttons is the same as described in the previous section of this chapter. Printing the Marker Channel™ Diagram To print the Marker Channel Diagram, select the [PRINT] menu button, and then select the CURRENT SCREEN REPORT option. You can print a diagram only while it is displayed on the screen. 196407001 Rev A Refer to the “Reference man.” category in doc#163256 for Printing Instructions. Medtronic Confidential 7 x 9 inches (178 mm x 229 mm) 5-16 Using the Programmer The printout lists the present parameter settings on which the diagram is based and includes definitions of the lines, labels, and symbols used in the diagram. Interpreting the Diagram Each Marker Channel Diagram is formed by a series of lines and symbols that depict pacemaker operation. The pacing mode in effect is printed above the ECG trace at the top of the chart. P P P P A V P P A V P A V P P Atrial and Ventricular Baselines — The diagram is formed along two parallel baselines labeled “A” and “V.” Symbols depicting atrial activity appear along the top side of baseline A; symbols depicting ventricular activity appear along the bottom side of baseline V. Sloped lines appearing between the two baselines depict the timing relationship between atrial and ventricular events. P S R ER (Pace) Output of a pacing stimulus. (Sense) A sensed event. (Refractory Sense) An event sensed within the refractory period. (Error) A marker that could not be decoded because of interference or interrupted telemetry. Supplemental Marker Labels — Supplemental labels indicate when a marker is the result of one of the following conditions: A c t. P P Rev A P Pace and Sense Markers — Short vertical lines extending upward from baseline A and downward from baseline V are the event markers received via Marker Channel telemetry. Each marker is labeled according to the event it represents. P 196407001 P Act. Safe PVC NCAP An activity-driven pace. A ventricular safety pace. A pacemaker-defined premature ventricular contraction. A non-competitive atrial pace. Refer to the “Reference man.” category in doc#163256 for Printing Instructions. Medtronic Confidential 7 x 9 inches (178 mm x 229 mm) Displaying and Printing the Patient’s ECG and EGM P R 5-17 Blanking and Refractory Periods — Rectangles on the A and V baselines depict atrial and ventricular blanking and refractory periods. S Solid Rectangles — Depict blanking periods. S S Open Rectangles — Depict refractory periods. Vertical lines appearing within the rectangle mark the timing of sense or pace events occurring in the opposite chamber. Such lines may indicate the start of a new refractory (and blanking) period. Timing Lines — The sloped, horizontal, and vertical lines appearing between the A and V baselines depict the timing relationship between the atrial and ventricular events. P Downward Sloping Lines — Depict A-to-V timing (based on the pacemaker’s operating AV interval) initiated by an atrial pace or sense event. The course of this line results in a ventricular pace, unless it is interrupted by a ventricular sense. P P P Upward Sloping Lines — Depict V-to-A timing (based on the pacemaker’s operating pacing rate) initiated by a ventricular pace or sense event. Except as stated below, the course of this line results in an atrial pace unless it is interrupted by an atrial sense or a PVC. In the VDD pacing mode, a ventricular pace (not an atrial pace) occurs if V-to-V timing completes before an atrial sense occurs. P S S P Horizontal Lines — Depict any extension in the timing required to maintain a proper pace schedule. In this example, the upper tracking rate results in an extension of A-to-V timing. Another example is non-competitive atrial pacing, which shows as an extension of V-to-A timing. S S S Timing extensions are common in diagrams of the DDI(R) mode because of the absence of atrial tracking. Vertical Lines — Depict interruption of a timing interval by a sense or the conclusion of a timing extension, which results in a pace. Error Conditions Under certain conditions, the programmer may not be able to properly determine pacemaker operation from the data available. Most such conditions result in the appearance of an error message on the diagram. 196407001 Rev A Refer to the “Reference man.” category in doc#163256 for Printing Instructions. Medtronic Confidential 7 x 9 inches (178 mm x 229 mm) 5-18 Using the Programmer If an error message appears, you should reposition the programming head and freeze another 10-second trace segment to obtain a new Marker Channel Diagram. NOTE: A Marker Channel Diagram cannot be displayed if an interrogation or programming transmission occurred during the 10-second interval of the frozen trace. Below is an explanation of the messages that indicate an error condition. “Missing Event” — This message appears if an event did not occur when it was expected based on the interrogated data registered in programmer memory. This situation can occur in the presence of interference that interrupts telemetry. Interruption of the diagram followed by the appearance of a Threshold Margin Test (pacing at 100 ppm for three cycles) indicates that movement of the programming head during recording of the 10-second frozen trace opened and closed the pacemaker reed switch. In this situation, the Threshold Margin Test depicted on the diagram may be accompanied by one or more “Missing Event” messages. “Diagram Error” — This message indicates that a particular sequence of events portrayed by the Marker trace cannot be processed and properly displayed by the Marker Channel Diagram. “Bad Data” — This message indicates that the programmer has not received the information it requires to complete the Marker Channel Diagram. This can occur when there is an interruption or fault in the telemetry being received - possibly due to interference or movement of the programming head. 196407001 Rev A Refer to the “Reference man.” category in doc#163256 for Printing Instructions. Medtronic Confidential 7 x 9 inches (178 mm x 229 mm) CHAPTER 6 Programming Pacing Parameters About This Chapter This chapter describes the following programming procedures: How to program the permanent pacing parameters controlling operation of the patient’s pacemaker. This procedure is conducted from the Pacing Parameters screen (see page 6-2). How to program nominal and saved parameter values (see page 6-6). How to program the Transtelephonic Monitor and Extended Telemetry parameters, which are related to follow-up procedures (see page 6-8). How to program the Status Reset command to verify or clear an ERI status or clear a pacemaker full electrical reset condition (see page 6-9). How to program the pacemaker serial number in the event it is cleared from pacemaker memory by an electrical reset (see page 6-10). For instructions on programming the parameters of the Diagnostics function, refer to Chapter 8. 6-1 196407001 Rev A Refer to the “Reference man.” category in doc#163256 for Printing Instructions. Medtronic Confidential 7 x 9 inches (178 mm x 229 mm) 6-2 Using the Programmer Programming Pacing Parameters To program changes to the permanent pacing parameters, begin by selecting the Pacing Parameters screen. This screen displays the present parameter settings and lets you select the parameters and values to be programmed. Selecting the Pacing Parameters Screen You can use either of two methods to select the Pacing Parameters screen: select the [PACING PARAMETERS] button if it is displayed in the lower right corner of the present screen, otherwise select the [PARAMETERS] Menu button, and then select the PACING PARAMETERS option as shown below. 1. Select [PARAMETERS] menu button. 2. Select PACING PARAMETERS option. Present settings will not be shown unless an appropriate interrogation has occurred. Interrogate the pacemaker, if required, to display these settings. Pacing Parameters Screen Refer to Part II of this manual for specific information about the pacing modes and the operation of certain parameters. Refer to Section E in Part III for a list of the parameters and values available for each 196407001 Rev A Refer to the “Reference man.” category in doc#163256 for Printing Instructions. Medtronic Confidential 7 x 9 inches (178 mm x 229 mm) Programming Pacing Parameters 6-3 Features of the Pacing Parameters Screen Parameter Display — Following an interrogation, the screen shows the present pacing parameter settings. The screen displays only those parameters that are applicable to the selected pacemaker model and pertinent to the present pacing mode. Note that the parameters are divided into labeled groups according to their general function. [PROGRAM] Button — This button appears in the lower right corner of the screen only when one or more new parameter values have been properly selected (see “Restricted Parameter Interactions” below). The PROGRAM key on the programming head will respond only when the [ PROGRAM] button shows on the screen. Special Options — The three buttons located at the right of the parameter display may be useful during the programming procedure described on the next page. SHOW PRESENT When you select new parameter values to program, these “pending” values are displayed in place of the interrogated present settings. To temporarily recall the present settings, press and hold this button. SHOW SAVED If you have saved a set of parameter values (see below), this button will appear on the screen. Pressing and holding this button will temporarily display these saved values. SAVE/ NOMINAL OPTIONS... Selecting this button displays options for: 1) clearing all pending values from the parameter screen, 2) saving a set of parameter values, and 3) recalling the set of saved values or nominal values to the screen as pending values. (Refer to “Programming Nominal and Saved Values” in this chapter.) Restricted Parameter Interactions Certain combinations of parameter values are restricted because they are invalid or result in undesirable interactions. The programmer recognizes these combinations and does not allow programming until all parameter conflicts are resolved and all parameter selection requirements are met. Refer to Section E in Part III for more information on parameter programming requirements and restrictions. Restricted Parameter Values — Any parameter value that conflicts with the setting of a present or pending parameter is displayed in italics in the parameter value option window (see step 2 of the programming procedure). 196407001 Rev A Refer to the “Reference man.” category in doc#163256 for Printing Instructions. Medtronic Confidential 7 x 9 inches (178 mm x 229 mm) 6-4 Using the Programmer DDIR Parameter Interaction — If you select a restricted parameter value, the display will indicate the interacting parameter values by displaying the values in reverse video. You must select new values to resolve the conflict before programming is allowed. Parameter Entry Requirement — A solid, shaded rectangle appearing where a parameter value should be displayed indicates that a valid value for this parameter must be selected before programming is allowed. General Parameter Programming Procedure For specific parameter information related to each pacemaker model, refer to Sections B and E of Part III. To program one or more parameter values: 1. Select the desired parameter from those displayed — Lower Rate for example. Press the selector pen directly over the parameter name or its value. NOTE: Select Pacing Mode first if you intend to program a mode. Selecting a mode displays the programmable parameters pertinent to that mode. 2. From the window of value options, select the desired value. Except for Hysteresis, selecting a value in italics results in a restricted parameter interaction. Selecting a value closes the window. The selected value appears in place of the present value and is denoted as “pending” by a dashed rectangle. To clear a pending value from the screen, select that parameter or value, and then select [CLEAR VALUE] in the value window. To close the value window without selecting a value, press [ACCEPT VALUE]. 196407001 Rev A Refer to the “Reference man.” category in doc#163256 for Printing Instructions. Medtronic Confidential 7 x 9 inches (178 mm x 229 mm) Programming Pacing Parameters 3. 6-5 Repeat steps 1 and 2 to include any other parameters you want to program. NOTE: If you try to exit the screen before you program the selected values, a pop-up window will provide the option to continue with this procedure or clear the pending values and exit the screen. 4. Position the programming head and select [PROGRAM]. Select the [PROGRAM] button to program all pending parameter values. Hold the programming head in position until the confirmation message appears. PROGRAM NOTE: If the programming is interrupted, it is possible that one or more of the parameter groups will not be programmed and will still show pending values. In such cases, the programming will not be confirmed, and the message box will direct you to reselect [PROGRAM]. Programming Mode Switch — If the present setting for Mode Switch is or if you select ON, the value window lists the present setting for the subordinate parameter Detect Rate (see example below) and provides the option to select a new value. Refer to Chapter 14 for information about the operation of Mode Switch. ON 1. To select a value for Detect Rate, use the same basic procedure described in steps 1 and 2 of the general programming procedure. 2. When you have selected the desired value for Detect Rate, select the [ACCEPT VALUE] button to close the primary parameter value window. If the present or pending value for Upper Tracking Rate is 165 ppm or above, the programmer automatically selects a pending value for Detect Rate. The values of 185 and 190 bpm are not selectable but will respectively appear as the pending value if Upper Tracking rate is 175 or 180 ppm. 196407001 Rev A Refer to the “Reference man.” category in doc#163256 for Printing Instructions. Medtronic Confidential 7 x 9 inches (178 mm x 229 mm) 6-6 Using the Programmer Programming Nominal and Saved Values The procedures below describe using the options available by selecting the [SAVE/NOMINAL OPTIONS...] button. Programming Medtronic or Site Nominal Values To recall Medtronic nominal settings (“Medtronic Values”) or Site Nominal settings to the screen as pending values for programming: 1. Select the [SAVE/NOMINAL OPTIONS...] button. 2. Select [MEDTRONIC VALUES] or [SITE NOMINALS] from the window of options. The respective parameter values will appear on the screen as pending values. You can directly program these values or make any desired changes prior to programming. NOTE: The [SITE NOMINALS] button shows only if Site Nominal values have been set up for the selected pacemaker model. Refer to Chapter 9. Saving a Set of Parameter Values To save the displayed present pacing parameter values (those interrogated from the patient’s pacemaker): 1. Select the [SAVE/NOMINAL OPTIONS...] button. 2. Select [SAVE PRESENT VALUES] from the window of options. The displayed present parameter values will be saved in programmer memory until you save another set of present values or end the patient session. You can view the currently saved values by selecting the [ SHOW SAVED] button on the Pacing Parameters screen. NOTE: Unless some parameter values have already been saved, using the [INTERROGATE ALL] button as described in Chapter 2 will automatically save the present pacing parameter settings. Programming the Saved Set of Values To recall the saved parameter values to the screen as pending values for programming: 1. Select the [SAVE/NOMINAL OPTIONS...] button. 2. Select [SAVED VALUES] from the window of options. The saved parameter values will appear on the screen as pending values. You can directly program these values or make any desired changes prior to programming. 196407001 Rev A Refer to the “Reference man.” category in doc#163256 for Printing Instructions. Medtronic Confidential 7 x 9 inches (178 mm x 229 mm) Programming Pacing Parameters 6-7 Programming Additional Parameters Additional parameters include the Transtelephonic Monitor and Extended Telemetry follow-up options, the pacemaker Serial Number, and the Status Reset command. To access these parameter options, select the Additional Parameters screen. Selecting the Additional Parameters Screen To display the Additional Parameters screen, select the [PARAMETERS] menu button, and then select the ADDITIONAL PARAMETERS option as shown below. 1. Select [PARAMETERS] menu button. 2. Select ADDITIONAL PARAMETERS option. Parameter settings will not show unless an appropriate interrogation has occurred. Interrogate the pacemaker, if necessary, to display the settings. Additional Parameters Screen 196407001 Rev A Refer to the “Reference man.” category in doc#163256 for Printing Instructions. Medtronic Confidential 7 x 9 inches (178 mm x 229 mm) 6-8 Using the Programmer Programming Transtelephonic Monitor Transtelephonic Monitor is a feature that can facilitate using transtelephonic monitoring during a remote patient follow-up procedure. The programmable options for this feature are ON and OFF. Refer to “Enhanced Transtelephonic Monitoring” in Chapter 13 for an explanation of this feature. WARNING: Do not program Transtelephonic Monitor to ON if the patient has an implantable defibrillator (see Chapter 13). To program Transtelephonic Monitor: 1. Select Trans Tele from the parameters listed on the Additional Parameters screen. 2. From the displayed window of options, select ON or OFF as desired. 3. Position the programming head and select [PROGRAM]. Hold the programming head steady until you receive a programming confirmation. Programming Extended Telemetry Programming Extended Telemetry to ON will cause the pacemaker to continuously transmit EGM and Marker Channel telemetry for 24 hours. Refer to Chapter 15 for information about Extended Telemetry. NOTE: Because Extended Telemetry increases current drain on the pacemaker battery, it should be used only when necessary. To program Extended Telemetry: 196407001 Rev A 1. Select Extend. Telem from the parameters listed on the Additional Parameters screen. 2. From the displayed window of options, select ON or OFF as desired. 3. Position the programming head and select [PROGRAM]. Hold the programming head steady until you receive a programming confirmation. Refer to the “Reference man.” category in doc#163256 for Printing Instructions. Medtronic Confidential 7 x 9 inches (178 mm x 229 mm) Programming Pacing Parameters 6-9 Programming the Status Reset Command For information about the Elective Replacement Indicator (ERI) or about Electrical Reset, refer to the respective sections in Chapter 16. Verifying or Clearing an ERI Status If a screen message indicates that the pacemaker Elective Replacement Indicator (ERI) has been set, you can use the Status Reset command to verify present battery status as follows: 1. Select the Status Reset from the parameters listed on the Additional Parameters screen. 2. From the option window, select RESET. 3. Position the programming head and select [PROGRAM]. Continue to hold the programming head steady while the pacemaker automatically tests the present condition of its battery. During this test, the pacemaker paces asynchronously at 100 ppm for several beats. (During these beats in a dual chamber mode, the AV interval will be 100 ms.) If the test verifies the ERI status, no reset will occur. If battery voltage has recovered, the ERI status is cleared, and you can proceed to reprogram the parameter settings. Clearing a Pacemaker Electrical Reset The Status Reset command can also be used to clear a full pacemaker electrical reset condition. Indication that a full electrical reset has occurred is VVI pacing at 65 ppm and, in some cases, a pacemaker serial number set to all zeros (000000). Refer to Chapter 16 for an explanation of “full electrical reset” versus “partial electrical reset.” IMPORTANT: If a full electrical reset has occurred , you should contact your Medtronic representative after using the Status Reset command to clear this condition. To clear a full electrical reset condition: 1. Select the Status Reset from the parameters listed on the Additional Parameters screen. 2. From the option window, select RESET. 3. Position the programming head and select [PROGRAM]. Continue to hold the programming head steady until confirmation is received. All parameters, including the pacemaker serial number, can now be reprogrammed to their proper settings. 196407001 Rev A Refer to the “Reference man.” category in doc#163256 for Printing Instructions. Medtronic Confidential 7 x 9 inches (178 mm x 229 mm) 6-10 Using the Programmer Programming the Pacemaker Serial Number Serial number programming should not be used to change the factory setting. This procedure is intended only for reprogramming the original serial number in the unlikely event it is lost from pacemaker memory due to a pacemaker electrical reset (see previous section about programming the Reset command). To reprogram pacemaker serial number: 196407001 Rev A 1. Select Serial Number from the list of parameters on the Additional Parameters screen. 2. Using the on-screen keypad, enter each digit of the original serial number. The selected numbers will appear in the small window to the right of the keypad. 3. If you make a mistake, select [CLEAR VALUE]. Otherwise, select [ACCEPT VALUE] to register the entered number as a pending value. 4. Position the programming head and select [PROGRAM]. Hold the programming head steady until you receive a programming confirmation. Refer to the “Reference man.” category in doc#163256 for Printing Instructions. Medtronic Confidential 7 x 9 inches (178 mm x 229 mm) CHAPTER 7 Determining and Evaluating Parameter Settings About This Chapter Capabilities of the programmer include test and measurement functions that can assist you in determining appropriate parameter values for programming the pacemaker or optimizing its operation. This chapter covers the following test procedures. Measuring the patient’s stimulation threshold to determine appropriate values for amplitude and pulse width (see page 7-2). Measuring the level of R-wave or P-wave sensing to determine appropriate values for pacemaker sensitivity (see page 7-15). Conducting an Activity Threshold test and an Exercise test to formulate parameter settings for programming or optimizing an Activity pacing mode (see page 7-21). Using temporary parameter programming to evaluate other parameter values without changing the permanent settings (see page 7-30). Directly measuring the actual values of the pacing rate and paced AV interval (see page 7-33). 7-1 196407001 Rev A Refer to the “Reference man.” category in doc#163256 for Printing Instructions. Medtronic Confidential 7 x 9 inches (178 mm x 229 mm) 7-2 Using the Programmer Measuring Stimulation Thresholds The Threshold Test function lets you measure the patient’s stimulation thresholds to determine appropriate settings for amplitude and pulse width. This measurement procedure begins at the Threshold Test Start screen. Selecting the Threshold Test Start Screen To display the Threshold Test Start screen, select the [TESTS/ECG] menu button, and then select the THRESHOLD TEST option as illustrated below. 1. Select [TESTS/ECG] menu button. 2. Select THRESHOLD TEST option. If you have not yet interrogated the pacemaker for its present parameter settings, a message will prompt you to do so at this point. If this prompt appears, position the programming head and select [ INTERROGATE] to proceed. Threshold Test Start Screen In this example, the programming head has been positioned over the patient’s pacemaker to display Marker Channel and EGM telemetry. Refer to pages 5-6 and 5-7 for instructions on adjusting the ECG and telemetry traces. Selecting a chamber/ mode option and the desired test type are the first two steps in conducting a threshold test. 196407001 Rev A Refer to the “Reference man.” category in doc#163256 for Printing Instructions. Medtronic Confidential 7 x 9 inches (178 mm x 229 mm) Determining and Evaluating Parameter Settings 7-3 Threshold Test Options The first two steps in the procedure for conducting a threshold test are to select a test chamber/mode option (when applicable) and to select the desired threshold test type. The buttons for these options appear below the waveform display on the Threshold Test Start screen. Chamber/Mode Selection The chamber/mode options that appear depend on the present permanent pacing mode. If the permanent pacing mode is DDD or DDDR, you can choose to run the threshold test in the atrium or the ventricle using either DDD or AAI/VVI as the test mode. If the permanent mode is a dual chamber mode other than DDD or DDDR, you can choose the chamber, but the test mode will be limited to AAI/VVI. If the permanent mode is a single chamber mode, the test chamber and mode will be fixed according to chamber being paced. Test Type Selection Test type buttons let you select one of four different threshold tests or the Inhibit function. [STRENGTH-DURATION CURVE THRE— Select this test to use automatic, step-by-step reduction of output energy to measure stimulation thresholds for both amplitude and pulse width. This test graphically displays the results as a computed strength-duration curve. The results screen lets you select the desired voltage safety margin and directly program permanent amplitude and pulse width values. SHOLDS] [AUTO AMPL THRESHOLD] — Select this test to measure the patient’s amplitude threshold. Pressing and holding the [ PROGRAM] button results in automatic, step-by-step reduction of the pacing pulse amplitude. [AUTO PW THRESHOLD] — Select this test to measure the patient’s pulse width threshold. Pressing and holding the [ PROGRAM] button results in automatic, step-by-step reduction of the pacing pulse width. 196407001 Rev A Refer to the “Reference man.” category in doc#163256 for Printing Instructions. Medtronic Confidential 7 x 9 inches (178 mm x 229 mm) 7-4 Using the Programmer [MANUAL THRESHOLD] — Select this test to manually select and test specific values for amplitude and pulse width. Automatic value reduction is not used in this test. Only the selected values are tested while you press and hold the [PROGRAM] button. [INHIBIT PACING] — This button is available on the Threshold Test Start screen as a convenience option. You can use it to temporarily inhibit output of the pacemaker to view the patient’s underlying rhythm or determine the intrinsic rate. Use of this feature is described on page 5-9. Before You Begin the Test Procedure Precautions At any point during a threshold test, lifting the programming head from over the pacemaker for at least 2 seconds will return the pacemaker to its permanently programmed state. This action should be taken in the event of a programmer malfunction, loss of power, or absence of an appropriate command confirmation. Be aware that movement of the programming head during an automatic threshold test may interrupt communication between the programmer and pacemaker, which will terminate the test. A Note About Hysteresis If Hysteresis has been programmed to ON during previous use of the AAI, AAT, VVI, or VVT pacing mode, it will be in effect when ever you return to one of these modes — even temporarily such as during a threshold test. If a message indicates that Hysteresis is in effect, you can program it to OFF by returning to the Pacing Parameters screen. To access Hysteresis, you must select one of the single chamber modes mentioned above. Waveform Display During setup and execution of a threshold test, the screen continuously displays the patient’s ECG and the telemetered waveforms being received from the pacemaker. Adjust the ECG trace so that you easily can see pacing artifacts and the resulting depolarization wave. During a threshold test, you must be able to determine whether or not capture is maintained or lost as pacemaker output is reduced, either manually or automatically. Refer to Chapter 5, pages 5-6 to 5-8 for information about using and adjusting the waveform display and about Marker telemetry. Selecting Pulses Per Decrement During a threshold test (except “Manual Threshold”), the programmer controls the number of pacing cycles it allows to occur at each threshold 196407001 Rev A Refer to the “Reference man.” category in doc#163256 for Printing Instructions. Medtronic Confidential 7 x 9 inches (178 mm x 229 mm) Determining and Evaluating Parameter Settings 7-5 test value before it automatically reduces the test value. As described in the test procedures that follow, you can adjust the number of pacing cycles (labeled “Pulses Per Decrement”) from 3 to 15 as desired. A value should be chosen that allows adequate time to evaluate the patient’s ECG to determine whether or not capture is maintained or lost. The programmer uses Marker telemetry to count pacing cycles during the execution of a threshold test. If “Sensor” telemetry is programmed or Pace markers are not otherwise being received, pacing cycles cannot be counted. In such cases, the timing between automatic output reductions will default to 8 seconds, and the selected number of pulses per decrement will not apply. NOTE: If the selected threshold test mode is DDD, the programmer will count two Pace markers as one pacing cycle. If only one chamber is being paced (pacing in the other chamber is inhibited), the number of pacing cycles that occur between each test value reduction will be twice the number selected for Pulses Per Decrement. NOTE: The time lapse between automatic test value reductions will not be greater than 8 seconds, regardless of the selected number of pulses per decrement. Conducting a Strength-Duration Curve Threshold Test The procedure for conducting a Strength-Duration Curve Threshold test involves determining a threshold value for both amplitude and pulse width (see page 7-3). This procedure is divided into four parts: A, B, C, and D. To conduct this test, you must complete all four parts. A. Selecting the Threshold Test This procedure begins at the Threshold Test Start screen (see page 7-2). 196407001 Rev A 1. If the permanent pacing mode is a dual chamber mode, select the desired “chamber/mode” button — [Atrial/DDD] for example. 2. Select the [STRENGTH-DURATION CURVE THRESHOLDS] button. Refer to the “Reference man.” category in doc#163256 for Printing Instructions. Medtronic Confidential 7 x 9 inches (178 mm x 229 mm) 7-6 Using the Programmer B. Measuring the Amplitude Threshold Execution of step 2 on the previous page displays the threshold test parameter setup options as shown in this example. 1. Use the [∧ ∧] and [∨ ∨] buttons to adjust each of the parameter values to the desired test setting. Lower Rate — Adjust to a value high enough to effect consistent pacing. Loss of capture cannot be determined if the pacemaker is inhibited. Paced/Sensed AV — If the test mode is DDD, adjust this interval to a value short enough to provide a consistently paced ventricular rhythm. The selected value applies to both Paced AV and Sensed AV intervals. Pulse Width — Adjust to the pulse width value you want in effect during the amplitude test. This value cannot be less than 1.0 ms. Amplitude — Adjust to the value at which you want the amplitude test to start. This value must be high enough to provide consistent capture. Pulses Per Decrement — Adjust to the number of pacing cycles you want to occur at each test value before reduction occurs (see page 7-4). 2. Position the programming head and hold it steady in position for the remainder of this procedure. Observe that Marker telemetry appears below the ECG trace. 3. Press and hold [PROGRAM] to execute the amplitude threshold test. The threshold test execution window shows the temporary values in effect. The arrow (<<<===) points to the value being reduced. Observe the patient’s ECG trace as the programmer automatically reduces amplitude one programmable step every 3 to 15 pacing cycles (as selected in step 1). An audible “beep” indicates confirmation of each new amplitude value. 4. 196407001 Rev A When capture is lost, immediately release [PROGRAM]. Refer to the “Reference man.” category in doc#163256 for Printing Instructions. Medtronic Confidential 7 x 9 inches (178 mm x 229 mm) Determining and Evaluating Parameter Settings 7-7 This action restores permanent parameter values and displays the threshold amplitude, which is one programmable amplitude step greater than the ending test value. If the “Ending” test value is not the point at which capture was lost, you can use the [∧ ∧] and [∨ ∨] buttons to adjust the displayed threshold value. C. Measuring the Pulse Width Threshold 1. To continue, press and hold [PROGRAM] to execute the pulse width test. The threshold test execution window shows the temporary values in effect. The arrow (<<<===) points to the value being reduced. Again, observe the patient’s ECG trace as the programmer automatically reduces pulse width in steps. An audible “beep” indicates confirmation of each new pulse width value. NOTE: The amplitude setting in effect will be the selected test value or twice the threshold value determined in part B above, whichever is greater. Starting pulse width will be one-half the value used in part B. 2. When capture is lost, immediately release [PROGRAM]. This action restores permanent parameter values and displays the threshold pulse width, which is one programmable pulse width step greater than the ending test value. If the “Ending” test value is not the point at which capture was lost, you can use the [∧ ∧] and [∨ ∨] buttons to adjust the displayed threshold value. 3. 196407001 Rev A To view the amplitude and pulse width threshold test results graphically as a strength-duration curve, select [SHOW STRENGTH-DURATION CURVE]. Refer to the “Reference man.” category in doc#163256 for Printing Instructions. Medtronic Confidential 7 x 9 inches (178 mm x 229 mm) 7-8 Using the Programmer NOTE: A message stating that the test results are invalid may indicate that the patient’s thresholds are too high to be used in the computation of a strength-duration curve or that product of the threshold amplitude and pulse width values for both tests (Part B and Part C) are the same (they must be different for computation of the strength-duration curve). If the latter is true, running the test again using a lower amplitude test value should result in a strength-duration curve. D. Viewing the Test Results and Programming Permanent Values for Amplitude and Pulse Width Selecting the button in Step 3 displays the threshold test results in the form of a strength-duration curve computed by the programmer. Options on this screen, as shown in the example below, let you select a desired safety margin and directly program permanent settings for amplitude and pulse width. Strength-Duration Threshold Test Results Screen Curves indicating the 2X and 3X safety margins. Patient’s computed threshold curve. About the Strength-Duration Curve — The curve formed by the edge of the shaded area is the computed curve of the patient’s threshold based on the two measured threshold values (shown as small circles on the curve). Any combination of amplitude and pulse width values that fall above this curve will result in capture. Conversely, any values that fall below the curve, i.e., within the shaded area, will not result in capture. The graphic symbols used in this graphic display are as follows: z Marks the results of the amplitude and pulse width tests. X Marks the present permanent amplitude and pulse width settings. + 196407001 Rev A Marks the selected pending amplitude and pulse width values. Refer to the “Reference man.” category in doc#163256 for Printing Instructions. Medtronic Confidential 7 x 9 inches (178 mm x 229 mm) Determining and Evaluating Parameter Settings 7-9 About the Safety Margin Curves — The solid, curved lines appearing above the strength-duration curve indicate the combination of amplitude and pulse width values that provide a safety margin of two times the amplitude threshold (2X) and three times the amplitude threshold (3X). The 3X curve may not be displayed in cases where the patient has relatively high thresholds. Selecting a Safety Margin and Programming Pending Values — Options on this screen let you choose pending values for amplitude and pulse width by either of two methods: by selecting the desired safety margin, or by manually adjusting the displayed value for each parameter. The pending values may then be programmed as permanent settings. To select a safety margin, use the [∧ ∧] and [∨ ∨] buttons to adjust the displayed value. Options are 1.0X (no margin), 1.5X, 2.0X, 2.5X and 3.0X. The default setting upon entry to this screen is 2.0X. NOTE: By selecting a safety margin, the programmer automatically displays the appropriate pending values for amplitude and pulse width. The values displayed will be the combination that attains the selected safety margin at the lowest possible drain on the pacemaker battery. This combination is indicated by the label “(max battery life values),” which appears below the pending values. To select pending values manually, use the [∧ ∧] and [∨ ∨] buttons to adjust the amplitude and pulse width values to the desired settings. The safety margin attained by the selected values will be displayed. To permanently program the amplitude and pulse width values selected by either method above: 196407001 Rev A 1. Position the programming head and select [PROGRAM]. 2. Watch for the programming confirmation message. Refer to the “Reference man.” category in doc#163256 for Printing Instructions. Medtronic Confidential 7 x 9 inches (178 mm x 229 mm) 7-10 Using the Programmer Estimated Time to Replacement The “Estimated Time to Replacement” is a calculated estimate of the average time (in months) remaining until pacemaker replacement will be required. This calculated estimate is based on the pending values selected for programming as well as data accumulated by the pacemaker since the previous patient session. This estimate provides an indication of how different pulse width and amplitude settings can affect the projected pacemaker longevity. NOTE: A value for Estimated Time to Replacement will not be displayed if up-to-date Battery/Lead data is not available. To obtain a value, position the programming head and select [ INTERROGATE] as prompted. Printing the Strength-Duration Threshold Test Results You can print the strength-duration curve only while it is displayed on the screen. The graph is not saved for printing later. To print the StrengthDuration Curve and Threshold Results report: 1. Select the [PRINT] Menu button. 2. Select the CURRENT SCREEN REPORT option. You can print the numerical results of the threshold test at any time during the patient session (see page 7-14). The numerical results are automatically saved when you exit the threshold test results screen. Exiting the Strength-Duration Threshold Test Results Screen If you want to exit the threshold test results screen and conduct another threshold test, select the [RETURN TO START] button. To exit the Threshold Test function, select the desired menu button from the top of the screen. 196407001 Rev A Refer to the “Reference man.” category in doc#163256 for Printing Instructions. Medtronic Confidential 7 x 9 inches (178 mm x 229 mm) Determining and Evaluating Parameter Settings 7-11 Conducting an Auto Amplitude or Auto Pulse Width Threshold Test Use this procedure to measure the patient’s threshold using either amplitude or pulse width. This procedure begins at the Threshold Test Start screen (see page 7-2). 1. If the permanent pacing mode is a dual chamber mode, select the desired “chamber/mode” button — [Atrial/DDD] for example. 2. Select the desired threshold test type: [AUTO AMPL THRESHOLD] or [AUTO PW THRESHOLD]. Execution of this step displays the test parameter setup options. 3. Use the [∧ ∧] and [∨ ∨] buttons to adjust each of the parameters to the desired test value. The selected test values will be applied temporarily during the threshold test. Lower Rate — Adjust to a value high enough to effect consistent pacing. Loss of capture cannot be determined if the pacemaker is inhibited. Paced/Sensed AV — If the test mode is DDD, adjust this interval to a value short enough to provide a consistently paced ventricular rhythm. The selected value applies to both Paced AV and Sensed AV intervals. Pulse Width — Adjust to the value you want in effect during the test. If you are conducting an Auto PW test, this will be the starting test value. Amplitude — Adjust to the value you want in effect during the test. If you are conducting an Auto Ampl test, this will be the starting test value. 196407001 Rev A Refer to the “Reference man.” category in doc#163256 for Printing Instructions. Medtronic Confidential 7 x 9 inches (178 mm x 229 mm) 7-12 Using the Programmer Pulses Per Decrement — Adjust to the number of pacing cycles you want to occur at each test value before reduction occurs (see page 7-4). 4. Position the programming head and hold it steady in position for the remainder of this procedure. Observe that Marker telemetry appears below the ECG trace. 5. Press and hold [PROGRAM] to execute the threshold test. The threshold test execution window shows the temporary values in effect. The arrow (<<<===) points to the value being reduced. This example shows amplitude test execution. Pulse width test execution is similar. Observe the patient’s ECG trace as the programmer automatically reduces the threshold test parameter one programmable step every 3 to 15 pacing cycles (as selected in step 3). An audible “beep” indicates confirmation of each new test value. 6. When capture is lost, immediately release [PROGRAM]. This action restores permanent parameter values and displays the threshold value, which is one programmable step greater than the ending test value. If the “Ending” test value is not the point at which capture was lost, you can use the [∧ ∧] and [∨ ∨] buttons to adjust the displayed threshold value. This example shows the amplitude test results. Pulse width test results are similar. The adjustable Pending values on the right side of the screen allow you to directly program permanent settings for amplitude and pulse width. The default values displayed are the present permanent settings. 7. 196407001 Rev A To program permanent values for amplitude and pulse width, use the [∧ ∧] and [∨ ∨] buttons to select a desired value for each parameter and then press the [PROGRAM] button. Do not lift the programming head until confirmation is indicated. Refer to the “Reference man.” category in doc#163256 for Printing Instructions. Medtronic Confidential 7 x 9 inches (178 mm x 229 mm) Determining and Evaluating Parameter Settings 7-13 To save the test results for printing, select [RETURN TO START] to return to the Threshold Test Start screen, or select a menu button to exit this function. Conducting a Manual Threshold Test Use this procedure to determine the patient’s threshold by manually testing various parameter settings. This procedure begins at the Threshold Test Start screen (see page 7-2). 1. If the permanent pacing mode is a dual chamber mode, select the desired “chamber/mode” button — [Atrial/DDD] for example. 2. Select the [MANUAL THRESHOLD] test type button. Execution of this step displays the test parameter setup options. 3. Use the [∧ ∧] and [∨ ∨] buttons to adjust each of the parameters to the desired test value. 4. Position the programming head and hold it steady in position for the remainder of this procedure. 5. To temporarily program the selected test values, press and hold the [PROGRAM] button. The test execution window shows the parameter settings now in effect. Observe the patient’s ECG to determine whether or not capture is maintained. 6. To cancel the test values and restore permanent operation, release the [PROGRAM] button. This action returns you to the test parameter setup options. By using this manual procedure to check incremental changes in the amplitude or pulse width test value, you can determine the threshold value. 196407001 Rev A Refer to the “Reference man.” category in doc#163256 for Printing Instructions. Medtronic Confidential 7 x 9 inches (178 mm x 229 mm) 7-14 Using the Programmer NOTE: Programmed test values are not saved for printing unless you select the [SAVE TEST VALUES] button on the test parameter setup screen. If you want to save a set of tested values, select this button after you release the [PROGRAM] button. 7. To end the test and return to the Threshold Test Start screen, select [RETURN TO START], or select a menu button to exit the Threshold Test function. Printing the Threshold Test Results During a patient session, the programmer can save the results of up to 32 threshold tests (8 pages of data). The results of “automatic” threshold test are saved when you exit the test results screen. Results of a manual test must be saved manually as described above. To obtain a report of the threshold tests: 1. Select the [PRINT] menu button at the top of the screen. 2. Select THRESHOLD RESULTS from the listed options. NOTE: You can print the strength-duration curve only while it is displayed on the screen (see page 7-10). Maximum Number of Test Results Saved If the maximum number of threshold test results that can be saved for printing is reached during the patient session, any attempt to execute another threshold test will result in a pop-up window that prompts you to print and then delete the currently saved test results. The window provides the following options: [PRINT THRESHOLD VALUES] — Selecting this button initiates a printout of the stored threshold test values. This option lets you print the test values before you delete them. [DELETE THRESHOLD VALUES] — Selecting this button deletes all the stored threshold test results so that the programmer can save the results of subsequent threshold tests conducted during the patient session. [EXIT] — Selecting this button closes the pop-up window. If you close the window without deleting the stored threshold test results, the results of subsequent threshold tests conducted during this patient session will not be saved for print out. 196407001 Rev A Refer to the “Reference man.” category in doc#163256 for Printing Instructions. Medtronic Confidential 7 x 9 inches (178 mm x 229 mm) Determining and Evaluating Parameter Settings 7-15 Determining a Setting for Sensitivity The Sensing Test can assist you in determining an appropriate setting for pacemaker sensitivity. This test measures and reports the present level of R-wave or P-wave sensing and includes the option for selecting and programming a permanent sensitivity value based on the test results. Selecting the Sensing Test Setup Screen To display the Sensing Test Setup screen, select the [TESTS/ECG] menu button, and then select the SENSING TEST option as illustrated below. 1. Select [TESTS/ECG] menu button. 2. Select SENSING TEST option. If an appropriate interrogation has not occurred, a screen message will direct you to interrogate the pacemaker to display the setup screen. In this example, the programming head has been positioned over the patient’s pacemaker to display Marker Channel and EGM telemetry. Sensing Test Setup Screen Refer to pages 5-6 and 5-7 for instructions on adjusting the ECG and telemetry traces. 196407001 Rev A Refer to the “Reference man.” category in doc#163256 for Printing Instructions. Medtronic Confidential 7 x 9 inches (178 mm x 229 mm) 7-16 Using the Programmer Before You Begin the Test Procedure About the Sensing Test During execution of the Sensing test, the pacemaker automatically determines whether or not sensing occurs at each of up to four sensitivity settings above the selected test value. The selected test values are in effect only while the [PROGRAM] button is pressed and held. NOTE: Because this test is accomplished by a separate sensing test circuit within the pacemaker, the operating parameters of the pacemaker during the test (while sensitivity values are being tested) do not vary from the selected test values. As such, the ECG and Marker Channel traces will not indicate any changes in pacemaker operation during the test. Test results are based on which of the tested sensitivity values resulted in, or did not result in, sensing. For example, if sensing during an atrial test did not occur at 4.0, 2.8, or 2.0 mV, but did occur at 1.4 mV, the test results would state that the P-wave amplitude is “between 1.4 and 2.0 mV.” Other outcomes of the Sensing test are covered following the test procedure. Precautions The Sensing test requires that the pacemaker be programmed temporarily to a pacing rate that will result in predominantly intrinsic heart activity. (This is necessary to allow sensing during execution of the test.) For this reason, use of the Sensing test should be limited to patients having an intrinsic rhythm that will provide adequate support during execution of the test. NOTE: If the patient’s condition indicates that pacing support is needed at any time during use of the Inhibit function or execution of the Sensing test, the procedure can be terminated immediately by releasing the [ PROGRAM] button or lifting the programming head. Waveform Display During setup and execution of a Sensing test, the screen displays the patient’s ECG and the telemetered waveforms being received from the pacemaker. Buttons at the left end of the waveform display allow adjustment of the waveform traces as described on pages 5-6 and 5-7. 196407001 Rev A Refer to the “Reference man.” category in doc#163256 for Printing Instructions. Medtronic Confidential 7 x 9 inches (178 mm x 229 mm) Determining and Evaluating Parameter Settings 7-17 Determining the Patient’s Intrinsic Rate To properly conduct the Sensing test, it is helpful to know the rate of the patient’s intrinsic rhythm. To evaluate the patient’s intrinsic rhythm and determine its rate, use the Inhibit function as described on page 5-9. The Inhibit function is accessible via the [INHIBIT PACING] button on the Sensing Test Setup screen. During inhibition of pacemaker output, observe that the waveform display shows the patient’s intrinsic rhythm with Sense markers (AS and/or VS) marking each intrinsic depolarization. Note the rate of the intrinsic rhythm which is displayed in bpm to the left of the waveform display. If an AS or VS Sense marker does not occur for each intrinsic depolarization, the present setting for sensitivity may be too high (a high millivolt setting means low sensitivity). A sensitivity test value that provides consistent sensing is required to successfully start the Sensing test. Conducting the Sensing Test The following procedure describes how to determine the present level of R-wave or P-wave sensing. 1. If the permanent mode is a dual chamber mode or VDD mode, select the desired chamber/mode button. - If the permanent mode is DDD or DDDR, you can choose the test chamber and DDD or AAI/VVI as the test mode. - If the permanent mode is VDD or a dual chamber mode other than DDD or DDDR, you can choose only the test chamber. - If the permanent mode is a single chamber mode, the test chamber and mode will be fixed, and step 1 does not apply. 2. Use the [∧ ∧] and [∨ ∨] buttons to adjust each of the parameter values to the desired test settings. Lower Rate — Adjust rate to a value low enough to obtain consistent sensing. The Sensing test will not run if the pacemaker is pacing. 196407001 Rev A Refer to the “Reference man.” category in doc#163256 for Printing Instructions. Medtronic Confidential 7 x 9 inches (178 mm x 229 mm) 7-18 Using the Programmer Sensed/Paced AV Interval — If the test mode is DDD, adjust this interval to a value long enough to accommodate normal conduction. (The selected value also applies to the Paced AV interval during execution of the test.) Sensitivity — Select a sensitivity value that provides consistent sensing. This setting can typically be left at the present permanent value. 3. Position the programming head and verify that the waveform display shows both the patient’s ECG and Marker telemetry. Continue to hold the programming head steady in position for the remainder of this procedure. 4. To execute the Sensing test, press and hold [PROGRAM]. Continue to hold [PROGRAM] until a screen message indicates that the test is complete or has otherwise been terminated. During execution of the test, the screen will display each sensitivity value as it is being tested. Observe that the Marker Channel trace shows predominantly Sense markers. NOTE: Releasing the [PROGRAM] button will terminate the test and restore the pacemaker to its permanent settings. If termination of the test is not confirmed, lift the programming head away from the pacemaker for at least 2 seconds. 5. When the test has ended or has otherwise been terminated, release [PROGRAM] as prompted by the message box. If the test was successful, the screen shows the test results and provides the option for selecting and programming a permanent sensitivity value. 196407001 Rev A Refer to the “Reference man.” category in doc#163256 for Printing Instructions. Medtronic Confidential 7 x 9 inches (178 mm x 229 mm) Determining and Evaluating Parameter Settings 7-19 Test Successful The results of a successfully executed test displays the P-wave or R-wave amplitude as being between two sensitivity settings. This information can be used to determine an appropriate permanent sensitivity setting. To program a permanent Sensitivity setting: 1. Use the [∧ ∧] or [∨ ∨] buttons to select a desired pending value. (The default values displayed are the present permanent values). 2. Position the programming head and press [PROGRAM]. Watch for confirmation of the programming. Retest Required Sensitivity Test Value Too Low — Test results that state that the P-wave or R-wave amplitudes are “greater than” a particular value indicate that sensing occurred at all of the four sensitivity values tested. Included on the display is the message, “Rerun test at a higher sensitivity value.” In this case, you should: 1. Return to the Test Setup screen (select [RETURN TO SETUP]). 2. Select a higher test value for sensitivity. 3. Repeat the test starting at step 3. Sensitivity Test Value Too High — If the test determines that sensing did not occur at the next setting above the test value, the programmer displays the test results, but also displays the message, “Rerun test at a lower sensitivity value.” 196407001 Rev A Refer to the “Reference man.” category in doc#163256 for Printing Instructions. Medtronic Confidential 7 x 9 inches (178 mm x 229 mm) 7-20 Using the Programmer To verify the test results in this case, it is recommended that you: 1. Return to the Test Setup screen (select [RETURN TO SETUP]). 2. Select a lower test value for sensitivity. 3. Repeat the test starting at step 3. Sense Markers Not Present — If telemetered Sense markers (AS or VS) are not present at the start of the Sensing test, the test will automatically terminate. Verify on the waveform display that sensing of the patient’s intrinsic rhythm is occurring. If pacing is observed, select [ RETURN TO SETUP] to return to the setup screen and refer to “Determining the Patient’s Intrinsic Rate” on page 7-17). Printing the Sensing Test Result To print the results of the most recent Sensing test, select the [PRINT] Menu button and then select the SENSING RESULTS option. 196407001 Rev A Refer to the “Reference man.” category in doc#163256 for Printing Instructions. Medtronic Confidential 7 x 9 inches (178 mm x 229 mm) Determining and Evaluating Parameter Settings 7-21 Determining Rate Response Parameter Settings As part of the process of programming a rate responsive pacing mode in a Prodigy DR or SR model, you can use the two tests described in this section to help determine appropriate settings for the parameters related to rate response. You can access these tests by selecting the Activity Tests screen. Selecting the Activity Tests Screen To display the Activity Tests screen, select the [TESTS/ECG] menu button, and then select the ACTIVITY TEST option as illustrated below. 1. Select [TESTS/ECG] menu button. 2. Select the ACTIVITY TEST option. This action displays the screen shown below. From this screen, you can select the Activity Threshold Test to determine a value for Activity Threshold or the Exercise Test to determine values for other rate response parameters. Activity Tests Selection Screen If you intend to conduct both tests, conduct the Activity Threshold test first. NOTE: If an Exercise test has already been conducted during the session, a [SHOW SAVED EXERCISE TEST] button will appear. Selecting a test execution button will erase the saved test results. 196407001 Rev A Refer to the “Reference man.” category in doc#163256 for Printing Instructions. Medtronic Confidential 7 x 9 inches (178 mm x 229 mm) 7-22 Using the Programmer About the Activity Tests The Activity Threshold test and Exercise test are intended to facilitate the selection of appropriate values when rate response parameters are adjusted to meet the individual patient’s needs.* Activity Threshold Test During the Activity Threshold test, the pacemaker collects heart rate and sensor output data during a 25-second countdown while the patient is at rest. Based on the data collected, the programmer will display a suggested value for Activity Threshold. You can accept and program this value (or one of your own choosing) directly from the test results screen. Exercise Test The Exercise test requires the patient to engage in an exercise, such as a brisk walk, for at least 2 minutes. During the exercise period, the pacemaker gathers information on the patient’s heart rate and the output of the activity sensor. Results of the test are displayed graphically as a plot of both the patient’s actual heart rate and the desired sensor rate. The desired sensor rate curve is based on the displayed parameter settings and can be altered by changing these settings. Buttons on the test results screen let you manipulate various parameter values to attain the desired rate response. The selected parameter values can then be programmed directly from the test results screen. Important Considerations If both the Activity Threshold test and the Exercise test are to be conducted, you must conduct the Activity Threshold test first. Both tests will clear recorded data accumulated in pacemaker memory by the Diagnostics function, if it has been programmed to operate. Prior to conducting the Activity Threshold or Exercise test, you should display and print the Diagnostic data. Once you conduct an Exercise test, you can return to the Exercise Test Results screen by selecting the [SHOW SAVED EXERCISE TEST] button on the Activity Tests Selection screen (see page 7-21). However, selecting the [ACT THRESHOLD TEST] or [EXERCISE TEST] button will erase the previous Exercise test results. *Rate response parameters are not adjustable in the Prodigy™ VDD model. 196407001 Rev A Refer to the “Reference man.” category in doc#163256 for Printing Instructions. Medtronic Confidential 7 x 9 inches (178 mm x 229 mm) Determining and Evaluating Parameter Settings 7-23 Conducting an Activity Threshold Test Preparing the Patient The following procedure involves programming and interrogating the patient’s pacemaker. The patient should be comfortably seated and be in a resting state prior to the start of this test. For this test, the patient’s pacemaker can be operating in either an Activity or non-Activity pacing mode. During non-Activity modes, the sensor continues to operate in the background. If the pacing mode is an Activity mode, lower rate should be programmed to its appropriate permanent setting. Test Procedure To execute the Activity Threshold test: 1. Select the [ACT THRESHOLD TEST] button on the Activity Tests screen. 2. With the patient at rest, position the programming head and select [PROGRAM]. Wait for programming confirmed message. 3. Lift the programming head away from the site of the pacemaker to start the test countdown. The screen will indicate the time remaining and a tone will sound every 5 seconds. The patient must remain at rest and not move during the 25-second countdown. If the patient moves during this period, select [RESTART TEST] and return to step 2. Except to restart the countdown, do not reposition the programming head until you are prompted to at the end of the 25-second countdown. 4. At the end of the countdown and as prompted by the screen, position the programming head and select [INTERROGATE]. The interrogation process will take several seconds. Successful interrogation results in the Activity Test results screen shown on the next page. 196407001 Rev A Refer to the “Reference man.” category in doc#163256 for Printing Instructions. Medtronic Confidential 7 x 9 inches (178 mm x 229 mm) 7-24 Using the Programmer Activity Threshold Test Results Screen Interpreting the Activity Threshold Test Results The test results window displays the following information: The percentage of heart beats recorded during the test that were paced. This value is given as a range. The number of Activity Detects that occurred during the test at each of the Activity Threshold settings. The test uses Sensor telemetry (see page 5-8) to monitor sensor output while each of the Activity Threshold settings is automatically put into effect. A suggested Activity Threshold value based on the following rules: - If more than 75% of the heart beats were paced during the test, the suggested Activity Threshold will be one setting above the threshold that produced zero Activity Detects.* - If less than 75% of the heart beats were paced during the test, the suggested Activity Threshold will be two settings above the threshold that produced zero Activity Detects.* *The suggested value cannot exceed “High,” which is the upper limit of the Activity Threshold settings. 196407001 Rev A Refer to the “Reference man.” category in doc#163256 for Printing Instructions. Medtronic Confidential 7 x 9 inches (178 mm x 229 mm) Determining and Evaluating Parameter Settings 7-25 Programming the Activity Threshold To program the suggested Activity Threshold value: 1. Position the programming head. 2. Select the [PROGRAM] button. Use the [∧] or [∨] button if you want to change the value before you program. NOTE: If the present permanent mode is not an Activity mode, the programmed Activity Threshold value will be saved in pacemaker memory and will become a pending value when you select an Activity mode for programming. Printing the Activity Threshold Test Results To print the results of the Activity Threshold test: 1. Select the [PRINT] menu button. 2. Select the ACTIVITY THLD RESULTS option. Proceeding to the Exercise Test Upon completion of the Activity Threshold test, you can proceed to the Exercise test directly from the test results screen. To proceed to the Exercise test, select the [EXERCISE TEST] button. 196407001 Rev A Refer to the “Reference man.” category in doc#163256 for Printing Instructions. Medtronic Confidential 7 x 9 inches (178 mm x 229 mm) 7-26 Using the Programmer Conducting an Exercise Test Preparing the Patient The following procedure involves programming and interrogating the patient’s pacemaker and having the patient complete at least two minutes of exercise. An appropriate exercise, such as a brisk walk, should be chosen. The patient should be prepared to engage in this exercise and should be at rest for several minutes before the test is started. For this test, the patient’s pacemaker can be operating in either an Activity or non-Activity pacing mode. Using a non-Activity mode has the advantage of letting you view the patient’s own response to exercise on the test results screen. However, an Activity mode may be appropriate if the patient has a very low exercise tolerance without rate responsive support. If you program an Activity mode, use the Activity Threshold setting determined during the Activity Threshold test. NOTE: If the pacemaker is programmed to an Activity mode, the test will begin (step 3 below) with pacing output at the lower rate setting. To execute the Exercise Test: 1. Select the [EXERCISE TEST] button. This button appears on the Activity Tests option screen and on the Activity Threshold test results screen. 2. Position the programming head and select [PROGRAM]. Wait for programming confirmed message. 3. To begin the 2-minute exercise countdown, lift the programming head away from the site of the pacemaker and advise the patient to begin exercising. The screen will indicate the time remaining and a tone will sound every 5 seconds. NOTE: The patient may continue to exercise beyond the 2-minute countdown. The pacemaker can collect test data for up to 8 minutes. It is advantageous to allow the patient to rest for a minute or two before you interrogate the pacemaker. If it becomes necessary to restart the exercise period, select [RESTART TEST] and return to step 2. 4. When the patient has completed the exercise (and rest period, if you chose to include one), position the programming head and select [INTERROGATE]. The interrogation process will take several seconds. Upon confirmation of the interrogation, the programmer displays the Exercise Test Results screen shown in the example on the next page. 196407001 Rev A Refer to the “Reference man.” category in doc#163256 for Printing Instructions. Medtronic Confidential 7 x 9 inches (178 mm x 229 mm) Determining and Evaluating Parameter Settings 7-27 Exercise Test Results Screen Curve shows desired sensor response rate. Patient’s heart rate during the test. UR = Upper Rate DR = Desired Rate LR = Lower Rate Appearance of a dashed vertical line indicates temporary interruption of data collection by application of the programming head (or magnet). Interpreting the Exercise Test Results Screen The Exercise test results screen graphically shows the heart rate data collected during the exercise period and the desired sensor rate based on the pending parameter values displayed on the right. The displayed Rate Response value is the value suggested by this test. The Activity Threshold value, which is not a pending value, is the present programmed setting. Patient’s Heart Rate — The curve formed of rectangular segments shows the patient’s actual heart rate during the exercise test period. The coded appearance of the segments indicates what percentage of the heart beats during each 2 to 6 second segment were paced. Display Printout 0-12% Patient’s rate is predominantly intrinsic. 13-87% Patient’s rate is both paced and intrinsic. 88-100% The patient’s rate is predominantly paced. Desired Sensor Response — The curve formed by the single solid line shows desired sensor-driven rate based on the parameter values shown on the right. This curve is dynamically linked to the listed parameter settings such that changes to the parameter values will cause a corresponding change in the shape of the curve. Thus, the desired sensor rate curve can be used as a visual aid in determining appropriate parameter settings. 196407001 Rev A Refer to the “Reference man.” category in doc#163256 for Printing Instructions. Medtronic Confidential 7 x 9 inches (178 mm x 229 mm) 7-28 Using the Programmer Selecting and Programming Parameter Values By observing how the desired sensor response curve changes as you adjust the parameters, you can formulate a set of parameter values that provides the appropriate rate response profile for the patient and the exercise performed. To select and program the rate response parameter values: 1. Adjust the Desired Rate. Desired Rate is the heart rate the patient ideally should have achieved for the exercise performed during this test. NOTE: The value for Desired Rate defaults to 100 bpm, which is a reasonable projection for an otherwise healthy patient engaging in a brisk, 2-minute walk. Adjusting this value may change the pending value for Rate Response. This value cannot be adjusted above the present Upper Activity Rate setting (adjust Upper Rate setting if necessary). NOTE: The interactions of certain parameter values can result in value selection restrictions that will cause one or both value selection buttons to disappear. A value selection button also disappears when the parameter range limit is reached. Desired Rate: Cannot be increased if Rate Response is 10. Cannot be decreased if Rate Response is 1. Must be greater than Lower Rate. Cannot be greater than Upper Activity Rate. Upper Activity Rate: Cannot be less than Desired Rate. Cannot be adjusted if Mode Switch is programmed to ON. Lower Rate: 196407001 Rev A Must be less than Desired Rate. Cannot be greater than 100 ppm if Mode Switch is programmed to ON. 2. Select a value for Upper Activity Rate, Lower Rate, Activity Acceleration, and Activity Deceleration that provides the desired rate response profile for this exercise. 3. To program the selected values, position the programming head and select [PROGRAM]. Refer to the “Reference man.” category in doc#163256 for Printing Instructions. Medtronic Confidential 7 x 9 inches (178 mm x 229 mm) Determining and Evaluating Parameter Settings 7-29 If the present permanent mode is an Activity mode, the programmed values will become the present values in effect. If the present mode is not an Activity mode, the values will be saved in pacemaker memory and will become pending values on the screen when you select an Activity mode for programming. Printing the Exercise Test Results To print the results of the Exercise test: 1. Select the [PRINT] menu button. 2. Select the ACTIVITY EXERCISE TEST option. NOTE: To obtain a printout of the test results graph, you must print the test results while the test results screen is displayed. Once you leave this screen, the test report will present only the parameter values. You can return to the Exercise Test Results screen by selecting the [SHOW SAVED EXERCISE TEST] button on the Activity Tests Selection screen. However, selecting one of the test execution buttons on this screen will erase the saved test results. 196407001 Rev A Refer to the “Reference man.” category in doc#163256 for Printing Instructions. Medtronic Confidential 7 x 9 inches (178 mm x 229 mm) 7-30 Using the Programmer Programming Temporary Parameter Values The Temporary Test function lets you evaluate different parameter settings or use high-rate pacing while having the option to quickly and easily return to the original permanent settings. The test settings remain in effect only while the [PROGRAM] button is pressed and held. Releasing [PROGRAM] returns the pacemaker to its permanently programmed state. Selecting the Temporary Test Screen To display the Temporary Test screen, select the [TESTS/ECG] menu button, and then select the TEMPORARY TEST option as illustrated below. 1. Select [TESTS/ECG] menu button. 2. Select TEMPORARY TEST option. If an appropriate interrogation has not occurred, a screen message will direct you to interrogate the pacemaker to display the Temporary Test screen. In this example, Marker and EGM telemetry are being received. Temporary Test Screen Refer to pages 5-6 and 5-7 for instructions on adjusting the ECG and telemetry traces. 196407001 Rev A Refer to the “Reference man.” category in doc#163256 for Printing Instructions. Medtronic Confidential 7 x 9 inches (178 mm x 229 mm) Determining and Evaluating Parameter Settings 7-31 Conducting a Temporary Parameter Test The waveform display lets you view the patient’s ECG and the telemetered waveforms while you are testing temporary parameter settings. Refer to pages 5-6 and 5-7 for information about the waveform display and its control buttons. WARNING: High-rate stimulation of the ventricles could result in ventricular tachycardia or fibrillation. Application of temporary high-rate pacing should be performed only under careful patient monitoring and control. Use the following procedure to program temporary parameter values. Refer to the table on the next page for parameter information. 1. If the pacemaker is a dual chamber model, select the desired test chamber. 2. Use the [∧ ∧] or [∨ ∨] button to select the desired test mode. 3. Using the [∧ ∧] and [∨ ∨] buttons, select the desired test parameter values. 4. Position the programming head; press and hold [PROGRAM] for as long as you want the test parameter to be in effect. The test values in effect will show on the screen. 5. To end the test, release [PROGRAM]. A Note About Hysteresis If Hysteresis has been programmed to ON during previous use of the AAI, AAT, VVI, or VVT pacing mode, it will be in effect when ever you return to one of these modes — even during temporary parameter testing. If a message indicates that Hysteresis is in effect, you can program it to OFF by returning to the Pacing Parameters screen. To access Hysteresis, you must select one of the single chamber modes mentioned above. 196407001 Rev A Refer to the “Reference man.” category in doc#163256 for Printing Instructions. Medtronic Confidential 7 x 9 inches (178 mm x 229 mm) 7-32 Using the Programmer Test Parameters and Values The following parameters and values are available for temporary programming depending on the permanent pacing mode and the selected test mode. Pacing Mode1 DDD, ODO, AAI, AOO, OAO, AAT, VVI, VOO, OVO, VVT Lower Rate DDD test mode — 30 to 175 ppm (Lower rate values will be limited by the present Upper Tracking Rate setting.) Pacing Rate Single chamber test mode — 30 to 400 ppm Amplitude 0.5 to 4.0 V (in steps of 0.5 V), 5.0. 7.5 V Pulse Width 0.03 to 0.15 ms (in steps of 0.03 ms) 0.15 to 1.0 ms (in steps of 0.05 ms) 1.0 to 1.5 ms (in steps of 0.1 ms) Sensitivity Atrial — 0.182, 0.25, 0.35, 0.5, 0.7, 1.0, 1.4, 2.0, 2.8, 4.0 mV Ventricular — 1.0, 1.4, 2.0, 2.8, 4.0, 5.6, 8.0, 11.2 mV 1 Temporary test modes are available as follows: DDD is available as a temporary mode only if the permanent mode is DDD or DDDR. ODO is available if the pacemaker is a dual chamber model, regardless of the permanent mode. If the selected pacemaker is a Prodigy VDD model, temporary modes will be limited to single chamber ventricular modes. If the pacemaker is a single chamber model, the test modes will be limited to those applicable to the paced chamber. 2 196407001 Rev A The 0.18 mV sensitivity value is not available in Prodigy SR and Prodigy S models. Refer to the “Reference man.” category in doc#163256 for Printing Instructions. Medtronic Confidential 7 x 9 inches (178 mm x 229 mm) Determining and Evaluating Parameter Settings 7-33 Measuring Rate and AV Interval The Measure ECG test lets you directly measure the pacemaker output parameters listed below. The measurement for each parameter is averaged over several pacing cycles. Dual Chamber Modes Single Chamber Mode Pacing Rate Paced AV Interval Pacing Interval Pacing Rate Pacing Interval NOTE: For Prodigy pacemakers, this function does not include measurement of pulse width. Measurement Using the ECG Signal — If the patient’s ECG is present, the programmer determines the values for each of these parameters from data processed from the ECG signal. Measurement Using Marker Channel Telemetry — If the ECG signal is not present, and the programming head is positioned over the pacemaker, the programmer will attempt to measure rate and interval using Marker Channel telemetry. NOTE: If the pacemaker is not operating asynchronously (magnet mode), inhibition of the output by intrinsic activity can affect or prevent proper measurement. Positioning the programming head without use of the Cancel Magnet function is recommended when you use this function. Initiating Parameter Measurement To initiate measurement of the output parameters, select the [TESTS/ECG] menu button, and then select the MEASURE ECG option as illustrated below. 1. Select [TESTS/ECG] menu button. 2. Select MEASURE ECG option. Selecting the MEASURE ECG option displays the Measure screen and automatically starts the parameter measurement process. Measured values, as shown in the example on the next page, will not appear on the screen for about 10 seconds. The message box will state the source of the measured values, ECG or Marker Channel. 196407001 Rev A Refer to the “Reference man.” category in doc#163256 for Printing Instructions. Medtronic Confidential 7 x 9 inches (178 mm x 229 mm) 7-34 Using the Programmer Measure Screen Select [NEW DATA] to repeat measurement if necessary. Measurement Results Measurements made using the patient’s ECG are based on data derived from the detected pacing artifacts. Accuracy of these measurements depends on the quality of the ECG signal and the stability of the artifact rate. Accuracy of measurements made using Marker Channel telemetry depends on the stability of Pace marker intervals. Three question marks (???) following a measured value indicate that, due to artifact instability, accuracy of the value is questionable or that the value represents an abnormal deviation from the expected range for this parameter. If the screen displays no measured values or values marked by “???,” verify asynchronous operation and repeat the measurement by pressing the [ NEW DATA] button. Printing the Measured Values To print the results of the last measurement made, select the [PRINT] menu button and then select the MEASURED VALUES option. You can obtain this report at any time during the patient session following the use of the Measure ECG function. 196407001 Rev A Refer to the “Reference man.” category in doc#163256 for Printing Instructions. Medtronic Confidential 7 x 9 inches (178 mm x 229 mm) CHAPTER 8 Collecting and Retrieving Diagnostic Data About This Chapter This chapter describes the Diagnostics function and the procedures for programming the pacemaker to record data related to the patient’s heart rate and operation of the pacemaker. Sections in this chapter cover the following information: Important points about the Diagnostic function (see page 8-2). The various types of data you can record (see page 8-3). A list of the programmable parameter options (see page 8-8). The setup options that can simplify programming (see page 8-11). Procedures for programming the pacemaker to collect diagnostic data (see page 8-13). How to display a graph of the recorded data (see page 8-17). Obtaining a printout of the recorded data (see page 8-19). Clearing the recorded data stored in pacemaker memory so that new data can be collected (see page 8-20). 8-1 196407001 Rev A Refer to the “Reference man.” category in doc#163256 for Printing Instructions. Medtronic Confidential 7 x 9 inches (178 mm x 229 mm) 8-2 Using the Programmer About the Diagnostics Function The Diagnostics function is a monitoring feature that lets you program the pacemaker to record in its memory any one of several types of information pertaining to the patient’s heart rate and certain pacemaker operations. Depending on the programmable options available for the selected model, the pacemaker can be set to record: 1) the patient’s heart rate in the form of a histogram, 2) the impedance of the pacing lead system, or 3) the details of up to 15 high-rate episodes. With the programmer, you can retrieve the recorded information and view it in a graphic format. You can print the information in its graphic format or in a tabular summary of the numerical data. The basic steps for using the Diagnostics function are: 1. Turn the function on by programming the appropriate parameter settings based on the type of information you want to record. 2. Allow time for data collection. Data collection can take from less than an hour to several weeks or months depending on the type of information being recorded. 3. Interrogate the pacemaker to view or print the recorded information. 4. Allow the pacemaker to continue to collect data or perform one of the following: - Clear the present data so that collection of new data can begin. - Change the parameter setup to collect a different set of data. - Program the function to OFF if its use is no longer required. Important points about using the Diagnostic function: Data collection is suspended while the programming head or a magnet is positioned over the pacemaker. Data collection resumes 30 seconds after the programming head is lifted from over the patient’s pacemaker. Data collection stops when the pacemaker reaches ERI status. Accumulated data can still be retrieved for viewing and printing. On those reports showing a start and end date, the end date will be labeled as the “ERI” date. If the ERI condition is reset, data collection can be restarted by using the [CLEAR DATA] button (see page 8-20) or by reprogramming the diagnostic parameter settings (see page 8-13). 196407001 Rev A Refer to the “Reference man.” category in doc#163256 for Printing Instructions. Medtronic Confidential 7 x 9 inches (178 mm x 229 mm) Collecting and Retrieving Diagnostic Data 8-3 If the pacemaker is at ERI status, programming of the Diagnostics function is not allowed. The time(s) and date(s) that appear on the display or printout of diagnostic data are based on the current settings of the programmer’s clock/calendar function. You can verify that the time and date are set correctly by selecting any report option on the Print menu. The current settings appear at the top of the report printout. Refer to Chapter 9 for instructions on setting the clock/calendar function. In addition to use of the [ CLEAR DATA] button, any one of the following will clear the recorded Diagnostic data: - Programming any Diagnostic parameter. - Conducting an Activity Threshold test or Exercise test. - The occurrence of a pacemaker electrical reset. Types of Data You Can Record The programmable parameters that control the Diagnostics function include one referred to as “Type.” The Type parameter lets you choose the type of data you want the pacemaker to record. The High Rate Episode option is not available in Prodigy S models. Programmable Type Options Prodigy Pacemaker Model DR D VDD SR S OFF1 Rate Histogram Lead Trend High Rate Episode2 ✓ ✓ ✓ ✓ ✓ ✓ ✓ ✓ ✓ ✓ ✓ ✓ ✓ ✓ ✓ ✓ ✓ ✓ ✓ 1 Programming the OFF option turns the Diagnostics function off and clears any data accumulated in pacemaker memory. No data is recorded while the Diagnostics function is programmed off. 2 For dual chamber pacing modes, “-A” and “-V” settings for this type option lets you choose to monitor the atrium or the ventricle. The sections that follow describe each Type option and show examples of the graphic displays used to present the recorded information. 196407001 Rev A Refer to the “Reference man.” category in doc#163256 for Printing Instructions. Medtronic Confidential 7 x 9 inches (178 mm x 229 mm) 8-4 Using the Programmer Rate Histogram Programming Rate Histogram causes the pacemaker to count heart rate events according to the rate at which they occur. You can choose to have event totals include or exclude refractory sensed events. Rate Histogram Report Example Graphic display of this information is in the form of a histogram showing what percentage of the rate events counted during the monitoring period fall into each 10 ppm segment of the reportable range of 40 to 180 ppm. (The “<40” ppm group also includes events occurring below 40 ppm; the “180>” ppm group also includes events occurring above 180 ppm.) Each 10 ppm event group is coded to show what percentage of the events in that group are paced events. NOTE: Printout of this data in the tabular format provides a higher rate group resolution of 5 ppm. If data was collected during dual chamber operation, both an atrial and ventricular histogram are available. The button in the upper right corner of the screen lets you switch between a display of the Atrial Rate Histogram and the Ventricular Rate Histogram. For additional information, refer to “Rate Histogram” in Chapter 17. 196407001 Rev A Refer to the “Reference man.” category in doc#163256 for Printing Instructions. Medtronic Confidential 7 x 9 inches (178 mm x 229 mm) Collecting and Retrieving Diagnostic Data 8-5 Lead Trend If you program Lead Trend, the pacemaker measures lead impedance every three hours and records the maximum and minimum values for each 3-day sampling period. The two dashed vertical lines indicate a temporary interruption in data collection caused by application of the programming head (or a magnet) over the pacemaker. Lead Trend Report Example On the graph, each 3-day impedance sample is indicated by a short, vertical line representing the range between the minimum and maximum impedance measured over that 3-day period. Recording time can be up to 360 days if the pacemaker is a dual chamber model (both atrial and ventricular leads are monitored) or 720 days if the pacemaker is single chamber model. If data is collected from a dual chamber model, a button in the upper right corner of the screen lets you switch between a display of the Atrial Lead Trend and the Ventricular Lead Trend. NOTE: Atrial Lead Trend does not apply to the VDD pacing mode. Selecting the [ATRIAL LEAD TREND] button will not display any data. For the Prodigy VDD model, the [ATRIAL LEAD TREND] button will not be displayed. NOTE: You can program Lead Trend monitoring to engage automatically if lead impedance changes to a value outside the acceptable range of 200 to 3000 ohms. Refer to Lead Monitor under “Programmable Parameter Options” following this section and “Monitoring Lead Stability” in Chapter 13. 196407001 Rev A Refer to the “Reference man.” category in doc#163256 for Printing Instructions. Medtronic Confidential 7 x 9 inches (178 mm x 229 mm) 8-6 Using the Programmer High Rate Episode If you program this Type option, the pacemaker monitors the designated chamber for “high rate episodes” as defined by the detection criteria selected during the setup procedure. The pacemaker records data for up to 15 consecutive episodes, or up to 7 episodes if the data for one is to include a short EGM. As shown in the example below, the information recorded for display includes the date and time of detection for each recorded episode, the episode duration, and the “Tachy Rate.” Tachy Rate is the highest rate sample obtained during the episode, excluding the first detection beat. NOTE: In addition to recording information for each of up to 15 episodes, the pacemaker will provide a count of the total number of episodes detected since the High Rate Episode recording option was programmed. This total count appears only on the printout of the Diagnostic data in tabular form (see page 8-19) and is labeled “Episodes Detected” near the top of the report. The maximum number for this count is 255. An episode labeled “Duration Unknown” indicates data collection during the episode was temporarily interrupted by application of the programming head (or a magnet) over the pacemaker. High Rate Episodes Report Example The SELECT EPISODE [∧ ∧] [∨ ∨] and [ZOOM IN] buttons let you view an episode in more detail. The detailed data shows the rate for each of eight consecutive events sampled at the following times: as rate achieved the detection rate, immediately following detection, and as rate drops below the detection rate ending the episode. Selecting the [CONVERT GRAPH TO INTERVALS] button lets you view the data in terms of intervals rather than rate. 196407001 Rev A Refer to the “Reference man.” category in doc#163256 for Printing Instructions. Medtronic Confidential 7 x 9 inches (178 mm x 229 mm) Collecting and Retrieving Diagnostic Data 8-7 Detailed View of a High Rate Episode If the “Collect EGM” option was programmed, one episode will include a short EGM. This episode is marked by an asterisk (*) preceding the detection date. The number of episodes for which data can be collected in this case is limited to seven. The EGM recording, which starts when the episode detection criteria have been met, captures about 2.5 seconds of cardiac activity. For additional information, refer to “High-Rate Episode” in Chapter 17. 196407001 Rev A Refer to the “Reference man.” category in doc#163256 for Printing Instructions. Medtronic Confidential 7 x 9 inches (178 mm x 229 mm) 8-8 Using the Programmer Programmable Parameter Options Setting up the Diagnostics function, as described later in this chapter, involves programming appropriate settings for Type and other associated parameters. The programmable parameters associated with the Diagnostics function are defined below. NOTE: Also refer to the next section for a description of the Setup option, which you can use as a simple alternative to manually selecting each parameter setting. Parameter TYPE Definition/Settings Selects the type of information to be recorded by the pacemaker. Refer to the previous section for a description of each Type setting. The type settings available depend on the selected pacemaker model (see table on page 8-3) Settings: REFRACT SENS (Refractory Sensed Events) Programs the pacemaker to include or exclude events sensed within the refractory period when it counts heart rate events. This parameter applies only to the Type setting of Rate Histogram. Settings: METHOD Rate Histogram Lead Trend High Rate Epis (-A, -V)* Off Exclude, Include “Rolling” programs the pacemaker to record continuously, such that new data overwrites the old data once memory capacity is reached. “Frozen” programs the pacemaker to record data until its memory capacity for the selected Type is reached. Recording then stops, and the collected data is frozen. This parameter applies to Lead Trend and High Rate Episodes. Settings: Rolling, Frozen *For dual chamber pacing modes, “-A” and “-V” settings let you choose to monitor the atrium or the ventricle. 196407001 Rev A Refer to the “Reference man.” category in doc#163256 for Printing Instructions. Medtronic Confidential 7 x 9 inches (178 mm x 229 mm) Collecting and Retrieving Diagnostic Data LEAD MONITOR 8-9 If you program Lead Monitor to “On,” data collection will automatically switch from the programmed Type to Lead Trend if the detected pacing lead impedance changes to a value outside the acceptable range of 200 to 3000 ohms. Data collection for the programmed Type stops, accumulated data is cleared, and collection of Lead Trend data begins. The programmable settings for Lead Monitor include a “Polarity Switch” option that automatically programs Pace Polarity and Sense Polarity to Unipolar if Lead Trend is automatically engaged because of unacceptable lead impedance. For dual chamber models, settings let you select the chamber for which Lead Monitor and Polarity Switch will be programmed: both chambers (A+V), the atrium (A.), or the ventricle (V.). Settings: Dual Chamber Models Single Chamber and VDD Models Off On On+Polar. Sw. - A+V On+Polar. Sw. - A. On+Polar. Sw. - V. Off On On+Polar. Sw. WARNING: Do not program a Polarity Switch option if the patient has an implantable defibrillator (see Chapter 13). NOTE: If you select the “A+V” Polarity Switch option, the settings for both atrial and ventricular Polarity will be programmed to Unipolar if the impedance for either lead system changes to an unacceptable value. NOTE: Polarity Switch for the atrium cannot be programmed if atrial sensitivity is programmed to 0.18, 0.25, or 0.35 mV. These settings apply only to bipolar sensing. Likewise if you have programmed Polarity Switch for the atrium, the 0.18, 0.25, and 0.35 mV atrial sensitivity settings cannot be programmed. NOTE: The following parameters apply only if the selected Type setting is High Rate Episode or High Rate Episode-A or -V. DETECT RATE (Detection Rate) As one of the two detection criteria, this parameter sets the minimum level that heart rate must reach to qualify as a high rate episode. Settings: DETECTION # (Detection Number) As one of the two detection criteria, this parameter sets the minimum number of consecutive heart beats that must occur above the Detection Rate to qualify as a high rate episode. Settings: 196407001 Rev A 80 to 400 ppm 2 to 200 events Refer to the “Reference man.” category in doc#163256 for Printing Instructions. Medtronic Confidential 7 x 9 inches (178 mm x 229 mm) 8-10 Using the Programmer TERMINATE # (Termination Number) This parameter sets the minimum number of consecutive heart beats that must occur below the Detection Rate before a high rate episode is considered terminated. Settings: COLLECT EGM Programming this parameter to ON causes the pacemaker to record a short EGM trace for one of the recorded high rate episodes. Using this feature reduces the maximum number of episodes that can be recorded from 15 to 7. The episode that includes the EGM is marked by an asterisk (*). Settings: 196407001 Rev A 2 to 20 events On, Off Refer to the “Reference man.” category in doc#163256 for Printing Instructions. Medtronic Confidential 7 x 9 inches (178 mm x 229 mm) Collecting and Retrieving Diagnostic Data 8-11 About the Setup Options The parameter list on the Diagnostic Parameters screen (see next section) includes a Setup option that can simplify the programming process. Choosing a Setup option (see list below) automatically selects an approriate pending value for Type and a typical preset value for each of the associated parameters. Instructions for using the Setup feature are presented in the next section. You can use Setup as an alternative to manually selecting a setting for each of the required parameters. The Setup options available depend on the Type options applicable to the selected pacemaker model (see table on page 8-3). Setup Option A. Tachy Monitor Description/Preset Settings Select to record high-rate episodes detected in the atrium. Type Method Detection Rate Detection # Terminate # Collect EGM Lead Monitor V. Tachy Monitor Select to record high-rate episodes detected in the ventricle. Type Method Detection Rate Detection # Terminate # Collect EGM Lead Monitor Tachy Monitor High Rate Epis-A. Rolling Upper Tracking Rate or Upper Activity Rate* 8 8 On Off High Rate Epis-V. Rolling Upper Tracking Rate or Upper Activity Rate* 3 3 On Off Select to record high-rate episodes detected in the paced chamber. This Setup option applies when the pacemaker is a Prodigy SR model. Type Method Detection Rate Detection # Terminate # Collect EGM Lead Monitor High Rate Episode Rolling Upper Activity Rate* 3 3 On Off *The values used for Detection Rate will be the programmed value for Upper Tracking Rate or Upper Activity Rate, whichever is pertinent to the permanent mode. If the permanent mode is DDDR, the greater of the two upper rates will be used. If neither upper rate parameter is pertinent to the permanent mode, you must select a desired value for Detection Rate. 196407001 Rev A Refer to the “Reference man.” category in doc#163256 for Printing Instructions. Medtronic Confidential 7 x 9 inches (178 mm x 229 mm) 8-12 Using the Programmer Rate Histogram Select to obtain a Rate Histogram. Type Refract Sens Lead Monitor Lead Trend Select to monitor impedance of the pacing lead system. Type Method Lead Monitor 196407001 Rev A Rate Histogram Include Off Lead Trend Rolling Off (fixed setting) Refer to the “Reference man.” category in doc#163256 for Printing Instructions. Medtronic Confidential 7 x 9 inches (178 mm x 229 mm) Collecting and Retrieving Diagnostic Data 8-13 Programming the Pacemaker to Record Data The procedure to program the pacemaker to begin recording the desired type of information begins at the Diagnostic Parameters screen. Selecting the Diagnostic Parameters Screen To display the Diagnostic Parameters (Diagnostics) screen, select the [PARAMETERS] menu button, and then select the DIAGNOSTIC PARAMETERS option as illustrated below. 1. Select [PARAMETERS] menu button. 2. Select DIAGNOSTIC PARAMETERS option. The Diagnostics screen shows the presently programmed parameter settings for this function. If the Diagnostics function has not been programmed to operate, a setting of “OFF” will be listed for the Type parameter as shown below. If settings are not displayed, interrogate the pacemaker. Diagnostic Parameters Screen 196407001 Rev A Refer to the “Reference man.” category in doc#163256 for Printing Instructions. Medtronic Confidential 7 x 9 inches (178 mm x 229 mm) 8-14 Using the Programmer NOTE: If low battery voltage has set the pacemaker ERI (elective replacement indicator), the programmer will not allow you to program the Diagnostics function. Diagnostic Parameter Screen Buttons The buttons located at the right of the parameter display may be useful during the programming procedure described on the next page. SHOW PRESENT SHOW SAVED SHOW GRAPH CLEAR DATA SAVE/ NOMINAL OPTIONS... 196407001 Rev A When you select new parameter values to program, these “pending” values are displayed in place of the interrogated present settings. To temporarily recall the present settings, press and hold this button. If you have saved a set of parameter values (see below), this button will appear on the screen. To temporarily display these saved values, press and hold this button. If the Diagnostics function was previously programmed to collect data and if this data has been interrogated, selecting this button will display a graph of the data retrieved from pacemaker memory. Selecting this button displays an option to clear the Diagnostics data presently accumulated in pacemaker memory (see page 8-20). Selecting this button displays options for: 1) clearing all pending values from the parameter screen, 2) saving a set of parameter values, and 3) recalling the set of saved values or nominal values (Medtronic or Site) to the screen as pending values. (Refer to “Programming Nominal and Saved Values” on page 6-6 for instructions on using these options.) Refer to the “Reference man.” category in doc#163256 for Printing Instructions. Medtronic Confidential 7 x 9 inches (178 mm x 229 mm) Collecting and Retrieving Diagnostic Data 8-15 Programming Procedure You can program the pacemaker to begin collecting diagnostic data by using either of two procedures: 1) Using Setup, which simplifies programming, or 2) Manually selecting the Diagnostic parameter settings. NOTE: If the pacemaker is presently programmed to collect data, programming the Diagnostic function will erase any data accumulated. Display and print data before programming. Procedure for Using Setup Choosing a Setup option automatically selects a set of parameter settings that are typical for the type of data you want the pacemaker to record. 1. From the Diagnostic Parameters screen, select SETUP at the top of the parameter list. 2. From the window of Setup options, select the option for the type of data you want to collect. Selecting a Setup option automatically lists a pending value for Type and each of the associated parameters. Refer to pages 8-11 and 8-12 for information about each of the Setup options. 3. At this point, you can modify any of the pending parameter settings if they are not appropriate. To do this, select the parameter you want to change, and then select the desired setting from the value window. NOTE: Altering a pending value (except the one for Lead Monitor) will cause the selected setting for SETUP to disappear. Refer to page 8-8 for information about each of the Diagnostic parameters. 4. 196407001 Rev A To program the pending parameter settings, position the programming head and select [PROGRAM]. Refer to the “Reference man.” category in doc#163256 for Printing Instructions. Medtronic Confidential 7 x 9 inches (178 mm x 229 mm) 8-16 Using the Programmer Data collection begins 30 seconds after you lift the programming head. (Data collection is suspended while the programming head is in position over the patient’s pacemaker.) Procedure for Manually Selecting the Parameter Settings As an alternative to using the Setup feature, you can manually select each of the parameter settings required to program the Diagnostics function. NOTE: You can start this procedure by selecting an appropriate Setup option as described above and then using this procedure to modify the preselected pending parameter values. 1. From the Diagnostic Parameters screen, select Type from the parameter list. 2. From the window of Type options, select the option for the type of data you want to collect. (If you are programming the Diagnostics function off, select Off and skip to step 4.) 3. The screen now displays the parameters pertinent to the selected Type setting. Select a desired setting for each of the listed parameters by selecting the parameter and then selecting the desired setting from the value window. The shaded rectangles, which may appear depending on the previous programmed status, indicate where values must be selected before programming will be allowed. 4. To program the selected pending settings, position the programming head and select [PROGRAM]. Data collection begins 30 seconds after you lift the programming head. (Data collection is suspended while the programming head is in position over the patient’s pacemaker.) 196407001 Rev A Refer to the “Reference man.” category in doc#163256 for Printing Instructions. Medtronic Confidential 7 x 9 inches (178 mm x 229 mm) Collecting and Retrieving Diagnostic Data 8-17 Displaying a Graph of the Recorded Data At any time during a patient session, you can display a graph of the Diagnostic data presently accumulated in pacemaker memory. Using Any One of Three Procedures You can display the graph of Diagnostic data by any one of the following procedures. In all cases, interrogate the pacemaker if necessary to display the graph. A message will indicate if the Diagnostics function is programmed off, in which case no graph will be displayed. Using the [DATA] Menu Button: Select the [DATA] menu button, and then select the SHOW DIAGNOSTICS GRAPH option (see page 4-12) From the Data Summary Screen: Select the [SHOW DIAGNOSTICS GRAPH] button (see page 4-8). From the Diagnostic Parameters Screen: Select the [SHOW GRAPH] button (see pages 8-13, 8-14). Options for Viewing Additional Information Some graph displays, depending on the programmed Type setting, provide one or more options for viewing additional information as described below. Refer to the display examples in the section starting on page 8-3. Viewing Options for Rate Histogram VENTR. RATE HISTOGRAM If the pacemaker is operating in a dual chamber mode during data collection, data will be collected for both chambers. Select [VENTR. RATE HISTOGRAM] button to switch to ventricular data; select [ATRIAL RATE HISTOGRAM] to switch back. Viewing Options for Lead Trend VENTR. LEAD TREND 196407001 Rev A If the pacemaker is operating in a dual chamber mode, during data collection, data will be collected for both chambers. Select [VENTR. LEAD TREND] button to switch to ventricular data; select [ATRIAL LEAD TREND] to switch back. Refer to the “Reference man.” category in doc#163256 for Printing Instructions. Medtronic Confidential 7 x 9 inches (178 mm x 229 mm) 8-18 Using the Programmer NOTE: Atrial Lead Trend does not apply to VDD pacing. Selecting [ATRIAL LEAD TREND] will not display any data. For the Prodigy VDD model, the [ATRIAL LEAD TREND] button will not be displayed. Viewing Options for High Rate Episodes On this data displays, a Zoom In option lets you view the data collected for a particular episode in more detail. To select and view an episode: 1. Use the SELECT EPISODE [∧ ∧] and [∨ ∨] buttons to position the episode selection box next to the episode you want to view. 2. Select the [ZOOM IN] button to display the selected episode. 196407001 Rev A 3. If you want to view the data in terms of intervals rather than rate, select the [CONVERT GRAPH TO INTERVALS] button. To return to the rate display, select [CONVERT GRAPH TO RATE]. 4. To view the detailed data for another episode without returning to the multiple episodes display, select the [PREVIOUS EPISODE] or [NEXT EPISODE] button. 5. To return to the multiple episodes display, select the [ZOOM OUT] button. Refer to the “Reference man.” category in doc#163256 for Printing Instructions. Medtronic Confidential 7 x 9 inches (178 mm x 229 mm) Collecting and Retrieving Diagnostic Data 8-19 Printing the Diagnostic Data You can print the diagnostic data retrieved from the pacemaker in either of two formats: in the same graphic format that appears on the screen, or as a table of the data used to create the graph. Printing the Graph You can print the diagnostic data in its graphic form only while the graph is displayed on the screen. To print the displayed graph: 1. Select the [PRINT] menu button from the top of the screen. 2. Select CURRENT SCREEN REPORT from the listed options. Formatting of the data for printing may take up to half a minute. Except for the [EMERGENCY] button, the display screen will be unresponsive to the selector pen during this data formatting period. Printing the Data in Tabular Form At any time during the patient session, you can print a tabular form of the diagnostic data, provided the pacemaker has been interrogated for this information. To print the diagnostic data in tabular form: 196407001 Rev A 1. Select the [PRINT] menu button from the top of the screen. 2. Select DIAGNOSTICS DATA TABLE from the listed options. Refer to the “Reference man.” category in doc#163256 for Printing Instructions. Medtronic Confidential 7 x 9 inches (178 mm x 229 mm) 8-20 Using the Programmer Clearing Recorded Data From the Pacemaker The Clear Data command lets you clear the Diagnostic data presently accumulated in pacemaker memory so that new data collection can begin. The Clear Data command does not alter the present Diagnostic parameter settings. New data collection begins 30 seconds after you lift the programming head from over the patient’s pacemaker. For a permanent record of the present data, print the data as described in the previous section before you execute the Clear Data command. To clear the Diagnostic data accumulated in pacemaker memory: 1. Select the [CLEAR DATA] button, which appears on the right side of the Diagnostic Parameters screen (see page 8-13) and in the same location on the Diagnostics graph display screen. 2. Position the programming head over the patient’s pacemaker and select the [CLEAR DATA] button from the window now showing on the screen. NOTE: Any one of the following will also clear the recorded Diagnostic data: Programming any Diagnostic parameter. Conducting an Activity Threshold test or Exercise test. The occurrence of a pacemaker electrical reset. 196407001 Rev A Refer to the “Reference man.” category in doc#163256 for Printing Instructions. Medtronic Confidential 7 x 9 inches (178 mm x 229 mm) CHAPTER 9 Programmer Setup Options About This Chapter This chapter describes the following programmer setup tasks: How to set the time and date if these settings are not correct on the display screen and printouts (see page 9-2). How to connect an external recorder or monitor (see page 9-3). How to use the Calibrate option associated with the EGM and Marker Channel signals delivered to an external recorder or monitor (see page 9-4). How to set up Site Nominal (user selected) parameter values for each of the Prodigy pacemaker models (see page 9-6). How to turn the pacing artifact display function on or off (see page 9-10). Information about software installation is covered in a separate booklet supplied with the software diskettes. 9-1 196407001 Rev A Refer to the “Reference man.” category in doc#163256 for Printing Instructions. Medtronic Confidential 7 x 9 inches (178 mm x 229 mm) 9-2 Using the Programmer Setting the Time and Date If the time or date displayed and printed by the programmer’s clock and calendar function is incorrect, use the following procedure to enter the correct setting. 1. Display the Automatic Model Select screen (see page 3-4) as follows: If the programmer is not operating, turn the programmer on. The start-up sequence will automatically display this screen. If the programmer is operating and a pacemaker model has been selected, end the patient session by selecting [END SESSION]. 2. From the Automatic Model Select screen, select the [SETUP...] button. 3. From the displayed setup options, select [SET TIME AND DATE]. 4. In any order, select the appropriate [∧ ∧] increase or [∨ ∨] decrease button to change the time or date setting. Set Time and Date Screen This screen shows the current settings for time and date. Use the [∧] and [∨] buttons to adjust the settings. NOTE: The time must be entered on the basis of a 24-hour clock, with 00:00 being midnight and 12:00 being noon. 5. 196407001 Rev A When you have selected the desired settings, press [ACCEPT]. If no further adjustments are necessary, press [RETURN]. Refer to the “Reference man.” category in doc#163256 for Printing Instructions. Medtronic Confidential 7 x 9 inches (178 mm x 229 mm) Programmer Setup Options 9-3 Connecting an External Recorder or Monitor For the Prodigy family of pacemakers, the waveform signals available at the programmer output connectors are shown below for the 9760 and 9790 programmers. Refer to the next section of this chapter for information on the Calibrate option, which may be useful when you view Marker Channel or EGM telemetry on an externally connected recorder or monitor. 9760 Programmer On the 9760 programmer, the signal output connectors are located on the left side of the unit. Connector Output Signal A Patient’s ECG B Telemetered atrial EGM C Telemetered ventricular EGM D Marker Channel Telemetry Connector Type: BNC Signal Type: ±1 Volt 9790 Programmer Connecting an external recorder or monitor to the 9790 programmer requires an optional adaptor. This adaptor connects to the analog output port located on the right side of the programmer. Connector (on adaptor) Output Signal 196407001 Rev A A Patient’s ECG B Telemetered atrial EGM C Telemetered ventricular EGM D Marker Channel Telemetry Connector Type: BNC Signal Type: Switchable to ±1 Volt or ±5 mV Refer to the “Reference man.” category in doc#163256 for Printing Instructions. Medtronic Confidential 7 x 9 inches (178 mm x 229 mm) 9-4 Using the Programmer Using the CALIBRATE Option The Calibrate option applies to viewing Marker Channel or EGM telemetry on an externally connected recorder or monitor. Marker Channel™ Telemetry On an external recorder or monitor, the trace of Marker Channel telemetry is not annotated with letter codes. Identification of each marker must be done on the basis of its relative amplitude. Selecting the Calibrate option inserts a reference diagram into the Marker Channel trace to aid in marker identification. Select this option, as shown below, at the moment you want the reference diagram to appear. To initiate a calibration output: 1. Select the [SPECIAL] Menu button. 2. Select the CALIBRATE option. Selecting the Calibrate option inserts the reference diagram shown below. This diagram shows the relative amplitude of the ascending (atrial) and descending (ventricular) markers. NOTE: On the 9790 programmer, you can press the calibrate button located next to the analog output port on the right side of the programmer as an alternative to using the 2-step procedure above. 9760 Programmer 9790 Programmer If you are using a 9760 programmer, the reference diagram appears only in the marker trace on the externally connected recorder or monitor. If you are using a 9790 programmer, the reference diagram appears in the marker trace on the programmer display and real-time printout as well as on the externally connected recorder or monitor. 196407001 Rev A Refer to the “Reference man.” category in doc#163256 for Printing Instructions. Medtronic Confidential 7 x 9 inches (178 mm x 229 mm) Programmer Setup Options 9-5 EGM/ECG Signal Calibration Depending on the displayed waveform trace, selecting the calibrate option also generates a voltage reference diagram that applies as follows: If you are using a 9760 programmer, the voltage reference diagram appears only in the telemetered EGM trace displayed or printed by an externally connected recorder or monitor. If you are using a 9790 programmer, the voltage reference diagram appears in both the ECG and telemetered EGM traces displayed and printed by the programmer as well as in the ECG and EGM traces displayed or printed by the externally connected recorder or monitor. The signal calibration diagram provides a voltage reference for determining waveform amplitudes. 5 mV Æ 1 mV Æ 0 mV Æ 9760 Programmer 196407001 Rev A 9790 Programmer Refer to the “Reference man.” category in doc#163256 for Printing Instructions. Medtronic Confidential 7 x 9 inches (178 mm x 229 mm) 9-6 Using the Programmer Setting Up Site Nominal Parameter Values CAUTION: Programming functions, including Emergency, are not available from the Site Nominal Setup screen. The Site Nominal Setup feature allows you to choose your own set of nominal parameter values to use as an alternative to preestablished Medtronic nominal values. You can choose one set of Site Nominal parameter values for each group of models. You must repeat the setup procedure for each group of models that you want to have Site Nominal values. You can setup Site Nominal values for both pacing parameters and the parameters used to program the Diagnostics function (see “Other Options” later in this section). Once you save a set of Site Nominal values for a group of models, you have the option (during a patient session) to recall these values to the screen as pending values for programming. From the parameter programming screen, you can recall the Site Nominal values as follows: 1) Select the [SAVE/NOMINAL OPTIONS...] button. 2) Select the [SITE NOMINALS] option. Site Nominals Setup Procedure Use this procedure to establish a set of Site Nominal parameter values for a group of pacemaker models or to change an existing set of Site Nominal values. The display conventions used in this setup procedure are the same as those used for programming parameter values (see Chapter 6). 1. Display the Automatic Model Select screen (see page 3-4): If the programmer is not operating, turn it on. The start-up sequence will automatically display this screen. If the programmer is operating and a pacemaker model has been selected, select [END SESSION] to display this screen. 2. Display the Site Nominal Setup screen: a) Select [SETUP...] from the Automatic Model Select screen. b) Select [SET SITE NOMINALS] from the setup options. 196407001 Rev A Refer to the “Reference man.” category in doc#163256 for Printing Instructions. Medtronic Confidential 7 x 9 inches (178 mm x 229 mm) Programmer Setup Options c) 9-7 Select the pacemaker type, [SINGLE CHAMBER MODELS] or [DUAL CHAMBER MODELS]. d) Select the desired Prodigy pacemaker group from those listed. Selecting the pacemaker group results in a data loading process that will take several seconds. The Site Nominal Setup screen for Pacing Parameters is then displayed (see example below). Site Nominal Setup Screen (example) If Site Nominal values have not been set up for the selected models, the screen will show Medtronic nominal values with all values pending. The screen otherwise shows the present Site Nominal values. 3. To establish the desired set of Site Nominal values, make the required changes to the parameters settings displayed: a) Select a parameter you want to change. For pacing parameters, select Pacing Mode first if you intend to change it. b) From the window of value options, select the desired value. NOTE: Selecting a value of ON for Mode Switch will display the present setting for Detect Rate within the Mode Switch value window. To choose a different setting, select Detect Rate to open its value window. After choosing the desired rate value, select [ACCEPT VALUE] to close the Mode Switch window (see page 6-5). 196407001 Rev A Refer to the “Reference man.” category in doc#163256 for Printing Instructions. Medtronic Confidential 7 x 9 inches (178 mm x 229 mm) 9-8 Using the Programmer c) 4. Repeat a and b until the screen displays the parameter settings you want to use as Site Nominal values for the selected pacemaker group. To save the parameters shown on the setup screen as Site Nominal values, select the [SAVE PROPOSED] button. A message at the bottom of the screen and an audible “beep” will confirm that the values have been saved. NOTE: The [SAVE PROPOSED] button will not be displayed if any of the selected values form a restricted parameter interaction (as indicated by values displayed in reverse video, see page 6-3). All parameter conflicts must be resolved before the selected Site Nominal values can be saved. 5. Select [END SITE NOMINALS] to exit the Site Nominal setup feature. NOTE: If you want to exit this procedure without saving a set of Site Nominal values, you can select the [END SITE NOMINALS] button at any point in the procedure prior to step 4. Other Options Site Nominals for the Diagnostics function Following step 2 of the setup procedure, the Site Nominal Setup screen automatically opens to the Pacing Parameters setup screen. To establish a set of Site Nominal parameter values for the Diagnostics function, select the [DIAGNOSTIC PARAMETERS] button and proceed with steps 3, 4 and 5. If you have completed the procedure for setting up and saving values for Pacing Parameters, you may repeat the procedure for Diagnostic Parameters by selecting the [DIAGNOSTIC PARAMETERS] button following step 4, rather than exiting the Site Nominal setup feature. Convenience buttons The following buttons may be used during the Site Nominal setup procedure: [SET TO MEDTRONIC] 196407001 Rev A Select this button if you want the setup screen to display Medtronic nominal values as pending values for all parameters. This feature is useful if you want to use Medtronic values as a starting point for setting up a new set of Site Nominal values. Refer to the “Reference man.” category in doc#163256 for Printing Instructions. Medtronic Confidential 7 x 9 inches (178 mm x 229 mm) Programmer Setup Options 196407001 Rev A 9-9 [SET TO SITE VALUES] Select this button if, during modification of an existing set of Site Nominals, you want to return to the original values. This button is displayed only if there is a saved set of Site Nominal values. [HELP] Select this button for a brief description of the Site Nominal Setup feature. Refer to the “Reference man.” category in doc#163256 for Printing Instructions. Medtronic Confidential 7 x 9 inches (178 mm x 229 mm) 9-10 Using the Programmer Setting the Artifact Display During processing and amplification of the patient’s ECG signal, the programmer automatically detects and enhances pacing artifacts so that they appear on the ECG display and printout. If you have a 9790 programmer, you can turn this artifact display feature on or off as follows: 1. Display the Automatic Model Select screen (see page 3-4) as follows: If the programmer is not operating, turn the programmer on. The start-up sequence will automatically display this screen. If the programmer is operating and a pacemaker model has been selected, end the patient session by selecting [END SESSION]. 2. From the Automatic Model Select screen, select the [SETUP...] button. 3. From the displayed setup options, select [ARTIFACT DISPLAY]. 4. In the Artifact Display window, select [ON] or [OFF] as desired. (The present setting appears in reverse video.) 5. Select [EXIT] to close the window. The selected option is saved in programmer memory and will remain in effect until you repeat the procedure above to change it. NOTE: With the artifact display feature turned off, pacing artifacts will not show on the programmer ECG display or printout. 196407001 Rev A Refer to the “Reference man.” category in doc#163256 for Printing Instructions. Medtronic Confidential 9879EN-II-T_9501043EN/CTC.qxd 5/10/99 11:46 Page II-1 7 x 9 inches (178 mm x 229 mm) PART II Understanding Pacemaker Operation Part II provides descriptions of Prodigy pacemaker features. This section supplements Part I (programmer procedures). Part III supplements this section with specific product information for the Prodigy DR, Prodigy D, Prodigy VDD, Prodigy SR, and Prodigy S pacemakers. Specific Prodigy features are organized under the following sections: ■ Pacing modes ■ Rate response therapy options ■ Pacemaker timing features ■ Lead/cardiac tissue interface ■ Special therapy options ■ Telemetry data ■ Miscellaneous operations ■ Diagnostics ■ Troubleshooting the pacing system Part II Understanding Pacemaker Operations 196407001 Rev A Refer to the “Reference man.” category in doc#163256 for Printing Instructions. Medtronic Confidential 7 x 9 inches (178 mm x 229 mm) 196407001 Rev A Refer to the “Reference man.” category in doc#163256 for Printing Instructions. Medtronic Confidential 9879EN-10_9501043EN/CTC.qxd 5/10/99 11:25 Page 10-1 7 x 9 inches (178 mm x 229 mm) CHAPTER 10 Pacing Modes About This Chapter This chapter provides information about the modes available with the Prodigy pacemaker. The sections are as follows: ■ Introduction (see page 10-3) ■ Mode Selection Decision Tree (see page 10-5) ■ ■ ■ ■ ■ Mode Pertinency Tables (see page 10-6) DDDR/DDD Modes (see pages 10-8 and 10-10) DDIR/DDI Modes (see pages 10-12 and 10-14) DVIR/DVI Modes (see pages 10-16 and 10-18) VDD Mode (see page 10-20) ■ AAIR/AAI Modes (see pages 10-22 and 10-24) ■ VVIR/VVI Modes (see pages 10-26 and 10-28) ■ AAT/VVT Modes (see page 10-30) ■ DOOR/AOOR/VOOR Modes (see page 10-32) ■ DOO/AOO/VOO Modes (see page 10-34) ■ ODO/OAO/OVO Modes (see page 10-36) 10-1 196407001 Rev A Refer to the “Reference man.” category in doc#163256 for Printing Instructions. Medtronic Confidential 7 x 9 inches (178 mm x 229 mm) 196407001 Rev A Refer to the “Reference man.” category in doc#163256 for Printing Instructions. Medtronic Confidential 9879EN-10_9501043EN/CTC.qxd 5/10/99 11:25 Page 10-3 7 x 9 inches (178 mm x 229 mm) Pacing Modes 10-3 Introduction Pacing Mode Selection This chapter provides an introduction to Prodigy pacemaker modes as an aid to pacing mode selection. The chapter is organized as follows: ■ Mode Selection Decision Tree. This decision tree, based on the 1991 ACC/AHA guidelines for pacemaker implantation,1 provides a simple means of identifying pacing modes appropriate for given indications. More specific indications for bradycardia-related pacing are described under “General Pacing Indications” in Part III. ■ Mode Pertinency Tables. These tables show which features and parameters apply to each commonly used pacing mode. ■ Mode Descriptions. These descriptions provide indications and contraindications for modes available with Prodigy pacemakers and brief descriptions of how these modes operate. NBG Pacing Codes Prodigy pacemaker modes are defined in NBG Code.2 Each five-letter NBG code describes a specific type of operation for implantable pacemakers. For simplicity, this manual uses only the first three or four letters, such as DDD, DDIR, DVIR, and so forth. The following chart describes the first four letters of the NBG code. 1 Dreifus LS, Fisch C, Griffin JC, et al. Guidelines for implantation of cardiac pacemakers and antiarrhythmia devices. A report of the American College of Cardiology/American Heart Association Task Force on Assessment of Diagnostic and Therapeutic Cardiovascular Procedures (Committee on Pacemaker Implantation). Journal of the American College of Cardiology. 1991; 18: 1-13. 2 Bernstein A., et al., “The NASPE/BPEG Pacemaker Code,” PACE, 10(4), Jul-Aug 1987. (“NBG” stands for “The North American Society of Pacing and Electrophysiology [NASPE] and the British Pacing and Electrophysiology Group [BPEG] Generic.” NBG’s five-letter code supersedes the ICHD Code. 196407001 Rev A Refer to the “Reference man.” category in doc#163256 for Printing Instructions. Medtronic Confidential 9879EN-10_9501043EN/CTC.qxd 5/10/99 11:25 Page 10-4 7 x 9 inches (178 mm x 229 mm) 10-4 Understanding Pacemaker Operations CHAMBER PACED MODE OF RESPONSE V = Ventricle T = Triggered A = Atrium I = Inhibited D = Dual Chamber D = Double (Both) S = Single Chamber O = O = None None DDDR CHAMBER SENSED RESPONSE PROGRAMMABLE/ RATE V = Ventricle P A = Atrium M = Multiprogrammable D = Dual Chamber C = Communicating S = Single Chamber R = Rate Responsive None O = O = = Programmable None Further Information The mode descriptions in this chapter provide only a basic overview of each mode. For further details on the rate responsive modes, refer to Chapter 11, “Rate Response Therapy Options.” For further details on pacemaker timing in all modes, refer to Chapter 12, “Pacemaker Timing.” For mode and therapy capability for each of the Prodigy models, refer to Part III. 196407001 Rev A Refer to the “Reference man.” category in doc#163256 for Printing Instructions. Medtronic Confidential 9879EN-10_9501043EN/CTC.qxd 5/10/99 11:25 Page 10-5 7 x 9 inches (178 mm x 229 mm) Pacing Modes 10-5 Mode Selection Decision Tree Below is a basic decision tree used to select the pacing mode. In the shaded boxes the preferred mode(s) are listed and the alternate mode(s) appears below the dashed line. Symptomatic Bradycardia (e.g., persistent atrial fibrillation, inexcitable atrium) No Can the atrium be sensed and/or paced reliably? Yes VVIR VVI Is AV conduction presently adequate? Yes No (e.g., complete or transient AV block) Is SA node conduction presently adequate? 196407001 Rev A Is SA node conduction presently adequate? Yes No Yes No AAI DDD AAIR DDDR AAIR DDDR DDD DDDR VDD DDDR DDIR Refer to the “Reference man.” category in doc#163256 for Printing Instructions. 196407001 Rev A ✓ ✓ ✓ ✓ ✓ ✓ ✓ Paced AV Interval Sensed AV Interval Rate Adaptive AV (ON/OFF) PVARP ✓ ✓ Post-Ventricular Atrial Blanking Post-Atrial Ventricular Blanking ✓ ✓ ✓ ✓ ✓ ✓ ✓ DVIR DVI VDD VVIR ✓ ✓ ✓ ✓ ✓ ✓ ✓ ✓ ✓ ✓ ✓ ✓ ✓ ✓ ✓ ✓ ✓ ✓ ✓ ✓ ✓ ✓ ✓ ✓ VVI ✓ ✓ VVT ✓ ✓ ✓ ✓ AAIR ✓ ✓ ✓ AAI ✓ ✓ ✓ AAT NOTE: Standard pacing and sensing parameters (amplitude, pulse width, sensitivity, and pace/sense polarities) are not shown here but are found in Part III under “Nominal Parameter Settings.” Also, asynchronous modes are not shown. ✓ ✓ ✓ ✓ BASIC OPERATION PARAMETERS* DDI * See Chapter 12 for operational descriptions of these timing parameters. Single Chamber Atrial Blanking ✓ Ventricular Refractory Period ✓ ✓ ✓ ✓ Upper Activity Rate Atrial Refractory Period ✓ ✓ ✓ Upper Tracking Rate ✓ ✓ ✓ Lower Rate DDIR DDD DDDR Parameter/Feature PARAMETERS AVAILABLE FOR EACH MODE 10-6 The following tables indicate which features and parameters apply to each commonly used pacing mode. All features and parameters are programmable unless otherwise marked. Mode Pertinency Tables 9879EN-10_9501043EN/CTC.qxd 5/10/99 11:25 Page 10-6 7 x 9 inches (178 mm x 229 mm) Medtronic Confidential Understanding Pacemaker Operations Refer to the “Reference man.” category in doc#163256 for Printing Instructions. 196407001 Rev A ✓ Non-Competitive Atrial Pacing (ON/OFF) ✓ Ventricular Safety Pacing (ON/OFF) ✓ ✓ ✓ ✓ ✓ ✓ Activity Rate Response Acceleration Deceleration DVIR DVI VDD VVIR ✓ ✓ ✓ VVI ✓ ✓ ✓ ✓ ✓ ✓ ✓ ✓ RATE RESPONSE THERAPY OPTIONS** ✓ ✓ ✓ SPECIAL THERAPY OPTIONS* DDI * See Chapter 14 for operational descriptions of special therapy options. ** See Chapter 11 for operational descriptions of rate response features. 3 Available only in Prodigy DR models. ✓ ✓ DDIR ✓ ✓ ✓ ✓ DDD Activity Threshold Single Chamber Hysteresis Special Pacing Operations ✓ PMT Intervention (ON/OFF) Managing Ventricular Rhythms ✓ DDDR (ON/OFF) Mode Switch3 Managing Atrial Rhythms Parameter/Feature PARAMETERS AVAILABLE FOR EACH MODE ✓ VVT ✓ ✓ ✓ ✓ AAIR ✓ AAI ✓ AAT 9879EN-10_9501043EN/CTC.qxd 5/10/99 11:25 Page 10-7 7 x 9 inches (178 mm x 229 mm) Medtronic Confidential Pacing Modes 10-7 Refer to the “Reference man.” category in doc#163256 for Printing Instructions. Medtronic Confidential 9879EN-10_9501043EN/CTC.qxd 5/10/99 11:25 Page 10-8 7 x 9 inches (178 mm x 229 mm) 10-8 Understanding Pacemaker Operations DDDR Mode Indications for the DDDR Mode The DDDR mode may be indicated for patients who have chronotropic incompetence, a stable atrial rhythm, and an anticipated moderate or high level of physical activity. Specific indications (also applicable to the DDD mode) are as follows: ■ ■ Requirement for AV synchrony over a wide range of rates. Examples include the following: - Active or young patients who have atrial rates responsive to clinical need. - Patients who have significant hemodynamic need. - Patients who have experienced pacemaker syndrome during previous pacemaker experience or a reduction in systolic blood pressure > 20 mm Hg during ventricular pacing at time of pacemaker implantation (with or without evidence of VA conduction). Complete heart block or sick sinus syndrome and stable atrial rates. ■ When simultaneous control of atrial and ventricular rates can be shown to inhibit tachyarrhythmias or when the pacemaker can be adjusted to a mode designed to interrupt the arrhythmia. ■ Intermittent drug-resistant and reentrant tachycardias. (Short AV interval settings or use of Mode Switching may be useful in responding to some reentrant atrial tachycardias.) The DDDR mode is particularly applicable in the presence of persistent VA conduction during previous pacemaker experience. Also, the mode may be indicated for patients with intermittent atrial and ventricular ectopic arrhythmias. Contraindications for the DDDR Mode The DDDR mode is contraindicated for the following patient diagnoses: 196407001 Rev A ■ Chronic or persistent supraventricular tachyarrhythmias, including atrial fibrillation or flutter. ■ An inexcitable atrium. ■ Severe ischemic heart disease, with angina pectoris symptoms aggravated by rapid heart rates. Refer to the “Reference man.” category in doc#163256 for Printing Instructions. Medtronic Confidential 9879EN-10_9501043EN/CTC.qxd 5/10/99 11:25 Page 10-9 7 x 9 inches (178 mm x 229 mm) Pacing Modes 10-9 DDDR Mode Operation In the DDDR mode, the pacemaker tracks the faster of the intrinsic atrial rate or the sensor-indicated rate. If the intrinsic rate is faster, the DDDR mode provides atrial synchronous pacing; otherwise, AV sequential pacing occurs at the sensor-indicated rate. Rate limits for atrial tracking (Upper Tracking Rate)4 and sensor tracking (Upper Activity Rate) are separately programmable. The AV intervals that follow sensed atrial events (SAV) and paced atrial events (PAV) are separately programmable, and they can be programmed to shorten with increasing rates (Rate Adaptive AV). A nonrefractory sensed event in either chamber inhibits pacing in that chamber. A ventricular nonrefractory sensed event in the VA interval that is not preceded by an atrial sense (AS or AR) may be a pacemaker-defined PVC, and starts a new VA interval. Sensor-indicated Interval A P Sensor-indicated Interval A S A P V P V S A P V S Parameters: Lower Rate = 60 ppm (1000 ms) Sensor-indicated Rate = 90 ppm (667 ms) A S V P PAV Interval = 200 ms SAV Interval = 170 ms PVARP = 280 ms V P 200 ms Example of DDDR Mode Operation. 4 196407001 Rev A The Total Atrial Refractory Period (TARP) may limit the tracking rate to a lesser value. Refer to the “Reference man.” category in doc#163256 for Printing Instructions. Medtronic Confidential 9879EN-10_9501043EN/CTC.qxd 5/10/99 11:25 Page 10-10 7 x 9 inches (178 mm x 229 mm) 10-10 Understanding Pacemaker Operations DDD Mode Indications for the DDD Mode The DDD mode may be indicated for patients with the following diagnoses: ■ Requirement for AV synchrony over a wide range of rates. Examples include the following: - Active or young patients who have atrial rates responsive to clinical need. - Patients who have significant hemodynamic need. - Patients who have experienced pacemaker syndrome during previous pacemaker experience or a reduction in systolic blood pressure > 20 mm Hg during ventricular pacing at time of pacemaker implantation (with or without evidence of VA conduction). ■ Complete heart block or sick sinus syndrome and stable atrial rates. ■ When simultaneous control of atrial and ventricular rates can be shown to inhibit tachyarrhythmias or when the pacemaker can be adjusted to a mode designed to interrupt the arrhythmia. ■ Intermittent drug-resistant and reentrant tachycardias. (Short AV interval settings or use of Mode Switching may be useful in responding to some reentrant atrial tachycardias.) Contraindications for the DDD Mode The DDD mode is contraindicated for the following patient diagnoses: 196407001 Rev A ■ Chronic or persistent supraventricular tachyarrhythmias, including atrial fibrillation or flutter. ■ An inexcitable atrium. ■ Severe ischemic heart disease, with angina pectoris symptoms aggravated by rapid heart rates. Refer to the “Reference man.” category in doc#163256 for Printing Instructions. Medtronic Confidential 9879EN-10_9501043EN/CTC.qxd 5/10/99 11:25 Page 10-11 7 x 9 inches (178 mm x 229 mm) Pacing Modes 10-11 DDD Mode Operation The DDD mode provides atrial synchronous pacing in the presence of intrinsic atrial activity; otherwise, AV sequential pacing occurs at the Lower Rate. Each atrial paced or nonrefractory atrial sensed event starts an AV interval and a Lower Rate interval. The AV intervals that follow sensed atrial events (SAV) and paced atrial events (PAV) are separately programmable, and the SAV may be optionally programmed to shorten with increasing rate (Rate Adaptive AV). Ventricular paced events may track atrial sensed events up to the programmed Upper Tracking Rate.4 A ventricular nonrefractory sensed event in the VA interval that is not preceded by an atrial sense (AS or AR) may be a pacemaker-defined PVC, and starts a new VA interval. Lower Rate Interval A P Lower Rate Interval A S A P V P V S Parameters: Lower Rate = 60 ppm (1000 ms) A P V S PAV Interval = 200 ms SAV Interval = 170 ms 200 ms Example of DDD Mode Operation. 4 196407001 Rev A The Total Atrial Refractory Period (TARP) may limit the tracking rate to a lesser value. Refer to the “Reference man.” category in doc#163256 for Printing Instructions. Medtronic Confidential 9879EN-10_9501043EN/CTC.qxd 5/10/99 11:25 Page 10-12 7 x 9 inches (178 mm x 229 mm) 10-12 Understanding Pacemaker Operations DDIR Mode Indications for the DDIR Mode The DDIR mode may be indicated for patients who require dual chamber pacing and who have frequent, but not constant, supraventricular arrhythmias. It may be preferable to the DDI mode in the presence of chronotropic incompetence and an anticipated moderate-to-high level of physical activity, particularly when atrial arrhythmias occur fairly frequently or the patients need dual chamber pacing only intermittently. Contraindications for the DDIR Mode The DDIR mode is contraindicated for patients with chronic or persistent supraventricular tachyarrhythmias, including atrial fibrillation or flutter. DDIR Mode Operation The DDIR mode provides dual chamber, sensor-driven, AV sequential pacing for heart rate variation without atrial tracking. Atrial pacing occurs at the sensor-indicated rate, with ventricular pacing at the end of the PAV interval unless inhibited. An atrial event sensed outside the PVARP will inhibit a scheduled atrial stimulus but will not start an AV interval. That is, ventricular paced events after such sensed atrial events occur at the sensorindicated rate. A ventricular nonrefractory sensed event in the VA interval starts a new VA interval. 196407001 Rev A Refer to the “Reference man.” category in doc#163256 for Printing Instructions. 9879EN-10_9501042_CTC.qxd 12/13/01 3:57 PM Medtronic Confidential Page 10-13 7 x 9 inches (178 mm x 229 mm) Pacing Modes Sensor-indicated Interval A P Sensor-indicated Sensor-indicated Interval VA Interval A S A P V P V P Parameters: Lower Rate = 60 ppm (1000 ms) Sensor-indicated Rate = 90 ppm (667 ms) Sensor-indicated Interval A P V P 10-13 A P V P PAV Interval = 200 ms 200 ms Example of DDIR Mode Operation. 196407001 Rev A Refer to the “Reference man.” category in doc#163256 for Printing Instructions. 9879EN-10_9501042_CTC.qxd 12/13/01 3:57 PM Medtronic Confidential Page 10-14 7 x 9 inches (178 mm x 229 mm) 10-14 Understanding Pacemaker Operations DDI Mode Indications for the DDI Mode The DDI mode may be indicated for patients who require dual chamber pacing and who have frequent, but not constant, supraventricular arrhythmias. Contraindications for the DDI Mode The DDI mode is contraindicated for patients with chronic or persistent supraventricular tachyarrhythmias, including atrial fibrillation or flutter. DDI Mode Operation The DDI mode provides dual chamber AV sequential pacing with atrial sensing but without atrial tracking. Atrial pacing occurs at the Lower Rate, with ventricular pacing at the end of the PAV interval unless inhibited. An atrial event sensed outside the PVARP will inhibit a scheduled atrial stimulus but will not start an AV interval. Ventricular paced events after such sensed atrial events occur at the Lower Rate. A ventricular nonrefractory sensed event in the VA interval starts a new VA interval. 196407001 Rev A Refer to the “Reference man.” category in doc#163256 for Printing Instructions. 9879EN-10_9501042_CTC.qxd 12/13/01 3:57 PM Medtronic Confidential Page 10-15 7 x 9 inches (178 mm x 229 mm) Pacing Modes Lower Rate Interval V P Parameters: Lower Rate = 60 ppm (1000 ms) Lower Rate VA Interval Lower Rate Interval A S A P A P 10-15 A P V P V P PAV Interval = 200 ms 200 ms Example of DDI Mode Operation. 196407001 Rev A Refer to the “Reference man.” category in doc#163256 for Printing Instructions. 9879EN-10_9501042_CTC.qxd 12/13/01 3:57 PM Medtronic Confidential Page 10-16 7 x 9 inches (178 mm x 229 mm) 10-16 Understanding Pacemaker Operations DVIR Mode Indications for the DVIR Mode The DVIR mode may be indicated for patients who have chronotropic incompetence and an anticipated moderate-to-high level of physical activity. Specific indications are as follows: ■ The need for synchronous atrial-ventricular contraction in symptomatic bradycardia and slow atrial rate. ■ Previously documented pacemaker syndrome. ■ Intermittent supraventricular arrhythmias in which combined pacing and drugs have been shown to be therapeutically effective. ■ Bradycardia-tachycardia syndrome, provided adjustment of atrial rate and AV interval terminates or prevents the emergence of supraventricular arrhythmias with or without concomitant drug administration. ■ Intermittent atrial and ventricular ectopic arrhythmias. ■ Inappropriate function in the DDDR, DDD, DDIR, or DDI modes when AV synchrony is desired. Contraindications for the DVIR Mode The DVIR mode is contraindicated for patients with frequent or persistent supraventricular tachyarrhythmias, including atrial fibrillation or flutter. 196407001 Rev A Refer to the “Reference man.” category in doc#163256 for Printing Instructions. 9879EN-10_9501042_CTC.qxd 12/13/01 3:57 PM Medtronic Confidential Page 10-17 7 x 9 inches (178 mm x 229 mm) Pacing Modes 10-17 DVIR Mode Operation The DVIR mode provides AV sequential pacing at the sensor-indicated rate unless inhibited by ventricular sensed events. Atrial pacing occurs at the sensor-indicated rate, with ventricular pacing at the end of the PAV interval unless inhibited. The DVIR mode ignores intrinsic atrial events. Sensing occurs only in the ventricle. A ventricular nonrefractory sensed event during the VA interval starts a new VA interval. Sensor-indicated VA Interval Sensor-indicated Interval A P A P V P Sensor-indicated Interval A P V S A P V P V S Parameters: Lower Rate = 60 ppm (1000 ms) PAV Interval = 200 ms Sensor-indicated Rate = 90 ppm (667 ms) 200 ms Example of DVIR Mode Operation. 196407001 Rev A Refer to the “Reference man.” category in doc#163256 for Printing Instructions. 9879EN-10_9501042_CTC.qxd 12/13/01 3:57 PM Medtronic Confidential Page 10-18 7 x 9 inches (178 mm x 229 mm) 10-18 Understanding Pacemaker Operations DVI Mode Indications for the DVI Mode The DVI mode may be indicated for patients with the following conditions: ■ Need for synchronous atrial-ventricular contraction in symptomatic bradycardia and slow atrial rate. ■ Previously documented pacemaker syndrome. ■ Intermittent supraventricular arrhythmias in which combined pacing and drugs have been shown to be therapeutically effective. ■ Bradycardia-tachycardia syndrome, provided adjustment of atrial rate and AV interval terminates or prevents the emergence of supraventricular arrhythmias with or without concomitant drug administration. ■ Intermittent atrial and ventricular ectopic arrhythmias. Contraindications for the DVI Mode The DVI mode is contraindicated for patients with frequent or persistent supraventricular tachyarrhythmias, including atrial fibrillation or flutter. 196407001 Rev A Refer to the “Reference man.” category in doc#163256 for Printing Instructions. 9879EN-10_9501042_CTC.qxd 12/13/01 3:57 PM Medtronic Confidential Page 10-19 7 x 9 inches (178 mm x 229 mm) Pacing Modes 10-19 DVI Mode Operation The DVI mode provides dual chamber AV sequential pacing without atrial sensing/tracking. Atrial pacing occurs at the Lower Rate, with ventricular pacing at the end of the PAV interval unless inhibited. Sensing occurs only in the ventricle, and intrinsic atrial events are ignored. A ventricular nonrefractory sensed event during the VA interval starts a new VA interval. Lower Rate VA Interval Lower Rate Interval A P A P V P Parameters: Lower Rate = 60 ppm (1000 ms) A P V S V S V P PAV Interval = 200 ms 200 ms Example of DVI Mode Operation 196407001 Rev A Refer to the “Reference man.” category in doc#163256 for Printing Instructions. 9879EN-10_9501042_CTC.qxd 10-20 12/14/01 3:36 PM Page 10-20 Understanding Pacemaker Operations VDD Mode Indications for the VDD Mode The VDD mode may be indicated for patients with the following conditions: ■ Requirements for ventricular pacing when adequate atrial rates and adequate atrial sensing are present; includes the presence of complete AV block when atrial contribution is needed for hemodynamic benefit and when pacemaker syndrome has been present or is anticipated. ■ Normal sinus rhythm and normal AV conduction in patients needing periodic ventricular pacing. Contraindications for the VDD Mode The VDD mode is contraindicated for patients with the following conditions: ■ Chronic or persistent supraventricular tachyarrhythmias, including atrial fibrillation or flutter. ■ Inadequate atrial sensing. ■ Intact VA conduction. VDD Mode Operation The VDD mode provides atrial synchronous pacing (or VVI pacing at the Lower Rate). The ventricle is paced synchronously up to the programmed Upper Tracking Rate.4 Sensing occurs in both the atrium and ventricle, but pacing occurs only in the ventricle. To promote atrial synchronous pacing at slow rates, a sensed atrial event occurring near the end of the Lower Rate interval will be followed by the programmed maximum SAV interval. The result is an extension of the ventricular lower rate (as shown in the following example). A ventricular nonrefractory sensed event in the V-V interval that is not preceded by an atrial sense (AS or AR) may be a pacemaker-defined PVC, and it starts a new V-V interval. 4 The Total Atrial Tracking Period (TARP) may limit the tracking rate to a lesser value. 9879EN-10_9501042_CTC.qxd 12/14/01 3:36 PM Page 10-21 Pacing Modes 10-21 Lower Rate Interval SAV Interval A S A S V P A S A S V P Parameters: Lower Rate = 60 ppm (1000 ms) Upper Tracking Rate = 120 ppm (500 ms) V P SAV Interval = 200 ms PVARP = 250 ms Example of VDD Operation 200 ms 9879EN-10_9501042_CTC.qxd 10-22 12/14/01 3:36 PM Page 10-22 Understanding Pacemaker Operations AAIR Mode Indications for the AAIR Mode The AAIR mode may be indicated for certain patients who have chronotropic incompetence and an anticipated moderate to high level of physical activity, normal AV conduction, and little likelihood of progression of AV block or induction of AV block as the result of drug therapy. Specific indications are as follows: ■ Symptomatic sinus node dysfunction, provided AV conduction is shown to be adequate by appropriate studies. ■ Hemodynamic enhancement through rate adjustment in patients who have bradycardia and symptoms of impaired cardiac output, provided AV conduction is shown to be adequate by appropriate studies. Contraindications for the AAIR Mode The AAIR mode is contraindicated in the presence of the following conditions: ■ Pre-existing AV conduction delay or block or if decremental AV conduction is demonstrated at slow paced rates (e.g., < 140 ppm) by appropriate tests. ■ Inadequate atrial sensing and atrial pacing threshold. ■ An inexcitable atrium. 9879EN-10_9501042_CTC.qxd 12/14/01 3:36 PM Page 10-23 Pacing Modes 10-23 AAIR Mode Operation The AAIR mode provides atrial-based rate responsive pacing in patients with intact AV conduction. Sensing and pacing occur only in the atrium. In the absence of sensed events, the chamber is paced at the sensor-indicated rate. NOTE: In the AAIR mode, atrial refractory sensed events do not restart the programmed Upper Activity Rate interval. Sensor-indicated Interval A P A R Sensor-indicated Interval A P A S Operation: Sensor-indicated Rate = 75 ppm (800 ms) Upper Activity Rate = 100 ppm (600 ms) Example of AAIR Mode Operation A P 200 ms 9879EN-10_9501042_CTC.qxd 10-24 12/14/01 3:36 PM Page 10-24 Understanding Pacemaker Operations AAI Mode Indications for the AAI Mode The AAI mode may be indicated for patients with the following conditions: ■ Symptomatic sinus node dysfunction, provided AV conduction is shown to be adequate by appropriate studies. ■ Hemodynamic enhancement through rate adjustment in patients who have bradycardia and symptoms of impaired cardiac output, provided AV conduction is shown to be adequate by appropriate studies. Contraindications for the AAI Mode The AAI mode is contraindicated in the presence of the following conditions: ■ Pre-existing AV conduction delay or block or if decremental AV conduction is demonstrated at slow paced rates (e.g., < 140 ppm) by appropriate tests. ■ Inadequate atrial sensing and atrial pacing threshold. ■ An inexcitable atrium. 9879EN-10_9501042_CTC.qxd 12/14/01 3:36 PM Page 10-25 Pacing Modes 10-25 AAI Mode Operation The AAI mode provides single chamber inhibited atrial pacing. Sensing and pacing occur only in the atrium. Pacing occurs at the programmed Lower Rate unless inhibited by sensed events. Pacing Rate Interval A P A R Pacing Rate Interval A P A S Parameter: Pacing Rate = 75 ppm (800ms) Example of AAI Mode Operation A P 200 ms 9879EN-10_9501042_CTC.qxd 10-26 12/14/01 3:36 PM Page 10-26 Understanding Pacemaker Operations VVIR Mode Indications for the VVIR Mode The VVIR mode may be indicated for certain patients who have chronotropic incompetence and an anticipated moderate to high level of physical activity. Specific indications are as follows: ■ Any symptomatic bradyarrhythmias, but particularly when there is no significant atrial hemodynamic contribution, as in persistent or paroxysmal atrial flutter/fibrillation or the presence of giant atria. ■ No evidence of pacemaker syndrome due to loss of atrial contribution or negative atrial kick. ■ Symptomatic bradycardia where pacing simplicity is the prime concern, as in cases of senility, terminal disease, inaccessibility to a follow-up center, or absent retrograde ventriculoatrial (VA) conduction. ■ Patients in whom it is necessary to disable the atrial circuit (for example, lead fracture, inappropriate function, and so forth). ■ Certain atrial and ventricular ectopic arrhythmias including chronic atrial fibrillation and flutter. Contraindications for the VVIR Mode The VVIRmodes is contraindicated in the presence of the following conditions: ■ Known pacemaker syndrome or symptoms produced by temporary ventricular pacing at the time of initial pacemaker implantation. ■ The need for maximum atrial contribution because of congestive heart failure or a special need for rate response. ■ VVIR pacing is particularly contraindicated in the presence of retrograde VA conduction or when angina pectoris or congestive heart failure is aggravated by fast rates. 9879EN-10_9501042_CTC.qxd 12/14/01 3:36 PM Page 10-27 Pacing Modes 10-27 VVIR Mode Operation The VVIR mode provides ventricular rate responsive pacing in patients for whom atrial-based pacing is deemed unnecessary or inappropriate. In the absence of sensed events, the ventricle is paced at the sensor-indicated rate. NOTE: In the VVIR mode, ventricular refractory sensed events restart the programmed Upper Activity Rate interval. Sensor-indicated Interval V P Sensor-indicated Interval Upper Activity Rate Interval V P V R Parameters: Lower Rate = 60 ppm (1000 ms) Sensor-indicated Rate = 90 ppm (667 ms) Sensor-indicated Interval V P V P Upper Activity Rate = 120 ppm (500 ms) Ventricular Refractory Period = 300 ms 200 ms Example of VVIR Mode Operation 9879EN-10_9501042_CTC.qxd 10-28 12/14/01 3:36 PM Page 10-28 Understanding Pacemaker Operations VVI Mode Indications for the VVI Mode The VVI mode may be indicated in the presence of the following conditions: ■ Any symptomatic bradyarrhythmias but particularly when there is no significant atrial hemodynamic contribution as in persistent or paroxysmal atrial flutter/fibrillation or the presence of giant atria. ■ No evidence of pacemaker syndrome due to loss of atrial contribution or negative atrial kick. ■ Symptomatic bradycardia where pacing simplicity is the prime concern in cases of senility, terminal disease, inaccessibility to a follow-up center, or absent retrograde ventriculoatrial (VA) conduction. ■ Patients in whom it is necessary to disable the atrial circuit (for example, lead fracture, inappropriate function, and so forth). ■ Certain atrial and ventricular ectopic arrhythmias including chronic atrial fibrillation and flutter. Contraindications for the VVI Mode The VVI mode is contraindicated in the presence of the following conditions: ■ Known pacemaker syndrome or symptoms produced by temporary ventricular pacing at the time of initial pacemaker implantation. ■ The need for maximum atrial contribution because of congestive heart failure or a special need for rate response. 9879EN-10_9501042_CTC.qxd 12/14/01 3:36 PM Page 10-29 Pacing Modes 10-29 VVI Mode Operation The VVI mode provides single chamber inhibited pacing at the Lower Rate unless inhibited by sensed events. Sensing occurs only in the ventricle. Pacing Rate Interval V P Pacing Rate Interval V P V S Parameters: Pacing Rate = 60 ppm (1000 ms) Ventricular Refractory Period = 300 ms Example of VVI Mode Operation V P 200 ms 9879EN-10_9501042_CTC.qxd 12/13/01 3:57 PM Page 10-30 Medtronic Confidential 7 x 9 inches (178 mm x 229 mm) 10-30 Understanding Pacemaker Operations AAT/VVT Modes Indications for the AAT and VVT Modes Single chamber triggered modes (AAT and VVT) are diagnostic modes intended to allow synchronization of an implanted pacemaker with an external signal generator or to facilitate identification of sensed events with pacing artifacts. For specific indications, refer to the AAI and VVI mode descriptions. Contraindications for the AAT and VVT Modes Because of the potential for triggered pacing in response to oversensing, use of the AAT and VVT modes outside of a diagnostic setting is not recommended. For specific contraindications, refer to the AAI and VVI mode descriptions. 196407001 Rev A Refer to the “Reference man.” category in doc#163256 for Printing Instructions. 9879EN-10_9501042_CTC.qxd 12/13/01 3:57 PM Medtronic Confidential Page 10-31 7 x 9 inches (178 mm x 229 mm) Pacing Modes 10-31 AAT and VVT Mode Operation Pacing occurs at the programmed rate, but a nonrefractory sensed event triggers an immediate pacing output (rather than inhibiting such output). Except that pacing outputs occur when events are sensed, the triggered modes operate identically to the corresponding inhibited modes. NOTE: Permanently triggered pacing will not occur faster than 300 ms (200 ppm) from the previous paced event. Temporary programmed triggered pacing is not limited to 300 ms (200 ppm). Pacing Rate Interval V P V R Pacing Rate Interval V P T P V P Parameters: Pacing Rate = 60 ppm (1000 ms) Ventricular Refractory Period = 300 ms 200 ms Example of VVT Mode Operation 196407001 Rev A Refer to the “Reference man.” category in doc#163256 for Printing Instructions. 9879EN-10_9501042_CTC.qxd 12/13/01 3:57 PM Medtronic Confidential Page 10-32 7 x 9 inches (178 mm x 229 mm) 10-32 Understanding Pacemaker Operations DOOR/AOOR/VOOR Modes Indications for the DOOR, AOOR, and VOOR Modes The DOOR, AOOR, and VOOR modes provide asynchronous AV sequential, atrial, or ventricular rate responsive pacing where synchronous pacing is not possible or practical, such as for patients who exhibit inappropriate inhibition due to muscle tremors, and so forth, or in patients who work in environments with excessive electromagnetic interference (EMI). These sensor-driven modes are intended primarily for use on a temporary basis, and they may be used in patients who have little or no intrinsic cardiac activity, thereby minimizing the possibility of competitive rhythms. Use of asynchronous modes on a chronic basis may result in potentially dangerous competitive pacing. Contraindications for the DOOR, AOOR, and VOOR Modes The DOOR, AOOR, and VOOR modes are contraindicated in the presence of the following conditions: 196407001 Rev A ■ Likelihood of competition between paced and intrinsic rhythms. ■ Presence of AV conduction disturbances. Refer to the “Reference man.” category in doc#163256 for Printing Instructions. 9879EN-10_9501042_CTC.qxd 12/13/01 3:57 PM Medtronic Confidential Page 10-33 7 x 9 inches (178 mm x 229 mm) Pacing Modes 10-33 DOOR, AOOR, and VOOR Mode Operation The DOOR, AOOR, and VOOR modes operate as follows: ■ The DOOR mode provides asynchronous AV sequential pacing at the sensor-indicated rate. Intrinsic events are ignored. ■ The AOOR and VOOR modes provide single chamber pacing at the sensor-indicated rate. Intrinsic events are ignored. Sensor-indicated Interval A P Sensor-indicated Interval A P V P Sensor-indicated Interval A P V P Parameters: Lower Rate = 60 ppm (1000 ms) Sensor-indicated Rate = 90 ppm (667 ms) Sensor-indicated Interval A P V P A P V P PAV Interval = 200 ms 200 ms Example of DOOR Mode Operation 196407001 Rev A Refer to the “Reference man.” category in doc#163256 for Printing Instructions. 9879EN-10_9501042_CTC.qxd 12/13/01 3:57 PM Medtronic Confidential Page 10-34 7 x 9 inches (178 mm x 229 mm) 10-34 Understanding Pacemaker Operations DOO/AOO/VOO Modes Indications for the DOO, AOO, and VOO Modes The DOO, AOO, or VOO mode may be indicated as follows: ■ They may be used intraoperatively to reduce the likelihood of triggering pacing outputs from electrocautery. ■ Asynchronous modes may also be used in patients who exhibit inappropriate inhibition due to muscle tremors, and so forth, or in patients who work in environments with excessive electromagnetic interference (EMI). Contraindications for the DOO, AOO, and VOO Modes The DOO, AOO, and VOO modes are contraindicated in the presence of the following conditions: 196407001 Rev A ■ Likelihood of competition between paced and intrinsic rhythms. ■ Presence of AV conduction disturbances. Refer to the “Reference man.” category in doc#163256 for Printing Instructions. 9879EN-10_9501042_CTC.qxd 12/13/01 3:57 PM Medtronic Confidential Page 10-35 7 x 9 inches (178 mm x 229 mm) Pacing Modes 10-35 DOO, AOO, and VOO Mode Operation The DOO, AOO, and VOO modes operate as follows: • The DOO mode provides A-V sequential pacing at the programmed rate with no inhibition by intrinsic events. • The AOO and VOO modes provide pacing at the programmed rate with no inhibition by intrinsic events in the applicable chamber. Besides being directly programmable, the DOO mode is the magnet mode of the corresponding dual chamber modes, except for the VDD mode, which is the VOO mode. AOO and VOO modes are the magnet modes of the corresponding atrial and ventricular single chamber modes, respectively. Lower Rate Interval A P Lower Rate Interval Lower Rate Interval A P V P Parameters: Lower Rate = 60 ppm (1000 ms) A P V P A P V P PAV Interval = 200 ms 200 ms Example of DOO Mode Operation 196407001 Rev A Refer to the “Reference man.” category in doc#163256 for Printing Instructions. Medtronic Confidential 9879EN-10_9501043EN/CTC.qxd 5/10/99 11:25 Page 10-36 7 x 9 inches (178 mm x 229 mm) 10-36 Understanding Pacemaker Operations ODO/OAO/OVO Modes Indications for the ODO, OAO, and OVO Modes The ODO, OAO, and OVO modes are intended for pacemaker diagnostic and troubleshooting purposes, where the clinician wishes to observe underlying rhythms. They may also be used to turn the pacemaker OFF during surgery or other procedures. The patient is without pacing support in these modes. WARNING: These modes should never be permanently programmed for pacemaker-dependent patients. For such patients, the programmer’s Inhibit function may be used for brief interruption of output(s). ODO, OAO, and OVO Mode Operation In the ODO, OAO, and OVO modes, sensing occurs in the designated chamber(s). When used in conjunction with Marker Channel telemetry and concurrent ECG, these modes may be used to observe underlying rhythms. 196407001 Rev A ■ Blanking periods in these modes are automatically minimized to maximize the sensing window(s). Thus, Marker Channel telemetry may display sense markers for cardiac events (for example, far-field R-waves) that otherwise would not appear due to longer blanking. ■ No timing intervals or refractory periods are used. Refer to the “Reference man.” category in doc#163256 for Printing Instructions. Medtronic Confidential 9879EN-11_9501043EN/CTC.qxd 5/10/99 11:26 Page 11-1 7 x 9 inches (178 mm x 229 mm) CHAPTER 11 Rate Response Therapy Options About This Chapter This chapter describes how to use Prodigy pacemaker rate response features. The sections are as follows: ■ Rate Responsive Pacing (see page 11-2) ■ Activity Threshold (see page 11-4) ■ Activity Rate Response (see page 11-6) ■ Acceleration and Deceleration Times (see page 11-8) 11-1 196407001 Rev A Refer to the “Reference man.” category in doc#163256 for Printing Instructions. Medtronic Confidential 9879EN-11_9501043EN/CTC.qxd 5/10/99 11:26 Page 11-2 7 x 9 inches (178 mm x 229 mm) 11-2 Understanding Pacemaker Operations Rate Responsive Pacing Overview Activity-based rate responsive pacing varies the pacing rate in response to the patient’s detected physical activity. Prodigy pacemakers offer the following rate responsive modes: ■ Dual chamber modes: DDDR, DDIR, DVIR, DOOR ■ Single chamber modes: AAIR, VVIR, AOOR, VOOR All of the rate response features discussed in this section apply to all of these modes. Sensor-Indicated Rate In rate responsive modes, pacing occurs at the sensor-indicated rate unless inhibited by sensed events. The pacing rate may vary as the patient’s activity level changes. The sensor-indicated rate is determined from the activity sensor signal and the following programmable parameters: ■ Lower Rate ■ Upper Activity Rate ■ Activity Threshold ■ Activity Rate Response ■ Acceleration ■ Deceleration The Lower Rate and Upper Activity Rate respectively control the minimum and maximum sensor-indicated pacing rates. The other parameters are described in the sections that follow. 196407001 Rev A Refer to the “Reference man.” category in doc#163256 for Printing Instructions. Medtronic Confidential 9879EN-11_9501043EN/CTC.qxd 5/10/99 11:26 Page 11-3 7 x 9 inches (178 mm x 229 mm) Rate Response Therapy Options 11-3 Typical Rate Response Settings The nominal rate response parameters will be found adequate for many patients (Activity Threshold = Medium, Activity Rate Response = 7, Acceleration = 0.5 minutes, and Deceleration = 5 minutes). 196407001 Rev A ■ For most patients, the pacemaker may be programmed to operate at or near the programmed Lower Rate when the patient is lying, sitting, or standing. If the patient has a elevated pacing rate at rest, Activity Threshold may need to be programmed to a higher setting. ■ When the patient is walking at a moderate pace, the pacing rate will typically increase to about 90 ppm, and up to 120 ppm during more brisk exercise. If the patient has minimal rate response during exercise, Activity Threshold may need to be programmed to a lower setting. ■ A simple programmer-directed exercise test may be used to tailor rate response settings to a patient’s needs (refer to “Determining Rate Response Parameter Settings” in Chapter 7). ■ The Rate Histogram diagnostic may be used to validate programmed rate response settings. Refer to the “Reference man.” category in doc#163256 for Printing Instructions. Medtronic Confidential 9879EN-11_9501043EN/CTC.qxd 5/10/99 11:26 Page 11-4 7 x 9 inches (178 mm x 229 mm) 11-4 Understanding Pacemaker Operations Activity Threshold Overview The programmable Activity Threshold determines the minimum intensity of detected physical activity to which the pacemaker responds. How Activity Threshold Influences Rate A piezoelectric crystal, bonded to the inside of the titanium pacemaker shield, is deflected by activity-induced pressure waves within the body. The sensor converts these pressure waves into electrical signals. The programmed Activity Threshold screens out activity signals below the selected setting. Detected sensor signals will vary from patient to patient due to body structure, placement of pacemaker, and so forth. Only sensor signals whose amplitude exceeds the programmed Activity Threshold (as shown below) are used in computing the sensor-indicated pacing rate. The lower the Activity Threshold, the smaller the signal required to influence the pacing rate. Settings High MHigh Med MLow Low Activity Sensor Output Low MLow Med MHigh High Time Activity Threshold = Med Sensor Signal with Threshold Set to Medium 196407001 Rev A Refer to the “Reference man.” category in doc#163256 for Printing Instructions. Medtronic Confidential 9879EN-11_9501043EN/CTC.qxd 5/10/99 11:26 Page 11-5 7 x 9 inches (178 mm x 229 mm) Rate Response Therapy Options 11-5 Evaluating the Activity Threshold Setting Marker Channel telemetry may be used to record or display the activity sensor signal for evaluation (refer to “More About Marker Channel Telemetry” in Chapter 5.) Few (or no) sensor detect markers should appear when the patient is sitting quietly. Refer to “Determining Rate Response Parameter Settings” in Chapter 7 for Activity Threshold testing. Typical Rate Performance The Medium setting for Activity Threshold usually provides satisfactory rate response while minimizing response to vibration sources when the patient is inactive. Walking increases pacing rate; sitting results in pacing at or near the Lower Rate. Use the table below as a guide for selecting an appropriate setting. NOTE: External pressure (such as lying prone) coupled with a Low Activity Threshold setting may cause the pacing rate to increase. 196407001 Rev A Programmable Settings Typical Rate Performance Low Responds to most body activity, including minimal exertion. Medium/Low Limited response to minimal exertion; responds to moderate or greater exertion. Medium Responds to moderate and vigorous body movements and exertion. Medium/High Limited response to moderate body movements and exertion. High Responds to only vigorous body movements and exertion. Refer to the “Reference man.” category in doc#163256 for Printing Instructions. Medtronic Confidential 9879EN-11_9501043EN/CTC.qxd 5/10/99 11:26 Page 11-6 7 x 9 inches (178 mm x 229 mm) 11-6 Understanding Pacemaker Operations Activity Rate Response Overview The Activity Rate Response slope, in conjunction with the Lower Rate and Upper Activity Rate, establishes the steady-state pacing rate for a given level of detected activity (indicated by activity signals that exceed Activity Threshold). ■ Ten Activity Rate Response slopes are available, with the most responsive setting (10) providing the greatest beat-to-beat rate change for a given change in detected activity. ■ In general, more conditioned patients have greater cardiac reserves, and they may require a lower programmed Activity Rate Response setting. Basic Operation The higher Activity Rate Response settings result in a higher sensorindicated rate for a given level of detected activity, as follows: 196407001 Rev A ■ All Activity Rate Response slopes are linear and extend from the Lower Rate to the Upper Activity Rate. ■ The Upper Activity Rate can be attained with any Activity Rate Response slope. ■ When the activity level stabilizes, the sensor-indicated rate will stabilize. Refer to the “Reference man.” category in doc#163256 for Printing Instructions. Medtronic Confidential 9879EN-11_9501043EN/CTC.qxd 5/10/99 11:26 Page 11-7 7 x 9 inches (178 mm x 229 mm) Rate Response Therapy Options 11-7 Determining the Steady-State Pacing Rate For any Activity Rate Response slope, the steady-state rate corresponding to a given level of activity depends on Lower Rate (LR) and Upper Activity Rate (UAR). The examples that follow show the Activity Rate Response slopes for two sets of rate limits, first for an elderly patient and second for a pediatric patient. For a given Activity Rate Response slope (for example, slope 7), both patients achieve their Upper Activity Rates for the same level of sustained sensor-detected activity, but the rates are quite different. Thus, the clinician can use the programmed rate limits and Activity Rate Response to match the rate prescription to the patient’s needs. Refer to “Determining Rate Response Parameters Settings” in Chapter 7 for rate response testing during exercise. Pacing Rate (ppm) 180 170 160 150 140 130 UAR 120 10 9 8 7 6 5 4 3 2 1 110 100 90 80 70 LR 60 Increasing Activity 180 UAR 170 10 9 8 7 6 5 4 3 2 1 160 Pacing Rate (ppm) 150 140 130 120 110 100 90 LR 80 70 60 Increasing Activity Activity Rate Response Settings 196407001 Rev A Refer to the “Reference man.” category in doc#163256 for Printing Instructions. Medtronic Confidential 9879EN-11_9501043EN/CTC.qxd 5/10/99 11:26 Page 11-8 7 x 9 inches (178 mm x 229 mm) 11-8 Understanding Pacemaker Operations Acceleration and Deceleration Times Overview Programmable Acceleration and Deceleration times control how rapidly the pacing rate changes in response to increased or decreased physical activity. Acceleration Operation Acceleration time is the time required to achieve approximately 90% of the difference between the current rate and a higher steady-state rate consistent with the current level of activity. The illustration below shows a graphic representation of the Acceleration curves at the onset of strenuous exercise. Upper Activity Rate Rate Range Acceleration Programmable Settings 0.25 Minutes 0.5 Minutes 1.0 Minutes Lower Rate 0 1 2 3 4 5 Time (Minutes) Acceleration Curves 196407001 Rev A Refer to the “Reference man.” category in doc#163256 for Printing Instructions. Medtronic Confidential 9879EN-11_9501043EN/CTC.qxd 5/10/99 11:26 Page 11-9 7 x 9 inches (178 mm x 229 mm) Rate Response Therapy Options 11-9 Deceleration Operation Deceleration time is the time required to achieve approximately 90% of the difference between the current rate and a lower steady-state rate consistent with the current level of activity. The illustration below shows a graphic representation of the Deceleration curves at an abrupt cessation of strenuous exercise. Upper Activity Rate Rate Range Deceleration Programmable Parameters 2.5 Minutes 5 Minutes 10 Minutes Lower Rate 0 1 2 3 4 5 6 7 8 9 10 Time (Minutes) Deceleration Curves 196407001 Rev A Refer to the “Reference man.” category in doc#163256 for Printing Instructions. Medtronic Confidential 7 x 9 inches (178 mm x 229 mm) 196407001 Rev A Refer to the “Reference man.” category in doc#163256 for Printing Instructions. Medtronic Confidential 9879EN-12_9501043EN/CTC.qxd 5/10/99 11:27 Page 12-1 7 x 9 inches (178 mm x 229 mm) CHAPTER 12 Pacemaker Timing About This Chapter This chapter describes the programmable and nonprogrammable timing intervals that govern the operation of Prodigy pacemakers. Topics discussed include the following: ■ Rates (see page 12-2) - Single Chamber Atrial - A-A Timing Blanking ■ - Lower Rate Refractory Periods - Sensor-indicated Rate (see page 12-16) - Post-Ventricular Atrial - Upper Tracking Rate Refractory Period (PVARP) - Upper Activity Rate Total Atrial Refractory - Rate Limit Period (TARP) - Environmental Vibration - Ventricular Refractory - Atrial Competition Period (VRP) - Mean Atrial Rate Atrial Refractory Period ■ AV Intervals (see page 12-8) (single chamber) - Paced AV (PAV) Interval Noise Reversion - Sensed AV (SAV) Interval ■ High Rate Atrial Tracking - Rate Adaptive AV (RAAV) (see page 12-23) ■ Blanking Periods - 2:1 Block (see page 12-14) - Pacemaker Wenckebach - Nonprogrammable Blanking - High Rate Operation in the - Post-Ventricular Atrial DDDR Mode Blanking - Post-Atrial Ventricular Blanking 12-1 196407001 Rev A Refer to the “Reference man.” category in doc#163256 for Printing Instructions. Medtronic Confidential 9879EN-12_9501043EN/CTC.qxd 5/10/99 11:27 Page 12-2 7 x 9 inches (178 mm x 229 mm) 12-2 Understanding Pacemaker Operations Rates Overview The following programmable rates control timing in Prodigy pacemakers: ■ Normal operating rates: - Lower Rate - Upper Tracking Rate - Upper Activity Rate ■ Other operating rates: - Hysteresis Rate (single chamber demand modes) Additionally, rates calculated by the pacemaker are used for some operations. These are: ■ sensor-indicated rate ■ mean atrial rate The other operating rates are described in Chapter 14, along with the functions that use them. The normal rates are described in this chapter. A-A Timing In all modes that pace the atrium, Prodigy pacemakers time from atrial event to atrial event when possible (A-A timing). This timing method mimics a natural sinus rhythm, producing A-A intervals that are nearly equal, except when timing is interrupted by: ■ PACs in the DDIR and DDI modes, ■ PVCs in the DDDR, DDD, DDIR, and DDI modes, or ■ Ventricular sensed events during the VA interval in the DVIR and DVI modes. VA intervals vary due to adjustments by A-A timing operations designed to achieve sensor-indicated or lower rate operation in the presence of varying AV conduction. 196407001 Rev A Refer to the “Reference man.” category in doc#163256 for Printing Instructions. Medtronic Confidential 9879EN-12_9501043EN/CTC.qxd 5/10/99 11:27 Page 12-3 7 x 9 inches (178 mm x 229 mm) Pacemaker Timing 12-3 Lower Rate The programmed Lower Rate defines the slowest rate at which pacing occurs during a mode’s basic operation. In rate responsive modes, in the absence of sensor-detected activity, the sensor-indicated rate is equal to the programmed Lower Rate. Lower Rate Interval DDD A Lower Rate Interval P S P P V P S Parameters: Lower Rate = 60 ppm (1000 ms) PAV Interval = 200 ms SAV Interval = 180 ms S P PVARP = 300 ms 200 ms Ventricular Refractory Period = 240 ms Example of Lower Rate Operation Operating Lower Rate Under certain circumstances, the programmed Lower Rate may be overridden by an operating lower rate that is higher or lower than the programmed value. The following rates may become the operating lower rate: 196407001 Rev A ■ programmed Hysteresis rate (for single chamber demand modes, Chapter 14) ■ Threshold Margin Test rate of 100 ppm, (Chapter 13) ■ Magnet Mode rate of 85 ppm, (Chapter 16) ■ Elective Replacement Indicator rate of 65 ppm, (Chapter 16) Refer to the “Reference man.” category in doc#163256 for Printing Instructions. Medtronic Confidential 9879EN-12_9501043EN/CTC.qxd 5/10/99 11:27 Page 12-4 7 x 9 inches (178 mm x 229 mm) 12-4 Understanding Pacemaker Operations Selecting a Lower Rate Program the lower rate to maintain adequate heart rates during periods of inactivity or during pauses in atrial rhythms in the DDDR, DDD, VDD, AAIR, and AAI modes. NOTE: In the VDD mode, atrial tracking near the lower rate may result in V-V intervals that exceed the lower rate interval. This is normal operation. Lower Rates from 120 to 130 ppm are intended for pediatric patients. Lower Rates below 50 ppm and above 100 ppm are primarily intended for diagnostic purposes. Sensor-indicated Rate The sensor-indicated rate is the basic pacing rate in all rate responsive modes (DDDR, DDIR, DVIR, DOOR, VVIR, VOOR, AAIR, and AOOR). It is determined by the pacemaker based on the sensor-detected level of patient activity and programmed rate response parameters. The sensorindicated rate will not be greater than the Upper Activity Rate or less than the Lower Rate. Sensor-indicated Interval DDDR A Sensor-indicated Interval Act P Act P Act P S V P S S Parameters: Sensor-indicated Rate = 90 ppm (667 ms) PAV Interval = 200 ms SAV Interval = 190 ms P 200 ms PVARP = 300 ms Ventricular Refractory Period = 220 ms Example of Sensor-indicated Rate Operation 196407001 Rev A Refer to the “Reference man.” category in doc#163256 for Printing Instructions. Medtronic Confidential 9879EN-12_9501043EN/CTC.qxd 5/10/99 11:27 Page 12-5 7 x 9 inches (178 mm x 229 mm) Pacemaker Timing 12-5 In rate responsive modes, the sensor-indicated rate tracks the activity signal detected by the piezoelectric crystal sensor's frequency and amplitude. ■ In dual chamber rate responsive modes, the sensor-indicated interval is the AS-AP or AP-AP interval. ■ In single chamber rate responsive modes, the sensor-indicated interval is the A-A or V-V interval. In these modes, sensor-indicated rate intervals start with a sensed or paced event in the chamber being paced. NOTE: The sensor-indicated rate is used to determine the value of the Rate Adaptive paced AV interval (PAV). Upper Tracking Rate The programmable Upper Tracking Rate is the maximum rate at which the ventricle may be paced in response to sensed atrial events in the DDDR, DDD, and VDD modes. Sensed atrial events below the Upper Tracking Rate will be tracked at a 1:1 ratio, but sensed events above the Upper Tracking Rate will result in pacemaker Wenckebach (for example, 6:5, 4:3, or 3:2) or 2:1 block. The Upper Tracking Rate usually should be programmed to a value less than the 2:1 block rate. Refer to “High Rate Atrial Tracking” later in this chapter for details. Upper Tracking Rate Parameters: Sensor-indicated Rate = 75 ppm (800 ms) Upper Tracking Rate = 100 ppm (600 ms) SAV Interval = 200 ms S S DDD A V P P 200 ms Example of Upper Tracking Rate (Wenckebach) Operation 196407001 Rev A Refer to the “Reference man.” category in doc#163256 for Printing Instructions. Medtronic Confidential 9879EN-12_9501043EN/CTC.qxd 5/10/99 11:27 Page 12-6 7 x 9 inches (178 mm x 229 mm) 12-6 Understanding Pacemaker Operations Upper Activity Rate In rate responsive modes, the programmable Upper Activity Rate provides the upper limit for the sensor-indicated rate during physical activity, particularly during vigorous exercise. In the DDDR mode, the Upper Activity Rate may be higher than, lower than, or the same as the Upper Tracking Rate. Programming Considerations for Upper Rates Programming a combination of high Upper Activity Rate and Upper Tracking Rate and a long refractory period may result in a shorter “sensing window.” Loss of sensing in such cases could result in competitive pacing (unless Non-Competitive Atrial Pacing is programmed ON). See “Non-Competitive Atrial Pacing” in Chapter 14. Programming the Upper Tracking Rate to a value greater than the Upper Activity Rate has the effect of allowing the atrial rhythm to be tracked to a rate higher than the sensor-driven rate. Rate Limit An internal circuit, independent of the pacing timers, limits single chamber atrial or ventricular pacing rates to 200 ppm for most single component failures. For dual chamber modes, atrial and ventricular rates are limited independently to 200 ppm. The rate limit is automatically disabled during temporary pacing in the AAI, AAT, AOO, VVI, VVT, and VOO modes to allow high rate pacing for diagnostic or therapeutic purposes. Limiting Response to Environmental Vibration In a rate responsive mode, the Prodigy pacemaker may respond to strong environmental vibrations (such as from heavy machinery, extreme acoustic sources, prolonged device palpation, exercise equipment, and so forth) by pacing at elevated rates. (Such rates will always be limited by the programmed Upper Activity Rate.) To eliminate this response, move the patient away from the vibration source. If this is not possible, reprogram the Upper Activity Rate setting to a value that is appropriate to the patient’s condition and/or adjust the Activity Threshold to a less sensitive setting. 196407001 Rev A Refer to the “Reference man.” category in doc#163256 for Printing Instructions. Medtronic Confidential 9879EN-12_9501043EN/CTC.qxd 5/10/99 11:27 Page 12-7 7 x 9 inches (178 mm x 229 mm) Pacemaker Timing 12-7 Possible Atrial Competition at High Rates At high sensor-driven rates in the DDDR and DDIR modes, sensor-driven pacing may approximate the intrinsic atrial rate, with some intrinsic atrial events falling into the PVARP. This could result in asynchronous pacing with the potential for competitive atrial pacing. The potential for asynchronous pacing at high rates should be considered before selecting an Upper Activity Rate, especially for patients known to be susceptible to induction of atrial tachyarrhythmias. The clinician may wish to weigh the benefits of high rate sensor-driven pacing against the potential for competitive pacing. NOTE: Use of the Rate Adaptive AV feature and Non-Competitive Atrial Pacing (DDDR mode only) can reduce the likelihood of the type of asynchronous pacing described above. Mean Atrial Rate The mean atrial rate (MAR) is a running average of the atrial rate that is continuously calculated by the pacemaker for use by the Mode Switch and Rate Adaptive AV features. The average uses all A-A intervals except those beginning with an atrial sense or atrial refractory sense and ending with an atrial pace. The illustration below shows how the MAR tracks the actual intrinsic atrial rate. Atrial Rate Increasing by 2 bpm/beat 200 Rate (bpm) 180 160 140 120 MAR Intrinsic Rate 100 80 60 0 5 10 15 20 25 30 35 Time (Seconds) Mean Atrial Rate 196407001 Rev A Refer to the “Reference man.” category in doc#163256 for Printing Instructions. Medtronic Confidential 9879EN-12_9501043EN/CTC.qxd 5/10/99 11:27 Page 12-8 7 x 9 inches (178 mm x 229 mm) 12-8 Understanding Pacemaker Operations AV Intervals Overview In dual chamber modes, the AV intervals determine the time between the occurrence of an atrial event and the scheduled delivery of a ventricular stimulus. Separate AV intervals for paced and sensed atrial events are available. The lengths of these intervals may be programmed to fixed values or (optionally) rate adaptive. ■ Paced AV Interval (PAV). PAV follows an atrial pace in the DDDR, DDD, DDIR, DDI, DVIR, DVI, DOOR, and DOO modes. The PAV interval duration may differ from the programmed value due to: - Rate Adaptive AV operation, - Ventricular Safety Pacing, or - Non-Competitive Atrial Pacing operation. PAV Interval P PAV PAV Interval P PAV DDD A V P P Example of PAV Interval Operation 196407001 Rev A Refer to the “Reference man.” category in doc#163256 for Printing Instructions. Medtronic Confidential 9879EN-12_9501043EN/CTC.qxd 5/10/99 11:27 Page 12-9 7 x 9 inches (178 mm x 229 mm) Pacemaker Timing ■ 12-9 Sensed AV Interval (SAV). SAV follows an atrial sensed event in atrial synchronous pacing modes (DDDR, DDD, and VDD). The SAV interval duration may differ from the programmed value due to: - Rate Adaptive AV operation or - Wenckebach operation, where the SAV is extended to avoid violation of the Upper Tracking Rate or the total atrial refractory period while tracking a fast intrinsic atrial rate (refer to “High Rate Atrial Tracking” later in this chapter). SAV Interval SAV Interval SAV S SAV S DDD A V P P Example of SAV Interval Operation 196407001 Rev A Refer to the “Reference man.” category in doc#163256 for Printing Instructions. Medtronic Confidential 9879EN-12_9501043EN/CTC.qxd 5/10/99 11:27 Page 12-10 7 x 9 inches (178 mm x 229 mm) 12-10 Understanding Pacemaker Operations Selecting PAV and SAV When programming AV intervals, the general hemodynamic goal is to assure that, to the extent possible, left-atrial systole is completed before left-ventricular systole begins. To achieve this, the AV interval durations may be adjusted independently of each other. 196407001 Rev A ■ To accommodate the difference in interatrial conduction times, the SAV usually should be programmed to a shorter duration than the PAV, typically 30 to 50 ms shorter. (If an SAV greater than the PAV is selected, the programmer displays a message noting that this is not usual, but the selected values may be programmed if clinically warranted.) ■ When the SAV is longer than the PAV, a V-pace following an atrial sense will always occur after the full SAV, even when the sensorindicated rate or Lower Rate interval expires first. ■ In certain patients, short AV intervals may be used as a prophylaxis for AV nodal or accessory pathway reentrant tachycardias in dual chamber modes. ■ AV intervals should be programmed to allow for normal AV conduction and ventricular depolarization in sick sinus patients. ■ Long PAV intervals (≥ 250 ms) should be used with caution. If intrinsic ventricular events occur and are not sensed, a long PAV may result in pacing into the ventricle’s relative refractory period, including the T-wave, or loss of AV synchrony which may precipitate retrograde activation of the atria with corresponding hemodynamic consequences and symptoms. Refer to the “Reference man.” category in doc#163256 for Printing Instructions. 9879EN-12_9501043EN/CTC.qxd 5/10/99 11:27 Page 12-11 Medtronic Confidential 7 x 9 inches (178 mm x 229 mm) Pacemaker Timing 12-11 Overview of Rate Adaptive AV Operation In the normal heart, AV conduction times tend to shorten as the heart rate increases and lengthen as the heart rate decreases. The Rate Adaptive AV (RAAV) feature, available in the DDDR, DDD, DDIR, DVIR, DOOR, and VDD modes, mimics this physiologic response. When RAAV is programmed ON, the pacemaker shortens AV intervals at higher atrial rates. This feature provides increased opportunity for atrial sensing, as follows: ■ Shortened SAV intervals increase the tracking range at fast atrial rates by shortening the total atrial refractory period (TARP) and increasing the 2:1 block rate (refer to “Total Atrial Refractory Period” and “High Rate Atrial Tracking” later in this chapter). ■ Shortened PAV intervals lengthen the atrial sensing window of the VA interval at higher sensor-driven rates. RAAV Operations For RAAV operation, the SAV and PAV are programmed (as applicable) to the values desired for low rates. At higher rates, RAAV shortens AV intervals as follows: ■ RAAV operation starts at 60 ppm and ends at 120 ppm. ■ As the rate increases above 60 ppm, the SAV and PAV intervals are gradually shortened to the minimum values of 80 ms and 110 ms (respectively) at 120 ppm. The minimum values also apply at all higher rates above 120 ppm. Adjustment of the SAV is pertinent to the DDDR, DDD, and VDD modes, while PAV adjustment pertains to the DDDR, DDIR, DVIR, and DOOR modes. The adjustment of AV interval(s) occurs as follows: ■ The mean atrial rate is used to determine SAV adjustments. Therefore, the SAV is not adjusted for isolated events (PACs), and SAV adjustment will lag during rapid increases or decreases in intrinsic atrial rate. ■ The sensor-indicated rate is used to determine PAV adjustments. Atrial refractory sensed events may affect the Rate Adaptive SAV because they are included in the mean atrial rate if the next atrial event is not paced. 196407001 Rev A Refer to the “Reference man.” category in doc#163256 for Printing Instructions. Medtronic Confidential 9879EN-12_9501043EN/CTC.qxd 5/10/99 11:27 Page 12-12 7 x 9 inches (178 mm x 229 mm) 12-12 Understanding Pacemaker Operations The graph below shows conceptually how the SAV or PAV is adjusted at higher rates when RAAV is programmed ON. 240 220 200 Programmed PAV 180 Programmed SAV 160 Ra te Ad ap Ad ap 140 AV Interval (ms) te Ra tiv tiv eS AV 120 eP AV Minimum PAV 100 Minimum SAV 80 60 40 20 0 60 120 Start Rate 180 Stop Rate Rate (ppm) Parameters: Programmed PAV = 200 ms Programmed SAV = 170 ms Rate Adaptive AV Operation (DDDR Mode) 196407001 Rev A Refer to the “Reference man.” category in doc#163256 for Printing Instructions. Medtronic Confidential 9879EN-12_9501043EN/CTC.qxd 5/10/99 11:27 Page 12-13 7 x 9 inches (178 mm x 229 mm) Pacemaker Timing 12-13 RAAV Operation in the DDDR and DDD Modes The DDDR and DDD modes use both the PAV and SAV intervals: ■ DDDR Mode. Both the SAV and PAV may be adjusted. ■ DDD Mode. The PAV is not adjusted in the DDD mode because atrial pacing occurs only at the programmed Lower Rate. SAV may be adjusted. Application for RAAV RAAV is primarily intended for AV block patients. Consideration should be given when using RAAV with sick sinus syndrome since it may promote unnecessary ventricular pacing. Using RAAV with Mode Switch When Mode Switch is programmed ON, RAAV is activated to operate as follows: 196407001 Rev A ■ RAAV operation starts at 60 ppm and ends at 150 ppm. ■ The minimum SAV is set to 30 ms. The minimum PAV is set from 30 to 100 ms (DDDR and DDD modes). Refer to the “Reference man.” category in doc#163256 for Printing Instructions. Medtronic Confidential 9879EN-12_9501043EN/CTC.qxd 5/10/99 11:27 Page 12-14 7 x 9 inches (178 mm x 229 mm) 12-14 Understanding Pacemaker Operations Blanking Periods Blanking periods disable sensing for a programmable or nonprogrammable interval. Signals that are blanked may originate in either chamber or from outside sources such as noise from muscle movement. Note: Black bars indicate blanking 1. Non-programmable Atrial Blanking P 1 2 DDD A V 3 P 4 P 2. Programmable Post-Ventricular Atrial Blanking 3. Programmable Post-Atrial Ventricular Blanking 4. Non-programmable Ventricular Blanking Example of Dual Chamber Blanking Operation Nonprogrammable Blanking Periods Immediately following a sensed or paced event in either chamber, sensing for that chamber is blanked for a nonprogrammable period that may vary from 50 to 100 ms. The actual duration of the blanking period is determined dynamically by the pacemaker, based on the strength and duration of the signal. Dynamic blanking prevents sensing the same signal twice while minimizing total blanking time. 196407001 Rev A Refer to the “Reference man.” category in doc#163256 for Printing Instructions. Medtronic Confidential 9879EN-12_9501043EN/CTC.qxd 5/10/99 11:27 Page 12-15 7 x 9 inches (178 mm x 229 mm) Pacemaker Timing 12-15 Post-Ventricular Atrial Blanking The programmable Post-Ventricular Atrial Blanking (PVAB) period, used in the DDDR, DDD, DDIR, DDI, and VDD modes, prevents sensing of ventricular paced events or far-field R-waves on the atrial lead. Any ventricular event (paced or sensed) starts the PVAB, which is also the first portion of the Post-Ventricular Atrial Refractory period (PVARP). PVAB is limited to values equal to or less than the programmed PVARP. Post-Atrial Ventricular Blanking The programmable Post-Atrial Ventricular Blanking (PAVB) period, which follows an atrial pacing stimulus in the DDDR, DDD, DDIR, DDI, DVIR, and DVI modes, prevents ventricular inhibition or ventricular safety pacing due to sensing of the atrial stimulus on the ventricular lead (crosstalk). ■ Long blanking periods (36 ms or greater) increase the possibility of unsensed ventricular events. ■ Long blanking periods used in conjunction with long PAV intervals (250 ms or greater) may result in pacing into the T-wave when intrinsic ventricular events are blanked and not sensed. PAV values (200 ms or less) should reduce the possibility of T-wave pacing. Single Chamber Atrial Blanking The programmable single chamber atrial blanking period, used in the AAIR, AAI, and AAT mode, prevents sensing of far-field R-waves. It is started by a paced, sensed, or refractory sensed atrial event. 196407001 Rev A Refer to the “Reference man.” category in doc#163256 for Printing Instructions. 9879EN-12_9501043EN/CTC.qxd 5/10/99 11:27 Page 12-16 Medtronic Confidential 7 x 9 inches (178 mm x 229 mm) 12-16 Understanding Pacemaker Operations Refractory Periods Overview A refractory period is an interval during which an intrinsic event sensed on a particular lead channel cannot start certain timing intervals. Each refractory period begins with a blanking period, during which no sensing occurs. During the unblanked portion of a refractory period, sensing occurs, but sensed events may not directly affect timing operations. Refractory periods are intended to prevent certain timing intervals from being started by inappropriate signals such as retrograde P-waves, far-field R-waves, or electrical noise. Though they may not start timing intervals, refractory sensed events are monitored by the pacemaker, and they affect the operation of Mode Switch, Rate Adaptive AV operation, Non-Competitive Atrial Pacing (NCAP), and pacemaker-defined PVC for which the periodicity or number of sensed events are pertinent. Refractory sensed events are included on Marker Channel recordings and Marker Channel Diagrams. 196407001 Rev A Refer to the “Reference man.” category in doc#163256 for Printing Instructions. Medtronic Confidential 9879EN-12_9501043EN/CTC.qxd 5/10/99 11:27 Page 12-17 7 x 9 inches (178 mm x 229 mm) Pacemaker Timing 12-17 Post-Ventricular Atrial Refractory Period The Post-Ventricular Atrial Refractory Period (PVARP) follows a paced, sensed, or refractory sensed ventricular event in the DDDR, DDD, DDIR, DDI, and VDD modes. It is intended primarily to prevent the sensing of retrograde P-waves that might promote Pacemaker-Mediated Tachycardias (PMTs) in atrial tracking modes. In the DDIR and DDI modes, PVARP prevents atrial inhibition from retrograde P-waves. The first portion of the PVARP is the programmable Post-Ventricular Atrial Blanking period (PVAB). During the remainder of the PVARP, intrinsic atrial events may be sensed as refractory sensed events (AR) and identified on Marker Channel recordings and Marker Channel Diagrams, but they do not affect stimulus timing. That is: ■ In the DDDR, DDD, and VDD modes, a SAV is not started. ■ In the DDDR, DDD, DDIR, and DDI modes, the scheduled atrial pace is not inhibited. PVARP P P DDD A V P Example of PVARP Operation The duration of the PVARP may be selected as follows: 196407001 Rev A ■ The PVARP should be programmed to a value greater than the patient’s retrograde (VA) time when retrograde conduction is present. ■ Excessively long PVARPs may induce 2:1 block at high intrinsic rates in atrial tracking modes (DDDR, DDD, and VDD). Refer to the “Reference man.” category in doc#163256 for Printing Instructions. 9879EN-12_9501043EN/CTC.qxd 5/10/99 11:27 Page 12-18 Medtronic Confidential 7 x 9 inches (178 mm x 229 mm) 12-18 Understanding Pacemaker Operations Automatic PVARP Extension After a PVC The programmed PVARP duration may be overridden when a pacemakerdefined premature ventricular contraction (PVC) occurs. A pacemakerdefined PVC starts an extended PVARP to 400 ms if the programmed PVARP is less than 400 ms. This extended PVARP causes retrograde Pwaves within 400 ms to be identified as refractory sensed events. ■ In dual chamber modes, except VDD, a pacemaker-defined PVC is any ventricular sensed event (refractory or nonrefractory) that follows a ventricular event (pace, refractory or nonrefractory sense) without an intervening atrial event (pace, refractory or nonrefractory sense). ■ In the VDD mode, a ventricular paced event delivered at the Lower Rate and not preceded by an atrial sensed event is also considered a PVC. In the DDDR mode, a pacemaker-defined PVC always enables NonCompetitive Atrial Pacing (NCAP) for one cycle when NCAP is programmed OFF. This occurs when the PVARP extension occurs. If Mode Switch is programmed ON, pacemaker-defined PVCs are not detected when the pacemaker switches to a non-atrial tracking mode. Detection resumes upon return to an atrial tracking mode. NOTE: The pacemaker automatically counts PVCs and runs of two or more consecutive PVCs. Both counts are included in the Event Summary report described in Chapter 17. Automatic PVARP Extension After a PMT The programmed PVARP duration may be overridden by the PMT Intervention feature. When PMT Intervention is programmed ON and a pacemaker-defined PMT is detected, the PVARP is forced to 400 ms after the ninth paced ventricular event of the PMT. Refer to Chapter 14 for further details on PMT Intervention and its interactions with PVARP. 196407001 Rev A Refer to the “Reference man.” category in doc#163256 for Printing Instructions. Medtronic Confidential 9879EN-12_9501043EN/CTC.qxd 5/10/99 11:27 Page 12-19 7 x 9 inches (178 mm x 229 mm) Pacemaker Timing 12-19 Total Atrial Refractory Period (TARP) In dual chamber modes that sense in the atrium, the Total Atrial Refractory Period (TARP) is the sum of two intervals, as follows: ■ AV Interval. The AV interval begins with an atrial event and ends with a ventricular event. The first portion is a nonprogrammable blanking period. Its complete duration is determined as follows: - In the DDDR, DDD, and VDD modes, the PAV or SAV interval is the AV interval. - In the DDIR and DDI modes, the AV interval starts with the first atrial sensed event in the VA interval or with an atrial pacing stimulus; it ends when the PAV expires, even when ventricular pacing is inhibited. ■ Post-Ventricular Atrial Refractory Period (PVARP). The PVARP is described above. TARP TARP SAV + PVARP SAV PVARP SAV PVARP Total Atrial Refractory Period During atrial tracking, TARP = SAV + PVARP, and its duration determines the rate at which 2:1 block occurs (refer to “High Rate Atrial Tracking” later in this chapter). 196407001 Rev A Refer to the “Reference man.” category in doc#163256 for Printing Instructions. Medtronic Confidential 9879EN-12_9501043EN/CTC.qxd 5/10/99 11:27 Page 12-20 7 x 9 inches (178 mm x 229 mm) 12-20 Understanding Pacemaker Operations Ventricular Refractory Period (VRP) The programmable Ventricular Refractory Period (VRP) follows paced, sensed, and refractory sensed ventricular events (including PVCs) in all modes that sense in the ventricle. The VRP is intended to prevent sensing of the T-wave or a PVC. The first portion of the VRP is a nonprogrammable blanking period. A ventricular refractory sensed event affects pacemaker timing as follows: ■ Ventricular blanking and refractory periods restart in all modes. ■ In the DDDR, DDD, and VDD modes, the Upper Tracking Rate interval, PVARP, and PVAB also restart. ■ In the VVIR mode, the Upper Activity Rate interval restarts. NOTE: In dual chamber modes, the VRP should be programmed shorter than the PVARP. P P DDD A V P VRP Example of Ventricular Refractory Period Operation In dual chamber modes, a ventricular refractory sensed event does not affect a scheduled sensor-driven or Lower Rate atrial output. Thus, a sensor-driven atrial output pulse will initiate a PAV with a ventricular output pulse following, unless inhibited. 196407001 Rev A Refer to the “Reference man.” category in doc#163256 for Printing Instructions. Medtronic Confidential 9879EN-12_9501043EN/CTC.qxd 5/10/99 11:27 Page 12-21 7 x 9 inches (178 mm x 229 mm) Pacemaker Timing 12-21 Atrial Refractory Period (Single Chamber) The programmable Atrial Refractory Period (ARP) follows paced, sensed, and refractory sensed atrial events. The ARP is used in the AAIR, AAI, and AAT modes, is intended to prevent inhibition due to far-field R-wave sensing. The first portion of the ARP is a programmable blanking period. The ARP should be programmed to a value long enough (150 ms or greater) to prevent far-field R-wave sensing but short enough to ensure atrial sensing up to the programmed Upper Activity Rate. Noise Reversion When sensing occurs during the Atrial Refractory Period (ARP) or Ventricular Refractory Period (VRP), the refractory period (and its blanking period) are restarted. The operation associated with continuous refractory sensing in the ARP or VRP is called noise reversion. Multiple restarts of the ARP or VRP (continuous noise reversion) do not inhibit scheduled pacing. Pacemaker behavior during continuous noise reversion is as follows: ■ Pacing occurs at the sensor-indicated rate for all rate responsive modes (except VVIR). Sensor-indicated Interval Act. P Act. P Act. P DDDR A V P R R R P P 200 ms Parameters: Lower Rate = 60 ppm (1000 ms) PAV Interval = 200 ms PVARP = 300 ms Upper Activity Rate = 120 ppm (500 ms) Ventricular Refractory Period = 240 ms PVAB = 200 ms Example of noise reversion in the DDDR mode pacing at the sensor-indicated rate. 196407001 Rev A Refer to the “Reference man.” category in doc#163256 for Printing Instructions. Medtronic Confidential 9879EN-12_9501043EN/CTC.qxd 5/10/99 11:27 Page 12-22 7 x 9 inches (178 mm x 229 mm) 12-22 Understanding Pacemaker Operations ■ Pacing occurs at the Lower Rate for all nonrate responsive modes and VVIR. Lower Rate VVIR V Act. P R R R R P Act. P 200 ms Parameters: Lower Rate = 60 ppm (1000 ms) Ventricular Refractory Period = 240 ms Upper Activity Rate = 120 ppm (500 ms) Example of noise reversion in the VVIR mode pacing at the Lower Rate. On the ECG, noise reversion may be difficult to distinguish from loss of sensing, but Marker Channel recordings will show refractory sense markers when noise reversion occurs. NOTE: Atrial sensing during the PVARP, or refractory period following an atrial paced or sensed event in the DDDR, DDD, DDIR, DDI, or VDD modes does not restart the refractory period. An atrial refractory sensed event however, will start a short blanking period of 50 to 100 ms depending on the signal strength and duration of the atrial event. Preventing Noise Sensing Noise reversion may be caused by electromagnetic interference (EMI), myopotentials, excessively high output settings, or low sensitivity settings. When it has been identified, noise reversion usually can be reduced or eliminated by one of the following actions: 196407001 Rev A ■ Reprogram the Sensitivity to a less sensitive (higher numerical value) setting. ■ Reprogram sensing to bipolar polarity (if available). ■ Reduce the amplitude and/or pulse width in the same or opposite chamber. ■ Remove patient from EMI environment. Refer to the “Reference man.” category in doc#163256 for Printing Instructions. 9879EN-12_9501043EN/CTC.qxd 5/10/99 11:27 Page 12-23 Medtronic Confidential 7 x 9 inches (178 mm x 229 mm) Pacemaker Timing 12-23 High Rate Atrial Tracking Overview In the DDDR, DDD, and VDD modes, the fastest atrial rate the pacemaker can track is determined by the Total Atrial Refractory Period (TARP), which is the sum of the SAV and the PVARP. Pacemaker behavior at high atrial rates in these modes is determined by the relationship between the TARP and the interval corresponding to the Upper Tracking Rate (UTR interval). In the DDDR mode, the interval corresponding to the Upper Activity Rate (UAR interval) also must be considered. 2:1 Block When the intrinsic atrial interval is shorter than the TARP, some atrial events will fall in the PVARP and not be tracked. At the rate where this first occurs, ventricular tracking occurs only on alternate beats, and 2:1 block ensues. In the DDD and VDD modes, the ventricular pacing rate drops precipitously. 196407001 Rev A ■ When Rate Adaptive AV operation is selected, the SAV shortens at high atrial rates, shortening the TARP and raising the 2:1 block rate. ■ When the 2:1 block rate is less than the Upper Tracking Rate, the Upper Tracking Rate cannot be achieved. ■ In the DDDR mode, pacing at the sensor-indicated rate may prevent a precipitous rate drop at the 2:1 block point when activity is present. ■ For patients with a documented propensity for prolonged or sustained atrial fibrillation or flutter, the clinician may wish to select Upper Tracking Rate, SAV, and PVARP values that induce 2:1 block at a desired rate (2:1 block rate = 60,000/TARP). Alternatives for controlling rates in these patients include use of the Mode Switch feature and DDIR mode pacing. ■ In the DDDR mode, atrial competition may occur if Upper Activity Rate exceeds the 2:1 block rate. Refer to the “Reference man.” category in doc#163256 for Printing Instructions. Medtronic Confidential 9879EN-12_9501043EN/CTC.qxd 5/10/99 11:27 Page 12-24 7 x 9 inches (178 mm x 229 mm) 12-24 Understanding Pacemaker Operations Pacemaker Wenckebach When the 2:1 block rate exceeds the programmed Upper Tracking Rate, pacemaker Wenckebach may occur. When the intrinsic rate exceeds the Upper Tracking Rate, a pacing stimulus at the expiration of the SAV would violate the Upper Tracking Rate. The pacemaker therefore extends the SAV until the Upper Tracking Rate interval expires. Subsequent SAVs require greater extension, until an atrial event falls in the PVARP and is not tracked. ■ In the DDDR, DDD, and VDD modes, the result normally is a fixed ratio between atrial and ventricular rates (3:2, 4:3, and so forth). ■ In the DDDR mode, the pacemaker Wenckebach rate may be smoothed by sensor-driven ventricular pacing, thereby overriding the fixed ratio. The following example shows how pacemaker Wenckebach operation occurs in the DDDR, DDD, or VDD modes. Upper Tracking Rate Interval Upper Tracking Rate Interval Upper Tracking Rate Interval SAV Interval S S S S R Act P DDDR A V P P Parameters: Sensor-indicated Rate = 90 ppm (667 ms) PAV Interval = 230 ms SAV Interval = 200 ms P P PVARP = 300 ms Upper Tracking Rate = 100 ppm (600 ms) P 200 ms Example of Pacemaker Wenckebach Operation 196407001 Rev A Refer to the “Reference man.” category in doc#163256 for Printing Instructions. Medtronic Confidential 9879EN-12_9501043EN/CTC.qxd 5/10/99 11:27 Page 12-25 7 x 9 inches (178 mm x 229 mm) Pacemaker Timing 12-25 High Rate Operation in the DDDR Mode The table that follows summarizes how the Total Atrial Refractory Period (TARP), the Upper Tracking Rate (UTR) interval, and the Upper Activity Rate (UAR) interval may interact at high atrial rates in the DDDR mode. Relationship Between TARP and Upper Rate Intervals Wenckebach Before 2:1 Block Achieve Upper Tracking Rate Potential Atrial Competition TARP > both UAR and UTR intervals no no yes* UAR interval > TARP > UTR interval no no no UAR interval > UTR interval > TARP yes yes no UTR interval > both UAR interval and TARP yes yes yes* * Unless the Non-Competitive Atrial Pacing is programmed ON (see “Non-Competitive Atrial Pacing” in Chapter 14). 196407001 Rev A Refer to the “Reference man.” category in doc#163256 for Printing Instructions. Medtronic Confidential 7 x 9 inches (178 mm x 229 mm) 196407001 Rev A Refer to the “Reference man.” category in doc#163256 for Printing Instructions. Medtronic Confidential 9879EN-13_9501043EN/CTC.qxd 5/10/99 11:29 Page 13-1 7 x 9 inches (178 mm x 229 mm) CHAPTER 13 Lead/Cardiac Tissue Interface About This Chapter This chapter discusses programming and follow-up topics relating to the lead/cardiac tissue interface. Key sections are as follows: ■ Selecting Pacing Parameters (see page 13-2) - ■ Selecting Pacing Polarity Bipolar Pacing Polarity Confirmation Determining/Verifying Stimulation Thresholds Selecting Output Parameters Selecting Sensing Parameters (see page 13-5) - Selecting Sensing Polarity Bipolar Sensing Polarity Confirmation Determining/Verifying Sensing Thresholds ■ Selecting Sensitivity Monitoring Lead Stability (see page 13-8) - ■ How the Monitor Works How the Polarity Switch Works - Recording a Lead Trend Transtelephonic Capture Verification with TMT (see page 13-11) - Dual/Single Chamber Threshold Margin Test Enhanced Transtelephonic Monitoring 13-1 196407001 Rev A Refer to the “Reference man.” category in doc#163256 for Printing Instructions. Medtronic Confidential 9879EN-13_9501043EN/CTC.qxd 5/10/99 11:29 Page 13-2 7 x 9 inches (178 mm x 229 mm) 13-2 Understanding Pacemaker Operations Selecting Pacing Parameters Overview Pacing output settings should be adequate to guarantee reliable capture, but not so high as to inappropriately deplete the pacemaker battery. Whether selecting pacing outputs at implant or follow-up, the same considerations apply: ■ Select Pacing Polarity for lead(s) ■ Determine stimulation threshold(s) ■ Select appropriate outputs (Pulse Width and Amplitude) Selecting Pacing Polarity Pacing Polarity is programmable for bipolar Prodigy models when used with bipolar leads. For dual chamber models other than Prodigy VDD, atrial and ventricular lead polarities are individually programmable for each chamber. ■ Unipolar Pacing Polarity. The lead tip is the active electrode and the noninsulated side of the pacemaker case is the common electrode. Unipolar pacing produces large pacing artifacts that aid in ECG interpretation. It is more likely to cause muscle stimulation, especially at high pacing amplitudes. ■ Bipolar Pacing Polarity. The lead tip is the active electrode and the lead ring is the common electrode. Bipolar pacing is less likely to produce muscle stimulation, but it produces smaller pacing artifacts on the ECG. WARNING: No pacing output results when a unipolar lead is connected to the pacemaker and Pacing Polarity is programmed to bipolar. Bipolar Pacing Polarity Confirmation Before programming from unipolar to bipolar pacing, the programmer verifies the presence of a functioning bipolar lead by testing lead impedance for each lead at an Amplitude of 5.0 V and a Pulse Width of 1.0 ms if the permanent settings are at or below this level. If permanent settings are above these values, the measurement will be made at the permanent settings. If lead impedance is between 200 Ω and 3000 Ω, a functional bipolar lead is assumed to be present. If the impedance is outside 196407001 Rev A Refer to the “Reference man.” category in doc#163256 for Printing Instructions. 9879EN-13_9501043EN/CTC.qxd 5/10/99 11:29 Page 13-3 Medtronic Confidential 7 x 9 inches (178 mm x 229 mm) Lead/Cardiac Tissue Interface 13-3 this range, a functional bipolar lead is not present; the programmer warns that the test failed, and Pacing Polarity remains set to unipolar. This interlock feature may be overridden to force lead Pacing Polarity to bipolar. WARNING: Do not override for an implanted lead. The override feature is intended only as a means to program the pacemaker for bipolar polarity prior to implant before lead connection. Determining Stimulation Threshold(s) at Implant At implant, a Medtronic Pacing System Analyzer (PSA) may be used to determine threshold values for capture. Refer to the PSA manual for detailed instructions. Verifying Stimulation Threshold(s) at Follow-up Medtronic programmers provide both automatic and manual threshold tests for determining the patient’s stimulation threshold at follow-up. Stimulation threshold resolution is determined by the available increments of amplitude and pulse width. Included with the automatic threshold test on the programmer is a strength-duration graph that shows voltage safety margins. For a detailed description of the threshold tests and test procedures, refer to “Measuring Stimulation Thresholds” in Chapter 7. 196407001 Rev A Refer to the “Reference man.” category in doc#163256 for Printing Instructions. Medtronic Confidential 9879EN-13_9501043EN/CTC.qxd 5/10/99 11:29 Page 13-4 7 x 9 inches (178 mm x 229 mm) 13-4 Understanding Pacemaker Operations Selecting Output Parameters Generally, a pacing voltage twice the chronic stimulation threshold voltage for a given Pulse Width provides an adequate safety margin. For most patients, pacing outputs are the major contributor to battery depletion. To maximize battery longevity, select the lowest amplitudes and pulse widths that provide at least a 2:1 voltage safety margin. When amplitudes greater than 2.5 V are required during the maturation phase of the lead(s), threshold(s) and output setting(s) should be carefully re-evaluated at the first follow-up. NOTES Amplitudes of 5.0 V and 7.5 V substantially reduce expected battery longevity. These amplitudes should be limited to short term uses such as “Emergency” settings and electrophysiologic studies or long term uses for specific indications such as exit block. High output pacing at 7.5 V may affect ECG or electrogram (EGM) waveform quality and potentially cause crosstalk or self-inhibition (see “General Warnings and Precautions,” Section F in Part III). “Longevity Projections,” Section C in Part III, shows longevity for all Prodigy models under various pacing scenarios. For Further Information Refer to the “Modes and Parameters,” Section E in Part III, for Amplitude and Pulse Width parameter settings. 196407001 Rev A Refer to the “Reference man.” category in doc#163256 for Printing Instructions. Medtronic Confidential 9879EN-13_9501043EN/CTC.qxd 5/10/99 11:29 Page 13-5 7 x 9 inches (178 mm x 229 mm) Lead/Cardiac Tissue Interface 13-5 Selecting Sensing Parameters Overview Sensitivity determines the minimum intracardiac signal that the pacemaker can detect when intrinsic atrial or ventricular events occur. Whether selecting sensing parameters at implant or verifying sensing at follow-up, the same considerations apply: ■ Select Sensing Polarity for lead(s) ■ Determine sensing threshold(s) ■ Select appropriate Sensitivity settings Selecting Sensing Polarity All bipolar Prodigy models connected to bipolar leads, Sensing Polarities for the atrial and/or ventricular channels are independently programmable to either bipolar or unipolar. (In the Prodigy VDD device, atrial sensing is bipolar only.) 196407001 Rev A ■ Unipolar Sensing Polarity. The lead tip and the noninsulated side(s) of the pacemaker are the sensing electrodes. Unipolar sensing may allow sensing of smaller intrinsic signals than does bipolar sensing, and it may be selected when intrinsic cardiac signals are difficult to detect with bipolar sensing. Oversensing due to myopotentials is more common with unipolar sensing than with bipolar sensing. ■ Bipolar Sensing Polarity. The lead tip and the lead ring electrode are the poles of the sensing circuit. Because bipolar sensing is more localized, it reduces the likelihood of sensing myopotentials and electromagnetic interference. It may also permit Sensitivity to be programmed to a more sensitive setting. Refer to the “Reference man.” category in doc#163256 for Printing Instructions. Medtronic Confidential 9879EN-13_9501043EN/CTC.qxd 5/10/99 11:29 Page 13-6 7 x 9 inches (178 mm x 229 mm) 13-6 Understanding Pacemaker Operations Bipolar Sensing Polarity Confirmation Before programming from unipolar to bipolar sensing, the programmer verifies the presence of a functioning bipolar lead by testing impedance for each lead at an Amplitude of 5.0 V and a Pulse Width of 1.0 ms if the permanent settings are at or below this level. If permanent settings are above these values, the measurement will be made at the permanent settings. If lead impedance is between 200 Ω and 3000 Ω, a functional bipolar lead is assumed to be present. If the impedance is outside this range, a functional bipolar lead is not present; the programmer warns that the test failed, and Sensing Polarity remains set to unipolar. This interlock feature may be overridden and lead Sensing Polarity forced to bipolar. WARNING: Do not override for an implanted lead. The override feature is intended only as a means to program the pacemaker for bipolar polarity before lead connection. Determining Sensing Threshold(s) at Implant At implant, a Medtronic Pacing System Analyzer (PSA) may be used to determine sensing threshold values for all Prodigy models except the Prodigy VDD model. Refer to the PSA manual for detailed instructions. (Refer to the CapSure VDD Model 5032 lead technical manual for information on determining sensitivity.) Prior to lead connection, measure the sensing potentials in the unipolar and (when appropriate) the bipolar configurations. When using a bipolar system, an adequate intracardiac signal should be present in both configurations to ensure proper sensing in either. Verifying Sensing Threshold(s) at Follow-up Intracardiac signal amplitudes decrease during the lead maturation process. Medtronic programmers provide an automatic sensitivity test that allows the follow-up clinician to verify a patient’s sensitivity setting(s). The automatic test provides for atrial or ventricular monitoring. The test provides the sensitivity setting just above and below the point at which P or R waves are sensed. For a detailed description of the test procedures, refer to “Determining a Setting for Sensitivity” in Chapter 7. 196407001 Rev A Refer to the “Reference man.” category in doc#163256 for Printing Instructions. Medtronic Confidential 9879EN-13_9501043EN/CTC.qxd 5/10/99 11:29 Page 13-7 7 x 9 inches (178 mm x 229 mm) Lead/Cardiac Tissue Interface 13-7 Selecting Sensitivity Setting(s) Atrial and ventricular Sensitivity are independently programmable in dual chamber models. In general, a 2:1 to 3:1 sensitivity safety margin (threshold sensitivity value divided by 2 or 3) will be adequate for newly implanted or chronic leads. For example, an atrial Sensitivity of 1.0 mV should be satisfactory for intrinsic atrial signals between 2.0 mV and 3.0 mV. (With the Prodigy VDD device, 3:1 atrial Sensitivity is recommended.) ■ Always perform an atrial sensing test to determine the appropriate atrial Sensitivity setting. ■ Excessively sensitive (low) settings can cause some or all of the following problems: - oversensing due to electromagnetic interference (EMI), myopotentials, T-waves, or crosstalk - undersensing due to overloading of the sensing circuit - noise reversion operation (as described in Chapter 12) ■ Atrial Sensitivity with bipolar sensing polarity allows 0.18 mV, 0.25 mV, and 0.35 mV atrial Sensitivity settings. (To prevent oversensing of muscle noise or electromagnetic interference, unipolar sensing is limited to values no less than 0.5 mV.) ■ Ventricular Sensitivities 1.0 mV or 1.4 mV with wide atrial pulse widths or high atrial amplitudes may result in Ventricular Safety Pacing with some lead systems at high sensor-driven pacing rates. Reprogramming ventricular Sensitivity to a less sensitive setting (higher numerical value) is one option under such circumstances. Other options include programming a longer ventricular blanking interval. For Further Information In the PSA manual, refer to sensitivity threshold test procedures. In Chapter 12, refer to “Refractory Periods” for a discussion of noise reversion. Refer to “Modes and Parameters,” Section E in Part III, for Sensitivity parameter settings. 196407001 Rev A Refer to the “Reference man.” category in doc#163256 for Printing Instructions. 9879EN-13_9501043EN/CTC.qxd 5/10/99 11:29 Page 13-8 Medtronic Confidential 7 x 9 inches (178 mm x 229 mm) 13-8 Understanding Pacemaker Operations Monitoring Lead Stability Overview The Lead Monitor is a programmable ON/OFF feature that periodically measures the pacing impedance of each lead. It is intended for troubleshooting when an intermittent lead problem is suspected. The Lead Monitor also has an optional Polarity Switch feature that can automatically reprogram polarity from bipolar to unipolar for each lead. It is intended to support backup unipolar pacing and sensing in the event of a bipolar lead failure. The Lead Monitor is available in all pacing modes. It is not recommended to use Lead Monitor with single chamber triggered modes (VVT and AAT). CAUTION: If the Lead Monitor detects out-of-range lead impedance, investigate lead integrity more thoroughly. WARNINGS Programming Lead Monitor with the optional polarity switch is contraindicated for patients with implantable defibrillators. When an out-of-range lead is detected, the monitor automatically reprograms the selected lead(s) to unipolar polarity. Pacing in the unipolar configuration may either provoke inappropriate therapy or withhold appropriate therapy. Do not program Lead Monitor ON prior to implanting the device in the patient. With no lead(s) connected, lead impedance is infinitely high and determined by the pacemaker to be out-of-range. If the device has been programmed to switch polarity, the resulting unipolar condition will not support pacing until the pacemaker is placed in the pocket, thereby completing the circuit. NOTE: The Lead Monitor is automatically disabled if the elective replacement indicator (ERI) is tripped. 196407001 Rev A Refer to the “Reference man.” category in doc#163256 for Printing Instructions. Medtronic Confidential 9879EN-13_9501043EN/CTC.qxd 5/10/99 11:29 Page 13-9 7 x 9 inches (178 mm x 229 mm) Lead/Cardiac Tissue Interface 13-9 How the Monitor Works Impedance for each active lead is measured every three hours. The measurement requires up to three pacing cycles during which Amplitude and Pulse Width will change to 5.0 V and 1.0 ms respectively, if the permanent settings are at or below this level. If permanent settings are above these values, the measurement will be made at the permanent settings. ■ Sustained intrinsic activity may prevent measurement(s) from occurring. ■ If a lead impedance measurement falls outside the range of 200 to 3000 ohms, the Lead Trend diagnostic (described below) is automatically activated. How the Polarity Switch Works The polarity of the selected bipolar lead(s) is automatically reprogrammed by the pacemaker from bipolar to unipolar if the lead impedance measurement is outside the range of 200 to 3000 ohms. Programmable options for Polarity Switching are: ■ atrium and ventricle (the atrial and ventricular polarity will switch to unipolar) ■ atrium (only the atrial polarity will switch to unipolar) ■ ventricle (only the ventricular polarity will switch to unipolar) Recording a Lead Trend The Lead Trend attempts to measure and log the impedance of each active lead every three hours. Lead impedance data collection is the same as for the Lead Monitor (described above). 196407001 Rev A ■ The pacemaker can collect up to 720 days of lead impedance data for single chamber configurations and 360 days of data for dual chamber configurations. ■ Lead Trend is automatically activated when the Lead Monitor detects an out-of-range lead. Refer to the “Reference man.” category in doc#163256 for Printing Instructions. Medtronic Confidential 9879EN-13_9501043EN/CTC.qxd 5/10/99 11:29 Page 13-10 7 x 9 inches (178 mm x 229 mm) 13-10 Understanding Pacemaker Operations The example below shows how the Lead Trend report is presented on the programmer. The report can be printed out or displayed on the programmer. Example of Lead Trend Diagnostic Overriding Other Diagnostics If the Lead Trend is activated because the Lead Monitor detects out-ofrange lead impedance(s), any programmed diagnostic is disabled, and its data are overwritten by Lead Trend data. For Further Information Refer to Chapter 8 “Collecting and Retrieving Diagnostic Data” for information on configuring the Lead Trend diagnostic and collecting its data. 196407001 Rev A Refer to the “Reference man.” category in doc#163256 for Printing Instructions. Medtronic Confidential 9879EN-13_9501043EN/CTC.qxd 5/10/99 11:29 Page 13-11 7 x 9 inches (178 mm x 229 mm) Lead/Cardiac Tissue Interface 13-11 Transtelephonic Capture Verification with TMT Overview During transtelephonic monitoring, the Threshold Margin Test (TMT) provides a check for loss of capture at 25% reduced pulse width(s). The TMT may indicate that loss of capture is possible but cannot verify that safety margin is adequate. WARNING: Loss of capture during TMT indicates that the stimulation safety margin is inadequate. Have the patient come to the clinic as soon as possible for threshold evaluation and reprogramming of outputs for a 2:1 voltage safety margin. Imminent loss of ventricular capture for a pacemaker-dependent patient may constitute an emergency situation. Dual Chamber TMT Operation Applying the magnet over the pacemaker initiates a Threshold Margin Test (TMT). As illustrated below, the pacemaker delivers three asynchronous AV sequential pulses at a rate of 100 ppm with a paced AV interval of 100 ms. The first two sequences of pulses are delivered at the programmed Pulse Widths. The third sequence is delivered at a 25% reduction of the programmed Pulse Widths. Magnet Applied Threshold Margin Test DDD Operation Rate = 100 ppm Parameters: Mode = DDD Lower Rate = 60 ppm PAV= 180 ms PAV = 100 ms Pulse Widths Reduced by 25% Asynchronous (DOO) Pacing Rate = 85 ppm 200 ms Dual Chamber TMT Operation 196407001 Rev A Refer to the “Reference man.” category in doc#163256 for Printing Instructions. Medtronic Confidential 9879EN-13_9501043EN/CTC.qxd 5/10/99 11:29 Page 13-12 7 x 9 inches (178 mm x 229 mm) 13-12 Understanding Pacemaker Operations Single Chamber and VDD Mode TMT Operation Applying the magnet over the pacemaker initiates TMT. As illustrated below for ventricular operation, the pacemaker delivers three asynchronous pulses at a rate of 100 ppm. The first two pulses are delivered at the programmed Pulse Width. The third pulse is delivered at a 25% reduction of the programmed Pulse Width. Magnet Applied VVIR Operation Threshold Margin Test Rate = 100 ppm Parameters: Mode = VVIR Pacing Rate = 60 ppm Asynchronous (VOO) Pacing Rate = 85 ppm Pulse Width Reduced by 25% 200 ms Single Chamber and VDD Mode TMT Operation 196407001 Rev A Refer to the “Reference man.” category in doc#163256 for Printing Instructions. Medtronic Confidential 9879EN-13_9501043EN/CTC.qxd 5/10/99 11:29 Page 13-13 7 x 9 inches (178 mm x 229 mm) Lead/Cardiac Tissue Interface 13-13 Enhanced Transtelephonic Monitoring The Transtelephonic Monitor is a programmable ON/OFF feature intended for use with remote pacemaker monitoring services. Programming the feature OFF does not effect conventional transtelephonic monitoring. When the Transtelephonic Monitor is programmed ON, the pacemaker delays the Threshold Margin Test for five seconds upon magnet application to enhance communication with transtelephonic equipment. If the Pacing Polarity is permanently programmed to bipolar, it is temporarily set to unipolar to provide improved ECG artifact detection for the remote monitoring equipment. (The programmed Polarity is restored when the magnet is removed.) WARNING: Programming Transtelephonic Monitor ON is contraindicated for patients with implantable defibrillators. When it is programmed ON, the Pacing Polarity is temporarily set to unipolar when the magnet is applied. Pacing in the unipolar configuration may either cause the defibrillator to provoke inappropriate therapy or withhold appropriate therapy. When Transtelephonic Monitor is programmed OFF, the Threshold Margin Test is not delayed upon magnet application, and conventional transtelephonic monitoring can occur. For Further Information Refer to “Programming Additional Parameters” in Chapter 6 for programming instructions regarding Transtelephonic Monitor. 196407001 Rev A Refer to the “Reference man.” category in doc#163256 for Printing Instructions. Medtronic Confidential 7 x 9 inches (178 mm x 229 mm) 196407001 Rev A Refer to the “Reference man.” category in doc#163256 for Printing Instructions. Medtronic Confidential 9879EN-14_9501043EN/CTC.qxd 5/10/99 11:31 Page 14-1 7 x 9 inches (178 mm x 229 mm) CHAPTER 14 Special Therapy Options About This Chapter This chapter describes Prodigy pacemaker features intended for special patient therapies. These features may be used for the following purposes: ■ Managing Atrial Rhythms - Mode Switch (see page 14-2) - Non-Competitive Atrial Pacing (see page 14-5) ■ ■ Managing Ventricular Rhythms - PMT Intervention (see page 14-7) - Ventricular Safety Pacing (see page 14-9) Other Operations - Single Chamber Hysteresis (see page 14-11) 14-1 196407001 Rev A Refer to the “Reference man.” category in doc#163256 for Printing Instructions. Medtronic Confidential 9879EN-14_9501043EN/CTC.qxd 5/10/99 11:31 Page 14-2 7 x 9 inches (178 mm x 229 mm) 14-2 Understanding Pacemaker Operations Mode Switch Overview Mode Switch is a programmable ON/OFF feature designed to prevent the tracking of paroxysmal atrial tachycardias in the DDDR, DDD, and VDD modes. (Mode Switch is not recommended for patients known to have chronic refractory atrial tachyarrhythmias: atrial tachycardia, atrial fibrillation, or atrial flutter.) When the pacemaker detects an atrial tachyarrhythmia, it switches from the programmed atrial tracking mode to a non-atrial tracking mode until the atrial tachycardia ceases. Mode switching occurs as follows: Atrial Tracking Mode Non-atrial Tracking Mode DDDR → ← DDIR DDD → ← DDIR VDD → ← VVIR How the Pacemaker Defines Atrial Tachycardia For mode switching purposes, the pacemaker defines an atrial tachycardia based on the mean atrial rate (a running average that the pacemaker continuously updates) and the programmable Detection Rate (the rate at which pacemaker-defined tachycardia starts): ■ When the mean atrial rate exceeds the programmed Detection Rate, atrial tachycardia is in progress. ■ When either the mean atrial rate drops below the programmed Upper Tracking Rate or five consecutive atrial paces occur, the atrial tachycardia has ceased. NOTE: Ventricular tracking is limited by the programmed Upper Tracking Rate or the total atrial refractory period even when the atrial rate rises to the programmed Detection Rate. 196407001 Rev A Refer to the “Reference man.” category in doc#163256 for Printing Instructions. Medtronic Confidential 9879EN-14_9501043EN/CTC.qxd 5/10/99 11:31 Page 14-3 7 x 9 inches (178 mm x 229 mm) Special Therapy Options 14-3 Mode Switch Operation If the pacemaker detects an atrial tachycardia in the DDDR, DDD, or VDD mode, it switches to the appropriate non-atrial tracking mode after approximately 15 seconds. To avoid an abrupt drop in ventricular rate, it smoothly reduces the pacing rate from the atrial synchronous rate to the sensor-indicated rate. After the rate transition is completed, the pacemaker continues sensor-driven pacing in the ventricle, operating in the non-atrial tracking mode until the atrial tachycardia ceases. When the pacemaker determines that the atrial tachycardia has ceased, it begins to switch back to the permanently programmed mode. For the DDDR and DDD modes, abrupt changes in ventricular rate are avoided by smoothly varying the pacing rate until the A-A interval corresponds to the mean atrial rate. At that point, the pacemaker switches to the permanently programmed atrial tracking mode. For the VDD mode, the pacemaker immediately switches back to the permanently programmed atrial tracking mode. Mode Switch Interruption The typical mode switching sequence may be interrupted by either of two occurrences: ■ The atrial tachycardia episode ceases before the pacemaker completes the rate transition to the appropriate non-atrial tracking mode, or ■ the atrial tachycardia episode ceases briefly but resumes before the permanently programmed atrial tracking mode is restored. In either case, the pacemaker responds by adjusting the rate transition in the appropriate direction. The criteria for switching to the permanently programmed mode are unaffected. 196407001 Rev A Refer to the “Reference man.” category in doc#163256 for Printing Instructions. Medtronic Confidential 9879EN-14_9501043EN/CTC.qxd 5/10/99 11:31 Page 14-4 7 x 9 inches (178 mm x 229 mm) 14-4 Understanding Pacemaker Operations Preset Parameter Settings When Mode Switch is programmed ON, several parameters are automatically set to the following values: ■ Upper Activity Rate is set equal to the Upper Tracking Rate. ■ Post-Ventricular Atrial Blanking is set to a value based on the programmed Upper Tracking Rate and Post-Ventricular Atrial Refractory Period is set to a value based on the programmed Detection Rate. ■ Rate Adaptive AV operates differently in varying AV intervals based on the programmed Upper Tracking Rate. NOTE: Post-Ventricular Atrial Refractory Period is set to “varied” for VDD mode switching. During mode switching, the “varied” refractory period is automatically adjusted to provide optimal tracking of atrial tachycardias. The values selected are necessary for proper mode switching operations. Counting Mode Switch Episodes Mode switch episodes are always counted by the pacemaker and the total is presented in the Event Summary (Chapter 17). 196407001 Rev A Refer to the “Reference man.” category in doc#163256 for Printing Instructions. Medtronic Confidential 9879EN-14_9501043EN/CTC.qxd 5/10/99 11:31 Page 14-5 7 x 9 inches (178 mm x 229 mm) Special Therapy Options 14-5 Non-Competitive Atrial Pacing Overview Non-Competitive Atrial Pacing (NCAP) is intended to prevent triggering of atrial tachycardias by an atrial pacing stimulus that falls within the atrium’s relative refractory period. This feature may be programmed ON/OFF in the DDDR mode only. How NCAP Affects Atrial Timing When NCAP is programmed ON, a refractory sensed atrial event falling in the PVARP starts a 300 ms NCAP period, during which no atrial pacing may occur: ■ If a sensor-driven or lower rate pacing stimulus is scheduled to occur during the NCAP period, the VA interval is extended until the NCAP period expires. ■ If no pacing stimulus is scheduled to occur during the NCAP period, timing is unaffected; pacing occurs at the end of the VA interval unless inhibited. ■ An atrial refractory sensed event occurring during the NCAP period starts a new NCAP period. Pace Atrium safely, no capture Relative refractory period, atrial pace may induce atrial tachy Pace Atrium safely, capture The Atrium’s Relative Refractory Period 196407001 Rev A Refer to the “Reference man.” category in doc#163256 for Printing Instructions. Medtronic Confidential 9879EN-14_9501043EN/CTC.qxd 5/10/99 11:31 Page 14-6 7 x 9 inches (178 mm x 229 mm) 14-6 Understanding Pacemaker Operations How NCAP Affects Ventricular Timing When an atrial pacing stimulus is delayed by the NCAP operation, the pacemaker attempts to maintain a stable ventricular rate by shortening the PAV interval that follows. It will not, however, shorten the PAV interval to less than 80 ms. When a relatively high lower rate and long PVARP are programmed, NCAP operation may result in ventricular pacing slightly below the lower rate. Sensor-indicated Interval Sensor-indicated Interval NCAP 300 ms Act. P R 80 ms NCAP P Act. P DDDR A V P P Parameters: 200 ms Sensor-indicated Rate = 120 ppm (500 ms) PAV Interval = 150 ms PVARP = 230 ms Post-Ventricular Atrial Blanking (PVAB) = 180 ms Ventricular Refractory Period = 230 ms NCAP Operation NCAP Availability The Non-Competitive Atrial Pacing feature may be programmed ON/OFF only in the DDDR mode. Its availability is further qualified as follows: 196407001 Rev A ■ When Mode Switching is programmed ON, NCAP operations are temporarily disabled if the pacemaker mode switches to the DDIR mode. The NCAP feature is reenabled upon return to the DDDR mode. ■ Even when NCAP is programmed OFF, the NCAP operation is invoked automatically for cycles on which PMT Intervention or pacemaker-defined PVC operations occur (refer to “PMT Intervention” later in this chapter). Refer to the “Reference man.” category in doc#163256 for Printing Instructions. Medtronic Confidential 9879EN-14_9501043EN/CTC.qxd 5/10/99 11:31 Page 14-7 7 x 9 inches (178 mm x 229 mm) Special Therapy Options 14-7 PMT Intervention Overview A pacemaker-mediated tachycardia may occur when retrograde P-waves (due to a loss of AV synchrony) are sensed and tracked in an atrial tracking mode. Pacemaker-Mediated Tachycardia (PMT) Intervention provides an automatic way for the pacemaker to detect and interrupt pacemaker-defined PMTs. This programmable ON/OFF feature is available in the DDDR, DDD, and VDD modes. WARNING: Certain PMTs may require intervention such as pacemaker reprogramming, magnet application, drug therapy, or lead evaluation. How the Pacemaker Defines PMT The pacemaker assumes that a PMT may be present when it detects a ninth ventricular pace following eight consecutive VA intervals that meet all of the following conditions: ■ duration less than 400 ms ■ start with a ventricular paced event ■ end with an atrial sensed event PMT Monitoring and Intervention When PMT Intervention is programmed ON, the pacemaker monitors for PMT episodes. When a pacemaker-defined PMT is detected, the pacemaker intervenes, forcing a 400 ms PVARP after the ninth paced ventricular event. If a PMT is indeed in progress, the extended PVARP ensures that the next atrial sensed event within 400 ms will be refractory. By interrupting atrial tracking for one cycle, the PMT may be stopped. NOTE: A sinus tachycardia could cause a feature intervention, resulting in a single P-wave falling in the PVARP and therefore not being tracked by the pacemaker. Automatic 90-Second Suspension After an intervention, PMT Intervention is automatically suspended for 90 seconds. This prevents unnecessary intervention in the presence of fast intrinsic atrial rates. 196407001 Rev A Refer to the “Reference man.” category in doc#163256 for Printing Instructions. Medtronic Confidential 9879EN-14_9501043EN/CTC.qxd 5/10/99 11:31 Page 14-8 7 x 9 inches (178 mm x 229 mm) 14-8 Understanding Pacemaker Operations 1 2 PVARP 3 PVARP PVARP Parameter: PVARP = 280 ms 8 PVARP 9 PVARP = 400 ms 200 ms PMT Intervention Interactions with Other Features in DDDR Mode In the DDDR mode, the PMT Intervention feature interacts with other pacemaker features and operations in the following ways: ■ Non-Competitive Atrial Pacing (NCAP) is automatically enabled for one cycle after the ninth ventricular pace of a pacemaker-defined PMT episode. The NCAP feature may shorten the ensuing PAV to maintain a stable ventricular rate. ■ If Mode Switch is programmed ON, PMT Intervention is temporarily disabled if the pacemaker switches to the DDIR mode. It is reenabled upon return to the DDDR mode. The Non-Competitive Atrial Pacing and Mode Switch features are described earlier in this chapter. 196407001 Rev A Refer to the “Reference man.” category in doc#163256 for Printing Instructions. Medtronic Confidential 9879EN-14_9501043EN/CTC.qxd 5/10/99 11:31 Page 14-9 7 x 9 inches (178 mm x 229 mm) Special Therapy Options 14-9 Ventricular Safety Pacing Overview Ventricular Safety Pacing (VSP) is intended to prevent ventricular asystole due to inappropriate inhibition of ventricular pacing. Such inhibition may be caused by crosstalk or ventricular oversensing. The feature is programmable ON or OFF in the DDDR, DDD, DDIR, DDI, DVIR, and DVI modes. ■ Crosstalk occurs when the ventricular lead senses atrial stimuli. When crosstalk occurs, the pacemaker may interpret the atrial paced event as a ventricular depolarization and inappropriately fail to pace the ventricle. ■ Frequent VSP may be caused by loss of atrial sensing. WARNING: VSP should always be programmed ON for pacemakerdependent patients. 196407001 Rev A Refer to the “Reference man.” category in doc#163256 for Printing Instructions. Medtronic Confidential 9879EN-14_9501043EN/CTC.qxd 5/10/99 11:31 Page 14-10 7 x 9 inches (178 mm x 229 mm) 14-10 Understanding Pacemaker Operations How VSP Operates When VSP is programmed ON, a ventricular sense within 110 ms after an atrial pacing pulse results in a ventricular pacing pulse at 110 ms (see illustration below) or at the programmed PAV interval, whichever expires first. If the sensed event was, in fact, a ventricular depolarization, the ventricular pacing pulse at 110 ms falls harmlessly into the absolute refractory period of the ventricle. 110 ms Act. P Act. P Act. P DDDR A V P SP Safe P Ventricular Safety Pacing (VSP) 196407001 Rev A Refer to the “Reference man.” category in doc#163256 for Printing Instructions. Medtronic Confidential 9879EN-14_9501043EN/CTC.qxd 5/10/99 11:31 Page 14-11 7 x 9 inches (178 mm x 229 mm) Special Therapy Options 14-11 Single Chamber Hysteresis Overview Single Chamber Hysteresis lets the pacemaker track an intrinsic rhythm below the programmed Lower Rate. This prevents the pacemaker from overriding slow but appropriate intrinsic rhythms that may develop during extended periods of inactivity such as sleep. Hysteresis is programmed to a rate below the Lower Rate. The feature, which is programmed to a Hysteresis Rate or OFF, is available in AAI, VVI, AAT, and VVT modes. How Hysteresis Works When Single Chamber Hysteresis rate is programmed, a sensed event temporarily suspends the programmed Lower Rate, and the pacemaker determines its escape rate from the hysteresis rate instead. As long as the intrinsic rate remains above the hysteresis rate, pacing is inhibited. The first occurrence of an escape pace at the hysteresis rate suspends hysteresis operations and reestablishes the programmed Lower Rate as the escape rate. The illustration on the next page shows hysteresis operation. 196407001 Rev A Refer to the “Reference man.” category in doc#163256 for Printing Instructions. Medtronic Confidential 9879EN-14_9501043EN/CTC.qxd 5/10/99 11:31 Page 14-12 7 x 9 inches (178 mm x 229 mm) 14-12 Understanding Pacemaker Operations Hysteresis Rate Interval Lower Rate Interval V P V P Parameters: Modes = VVI Pacing Rate = 70 ppm (857 ms) V S Lower Rate Interval V P Ventricular Refractory Period = 300 ms Hysteresis Rate = 60 ppm (1000 ms) V P 200 ms Single Chamber Hysteresis Operation Programming Considerations Hysteresis is intended for patients with a predominately normal sinus rhythm without ventricular irritability. Some patients may experience undesirable cardiac arrhythmias near the Hysteresis Rate (such as bigeminal beats). Therefore, the clinician should verify adequate cardiac support at the programmed Hysteresis Rate before programming. The difference between the Hysteresis Rate and the programmed Lower Rate is typically not greater than 30 ppm. 196407001 Rev A Refer to the “Reference man.” category in doc#163256 for Printing Instructions. Medtronic Confidential 9879EN-15_9501043EN/CTC.qxd 5/10/99 11:32 Page 15-1 7 x 9 inches (178 mm x 229 mm) CHAPTER 15 Telemetry Data About This Chapter This chapter describes telemetered information available from the pacemaker for routine monitoring and problem solving. The telemetered data are as follows: ■ Parameter Summary (see page 15-2) ■ Battery and Lead Information (see page 15-4) ■ Marker Channel Telemetry (see page 15-6) ■ Intracardiac Electrogram (EGM) (see page 15-8) ■ Extended Telemetry (see page 15-10) 15-1 196407001 Rev A Refer to the “Reference man.” category in doc#163256 for Printing Instructions. Medtronic Confidential 9879EN-15_9501043EN/CTC.qxd 5/10/99 11:32 Page 15-2 7 x 9 inches (178 mm x 229 mm) 15-2 Understanding Pacemaker Operations Parameter Summary Overview When interrogated by the programmer, the pacemaker telemeters its permanently programmed parameter settings along with battery status and device identification. Parameters Reported The programmer will report only parameters pertinent to the programmed mode. Depending on the Prodigy model and the programmed mode, the telemetered parameters and pacemaker data may include: 196407001 Rev A ■ Mode ■ Activity Rate Response ■ Pacing Rate(s) ■ Activity Threshold ■ AV Interval(s) ■ Acceleration/Deceleration ■ Refractory Period(s) ■ Therapy Features ■ Blanking Period(s) ■ Device Identification ■ Pulse Amplitude(s) ■ Serial Number ■ Pulse Width(s) ■ Battery Status ■ Sensitivity(ies) ■ Event Summaries ■ Polarity(ies) ■ Diagnostics Refer to the “Reference man.” category in doc#163256 for Printing Instructions. Medtronic Confidential 9879EN-15_9501043EN/CTC.qxd 5/10/99 11:32 Page 15-3 7 x 9 inches (178 mm x 229 mm) Telemetry Functions 15-3 Possible Variation from Programmed Values In general, the reported parameters will be set to the same values from the previous programming session. Exceptions are as follows: ■ Electrical Reset. If the pacemaker has undergone a full or partial Electrical Reset, the reported parameters will differ from their previously programmed settings, as described in the section “Electrical Reset” in Chapter 16. ■ Elective Replacement Indication. If the Elective Replacement Indicator (ERI) is set, the reported parameters will be the ERI values, as described in the section “Elective Replacement Indicator (ERI)” in Chapter 16. For Further Information Refer to Chapter 4, “Retrieving Pacing System Data,” to retrieve pacemaker parameters and data. 196407001 Rev A Refer to the “Reference man.” category in doc#163256 for Printing Instructions. Medtronic Confidential 9879EN-15_9501043EN/CTC.qxd 5/10/99 11:32 Page 15-4 7 x 9 inches (178 mm x 229 mm) 15-4 Understanding Pacemaker Operations Battery and Lead Information Overview The pacemaker can telemeter measured and calculated values for battery parameters, pacing output(s), and lead(s) to the programmer. These data may be used both for routine assessment of pacing system performance and for evaluating suspected problems. Telemetered Data The battery and lead data for atrial and/or ventricular channels are as follows: ■ Battery Status: - ■ Atrial and/or ventricular output: - 196407001 Rev A Message “OK” or “Replace Pacer” Voltage (V) Current (µA) Impedance (Ω) Estimated Time to Replacement (months) Pulse Duration (ms) Pulse Amplitude (V) Output Energy (µJ) Lead Current (mA) Lead Impedance (Ω) Pacing Configuration (Unipolar/Bipolar) Refer to the “Reference man.” category in doc#163256 for Printing Instructions. Medtronic Confidential 9879EN-15_9501043EN/CTC.qxd 5/10/99 11:32 Page 15-5 7 x 9 inches (178 mm x 229 mm) Telemetry Functions 15-5 Preserving Battery and Lead Data The Battery/Lead Data Report should be printed out at every follow-up session and kept in the patient record. Significant changes in chronic lead data could indicate a lead dislodgement or fracture. Battery status changes could indicate that the battery is nearing depletion. For Further Information Refer to “Displaying Battery and Lead Information” in Chapter 4 for instructions on retrieving battery and lead data. 196407001 Rev A Refer to the “Reference man.” category in doc#163256 for Printing Instructions. Medtronic Confidential 9879EN-15_9501043EN/CTC.qxd 5/10/99 11:32 Page 15-6 7 x 9 inches (178 mm x 229 mm) 15-6 Understanding Pacemaker Operations Marker Channel™ Telemetry Overview Marker Channel telemetry provides simple depictions of paced and sensed events that aid in the evaluation of pacemaker timing and operations. The annotations are most useful when considered in conjunction with a simultaneous ECG and/or EGM. Marker Channel telemetry is available in all modes. Marker Channel Diagrams is available in all dual chamber modes, including the VDD mode. Selections The following Marker Channel selections are provided: ■ Marker Channel Recordings. Two types of recordings are available: - Marker Telemetry. When Marker Telemetry is selected, annotated vertical markers show paced, sensed, and refractory sensed events. Atrial markers and ventricular markers have distinctive placements and heights to denote the type of event marked. Marker Telemetry may be used to identify which ECG events are treated as paced or sensed events by the pacemaker and to measure timing intervals. - Sensor Telemetry. When Sensor Telemetry is selected, nonannotated markers identify whether and to what extent the activity sensor is stimulated. Markers appear when detected activity exceeds the programmed threshold. ■ Marker Channel Diagrams. These diagrams illustrate programmable and fixed dual chamber timing intervals for a frozen portion of an ECG. The diagrams use distinctive annotations, symbols, and placements appropriate for the type of atrial or ventricular operations. NOTE: The surface ECG is not diagnosed by the Marker Channel Diagram. For example, the ECG may show an intrinsic event that is not marked as sensed or refractory on the Marker Channel Diagram. In such cases, pacemaker troubleshooting is suggested (refer to Chapter 18 “Troubleshooting the Pacing System”). 196407001 Rev A Refer to the “Reference man.” category in doc#163256 for Printing Instructions. Medtronic Confidential 9879EN-15_9501043EN/CTC.qxd 5/10/99 11:32 Page 15-7 7 x 9 inches (178 mm x 229 mm) Telemetry Functions 15-7 Marker Annotations AP = Atrial pace AS = Atrial sense AR = Atrial sense in refractory VP = Ventricular pace VS = Ventricular sense VR = Ventricular sense in refractory TP = Triggered Pace (AAT or VVT pacing mode) MS = Mode Switch Episode (marks the beginning and the end) ER = Error Marker (flags a Marker signal that could not be decoded) For Further Information Marker Channel Recordings and Diagrams are further described in Chapter 5. Information for interpreting Marker Channel Diagrams is provided there. 196407001 Rev A Refer to the “Reference man.” category in doc#163256 for Printing Instructions. Medtronic Confidential 9879EN-15_9501043EN/CTC.qxd 5/10/99 11:32 Page 15-8 7 x 9 inches (178 mm x 229 mm) 15-8 Understanding Pacemaker Operations Intracardiac Electrogram (EGM) Overview The intracardiac electrogram (EGM) is a real-time waveform as detected by the atrial or ventricular lead(s) accompanied by Marker Channel annotation. Pacing stimuli are not detected by the EGM circuitry, but the programmer inserts simulated pacing pulses in the appropriate locations on the EGM recording. The EGM can be displayed on the programmer or printed out as shown below. NOTE: The simulated pacing pulses on the EGM should not be interpreted as representing the actual amplitude of paced events. Use an ECG to determine such events. Electrogram with Marker Channel Recordings 196407001 Rev A Refer to the “Reference man.” category in doc#163256 for Printing Instructions. Medtronic Confidential 9879EN-15_9501043EN/CTC.qxd 5/10/99 11:32 Page 15-9 7 x 9 inches (178 mm x 229 mm) Telemetry Functions 15-9 Uses for Electrogram The intracardiac electrogram shows intracardiac waveforms and their timing as the pacemaker sees them. It may be used as follows: ■ Atrial and ventricular waveforms may be evaluated for the following: - ■ Relative amplitude of intrinsic signals Myopotentials or electromagnetic interference (EMI) Loss of atrial capture Retrograde P-waves Supraventricular tachycardias Timing intervals may be evaluated as follows: - Appropriate Paced AV and Sensed AV parameters may be determined by measuring AV conduction times. - An appropriate Post-Ventricular Atrial Refractory Period (DDDR, DDD, DDIR, DDI, and VDD modes) may be determined by measuring VA conduction times. NOTE: Absolute intracardiac amplitudes measured from the EGM should not be used to assess programmed Sensitivity. Use the Sensing Threshold Test instead. Maintaining Telemetry The programming head must be held in place over the pacemaker while telemetering the EGM. Enabling the programmer “inhibit” function will inhibit pacing and display intrinsic events only. WARNING: Use the programmer “inhibit” function with care when obtaining intrinsic EGMs, because the patient is without pacing support. For Further Information For additional information, refer to “Displaying the Patient's ECG and EGM” in Chapter 5. 196407001 Rev A Refer to the “Reference man.” category in doc#163256 for Printing Instructions. Medtronic Confidential 9879EN-15_9501043EN/CTC.qxd 5/10/99 11:32 Page 15-10 7 x 9 inches (178 mm x 229 mm) 15-10 Understanding Pacemaker Operations Extended Telemetry Overview Extended Telemetry is a programmable ON/OFF feature intended for frequent patient monitoring in the permanently programmed mode during a 24-hour period. ■ When Extended Telemetry is programmed ON, the pacemaker continuously transmits telemetry data regardless of whether the programming head is applied or not. ■ Extended Telemetry is automatically programmed OFF by the pacemaker after 24-hours. (A programmer command can terminate the feature prior to automatic shutoff.) Extended Telemetry Options When Extended Telemetry is programmed ON, one of the following telemetry types may be selected for automatic transmission: ■ EGM with Marker Channel annotations ■ Marker Telemetry ■ Sensor Telemetry Additional Battery Drain Extended Telemetry significantly increases pacemaker battery current drain. ■ The pacemaker’s longevity will be reduced by approximately a day for each day that Extended Telemetry is used. ■ Extended Telemetry should not be used when the Elective Replacement Indicator is set. For Further Information Refer to “Programming Additional Parameters” in Chapter 6 for programming instructions regarding Extended Telemetry. 196407001 Rev A Refer to the “Reference man.” category in doc#163256 for Printing Instructions. Medtronic Confidential 9879EN-16_9501043EN/CTC.qxd 5/10/99 11:33 Page 16-1 7 x 9 inches (178 mm x 229 mm) CHAPTER 16 Miscellaneous Operations About This Chapter This chapter describes certain special operations of the Prodigy pacemaker, as follows: ■ Magnet Mode Operation (see page 16-2) ■ Temporary Programming (see page 16-5) ■ Electrical Reset (see page 16-6) ■ Elective Replacement Indicator (ERI) (see page 16-8) ■ Emergency Pacing (see page 16-9) 16-1 196407001 Rev A Refer to the “Reference man.” category in doc#163256 for Printing Instructions. Medtronic Confidential 9879EN-16_9501043EN/CTC.qxd 5/10/99 11:33 Page 16-2 7 x 9 inches (178 mm x 229 mm) 16-2 Understanding Pacemaker Operations Magnet Mode Operation Overview When the programming head (or other powerful magnet) is placed over the pacemaker, an internal reed switch closes to initiate Magnet Mode operation. Magnet application initiates a Threshold Margin Test and may temporarily suspend the operation of specific features. Magnet Mode Functions When the magnetic reed switch closes during normal operations, the pacemaker performs the following actions: ■ A Threshold Margin Test (TMT) is performed at 100 ppm, with pulse width reduced by 25% on the third pacing cycle as a check for loss of capture. WARNING: Loss of capture during TMT indicates that the stimulation threshold safety margin is inadequate. Immediately perform a Pacing Threshold Test and reprogram outputs to establish a 2:1 voltage safety margin. ■ The pacemaker switches to an asynchronous mode and paces at the magnet rate. - Magnet modes are as follows: DOO in modes with dual chamber pacing, VOO in the VDD mode, and VOO/AOO in single chamber modes. - Magnet rate for normal operation is 85 ppm for all modes. - Magnet rate is 65 ppm when the Elective Replacement Indicator is set or a full electrical reset has occurred. 196407001 Rev A ■ Telemetry is enabled. ■ Diagnostic data collection is suspended. Refer to the “Reference man.” category in doc#163256 for Printing Instructions. Medtronic Confidential 9879EN-16_9501043EN/CTC.qxd 5/10/99 11:33 Page 16-3 7 x 9 inches (178 mm x 229 mm) Miscellaneous Operations 16-3 Magnet Mode remains in effect as long as the programming head (or other magnet) remains in position unless canceled by a programmer command. When the magnet is removed, the pacemaker resumes programmed operation within two seconds. Establish Magnet Mode Operation Magnet mode operation is established by placing the programming head over the implant site and moving the head along the axis as shown below until the head light indicates telemetry is possible. Also, Magnet Mode operation can be confirmed by a head-positioning feature that sends telemetry confirmation signals continuously. Refer to “Using the Programming Head” in Chapter 2. Axis Prodigy DR (7860/61/62) Prodigy D (7864/65/66) Prodigy VDD (8168) Axis Prodigy SR (8158, 8160/61/62) Prodigy S (8164/65/66) Positioning the Programming Head 196407001 Rev A Refer to the “Reference man.” category in doc#163256 for Printing Instructions. Medtronic Confidential 9879EN-16_9501043EN/CTC.qxd 5/10/99 11:33 Page 16-4 7 x 9 inches (178 mm x 229 mm) 16-4 Understanding Pacemaker Operations Special Operation with Extended Telemetry When the Extended Telemetry feature is programmed ON, the pacemaker responds to magnet application by sending telemetry data, as described in the “Extended Telemetry” section of Chapter 15. For Further Information “Transtelephonic Capture Verification with TMT” in Chapter 13 provides a detailed discussion of the Threshold Margin Test. 196407001 Rev A Refer to the “Reference man.” category in doc#163256 for Printing Instructions. Medtronic Confidential 9879EN-16_9501043EN/CTC.qxd 5/10/99 11:33 Page 16-5 7 x 9 inches (178 mm x 229 mm) Miscellaneous Operations 16-5 Temporary Programming Overview Pacing mode and certain other parameters may be programmed temporarily for diagnostic purposes or to test their effects on pacing operations prior to permanent programming. Permanent settings are restored automatically when the programming head is removed or the telemetry link is broken. Temporarily Programmable Parameters Five pacing parameters may be programmed temporarily: ■ Mode. Temporary modes are DDD, ODO, VVI, AAI, VVT, AAT, OVO, OAO, VOO, and AOO. ■ Rate. High rates up to 400 ppm are programmable in VVI, AAI, VVT, AAT, VOO, and AOO modes. ■ Pulse amplitude(s). All values are available. ■ Pulse width(s). All values are available. ■ Sensitivity(ies). All values are available. NOTE: Available modes are dependent on the permanent mode. Temporary Refractory Settings Temporary programming of the VVI, AAI, VVT, or AAT mode temporarily sets the appropriate refractory period (Atrial Refractory Period and/or Ventricular Refractory Period) to 150 ms. The DDD mode temporarily sets PVARP to 400 ms. Atrial modes have Atrial Blanking set to 100 ms. It also enables pacing rates up to 400 ppm. For Further Information Refer to “Programming Temporary Parameter Values” in Chapter 7 for additional information on temporary programmable parameters. 196407001 Rev A Refer to the “Reference man.” category in doc#163256 for Printing Instructions. Medtronic Confidential 9879EN-16_9501043EN/CTC.qxd 5/10/99 11:33 Page 16-6 7 x 9 inches (178 mm x 229 mm) 16-6 Understanding Pacemaker Operations Electrical Reset Overview Under extreme conditions, a momentary interruption of electrical power to the pacemaker’s control circuitry may cause an electrical reset. Pacing parameters are reset to specific values when power is restored. An electrical reset may occur when the pacemaker is exposed to cold temperatures, electrocautery, external defibrillation, or therapy from an implanted defibrillator. Two types of electrical reset are possible: ■ Partial reset. Polarity, pacing mode, and certain other parameters are preserved. Lower (Pacing) Rate is at 65 ppm. ■ Full reset. Pacing resumes in the VVI mode at 65 ppm with reset parameters. The programmer detects and reports any reset condition when the pacemaker is interrogated. A full reset also may be inferred when the ECG shows VVI pacing at 65 ppm and the battery is not depleted (Elective Replacement Indicator [ERI] is not set). Partial Electrical Reset If a partial electrical reset occurs, the pacemaker automatically preserves the following parameters to their previously programmed states: ■ pacing and sensing polarities ■ pacing mode ■ Mode Switch selection ■ ERI status All other parameters are changed to their Electrical Reset values (refer to the “Electrical Reset Parameter Settings,” Section B in Part III). 196407001 Rev A Refer to the “Reference man.” category in doc#163256 for Printing Instructions. Medtronic Confidential 9879EN-16_9501043EN/CTC.qxd 5/10/99 11:33 Page 16-7 7 x 9 inches (178 mm x 229 mm) Miscellaneous Operations 16-7 Full Electrical Reset If a full electrical reset occurs, all programmed values are lost. When power is restored, the pacemaker automatically performs the following reset recovery operations: ■ Mode is set to VVI at 65 ppm. ■ In bipolar models, the pacemaker determines whether a functioning bipolar lead is present in the ventricle. If so, it sets ventricular pacing and sensing polarities to bipolar. If not, pacing and sensing polarities are set to unipolar. All other parameters are set to Electrical Reset values (see “Electrical Reset Parameter Settings,” Section B in Part III). NOTE: If the pacemaker is found in the VVI mode at 65 ppm, use the programmer “Status Reset” command to clear the reset condition and reprogram the pacemaker. If after interrogating the pacemaker a message appears on the programmer screen/printout indicating the Date/Time memory has been altered, contact your Medtronic representative for further information. 196407001 Rev A Refer to the “Reference man.” category in doc#163256 for Printing Instructions. Medtronic Confidential 9879EN-16_9501043EN/CTC.qxd 5/10/99 11:33 Page 16-8 7 x 9 inches (178 mm x 229 mm) 16-8 Understanding Pacemaker Operations Elective Replacement Indicator (ERI) Overview The Elective Replacement Indicator (ERI) is reported upon interrogation with the programmer when the pacemaker battery is nearly depleted. When the ERI is set, the pacemaker is automatically reprogrammed to a distinctive set of parameters. For the Prodigy pacemaker, ERI is permanent VVI mode at 65 ppm. Basis for Setting ERI ERI is set when the battery voltage drops below a certain limit and remains there. (The ERI criteria for all Prodigy pacemaker models are listed in the “Elective Replacement Indicator [ERI],” Section C in Part III.) When ERI is set, diagnostic data collection is suspended, but data previously collected is retained in the pacemaker’s memory. WARNING: When ERI is set, Prodigy DR, Prodigy D, and Prodigy VDD pacemakers should be replaced within 3.0 months, whereas, Prodigy SR and Prodigy S pacemakers should be replaced within 2.5 months. For projected time remaining until cessation of pacing, refer to “Longevity Projections,” Section C in Part III. ERI Verification When the programmer detects that ERI is set, it displays a message. Upon command, the programmer will attempt to reset the ERI. The programmer first performs a stress test to determine the battery’s condition. If the battery fails the stress test, the programmer will not reset ERI. Because ERI is set only after multiple voltage measurements, it is unlikely to be set prematurely. Therefore, it is anticipated that most attempts to reset it will fail. For Further Information Refer to the section “Displaying a Summary of Pacemaker Status” in Chapter 4 to interrogate the pacemaker’s battery and ERI status. Refer to the section “Elective Replacement Indicator (ERI),” Section C in Part III, for further information on ERI parameter settings for all Prodigy models. 196407001 Rev A Refer to the “Reference man.” category in doc#163256 for Printing Instructions. Medtronic Confidential 9879EN-16_9501043EN/CTC.qxd 5/10/99 11:33 Page 16-9 7 x 9 inches (178 mm x 229 mm) Miscellaneous Operations 16-9 Emergency Pacing Overview Emergency pacing provides VVI pacing at high output settings in emergency situations for pacemaker-dependent patients. For Further Information Refer to “Emergency Parameter Settings,” Section B in Part III, for more information. 196407001 Rev A Refer to the “Reference man.” category in doc#163256 for Printing Instructions. Medtronic Confidential 7 x 9 inches (178 mm x 229 mm) 196407001 Rev A Refer to the “Reference man.” category in doc#163256 for Printing Instructions. Medtronic Confidential 9879EN-17_9501043EN/CTC.qxd 5/10/99 11:34 Page 17-1 7 x 9 inches (178 mm x 229 mm) CHAPTER 17 Diagnostics About This Chapter This chapter describes diagnostic capabilities of Prodigy pacemakers, as follows: ■ Introduction to Prodigy Diagnostics (see page 17-2) ■ Event Summary (see page 17-4) ■ Rate Histogram (see page 17-6) ■ High Rate Episode (see page 17-8) 17-1 196407001 Rev A Refer to the “Reference man.” category in doc#163256 for Printing Instructions. Medtronic Confidential 9879EN-17_9501043EN/CTC.qxd 5/10/99 11:34 Page 17-2 7 x 9 inches (178 mm x 229 mm) 17-2 Understanding Pacemaker Operations Introduction to Prodigy™ Diagnostics Overview The Prodigy pacemaker offers both background and programmable diagnostics intended for evaluation of the patient’s intrinsic rhythms and the pacemaker’s operation. All Event Summary diagnostics run continuously in the background. Only one of the three programmable diagnostics can be selected at a time. Event Summary Event Summary is a nonprogrammable, pacemaker function that provides summary counts. At the first data summary “Interrogate” or “Interrogate All” command at each follow-up session, the Event Summary data are automatically telemetered to the programmer and the counters are cleared. Thus, data collection is independent of the programmable diagnostics. Event Monitoring Diagnostics Three programmable event monitoring diagnostics are listed below. Two are described in this chapter (depending on the Prodigy model and programmed mode), the other diagnostic is described elsewhere. They are as follows: 196407001 Rev A ■ Rate Histogram. Collects heart rate and percent-paced data for the atrium and/or ventricle. ■ High Rate Episode. Collects data on high-rate episodes occurring in the atrium or ventricle. ■ Lead Trend. Collects lead impedance data over time (Chapter 13). Refer to the “Reference man.” category in doc#163256 for Printing Instructions. Medtronic Confidential 9879EN-17_9501043EN/CTC.qxd 5/10/99 11:34 Page 17-3 7 x 9 inches (178 mm x 229 mm) Diagnostics 17-3 Exceptional Conditions Under exceptional conditions, the pacemaker may discontinue or suspend the programmed diagnostic: ■ If the Lead Monitor is programmed ON and abnormal lead impedance is detected (Chapter 13), the pacemaker automatically activates the Lead Trend diagnostic, overriding any other diagnostic choice. Any previously collected data are overwritten. ■ If the Elective Replacement Indicator (ERI) is tripped (Chapter 16), diagnostic data collection is suspended and the date ERI was tripped is recorded. Any data already collected are preserved. ■ Programming of any diagnostic is disabled if ERI is tripped. ■ Data collection is suspended during magnet application. Clearing Diagnostic Data All data for the currently programmed diagnostic are erased by any of the following actions: 196407001 Rev A ■ programming another diagnostic, ■ using the programmer’s “Clear Data” command, or ■ initiating the activity threshold test or exercise test. Refer to the “Reference man.” category in doc#163256 for Printing Instructions. Medtronic Confidential 9879EN-17_9501043EN/CTC.qxd 5/10/99 11:34 Page 17-4 7 x 9 inches (178 mm x 229 mm) 17-4 Understanding Pacemaker Operations Event Summary Overview The Event Summary reports certain pacing and sensing statistics automatically collected by the pacemaker and telemetered to the programmer at interrogation. The summary data complements and supplements data collected by the programmable diagnostics. This data is displayed on the Data Summary screen of the programmer or may be printed. Types of Data Summarized The types of data collected and summarized depend on the programmed mode and other options. The possible data types are as follows: ■ % Total Events. Presents percentages of the types of AV event sequences (dual chamber modes) or paced and sensed events (single chamber modes), as follows: - Dual Chamber Modes (Except VDD): AS-VS, AS-VP, AP-VS, and AP-VP sequences - VDD Mode: AS-VS and AS-VP sequences VS (ventricular sense preceded by ventricular event) VP (ventricular pace preceded by ventricular event) - Single Chamber Modes: Sensed and paced events The percentages are based on actual counts (refractory sensed events are excluded), which may be printed out with the programmer. Counting ceases when any counter reaches the maximum count. Reaching the maximum count limit is unlikely since each counter can store several years of data. ■ 196407001 Rev A Premature Ventricular Contractions (PVC). In dual chamber modes, counts pacemaker-defined PVCs (a sensed ventricular event following any ventricular event with no intervening atrial event) and runs of two or more consecutive PVCs with no intervening atrial event (dual chamber modes). The combined maximum count of single PVCs and PVC runs is at least 65,536. Refer to the “Reference man.” category in doc#163256 for Printing Instructions. Medtronic Confidential 9879EN-17_9501043EN/CTC.qxd 5/10/99 11:34 Page 17-5 7 x 9 inches (178 mm x 229 mm) Diagnostics ■ 17-5 Mode Switches. Counts mode changes from the DDDR, DDD, or VDD mode to a non-atrial tracking mode (available only when Mode Switch is programmed ON). The maximum count is 255. Collecting Event Summary Data Event Summary data are automatically telemetered to the programmer when the pacemaker is first interrogated by the data summary “Interrogate” or “Interrogate All” command at each follow-up session. The counters are cleared automatically by the programmer at each follow-up session, so Event Summary data should be reviewed and/or printed out before the end of a follow-up session, or it will be lost. The example below shows how Event Summary data is displayed on the Data Summary screen of the programmer. The data also may be printed out on the programmer. Example of Event Summary Data For Further Information Refer to “Displaying a Summary of Pacemaker Status” in Chapter 4 for information on retrieving Event Summary data. 196407001 Rev A Refer to the “Reference man.” category in doc#163256 for Printing Instructions. Medtronic Confidential 9879EN-17_9501043EN/CTC.qxd 5/10/99 11:34 Page 17-6 7 x 9 inches (178 mm x 229 mm) 17-6 Understanding Pacemaker Operations Rate Histogram Overview The Rate Histogram counts and collects atrial and/or ventricular events and classifies them by rate range and the percentage paced out of the total beats counted. This diagnostic is intended for ambulatory monitoring uses, including the following: ■ assessing chronotropic incompetence ■ monitoring rate distribution ■ evaluating programmed rate response parameters Data Collection The Rate Histogram counts all paced and sensed atrial and/or ventricular events. The event counts and percentage paced information are recorded in event groups (bins) between the rates of 45 and 185 ppm. Events at rates below 45 ppm are counted in the lowest event group; rates above 185 ppm are counted in the highest event group. Refractory sensed events can be included or excluded by programming the desired option. The collection period for the Rate Histogram is indicated by the starting and ending dates. NOTE: In dual chamber modes, some events below the programmed Lower Rate may be recorded on the ventricular histogram when intrinsic activity alternates with Lower Rate pacing. This is normal with A-A timing. Each Rate Histogram bin can store several years of event data. Data collection ceases when any rate bin is filled. 196407001 Rev A Refer to the “Reference man.” category in doc#163256 for Printing Instructions. Medtronic Confidential 9879EN-17_9501043EN/CTC.qxd 5/10/99 11:34 Page 17-7 7 x 9 inches (178 mm x 229 mm) Diagnostics 17-7 Events Displayed Outside Lower and Upper Rate Limits The diagnostic’s displayed rate for each event is based on the interval from the previous event. When refractory sensed events are included, AR-AP or VR-VP intervals result in displayed paced beats which are significantly higher than the actual pacing rate. These displayed rates can appear above the programmed Upper Activity Rate in rate responsive modes or above the programmed Lower Rate in non-rate responsive modes. The diagnostic also displays paced and sensed events of the actual pacing rate below the programmed Lower Rate during any of the following scenarios: A-A timing, Single Chamber Hysteresis rates, and VDD mode operation. Retrieving the Rate Histogram When the Rate Histogram is interrogated, the programmer retrieves the histogram data and presents a rate profile. Each segment of the reportable rate-range is annotated with its percentage-paced category (0%, 1 to 49%, 50 to 99%, and 100% paced). The example below shows how Rate Histograms are presented on the programmer. The report can be printed or displayed on the programmer. Example of Rate Histogram Display For Further Information Refer to Chapter 8, “Collecting and Retrieving Diagnostic Data,” for information on configuring the Rate Histogram diagnostic and collecting its data. 196407001 Rev A Refer to the “Reference man.” category in doc#163256 for Printing Instructions. Medtronic Confidential 9879EN-17_9501043EN/CTC.qxd 5/10/99 11:34 Page 17-8 7 x 9 inches (178 mm x 229 mm) 17-8 Understanding Pacemaker Operations High Rate Episode Overview The High Rate Episode monitor is intended for detection and assessment of episodes of atrial or ventricular tachycardia. It can record data for up to 15 High Rate Episodes, or 7 High Rate Episodes and one Electrogram (EGM) associated with an episode. Episode Data Collected Atrial or ventricular sensed, refractory sensed, and paced events may be counted as part of a high rate episode. For each high rate episode detected, the pacemaker records the following data: ■ date, time, and duration ■ highest sampled rate (Tachy Rate) ■ rates for 24 events, as follows: - the eight events immediately preceding the episode - the first eight events of the episode - the last eight events of the episode 196407001 Rev A Refer to the “Reference man.” category in doc#163256 for Printing Instructions. Medtronic Confidential 9879EN-17_9501043EN/CTC.qxd 5/10/99 11:34 Page 17-9 7 x 9 inches (178 mm x 229 mm) Diagnostics 17-9 How High Rate Episodes Are Defined For the purposes of this diagnostic, a “high rate episode” begins when a specified number of sequential heart beats exceeds a specified rate. The episode ends when a specified number of sequential heartbeats occur below the specified rate. The table that follows describes the programmable parameters that define a high rate episode. Programmable Parameters for High Rate Episode Detection Parameter Range Meaning Detection Rate 80 to 400 ppm The minimum rate above which the atrial or ventricular rate is declared a high rate episode. Detection Number 2 to 200 events The number of sequential events above the Detection Rate required for a high rate episode. Termination Number 2 to 20 events The number of sequential events below the Detection Rate required to end a high rate episode. Programmable Data Collection Options The following programmable options control how episode data are collected: Programmable Options for High Rate Episode Data Collection 196407001 Rev A Parameter Values Meaning Type Atrial or ventricular Chamber for which episode data are collected. Data collection method Frozen or Rolling episodes The Frozen method collects data for the first 15 High Rate Episodes (seven when EGM is selected). The Rolling method continuously collects data for the mostrecent 15 High Rate Episodes (seven when EGM is selected), overwriting the oldest data if necessary. EGM OFF or ON When ON, the number of episodes collected is reduced to seven with an approximately two second EGM with simulated pacing pulses for one High Rate Episode. Refer to the “Reference man.” category in doc#163256 for Printing Instructions. Medtronic Confidential 9879EN-17_9501043EN/CTC.qxd 5/10/99 11:34 Page 17-10 7 x 9 inches (178 mm x 229 mm) 17-10 Understanding Pacemaker Operations Collecting EGM Data If the EGM option is programmed ON, an approximately two second EGM with simulated pacing pulses is recorded for one episode, and the number of episodes for which data can be recorded is reduced to seven. The episode for which the EGM is recorded is selected as follows: ■ Frozen Episodes. An EGM is recorded for the first episode detected. ■ Rolling Episodes. An EGM is recorded for the first episode detected. Once every 24 hours, a new EGM will be recorded if another episode occurs. When episodes occur infrequently, the EGM will be for the last episode. To avoid ambiguity, the programmer always identifies the episode for which EGM data was recorded. Recording High Rate Atrial Episodes in Dual Chamber Modes In the DDDR, DDD, DDIR, DDI, and VDD modes, atrial sensing is blanked for a programmable interval (the Post-Ventricular Atrial Blanking) following any ventricular event. Detection of high rate atrial episodes in these modes may be inhibited by blanking when high Detection Counts are programmed and may result in a periodic rate drop on the displayed graph or printed tabular report. Events Displayed Outside Upper Rate Limit The High Rate Episode displayed rate for each event is based on the interval from the previous event. AR-AP or VR-VP intervals result in displayed paced beats which are significantly higher than the actual pacing rate. These displayed rates can appear above the programmed Upper Activity Rate in rate responsive modes or above the programmed Lower Rate in non-rate responsive modes. (For example, an AR-AP event at a rate of 200 ppm (300 ms) can be an indicator of Non-Competitive Atrial Pacing therapy.) Retrieving High Rate Episode Data The first example below shows how High Rate Episode data are summarized on the programmer. The next example shows how the programmer presents detailed data for a selected episode. All reports can be printed out or displayed on the programmer. 196407001 Rev A Refer to the “Reference man.” category in doc#163256 for Printing Instructions. Medtronic Confidential 9879EN-17_9501043EN/CTC.qxd 5/10/99 11:34 Page 17-11 7 x 9 inches (178 mm x 229 mm) Diagnostics 17-11 Example of High Rate Episodes Display Example of Detailed View of High Rate Episode For Further Information Refer to Chapter 8, “Collecting and Retrieving Diagnostic Data,” for information on configuring the High-Rate Episode diagnostic and collecting its data. 196407001 Rev A Refer to the “Reference man.” category in doc#163256 for Printing Instructions. Medtronic Confidential 7 x 9 inches (178 mm x 229 mm) 196407001 Rev A Refer to the “Reference man.” category in doc#163256 for Printing Instructions. Medtronic Confidential 9879EN-18_9501043EN/CTC.qxd 5/10/99 11:35 Page 18-1 7 x 9 inches (178 mm x 229 mm) CHAPTER 18 Troubleshooting the Pacing System About This Chapter This chapter describes how to isolate and correct problems with the Prodigy pacing system. The sections are as follows: ■ Troubleshooting Strategy (see page 18-2) ■ Troubleshooting Electrical Problems (see page 18-3) ■ Troubleshooting Hemodynamic Problems (see page 18-5) ■ Handling, Storage, and Resterilization (see page 18-7) ■ Pacemaker Longevity (see page 18-8) ■ Replacing the Pacemaker (see page 18-10) ■ Patient Information and Service (see page 18-11) – – – – Registration Patient Manual Establishing a Patient Record Assistance Information 18-1 196407001 Rev A Refer to the “Reference man.” category in doc#163256 for Printing Instructions. Medtronic Confidential 9879EN-18_9501043EN/CTC.qxd 5/10/99 11:35 Page 18-2 7 x 9 inches (178 mm x 229 mm) 18-2 Understanding Pacemaker Operations Troubleshooting Strategy Overview When troubleshooting pacemaker problems, the clinician must consider both electrical problems and the effect of various parameter settings on cardiac hemodynamics. Determining the nature of the troubleshooting problem is the first step toward solving it. The following questions may help pinpoint the type of problem: ■ Is the pacing system operating per design? ■ Is this operation appropriate for this patient? The answer to the first question helps determine whether the patient has a conduction disorder or the pacemaker has an electrical problem. The answer to the second question helps to assess the hemodynamic appropriateness of the pacemaker’s settings. For example, when a DDD pacemaker tracks an atrial tachycardia, it is operating as it was intended to perform. While its electrical function is appropriate, the hemodynamic result may not be appropriate (for example, if the patient also has angina). While troubleshooting may sometimes be challenging, the steps in the troubleshooting process are simple, and they are the same for each type of problem: 196407001 Rev A 1. Define the problem 2. Identify the cause of the problem 3. Correct the problem Refer to the “Reference man.” category in doc#163256 for Printing Instructions. Medtronic Confidential 9879EN-18_9501043EN/CTC.qxd 5/10/99 11:35 Page 18-3 7 x 9 inches (178 mm x 229 mm) Troubleshooting the Pacing System 18-3 Troubleshooting Electrical Problems Defining Electrical Problems When investigating an electrical problem, the clinician will need data from a wide variety of sources, including the following: ■ Patient Data. Determine the patient’s medical history, especially the underlying cardiac rhythm. ■ Pacemaker Data. Determine the device model and serial number and, especially, its elective replacement characteristics. ■ Lead Data. Determine the lead type and serial number and, most importantly, the impedance data on each lead. Identifying the Cause of an Electrical Problem Electrical problems have only six potential causes. Pinpointing the actual cause, however, is sometimes difficult. During the problem-identification phase of troubleshooting, one should consider not only the surface ECG, but also the intracardiac electrograms and Marker Channel recordings. The six causes of electrical problems are as follows: 196407001 Rev A ■ Undersensing. If the pacemaker fails to reset or start timing operations when P- and/or R-waves are apparent on the surface ECG, undersensing is the likely cause. If undersensing is occurring, Marker Channel telemetry will fail to display appropriate sense markers (AS, AR, VS, and VR). One possible cause would be inappropriate programming of the sensitivity settings(s). Refer to “Determining a Setting for Sensitivity” in Chapter 7. ■ Oversensing. If the pacemaker resets or starts timing intervals when no P- or R-waves are apparent on the surface ECG, oversensing is the likely cause. If so, Marker Channel telemetry will display inappropriate sense markers. A sensitivity setting programmed to a very low number might be the cause. Refer to “Determining a Setting for Sensitivity” in Chapter 7. ■ Noncapture. When pacing occurs with no evidence of a depolarization after each pacing artifact/spike on the surface ECG, loss of capture has occurred. Investigate the output settings. Are the amplitude and pulse width settings adequate to consistently capture cardiac tissue? When capture is lost, a threshold test may be used to determine appropriate Refer to the “Reference man.” category in doc#163256 for Printing Instructions. Medtronic Confidential 9879EN-18_9501043EN/CTC.qxd 5/10/99 11:35 Page 18-4 7 x 9 inches (178 mm x 229 mm) 18-4 Understanding Pacemaker Operations output settings (refer to “Measuring Stimulation Thresholds” in Chapter 7). If a lead problem is suspected, the Prodigy pacemaker’s Lead Trend diagnostic can provide trend data on the integrity of the lead. ■ No output. If pacing artifacts do not appear on the ECG, even though Marker Channel telemetry shows pacing markers (AP or VP), output to the cardiac tissue may be compromised. If pacing stimuli are not being delivered (digitized ECGs sometimes miss pacing artifacts), a lead wire fracture or a faulty lead connection might be the source of the problem. Determine the lead impedance and compare to values from previous followup sessions. ■ Altered Parameter. If the pacing mode or other parameter differs from what appears on the latest entry in the patient’s record (for example, the patient presents with the pacemaker in the VVI mode), battery depletion or full electrical reset might be the cause. ■ Undesirable Side Effects. This category that covers a broad range of situations. For example, a patient might present with a pectoralis muscle being stimulated at the programmed pacing rate due to high amplitude output(s) with a unipolar pacemaker. Or, another might have all the classic symptoms of pacemaker syndrome, due to retrograde P-waves that may occur with the loss of AV synchrony. Correcting the Problem Four types of solution apply to electrical problems, two non-invasive and two invasive. 196407001 Rev A ■ Reprogramming. For example, pocket stimulation usually occurs with unipolar pacing. In some systems the device may be programmed to bipolar pacing, if available. ■ Changing the patient’s medication or diet. Some anti-arrhythmic drugs, for example, may alter the patient’s stimulation threshold. Diet may alter the patient’s electrolyte balance, having a direct effect on the stimulation threshold. ■ Repositioning the lead. If a lead slips out of position, it may be impossible to pace and/or sense consistently. If this is confirmed, the lead must be repositioned or replaced. ■ Replacing the lead or the pacemaker. If the lead wire is fractured or the battery is depleted, there is no other recourse than to replace one or both. Refer to the “Reference man.” category in doc#163256 for Printing Instructions. Medtronic Confidential 9879EN-18_9501043EN/CTC.qxd 5/10/99 11:35 Page 18-5 7 x 9 inches (178 mm x 229 mm) Troubleshooting the Pacing System 18-5 Troubleshooting Hemodynamic Problems Defining a Hemodynamic Problem When investigating a hemodynamic problem, data will be needed from many sources, including: ■ Patient Data. Determine the patient’s condition and daily routine. Is the patient active or relatively sedentary? Is the patient on drug therapy? If the problem is activity-related, what is the patient doing when the problem occurs, and what are the symptoms? ■ Pacemaker Data. Determine the device’s model and serial number, its diagnostic capabilities, and its programmed settings. Identifying the Cause of a Hemodynamic Problem Identifying the cause of a hemodynamic problem can be challenging. Prodigy diagnostic features, however, simplify the evaluation of such problems by providing immediate long term information about pacemaker settings and function. The three most common causes of hemodynamic problems are listed below. 196407001 Rev A ■ Pacemaker Syndrome. This occurs when the pacemaker mode or parameter settings result in a loss of AV synchrony. Most commonly, in dual chamber modes, the problem is related to an inappropriate AV interval, but it may also result from premature onset of 2:1 block or loss of atrial capture or sensing. Use of atrial Electrogram, the Marker Channel recording, or the Marker Channel Diagram can help determine the exact cause. ■ Inappropriate Rate Response. This may result when programmed rate response settings do not match the patient’s activity needs. The activity threshold may be set too low or high. Other causes are rate response settings that are too aggressive or not aggressive enough. A simple exercise test may be used to establish rate response settings (refer to “Determining Rate Response Parameter Settings” in Chapter 7). The Rate Histogram (Chapter 17) diagnostic may be used to validate and fine tune the patient’s rate response prescription. Refer to the “Reference man.” category in doc#163256 for Printing Instructions. Medtronic Confidential 9879EN-18_9501043EN/CTC.qxd 5/10/99 11:35 Page 18-6 7 x 9 inches (178 mm x 229 mm) 18-6 Understanding Pacemaker Operations ■ Changes in Patient Condition. A common example is the development of chronic atrial flutter or fibrillation post-implant. If the clinician suspects this condition, the Prodigy pacemaker’s High Rate Episode diagnostic can provide information on atrial tachycardias that are sensed, including the rates at which they occur and the number of occurrences (refer to Chapter 17 for more information). If Mode Switch is programmed ON, the Event Summary will include a count of mode switch events. Correcting a Hemodynamic Problem Solutions to hemodynamic problems are invariably non-invasive. 196407001 Rev A ■ Alter Rate Response Settings. A patient who feels lightheaded while walking up a flight of stairs may have a rate response setting that is not responsive enough. A possible solution may be to change the patient’s Activity Rate Response setting or Activity Threshold. ■ Change the Patient’s Medication. In patients with intermittent atrial tachycardias, drug therapy can reduce the frequency of SVTs. ■ Reprogram. In dual chamber modes, if the patient experiences intermittent sudden ventricular tachycardia, it may be necessary to program the Mode Switch feature ON. Refer to the “Reference man.” category in doc#163256 for Printing Instructions. Medtronic Confidential 9879EN-18_9501043EN/CTC.qxd 5/10/99 11:35 Page 18-7 7 x 9 inches (178 mm x 229 mm) Troubleshooting the Pacing System 18-7 Handling, Storage, and Resterilization Handling and Storage Do not implant the pacemaker if the package is damaged, or if the pacemaker has been dropped from a height of 30 cm (12 inches) or more. Damaged packages must be returned to the manufacturer. Storage temperature range from -18˚C (0˚F) to 55˚C (131˚F). Exposure to temperatures below -18˚C (0˚F) or intense electrical interference may cause the pacemaker’s parameter settings to change to full or partial electrical reset conditions. Refer to “Electrical Reset” in Chapter 16 for more information. Resterilization The pacemaker has been delivered in a sterile condition. Sterilization has been performed using ethylene-oxide. If sterility of the package has been compromised, place the pacemaker in an ethylene-oxide permeable package and resterilize the pacemaker using ethylene-oxide. Sterilizer effectiveness should be verified by using a validated sterilization process. Resterilization and cleaning of the pacemaker or the torque wrench should not: 196407001 Rev A ■ be performed using autoclaving, gamma radiation, organic cleaning agents (e.g., alcohol, acetone, etc.), or ultrasonic cleaners, and ■ exceed a temperature of 60˚C (140˚F) or a pressure of 103k Pa (15 psi) above ambient. Refer to the “Reference man.” category in doc#163256 for Printing Instructions. Medtronic Confidential 9879EN-18_9501043EN/CTC.qxd 5/10/99 11:35 Page 18-8 7 x 9 inches (178 mm x 229 mm) 18-8 Understanding Pacemaker Operations Pacemaker Longevity Background The Elective Replacement Indicator (ERI) establishes the point in time when the physician should schedule replacement of the pacemaker as soon as possible. Elective Replacement Indicator The Elective Replacement Indicator consists of a pacing mode and distinctive rate, as follows: ■ Pacing Mode VVI ■ Lower Rate 65 ppm When ERI is set due to battery depletion, the pacemaker will continue to operate under elective replacement conditions unless the programmer “Status Reset” command clears the ERI. Time from ERI to Cessation of Pacing From the point that the ERI is set, the pacemaker will continue to operate at ERI conditions for a minimum of 3.0 months for Prodigy DR, Prodigy D and Prodigy VDD pacemakers and 2.5 months for Prodigy SR and Prodigy S pacemakers until the battery fully depletes. At full battery depletion, erratic pacing will ensue. The patient should be scheduled for immediate pacemaker replacement when the ERI is first detected. 196407001 Rev A Refer to the “Reference man.” category in doc#163256 for Printing Instructions. Medtronic Confidential 9879EN-18_9501043EN/CTC.qxd 5/10/99 11:35 Page 18-9 7 x 9 inches (178 mm x 229 mm) Troubleshooting the Pacing System 18-9 Distinguishing ERI from Full Electrical Reset Like the Elective Replacement Indicator (ERI), a full electrical reset puts a Prodigy pacemaker in VVI mode at 65 ppm, as described in the section “Electrical Reset” in Chapter 16. Prodigy pacemakers are designed to be less susceptible to electrocautery, defibrillation, and so forth, than previous generation Medtronic pacemakers, and only extreme electromagnetic disturbances can trigger a full electrical reset. If the pacemaker is in a full electrical reset condition and the ERI status is not set, use the programmer “Status Reset” command to clear the reset condition and reprogram the pacemaker. If after interrogating the pacemaker a message appears on the programmer screen/printout indicating the Date/Time memory has been altered, contact your Medtronic representative for further information. For Further Information See Section G in Part III, “Hospital, Medical, Home, and Job Environment Interference”. See Section C in Part III under “Elective Replacement Indicator (ERI)” applicable to the ERI for the specific Prodigy pacemaker model. Also, see Section C in Part III under “Longevity Projections” for Prodigy pacemaker operating life. 196407001 Rev A Refer to the “Reference man.” category in doc#163256 for Printing Instructions. Medtronic Confidential 9879EN-18_9501043EN/CTC.qxd 5/10/99 11:35 Page 18-10 7 x 9 inches (178 mm x 229 mm) 18-10 Understanding Pacemaker Operations Replacing the Pacemaker To replace the pacemaker: 1. Program the old pacemaker to a nonrate responsive pacing mode prior to explantation. This avoids any potential rate increase while handling the pacemaker. 2. Insert the proper white-handled hex wrench through each slit in the rubber grommets and loosen each set screw by turning counterclockwise. 3. Gently retract the lead from the pacemaker. 4. If the lead pin shows signs of pitting or corrosion, the entire lead should be replaced to ensure the integrity of the pacing system. 5. Measure stimulation thresholds and sensing potentials. Pacemaker dependent patients will be without pacing support when the lead is disconnected. Therefore, the physician should have a temporary external pacing device available for use. A Medtronic Lead Adaptor Kit may be required to connect the new pacemaker to the chronic leads. The kit allows connection of lead from other manufacturers to Medtronic pacemakers. WARNING: Use of electrocautery units when replacing Prodigy pacemakers may cause permanent loss of output prior to explanting the device. Refer to “Hospital, Medical, Home, and Job Environment Interference,” Section G in Part III, for information on electrocautery use. For Further Information For further information on implanting Prodigy pacemakers, consult the implantation manual packaged with each device. For information on available adaptor kits, consult the Pacemaker and Connector Encyclopedia (a Medtronic publication). Refer to Section A in Part III under “Pacemaker Connectors” for the different types of Prodigy connectors. 196407001 Rev A Refer to the “Reference man.” category in doc#163256 for Printing Instructions. Medtronic Confidential 9879EN-18_9501043EN/CTC.qxd 5/10/99 11:35 Page 18-11 7 x 9 inches (178 mm x 229 mm) Troubleshooting the Pacing System 18-11 Patient Information and Service Patient Registration Information A registration form is included in the shipping package for each Medtronic implantable pacemaker. Upon completion by the physician, the form serves as a permanent record of facts related to the implanted device. A copy of this form should be returned to Medtronic, where vital information will be transferred to a wallet-size, permanent Pacemaker Identification Card which will be mailed directly to the patient. A temporary identification card is included in the shipping package for use by the patient until the permanent card arrives. Note that in some areas, the pacemaker package may not contain the registration form. Patient Manual In addition, a patient manual and patient card are provided in the pacemaker shipping package. Specifically, the manual provides patientoriented explanations about the heart, pacemaker operation, typical pacemaker implantation procedures, the Pacemaker Identification Card, and tips for effectively living with a pacemaker. The patient card shows what the pacemaker looks like and its name. Note that in some areas, the pacemaker package may not contain the patient materials. Establishing a Patient Record At the time of implant the clinician should establish a record of the patient’s pacemaker programmed parameter settings for later reference. The registration form should not serve this purpose since the form is intended for registering the patient and pacemaker with Medtronic. A patient record can give the clinician an accurate account of the patient’s medical history at subsequent follow-ups when evaluating the pacemaker’s performance. 196407001 Rev A Refer to the “Reference man.” category in doc#163256 for Printing Instructions. Medtronic Confidential 9879EN-18_9501043EN/CTC.qxd 5/10/99 11:35 Page 18-12 7 x 9 inches (178 mm x 229 mm) 18-12 Understanding Pacemaker Operations Assistance Information Medtronic representatives and engineers, located throughout the world, are highly trained and available to serve you. Upon request, representatives will train qualified hospital personnel in the use of Medtronic products. In addition, Medtronic maintains a professional staff of consultants to provide technical and medical consultation to product users in the United States at 1 (800) 328-2518 (24-hour consultation service). Refer to the appropriate number on the back cover of this manual for consultation in other countries. For Further Information For supplemental information, contact your local Medtronic representative, or call or write Medtronic (see back cover for addresses and phone numbers). 196407001 Rev A Refer to the “Reference man.” category in doc#163256 for Printing Instructions. Medtronic Confidential 9879EN-III-T_9501043EN/CTC.qxd 5/10/99 11:47 Page III-1 7 x 9 inches (178 mm x 229 mm) PART III Prodigy™ Reference Information Part III provides functional, parameter, and precautionary product information for the Prodigy DR, Prodigy D, Prodigy VDD, Prodigy SR, and Prodigy S pacemakers. This section supplements Part I (programmer procedures) and Part II (pacemaker operations and features). Specific Prodigy product information is organized under the following sections: ■ ■ ■ ■ ■ ■ ■ ■ ■ ■ Basic description, radiopaque identification, mechanical dimensions, lead compatibility, and pacemaker connectors Shipping, nominal, electrical reset, and emergency parameters Longevity projections, elective replacement indicator, and battery specifications Magnet mode operations, telemetry functions, diagnostics, and event summaries Modes and parameters, programming requirements and restrictions, and timing reference table General warning and precautions Hospital, medical, home, and job environment interference General pacing indications Glossary Index Part III Prodigy Reference Information 196407001 Rev A Refer to the “Reference man.” category in doc#163256 for Printing Instructions. Medtronic Confidential 7 x 9 inches (178 mm x 229 mm) 196407001 Rev A Refer to the “Reference man.” category in doc#163256 for Printing Instructions. Medtronic Confidential 9879EN-A_9501043EN/CTC.qxd 5/10/99 11:36 Page A-1 7 x 9 inches (178 mm x 229 mm) SECTION A Basic Description, Radiopaque Identification, Mechanical Dimensions, Lead Compatibility, and Pacemaker Connectors Section A contains basic descriptions, radiopaque identifications, mechanical dimensions, lead compatibility, and pacemaker connectors for each of the Prodigy pacemakers listed below. ■ Prodigy DR (Models 7860, 7861, 7862) ■ Prodigy D (Models 7864, 7865, 7866) ■ Prodigy VDD (Model 8168) ■ Prodigy SR (Models 8158, 8160, 8161, 8162) ■ Prodigy S (Models 8164, 8165, 8166) A-1 196407001 Rev A Refer to the “Reference man.” category in doc#163256 for Printing Instructions. Medtronic Confidential 9879EN-A_9501043EN/CTC.qxd 5/10/99 11:36 Page A-2 7 x 9 inches (178 mm x 229 mm) A-2 Prodigy Reference Information Basic Description The Medtronic Prodigy family of pacemakers consists of multiprogrammable, implantable pacemakers. The five pacemakers in the Prodigy family offer a wide range of therapeutic features and diagnostic capabilities based on a common platform. Physicians may choose the appropriate pacemaker for the patient and expect similar programming and follow-up operations between the five pacemakers. Medtronic programmers allow the clinician to change pacing therapies and assess pacing and diagnostic data by communicating with the pacemaker via telemetry. In addition, the clinician can perform system functions such as interrogating the pacemaker, measuring stimulation thresholds, and inhibiting the pacemaker. Prodigy DR pacemakers are dual chamber, activity-based rate responsive DDDR pacemakers. ■ Model 7860 is compatible with IS-1* bipolar/unipolar leads. ■ Model 7861 is compatible with 5 or 6 mm leads. ■ Model 7862 is compatible with low-profile 3.2 mm bipolar leads and IS-1* bipolar/unipolar leads. Prodigy D pacemakers are dual chamber, DDD pacemakers. ■ Model 7864 is compatible with IS-1* bipolar/unipolar leads. ■ Model 7865 is compatible with 5 or 6 mm unipolar leads. ■ Model 7866 is compatible with low-profile 3.2 mm bipolar leads and IS-1* bipolar/unipolar leads. Prodigy VDD pacemakers are dual chamber VDD pacemakers that utilize a single lead pacing system. In addition, single chamber, activity-based rate responsive VVIR pacing is ON/OFF programmable. The Prodigy VDD pacemakers are designed for use with the CapSure VDD (Model 5032) lead, which provides bipolar atrial sensing and ventricular pacing and sensing. The pacemaker’s ventricular port is IS-1* compatible. The atrial port is a bipolar connector which meets the mechanical requirements of the IS-1 standard but is only designed to sense. * IS-1 refers to an International Connector Standard (See Document No. ISO 5841-3; 1992) whereby pulse generators and leads so designated are assured of a basic mechanical fit. 196407001 Rev A Refer to the “Reference man.” category in doc#163256 for Printing Instructions. 9879EN-A_9501043EN/CTC.qxd 5/10/99 11:36 Page A-3 Medtronic Confidential 7 x 9 inches (178 mm x 229 mm) Basic Description, Radiopaques, Dimensions, Lead Compatibility, and Connectors A-3 Prodigy SR pacemakers are single chamber, activity-based rate responsive VVIR/AAIR pacemakers. ■ Model 8160 is compatible with IS-1* bipolar/unipolar leads. ■ Model 8161 is compatible with 5 or 6 mm unipolar leads. ■ Model 8162 is compatible with low-profile 3.2 mm bipolar leads and IS-1* bipolar/unipolar leads. ■ Model 8158 is compatible with 5 mm bifurcated bipolar leads. Prodigy S pacemakers are single chamber VVI/AAI pacemakers. ■ Model 8164 is compatible with IS-1* bipolar/unipolar leads. ■ Model 8165 is compatible with 5 or 6 mm unipolar leads. ■ Model 8166 is compatible with low-profile 3.2 mm bipolar leads and IS-1* bipolar/unipolar leads. * IS-1 refers to an International Connector Standard (See Document No. ISO 5841-3; 1992) whereby pulse generators and leads so designated are assured of a basic mechanical fit. 196407001 Rev A Refer to the “Reference man.” category in doc#163256 for Printing Instructions. Medtronic Confidential 9879EN-A_9501043EN/CTC.qxd 5/10/99 11:36 Page A-4 7 x 9 inches (178 mm x 229 mm) A-4 Prodigy Reference Information Radiopaque Identification A standard X-ray displays the pacemaker’s radiopaque code block as black characters on a white background (see radiopaque illustration below). This code identifies the Prodigy models as follows: Model Radiopaque I.D. Prodigy DR Model 7860 Model 7861 Model 7862 PDH PDJ PDK Prodigy D Model 7864 Model 7865 Model 7866 PDL PDM PDN Prodigy VDD Model 8168 PEK Prodigy SR Model 8158 Model 8160 Model 8161 Model 8162 PEM PED PEE PEF Prodigy S Model 8164 Model 8165 Model 8166 PEG PEH PEJ Model 7860 Radiopaque Identification 196407001 Rev A Refer to the “Reference man.” category in doc#163256 for Printing Instructions. Medtronic Confidential 9879EN-A_9501043EN/CTC.qxd 5/10/99 11:36 Page A-5 7 x 9 inches (178 mm x 229 mm) Basic Description, Radiopaques, Dimensions, Lead Compatibility, and Connectors A-5 Mechanical Dimensions Prodigy Model 196407001 Height (mm) Length (mm) Thickness (mm) Mass (g) Vol (cc) Prodigy DR 7860 7861 7862 44.7 50.3 46.7 47.9 47.9 47.9 7.5 7.5 7.5 27.1 28.5 28.0 12.1 14.2 13.0 Prodigy D 7864 7865 7866 44.7 50.3 46.7 47.9 47.9 47.9 7.5 7.5 7.5 26.9 28.3 27.8 12.1 14.2 13.0 Prodigy VDD 8168 44.7 47.9 7.5 27.1 12.1 Prodigy SR 8158 8160 8161 8162 45.8 40.2 43.3 42.9 42.9 42.9 42.9 42.9 7.5 7.5 7.5 7.5 22.5 21.5 22.5 22.5 11.2 9.7 11.0 10.5 Prodigy S 8164 8165 8166 40.2 43.3 42.9 42.9 42.9 42.9 7.5 7.5 7.5 21.3 22.3 22.3 9.7 11.0 10.5 Rev A Refer to the “Reference man.” category in doc#163256 for Printing Instructions. Medtronic Confidential 9879EN-A_9501043EN/CTC.qxd 5/10/99 11:36 Page A-6 7 x 9 inches (178 mm x 229 mm) A-6 Prodigy Reference Information Lead Compatibility Prodigy Model Polarity Primary Lead Lead Adaptor Prodigy DR Model 7860 IS-1* BI 5866-24M for bifurcated bipolar lead 5866-45 for IS-1 lead 5866-24M for bifurcated bipolar lead Model 7861 Model 7862 Prodigy D Model 7864 Model 7865 Model 7866 Prodigy VDD Model 8168 Prodigy SR Model 8160 Model 8161 Model 8162 Model 8158 Prodigy S Model 8164 Model 8165 Model 8166 Unipolar/ Bipolar Unipolar Unipolar/ Bipolar Unipolar 5/6 mm Low-profile 3.2 mm bipolar or IS-1* BI Unipolar/ Bipolar Unipolar IS-1* BI Unipolar 5/6 mm Unipolar/ Bipolar Low-profile 3.2 mm bipolar or IS-1* BI Unipolar/ Bipolar** 5032 CapSure VDD lead N/A Unipolar/ Bipolar Unipolar IS-1* BI 5866-24M for bifurcated bipolar lead 5866-45 for IS-1 lead 5866-24M for bifurcated bipolar lead 5866-22 for low-profile 3.2 mm bipolar lead Unipolar 5/6 mm Unipolar/ Bipolar Unipolar/ Bipolar Low-profile 3.2 mm bipolar or IS-1* BI 5 mm bifurcated bipolar or two standard unipolar 5 mm (epicardial) Unipolar/ Bipolar Unipolar IS-1* BI Unipolar 5/6 mm Unipolar/ Bipolar Low-profile 3.2 mm bipolar or IS-1* BI 5866-24M for bifurcated bipolar lead 5866-45 for IS-1 lead 5866-24M for bifurcated bipolar lead 5866-24M for bifurcated bipolar lead 5866-45 for IS-1 leads 5866-24M for bifurcated bipolar lead * IS-1 refers to an International Connector Standard (See Document No. ISO 5841-3; 1992) whereby pulse generators and leads so designated are assured of a basic mechanical fit. **Ventricular channel is unipolar or bipolar programmable. Atrial channel is permanently set to bipolar. 196407001 Rev A Refer to the “Reference man.” category in doc#163256 for Printing Instructions. Medtronic Confidential 9879EN-A_9501043EN/CTC.qxd 5/10/99 11:36 Page A-7 7 x 9 inches (178 mm x 229 mm) Basic Description, Radiopaques, Dimensions, Lead Compatibility, and Connectors A-7 Pacemaker Connectors Prodigy DR (7860) Prodigy D (7864) Prodigy VDD* (8168) Ø 1.93 mm (2x) Ø 3.5 mm (2x) 19.1 mm (2x) 25.9 mm (2x) Bipolar Connector (IS-1†) Prodigy DR (7861) Prodigy D (7865) Ø 2.46 mm (2x) Ø 4.5 mm (2x) Ø 6.0 mm (2x) Ø 5.0 mm (2x) 17.9 mm (2x) 26.4 mm (2x) 6.1 mm (2x) Unipolar Connector (5/6 mm) * Prodigy VDD connector is atrial bipolar sensing only and ventricular bipolar or unipolar pacing and sensing. † IS-1 refers to an International Connector Standard (See Document No. ISO 5841-3; 1992) whereby pulse generators and leads so designated are assured of a basic mechanical fit. 196407001 Rev A Refer to the “Reference man.” category in doc#163256 for Printing Instructions. Medtronic Confidential 9879EN-A_9501043EN/CTC.qxd 5/10/99 11:36 Page A-8 7 x 9 inches (178 mm x 229 mm) A-8 Prodigy Reference Information Prodigy DR (7862) Prodigy D (7866) Ø 1.88 mm (2x) Ø 3.5 mm (2x) 16.7 mm (2x) 25.6 mm (2x) Bipolar Connector (low-profile 3.2 mm) Prodigy SR (8160) Prodigy S (8164) Ø 1.93 mm Ø 3.5 mm 17.5 mm 24.3 mm Bipolar Connector (IS-1*) * 196407001 Rev A IS-1 refers to an International Connector Standard (see document ISO 5841-3; 1992) whereby pulse generators and leads so designated are assured of a basic mechanical fit. Refer to the “Reference man.” category in doc#163256 for Printing Instructions. Medtronic Confidential 9879EN-A_9501043EN/CTC.qxd 5/10/99 11:36 Page A-9 7 x 9 inches (178 mm x 229 mm) Basic Description, Radiopaques, Dimensions, Lead Compatibility, and Connectors A-9 Prodigy SR (8161) Prodigy S (8165) Ø 2.46 mm Ø 6.0 mm Ø 4.5 mm Ø 5.0 mm 17.9 mm 26.4 mm Unipolar Connector (5/6 mm) Prodigy SR (8162) Prodigy S (8166) Ø 1.88 mm Ø 3.5 mm 17.5 mm 26.4 mm Bipolar Connector (low-profile 3.2 mm) Prodigy SR (8158) 22.9 mm 13.7 mm Ø 5.1 mm (2x) Ø 1.7 mm (2x) 16.8 mm 25.9 mm Bifurcated Bipolar (5 mm) 196407001 Rev A Refer to the “Reference man.” category in doc#163256 for Printing Instructions. Medtronic Confidential 7 x 9 inches (178 mm x 229 mm) 196407001 Rev A Refer to the “Reference man.” category in doc#163256 for Printing Instructions. Medtronic Confidential 9879EN-B_9501043EN/CTC.qxd 5/10/99 11:37 Page B-1 7 x 9 inches (178 mm x 229 mm) SECTION B Shipping, Nominal, Electrical Reset, and Emergency Parameters Section B contains tables which present parameter settings for Shipping, Nominal, Electrical Reset, and Emergency conditions. The clinician may refer to these tables to validate pacemaker operation following: ■ removal of the pacemaker from the package (shipping parameter settings), ■ use of the Medtronic nominal programming command, ■ a full or partial electrical reset of the pacemaker, and ■ use of the emergency programmer command. The Prodigy pacemaker parameter settings are given for the following models: ■ Prodigy DR (Models 7860, 7861, 7862) ■ Prodigy D (Models 7864, 7865, 7866) ■ Prodigy VDD (Model 8168) ■ Prodigy SR (Models 8158, 8160, 8161, 8162) ■ Prodigy S (Models 8164, 8165, 8166) B-1 196407001 Rev A Refer to the “Reference man.” category in doc#163256 for Printing Instructions. Medtronic Confidential 9879EN-B_9501043EN/CTC.qxd 5/10/99 11:37 Page B-2 7 x 9 inches (178 mm x 229 mm) B-2 Prodigy Reference Information Shipping Parameter Settings NOTE: Parameter settings not appearing for a specific Prodigy pacemaker are not applicable to that device. Some parameter settings are dependent on mode or other parameters. Parameter Prodigy DR Prodigy D Prodigy VDD (8168) Prodigy SR (8158) (8160/61/62) (7860/61/62) (7864/65/66) Mode DDD Mode Switch OFF Lower (Pacing) Rate 60 ppm Upper Activity Rate* 120 ppm Upper Tracking Rate 120 ppm (8164/65/66) DDD VDD VVI VVI 60 ppm 50 ppm 60 ppm 60 ppm 120 ppm 120 ppm 120 ppm Paced AV (PAV) 150 ms Sensed AV (SAV) 120 ms RAAV OFF 150 ms 120 ms OFF 120 ms OFF PVARP Ventricular Refractory Period 310 ms 230 ms 310 ms 230 ms OFF OFF 3.5 V 0.4 ms 0.5 mV 220 ms 0.25 mV 220 ms 310 ms 230 ms PMT Intervention OFF Atrial Amplitude Pulse Width Sensitivity Blanking (PVAB) Pacing Polarity 3.5 V 0.4 ms 0.5 mV 220 ms See package label Sensing Polarity See package label 196407001 Rev A Prodigy S See package label See package label 330 ms 330 ms Bipolar Refer to the “Reference man.” category in doc#163256 for Printing Instructions. Medtronic Confidential 9879EN-B_9501043EN/CTC.qxd 5/10/99 11:37 Page B-3 7 x 9 inches (178 mm x 229 mm) Shipping, Nominal, Electrical Reset, and Emergency Parameters Parameter Ventricular Amplitude Pulse Width Sensitivity Blanking (PAVB) Pacing Polarity Prodigy DR Prodigy D Prodigy VDD (7860/61/62) (7864/65/66) 3.5 V 0.4 ms 2.8 mV 28 ms See package label Sensing Polarity See package label Rate Response* Activity Rate Response Activity Threshold Acceleration Deceleration Ventricular Safety Pacing (8168) Prodigy SR (8158) (8160/61/62) (8164/65/66) 3.5 V 0.4 ms 2.8 mV 28 ms 3.5 V 0.4 ms 2.8 mV 3.5 V 0.4 ms 2.8 mV 3.5 V 0.4 ms 2.8 mV See package label See package label See package label See package label See package label See package label See package label See package label 7 7 Medium Medium 0.5 min 5 min 0.5 min 5 min ON B-3 Prodigy S ON Non-Competitive* ON Atrial Pacing Lead Monitor OFF OFF OFF OFF OFF Transtelephonic Monitor OFF OFF OFF OFF OFF Extended Telemetry OFF OFF OFF OFF OFF Single Chamber Hysteresis OFF* OFF* OFF* OFF OFF Diagnostics OFF OFF OFF OFF OFF Serial Number Factory set Factory set Factory set Factory set Factory set * Parameter is not pertinent to the shipping mode. 196407001 Rev A Refer to the “Reference man.” category in doc#163256 for Printing Instructions. Medtronic Confidential 9879EN-B_9501043EN/CTC.qxd 5/10/99 11:37 Page B-4 7 x 9 inches (178 mm x 229 mm) B-4 Prodigy Reference Information Nominal Parameter Settings NOTE: Parameter settings not appearing for a specific Prodigy pacemaker are not applicable to that device. Some parameter settings are dependent on mode or other parameters. Parameter Prodigy DR Prodigy D Prodigy VDD (8168) Prodigy SR (8158) (8160/61/62) (7860/61/62) (7864/65/66) Mode DDDR Mode Switch OFF Lower (Pacing) Rate Upper Activity Rate Upper Tracking Rate 60 ppm (8164/65/66) DDD VDD VVIR VVI 60 ppm 50 ppm 60 ppm 60 ppm 120 ppm 120 ppm 120 ppm 120 ppm 120 ppm Paced AV (PAV) 150 ms Sensed AV (SAV) 120 ms RAAV OFF 150 ms 120 ms OFF 120 ms OFF PVARP Ventricular Refractory Period 310 ms 230 ms 310 ms 230 ms OFF OFF 3.5 V 0.4 ms 0.5 mV 220 ms 3.5 V 0.4 ms 0.5 mV 220 ms 0.5 mV 220 ms As programmed As programmed As programmed As programmed Bipolar 3.5 V 0.4 ms 2.8 mV 28 ms 3.5 V 0.4 ms 2.8 mV 28 ms As programmed As programmed As programmed As programmed 310 ms 230 ms PMT Intervention OFF Atrial Amplitude Pulse Width Sensitivity Blanking (PVAB) Pacing Polarity Sensing Polarity Ventricular Amplitude Pulse Width Sensitivity Blanking (PAVB) Pacing Polarity Sensing Polarity 196407001 Rev A Prodigy S 330 ms 330 ms 3.5 V 0.4 ms 2.8 mV 3.5 V 0.4 ms 2.8 mV 3.5 V 0.4 ms 2.8 mV As programmed As programmed As programmed As programmed As programmed As programmed Refer to the “Reference man.” category in doc#163256 for Printing Instructions. Medtronic Confidential 9879EN-B_9501043EN/CTC.qxd 5/10/99 11:37 Page B-5 7 x 9 inches (178 mm x 229 mm) Shipping, Nominal, Electrical Reset, and Emergency Parameters Parameter Rate Response Activity Rate Response Activity Threshold Acceleration Deceleration Prodigy DR Prodigy D Prodigy VDD (7860/61/62) (7864/65/66) (8168) Prodigy SR (8158) (8160/61/62) 7 7 Medium Medium 0.5 min 5 min 0.5 min 5 min Prodigy S (8164/65/66) Ventricular Safety Pacing ON ON Non-Competitive Atrial Pacing ON Lead Monitor OFF OFF OFF OFF OFF Transtelephonic Monitor As programmed As programmed As programmed As programmed As programmed Extended Telemetry OFF OFF OFF OFF OFF Single Chamber Hysteresis 196407001 B-5 OFF Diagnostics Rate Histogram, Include Ref. Sense Rate Histogram, Include Ref. Sense Rate Histogram, Include Ref. Sense Rate Histogram, Include Ref. Sense Rate Histogram, Include Ref. Sense Serial Number As programmed As programmed As programmed As programmed As programmed Rev A Refer to the “Reference man.” category in doc#163256 for Printing Instructions. Medtronic Confidential 9879EN-B_9501043EN/CTC.qxd 5/10/99 11:37 Page B-6 7 x 9 inches (178 mm x 229 mm) B-6 Prodigy Reference Information Electrical Reset Parameter Settings NOTE: Parameter settings not appearing for a specific Prodigy pacemaker are not applicable to that device. Some parameter settings are dependent on mode or other parameters. Parameter Prodigy DR Prodigy D Prodigy VDD (7860/61/62) (7864/65/66) Mode As programmed (or VVI1) Mode Switch As programmed (or OFF1) 175 bpm Detect Rate Lower (Pacing) Rate Upper Activity Rate Upper Tracking Rate 65 ppm (8168) Prodigy SR (8158) (8160/61/62) (8164/65/66) As programmed (or VVI1) As programmed (or VVI1) As programmed (or VVI1) As programmed (or VVI1) 65 ppm 65 ppm 65 ppm 65 ppm 120 ppm 120 ppm 120 ppm 120 ppm 120 ppm Paced AV (PAV) 150 ms Sensed AV (SAV) 120 ms RAAV OFF (or ON2) 150 ms 120 ms OFF 120 ms OFF PVARP Ventricular Refractory Period 310 ms 230 ms 310 ms 230 ms OFF OFF 5.0V 0.4 ms 0.5 mV 220 ms 0.5 mV 220 ms 310 ms 230 ms PMT Intervention OFF Atrial Amplitude Pulse Width Sensitivity Blanking (PVAB) Pacing Polarity 5.0V 0.4 ms 0.5 mV 220 ms (or 150ms2) As programmed (or Unipolar1) Sensing Polarity As programmed (or Unipolar1) 196407001 Rev A Prodigy S As programmed (or Unipolar1) As programmed (or Unipolar1) 330 ms (or 400 ms3) 330 ms (or 400 ms3) 220 ms 220 ms Bipolar Refer to the “Reference man.” category in doc#163256 for Printing Instructions. Medtronic Confidential 9879EN-B_9501043EN/CTC.qxd 5/10/99 11:37 Page B-7 7 x 9 inches (178 mm x 229 mm) Shipping, Nominal, Electrical Reset, and Emergency Parameters Parameter Ventricular Amplitude Pulse Width Sensitivity Prodigy DR Prodigy D Prodigy VDD (7860/61/62) (7864/65/66) (8168) 5.0V 0.4 ms 2.8 mV 5.0V 0.4 ms 2.8 mV Blanking 28 ms (PAVB) Pacing Polarity4 As programmed Sensing Polarity4 As programmed Rate Response Activity Rate Response Activity Threshold Acceleration Deceleration B-7 Prodigy SR (8158) (8160/61/62) Prodigy S (8164/65/66) 5.0V 0.4 ms 2.8 mV 5.0V3 0.4 ms3 2.8 mV (or 0.5 mV3) 5.0V3 0.4 ms3 2.8 mV (or 0.5 mV3) As programmed As programmed As programmed3 As programmed3 As programmed3 As programmed3 28 ms As programmed As programmed 7 7 Medium 0.5 min 5 min Medium 0.5 min 5 min Ventricular Safety Pacing ON ON Non-Competitive Atrial Pacing ON Lead Monitor OFF OFF OFF OFF OFF Transtelephonic Monitor OFF OFF OFF OFF OFF Extended Telemetry OFF OFF OFF OFF OFF Single Chamber Hysteresis OFF OFF OFF OFF OFF Diagnostics OFF OFF OFF OFF OFF Serial Number As programmed (or zeros) As programmed (or zeros) As programmed (or zeros) As programmed (or zeros) As programmed (or zeros) 1 Parameter setting if a full electrical reset occurs. Parameter setting if mode switch is ON after a partial electrical reset. 3 Atrial parameter if programmed to a single chamber atrial mode. 4 Polarity for the Models 7860/62, 7864/66, 8168, 8158, 8160/62, and 8164/66 connected to a bipolar lead and if a full electrical reset occurs. All models connected to a unipolar lead reset to unipolar. 2 196407001 Rev A Refer to the “Reference man.” category in doc#163256 for Printing Instructions. Medtronic Confidential 9879EN-B_9501043EN/CTC.qxd 5/10/99 11:37 Page B-8 7 x 9 inches (178 mm x 229 mm) B-8 Prodigy Reference Information Emergency Parameter Settings 5 196407001 Rev A Parameter Prodigy DR Prodigy D Prodigy VDD Prodigy SR5 Prodigy S5 Mode VVI Pacing Rate 70 ppm Ventricular Refractory Period 330 ms Ventricular Amplitude Pulse Width Sensitivity Pacing Polarity Sensing Polarity 7.5V 1.5 ms 2.8 mV Unipolar Unipolar Single Chamber Hysteresis OFF Pacemaker reverts to VVI mode with atrial implants. Refer to the “Reference man.” category in doc#163256 for Printing Instructions. Medtronic Confidential 9879EN-C_9501043EN/CTC.qxd 5/10/99 11:38 Page C-1 7 x 9 inches (178 mm x 229 mm) SECTION C Longevity Projections, Elective Replacement Indicator, and Battery Specifications Section C contains information on longevity projections and elective replacement indicator operations and messages that aid in determining when to replace Prodigy pacemakers. In addition, battery specifications are given. Information is provided for the following Prodigy models: ■ Prodigy DR (Models 7860, 7861, 7862) ■ Prodigy D (Models 7864, 7865, 7866) ■ Prodigy VDD (Model 8168) ■ Prodigy SR (Models 8158, 8160, 8161, 8162) ■ Prodigy S (Models 8164, 8165, 8166) C-1 196407001 Rev A Refer to the “Reference man.” category in doc#163256 for Printing Instructions. Medtronic Confidential 9879EN-C_9501043EN/CTC.qxd 5/10/99 11:38 Page C-2 7 x 9 inches (178 mm x 229 mm) C-2 Prodigy Reference Information Longevity Projections Projected Longevity from Implant to ERI The following tables show the estimated time from implant to the elective replacement indicator (ERI) being set at nominal and low output settings for Prodigy pacemakers. The estimated time varies based on the lead impedance, the programmed amplitudes, and the percent paced. Prodigy DR and Prodigy D Pacemakers’ Projected Longevity from Implant to ERI Programmed Settings Percent Paced Rate: 60 ppm Mode: Pulse Width Atrial: 0.4 ms Ventricular: 0.4 ms Projected Longevity (Years) Prodigy DR Prodigy D (7860/61/62) (7864/65/66) DDDR DDD 500 ohms 600 ohms Lead Impedance 1000 500 ohms ohms 600 ohms 1000 ohms Nominal Amplitudes 100% 7.2 7.7 9.2 7.3 7.8 9.3 Atrial: 3.5 V Ventricular: 3.5 V 50% 9.2 9.6 10.8 9.3 9.8 10.9 100% 9.7 10.1 11.1 9.8 10.2 11.3 50% 11.2 11.4 12.1 11.3 11.6 12.3 Low Amplitudes Atrial: 2.5 V Ventricular: 2.5 V WARNING: When the elective replacement indicator (ERI) is set, the pacemaker will continue to operate at ERI conditions for a minimum of 3 months until the battery depletes. 196407001 Rev A Refer to the “Reference man.” category in doc#163256 for Printing Instructions. Medtronic Confidential 9879EN-C_9501043EN/CTC.qxd 5/10/99 11:38 Page C-3 7 x 9 inches (178 mm x 229 mm) Longevity Projections, Elective Replacement Indicator, and Battery Specifications C-3 Prodigy VDD Pacemakers’ Projected Longevity from Implant to ERI Programmed Settings Percent Paced Projected Longevity (Years) Prodigy VDD (8168) VDD Rate: 60 ppm Mode: Pulse Width: 4.0 ms Lead Impedance 600 ohms Nominal Amplitude: 3.5 V Low Amplitude: 2.5 V 100% 9.8 50% 11.2 100% 11.5 50% 12.4 Prodigy SR and Prodigy S Pacemakers’ Projected Longevity from Implant to ERI Programmed Settings Percent Paced Rate: 60 ppm Mode: Pulse Width: 0.4 ms Nominal Amplitude: 3.5 V Low Amplitude: 2.5 V Projected Longevity (Years) Prodigy SR Prodigy S (8158, 8160/61/62) (8164/65/66) VVIR VVI Lead Impedance 1000 500 ohms ohms 500 ohms 600 ohms 600 ohms 1000 ohms 100% 7.8 8.2 9.3 7.9 8.4 9.4 50% 9.3 9.6 10.3 9.4 9.7 10.4 100% 9.6 9.9 10.5 9.8 10.1 10.7 50% 10.5 10.7 11.1 10.7 10.9 11.3 WARNING: When the elective replacement indicator (ERI) is set, the pacemaker will continue to operate at ERI conditions for a minimum of 3.0 months for the Prodigy VDD pacemaker and a minimum of 2.5 months for the Prodigy SR and Prodigy S pacemakers until the battery depletes. NOTE: The values above are based on calculations using deliverable battery capacity. These values are estimates of longevity projections from implant to ERI and are intended to assist the clinician in understanding the effects of various pacing conditions on battery longevity. These values should not be interpreted as precise numbers. 196407001 Rev A Refer to the “Reference man.” category in doc#163256 for Printing Instructions. Medtronic Confidential 9879EN-C_9501043EN/CTC.qxd 5/10/99 11:38 Page C-4 7 x 9 inches (178 mm x 229 mm) C-4 Prodigy Reference Information Projected Longevity From ERI to Erratic Pacing The following tables show the estimated time from the ERI to erratic pacing for the Prodigy pacemakers. Regardless of the patients programmed settings, virtually all (i.e., 99.9%) Prodigy DR, Prodigy D, and Prodigy VDD pacemakers will achieve a minimum (min) of 3.0 months longevity after ERI is set, while Prodigy SR and Prodigy S pacemakers will achieve a minimum (min) of 2.5 months longevity after ERI is set. Additional longevity may be gained depending on the patient’s individual pacing conditions. Note that the average (avg) time in the table below refers to the projected mean longevity of pacemakers at the stated conditions. Prodigy DR and Prodigy D Pacemaker’s Projected Longevity from ERI to Erratic Pacing Previously Programmed Settings Percent Paced Rate (ppm) Nominal Settings Mode: DDDR/DDD Amplitudes Atrial and Ventricular: 3.5 V Pulse Widths Atrial and Ventricular: 0.4 ms Single Chamber Settings Mode: VVIR/VVI Amplitude: 3.5 V Pulse Width: 0.4 ms Projected Longevity (Months) Prodigy DR (7860/61/62) Prodigy D (7864/65/66) 500 ohms 60 100% Min 4.5 Avg* 9.5 60 100% Min 3.5 Avg 7.5 * Current data show that combinations of extreme pacing conditions (high output values [≥ 5.0V] and high pulse widths or low impedance values [300 ohms]) may increase the average projection in the DDDR/DDD modes. 196407001 Rev A Refer to the “Reference man.” category in doc#163256 for Printing Instructions. Medtronic Confidential 9879EN-C_9501043EN/CTC.qxd 5/10/99 11:38 Page C-5 7 x 9 inches (178 mm x 229 mm) Longevity Projections, Elective Replacement Indicator, and Battery Specifications C-5 Prodigy VDD Pacemaker’s Projected Longevity from ERI to Erratic Pacing Previously Programmed Settings Percent Paced Rate (ppm) Nominal Settings Mode: VDD Amplitude: 3.5 V Pulse Width: 0.4 ms Single Chamber Settings Mode: VVIR/VVI Amplitude: 3.5 V Pulse Width: 0.4 ms Projected Longevity (Months) Prodigy VDD (8168) 500 ohms 60 100% Min 3.5 Avg* 7.5 60 100% Min 3.5 Avg 7.5 Prodigy SR and Prodigy S Pacemakers’ Projected Longevity from ERI to Erratic Pacing Previously Programmed Settings Percent Paced Rate (ppm) Single Chamber Settings Mode: VVIR/VVI Amplitude: 3.5 V Pulse Width: 0.4 ms 60 Projected Longevity (Months) Prodigy SR (8158, 8160/61/62) Prodigy S (8164/65/66) 500 ohms 100% Min 2.5 Avg† 6.5 * Lower impedances will decrease the average projections. At 300 ohms and a rate of 60 ppm, the average projected longevity is about 6.9 months in the VDD mode. † Current data show that combinations of extreme pacing conditions (high output values [≥ 5.0V] and high pulse widths or low impedance values [300 ohms]) may decrease the average projection of the Prodigy SR and Prodigy S pacemakers in the SSIR/SSI modes, potentially below 2.5 months. Under extreme conditions, the projections can be as short as 1.9 months for these pacemakers. 196407001 Rev A Refer to the “Reference man.” category in doc#163256 for Printing Instructions. Medtronic Confidential 9879EN-C_9501043EN/CTC.qxd 5/10/99 11:38 Page C-6 7 x 9 inches (178 mm x 229 mm) C-6 Prodigy Reference Information Elective Replacement Indicator (ERI) The Elective Replacement Indicator (ERI) is set when the battery voltage drops below 2.62 V (all models). Listed below are the ERI for nonmagnet and magnet modes for the Prodigy pacemakers. Elective Replacement Indicator Conditions Nonmagnet Mode VVI mode at 65 ppm rate Magnet Mode VOO mode at 65 ppm rate Telemetry Replacement message on programmer Battery/Lead Information Replacement message and displayed battery voltage on programmer From the point that the ERI is set, the pacemaker will continue to operate at ERI conditions for a minimum of 3.0 months for the Prodigy DR, Prodigy D, and Prodigy VDD pacemakers and 2.5 months for the Prodigy SR and Prodigy S pacemakers until the battery fully depletes. At full battery depletion, erratic pacing will ensue. The patient should be scheduled for immediate pacemaker replacement when the ERI is first detected. 196407001 Rev A Refer to the “Reference man.” category in doc#163256 for Printing Instructions. Medtronic Confidential 9879EN-C_9501043EN/CTC.qxd 5/10/99 11:38 Page C-7 7 x 9 inches (178 mm x 229 mm) Longevity Projections, Elective Replacement Indicator, and Battery Specifications C-7 Battery Specifications 196407001 Prodigy DR (7860/61/62) Prodigy D (7864/65/66) Prodigy VDD (8168) Prodigy SR (8158, 8160/61/62) Prodigy S (8164/65/66) Type Lithium-iodine Lithium-iodine Voltage 2.8 V 2.8 V Available Capacity 1.5 amp-hr 1.1 amp-hr Average Projected Capacity 1.2 amp-hr 0.90 amp-hr Rev A Refer to the “Reference man.” category in doc#163256 for Printing Instructions. Medtronic Confidential 7 x 9 inches (178 mm x 229 mm) 196407001 Rev A Refer to the “Reference man.” category in doc#163256 for Printing Instructions. Medtronic Confidential 9879EN-D_9501043EN/CTC.qxd 5/10/99 11:39 Page D-1 7 x 9 inches (178 mm x 229 mm) SECTION D Magnet Mode Operations, Telemetry Functions, Diagnostics, and Event Summaries Section D contains Prodigy magnet mode operations, telemetry functions, and diagnostics that are available for patient follow-up sessions. These capabilities are used to assess the patient’s cardiac profile and the pacemaker’s operation for the following Prodigy pacemakers: ■ Prodigy DR (Models 7860, 7861, 7862) ■ Prodigy D (Models 7864, 7865, 7866) ■ Prodigy VDD (Model 8168) ■ Prodigy SR (Models 8158, 8160, 8161, 8162) ■ Prodigy S (Models 8164, 8165, 8166) D-1 196407001 Rev A Refer to the “Reference man.” category in doc#163256 for Printing Instructions. Medtronic Confidential 9879EN-D_9501043EN/CTC.qxd 5/10/99 11:39 Page D-2 7 x 9 inches (178 mm x 229 mm) D-2 Prodigy Reference Information Magnet Mode Operations Listed below are the magnet mode operations in dual and single chamber modes for the Prodigy pacemakers. Magnet Mode Operations Dual Chamber Modes DOO mode at 85 ppm VDD Mode VOO mode at 85 ppm Single Chamber Modes VOO/AOO mode at 85 ppm Magnet mode operations is established by placing the programming head over the implant site and moving the head along the axis as shown below until the head light indicates telemetry is possible. Axis Prodigy DR (7860/61/62) Prodigy D (7864/65/66) Prodigy VDD (8168) Axis Prodigy SR (8158, 8160/61/62) Prodigy S (8164/65/66) Positioning the Programming Head 196407001 Rev A Refer to the “Reference man.” category in doc#163256 for Printing Instructions. Medtronic Confidential 9879EN-D_9501043EN/CTC.qxd 5/10/99 11:39 Page D-3 7 x 9 inches (178 mm x 229 mm) Magnet Mode Operations, Telemetry Functions, Diagnostics, and Event Summaries D-3 Telemetry Functions Listed below are Marker Channel telemetries, battery and lead telemetry, diagnostics, and event summaries for each of the Prodigy pacemakers. Marker Channel Telemetry Prodigy DR Prodigy D Prodigy VDD Prodigy SR Prodigy S Marker Telemetry ✓ ✓ ✓ ✓ ✓ Sensor Telemetry ✓ ✓ ✓ Marker Channel Diagrams ✓ ✓ ✓ EGM (A or V) ✓ ✓ ✓ ✓ ✓ Battery and Lead Information Prodigy DR, Prodigy D, Prodigy VDD, Prodigy SR, Prodigy S Battery Status Value Message “OK” or “Replace Pacer” Tolerance* Voltage V ± 10% Current µA ± 30% Impedance Ohms ± 10% (± 100 ohms) Est. Time to Replace Months Atrial and/or Ventricular Chambers Value Tolerance* Pulse Width ms ± 1% Amplitude V ± 10% Output Energy µJ ± 45% Lead Current mA ± 35% Lead Impedance Ohms ± 20% Pacing Polarity UNI/BI * Based on a 200 to 1250 ohm load at the time of manufacture until ERI. 196407001 Rev A Refer to the “Reference man.” category in doc#163256 for Printing Instructions. Medtronic Confidential 9879EN-D_9501043EN/CTC.qxd 5/10/99 11:39 Page D-4 7 x 9 inches (178 mm x 229 mm) D-4 Prodigy Reference Information Dual Chamber Pacemaker Diagnostics NOTE: Prodigy diagnostics are programmed using the diagnostic setups listed below that set the diagnostic type and associated parameters listed under “setup values”. Alternately, other programmable values can be selected for the diagnostic type and parameters. Diagnostic Setup A. Tachy Monitor Type: Method: Detection Rate1: Detection Number: Termination Number: Collect EGM: Lead Monitor2: V. Tachy Monitor Type: Method: Detection Rate1: Detection Number: Termination Number: Collect EGM: Lead Monitor2: 196407001 Rev A Setup Values Other Programmable Values High Rate Episode-A. Rolling Upper Tracking Rate or Upper Activity Rate, whichever is greater Frozen 80 - 400 ppm 8 2 - 200 8 ON OFF 2 - 20 OFF ON, ON + Polar. SW. (A+V, A, or V) High Rate Episode-V. Rolling Upper Tracking Rate or Upper Activity Rate, whichever is greater Frozen 80 - 400 ppm 3 2 - 200 3 ON 2 - 20 OFF OFF ON, ON + Polar. SW. (A+V, A, or V) Refer to the “Reference man.” category in doc#163256 for Printing Instructions. Medtronic Confidential 9879EN-D_9501043EN/CTC.qxd 5/10/99 11:39 Page D-5 7 x 9 inches (178 mm x 229 mm) Magnet Mode Operations, Telemetry Functions, Diagnostics, and Event Summaries Diagnostic Setup Setup Values Rate Histogram Type: Refractory: Lead Monitor2: Rate Histogram Include OFF Lead Trend Type: Method: Lead Trend Rolling Lead Monitor2: D-5 Other Programmable Values Exclude ON, ON + Polar. SW. (A+V, A, or V) Frozen OFF (fixed setting) 1 The values used for Upper Tracking Rate and Upper Activity Rate are the most recent programmed values registered in pacemaker memory. These values will be used even when they are not pertinent to the present permanent mode. 2 “ON” and ventricular “ON + Polar. SW-V.” are the only programmable Lead Monitor values for the Prodigy VDD pacemaker. 196407001 Rev A Refer to the “Reference man.” category in doc#163256 for Printing Instructions. Medtronic Confidential 9879EN-D_9501043EN/CTC.qxd 5/10/99 11:39 Page D-6 7 x 9 inches (178 mm x 229 mm) D-6 Prodigy Reference Information Single Chamber Pacemaker Diagnostics NOTE: Prodigy diagnostics are programmed using the diagnostic setups listed below that set the diagnostic type and associated parameters listed under “setup values”. Alternately, other programmable values can be selected for the diagnostic type and parameters. Diagnostic Setup Setup Values Other Programmable Values Monitor3 Tachy Type: Method: Detection Rate4: Detection Number: Termination Number: Collect EGM: Lead Monitor: 3 2- 200 3 ON OFF 2 - 20 OFF ON, ON + Polar. SW. Rate Histogram Include OFF Lead Trend Type: Method: Lead Trend Rolling 3 4 Rev A Frozen 80 - 400 ppm Rate Histogram Type: Refractory: Lead Monitor: Lead Monitor: 196407001 High Rate Episode Rolling Upper Activity Rate or 120 ppm, whichever is greater Exclude ON, ON + Polar. SW. Frozen OFF (fixed setting) Diagnostic is only applicable to the Prodigy SR pacemaker. The value used for the Upper Activity Rate is the most recent programmed value registered in pacemaker memory. This value will be used even when it is not pertinent to the present programmed mode. Refer to the “Reference man.” category in doc#163256 for Printing Instructions. Medtronic Confidential 9879EN-D_9501043EN/CTC.qxd 5/10/99 11:39 Page D-7 7 x 9 inches (178 mm x 229 mm) Magnet Mode Operations, Telemetry Functions, Diagnostics, and Event Summaries D-7 Event Summaries Prodigy DR Prodigy D Prodigy VDD Prodigy SR Prodigy S ✓ ✓ ✓ ✓ ✓ ✓ ✓ ✓ PVC and PVC Run Events ✓ ✓ ✓ Mode Switch Event ✓ Percent Total Events AV Sequence Pace/Sense 196407001 Rev A Refer to the “Reference man.” category in doc#163256 for Printing Instructions. Medtronic Confidential 7 x 9 inches (178 mm x 229 mm) 196407001 Rev A Refer to the “Reference man.” category in doc#163256 for Printing Instructions. Medtronic Confidential 9879EN-E_9501043EN/CTC.qxd 5/10/99 11:40 Page E-1 7 x 9 inches (178 mm x 229 mm) SECTION E Modes and Parameters, Programming Requirements and Restrictions, and Timing Reference Table Section E provides programmable, nonprogrammable, and temporary parameter capabilities for the Prodigy pacemakers. The parameters are divided into the dual chamber pacemakers and the single chamber pacemakers listed below. In addition, programming requirements and restrictions are given for the programmer software and an event timing reference table by mode. ■ Prodigy DR (Models 7860, 7861, 7862) ■ Prodigy D (Models 7864, 7865, 7866) ■ Prodigy VDD (Model 8168) ■ Prodigy SR (Models 8158, 8160, 8161, 8162) ■ Prodigy S (Models 8164, 8165, 8166) E-1 196407001 Rev A Refer to the “Reference man.” category in doc#163256 for Printing Instructions. Medtronic Confidential 9879EN-E_9501043EN/CTC.qxd 5/10/99 11:40 Page E-2 7 x 9 inches (178 mm x 229 mm) E-2 Prodigy Reference Information Dual Chamber Pacemaker Permanent Programmable Modes and Parameters In the table below are the Prodigy DR, Prodigy D, and Prodigy VDD permanent programmable modes and parameters. Parameters listed under separate columns apply only to the specific Prodigy model. Parameters common to two or three Prodigy models are listed once under the respective models. Parameter Prodigy DR (7860/61/62) Prodigy D (7864/65/66) Prodigy VDD (8168) Pacing Mode DDDR, DDD, VDD, DDIR, DDI, DVIR, DVI, DOOR, DOO, VVIR, VVI, VVT, VOOR, VOO, AAIR, AAI, AAT, AOOR, AOO, ODO, OVO, OAO DDD, VDD, DDI, DVI, DOO, VVI, VVT, VOO, AAI, AAT, AOO, ODO, OVO, OAO VDD, VVIR, VVI, VVT, VOOR, VOO, ODO, OVO, OAO Mode Switch Detect Rate ON/OFF 120, 125, 130, … 175 bpm Lower Rate PAV 80, 90, 95, 100, ... 180 ppm Not applicable 30, 40, 50, … 350 ms RAAV 196407001 80, 90, 95, 100, … 180 ppm 30, 40, 50, … 350 ms SAV ON/OFF Rev A Applies to DDDR, DDD, and VDD modes; Detect Rates of 185 or 190 bpm are available if UTR is set to 175 or 180 ppm, respectively. 30, 35, 40, … 180 ppm (except 65 and 85 ppm) Upper Tracking Rate Upper Activity Rate Not Applicable Notes DDDR, DDD, and VDD modes 120 ppm Applies to rate responsive modes, including DDD and VDD with Mode Switch ON Not applicable Dual chamber modes, except VDD DDDR, DDD, and VDD modes DDDR, DDD, DDIR, DVIR, DOOR, and VDD modes Refer to the “Reference man.” category in doc#163256 for Printing Instructions. Medtronic Confidential 9879EN-E_9501043EN/CTC.qxd 5/10/99 11:40 Page E-3 7 x 9 inches (178 mm x 229 mm) Programmable, Nonprogrammable, and Temporary Parameters, Restrictions, and Timing Parameter Prodigy DR (7860/61/62) Prodigy D (7864/65/66) Prodigy VDD (8168) E-3 Notes PVARP 150, 160, 170, … 500 ms DDDR, DDD, DDIR, DDI, and VDD modes Ventricular Refractory Period 150, 160, 170, … 500 ms Dual chamber and ventricular modes, except DOOR, DOO, VOOR, and VOO modes Atrial Refractory Period PMT Intervention Atrial Amplitude* 150, 160, 170, … 500 ms Not applicable ON/OFF AAIR, AAI, and AAT modes DDDR, DDD, and VDD modes 0.5, 1.0, 1.5, 2.0, 2.5, 3.0, 3.5, 4.0, 5.0, 7.5 V Not applicable Pulse Width 0.03, 0.06, 0.09, 0.12 ms 0.15, 0.20, 0.25, … 1.0 ms 1.1, 1.2, 1.3, 1.4, 1.5 ms Not applicable Sensitivity 0.18, 0.25, 0.35, 0.5, 0.7, 1.0, 1.4, 2.0, 2.8, 4.0 mV 0.18, 0.25, 0.35, 0.5, 0.7, 1.0, 1.4, 2.0, 2.8, 4.0 mV Blanking (PVAB) 100, 110, 120, … 350 ms 100, 110, 120, … 350 ms Pacing Polarity Unipolar, Bipolar Not applicable Sensing Polarity Unipolar, Bipolar Not applicable 0.18, 0.25 and 0.35 mV sensitivity applies to bipolar atrial sensing only Models 7861 and 7865 unipolar pacing and sensing only; Model 8168 is bipolar atrial sensing only * Tolerance is based on 37°C and a 510 ohm load for the following: 0.5 V (± 10%), 1.0 V (± 10%), 1.5 V (± 10%), 2.0 V (± 10%), 2.5 V (+ 2/- 13%), 3.0 V (± 10%), 3.5 V (+ 9/- 7%), 4.0 V (± 10%), 5.0 V (+ 1/- 13%), 7.5 V (+ 1/- 13%). 196407001 Rev A Refer to the “Reference man.” category in doc#163256 for Printing Instructions. Medtronic Confidential 9879EN-E_9501043EN/CTC.qxd 5/10/99 11:40 Page E-4 7 x 9 inches (178 mm x 229 mm) E-4 Prodigy Reference Information Parameter Prodigy DR (7860/61/62) Prodigy D (7864/65/66) Ventricular Amplitude* Prodigy VDD (8168) Notes 0.5, 1.0, 1.5, 2.0, 2.5, 3.0, 3.5, 4.0, 5.0, 7.5 V Pulse Width 0.03, 0.06, 0.09, 0.12 ms 0.15, 0.20, 0.25, … 1.0 ms 1.1, 1.2, 1.3, 1.4, 1.5 ms Sensitivity 1.0, 1.4, 2.0, 2.8, 4.0, 5.6, 8.0, 11.2 mV Blanking (PAVB) 20, 28, 36, 44 ms Ventricular blanking not applicable to the Model 8168 Pacing Polarity Unipolar, Bipolar Models 7861 and 7865 unipolar pacing and sensing only Sensing Polarity Unipolar, Bipolar Rate Response Activity Rate Response 1, 2, 3, … 10 Not Applicable Applies to rate responsive modes, including DDD and VDD with Mode Switch ON 7 Activity Threshold Low, Medium/Low, Medium, Medium/High, High Medium Acceleration 0.25 min, 0.5 min, 1.0 min 0.5 min Deceleration 2.5 min, 5.0 min, 10 min 5.0 min Ventricular Safety Pacing Non-Competitive Atrial Pacing ON/OFF ON/OFF Not Applicable Not Applicable Applies to DDDR, DDD, DDIR, DDI, DVIR, and DVI modes DDDR mode * Tolerance is based on 37°C and a 510 ohm load for the following: 0.5 V (± 10%), 1.0 V (± 10%), 1.5 V (± 10%), 2.0 V (± 10%), 2.5 V (+ 2/- 13%), 3.0 V (± 10%), 3.5 V (+ 9/- 7%), 4.0 V (± 10%), 5.0 V (+ 1/- 13%), 7.5 V (+ 1/- 13%). 196407001 Rev A Refer to the “Reference man.” category in doc#163256 for Printing Instructions. Medtronic Confidential 9879EN-E_9501043EN/CTC.qxd 5/10/99 11:40 Page E-5 7 x 9 inches (178 mm x 229 mm) Programmable, Nonprogrammable, and Temporary Parameters, Restrictions, and Timing Parameter Lead Monitor Prodigy D (7864/65/66) ON, OFF, ON + Polar. SW. - A+V, ON + Polar. SW. - A, ON + Polar. SW. - V Transtelephonic Monitor ON/OFF Extended Telemetry ON/OFF Single Chamber Hysteresis 196407001 Prodigy DR (7860/61/62) Rev A 40, 50, 60 ppm, OFF Prodigy VDD (8168) E-5 Notes Ventricular Polarity Switching applies to Model 8168 VVI, VVT, AAI, and AAT modes Refer to the “Reference man.” category in doc#163256 for Printing Instructions. Medtronic Confidential 9879EN-E_9501043EN/CTC.qxd 5/10/99 11:40 Page E-6 7 x 9 inches (178 mm x 229 mm) E-6 Prodigy Reference Information Single Chamber Pacemaker Permanent Programmable Modes and Parameters In the table below are the Prodigy SR and Prodigy S permanent programmable modes and parameters. Parameters listed under separate columns apply only to the specific Prodigy model. Parameters common to both Prodigy models are listed once. Parameter Modes Lower (Pacing) Rate Upper Activity Rate Refractory Period Amplitude* Pulse Width Sensitivity Atrial Ventricular Blanking Prodigy SR (8158) (8160/61/62) Prodigy S Notes VVIR, VVI, VVT, VOOR VOO, AAIR, AAI, AAT AOOR, AOO, OVO, OAO VVI, VVT, VOO AAI, AAT, AOO, OVO, OAO (8164/65/66) 30, 35, 40, … 180 ppm (except 65 and 85 ppm) 80, 90, 95, 100, … 180 ppm Not Applicable Rate responsive modes 150, 160, 170, … 500 ms 0.5, 1.0, 1.5, 2.0, 2.5, 3.0, 3.5, 4.0, 5.0, 7.5 V 0.03, 0.06, 0.09, 0.12 ms 0.15, 0.20, 0.25, … 1.0 ms 1.1, 1.2, 1.3, 1.4, 1.5 ms 0.25, 0.35, 0.5, 0.7, 1.0, 1.4, 2.0, 2.8, 4.0 mV 1.0, 1.4, 2.0, 2.8, 4.0, 5.6, 8.0, 11.2 mV 100, 110, 120, … 350 ms Pacing Polarity Bipolar, Unipolar Sensing Polarity Bipolar, Unipolar 0.25 and 0.35 mV sensitivity for bipolar sensing only AAIR, AAI, and AAT modes Models 8161 and 8165 unipolar pacing and sensing only * Tolerance is based on 37°C and a 510 ohm load for the following: 0.5 V (± 10%), 1.0 V (± 10%), 1.5 V (± 10%), 2.0 V (± 10%), 2.5 V (+ 2/- 13%), 3.0 V (± 10%), 3.5 V (+ 9/- 7%), 4.0 V (± 10%), 5.0 V (+ 1/- 13%), 7.5 V (+ 1/- 13%). 196407001 Rev A Refer to the “Reference man.” category in doc#163256 for Printing Instructions. Medtronic Confidential 9879EN-E_9501043EN/CTC.qxd 5/10/99 11:40 Page E-7 7 x 9 inches (178 mm x 229 mm) Programmable, Nonprogrammable, and Temporary Parameters, Restrictions, and Timing Parameter Rate Response Activity Rate Response Activity Threshold Acceleration Deceleration Lead Monitor Prodigy S 1, 2, 3, … 10 Not Applicable Rate responsive modes Low, Medium/Low, Medium, Medium/High, High 0.25 min, 0.5 min, 1.0 min 2.5 min, 5.0 min, 10 min ON, OFF, ON + Polar. SW. ON/OFF Extended Telemetry ON/OFF Rev A Notes (8164/65/66) Transtelephonic Monitor Single Chamber Hysteresis 196407001 Prodigy SR (8158) (8160/61/62) E-7 40, 50, 60 ppm, OFF VVI, VVT, AAI, and AAT modes Refer to the “Reference man.” category in doc#163256 for Printing Instructions. Medtronic Confidential 9879EN-E_9501043EN/CTC.qxd 5/10/99 11:40 Page E-8 7 x 9 inches (178 mm x 229 mm) E-8 Prodigy Reference Information Programming Requirements and Restrictions The following requirements and restrictions insure that parameter settings selected for programming do not form an invalid combination or cause an undesirable interaction. An invalid combination of pending parameter values is indicated when the pending values of the parameters involved appear on the screen in reverse video (see pages 6-3 and 6-4). Programming will not be allowed until valid parameter values have been selected. Parameter Programming Restriction/Requirement Atrial Blanking Atrial Blanking cannot be greater than PVARP. Atrial Blanking must be at least 50 ms shorter than Atrial Refractory. The programmed value for Atrial Blanking cannot be changed when Mode Switch is ON. Lower Rate Lower Rate must be less than Upper Activity Rate and/or Upper Tracking Rate. The following combinations of Lower Rate and Paced AV Interval cannot be programmed: Lower Rate 140 ppm 145 150 155 160 165 170 175 180 Paced AV Interval 340 - 350 ms 330 - 350 310 - 350 300 - 350 290 - 350 280 - 350 260 - 350 250 - 350 240 - 350 Pacing Mode If an interrogation for the present parameter settings has not occurred, the programmer will not allow you to program a pacing mode unless you also select values for certain other parameters, such as Lower Rate. Interrogating the pacemaker from the Pacing Parameters screen eliminates this requirement. Mode Switch Certain parameter values automatically are made pending when you select ON as the Mode Switch value: ■ Upper Activity Rate is set equal to Upper Tracking Rate. ■ Rate Adaptive AV Interval is set to ON. ■ Atrial Blanking is set to a value based on the Upper Tracking Rate and PVARP is set to a value based on the Detect Rate. If the pacing mode is VDD, PVARP is set to “varied.” Upper Tracking Rate cannot be less than 100 ppm. Lower Rate cannot be less than 35 ppm or greater than 100 ppm. Sensed AV cannot be less than 40 ms or greater than 160 ms. 196407001 Rev A Refer to the “Reference man.” category in doc#163256 for Printing Instructions. Medtronic Confidential 9879EN-E_9501043EN/CTC.qxd 5/10/99 11:40 Page E-9 7 x 9 inches (178 mm x 229 mm) Programmable, Nonprogrammable, and Temporary Parameters, Restrictions, and Timing E-9 Detect Rate must be at least 10 bpm greater than the Upper Tracking Rate, except for the combination of 175 bpm (Detect Rate) and 170 ppm (Upper Tracking Rate), which is valid. If the Upper Tracking Rate is 165 ppm or above, a pending value for Detect Rate is automatically selected by the programmer. Paced AV cannot be less than the Sensed AV or greater than the Sensed AV plus 70 ms. PVARP The programmed value for PVARP cannot be changed when Mode Switch is ON. Rate Adaptive AV Interval Rate Adaptive AV Interval cannot be programmed OFF when Mode Switch is ON. Sensitivity Permanent Atrial Sensitivity cannot be less than 0.5 mV if Atrial Sense Polarity is Unipolar or if Polarity Switch for the atrium is programmed. Upper Rate Upper Activity Rate and/or Upper Tracking Rate must be greater than (Activity, Tracking) Lower Rate. Upper Activity Rate cannot be selected for programming while Mode Switch is ON. If Mode Switch is programmed ON or is pending, Upper Tracking Rate must be at least 10 ppm less than the Mode Switch Detect Rate, except for the combination of 170 ppm (Upper Tracking Rate ) and 175 bpm (Detect Rate), which is valid. 196407001 Rev A Refer to the “Reference man.” category in doc#163256 for Printing Instructions. Medtronic Confidential 9879EN-E_9501043EN/CTC.qxd 5/10/99 11:40 Page E-10 7 x 9 inches (178 mm x 229 mm) E-10 Prodigy Reference Information Nonprogrammable Parameters Parameter Prodigy DR (7860/61/62) Prodigy D (7864/65/66) Prodigy VDD (8168) Notes Atrial Blanking Period 50 - 100 ms Paced AV and Sensed AV intervals pacemaker-determined Ventricular Blanking Period 50 - 100 ms Ventricular Refractory Period pacemakerdetermined Rate Limit 200 ppm Atrial and ventricular rates, tolerance is ± 20 ppm Parameter Ventricular Blanking Period Rate Limit 196407001 Rev A Prodigy SR (8158) (8160/61/62) Prodigy S Notes (8164/65/66) 50 - 100 ms 200 ppm Ventricular Refractory Period pacemaker-determined Atrial and ventricular rates, tolerance is ± 20 ppm. Refer to the “Reference man.” category in doc#163256 for Printing Instructions. Medtronic Confidential 9879EN-E_9501043EN/CTC.qxd 5/10/99 11:40 Page E-11 7 x 9 inches (178 mm x 229 mm) Programmable, Nonprogrammable, and Temporary Parameters, Restrictions, and Timing E-11 Temporary Modes and Parameters Parameter Pacing Mode Prodigy DR (7860/61/62) Prodigy D (7864/65/66) Prodigy VDD (8168) Prodigy SR (8158, 8160/61/62) Prodigy S (8164/65/66) Notes DDD*, VVI, VVT, VOO, AAI, AAT, AOO, ODO*, OVO, OAO DDD and ODO modes are not applicable to Models 8168, 8158, 8160/61/62, and 8164/65/66; Atrial modes are not applicable to the Model 8168 Pacing Rate† Amplitude Pulse Width Atrial Sensitivity Ventricular Sensitivity 30, 35, 40, … 180 ppm (except 65 and 85 ppm), 190, 200, 210, … 280 ppm, 300, 310, 320, 330, 350, 370, 380, 400 ppm 0.5, 1.0, 1.5, 2.0, 2.5, 3.0, 3.5, 4.0, 5.0, 7.5 V 0.03, 0.06, 0.09, 0.12 ms, 0.15, 0.20, 0.25, … 1.0 ms, 1.1, 1.2, 1.3, 1.4, 1.5 ms 0.18‡, 0.25, 0.35, 0.5, 0.7, 1.0, 1.4, 2.0, 2.8, 4.0 mV Not applicable to the Model 8168 1.0, 1.4, 2.0, 2.8, 4.0, 5.6, 8.0, 11.2 mV * Availability of mode is dependent on the permanent mode. † Pacing rate is limited to 5 ppm below the programmed Upper Tracking Rate in the DDD mode. ‡ Available with Models 7860/61/62 and 7864/65/66. 196407001 Rev A Refer to the “Reference man.” category in doc#163256 for Printing Instructions. Medtronic Confidential 9879EN-E_9501043EN/CTC.qxd 5/10/99 11:40 Page E-12 7 x 9 inches (178 mm x 229 mm) E-12 Prodigy Reference Information Timing Reference Table Event Modes Timing Description 1. A-sense outside refractory period DDD, DDDR, VDD Starts atrial refractory (including the associated 50 to 100 ms atrial blanking) period and SAV. 2. A-sense outside refractory period AAIR, AAI, AAT Starts Upper Activity Rate (AAIR only), programmed Atrial Refractory (including the associated programmed Atrial Blanking) period, and A-A escape interval; emits pacing pulse up to 200 ppm (300 ms) in AAT only. 3. A-sense outside refractory period DDI, DDIR Starts atrial refractory (including the associated 50 to 100 ms atrial blanking) period. 4. A-sense ODO, OAO Starts a 50 to 100 ms atrial blanking period. 5. A-sense refractory in SAV DDD, DDDR, VDD Starts a 50 to 100 ms atrial blanking period. The atrial refractory period remains active. 6. A-sense refractory in PAV DDD, DDDR, DDI, DDIR Starts a 50 to 100 ms atrial blanking period. The atrial refractory period remains active. 7. A-sense refractory after nonrefractory A-sense and before V-pace occurs DDIR, DDI Starts a 50 to 100 ms atrial blanking period. The atrial refractory period remains active. 8. A-sense refractory in PVARP (NCAP is OFF) DDD, DDDR, VDD, DDI, DDIR Starts a 50 to 100 ms atrial blanking period. 9. A-sense refractory in PVARP or NCAP interval A-pace. (NCAP is ON) DDDR (Re)Starts 300 ms NCAP interval. A-pace will be delayed until NCAP timeout. Subsequent PAV will be shortened in case of delayed 10. A-sense in atrial refractory period AAI, AAIR, AAT Starts programmed Atrial Refractory (including the associated programmed Atrial Blanking) period. 196407001 Rev A Refer to the “Reference man.” category in doc#163256 for Printing Instructions. Medtronic Confidential 9879EN-E_9501043EN/CTC.qxd 5/10/99 11:40 Page E-13 7 x 9 inches (178 mm x 229 mm) Programmable, Nonprogrammable, and Temporary Parameters, Restrictions, and Timing Event 196407001 E-13 Modes Timing Description 11. A-pace DDD, DDDR, DDI, DDIR Starts atrial refractory (including the associated 50 to 100 ms atrial blanking) period, programmed Ventricular Blanking Period, and PAV. 12. A-pace DVI, DVIR, DOO, DOOR Starts programmed Ventricular Blanking period (DVI and DVIR only) and PAV. 13. A-pace AAI, AAIR, AAT Starts Upper Activity Rate (AAIR only), programmed Atrial Refractory (including the associated programmed Atrial Blanking) period, and A-A escape interval. 14. A-pace AOO, AOOR Starts Upper Activity Rate (AOOR only) and A-A escape interval. 15. V-sense outside SAV, PAV or refractory period (not PVC) DDD, DDDR, DDI, DDIR, VDD Restarts VA interval, Upper Tracking Rate (DDD, DDDR, and VDD only), PVARP (including the associated programmed PVAB period), and programmed Ventricular Refractory (including the associated 50 to 100 ms ventricular blanking) period. 16. V-sense ODO, OVO Starts a 50 to 100 ms ventricular blanking period. 17. V-sense outside PAV or refractory period DVI, DVIR Restarts VA interval and programmed Ventricular Refractory (including the associated 50 to 100 ms ventricular blanking) period. 18. V-sense outside refractory period VVI, VVIR, VVT Restarts Upper Activity Rate (VVIR only), programmed Ventricular Refractory (including the associated 50 to 100 ms ventricular blanking) period, and V-V escape interval; emits pacing pulse up to 200 ppm (300 ms) in VVT only. 19. PVC (V-sense outside refractory, not preceded by A-sense, A-pace or A-sense in PVARP) DDD, DDDR, DDI, DDIR, VDD Restarts VA interval and starts minimum PVARP of 400 ms; starts the associated programmed PVAB period, programmed Ventricular Refractory (including the associated 50 to 100 ms ventricular blanking) period, and Upper Tracking Rate (DDD, DDDR, and VDD only). Rev A Refer to the “Reference man.” category in doc#163256 for Printing Instructions. Medtronic Confidential 9879EN-E_9501043EN/CTC.qxd 5/10/99 11:40 Page E-14 7 x 9 inches (178 mm x 229 mm) E-14 Prodigy Reference Information Event Modes Timing Description 20. PVC (refractory V-sense not preceded by A-sense, A-pace or A-sense in PVARP) DDD, DDDR, DDI, DDIR, VDD Starts minimum PVARP of 400 ms; starts the associated programmed PVAB period, programmed Ventricular Refractory (including the associated 50 to 100 ms ventricular blanking) period, and Upper Tracking Rate (DDD, DDDR, and VDD only). 21. V-sense in SAV DDD, DDDR, VDD Starts VA interval, Upper Tracking Rate, PVARP (including the associated PVAB period), and programmed Ventricular Refractory (including the associated 50 to 100 ms ventricular blanking) period. 22. V-sense in PAV outside 110 ms VSP window or VSP is OFF DDD, DDDR, DDI, DDIR, DVI, DVIR Starts VA interval, Upper Tracking Rate (DDD and DDDR only), PVARP (including the associated programmed PVAB period, but not in DVI and DVIR), and programmed Ventricular Refractory (including the associated 50 to 100 ms ventricular blanking) period. 23. V-sense in PAV inside 110 ms VSP window with VSP is ON DDD, DDDR, DDI, DDIR, DVI, DVIR Starts Upper Tracking Rate (DDD and DDDR only), PVARP (including the associated programmed PVAB period, but not in DVI and DVIR), and programmed Ventricular Refractory (including the associated 50 to 100 ms ventricular blanking) period. Emits safety pace at 110 ms or at PAV timeout, whichever is less. Starts VA interval at the Safety Pace. 24. V-sense after A-sense and before V-pace occurs DDIR, DDI Restarts VA interval, programmed Ventricular Refractory (including the associated 50 to 100 ms ventricular blanking) period, and PVARP (including the associated programmed PVAB period). 25. V-sense in refractory period (not PVC) DDD, DDDR, DDI, DDIR, VDD Restarts Upper Tracking Rate (DDD, DDDR, and VDD only), PVARP (including the associated programmed PVAB period), and programmed Ventricular Refractory (including the associated 50 to 100 ms ventricular blanking) period. 26. V-sense in refractory period DVI, DVIR, VVI, VVIR, VVT Restarts programmed Ventricular Refractory (including the associated 50 to 100 ms ventricular blanking) period and Upper Activity Rate (VVIR only). 196407001 Rev A Refer to the “Reference man.” category in doc#163256 for Printing Instructions. Medtronic Confidential 9879EN-E_9501043EN/CTC.qxd 5/10/99 11:40 Page E-15 7 x 9 inches (178 mm x 229 mm) Programmable, Nonprogrammable, and Temporary Parameters, Restrictions, and Timing Event 196407001 E-15 Modes Timing Description 27. V-pace VDD Starts V-V interval, Upper Tracking Rate, a 400 ms PVARP or the programmed PVARP if greater than 400 ms (including the associated programmed PVAB period), and programmed Ventricular Refractory (including the associated 50 to 100 ms ventricular blanking) period. 28. V-pace (not ventricular safety pace) DDD, DDDR, DDI, DDIR Starts VA interval, Upper Tracking Rate (DDD and DDDR only), PVARP (including the associated programmed PVAB period), and programmed Ventricular Refractory (including the associated 50 to 100 ms ventricular blanking) period. 29. V-pace (not ventricular safety pace) DVI, DVIR, DOOR, DOO Starts VA interval and programmed Ventricular Refractory (including the associated 50 to 100 ms ventricular blanking) period (DVI and DVIR only). 30. V-pace VVI, VVIR, VVT, VOOR, VOO Starts Upper Activity Rate (VVIR, and VOOR only), V-V escape interval, and programmed Ventricular Refractory (including the associated 50 to 100 ms ventricular blanking) period (VVI, VVIR, and VVT only). 31. V-pace (ventricular safety pace) DDDR, DDIR, DDD, DDI, DVIR, DVI Starts VA interval, Upper Tracking Rate (DDDR, DDD only), PVARP (including the associated programmed PVAB period, but not in DVI and DVIR), and programmed Ventricular Refractory (including the associated 50 to 100 ms ventricular blanking) period. Rev A Refer to the “Reference man.” category in doc#163256 for Printing Instructions. 9879EN-E_9501043EN/CTC.qxd 5/10/99 11:40 Page E-16 Medtronic Confidential 7 x 9 inches (178 mm x 229 mm) E-16 Prodigy Reference Information The Prodigy pacemaker’s timing in dual chamber modes can be summarized by the following rules: ■ In the DDDR, DDIR, DVIR, DDD, DDI, and DVI modes, an atrial pace starts a PAV that times out only in the absence of a sensed ventricular event. That is, the VA interval always begins with the next sensed or paced ventricular event, whichever comes first. In the VDD mode, an atrial sense starts a SAV that times out only in the absence of a sensed ventricular event. ■ In the DDDR, DDD, and VDD modes, a nonrefractory sensed atrial event starts an SAV that times out only in the absence of a sensed ventricular event. That is, the VA interval (V-V escape interval in VDD mode) always begins with the next sensed or paced ventricular event, whichever comes first. ■ In the DDDR, DDIR, DVIR, DOOR, DDD, DDI, and DVI modes, VA interval adjustments are made on a beat-by-beat basis to maintain a constant atrial pacing rate (A-A timing). These VA adjustments are made whenever: The AV interval is shorter than the PAV interval, which will be started by the next scheduled atrial pace (next scheduled PAV interval). ■ 196407001 Rev A When the Rate Adaptive AV feature is programmed ON in the DDDR, DDD, DDIR, DVIR, DOOR or VDD mode, the pacemaker modifies the AV intervals (scheduled PAV or SAV intervals) step-by-step as the heart rate increases or decreases. The scheduled PAV or SAV intervals are determined at every V-pace or nonrefractory V-sense event. The resulting operating PAV interval is based upon the current sensor rate, whereas the operating SAV is based upon the mean atrial rate (a running average atrial rate). Refer to the “Reference man.” category in doc#163256 for Printing Instructions. Medtronic Confidential 9879EN-F_9501043EN/CTC.qxd 5/10/99 11:41 Page F-1 7 x 9 inches (178 mm x 229 mm) SECTION F General Warnings and Precautions Section F contains general warnings and precautions that the clinician should consider when programming Prodigy pacemakers. Specific mode or parameter warnings and precautions are covered under the specific topic in Section II of this manual. Information is provided for the following Prodigy pacemakers: ■ Prodigy DR (Models 7860, 7861, 7862) ■ Prodigy D (Models 7864, 7865, 7866) ■ Prodigy VDD (Model 8168) ■ Prodigy SR (Models 8158, 8160, 8161, 8162) ■ Prodigy S (Models 8164, 8165, 8166) F-1 196407001 Rev A Refer to the “Reference man.” category in doc#163256 for Printing Instructions. 9879EN-F_9501043EN/CTC.qxd 5/10/99 11:41 Page F-2 Medtronic Confidential 7 x 9 inches (178 mm x 229 mm) F-2 Prodigy Reference Information General Warnings General Warning Medtronic implantable pacemakers and leads are implanted in the extremely hostile environment of the human body. This environment places severe limitations on the design and function of the pacemaker and lead. These limitations unavoidably reduce the potential performance and longevity of the pacemaker and lead despite the exercise of due care in design, component selection, manufacture and testing prior to sale. Reference is hereby made to published data on predictable failure rates of the pacemaker and lead and their implantation which have either been furnished by Medtronic or are otherwise available to physicians. The pacemaker includes a nonseparable power source which will ultimately cease to function due to exhaustion or premature failure thereby necessitating removal of the pacemaker. The lead is necessarily very small in diameter and very flexible, which unavoidably increases the likelihood of breakage or breach of its insulation. Other reasons for failure of the pacemaker or lead include, but are not limited to: body rejection phenomena; change in performance characteristics due to component changes or failures; unusual physiological variations in patients; medical complications; lead displacement; lead fracture; fibrotic tissue formation; erosion of the pacemaker or lead through body tissue or interference from transmitters, tools, appliances, instruments, equipment or other devices which use electricity or electromagnetic wave transmission. Consequently, no representation or warranty is made that failure or cessation of function of the pacemaker or lead will not occur, that the body will not react adversely to the implantation of the pacemaker or lead, that medical complications will not follow the implantation of the pacemaker or lead or that the pacemaker and lead will, in all cases, restore adequate cardiac function. Side Effects Possible side effects include, but are not limited to, body rejection phenomena including local tissue reaction, muscle and nerve stimulation, infection, erosion of pacemaker lead through skin, transvenous lead-related thrombosis, embolism and cardiac tamponade. 196407001 Rev A Refer to the “Reference man.” category in doc#163256 for Printing Instructions. Medtronic Confidential 9879EN-F_9501043EN/CTC.qxd 5/10/99 11:41 Page F-3 7 x 9 inches (178 mm x 229 mm) Warnings and Precautions F-3 Implantable Defibrillator Some pacemaker patients may also require therapy from an implantable defibrillator. Only bipolar pacing should be used with these patients. In some cases, pacing in the unipolar configuration may cause the defibrillator either to deliver inappropriate therapy or withhold appropriate therapy. Regarding the use of Prodigy models in patients having an implanted defibrillator, see below. ■ Prodigy DR (Model 7861) Prodigy D (Model 7865) These models are unipolar-only devices and should not be used in patients having an implantable defibrillator. ■ Prodigy DR (Models 7860, 7862) Prodigy D (Models 7864, 7866) These models implanted with unipolar lead(s) should not be used in patients having an implantable defibrillator. These models implanted with bipolar leads automatically switch to ventricular bipolar pacing polarity following a full VVI, 65-ppm electrical reset (e.g., due to a defibrillation shock). Atrial and ventricular bipolar pacing polarities are unaffected by a partial electrical reset. Use of these models may be recommended for such patients provided bipolar leads are implanted. ■ 196407001 Rev A Prodigy VDD (Model 8168) The Model 8168 implanted with the Model 5032 Lead automatically switches to ventricular bipolar pacing polarity following a full VVI, 65-ppm electrical reset (e.g., due to a defibrillation shock). A partial electrical reset will not affect ventricular bipolar pacing polarity. Use of the Model 8168 may be recommended for such patients. A full electrical reset will not change the permanent atrial bipolar pacing polarity. Refer to the “Reference man.” category in doc#163256 for Printing Instructions. 9879EN-F_9501043EN/CTC.qxd 5/10/99 11:41 Page F-4 Medtronic Confidential 7 x 9 inches (178 mm x 229 mm) F-4 Prodigy Reference Information ■ Prodigy SR (Model 8161) Prodigy S (Model 8165) These models are unipolar-only devices and should not be used in patients having an implantable defibrillator. ■ Prodigy SR (Models 8158, 8160, 8162) Prodigy S (Models 8164, 8166) These models implanted with unipolar lead(s) should not be used in patients having an implantable defibrillator. These models implanted with a bipolar lead automatically switch to bipolar pacing polarity following a full VVI, 65-ppm electrical reset (e.g., due to a defibrillation shock). Bipolar pacing polarity is uneffected by a partial electrical reset. Use of these models may be recommended for such patients provided a bipolar lead is implanted. WARNINGS Programming Lead Monitor with the optional polarity switch is contraindicated for patients with implantable defibrillators. When an out-of-range lead is detected, the monitor automatically reprograms selected leads to unipolar polarity. Pacing the unipolar configuration may cause the defibrillator either to deliver inappropriate therapy or to withhold appropriate therapy. Programming Transtelephonic Monitor ON is contraindicated for patients with implantable defibrillators. When it is programmed ON, the pacing polarity is temporarily set to unipolar when the magnet is applied. Pacing in the unipolar configuration may cause the defibrillator either to deliver inappropriate therapy or to withhold appropriate therapy. 196407001 Rev A Refer to the “Reference man.” category in doc#163256 for Printing Instructions. Medtronic Confidential 9879EN-F_9501043EN/CTC.qxd 5/10/99 11:41 Page F-5 7 x 9 inches (178 mm x 229 mm) Warnings and Precautions F-5 General Precautions Failure Mechanisms The clinician should be aware that all pacemakers ultimately cease to function. There is minimal risk that they may also fail at any time due to random component or battery failure(s) which cannot be predicted prior to occurrence. Also, the pacing system may cease to function at any time due to lead-related problems such as displacement, fracture, fibrotic tissue formation, elevated thresholds or medical complications, such as myocardial infarction occurring at the site of the electrode. Proper operation in the demand (inhibited) or triggered modes may be affected by interference from electrical equipment. ODO/OVO/OAO Modes The ODO, OVO, and OAO modes (Prodigy DR, Prodigy D, and Prodigy VDD pacemakers), and the OVO and OAO modes (Prodigy SR and Prodigy S pacemakers) may be permanently programmed for use as a temporary diagnostic mode; each of these modes provide atrial and/or ventricular sensing without pacing. Use these modes with caution. They should not be used with pacemaker dependent-patients. Use of a magnet with this mode causes OOO operation, that is, no sensing or pacing. Do not leave the patient in any of these modes without constant monitoring and supervision. High-Rate Pacing When using high-rate pacing above 130 ppm, the clinician should interrogate the pacemaker to determine the battery status before and after such use to check for the presence of the Elective Replacement Indicator (ERI) condition. High-rate pacing over several years may set the ERI prematurely. High pacing rates with the battery partially depleted may cause premature triggering of the ERI. 196407001 Rev A Refer to the “Reference man.” category in doc#163256 for Printing Instructions. Medtronic Confidential 9879EN-F_9501043EN/CTC.qxd 5/10/99 11:41 Page F-6 7 x 9 inches (178 mm x 229 mm) F-6 Prodigy Reference Information Crosstalk and Self-Inhibition Crosstalk occurs in dual chamber systems (except with the Prodigy VDD pacemaker) when atrial pacing output pulses are sensed by the ventricular lead. Special circuitry in Prodigy pacemakers prevents crosstalk and selfinhibition during normal operation. Crosstalk is more likely to occur at high sensor-driven pacing rates, high atrial amplitudes, and wide atrial pulse widths. Crosstalk will result in Ventricular Safety Pacing (VSP) when programmed ON, or self-inhibition when VSP is programmed OFF. Programming a longer Ventricular Blanking period will usually resolve the problem. Self-inhibition in single chamber modes results from the sensing of the pacing output pulse. This is more likely to occur with high amplitudes, wide pulse widths, and low sensitivity settings. Reprogramming the Sensitivity to a less sensitive setting (higher numeric value) will usually resolve the situation. In addition, inhibition can occur when far-field R-waves are sensed in the AAIR and AAI modes. This can be prevented by properly programming of the Atrial Refractory Period. Rate Increase Caused by “Twiddler’s Syndrome” “Twiddler’s syndrome,” i.e., patient manipulation of the device after implant, may cause the pacing rate to increase temporarily, if the device is programmed to a rate responsive mode. 196407001 Rev A Refer to the “Reference man.” category in doc#163256 for Printing Instructions. Medtronic Confidential 9879EN-F_9501043EN/CTC.qxd 5/10/99 11:41 Page F-7 7 x 9 inches (178 mm x 229 mm) Warnings and Precautions F-7 Potential Effects of Pressure on the Pacemaker Clinical studies of activity rate responsive pacemakers have reported instances of increased sensitivity to muscle motion (such as heart contractions) when external pressure is exerted on the device. This increased sensitivity to muscle motion can potentially cause an increase in the pacing rate up to the programmed Upper Activity Rate. This might occur when the patient is lying on the pacemaker while sleeping, or by pressing the programmer head over the pacemaker. Implantation of the pacemaker near the patient’s skeletal system (e.g., in a very thin patient), may augment the effect when pressure is applied. During such occurrences, the Prodigy pacemaker is operating as it was designed. This phenomenon does not indicate device malfunction or inappropriate programming. Relieving the abnormal pressure on the device will restore the appropriate pacing rate. Reprogramming the Activity Threshold to Medium High or High has been shown to resolve the situation if the patient’s observed rate response is not significantly effected. Muscle Stimulation with Unipolar Pacing ■ Prodigy DR Under certain circumstances (e.g., (Model 7861) high output settings, etc.) these Prodigy D (Model 7865) unipolar-only pacemakers may Prodigy SR (Model 8161) induce muscle stimulation at the Prodigy S (Model 8165) pocket site. ■ Prodigy DR These bipolar Prodigy pacemaker models (Models 7860, 7862) programmed to unipolar pacing may Prodigy D exhibit muscle stimulation also. (Models 7864, 7866) Prodigy VDD (Model 8168) Prodigy SR (Models 8158, 8160, 8162) Prodigy S (Models 8164, 8166) Such stimulation may reach and be limited to rates of 80 or 90 ppm when the programmed Upper Activity Rate is 80 or 90 ppm. At programmed Upper Activity Rates greater than 100 ppm, rate elevation due to pacemaker-induced muscle stimulation may reach a maximum of 95 ppm. Pacemaker-induced muscle stimulation may be effectively controlled and/or eliminated by programming Pulse Width to a narrower setting or programming a lower Amplitude. 196407001 Rev A Refer to the “Reference man.” category in doc#163256 for Printing Instructions. Medtronic Confidential 9879EN-F_9501043EN/CTC.qxd 5/10/99 11:41 Page F-8 7 x 9 inches (178 mm x 229 mm) F-8 Prodigy Reference Information Effects of Myopotentials During Unipolar Pacing Myopotentials could affect the operation of Prodigy models programmed to unipolar sensing, especially atrial Sensitivity settings of 0.5 thru 1.0 mV and ventricular Sensitivity setting of 1.0 and 1.4 mV. Myopotentials sensed on the atrial channel outside of the total atrial refractory period (SAV + PVARP) start Sensed AV intervals in the DDDR, DDD, and VDD modes. Continuous myopotentials cause reversion to asynchronous operation when sensed in the refractory period: ■ on the ventricular channel at intervals less than the Ventricular Refractory Period, in the DDDR, DDD, DDIR, DDI, DVIR, DVI, VVIR, VVI, and VVT modes or ■ on the atrial channel at intervals less than the Atrial Refractory Period in the AAIR, AAI, and AAT modes. In the VVIR mode, the resulting asynchronous pacing occurs at the Lower Rate, otherwise such asynchronous pacing occurs at the sensor-indicated rate for rate responsive modes or the Lower Rate for nonrate responsive modes. The effects of myopotentials may be effectively controlled by programming a less sensitive Sensitivity setting (higher numerical setting). Premature Elective Replacement Conditions Continuous pacing at high rates (i.e., greater than 100 ppm) and at wide pulse widths (i.e., up to 1.0 ms) may cause the battery to deplete rapidly and indicate that the pacemaker should be replaced. If the Elective Replacement Indicator (ERI) is set, the pacemaker operates in the VVI mode at a rate of 65 ppm. While operating at ERI, the battery voltage may gradually rise above 2.62 V, allowing the pacemaker to be reset and reprogrammed. Mode at Elective Replacement Indication For dual chamber pacemakers, pacing reverts to the ventricular channel (VVI mode) when the Elective Replacement Indicator is set, even when programmed to AAIR, AAI, AAT, AOOR, or AOO mode. 196407001 Rev A Refer to the “Reference man.” category in doc#163256 for Printing Instructions. Medtronic Confidential 9879EN-F_9501043EN/CTC.qxd 5/10/99 11:41 Page F-9 7 x 9 inches (178 mm x 229 mm) Warnings and Precautions F-9 Potential Complications Prodigy pacemaker/lead system may operate inappropriately or fail completely due to several potential complications. Note the following potential complications: 196407001 Rev A ■ Potential effects of premature battery depletion are decreased output voltage, no pacing output, loss of capture, elective replacement indication, and eventual erratic pacing. ■ Potential effects of pacemaker component(s) failure are loss of pacing output, pacing rate and other parameter changes, reversion to asynchronous mode, loss of capture, loss of programming capability, elective replacement indication, and erratic pacing. ■ Potential effects of the sensor detecting muscle or mechanical stimulation is increased pacing rate to levels higher than expected for a given patient activity. In addition, an open or shorted sensor may cause activity detection and rate responsive pacing to cease operating. ■ Potential effects of electromagnetic interference (EMI) on the pacemaker’s circuitry are pacing output inhibition, reversion to asynchronous mode, pacing synchronized to the EMI source, and a partial or full electrical reset condition. EMI from electrocautery and defibrillation may cause pacing output inhibition, temporary pause in pacing, permanent loss of pacing output, reversion to asynchronous mode, pacing synchronized to the EMI source, set the elective replacement indicator, and a partial or full electrical reset condition. ■ Potential effects of poor connection of lead to pacemaker connector block are intermittent or continuous loss of capture, failure to sense properly or loss of sensing, crosstalk between leads, and inhibition of pacing. ■ Reversed connection of the atrial and ventricular leads will result in improper pacing and sensing operations. ■ Potential effects of displaced or fractured lead are intermittent or continuous loss of capture and/or sensing, and inhibition of pacing. Cardiac perforation may cause intermittent or continuous loss of capture and/or sensing, inhibition of pacing, cardiac tamponade, and muscle or nerve stimulation. Myocardial irritability at the time of lead insertion may cause fibrillation or flutter. Elevation of pacing thresholds may cause a loss of capture. Refer to the “Reference man.” category in doc#163256 for Printing Instructions. Medtronic Confidential 7 x 9 inches (178 mm x 229 mm) 196407001 Rev A Refer to the “Reference man.” category in doc#163256 for Printing Instructions. Medtronic Confidential 9879EN-G_9501043EN/CTC.qxd 5/10/99 11:43 Page G-1 7 x 9 inches (178 mm x 229 mm) SECTION G Hospital, Medical, Home, and Job Environment Interference Section G contains information on potential effects of electromagnetic interference on Prodigy pacemakers in the hospital or medical environment and in the home or job environment. Also, general recommendations are given for follow-up frequency (Medicare guidelines). Listed below are the Prodigy models for which this information applies. ■ Prodigy DR (Models 7860, 7861, 7862) ■ Prodigy D (Models 7864, 7865, 7866) ■ Prodigy VDD (Model 8168) ■ Prodigy SR (Models 8158, 8160, 8161, 8162) ■ Prodigy S (Models 8164, 8165, 8166) G-1 196407001 Rev A Refer to the “Reference man.” category in doc#163256 for Printing Instructions. Medtronic Confidential 9879EN-G_9501043EN/CTC.qxd 5/10/99 11:43 Page G-2 7 x 9 inches (178 mm x 229 mm) G-2 Prodigy Reference Information Hospital or Medical Environment Interference Prodigy pacemakers are designed to ensure immunity from most common sources of electromagnetic interference (EMI). Because many different EMI sources exist or could become common in the future, it is impossible to characterize all EMI sources. Moreover, due to the everchanging electrical environment, severe EMI sources presently rare or unknown could become common in the future. If the pacemaker is inhibited or has reverted to asynchronous operation in the presence of EMI, turning off the source or moving away from the source will return the pacemaker to normal operation. Listed below are typical EMI sources. Additional information is available upon request from your Medtronic representative. X-Ray and Fluoroscopy Testing of pacemakers similar to Prodigy devices by exposure to diagnostic X-ray or fluoroscopic radiation has not affected those pacemakers. Irradiation The pacemaker should not be directly irradiated by therapeutic levels of ionizing radiation (such as produced by cobalt machines or linear accelerators used for cancer treatment) because of the risk of permanent damage to the pacemaker circuitry. If such therapy is required in the vicinity of the pacemaker, shield the device and confirm its function after treatment. Magnetic Resonance Imaging WARNING: The use of Magnetic Resonance Imaging (MRI) among pacemaker patients has been contraindicated by MRI manufacturers. Medtronic does not recommend subjecting pacemaker patients to MRI scanning. Clinicians should carefully weigh the decision to use MRI with pacemaker patients. The following information is provided to the clinician to assist in careful consideration of the risks and benefits of subjecting pacemaker patients to MRI scanning, should the clinical circumstances arise. No objective studies of the effects of MRI on pacemakers have been performed. Limited Medtronic testing has observed: 196407001 Rev A Refer to the “Reference man.” category in doc#163256 for Printing Instructions. Medtronic Confidential 9879EN-G_9501043EN/CTC.qxd 5/10/99 11:43 Page G-3 7 x 9 inches (178 mm x 229 mm) Hospital, Medical, Home or Job Environment Interference G-3 a) Magnetic and radio frequency (RF) fields produced by MRI may adversely affect the operation of the pacemaker, including total inhibition of pacing output. b) Magnetic fields may activate magnet mode operation and cause asynchronous pacing. Limited published studies1 on the effects of MRI on pacing have observed increased ventricular pacing beyond the rate limit. Pacemaker patients who are treated with MRI should be closely monitored and programmed parameters should be verified upon cessation of MRI. Lithotripsy Permanent damage to the pacemaker may occur if the device is at the focal point of the lithotripsy beam. Since this situation is easily avoided, lithotripsy may be used safely with Prodigy pacemakers provided: ■ the pacemaker is programmed to a single chamber nonrate responsive mode (VVI/AAI or VOO/AOO) prior to treatment; and ■ the pacemaker is at least 1 to 2 inches (2.5 to 5 cm) away from the focal point of the lithotripsy beam. Diathermy Do not use diathermy directly over the pacemaker implant site because of the heating effects of internal components and possible damage to the pacemaker. External Defibrillation Place the defibrillation paddles at least 5 inches (13 cm) from the pacemaker and confirm normal operation after defibrillation. Defibrillatory discharges may result in temporary and/or permanent myocardial damage at the electrode-tissue interface, as well as temporary and/or permanent elevated pacing thresholds. The pacemaker may be damaged by defibrillatory discharges if the paddles are placed over the pacemaker. 1 196407001 Rev A Holmes, Hayes, Gray, et al. The effects of magnetic resonance imaging on implantable pulse generators. PACE. 1986; 9 (3): 360-370. Refer to the “Reference man.” category in doc#163256 for Printing Instructions. Medtronic Confidential 9879EN-G_9501043EN/CTC.qxd 5/10/99 11:43 Page G-4 7 x 9 inches (178 mm x 229 mm) G-4 Prodigy Reference Information Electrocautery Electrocautery can induce ventricular fibrillation. The electrocautery tip should never be used within 15 cm (6 inches) of an implanted Prodigy pacemaker/lead system. The use of electrocautery may cause a temporary pause in output, the rate exceed the 200 ppm rate limit, set the elective replacement indicator or electrically reset the device. The pacemaker may also be inhibited, triggered, or revert to asynchronous operation due to the use of electrocautery. Because of these potential complications, alternatives to electrocautery should be used when available. Effects to the pacemaker vary considerably based on the type of electrocautery unit, coagulation and cutting current settings, current pathway from the cautery tip to the indifferent plate, and the pacemaker/lead system. Electrocautery units could also interfere with ECG monitoring equipment. Monitor cardiac activity via blood pressure or pressure pulses when using electrocautery. If electrocautery cannot be avoided, follow these steps to minimize complications: 196407001 Rev A 1. program the device to the VOO/AOO (nonrate responsive) mode beforehand and avoid direct contact with the pacemaker or leads to avoid induction of tachyarrhythmias and/or fibrillation, 2. position the ground plate so that the current pathway does not pass through or near the pacemaker system, i.e., place ground plate under the patient’s buttocks or legs during abdominal surgery, 3. use short, intermittent, and irregular bursts at the lowest feasible energy levels, 4. where possible, use a bipolar electrocautery system, and 5. have temporary pacing and defibrillation equipment available. Refer to the “Reference man.” category in doc#163256 for Printing Instructions. Medtronic Confidential 9879EN-G_9501043EN/CTC.qxd 5/10/99 11:43 Page G-5 7 x 9 inches (178 mm x 229 mm) Hospital, Medical, Home or Job Environment Interference G-5 Home and Job Environment Interference Based on laboratory tests of Prodigy pacemakers, the device should not be affected by the normal operation of electrical equipment, household appliances, electric machine shop tools, microwave ovens, spark-ignited internal combustion engines, low-powered radio, and microwave frequency transmitters. All such equipment should be kept in good repair and properly grounded to avoid the possibility of electrical shock or interference with the proper operation of the pacemaker. Some types of theft prevention equipment, such as those found at store entrances and exits, may temporarily inhibit Prodigy pacemakers or cause it to revert to asynchronous operation. This response, however, is temporary; the pacemaker returns to normal operation when the patient moves away from such equipment. Consult Medtronic when the patient will be in an area where contact with current carrying conductors is possible or when near high-powered electromagnetic fields radiated by arc welding units, induction furnaces, induction stoves, resistance welders, radio or microwave frequency transmitters, etc. Cellular Phones Recent studies have indicated there may be a potential interaction between cellular phones and pacemaker operation. Potential effects may be due to either the radio frequency signal or the magnet within the phone and could include inhibition or asynchronous pacing when the phone is within close proximity (within 6 inches or 15 centimeters) to the pacemaker. It is important to note, based on testing to date, that any effect resulting from an interaction between the cellular phone and the implanted pacemaker is temporary. Simply moving the phone away from the implanted device will return it to its previous state of operation. Because of the great variety of cellular phones and the wide variance in patient physiology, an absolute recommendation to cover all patients cannot be made. 196407001 Rev A Refer to the “Reference man.” category in doc#163256 for Printing Instructions. 9879EN-G_9501043EN/CTC.qxd 5/10/99 11:43 Page G-6 Medtronic Confidential 7 x 9 inches (178 mm x 229 mm) G-6 Prodigy Reference Information The following information provides a general guideline to patients having an implanted pacemaker who desire to operate a cellular phone: ■ Maintain a minimum separation of 6 inches (15 centimeters) between a hand-held personal cellular phone and the implanted device. Portable and mobile cellular phones generally transmit at higher power levels compared to hand-held models. For phones transmitting above three watts, a minimum separation of 12 inches (30 centimeters) between the antenna and the implanted device is advised. ■ Patients should hold the phone to the ear opposite the side of the implanted device. Patients should not carry the phone in a breast pocket or on a belt over or within 6 inches (15 centimeters) of the implanted device as some phones emit signals when they are turned ON but not in use (i.e., in the listen or standby mode). Storing the phone in a location opposite the side of implant is recommended. General Recommendations The first few months after implanting a new pacing system the patient may require close monitoring. In the U.S.A., the physician may wish to use the individual state’s or Medicare’s maximum frequency table for dual chamber pacemakers under Guideline I, i.e., every two months from the second month through three years post-implant, and monthly thereafter (Ref. Carriers Manual, Part 3, Claims Process, Transmittal No. 1051, or a later publication, if available). Note that Guideline I applies to those pacing systems (i.e., the pacemaker and the lead used) for which 5 years of clinical data are not yet available. 196407001 Rev A Refer to the “Reference man.” category in doc#163256 for Printing Instructions. Medtronic Confidential 9879EN-H_9501043EN/CTC.qxd 5/10/99 11:45 Page H-1 7 x 9 inches (178 mm x 229 mm) SECTION H General Pacing Indications The indications for long-term cardiac pacing as recommended by the American Heart Association Task Force on Assessment of Diagnostic and Therapeutic Cardiovascular Procedures (Committee on Pacemaker Implantation)1 are presented below. Indications for permanent pacemakers have been grouped according to the following classifications: ■ Class I: Conditions for which there is general agreement that permanent pacemakers should be implanted. ■ Class II: Conditions for which permanent pacemakers are frequently used but there is divergence of opinion with respect to the necessity of their insertion. ■ Class III: Conditions for which there is general agreement that pacemakers are unnecessary. 1 Dreifus LS, Fisch C, Griffin JC, et al. Guidelines for implantation of cardiac pacemakers and antiarrhythmia devices. A report of the American College of Cardiology / American Heart Association Task Force on Assessment of Diagnostic and Therapeutic Cardiovascular Procedures (Committee on Pacemaker Implantation). Journal of the American College of Cardiology. 1991; 18: 1-13. H-1 196407001 Rev A Refer to the “Reference man.” category in doc#163256 for Printing Instructions. Medtronic Confidential 9879EN-H_9501043EN/CTC.qxd 5/10/99 11:45 Page H-2 7 x 9 inches (178 mm x 229 mm) H-2 Prodigy Reference Information Indications for Permanent Pacing in Acquired Atrioventricular Block in Adults Class I: 196407001 Rev A ■ Complete heart block, permanent or intermittent, at any anatomic level, associated with any one of the following complications: - Symptomatic bradycardia. In the presence of complete heart block, symptoms must be presumed to be due to the heart block unless proved to be otherwise. - Congestive heart failure. - Ectopic rhythms and other medical conditions that require drugs that suppress automaticity of escape pacemakers and result in symptomatic bradycardia. - Documented periods of asystole ≥ 3 seconds or any escape rate < 40 bpm in symptom-free patients. - Confusional states that clear with temporary pacing. - Post A-V junction ablation, myotonic dystrophy. ■ Second-degree AV Block, permanent or intermittent, regardless of the type or the site of block with symptomatic bradycardia ■ Atrial fibrillation, flutter or rare cases of supraventricular tachycardia with complete heart block or advanced AV block, and any other conditions described above under complete heart block. The bradycardia must be unrelated to digitalis or drugs known to impair AV conduction. Refer to the “Reference man.” category in doc#163256 for Printing Instructions. 9879EN-H_9501043EN/CTC.qxd 5/10/99 11:45 Page H-3 Medtronic Confidential 7 x 9 inches (178 mm x 229 mm) General Pacing Indications H-3 Class II: ■ Asymptomatic complete heart block, permanent or intermittent, at any anatomic site with a ventricular rate of > 40 bpm or faster. ■ Asymptomatic Type II second-degree AV block, permanent or intermittent. ■ Asymptomatic Type I second-degree AV block at intra-His or infraHis levels. Class III: 196407001 Rev A ■ First degree AV block. ■ Asymptomatic Type I second-degree AV block at the supra-His (AV node) level. Refer to the “Reference man.” category in doc#163256 for Printing Instructions. Medtronic Confidential 9879EN-H_9501043EN/CTC.qxd 5/10/99 11:45 Page H-4 7 x 9 inches (178 mm x 229 mm) H-4 Prodigy Reference Information Indications for Permanent Pacing After Myocardial Infarction Class I: ■ Persistent advanced second-degree AV block or complete heart block after acute myocardial infarction with block in the His-Purkinje system (bilateral bundle branch block). ■ Patients with transient advanced AV block and associated bundle branch block. Class II: ■ Patients with persistent advanced block at the AV node. Class III: 196407001 Rev A ■ Patients with persistent first-degree AV block in the presence of bundle branch block not previously demonstrated. ■ Transient AV conduction disturbances in the absence of intraventricular conduction defects. ■ Transient AV block with isolated left anterior hemiblock. ■ Acquired left anterior hemiblock without AV block. Refer to the “Reference man.” category in doc#163256 for Printing Instructions. Medtronic Confidential 9879EN-H_9501043EN/CTC.qxd 5/10/99 11:45 Page H-5 7 x 9 inches (178 mm x 229 mm) General Pacing Indications H-5 Indications for Permanent Pacing in Bifascicular and Trifascicular Block Class I: ■ Bifascicular block with intermittent complete heart block associated with symptomatic bradycardia. ■ Bifascicular or trifascicular block with intermittent Type II seconddegree AV block without symptoms attributable to the heart block. Class II: ■ Bifascicular or trifascicular block with syncope that is not proved to be complete heart block, but other possible causes for syncope are not identifiable. ■ Marked prolonged HV interval > 100 ms. ■ Pacing-induced infra-His block. Class III: 196407001 Rev A ■ Fascicular block without AV block or symptoms. ■ Fascicular block and first-degree AV block without symptoms. Refer to the “Reference man.” category in doc#163256 for Printing Instructions. Medtronic Confidential 9879EN-H_9501043EN/CTC.qxd 5/10/99 11:45 Page H-6 7 x 9 inches (178 mm x 229 mm) H-6 Prodigy Reference Information Indications for Permanent Pacing in Sinus Node Dysfunction Class I: ■ Sinus node disfunction with documented symptomatic bradycardia. In some patients this will occur as a consequence of long-term (essential) drug therapy of a type and dose for which there are no acceptable alternative. Class II: ■ Sinus node dysfunction occurring spontaneously or as a result of necessary drug therapy with heart rate < 40 bpm when a clear association between symptoms consistent with the bradycardia and the actual presence of bradycardia has not been documented. Class III: 196407001 Rev A ■ Sinus node dysfunction in asymptomatic patients, including those in whom substantial sinus bradycardia (heart rate < 40 beats/minute) is a consequence of long term treatment. ■ Sinus node dysfunction in patients in whom symptoms suggestive of bradycardia are clearly documented not to be associated with a slow heart rate. Refer to the “Reference man.” category in doc#163256 for Printing Instructions. 9879EN-H_9501043EN/CTC.qxd 5/10/99 11:45 Page H-7 Medtronic Confidential 7 x 9 inches (178 mm x 229 mm) General Pacing Indications H-7 Indications for Permanent Pacing in Hypersensitive Carotid Sinus Syndrome and Neurovascular Syndromes Class I: ■ Recurrent syncope associated with clear, spontaneous events provoked by carotid sinus stimulation; minimal carotid sinus pressure induces asystole of > 3 seconds (in the absence of any medication that depresses the sinus node or AV conduction). Class II: ■ Recurrent syncope without clear, provocative events and with a hypersensitive cardioinhibitory response. ■ Syncope with associated bradycardia reproduced by a head-up tilt with or without isoproterenol or other forms of provocative maneuvers and in which a temporary pacemaker and a second provocative test can establish the likely benefits of a permanent pacemaker. Class III: 196407001 Rev A ■ A hyperactive cardioinhibitory response to carotid sinus stimulation in the absence of symptoms. ■ Vague symptoms, such as dizziness or light-headedness, or both, with a hyperactive cardioinhibitory response to carotid sinus stimulation. ■ Recurrent syncope, light-headedness or dizziness in the absence of a cardioinhibitory response. Refer to the “Reference man.” category in doc#163256 for Printing Instructions. Medtronic Confidential 9879EN-H_9501043EN/CTC.qxd 5/10/99 11:45 Page H-8 7 x 9 inches (178 mm x 229 mm) H-8 Prodigy Reference Information Indications for Permanent Pacing in Children Class I: ■ Second or third-degree heart block with symptomatic bradycardia. ■ Advanced second or third-degree AV block with moderate to marked exercise intolerance. ■ External ophthalmoplegia with bifascicular block. ■ Sinus node dysfunction with symptomatic bradycardia. ■ Congenital AV block with wide QRS escape rhythm or with block below the His bundle. ■ Advanced second or third-degree AV block persisting 10-14 days after cardiac surgery. Class II: 196407001 Rev A ■ Bradycardia-tachycardia syndrome with the need for an antiarrhythmic drug other than digitalis or phenytoin. ■ Second or third-degree AV block within the Bundle of His in an asymptomatic patient. ■ Prolonged subsidiary pacemaker recovery time. ■ Transient surgical second or third-degree AV block that reverts to bifascicular block. ■ Asymptomatic second or third-degree AV block and a ventricular rate < 45 beats/minute when awake. Complete AV block when awake, with an average ventricular rate < 50 beats/minute. ■ Complete AV block with double or triple rest cycle length pauses or minimal heart rate variability. ■ Asymptomatic neonate with congenital complete heart block and bradycardia in relation to age. ■ Complex ventricular arrhythmias associated with second or thirddegree AV block or sinus bradycardia. ■ Long Q-T syndrome. Refer to the “Reference man.” category in doc#163256 for Printing Instructions. Medtronic Confidential 9879EN-H_9501043EN/CTC.qxd 5/10/99 11:45 Page H-9 7 x 9 inches (178 mm x 229 mm) General Pacing Indications H-9 Class III: 196407001 Rev A ■ Asymptomatic postoperative bifascicular block. ■ Asymptomatic postoperative bifascicular block with first-degree AV block. ■ Transient surgical AV block that returns to normal conduction in one week. ■ Asymptomatic Type I second-degree AV block. ■ Asymptomatic congenital complete heart block without profound bradycardia in relation to age. Refer to the “Reference man.” category in doc#163256 for Printing Instructions. Medtronic Confidential 7 x 9 inches (178 mm x 229 mm) 196407001 Rev A Refer to the “Reference man.” category in doc#163256 for Printing Instructions. Medtronic Confidential 9879EN-Glos_9501043EN/CTC.qxd 5/10/99 11:42 Page I-1 7 x 9 inches (178 mm x 229 mm) GLOSSARY About This Glossary The following terms have meanings pertaining to 1) certain general pacing concepts, 2) Medtronic products, and 3) special usage in this guide. I-1 196407001 Rev A Refer to the “Reference man.” category in doc#163256 for Printing Instructions. 9879EN-Glos_9501043EN/CTC.qxd 5/10/99 11:42 Page I-2 Medtronic Confidential 7 x 9 inches (178 mm x 229 mm) I-2 Prodigy Reference Information activity - 1) patient body motion as detected by the pacemaker’s piezoelectric crystal sensor in rate responsive modes. 2) type of rate responsive pacemaker that increases or decreases pacing rate in proportion to levels of detected patient body motion. artifact - the pacemaker’s electrical output recorded as a vertical spike on the electrocardiogram. atrial kick - contribution of an atrial contraction to ventricular late enddiastolic filling volume and pressure. atrial tracking - a pacing operation (in the DDDR, DDD, and VDD modes) in which the ventricles are paced in synchrony with sensed atrial events. AV synchrony - the activation sequence of the heart in which the atria contract first and then, after an appropriate delay, the ventricles. Pacemakers which utilize the atrium for sensing and/or pacing are designed to replicate the heart’s normal contraction sequence. battery capacity - a battery’s capability for current delivery, expressed in Ampere hours, i.e., current x time. The battery capacity is one determinant of pacemaker longevity, along with current drain (see later). blanking - a time interval during which the pacemaker’s sensing circuitry is turned off and no sensing can occur. calibrate - a reference signal sent to an externally connected recorder or monitor used to facilitate the measurement of telemetered EGM or ECG tracings. chronotropic incompetence - inability of the heart to vary its rate appropriately in response to exercise. clipping - the truncation of displayed waveform peaks which can occur on the ECG/Markers/EGM screen of the full-screen programmer when the selected amplitude scaling option is set too high. configuration - the programmable state for a pacemaker operation option. Specifically applies to 1) polarity, i.e., unipolar or bipolar, 2) threshold test choices for execution and printing results. confirmation - programmer display of message(s) to verify permanent programming and storage of selected pacing parameter values after engaging the PROGRAM button. crosstalk - in dual chamber pacemakers, the sensing of a pacing stimulus delivered in the opposite chamber, which results in undesirable pacemaker response, e.g., false inhibition or resetting of the refractory period. 196407001 Rev A Refer to the “Reference man.” category in doc#163256 for Printing Instructions. 9879EN-Glos_9501043EN/CTC.qxd 5/10/99 11:42 Page I-3 Medtronic Confidential 7 x 9 inches (178 mm x 229 mm) Glossary I-3 current - in pacemakers, the continuing flow of electricity through the pacemaker circuit (esp. through the lead conductor) as measured in milliamperes; high current is associated with high voltage, low current with low voltage. Current cannot be directly controlled, but can be indirectly controlled by altering the voltage or the resistance (impedance). current drain - 1) depletion of electricity from the pacemaker battery measured in microjoules caused by: the continuous low-level “selfdischarge” from the battery, pacing and sensing circuit efficiency, and programmable factors under the control of the follow-up clinician: a) pacing rate; b) output voltage (amplitude); c) pulse duration (pulse width); d) percent of time pacing, and e) other programmable features; 2) one determinant of pacemaker longevity along with battery capacity. Current drain is inversely proportional to pacemaker longevity. demand modes - any pacemaker mode which, after sensing a spontaneous depolarization, withholds its pacing stimulus. electrical reset - automatic setting of pacing parameters to specific values upon pacemaker detection of a momentary interruption of electrical power to the pacemaker’s control circuitry; can be either a partial or a full reset. partial reset - pacing mode, polarity, and certain other parameter settings are preserved; all other parameters are changed to their Electrical Reset values. full reset - pacing resumes in the VVI mode with all values changed to Electrical Reset values. electrogram - in pacing, the recording of the cardiac waveforms as taken at the lead (electrode) site within the heart. Electrograms may be transmitted from implanted pacemakers by telemetry. electromagnetic interference (EMI) - radiated or conducted energy either electrical or magnetic - which can interfere with or disrupt the function of a pacemaker. emergency - for the pacing system, programming EMERGENCY delivers maximal energy output in the VVI mode in an attempt to provide pacing support to the ventricle. NOTE: Programming EMERGENCY for single chamber systems applied in the atrium results in emergency AAI pacing. episode - usually applied to a series of cardiac events; here used to mean certain pacemaker-defined series of cardiac events, such as PMT episodes and Mode Switch episodes, are reported via programmer diagnostics. escape interval - a pacemaker-defined time between a paced or sensed cardiac event and the subsequent scheduled pacing stimulus; the longest interval associated with the base pacing rate. 196407001 Rev A Refer to the “Reference man.” category in doc#163256 for Printing Instructions. 9879EN-Glos_9501043EN/CTC.qxd 5/10/99 11:42 Page I-4 Medtronic Confidential 7 x 9 inches (178 mm x 229 mm) I-4 Prodigy Reference Information escape rate - a pacing rate which is a function of the “escape interval” (see above); the slowest pacing rate possible. exit block - failure of a pacemaker to capture the heart because the patient’s stimulation threshold exceeds the output of the pacemaker. freeze - to stop and collect a portion of the patient’s ECG trace on a fullscreen programmer. frozen - characterizes a type of “cumulative” diagnostic data collection (e.g., frozen trend) whereby data is recorded by the pacemaker continuously until its memory capacity for the diagnostic is reached, whereupon recording stops. hysteresis - a pacing operation and programmable parameter that allows a longer escape interval after a sensed event, giving the heart a greater opportunity to beat on its own. impedance - the total opposition that a circuit presents to current flow in the pacing system. inhibit - a temporary function which causes the cessation of pacing output pulses. interlock - a safety restriction in the pacemaker programmer software that aids in the choice of proper values, usually by initiating a screen message informing the user of important value interrelationships. interrogate - a programmer command used to retrieve and display information about the status of the patient’s pacing system. longevity - duration of the normal service life of the pacemaker. Marker Channel™ Diagram - a pacing system feature used to simplify pacemaker operation evaluation by identifying pacing and/or sensing operations as well as timing intervals and by providing special notations for certain detected and paced events (e.g., PVCs, NCAPs, etc.). Marker Channel™ recording - a pacing system feature used to simplify ECG interpretation by identifying pacing and/or sensing operations. mean atrial rate - a running average of the atrial rate that is continuously calculated by the pacemaker for use by the Mode Switch and Rate Adaptive AV features. The average uses all A-A intervals except those beginning with either an atrial sense or atrial refractory sense and then ending with an atrial pace. myopotential - a term used to describe electrical signals that originate in body muscles; these signals may be sensed by the pacemaker and falsely interpreted as cardiac depolarizations. 196407001 Rev A Refer to the “Reference man.” category in doc#163256 for Printing Instructions. Medtronic Confidential 9879EN-Glos_9501043EN/CTC.qxd 5/10/99 11:42 Page I-5 7 x 9 inches (178 mm x 229 mm) Glossary I-5 noise - any electromagnetic interference, myopotentials, or crosstalk detected by a pacemaker’s sensing amplifier. noise reversion - continuous restarting of the refractory period (and its blanking period) caused by continuous sensing at intervals less than the refractory period. nominal - in pacing, the term describes a set of programmable parameter values considered reasonable for the majority of uncomplicated patients. nonrefractory - describes atrial or ventricular events sensed outside of a refractory period (in dual chamber modes, outside of AV intervals and Post-Ventricular Atrial Refractory Period; in single chamber modes outside of the Atrial Refractory Period or Ventricular Refractory Period). oversensing - inappropriate sensing of non-cardiac signals, e.g., myopotentials, electromagnetic interference, crosstalk, etc., which can cause inhibition of the pacemaker stimulus. pacemaker-defined PVC (premature ventricular contraction) - any ventricular sensed event (refractory or nonrefractory) that follows a ventricular event (pace, refractory sense, or nonrefractory sense) without an intervening atrial event (pace, refractory sense, or nonrefractory sense). pacemaker-mediated tachycardia (PMT) - a paced rhythm, usually rapid, which can occur with loss of AV synchrony. This circus rhythm begins with and is sustained by ventricular events which are conducted retrogradely (i.e., backwards) to the atria. The pacemaker senses this retrograde atrial depolarization, starts an AV interval, and then delivers a stimulus to the ventricle, causing a ventricular depolarization, which again is conducted retrogradely to the atria. The cycle repeats itself to produce tachycardia. pacemaker syndrome - a collection of signs and symptoms (often described as dizziness and/or weakness) related to the adverse hemodynamic effects of ventricular pacing, usually attributed to the absence of synchrony between the atrial and ventricular contractions. piezoelectric crystal - crystal that produces electrical signals when it is subjected to mechanical deformation. In pacing, piezoelectric crystals are used in sensors to detect motion, changes in pressure, etc., in certain rate responsive pacemakers. PMT - (see “pacemaker-mediated tachycardia” earlier.) 196407001 Rev A Refer to the “Reference man.” category in doc#163256 for Printing Instructions. 9879EN-Glos_9501043EN/CTC.qxd 5/10/99 11:42 Page I-6 Medtronic Confidential 7 x 9 inches (178 mm x 229 mm) I-6 Prodigy Reference Information radiopaque ID - a small metallic plate (inside the pacemaker connector) bearing both the Medtronic logo and a code for identifying the pacemaker under fluoroscopy. real-time measurement - a pacing system function that presents measured and calculated data at the time of the clinician’s query via programmer telemetry. retrograde conduction - the propagation of ventricular depolarization to the atria, also known as “VA conduction.” rolling trend - a type of continuous diagnostic data collection whereby data is recorded by the pacemaker continuously such that new data overwrites the old data once memory capacity is reached. safety margin - 1) the difference between the measured stimulation threshold and the programmed output voltage. Output settings that produce a margin of twice the stimulation threshold are necessary because of threshold variability due to exercise, eating, sleeping, drug therapy, and other changes in cardiac condition. 2) safety margin, voltage - a factor defined as the ratio of the programmed output voltage divided by the stimulation threshold voltage (see “Strength-Duration Test”) to achieve adequate pacing voltage and duration to prevent loss of capture. sensing threshold - the minimum signal strength (highest Sensitivity setting) that allows continuous sensing of intrinsic depolarizations. sensitivity - the degree to which a pacemaker’s sense amplifiers are responsive to levels of electrical activity in the heart (or other electrical signals). sensor-indicated rate - the pacing rate determined by the sensor-detected level of patient activity and on programmed rate response parameters; this rate is never greater than the Upper Activity Rate or less than the operating lower rate. status reset - a pacing system command which attempts to reset an electrical reset or the elective replacement indicator. stimulation threshold - the minimum electrical stimulus needed to consistently capture the heart. It can be expressed in terms of amplitude (volts, milliamps), pulse width (milliseconds), and/or energy (microjoules). 196407001 Rev A Refer to the “Reference man.” category in doc#163256 for Printing Instructions. 9879EN-Glos_9501043EN/CTC.qxd 5/10/99 11:42 Page I-7 Medtronic Confidential 7 x 9 inches (178 mm x 229 mm) Glossary I-7 strength-duration - refers to a curve that is a plot of at least two pacemaker stimulation-threshold test results, each test defining amplitude (strength) and pulse width (duration). The narrower the pulse width, the greater the voltage required to stimulate the heart, and vice versa. (See “Strength-Duration Test.”) Strength-Duration Test - the full-screen programmer’s Strength-Duration Test plots. 1) a stimulation threshold strength-duration curve from minimum output settings (voltages and pulse widths) needed to capture the myocardium; if values below the curve are programmed, loss of capture will occur. 2) the same test’s safety margin strength-duration curve is plotted by the programmer based on the programmed stimulation threshold amplitudes and pulse widths and a selected SafetyMargin Factor (e.g., X2.0). (See “safety margin” and “strength-duration” earlier.) telemetry - the transmission of data from the pacemaker to the programmer by radio waves. Information transmitted includes programmed status, real-time measurements, and diagnostic data. temporary (settings) - nonpermanent parameters programmed for brief diagnostic purposes or to quickly test their effects on pacing operations prior to permanent programming. Permanent settings are restored automatically when the programming head is removed or the telemetry link is broken. trigger - in pacing, to start a process, operation, or a collection of data. triggered mode - a pacemaker mode that, upon detecting a spontaneous depolarization or other signal, delivers an electrical stimulus to the heart. troubleshooting - a strategy and methodology for isolating and correcting problems with the pacing system. 2:1 block rate - the rate at which intrinsic atrial events are sensed as refractory in the TARP causing synchronization of V-pacing to every other atrial event. Determined by the total atrial refractory period (TARP: the sum of the AV interval and the PVARP). The operation results in a ventricular rate one half as fast as the atrial rate. undersensing - failure of the pacemaker to sense the P-wave or R-wave may cause the pacemaker to not withhold pacing output pulses. value window - box-like display listing specific programmable options for a selected parameter from a programmer screen (such as from the Programmable Parameters screen). 196407001 Rev A Refer to the “Reference man.” category in doc#163256 for Printing Instructions. 9879EN-Glos_9501043EN/CTC.qxd 5/10/99 11:42 Page I-8 Medtronic Confidential 7 x 9 inches (178 mm x 229 mm) I-8 Prodigy Reference Information Wenckebach operation - in dual chamber atrial tracking modes, an upper rate operation which limits the average ventricular pacing rate when intrinsic atrial rates rise above the programmed Upper Tracking Rate. The pacemaker does this by gradually prolonging the pacemaker’s AV interval until one atrial event falls into the PVARP and is not tracked. Since no AV interval is started by the refractory event, there will be no ventricular output synchronized to this atrial event. 196407001 Rev A Refer to the “Reference man.” category in doc#163256 for Printing Instructions. Medtronic Confidential 9879EN-Index_9501043EN/CTC.qxd 5/10/99 11:48 Page J-1 7 x 9 inches (178 mm x 229 mm) INDEX 2:1 block, 12-23 A A-A timing, 12-2 Acceleration time, 11-8 Act Threshold Test button, 7-21 Activity rate response, 11-6 threshold, 11-4 tests, 7-21 options, 7-21 screen, 7-21 Threshold test, 7-22 conducting an, 7-23 Adaptor compatibility, A-6 Assistance, 18-12 Additional parameters, 4-4, 6-9 option, 6-9 screen, 4-4 Adjusting ECG/EGM, 5-6 frozen trace, 5-12 Atrial blanking (single chamber), 12-15 refractory period (single chamber), 12-21 Audible signals, 1-7 Auto amplitude test, 7-3, 7-11 Auto pulse width test, 7-3, 7-11 Automatic Model Select button, 3-4 Automatic PVARP Extension, 12-18 AV Intervals paced (PAV), 12-8 sensed (SAV), 12-9 rate-adaptive (RA-AV), 12-11 B Battery status, 4-6, 4-10 Battery/lead data, 4-7, 4-9 information, 15-4, D-3 screen, 4-9 Battery depletion, 16-8, 18-8 Battery longevity, C-2, C-4 Battery specifications, C-7 Blanking periods nonprogrammable, 12-14 post-atrial ventricular blanking (PAVB), 12-15 post-ventricular atrial blanking (PVAB), 12-15 single chamber atrial blanking, 12-15 Block, 2:1, 12-23 Buttons Act Threshold Test, 7-21 Automatic Model Select, 3-4 Cancel Magnet, 1-10, 2-9 Clear Data, 8-2, 8-3, 8-20 command, 1-10 Data, 1-8, 3-7, 3-8, 4-5, 4-9, 4-12 Emergency, 1-10, 2-6 End Session, 1-9, 3-7, 3-8 Enhanced, 2-3, 2-4 Exercise Test, 7-26 J-1 196407001 Rev A Refer to the “Reference man.” category in doc#163256 for Printing Instructions. Medtronic Confidential 9879EN-Index_9501043EN/CTC.qxd 5/10/99 11:48 Page J-2 7 x 9 inches (178 mm x 229 mm) J-2 Prodigy Reference Information Freeze, 1-9, 3-7, 5-10 Help, 1-9, 2-13, 3-7 Inhibit, 5-9 Interrogate, 1-10, 2-5, 2-7 Interrogate All, 1-10, 2-7 Normal Assist option, 2-3, 2-4 Pacing Parameters, 1-10 Parameters, 1-9, 3-7, 4-2, 4-3, 4-4, 6-2, 6-7 Print, 1-9, 2-10, 3-7 Program, 1-10, 2-5, 6-3 Save Present Values, 6-6 Show Diagram, 5-14 Show Graph, 8-14, 8-17 Save/Nominal Options, 6-3, 6-6 Show Present, 6-3 Show Saved, 6-3, 6-6 Special, 1-9, 2-4, 3-7, 9-4 Tests/ECG, 1-8, 3-7, 7-2, 7-15, 7-21, 7-30, 7-33 C Calibrate option, 9-4 Calibration output, 9-4 Calipers, on-screen, 5-10, 5-13 Cancel Magnet button, 1-10, 2-9 function, 2-9 Cellular phones, G-5 Cessation, pacing, 18-8 Clear Data button, 8-2, 8-3, 8-20 Clearing an electrical reset, 6-9 Clock and calendar function, 9-2 Codes, Marker, 5-8 Command buttons, 1-10 Complications, pacemaker/lead, F-9 Conducting Activity Threshold test, 7-21 Auto Amplitude threshold test, 7-11 Auto Pulse Width threshold test, 7-11 Exercise test, 7-26 Manual threshold test, 7-13 Sensing test, 7-17 Strength-Duration threshold test, 7-5 Temporary parameter test, 7-31 196407001 Rev A Connecting external monitor, 3-2, 9-3 external recorder, 3-2, 9-3 skin electrodes, 3-2 Contraindications AAI Mode, 10-24 AAIR Mode, 10-22 AAT Mode, 10-30 DDD Mode, 10-10 DDDR Mode, 10-8 DDI Mode, 10-14 DDIR Mode, 10-12 DOO/AOO/VOO Modes, 10-34 DOOR/AOOR/VOOR Modes, 10-32 DVI Mode, 10-18 DVIR Mode, 10-16 ODO/OAO/OVO Modes, 10-36, F-5 VDD Mode, 10-20 VVI Mode, 10-28 VVIR Mode, 10-26 VVT Mode, 10-30 Convention, format, 1-3 Crosstalk, F-6 Cursors, caliper, 5-13 D Data button, 1-8, 3-7, 4-5, 4-9, 4-12 Data summary screen, 4-5 Data types, diagnostic recording, 8-3 Deceleration time, 11-9 Defibrillator warnings external, G-3 implantable, F-3 Desired sensor response, 7-27 Detection Rate, 14-2 Device identification, A-4 Diagnostics event summary, 17-2, 17-4 function, 8-2 graph screen, 4-12 high rate episode, 17-10 lead trend, 13-9 model specific, D-4, D-6 overview, 17-2 Refer to the “Reference man.” category in doc#163256 for Printing Instructions. Medtronic Confidential 9879EN-Index_9501043EN/CTC.qxd 5/10/99 11:48 Page J-3 7 x 9 inches (178 mm x 229 mm) Index parameter options, 8-14 parameters screen, 4-3, 8-13 programming, 8-15 rate histogram, 8-4, 17-6 recording data types, 8-3 setup options, 8-11 Diagram, Marker channel, 5-14 Diathermy interference, G-3 Dimensions, A-5 Display screen, 1-5 E ECG adjustment, 5-6 amplitude scaling, 5-6 cable, 3-2 filter, 5-6 lead configuration, 5-6 recording, 5-2 ECG/EGM display, 5-5 ECG/Markers/EGM screen, 5-5 EGM, also see electrogram, 5-3, 5-5, 5-7 amplitude scaling, 5-6 telemetry, 5-3, 5-7 Elective replacement indicator (ERI), 15-3, 16-8, 18-8, C-6, F-8 Electrical reset, 6-9, 15-3, 16-6, 18-9, B-6, F-3 Electrocautery interference, G-4 Electrodes, skin, 3-2 Electrogram, 5-3, 5-5, 15-8 Electromagnetic interference, G-2 Emergency button, 1-10, 2-6 pacing, 16-9, B-8 parameter programming, 2-6 parameters, 2-6 programmed parameters, B-8 End Session button, 1-9, 3-7, 3-8 Ending a patient session, 3-9 Enhanced button, 2-3, 2-4 Environmental interference, G-2, G-5 vibration, 12-6 ERI, see elective replacement indicator 196407001 Rev A J-3 ERI status, clearing an, 6-9 Event summary, 4-7, 17-2, 17-4, D-9 Exercise test, 7-22 conducting an, 7-26 Exercise Test button, 7-21, 7-26 Extended telemetry, 4-4, 6-8, 15-10 External monitor, connecting, 3-2, 9-3 External recorder, connecting, 3-2, 9-3 F Failure mechanisms, F-5 Filter, ECG, 5-6 Fluoroscopy interference, G-2 Format conventions, 1-3 Freeze button, 1-9, 3-7, 5-10 function, 5-10 option, 5-10 Freezing the ECG trace, 5-10 G General indications, H-1 precautions, 1-4, F-5 warnings, 1-4, F-2 Graph, diagnostics, 4-12 H Help button, 1-9, 2-13, 3-7 options, 2-13 High rate atrial tracking, 12-23 High rate episode, 17-10 High rate episodes report, 8-7, 8-9 High rate operation, 7-31, 12-6, 12-25, F-5 Home environment interference, G-5 Hospital environment interference, G-2 Hysteresis, 14-11 I Identification, A-4 Implantable defibrillator, F-3 Indications AAI Mode, 10-24 Refer to the “Reference man.” category in doc#163256 for Printing Instructions. Medtronic Confidential 9879EN-Index_9501043EN/CTC.qxd 5/10/99 11:48 Page J-4 7 x 9 inches (178 mm x 229 mm) J-4 Prodigy Reference Information AAIR Mode, 10-22 AAT Mode, 10-30 DDD Mode, 10-10 DDDR Mode, 10-8 DDI Mode, 10-14 DDIR Mode, 10-12 DOO/AOO/VOO Modes, 10-34 DOOR/AOOR/VOOR Modes, 10-32 DVI Mode, 10-18 DVIR Mode, 10-16 ODO/OAO/OVO Modes, 10-36 VDD Mode, 10-20 VVI Mode, 10-28 VVIR Mode, 10-26 VVT Mode, 10-30 Indications, general pacing, H-1 Indicator, Position Head, 2-2 Inhibit button, 5-9 function, 5-9 Inhibiting output, 5-9 Inhibition, F-9 Installation, software, 1-2 Interrogate button, 1-10, 2-5, 2-7 key, 2-5 Interrogate All button, 1-10 command, 2-7 feature, 2-7 Intracardiac electrogram, see EGM, electrogram Irradiation interference, G-2 J Job environment interference, G-5 K Keys Interrogate, 2-5 Paper Advance, 5-2 Paper Speed, 5-2 Program, 2-5 196407001 Rev A L Lead Monitor, 13-8 Polarity Switch, 13-9 Lead Trend, 13-9 Lead compatibility, A-6 monitor, 13-8 trend, 8-5, 13-9 Lead configuration, ECG, 5-6 Lithotripsy interference, G-3 Longevity pacemaker, 18-8 projections, C-2, C-4 Lower rate, 12-3 M Magnet mode, 16-2, D-2 Magnet resonance imaging (MRI), G-2 Manual threshold test, 7-4, 7-13 Marker Channel annotations and codes, 5-8 diagram, 5-14 telemetry, 5-3, 5-7, 5-8, 15-6, D-3 Mean atrial rate, 12-7 Measure ECG test, 7-33 Measuring parameters, 4-10, 7-33 Mechanical dimensions, A-5 Medical environment interference, G-2 Medicare guideline, G-6 Menu buttons, 1-5, 1-8 Mode operation AAI Mode, 10-25 AAIR Mode, 10-23 AAT Mode, 10-31 DDD Mode, 10-11, 12-13 DDDR Mode, 10-9, 12-13 DDI Mode, 10-14 DDIR Mode, 10-12 DOO/AOO/VOO Modes, 10-35 DOOR/AOOR/VOOR Modes, 10-33 DVI Mode, 10-19 DVIR Mode, 10-17 ODO/OAO/OVO Modes, 10-36 VDD Mode, 10-20 Refer to the “Reference man.” category in doc#163256 for Printing Instructions. 9879EN-Index_9501043EN/CTC.qxd 5/10/99 11:48 Page J-5 Medtronic Confidential 7 x 9 inches (178 mm x 229 mm) Index VVI Mode, 10-29 VVIR Mode, 10-27 VVT Mode, 10-31 Mode pertinency, 10-6 Mode selection, 10-3 Mode selection, tree 10-5 Mode switch, 14-2 RAAV activation, 12-13 Preset parameters, 14-4 Monitor lead, 13-8 transtelephonic, 13-11 MRI interference, G-2 Muscle stimulation, F-7 Myopotentials, F-8 N NBG pacing codes, 10-3 NCAP, see non-competitive atrial pacing Noise reversion, 12-21 Nominal settings, B-4 programming, 6-6 Non-competitive atrial pacing (NCAP), 14-8 mode switch interaction, 14-8 Nonprogrammable blanking periods, 12-14 Normal Assist button, 2-3, 2-4 O ON/OFF switch, 3-3 On-screen calipers, 5-10, 5-13 Output, 13-2 Output connectors, 9-3 P Paced AV interval (PAV), 12-8 Pacemaker replacement, 18-10 Pacemaker timing A-A timing, 12-2 AV intervals, 12-8 blanking periods, 12-14 high-rate atrial tracking, 12-23 rates, 12-2 refractory periods, 12-16 reference by mode, E-12 196407001 Rev A J-5 Pacemaker electrical reset, 6-9 Pacemaker ID, 1-5 Pacemaker serial number, 4-4, 6-10 Pacing cessation, 18-8 codes, 10-3 general indications, H-1 mode selection, 10-3 modes, 10-1 output, 13-4 rate responsive, 11-2 timing, 12-1, E-12 Pacing output bipolar polarity confirmation, 13-2 selecting outputs, 13-4 selecting polarity, 13-2 stimulation thresholds, 13-3 Pacing Parameters button, 1-10 Package Handling, 18-7 Package Storage, 18-7 Paper Advance key, 5-2 Paper Speed key, 5-2 Parameter interactions, 6-3, E-8 settings, Diagnostics, 4-4 settings, displaying, 4-2 subgroups, 6-3 summary, 15-2 Parameters electrical reset settings, B-6 emergency settings, 2-6, B-8 nominal settings, B-4 nonprogrammable, E-10 output, 13-4 pacing, 13-2 programmable E-2, E-6 selection of, 13-2 sensing, 13-5 shipping settings, B-2 temporary settings, 16-5, E-11 Parameters button, 1-9, 3-7, 4-2, 4-3, 4-4, 6-7 Patient information, 18-11 record, 18-11 Refer to the “Reference man.” category in doc#163256 for Printing Instructions. Medtronic Confidential 9879EN-Index_9501043EN/CTC.qxd 5/10/99 11:48 Page J-6 7 x 9 inches (178 mm x 229 mm) J-6 Prodigy Reference Information service, 18-11 PAV, see paced AV interval PAVB, see post-atrial ventricular blanking PVAB, see post-ventricular atrial blanking Percent total events, 4-7 PMT intervention, 14-7 mode switch, 14-8 non-competitive atrial pacing, 14-8 PVARP extension, 12-18 Polarity confirmation, 13-2, 13-6 Polarity Switch, 8-9, 13-9 Position Head Assist option, 2-3 indicator light, 2-2 Positioning the programming head, 2-2 Post-atrial ventricular blanking (PAVB), 12-15 Post-ventricular atrial blanking (PVAB), 12-15 Post-ventricular atrial refractory period (PVARP), 12-17 automatic extension, 12-18 Power switch, 3-3 Precautions, pacemaker, F-5 Precautions, general, 1-4 Premature elective replacement conditions, F-8 Pressure on pacemaker, F-7 Print button, 1-9, 2-10, 3-7 Print options Activity Exercise Test, 2-11 Activity Threshold Results, 2-11 Battery/Lead Data, 2-11 Current Screen Report, 2-10 Data Summary, 2-11 Diagnostics Data Table, 2-11 Full Report, 2-11 Measured Values, 2-11 Parameter Values, 2-10 selecting, 2-10 Sensing Results, 2-11 Threshold Results, 2-11 Trace, 2-11 Waveform Segment, 2-11 Waveforms, 2-11 Printing Activity Threshold test results, 7-25 196407001 Rev A Exercise test results, 7-29 measured results, 7-34 recorded diagnostics data, 8-19 reports, 2-10 sensing test results, 7-20 threshold test results, 7-14 Prodigy D description, A-2 diagnostics, D-4 nonprogrammable parameters, E-10 programmable parameters, E-2 Prodigy DR description, A-2 diagnostics, D-4 nonprogrammable parameters, E-10 programmable parameters, E-2 Prodigy S description, A-3 diagnostics, D-6 nonprogrammable parameters, E-10 programmable parameters, E-6 Prodigy SR description, A-3 diagnostics, D-6 nonprogrammable parameters, E-10 programmable parameters, E-6 Prodigy VDD description, A-2 diagnostics, D-4 nonprogrammable parameters, E-10 programmable parameters, E-2 Program button, 1-10, 2-5, 6-3 key, 2-5 Programmable telemetry options, 5-7 Programmer, setting up, 3-2 Programming diagnostics function, 8-15 Emergency parameters, 2-6 nominal values, 6-8 requirements, E-8 restrictions, E-8 serial number, 6-10 temporary parameters, 7-30 Refer to the “Reference man.” category in doc#163256 for Printing Instructions. 9879EN-Index_9501043EN/CTC.qxd 5/10/99 11:48 Page J-7 Medtronic Confidential 7 x 9 inches (178 mm x 229 mm) Index Programming head, 2-2 positioning, 2-2 PVAB, see post-ventricular atrial blanking PVARP, see post-ventricular atrial refractory period PVCs, 4-8 R RA-AV, see rate adaptive AV Radiopaque identification, A-4 Rate adaptive AV (RA-AV) operation, 12-11 operations in DDDR & DDD modes, 12-13 used with mode switch, 12-13 with sick sinus syndrome, 12-13 Rate histogram, 8-4, 17-6 Rate limit, 12-6 Rate response activity, 11-2 parameter settings, 11-3 Rate responsive pacing, 11-2 Rates lower rate, 12-3 mean atrial, 12-7 operating lower rate, 12-3 sensor-indicated, 12-4 upper activity, 12-6 upper tracking, 12-5 Real-time measurements, 4-10 ECG recording, 5-2 Real-time telemetry, see battery/lead Refractory periods atrial (single chamber), 12-21 post-ventricular atrial (PVARP), 12-17 total atrial (TARP), 12-19 ventricular (VRP), 12-20 Registration, 18-11 Replacing the pacemaker, 18-10 Resterilization, 18-7 S Safety margin curve, 7-9 SAV, see sensed AV interval Save/Nominal Options button, 6-3, 6-6 196407001 Rev A J-7 Save Present Values button, 6-6 Selecting a model, 3-4, 3-5 Selecting a safety margin, 7-9 Self test, 3-3 Self-inhibition, F-6 Sensed AV interval (SAV), 12-9 Sensing parameters bipolar polarity confirmation, 13-6 selecting polarity, 13-5 selecting sensitivity, 13-7 sensing thresholds, 13-6 Sensing test, 7-15 conducting a, 7-17 setup screen, 7-15 Sensing threshold, 13-5 Sensitivity settings, 13-7 Sensor-indicated rate, 11-4 Sensor telemetry, 5-8 Serial number, 6-7, 6-10 Service, 18-11 Setting the time and data, 9-2 Setting up Site Nominal parameters, 9-6 Setting up the programmer, 3-2 Shipping parameters, B-2 Show Graph button, 8-14 Show Diagram button, 5-14 Show Present button, 6-3 Show Saved button, 6-3 Sick Sinus Syndrome, 12-13 Side effects, F-2 Single chamber atrial blanking, 12-15 Single chamber hysteresis, 14-11 Site Nominal parameter settings, 9-6 Skin electrodes, 3-2 Software 9879E, 1-2 installation, 1-2 Special button, 1-9, 2-4, 3-7, 9-4 Starting a patient session, 3-4 Status reset, 4-4, 6-9 command, 6-9 Stimulation threshold, 13-2 Strength-Duration curve, 7-8 Refer to the “Reference man.” category in doc#163256 for Printing Instructions. Medtronic Confidential 9879EN-Index_9501043EN/CTC.qxd 5/10/99 11:48 Page J-8 7 x 9 inches (178 mm x 229 mm) J-8 Prodigy Reference Information test, 7-3, 7-5 Subordinate parameters, 6-5 Switch, ON/OFF, 3-3 System setup options, 3-3 System test, 3-3 U T V TARP, see total atrial refractory period Technical assistance, 18-12 Telemetry EGM, 5-3, 5-7 functions, D-3 Marker Channel, 5-3, 5-7, 5-8 options, programmable, 5-7 programmable, 5-7 Sensor, 5-7, 5-8 Temporary function, 7-30 modes, E-11 parameters, 16-5, E-11, 7-30 test, 7-30 conducting a, 7-31 Tests/ECG button, 1-8, 3-7, 7-2, 7-15, 7-21, 7-30, 7-33 Threshold activity, 11-4 margin test (TMT), 13-11 sensing, 13-5 stimulation, 13-2 Threshold curve, 7-8 Threshold margin test (TMT), 13-11 Threshold test function, 7-2 options, 7-3 Timing, pacemaker, 12-1, E-12 TMT, see threshold margin test Total Atrial Refractory Period (TARP), 12-19 Transtelephonic capture verification, 13-11 monitor, 13-13 Troubleshooting electrical problems, 18-3 hemodynamic problems, 18-5 strategy, 18-2 Twiddler’s syndrome, F-6 Ventricular refractory period (VRP), 12-20 Ventricular safety pacing, 14-9 Vibration, environmental, 12-6 196407001 Rev A Unipolar pacing muscle stimulation, F-7 myopotentials, F-8 Upper tracking rate, 12-5 W Warning, high rate stimulation, 7-31 Warnings, general, 1-4 Warnings, pacemaker, F-2 Waveform print option, 2-11, 5-11 Waveform Segment print option, 2-11, 5-11 Waveform telemetry options, 5-7 Wenckebach, 12-24 X X-Ray interference, G-2 Refer to the “Reference man.” category in doc#163256 for Printing Instructions. Medtronic Confidential 7 x 9 inches (178 mm x 229 mm) 196407001 Rev A Refer to the “Reference man.” category in doc#163256 for Printing Instructions. Medtronic Confidential 7 x 9 inches (178 mm x 229 mm) Europe Medtronic Europe S.A./N.V. Woluwe Office Garden Woluwedal 26 1932 St. Stevens Woluwe Belgium Telephone: (32-2) 716 88 11 FAX: (32-2) 716 88 15 Latin America Medtronic, Inc. 450 Fairway Drive Suite 103 Deerfield Beach, FL 33441 USA Telephone: (305) 428-8556 FAX: (305) 428-8984 Asia-Pacific Japan Medtronic Asia-Pacific Shuwa Kioi-cho Park Building, 5F 3-6 Kioi-cho, Chiyoda-ku Tokyo 102, Japan Telephone: (81-3) 3230-2701 FAX: (81-3) 3230-0446 North America Canada Medtronic of Canada Ltd. 6733 Kitimat Road Mississauga, Ontario L5N 1W3 Canada Telephone: (905) 826-6020 FAX: (905) 826-6620 Toll-free: 1-800-268-5346 (24-hour consultation service) Australia Medtronic Australasia Pty. Ltd. 50 Strathallen Avenue Northbridge NSW 2063 Australia Telephone: 61-2-9582999 FAX: 61-2-9587077 Asia Medtronic International Ltd. 2002 CC Wu Building 308 Hennessey Road, Wanchai Hong Kong, B.C.C. Telephone: (852) 2891-4068 FAX: (852) 2891-6830 1 196407001 Rev A United States Medtronic, Inc. 7000 Central Avenue, NE Minneapolis, MN 55432-3576 USA Telephone: (612) 574-4000 FAX: (612) 574-4879 Toll-free: 1-800-328-2518 (24-hour consultation service) September 1995 UC9501043EN 196407-001 Refer to the “Reference man.” category in doc#163256 for Printing Instructions.