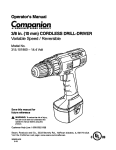
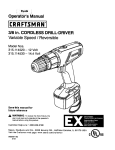
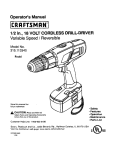
1
Operator's Manual
3/8 in. 9.6 VOLT
CORDLESS DRILL-DRIVER
Variable Speed / Reversible
Model No.
315.114050
Save this manual for
future reference
WARNING: Toreduce
the
risk of Injury, the
user must read and understandthe operator's
manual before usingthis product.
Customer Help Line: 1-800-932-3188
Sears, Roebuck and Co., 3333 Beverly
Rd., Hoffman
Visit the Craftsman web page: www,sears.com/craftsman
983000-329
8-o3
Estates,
IL 60179
USA
•
Warranty .........................................................................................................................................................................
2
•
Introducton.....................................................................................................................................................................
2
•
General Safety Rules ...............................................................................................................................................
3-4
•
SpeciflcSafety Rules ..............................................................................................................................................
4-5
•
Symbols..........................................................................................................................................................................
6
•
Product Specifications....................................................................................................................................................
7
•
Unpacking.......................................................................................................................................................................
7
•
Features .....................................................................................................................................................................
•
Operation..................................................................................................................................................................
•
Maintenance.................................................................................................................................................................
15
•
Accesserles..................................................................................................................................................................
15
•
Exploded View and Repelr Parts List...........................................................................................................................
16
•
Parts Ordering / Service ...............................................................................................................................................
18
7-8
9-14
FULL ONE YEAR WARRANTY ON CRAFTSMAN 3/8 In. CORDLESS DRILL-DRIVER
If this CRRFTSMAN 3/8 In. Cordless DdlI-Ddver falls to give complete satisfaction within one year from the date of purchase, RETURN rrTo THE NEAREST SEARS STORE OR SEARS SERVICE CENTER IN THE UNITED STATES, and
Sears wilt replace it, free of charge,
If this €ItRFt'$NRN3/8 In, Cordless DdU-Ddver Is used for commercial or rental purposes, thiswarranty appliesfor oniy
90 days from the date of purchase.
This warranty gives you specific legal rights,and you may also have other dghts whichvary from state to state.
Sears, Roebu-'k and Co., Dept. 817WA, Hoffman Estates, IL 60179
Yourdrill-driverhas many features for makingyour ddlllng
operationsmore pleasantand enjoyable. Safety,
performance
and dapendablllty
have been giventop
priorityIn the design of this drill-drivermaking iteasy to
maintainand operate.
_,
WARNING: Do not attempt to use this product until
you read thoroughly and understandcomplatelythe
operator'smanual. Pay close attentionto the safety
rules includingDangers,Warnings and Cautions. If
you use this productproperlyand only as Intended,
you will enjoyyears of safe, reliable service.
Look for this symbol to point out Important safety precautions. It means
attention!!! Your safety Is Involved.
_1= WARNING:
O
The operation of any powertool can result In foreign objectsbeing throwninto youreyes, which can
resultIn severe eye damage. Before beginning powertcol operation, always wear safety gogglesor
safety glasses with side shieldsand a full face shieldwhen needed. We recommendWide Vision
Safety Mask for use over eyeglasses or standard safety glasses with side shields,available at Sears
Retail Stores. Always wear eye protectionwhich Is marked to complywith ANSI Z87.1.
2
• 1, WARNING: Reed and understand all Instructions.
Failureto follow all Instructionslistedbelow, may
msuk in electric shock,fire and/or seriouspersonal
Injury.
Personal Safety
•
Stay alert, watch what you are doing and use
common sense when operating a power tool. Do
not use tool while Urad or under the Influence of
dregs, alcohol, or medication. A momentof inattentionwhile operatingpowertools may resultin serious
personal injury.
•
Dress properly. Do not wear loose clothing or
jewelry. Contain long heir. Keep your heir, clothing,
and gloves away from moving parts. Looseclothes,
Jewelry.or long hair can be caught in movingparts.
•
Avoid accidental starting. Be sure switch is in the
locked or off position before inserting battery
pack. Canylng toolswith your finger on the switchor
insertingthe battery pack intoa tool w_hthe switch on,
invites acclder_s.
•
Remove adjusting keys or wrenches before turning the tool on.Awrench ore key that is le_ attached
to a rotatingpart of the toolmay resultIn personal
Injury.
•
Do not overreach. Keep proper footing and batance at all times. Proper footingand balance enables
better controlof the tool In unexpected situations.Do
not use on a ladderor unstable support.
Use safety equipment. Always wear eye protection.
Dust mask, nonskidsafety shoes, hard hat, or hearing
protectionmust be usedfor approprfateoondltlons.
SAVE THESE INSTRUCTIONS
Work Area
•
Keep your work area clean and well lit, Cluttered
benches and dark areas inviteaccidents.
Do not operate power tools in era(plosiveatmospheres, such as in the presence of flammable
liquids, gases, or dust. Power toolscreate sparks
which may ignite the dust or fumes.
•
Keep bystanders, children, and visitors away while
operating a power tool. Distractions can cause you
to lose control.
Eie=tdcal Safety
• A battery operaterl tool with integral batteries or a
separate battery pack must be recharged only with
the specified chargm for the battery. A chargerthat
may be suitable for one type of battery may create a
risk of fire when used with another battery.Use b_ttery
only with charger listed.
MODEL
BATTERY PACK
CHARGER
315.114050
ITEM NO. 9 11074
ITEMNO. S 11070
(976965-001)
(976790-001)
Use battery operated tool only with specifically
designated batter/peck. Use of any otherbatteries
may create a risk of fire. Use only with batterypack
listed.
Do not abuse the cord. Never use the cord to carry
the charger. Keep cord away from heat, oil, sharp
edges, or moving parts. Replace damaged cords
Immediately. Damaged cordsmay create a fire,
•
servlcad before using. Many acoidents are caused by
poorly naintair_d teals.
Use only accessories that are recommended by the
manufacturer for your model. Accessories that may be
su_able for one tool, may create a riskof injury when used
on another tool,
Tool Use and Care
•
•
•
•
•
•
•
•
Use clamps or other practical way to secure end
support the workpisee to a stable platform. Holding
the work by hand or against your body is unstable and
may lead to loss of control.
Do not force tool. Use the correct tool for your
application. The correct tool will do the job better and
safer at the rete for which it is designed.
Do not use tool if switch dose nof turn It on or off.A
tool that cannot be controlledwith the switch is d_ngsrous and must be repaired:Tool Use and Care
Disoseneot battew pack from toot or place the mltch In
the locked or otf pesRIon hefora maldng any adJustmmts,
ofta@ng acoessede_ or stedng the toot. Such praventlve
s_oty mes_ums reduceriskofstarlingthe ted acddertally,
Store Idle tools out of reach of children and other
untrained psmons. Tools are dangerous in the hands of
untrained users.
When battery pack Is not In use, keep it away from
other metal objects like: paper clips, coins, keys,
nails, screws, or other small metal objects that can
make a connection frem one terminal to another.
Shorting the battery terminals together may cause
sparks, bums, or a fire.
Maintain tools with cam. Keep cutting tools sharp
and clean. Properly maintained tools, with sharp cutting
edges am less likelyto bind end are easier to control.
Check for mlsalignment or binding of moving parts,
breakage of parts, and any other condlUen thot may
alfeot the toore ogerstlon. If damaged, have the tool
•
Keep the tool end its handle dry, clean end free from
all and grease. Always use s clean cloth when cleaning.
Never use broke fluids, gasoline, petroleum-bssed
products, or any strong solvents to dean your tool
Selvlce
•
•
Tool seralca must be performed only by qualified
repair personnel. Service or maintenance performed by
unqualified personnel oould result in a risk of injury,
When servicing a tool, use only identical replacement
parts. Follow Instructions In the Malntenanca section
of this manual Use of unauthorized parts or f_lum to
follow Maintenance Instructions may create a dsk of shock
or injuly,
Hold tool by Insulated gripping surfaces when performing an operation where the cutting tool may contact
hidden wiring. Contact with a "live" wire will make exposed metal parts of the tool "live= and shockthe operator.
Batteries vent hydrogen gas and can explode In
the presence of a source of Ignition, such as a pilot
light. To reduce the dsk of sedous persona] Injury,
never use any cordless product in the presence of
open flame. An exploded battery can propel debris
and chemicals, If exposed, flush with water immediately.
Additional Safety Rttles
Know your power tool. Read operator's manual
carefully. Learn Its applications and limitations,
as well as the specific pofeatial hazards misted to
this tool. Followingthis rule will reducethe risk of
electric shock,fire, or seflous Injury.
Additional Cordless Tool Rules
•
•
•
i
WARNING: Never use a battery that has been
dropped or received a sharpblow, A damaged
battery Is subjectto explosion.Properlydispose of a
dropped battery Immediately. Failureto heed this
wamlng can result in sedous personal Injury.
Do not charge battery tool In a damp or wet location. Following this rule will reduce the rtsk of a]eotflc
shock.
Battery tools do not have to be plugged Into an
electrical outlet; therefore, they are always In
operating condition. Be aware of possible hazards when not using your battery tool or when
changing accessories. Followingthis rule will
reduce the dsk of electric shook,fire, or serious
personal Injury.
DO not place battery tools or their batteries near
fire or heat. This will reducethe risk of explosionand
possibleInjury,
4
•
For best results, your battery tool should be
charged in a location when) the temperature Is
more than 50°F but less than IO0°F. Do not store
outside or In vehicles.
•
Under extreme usage or temperature conditions,
battery leakage may occur. If liquid comes In
contact with your skin, wash Immediately with
soap and water, than neutralize with lemon juice or
vinegar. If liquid gets Into your eyes, flush them
with clean water for el least 10 minutes, then seek
immediate medical attention. Followingthis rule will
reclusethe dsk of serious personal injury.
• ThZ wire size Is large enough for AC ampere
ral:lngof charger as specified below:
_,WARNING:
Never usa a battery that has been
dropped or received a sharp blow. A damaged bakery
Is subjectto explosion. Properlydispose of a dropped
battery Immedla[ely.Failureto heed this warning can
result in sedous personalInjury.
•
Before using battery charger, read all instructions
and caofionew markings In this manual, on
battery charger, and product using battew
charger. Followingthis rulewill reducethe risk of
electric shock,fire, or serious personal injury.
•
TO reduce risk of inJuw, charge only nickelcadmium type rechargsuble batterlce. Other types
of batteries may burst causing personal Injury and
damage. Follow]ngthis ru]ewill reduce the risk of
electdc shock,fire, or sadous persanal Injury.
•
Do not expose charger to wet or damp conditions.
Followingthis rulewill reduce the flskof electflc
shock,fire, or serious personal Injury.
Use of an attachment not recommended or sold
by the battery charger manufacturer may result in
a risk of fire, electric shock, or Injury to persons.
Followingthis rule will reducethe riskof electric
shock,fire, or serious personal injury.
•
•
•
•
Cord Length (FeeL) 25'
Cord Size (AWG) 16
•
•
•
•
To reduce riM( of damage to charger body and
cord, pull by charger plug rather then cord when
disconnecting chargez. Followingthis rule will
reduce the risk of electric shock,fire, or serious
personal Injury.
Make sure cord is located sc that It will not be
stepped on, tripped over, or otherwise subjected
to damage or stress. Followingthis rulewill reduce
Lhe risk of seriouspersonal Inlury.
An extension cord should not be used unless
absolutely necessary. Use of improperextension
cord could resultIn a riskof fire and electric shock.If
extension cord must be used, make sure:
•
•
•
•
• That pins on plug of extension cord are the
same number, size and shape as those of
plug on charger.
•
That extension cord Is properly wired and In
good electrical condition; and
50'
16
100"
16
Note: AWG = American Wire Gage
no not operate charger with a damaged cord or
plug. If damaged, have replaced Immediately by a
qualified serviceman. Followingthis rule willreducethe
risk_ electricshock,fire, or sadous pemor_J Injury.
Do not operate charger If It has received a sharp
blow, been dropped, or otherwise damaged in any
way; take if to a qualified serviceman. FolloWing
this rule will reduce the dsk of electric shock,fire, or
serious personalinjury.
Do not disassemble charger; take it to a qualified
surviceman when sundca or repair Is required.
Incorrect reassembly may result in a risk of
efectdc shock or fire. Followingthis rule will reduce
the rlsk of electric shock,fire, or seriouspersonal
Injury.
To reduce the dak of alectdc shock, unplug
charger from outlet before attempting any msintenanse or cleaning. Turning off controls will not
reduce this risk. Followingthis rulewill reducethe
riskof electricshock,fire, or serious personal Injury.
Do not use charger outdoors. FollowingLhtsrule will
reducethe risk of electric shock,fire, or serious
personal injury,
Disconnect charger from power supply when not
in use. Followingthls rulewill reducethe risk of
electric shock,fire, or serious personalInjury.
RISK OF ELECTRIC SHOCK. DO NOT TOUCH
UNINSULATED PORTION OF OUTPUT CONNECTOR OR UNINSULATI=D BA'ITERY TERMINAL.
love these Instruction,,. Refer to them frequently
and use them to Instruct others who may use this
tool. If you loan someone this tool, loan them
these Instructions also. Followingthis rulewill
reduce the dskof electric shock,fire, or serious
personal injury.
_WARNING:
Some dust created by power sanding, sawing, gdndtng, drilling, and other construct(on activities
contains chemicals known to cause cancer, birth defects or other reproductive harm. Some examples of these
chemicals are:
• lead from lead-based points,
• crystalline silica from bricks and cement and other masonry products, and
• arsanlc and chromiumfrom chemically-treated lumber.
Your risk from these exposures varies, depending on how often you do this type of work. To reduce your
exposure to these chemicals: work In a well ventll_ed area, and work with approved safety equipment, such
as those dust masks that are specially designed to filter out microscopic particles.
5
Important: Some of the followingsymbolsmay be used on your tool.Please studythem and leam their meaning. Proper
interpretationof these symbolswill allow you to operate the tool better and safer.
NAME
DESIGNATION/EXPLANATION
V
Volts
Voltage
A
Amperes
Current
Hz
Hertz
Frequency (cyclesper second)
mln
Minutes
Time
AlternatingCurrent
Type or a characteristicnf current
=
DireotCurrent
Type or a characteristicof current
no
No Load Speed
Rotational speed, at no load
.../mln
Revolutionsor ReciprocationPer Minute
Revolutloos, strokes,
surface speed,orbitsetc. per minute
&
Safety Alert Symbol
Indicatesdanger,warningorcaution.
It means attention!!! Your safety is
involved.
O
Wear Eye Protection
Always wear safety gogglesor
safety glasseswithside shleldswhen
operatingthis produot.
Wet ConditionsAlert
Do not expose to rainor use in damp
Iocetlons.
SYMBOL
The purposeof safety symbolsIs to attract your attention to possibledangers.The safety symbols,and the
explanationswith them, deserve your careful attention and understanding.The safetywarnings do nnt by themselves
eliminate any danger. The Instructionsor warningsthey give are not substitutesfor properaccident prevention
neasures,
Symbol
A
A
A
NOTE:
Meaning
DANGER: Indicatesan Immlnantlyhazardous situationwhich, If not avoided, will resuitin death or
serious injury.
WARNING: Indicates a potentiallyhazardous situationwhich, If not avoided, could result In death or
serlous Injury.
CAUTION: Indicatesa potentiallyhazardous situationwhich, If not avoided, may result in minoror
moderate Injury. It may also be used to alert against unsafe practices that may cause property damage.
Advises you of Information or Instructions vital to the operationor maintenanceof the equipment.
SAVE THESE INSTRUCTIONS
6
Chuck
3/8In. Key'less
Motor
DC 9.6 Volt
Gear Train
Switch
No Load Speed
One Speed
Vadable Speed
O-600/min
BATTERY PACK
Item No. J11074
(976965-001)
instructions
Yourdrillhas been shippedcompletelyassembled.
•
Carefullyremove the tool and accessehes from the
box.
• Make sure that all Items listed In the pecking listare
Included.
m Inspectthe tool carefullyto make sure no breakage or
damage ocouredduring shipping,
= Donot discard the p=_cldng
material untilyou have
carefully Inspected and satisfactorilyoperated the tool.
• If any perts are damaged or missing,please call
1-800-932o3188.
90 In.lb.
Item No, =11070
(976790-001)
120 V, 60 Hz,AC only
3-6 Hour
6 Positions
MaximumTorque
CHARGER
Rating
Charge Rate
Clutch
Pacldng List
DHII
Battery Pack
Charger
Double-anded ScrewdriverBIt (2)
40 pce BIt Set
Carry Bag
Operator's Manual
_WARNING:
If any parts are missing do not operate
yourtoof untilthe missingparts are replaced. Failure
to do so could resulttn possibleserious Injury.
J_ WARNING: The ddll shouldnever be connected to a
power supplywhen you are assemblingparts, making
adjustments,cleaning, performingmaintenance, or
when the tool Is not In use, Dlsoonnectlngthe tool will
preventacctdentaistartingthat could cause sedous
Injury.
KNOW YOUR DRILL-DRIVER
See Figure 1.
Before altemlXIng to use your drill-driver,farnllladze
yourself with all operating features and safety
requirements.
KEYLESS CHUCK
Yourdrill-driverhas a keyles#chuck that allowsyou to hand
tightenor releasedrillbit Inthe chuck Jaws.
SWITCH
To turnyour ddll-ddverON, depressthe switchtdgger.
Release switch tdgger to turnyour ddU-ddverOFF.
SWITCH LOCK
The switch tdgger can be lockedin the OFF position.This
feature helps reduce the possibilityof ,_ccldentaist-rtTng
when not In use,
VARIABLE SPEED
This tool has a varlab{e speed switch that delivers higher
speed with Increased tdgger pressure.Speed Is contmnod
by the amount of switch tdgger depression.
FORWARD/REVERSE
SELECTOR
(DIRECTION OF ROTATION SELECTOR)
Your ddn-ddverhas a forward/reverseselector locked
above the switchtrigger,
WRIST STRAP
A wrist strap Is providedto reducethe chances of drepplng
your drill-driver.Place one hand through the wdst strap
when carryingtool.
BIT STORAGE
When not in use, bit(s) providedwith your drill-drivercan
be placed In the storage area located on the top of the
motor housing.
A
WARNING: Ifany parts am missing,do notoperate
yourdrill-driveruntil the missingparts are replaced.
Failureto do socould resultIn possibleserious
personal injury.
BIT STORAGE
SCREWDRIVER
BITS
TORQUE
ADJUSTMENTRING
KEYLESS
CHUCK
ROTATION
SELECTOR
CHARGING
STAND
UGHT
BATrERY
CHARGER
BATI'ERYPACK
SHOWNINTOOL
CHARGER
See Figure I.
S
Fig. 1
IMPORTANT INFORMATION
HOT BATTERY PACK
WARNING: Do not aJtowfamiliaritywith your drilldriver to make you careless. Remember that a
careless fraction of a second Is sufficientto Inflict
severe Injury.
When usingyour ddl[_dver continuously, the batteries in
your battery packwill become hot. You shouldlet a hot
bakery pack cooldown for approximately30 minutes
before attempting to recharge.
CHARGING BATTERY PACK
See Figure 1.
The battery peck for this toolhas been shippedIn a low
charge conditionto prevent possibleproblems.Therefore,
you shouldcharge itat least 3 hourspriorto use.
Note: Batterieswill not reach full charge the first time they
are charged. Allow several cy-cles(ddllingfollowed by
recharging)for them to become fullycharged.
Note; This situationonly occurswhen continuous use of
your drillcauses the batteriesto become hot. It does nct
occurunder normalcircumstances.Refer to "CHARGING
BATrERY PACK_ for normal rechargingof bakeries. If
the charger does not chargeyour battery peck under
normal circumstances,return both tha battery pack and
charger to your nearest Sears Repair Center for electdcaJ
check.
TO CHARGE
• Charge battery pack only with the charger and
charging stand provided.
• Make sure power supply Is normal house voltage,
120 volts, 60 Hz, AC only.
• Connect charger to power supply.
•
FOR RECHARGING
Place battery pack In charging stand.Align raiseddbon
batten/peck with groove In chargingstand. See Figure
1.
• Press down on battery peckto be sure contacts on
battery peck engage properlywith contacts In charging
stand.
• When properlyconnected,the red light on charging
stand will turnon.
• Note: Ifcbargerdsesnctcbargebetterypack,mtumbaJ_ery
pack,chargingstand,and chargertoyourneatsstSeam
RepekCenterforelectdcaJ
check.
• Afternorma_
usage,3 hcursol chargingtime Isrequiredto be
fullycharged.A minimumchargetimeof 3 hoursIsreqdmd
to rechargea co_ely
dschargedtool.
• The battery peck will become sllghtlywarm to the touch
while charging.Thls is normal and does not Indicate a
problem.
• Do not place charger in an area of extreme heat or
cold. it will work best at temper=_tures
between 50_F100°F.
• When batteriesbecome fully charged, unplugcharger
from power supplyand remove the battery peck.
9
TO INSTALL
SWITCH
See Figure 2.
•
To turnyour drillON, depress the switchtrigger. To turn it
OFF, release the switchtrigger.
•
FORWARD/REVERSE
SELECTOR
BATTERY PACK
Lockswitch triggeron your drillby placingthe direction
of rotationselectorIn center position.See Figure 3,
Place battery pack In your ddlLAlign raised db on
battery packwith groove insideddlL See Figure3.
BATI'ERY PACK
VARIABLESPEED
SWITCHTPJGGER
Fig. 2
LATCHES
VARIABLE
SPEED
This tool has a variable speed switch that delivers higher
speed and torque with Increased triggerpressure.Speed Is
controlledby the amount of switch trigger depression,
Note: You might hear a whistlingor dnglng noisefrom the
switch duringuse, Do not be concerned, this Is a normal
part of the switch function,
_
DEPRE_ LATCHESTO
RELEASE BA'rrERY PACK
Fig. 3
• Make surethe latches on each s{de of your battery
pack snap In place and battery pack Is securedIn drill
beforebeginningoperation,
A
CAUTION: When placingbattery pack In your dd[I,
be sure raised ribon battery pack aligns w_thgroove
Inside ddll and latches snap intoplace pmpady.
Improperassembly of battery pack can cause
damage to internalcomponents,
TO REMOVE BAI"rERY
PACK
• Lock switch tdgger on your drillby placing the direction
of rotationselector in center position, See Figure 3.
• Locate tatohes on side of battery pack and depressto
release battery pack from your drill.See Figure 3.
• Remove battery pack from your drill
10
SWITCH LOCK
See Figure 4,
KEYLESS CHUCK
See Figure 5.
The switchtdgger can be locked In the OFF position.This
feature can be used to prevent the possibilityof accldental
startingwhen not in use. To lock switchtrigger, place the
directionof rotationselector (Forward/ReverSeSelector)
in center position.
Yourdrillhasa k_=yless
chuck. As the name Impites,you can
handtightenor releasedrillbitsin the chuck J;tws.Graspand
holdthe collarofthe chuck withone hand. Rotatethe chuck
bodywithyourotherhand.The arrowson the chuck
Indicatewhichdirectionto rotatethe chuck bodyin orderto
LOCK (tighten)or UNLOCK (release)the ddllbiL
REVERSE
SELECTOR
WITH
CENTERLOCKPOSITION
DI_LLBIT
UNLOCK
(RELEASE)
CHUCKCOLLAR
CHUCKJAW8
°
FORWARD
SWITCHTRIGGER
LOCK
('nGNTEN)
Fig. 4
CHUCK BODY
_lh WARNING: Battery toolsare always in operating
condition.Therefore, switch shouldalways be locked
when not in use or canylng at your side.
Fig. 5
_h= WARNING: Do not holdchuck bodywith one hand
and use power of the drillto tighten chuck Jawson
drill bit. Chuck bodycould slip In your hand or your
hand could slipand come In contact with rotatingdrill
bit.This could cause an accidentresulting In serious
persona]
Injury.
REVERSIBLE
See Figure 4.
This tool has the feature of being reversible, The direction
of rotationis controlled by a selector locatedabove the
switchtrigger, With the drill held In normal operating
position,the directionof rotationselector shouldbe
positionedto the left of the switchfor ddlllng.The drilling
direction[s reversed when the selector Is to the rightof
the switch.When the selector Is In center position, the
switch trigger is locked,
CAUTION:
To prevent gear damage, always allow
chuck to come to a complete stop before changing
the direction of rotation.
To stop, release switch triggerand allowthe chuckto come
to a complete stop.
11
INSTALLING BITS
See Figure 6.
REMOVING BITS
•
Lock the switchtdgger by placing the directionof
rotation selector In center position.See Figure 5,
•
Loekthe swltchtrigger by ptaolngthe directionof
rotation selectorIn center position.See Figure 4,
•
Open or close chuck Jawsto a pointwhere the openIng Is slightlylarger than the bit size you Intend to use.
Also, raise the front of your drill slightlyto keep the bit
from falling out of the chuck jaws,
Insert ddll bit straightinto chuck the full length of the
jaws as shown In Figure 6.
Tighten the chuck Jawson ddll bt.
•
Loosenthe chuck Jawsfrom ddll bit.
•
To loosen:grasp and held the collar of the chuckwith
one hand, whUerotatingchuck bodywith your other
hand. Note: Rotate chuck body in the directionof the
arrowmarked UNLOCK to loosen chuckJaws.
Do not use a wrenchto tighten or loosenthe chuck
•
•
DRILLBIT
See Figum 6.
UNLOCK
(RELEASE)
•
JSWS,
•
CHUCKCOLLAR
Remove ddll bitfrem chuckjaws.
ADJUSTABLE
TORQUE CLUTCH
Your ddlt Is equipped with an adjustable torque clutchfor
driving different types of screws Into different materials.
The proper settingdepends on the type of mateflal and the
size of screwyou are using,
TO ADJUST TORQUE
•
•
CHUCKJAWS
LOCK
(TIGHTEN)
CHUCKBODY
RK_HT
•
•
Identifythe six position torque Indicator settings located
on the front ofyour ddU.See Figure 8.
Rotate adjustingringto the desired setting.
• 1
For drivingsmall screws.
• 2
For drivingscrews intosoft
materiel.
• 3
• 4
• 5
For ddvlngscrews Into softand hard
materials.
For drivingscrewsIn hard wood.
For drivinglarge screws.
• 41.,'l
For heavy drilling.
Fig. 6
To tighten the chuckJawson ddll bit; grasp and hold
the cofla.rof the chuck with one hand, while rotating
the chuck bodywith your other hand,
Note: Rotate the chuck bodyIn the direction of the
arrow marked LOCK to tighten chuckJaws.
Do not use a wrench to tighten or loosen chuck laws.
TO DECREASE
TORQUE
ADJUSTING
RING
_IL WARNING: Make sure to Insert ddll bit straightInto
chuck Jaws.Do not Insert drill bit Into chuck Jawsat
an angle then tighten, as shownIn Figure 7. Thls
could cause drill bit to be thrown from ddU,resulting
In possible sedous personalInjuryor damage to the
chuck.
TOINCREASE
TORQUE
Fig. 7
12
Fig. 8
DRILLING
BIT STORAGE
See Figure 9,
See Figure10.
When not In use, bits provided with your drill can be
placed In the storage arealocated on the bottomof your
ddll as shown in Figure9.
SCREWDRIVER
BITS
BITSTORAGE
AREA
Fig. lO
When drillinghard smoothsurfaces use a center punch to
mark desired hole location. This wlif preventthe ddll bit
from slippingoff center as the hole Is started.However,
the low speed feature allows staltlng holeswithoutcenter
punchingIf desired. To accomplish this, simplyoperate
your drill at a low speed untifthe hole Is staked,
The matedal to be ddlledshould be securedIn a vise or
with clamps to keep itfrom turning as the drill bit rotates.
Hold tool firmly and place the bit at the pointto be ddUed.
Depress the switchtdgger to starttool.
Move the ddll bit Into the workplese applying only enough
preessure
to keep the bit cutting. Do nat force or apply side
pressureto elongate e hole.
_
WARNING: Be prepared for bindingor bit
breakthrough.When these situationsoccur, ddll has
a tendencyto grab a.ndkick oppositeto the direction
of rotationand could cs.useloss of controlwhen
breakingthrough material. If no( prepared, this loss
of control can result In possible sedous injury.
When ddlllngmetals, use a light oll on the drillbit to keep
It from overheating.The oil will prolongthe life of the bit
_mdIncreasethe drillingastlon.
If the bit JamsIn workplese or If the drillstalls, release
switchtdgger Immediately.Remove the bit from the
workplece and determine the reason for Jamming.
13
CHUCK REMOVAL
•
See Figures 11,12, end 13.
The chuck must be removed In order to use some
accessodes. To remove:
Insert hex key In chuck and tighten chuckjaws securely.Tap sharplywith a mallet in a counterclockwise
direction,This will loosen chuck on the spindle. It can
now be unscrewed by hand, See Figure 13,
• Lockthe switchtdgger by placingthe directionof
rotationselectorIn center position.See Figure 4,
• Insert a 5/16 In. or larger hex key Irto the chuck ofyour
drilland tighten the chuckJawssecurely,
MALLEI"
• Tap the hex key sharplywith a mallet in a clockwise
direction,See Figure 1 2. This will loosen the screwIn
the chuck for easy removal
MALLET
CHUCKJAWS
Fig. 13
TO RETIGHTEN
HEXKEY
KEYLESS
CHUCK
A LOOSE CHUCK
The chuck may become loose on spindleand develop a
wobble. Periodicallycheck chuck screwfor tightness.
To tighten,follow these steps:
• Open chuck Jawsand remove hex key. Remove the
chuck screw by turning it In a clockwisedlrectlcxl,See
Figure 12.
Note: The screwhas left hand threads,
• Lock the switch trigger by placingthe directionof
rotationselector In center position,See Figure 4,
• Open the chuck Jaws.
•
SCREWDRIVER
[
Fig, 12
14
Inserthex key Into chuck and tighten chuckJaws
securely.Tap hex key sharplywith a mallet In a
ck_,,kwlsedirection.This will tighten chuck on the
spindle.
• Open the chuck laws and remove hex key.
• Tighten the chuck screw.
Note: The chuck screw has lelt hand threads.
_i
Do not abuse power tools. Abusive practicescan damage
tod as well as workplece.
WARNING: When selvlclng, us=,only Identical
Craftsman replacement parts. Use of any other
pert may create a hazard or cause productdamage.
Only the parts shownon parts list, page 16, are Intended
to be repaired or replaced by the customer.All other parts
shouldbe replaced at a Sears Service Center,
Avoid using solventswhen cleaning plasticparts, Most
plasticsare susceptibleto damage from vadous types of
commercialsolventsand may be damaged by their use.
Use clean cloths to remove dirt, dust, oil, grease, etc.
,_
,_k WARNING: Do not attemptto modify this tool or
create accessories not recommendedfor use with
this tool. Any such aiteretion or moditlcatlonIs
misuse and could result in a hazardous condition
leading to possiblesedous personalInjury.
WARNING: Do not at a.nytime let brake fluids,
gasoline, petroleum-besedproducts,penetratingoils,
etc. come In contactwith plasticparts.They contain
chemicalsthat can damage, weaken or destroy
plastio.
BATTERIES
Your ddll'sbattery pack is _:lUlpbed with nickel-cadmium
rechargeable pettedes. Length of service from each
charging will depend on the type of work you are doing.
The battehes In this tool have been designed to provide
maximumtroublefree life. However, like all batteries,they
will eventuallywear out. DO"not disassemblebattery peck
and attempt to replace the batteries. Handling ofthese
batteries, especially when weadng dngs and jewelry,
could result In e serious bum.
•
Store and charge your batteriesin a cool area.
Temperatures above or below normal room
temperature will shortenbattery life.
•
Never store batteries In a dischargedcondition.
Recharge them Immediatelyafter they are
discharged.
•
All ba_edes gradually lose their charge. The higher
the temperature the quickerthey lose their charge, if
you store yourtool for long bedods of time without
using it. recharge the baZtedesevery monthor two.
This practicewill prolongbattery life.
To obtain the longestpossiblebattery life,we suggestthe
following:
To preserve naturei resources, please
BATTERY PACK REMOVAL
FOR RECYCLING
recycle or dispose d hattedes properly.
This product contains nlckel-sadmlum
batteries. Local, state or federal laws
may prohibit dlsposal of niokel-cadmlum
bettedes in ordinary trash.
AND PREPARATION
WARNING: Upon removal, cover the battery pack's
terminalswith heaW duty adhesive tape. Do cot
attempt to destroy or disassemble battew pack or
remove any of Its components,Nickel-cadmium
batteries mustbe recycled or disposedof properly.
Also, never touch bothterminals with metal objects
and/or body parts as shortc_rcuitmay result. Keep
away from children.Failureto comply with these
warnings could result in fire and/or serious Injury.
Consultyour localwaste authorityfor Information
regardingavailable recyclingand/or disposaloptions,
The followingrecommended accessoriesare currentlyavailable at Sears Retail Stores.
•
6-Pc. Extra Length Magnite Power Bit Set
•
17-Pc. Power Screwdriver/NutdrlverSet and Case
•
30-Pc. Power Screwddver/NutdrlverSet and Case
•
High Speed Bits (For Wood or Metal)..3/4 In. Max.
,_IL WARNING:
The use of attachments or accessories not listed might be hazardous,
15
CRAFTSMAN
3/8in.,9.6VOLTCORDLESS
DRILL-DRIVER
- MODELNO.315.114050
In all correspondenceregarding your318In., 9.6 VOLT CORDLESS DRILL-DRIVER orwhen orderingrepair
The modelnumberwillbe found on a plate attached tothe motorhousing.Alwaysrnentlon the modelnumber
parts.
SEE BACK PAGE FOR PARTS ORDERING
INSTRUCTIONS
2
\
1
\
4
\
PARTS UST
Key
No.
1
2
Part
Number
660120002
Descd_lon
Qty.
Screw (Special) ...................................................................... 1
690033001
Chuck..................................................................................... 1
3
* Item No. _ 11074
Battery Pack (976965-001) .................................................... 1
4
* Item No, J_11070
Charger (976790-001) ........................................................... 1
5
900211007
Tool Bag - Not Shown ........................................................... 1
983OOO-329
Operator's Manual
* Can Be Purchased Thru RSOS (Retail Speclai Order System)
16
II II
IIII
17
Your Home
For repair-in
your home-of
all major brand appliances,
lawn and garden equipment, or heating and cooling systems,
no matter who made it, no matter who sold it!
For the replacement parts, accessories and
owner's manuals that you need to do-it-yourself.
For Sears professional installationof home appliances
and items like garage door openers and water heaters.
1-800-4-MY-HOME ® (1-800.469-4663)
Call anytime, day or night(U.S.A, and Canada)
www.sears.com
www.sears.ca
Our Home
For repair of carry-in items like vacuums, lawn equipment,
and electronics, call or go on-line for the IocaUonof your nearest
Sears Parts & Repair Center.
1-800-488-1222
Call anytime, day or night (U.S.A. only)
WWW.sears.com
To purchase a protection agreement (U.S.A.)
or maintenance agreement (Canada) on a product serviced by Sears:
1-800-827-6655
(U.S.A.)
Para pedir.servicio de reparacibn
a domicilio, y para ordenar piezas:
1-888-SU-HOGAR
_
1-800-361-6665
Au Canada pour service en fran;ais:
1-800-LE-FOYER _c
(1-888-784-6427)
|
(Canada)
(1-800-533-8937)
www.sears,ca
6E/ G
® Regist ered Tradem ark I TM T r ademm'k I SU Sendce M ark d Sears, Rodouck md Co.
® M arca Regts_Kla I "n_Marca de F_tbdca / =MMarca de Sen_do de _eara. Roebudc _
Mc Marque de oomrneroe / MOM zrque d6po,s_m de Sears, Roebud_ md Co.
_.
© Seam, Roebud_ and Co,