1
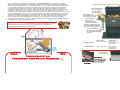
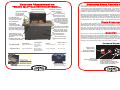
Cookbook and
Owner’s Guide
Dear “ Louisiana Grill ” Wood Pellet Barbecue Owner:
Thank you for choosing to purchase a “ L ouisiana Grill ” wood pellet or dual fuel
barbecue. Please accept our gift of a 20lb. bag of flavored wood pellets as both a “Thank You” and
as a start to get you on the road to the savory flavor of convective wood pellet cooking.
Cooking with your Louisiana Wood Pellet Grill is about to bring you full
circle from the days of the caveman when cooking outdoors and with
wood was a necessity, to cooking indoors in your modern kitchen and
now back to the great outdoors and that savory wood flavor.
Think of your “ L ouisiana Grill”
as an extra stove available
to bake, roast, grill, sear and smoke food. Barbecuing provides a form of
entertainment, which is relaxed and casual. Your meals can be
completely cooked outdoors and where the chief is one of the crowd.
We’d like to take this opportunity to pass on a few important tips concerning grilling with wood
pellets.
1. Initial set-up of our “Louisiana Grill” is the most important step to ensure the
efficient and satisfactory operation of your barbecue for many years to come.
2. Be diligent in your cleaning and maintenance program. Taking care of your grill will
add years of life and keeps it looking great.
Our loyal staff, valued customers, friends and our loving families have all contributed recipes to this
cookbook. We have tried to include a broad range of cuisines and styles, starting with Mom’s Great
Home Cooking and many, many, many, catering and entertaining experiences to current classics and
new soon to be classics.
If you are interested in contributing a family favourite, please send it by:
Fax: 1-780-960-0430, Web www.dansons.com, or to the address below.
With a minimum of care your “ L ouisiana Grill” stove will provide years of clean,
efficient and environmentally sound cooking. And be prepared for those never ending compliments.
Thank you for choosing “ L ouisiana Grill ” .
Canadian Comfort Industries &
Dansons Group Inc.
COPYRIGHT NOTICE
Copyright 2003, Canadian Comfort Industries. All rights reserved.
No part of this manual may be copied, transmitted, transcribed, stored in a retrieval system, in
any form or by any means without the expressed written permission of,
Canadian Comfort Industries; 26319 Twp Rd 53, Acheson, AB, Canada T7X 5A3
A VANDERWELL COMPANY
D
S
S&
GS
RS
NG
ER
GE
NIIN
NG
RN
&W
WAAR
DAAN
Failure to follow the Dangers, Warnings and Cautions contained in this Owner’s Manual may result in
serious bodily injury or death, or in a fire on an explosion causing damage to property.
Do not store a spare or disconnected liquid propane cylinder under or near this barbecue.
After a period of storage, and/or non-use, the Louisiana Grill Barbecue should be checked for
burner obstructions before use. See instructions in this manual for correct procedures.
Do not operate the Louisiana Grill barbeque if there is a gas leak.
Do not put a barbeque cover or anything flammable on, or in the storage area under the barbeque.
Children should never use your Louisiana Grill barbeque. Accessible parts of the barbeque
may be very hot. Keep young children away while it is use.
You should exercise reasonable care when operating your Louisiana Grill barbeque. It will
be hot during cooking or cleaning and should never be left unattended or moved while in operation.
STAINLESS STEEL “FLAVOR GUARD”
STAINLESS STEEL FLAME DEFLECTOR
STAINLESS STEEL BURN POT
CONTROL PANEL
CAST IRON COOKING GRILL
“GRILLMATE” COOKING GRATE
COVER-UP
ABOUT WOOD PELLETS
O
OPPEER
RA
ATTIIO
ON
N
UNPACKING YOUR GRILL
INSTALLING THE SIDE SHELVES
INITIAL SET-UP
SMOKE MODE
SHUTTING OFF
14
14
15
1 6 ,1 7
18
19
20
20
GRILL MAINTENANCE
21
LIMITED WARRANTY
2 2 ,2 3
GETTING STARTED
Do not use lava or charcoal in your Louisiana Grill.
Never lean over open grill or place hands or fingers on the front edge of the cooking box.
Should a grease fire occur, turn off all burners and leave lid closed until the fire is out.
Do not enlarge valve orifices or burner pots when cleaning the valves or burners
“ L ouisiana Grills ” should be cleaned on a regular basis.
Use heat-resistant barbeque mitts or gloves when operating barbeque.
LIQUID PROPANE GAS UNITS/SIDE BURNERS ONLY:
Use the regulator that is supplied with your Louisiana Grill Dual Fuel barbeque.
8
8
8
8
9
1 0 ,1 1
12
13
LIGHTING – AUTOMATIC
LIGHTING – MANUAL
Liquid propane is not natural gas. The conversion or attempted use of natural gas in a liquid
propane unit will void your warranty.
Should the propane burners go out while in operation, turn off all gas valves. Open the lid and wait five
minutes before attempting to relight, using the lighting instructions
Do not attempt to disconnect any gas fitting while your barbeque is in operation.
A dented or rusty liquid propane cylinder may be hazardous and should be checked by your liquid
propane supplier. Do not use a liquid propane cylinder with a damaged valve.
Although your liquid propane cylinder may appear to be empty, gas may still be present, and the
cylinder should be transported and stored accordingly.
If you see, smell or hear the hiss or escaping of gas from the liquid propane cylinder:
Move away from the cylinder.
Do not attempt to correct it yourself.
Call your fire department
C
S
TS
NT
EN
TE
NT
ON
CO
HOW YOUR LOUISIANA GRILL WORKS
LITTLE LOUIE / KENTWOOD GRILLS
GREENWOOD / GRANDE ISLE GRILLS
SSPPPEEECCCIIIAAALLL FFFEEEAAATTTUUURRREEESSS
5
6
7
COOKBOOK
GRILLING TIPS AND TECHNIQUES
COLD WEATHER COOKING
HOT WEATHER COOKING
24
24
FOOD SAFETY TIPS AND TECHNIQUES
H
AG
RL
NA
UR
AN
OU
YO
SIIA
LW
S1
LL
KS
WY
UIIS
RK
HO
OW
LO
OU
GR
RIIL
WO
OR
10
01
1
Your Louisiana Wood Pellet Grill combines many unique features with time proven pellet-burning
technology. Together they give you perfect control, quick, savoury-and absolutely fool proof cooking
results every time.
The perfect barbeque experience starts with filling your hopper with all natural wood pellets. Pushing
the Start Button activates the “Electronic Auto Igniter”, the combustion fan, and the auger feed systems.
The auger delivers the pellets to the burn grate. Your Louisiana Grill uses “Top Feed” technology
which means the auger pushes the wood pellets up above the burn pot area and then the pellets fall
down a chute in to the burn area. The top of the auger is an open design, thus reducing the possibilities
of “auger jams” and allows for the use of less than premium fuel quality. Adjusting the temperature
control switch sets the speed of the auger and the temperature output. The “Electronic Auto Igniter"
activates for approximately 30 minutes, or until an operating temperature of 120º F is reached, igniting
the pellets in the burn pot. A fan provides combustion air to the burn grate as well as causes air
movement in the cooking area, resulting in convection cooking. The fuel burns in the burn grate, hot and
intense, somewhat like a forge. The fly ash is directed downward by the “Flame Deflector”, and can be
cleaned out through the ash drawer. The “Flame Deflector” also protects the food from direct flame and
distributes the heat evenly throughout the cooking area. The natural smoke flavour produced by the
burning pellets, the smoke produced by the “Grillmate” or “Flavor Guard”, and the air circulating
throughout the cooking area, combine to give you that savoury flavour that is unique to pellet grills and
will win you rave reviews each time you use it.
Tip
Your Louisiana Grill can run efficiently over extended periods of time and
at different heat output levels as long as the fuel supply is uninterrupted and
timely cleaning and maintenance is performed.
Double wall construction
helps retain heat for all
year grilling
Stainless Stay Cool Handle
Large 10 lb.+ Hopper capicity
Sealed, easy to flip up top
High quality thermostat
Cast iron grill(s) for
long life and even
heat distribution
(Located on backside of unit)
1 pc Stainless Steel
“Flavor Gaurd”
cooking grate
Low CFM Blower Fan
Causes pellets to burn and
ConvectionOven cooking
(Standard on Little Louie or
Kentwood Paint grade)
Auto Start Button &
Electric Igniter
eliminate the need for
matches & lighter fluids
Two Stainless Steel Side Shelves
offer a durable easy to clean surface
Full Range Temperature Control
gives range of 200 to 600 degrees,
giving more cooking options
Ash Drawer and Grease Catcher,
makes for no fuss cleaning
Smoke Switch gives you
that savory flavor on demand
Hot smokes at approximately
200 deg F.
Heavy duty construction using
stainless & aluminized steel
Heavy duty locking casters
Heat Output
L ittle L ouie
K entwood
Cooking Area
approx. 26,000 BTU’s
200 sq. Inches
approx. 45,000 BTU’s
408 sq. Inches
Large enough for
the whole family
Large enough to cook
a 25lb. turkey
Size H x W x D
Electric
110 Volt 3 prong plug
46” x 40” x 25”
110 Volt 3 prong plug
48” x 46” x 30”
1 pc Cabinet Door
Y
R
UR
YO
OU
N
W
NE
EW
Stainless Steel or
Black Paint Grade
“
EL
E’’’’ O
R
UIIE
OR
“L
LO
OU
LIITTTTLLE
“
D”
E .. .. ..
OD
UE
OO
TB
CU
WO
ET
EC
TW
TP
LE
BE
NT
RT
LL
RB
EN
”C
CAAR
PE
EL
BAAR
“K
KE
Custom Fit Grill Cover
(Standard on Kentwood
Stainless Steel models)
Stylish vinyl cover to
protect your investment
YOUR NEW “GREENWOOD” OR
“GRAND ISLE” CABINET PELLET GRILL …
Stainless Stay Cool Handle
High quality thermostat
Cast iron grills for
long life and even
heat distribution
Double wall construction
helps retain heat for all
year grilling
Large 10 lb.+ Hopper capicity
Sealed, easy to flip up top
(Located on backside of unit)
Low CFM Blower Fan
Causes pellets to burn and
ConvectionOven cooking
1 pc “Grill Mate”stainless steel
and platinum coated cooking grate
Enhances quality and quantity
of smoke. Reduces flare-ups and
improves heat response
and distribution
Auto Start Button &
Electric Igniter
eliminate the need for
matches & lighter fluids
Stainless Steel Wrap-around Shelf
offers a durable easy to clean surface
Full Range Temperature Control
gives range of 200 to 600 deg F,
giving more cooking options
Ash Drawer and Grease Catcher,
makes for no fuss cleaning
(located behind the cabinet doors)
Smoke Switch gives you
that savory flavor on demand
Hot smokes at approximately
200 deg F.
Available in paint grade
or all stainless steel finishes
G reenwood
G rand I sle
Enclosed cabinet area
Large protected storage
Heavy duty construction using
stainless & aluminized steel
Large easy-roll wheels
Heat Output
Heavy duty locking casters
Cooking Area
STAINLESS STEEL “FLAVOR GUARD” GRATE
Your “Little Louie” or select “Kentwood” Louisiana Grill is equipped with a high temperature stainless
steel “Flavor Guard” grate. This grate like device is installed above the burn pot and flame deflector,
and is used to catch and vaporize the cooking juices. The “Flavor Guard” is constructed of five offset
“V” shaped runners welded together to make a single piece. There are also two moveable pull-tabs
installed to make removal easier. When properly installed, the pointed top of the “V” shaped runners
and the two pull-tabs must point upward toward the cast iron cooking grills.
When the meat juices drip from the food onto the specially angled “Flavor Guard”, it creates the smoke
that gives food that irresistible barbecued flavour. Thanks to the unique design of the “Flavor Guard””
and the flexible temperature controls, uncontrolled flare-ups are virtually eliminated, because you
control the flames. There is no lava rock or brick to absorb excess fat drippings that can cause
unwanted flare-ups. The “Flavor Guard” is rust resistant and easy to remove and clean.
F
FLLAAM
ME
ED
DEEFFLLEECCTTOOR
R
All “Louisiana Grill” models come with a stainless steel flame deflector and burn pot, designed to
withstand high temperature and give years of performance. The flame deflector has been designed to
keep the flame out of direct contact with your cooking surface, thus helping to reduce the chance of
flare-ups. As well you will note the notches in the side of the deflectors; these are to help in distributing
the heat evenly throughout the whole cooking area and right to the edges. The unique design of the
deflector also directs the majority of fly ash down toward the ash pan,
B
BU
UR
RN
NP
POOTT
The burn pot is also constructed out of stainless steel and is the heart of your grill. The burning
temperature in the pot can reach temperatures of 1700 to 2000ºF. The air holes are designed to allow
the right combination of fan forced air to force the wood pellets to burn hot and clean while grilling or
allow them to smoulder and produce the savory smoke while in the smoke mode. The bottom is
notched out to allow the pot to set over the electric igniter, allowing the heated air within the ignitor
casing to heat up the pellets until they spontaneously combust.
C
COONNTTR
RO
OL
LP
PAANNEELL
Size H x W x D
Electric
approx. 45,000 BTU’s
408 sq. Inches
Large enough to
entertain
110 Volt 3 prong plug
48” x 47” x 35”
approx. 50,000 BTU’s
612 sq. Inches
Large enough for
family and friends
110 Volt 3 prong plug
48” x 57” x 35”
Electric Push
Button Start
Electric Auto Igniter
no more messy starters
Igniter Light
Indicates when igniter
is in operation
Custom Fit Grill Cover
(Standard on Stainless Steel models)
Stylish vinyl cover to
protect your investment
Cooking Control
Full temperature range
of 200 to 600 deg F.
Fully adjustable to allow for
a wide range of cooking styles,
foods, and environments
Smoke / Cook Mode
with a flip of a switch you
can automatically turn your
grill into a hot smoker
You control that savory
wood fire taste, just like the
big restaurants!
CAST IRON COOKING GRILLS
Your Louisiana Grill comes complete with cast iron cooking grills. To maintain the excellent
searing and grilling performance of your grills, as well as their longevity, some special care and
maintenance is required. As with any cast iron cooking tools, PROPER SEANSONING is a must.
“
GG
NG
LM
E
LL
E”
KIIN
TE
OK
AT
“G
RIIL
MAATTE
”C
CO
OO
GR
RA
GR
Select Louisiana Grills come complete with this unique stainless steel structure called
“Grill Mate”, manufactured for us by Chef Tech LLC. This cooking grate delivers the ultimate
control in cooking with either wood pellet or liquid propane. There are no lava rocks, bricks,
or other material to absorb excess fat drippings that can cause unwanted flare-ups. Thanks
to the unique design of “Grill Mate” and the flexible temperature control, uncontrolled flareups are virtually eliminated, because YOU control the flames.
First time use
Before using any cast iron grill, wash it thoroughly with a mild dishwashing liquid to move the
protective wax coating applied for shipping. Rinse with HOT water and dry completely with a soft
cloth or paper towel. NEVER WASH IN A DISHWASHER, OR ALLOW THEM TO DRAIN DRY.
Now you must season the grills to prevent rust and sticking.
How to “Season”
A solid vegetable shortening or olive oil is recommended for the initial seasoning.
1. Spread a thin coating of solid vegetable shortening or olive oil over the entire surface, including
all corners, with a paper towel. Do not use salted fats such as butter or margarine.
2. Preheat your Louisiana Grill for 15 minutes then place the coated grills in the barbecue.
3. Turn your heat setting to medium/ignite and close the lid.
4. Allow your Louisiana Grill to heat the cast iron grills for 1 to 1 ½ hours.
5. Turn off the Feed Rate/Temperature control and let your Louisiana Grill go through the SHUT
DOWN cycle and cool completely.
6. Your cast iron grills are now “Seasoned” and ready for use.
Maintenance (every time you grill)
DO NOT do a prolong burn-off after you grill. Approximately 5 minutes will do, as this burn-off is
required to help in the maintenance of the “Grillmate” cooking grates (not available on all models)
Leaving the cooking residues on the cast iron grills does leave a protective coating on the iron. Then
do a burn-off or a 10 – 15 minute preheat just before your next cook out. This will vaporize most
everything on the grill, then brush off charred residues with a steel brush rather than a brass brush.
Rust
If rust does appear, it is an indication that the cast iron grills have not been seasoned properly
or enough. Or, if the extended burn-off method has been used after grilling, the seasoning
has also been burned off. You must begin the seasoning process again, after brushing all
rust away with a steel wire brush
TIP
The more you use your Louisiana Grill and the cast iron grills, the easier the
maintenance will be. If you store your cast iron grills for extended periods of
time, grease them very lightly with vegetable shortening or olive oil, then wipe
them dry with a paper towel. Store them in a dry place.
“Grillmate”
Bottom surface
Top Surface
Frequently Asked Questions:
What is the “Grillmate” and what does it do?
The “Grillmate” is a unique stainless steel structure, which is coated with a specially designed catalyst,
platinum. This structure intercepts the grease and other drippings from the food being grilled before it
can reach the hot metal surfaces and burner pots below and result in a flare-up. The catalyst allows the
unit to burn the grease at a lower temperature and thus generates smoke instead of flame.
What are the benefits of the “Grillmate”?
1.
2.
3.
4.
5.
6.
Eliminates flare-ups. When properly installed and maintained, the unit will virtually eliminate
flare-ups.
Enhances the amount and quantity of smoke. The “Grillmate” creates smoke from the natural
juices of the food being grilled. This results in that “smoked and savory” flavor.
Prevents food from drying out. Because the “Grillmate” eliminates flames and generates
smoke and steam from the natural juices, the food does not dry out.
Improves heat distribution. The “Grillmate” is designed to distribute the heat output of the
burner or burners, by evenly distributing the heat produced from the burn pot.
Improves heat response. The stainless steel construction of the “Grillmate” does not store
excess heat; therefore, when the burner temperature is adjusted, the temperature at the grilling
surface changes very quickly (usually within 90 seconds). This enhances your ability to sear the
food then reduce the heat and grill it over a low heat.
Increases the life of the grill. The “Grillmate” reduces the amount of grease that reaches the
burners and surrounding area by up to 75%. Grease and drippings are the primary reason for
corrosion of the gas burners and grill body.
Do I need to Parboil really fatty foods?
No, simply put them on the grill and go! The “Grillmate” is specially designed to eliminate flare-ups so
that no extra effort is required when cooking foods like bratwurst, Italian sausages, chicken legs and
backs, or spare ribs. Just remember to grill on a lower setting.
“
GG
NG
LM
E
LL
E”
KIIN
TE
OK
AT
“G
RIIL
MAATTE
”C
CO
OO
GR
RA
GR
Operation:
1.
2.
3.
Follow the instructions for lighting your Louisiana Grill. (see details elsewhere in this manual).
Allow the grill to preheat for 10 minutes.
Grill as you normally would. You will notice an increased amount of smoke, which adds that
“smoked and savory” flavor to your food.
4. If you notice any grease, which ignites on the cooking grate, turn the temperature down in
order to achieve maximum performance.
Note: because of the nature of the “Grillmate” cooking grate, low temperature settings will cook as
quickly and thoroughly as high one’s, in turn, greatly reducing your operating costs.
5. After grilling you should allow the unit to clean itself. (see details in the following section).
C
R--U
ER
VE
P
CO
OV
UP
Your Louisiana Grill cover will help in protecting your grill from the detrimental effects of
weather and outside pollutants. As with any outdoor product, however, a cover is only as good as the
maintenance given to the grill. Following the recommended maintenance included in this manual will
add greatly to the life of your grill.
“ L ouisiana Grills ” covers carry a limited 2-year warranty from the manufacturer against
splitting or cracking, but there are some common sense precautions that you should take in caring for
the vinyl covers.
Helpful Hints
D
DO
O’’ss
Keep your Louisiana Grill cover clean. This is your best protection against mildew which will form on
any dirt or foreign material allowed to accumulate on tops or bottoms of fabric. Use a cleaner such as
Armor-All, or a product that will not only clean but also protect.
Have any small tears or punctures repaired promptly.
Keep away from pets.
Use and Care
Your “Grillmate” cooking grate will give you many years of flavourful service, however, you should
read and observe the following precautions:
The “Grillmate” is a self-cleaning structure and requires only a 15-minute cleaning cycle on the high
setting. We normally would recommend this after each grilling. However, many users who grill
frequently have found that this can lead to excessive fuel consumption, and is not recommended
because of the cast iron grills. We have developed the following cleaning procedure, which works
well, but depending on your grilling habits, may result in reduced performance.
Keep all shrubs and vines away from your grill cover as many plants contain acids, which harm fabrics.
D
DO
ON
NO
OTT
Cover your grill while the grill is still hot
Store anything on the top of your grill cover.
Permit leaves, twigs or other organic debris to remain on the cover for long periods of time
Normal Cleaning Method:
Use high-pressure hoses or steam to clean.
After the completion of grilling, turn the grill to high until only an occasional wisp of smoke is seen
(about 5 minutes). This will remove most of the material that builds up on the “Grillmate”. The next
time you grill allow the grill to preheat on high for 5 – 10 minutes to complete the cleaning cycle.
Use wire or stiff brushes, harsh detergents, abrasive cleaners or chlorine on your grill cover.
Periodic Thorough Cleaning Method:
At least once every 5 to 6 uses (more if you experience heavy build-up & less if you do not) you
should perform a complete cleaning cycle. This consists of turning the grill on high for a 15 – 20
minute period. Allow the grill to cool completely, remove the cast iron grill(s) and brush the Grill Mate
with a soft bristled brush (paintbrush or old BBQ brush). DO NOT USE A STIFF OR WIRE
BRISTLED BRUSH OR CLEANING SOLUTIONS. THE USE OF THESE ITEMS WILL VOID THE
WARRANTY ON YOUR GRILL MATE.
Alternate Cleaning Methods:
1.
2.
The “Grillmate” may be placed in your self-cleaning oven and subjected to a “clean” cycle.
The “Grillmate” may be gently rinsed with a garden hose. If you have hard or chlorinated water,
you should rinse the “Grillmate” with distilled water prior to reinstalling in the grill.
A
S
TS
TW
ET
UT
DP
LE
OU
OD
LL
AB
BO
WO
OO
PE
EL
U
GY
AG
NG
NA
AN
KIIN
CK
SIIA
L
AC
RL
LL
PA
UR
UIIS
UN
NP
YO
OU
LO
OU
GR
RIIL
They are no thicker than the eraser on the end of a pencil, people who see them for the first time think
they look like rabbit food, but there is nothing small about the heat energy in a wood pellet. These clean
burning wood pellets generate about 8200 BTU’s per pound with very little ash and low moisture
content.
Wood pellets are not new; they have been around for a long time used in industrial, commercial and
residential heating appliances. There are more than 125 active pellet mill operations in United States
and Canada, producing millions of pounds of pellet each year.
Barbeque wood pellets are produced in the same
matter as wood pellet fuel is produced for home
heating. Pure raw material (sawdust) is pulverized
with a hammer mill and then dried. The dried
material is then processed under heat and
pressure. Lignin, which is the natural glue, which
holds plant fibre together, softens above 100º C,
permitting the material to change shape. The hot
lignin then acts like a binding agent to bond the
pellet together. The heated material then goes
through a hard steel die, much like a meat grinder,
which rotates against rollers forcing the material through the die with pressure over
3 000 PSI. As the pellet is forced through the die it is sheared off at a specific maximum length, cooled,
screened, vacuumed, and then bagged into 20 lb bags.
General specifications for barbeque pellets are: 100% hardwood, 1”long or less in length, ¼” diameter,
less then 2% ash content, less then 2% fines, under 10% moisture content, approx. 8200 BTU’s per lb.
and about 40 lbs per cubic ft. density.
Mesquite, from the Aztex “mizquiti” (which means “the honey tree”); true to its name gives a delicate,
subtle, sweet flavour to grilled foods- especially good with poultry and seafood.
Hickory intensifies the flavour of food with a robust, tangy taste that is better suited to red meat than to
poultry and fish.
Apple or fruitwoods, many from orchards destroyed by fire or old age, are a big hit. Like its mesquite
counterpart, the heaviest branches of the apple tree is heated to kill insects, then chipped, made into
pellets, and packaged for retail. Apple or any fruitwood, adds a smoky, mild sweetness to everything
that you cook or is highly recommended for any baking.
Alder
Apple
Hickory
Mesquite
Beef
x
Buffalo
X
x
x
X
X
Chicken
x
x
x
x
Turkey
x
x
x
x
Fish
X
X
Lamb
x
Pork
X
X
X
Baking
X
X
Your new Louisiana Grill “Little Louie” or “Kentwood” model does require some assembly.
Please note that during shipping some movement may have taken place, so a complete visual
inspection is required.
TIP
Be sure to inspect entire grill after removing the protective shipping carton.
Report any damage to your local dealer immediately.
Shipping damage is not covered under warranty.
Tool Required:
1 - Phillips Screwdriver
Procedure:
Open the cabinet doors. You will find 2, 3” long Phillips wood screws inside securing the grill to the
shipping crate. Back these out. Check to ensure the “Stops” on the casters have been disengaged.
Gently remove your grill from the shipping pellet and roll into place.
IIN
ES
HE
TH
S
ES
GT
VE
NG
LV
EL
LIIN
HE
LL
SH
AL
TA
ES
ST
DE
NS
SIID
ATTENTION:
Care must be taken not to cross thread the mountings screws into the brass nut inserts
Tool Required:
1 - Phillips Screwdriver
Unpack & identify pieces.
1.
2.
3.
4.
1 left hand side support bracket.
(this has the control board installed.)
1 right hand side support bracket.
2 Stainless Steel side shelf tops.
12 Stainless Steel #8/32 x 5/8” long screws
Procedure:
Install the right hand side shelf support. You will use 4 stainless steel screws.
The best way to ensure that you do not cross thread the brass nut inserts is to start each
screw by hand. Hand tighten each screw, and then tighten to a snug fit using the Phillips
screwdriver.
Install the right hand stainless steel top shelf. You will use 2 of the #8/32 x 5/8” screws.
Remove the control box, only, from the left hand side support, leaving the wiring harness
attached to the support. This now gives you easy access to screw both the support and top
shelf to the side of the grill.
Now install the left hand side shelf support using 4 of the stainless steel screws.
Connect the 6 pin wiring harness from the grill to the 6-pin connector leading from the control
box. Be sure the connection is tight. Note that the 6-pin connector from the control box has
two groves moulded in it, while the other connector has two protrusions moulded to it.
Install the left hand Stainless Steel side shelf top using the final 2 #8/32 x5/8” screws.
Re-install the control box to the side shelf support, using the 2 screws that you removed
before.
IIN
S
ES
RE
LS
UR
AL
DU
ED
TIIA
CE
T--U
PP
OC
NIIT
SE
ET
UP
PR
RO
G
GS
D
NG
ED
TE
TIIN
RT
TT
GE
ET
STTAAR
Please note that during shipping some movement may have taken place, so a complete visual
inspection is required. Please follow these Initial Set-up procedures to insure the proper and safe
operation of your grill.
With today’s lifestyle of striving to eat healthy and nutritious foods, one factor to consider is the
importance of reducing fat intake. One of the best ways to cut down on fat in your diet is to use a low
fat method of cooking, such as grilling.
Note: Do not plug your grill into an electrical outlet until this procedure is
complete.
Throughout this manual, you will notice the emphasis on grilling food slowly at MEDIUM temperature
settings. Because of the benefit of convection cooking, and the use of the “Grillmate” or “Flavor Guard”,
your Louisiana Grill will enable you to avoid flare-ups and maximize the nutritional value of the foods
that you cook.
TIP: It is recommended practise to always go through the INITIAL
SET UP Procedures after every 5 to 10 uses. This will ensure proper
ignition and continuous happy grilling experiences.
Open the GRILL LID and remove the Cast Iron Cooking Grills. “Little Louie” comes with 1 grill, the
“Kentwood” and “Greenwood” models come with 2 sections and the “Grande Isle” comes with 3.
Remove the “Grillmate” or stainless steel “Flavor Guard” Cooking surface.
Remove the Flame Deflector. This is the “U” shaped stainless steel metal piece sitting over the burn
grate. The “U” shape sits upside down to help distribute the heat and to keep fly ash to a minimum. The
flame deflector also keeps the flame from making direct contact with your cooking.
Remove the stainless steel burn grate and check the burn pot area, remove any foreign items. Ensure
that the air holes in the grate are clear of debris.
Re-install the burn grate. Ensure that the stainless steel grate is setting down and snug in the burn pot
with the two igniter holes visible and clear of obstructions, in the bottom of the grate. If the grate does
not sit firmly in the pot area you will have to adjust the grate adjustment tab.
Re-install the flame deflector. This mounts back on the side brackets located on each side of the burn
area. The opening of the “U” shape should be facing downwards, and should be centered over the burn
grate.
Re-install the Cooking Grates: For the “Grillmate” ensure that the grill with the small round holes is
facing upward and the basket weave pattern is facing downward, towards the flame deflector and burn
area. For re-installing the “Flavor Guard”, the pointed top of the “V” shaped runners and the two
pull-tabs must point upward toward the cast iron cooking grills.
Reinstall the Cast Iron Grills.
Open the Pellet Hopper Lid, found in the rear of your grill, behind the lid. Check for any foreign objects.
Fill the hopper with your choice of wood pellet fuel. Replace the hopper lid.
Plug your Louisiana Grill into the nearest AC outlet.
You are now ready to push that start button and enjoy that savory taste of pellet convection cooking.
WARNING:
Do not move your Louisiana Grill while operating or while the barbecue is hot. Make sure the fire is
completely out and that the grill is completely cold before transporting the grill.
Following is a list of the important tips that will contribute to the cooking
perfection that you can expect when using your Louisiana Grill.
Operating the Grill
Initial Burn Off
Before cooking on your grill for the first time, we recommend that you “burn off” the grill to ride it of any
foreign matter. Remove the cast iron grills and wash with a mild soap and detergent. With the grills
removed, light and operate the grill on PRE-HEAT with the lid down for 10 – 20 minutes. After burn off,
turn the control knob to OFF and replace the seasoned grills.
Lighting your Grill
It is recommended practise to always go through the INITIAL SET UP Procedures after every 5 to 10
uses. This will ensure proper ignition and many happy grilling experiences. Light as per instructions
found in detail later in this manual. If the grill fails to light, this is most likely due to a dirty or full burn pot
blocking the auto igniter air passages. (refer to lighting instructions found elsewhere in this manual)
Should your auto igniter refuse to ignite the wood pellets, it is easy to light your grill manually with a
match and lighting agent. (refer to manual lighting instructions found elsewhere in this manual)
Pre-Heating
It is extremely important to ALWAYS allow your grill to preheat before cooking. This allows the grill and
cast iron grates to heat up quicker and the grill is able to maintain its cooking temperature once your
food is put placed in the cooking area. If you do not allow the grill to preheat, you will find that it takes a
longer period of time to bring both the grill and the food to cooking temperatures.
Always pre-heat your Louisiana Grill with the lid closed. After your Grill has ignited, set your control
knob to PREHEAT for 10-15 minutes depending on weather. This gives you enough time to prepare
your food for the grill; as well it is the final step in cleaning your cast iron grates, and the “Grillmate”.
Lid Position
Always cook with the lid closed. Not only does this keep the temperature even, the food will
cook faster, using less fuel. A closed lid also helps to create a smokier flavour. You can slow
down your cooking by propping up the lid using the grill lifter.
L
AG
GY
NA
NG
AN
TIIN
SIIA
L
HT
RL
LL
GH
UR
UIIS
LIIG
YO
OU
LO
OU
GR
RIIL
Cast Iron Grates
The best chefs use cast iron grills because cast iron heats evenly, and quickly sears food to
lock in the juices and natural flavour. Cast Iron is also ideal for great steak house markings.
(see Cast Iron Grate Feature elsewhere in this manual).
TIP: It is recommended practise to always go through the INITIAL SET
Cooking Settings
UP Procedures after every 5 to 10 uses. This will ensure proper
ignition and many happy grilling experiences.
Pre Heat
The PREHEAT setting will give an oven temperature of over 600ºF (316ºC), depending on weather
conditions. This setting is used to quickly preheat your grill as well as to finish the cleaning cycles for
the cast iron grills and the “Grillmate”. Could also be used as a HIGH setting in extreme cold weather
conditions.
High
The HIGH setting will give an oven temperature of approximately 500ºF – 550ºF, depending on the
weather. This setting is ideal for quickly searing steaks and chops.
Medium / Ignite
The MEDIUM / IGNITE setting will give an oven temperature of approximately 350ºF (177ºC) when the
lid is closed and the weather conditions permit. This setting is recommended for finishing cooking
steaks, hamburgers, chops, etc. This setting is also used to IGNITE your Louisiana Grill. This setting
allows just enough pellets to feed and the proper air to transfer heat from the igniter to start the wood
pellet fuel.
Automatic Start Up
Place COOKING MODE SWITCH to the COOK position.
Turn the FEED CONTROL (temperature output) to the IGNITE position.
Press the START BUTTON.
•
This initiates the start up cycle, which includes; the auger will start to turn, the iginiter
will begin to glow, the igniter indicator will light and the combustion fan will start.
•
The grill now has 30 minutes to produce heat before it will shut down automatically.
•
The iginiter and igniter indicator will turn off automatically when you’re the
temperature sensor switch reaches 120ºF or 30 minutes.
Your grill will begin to produce smoke while the start up cycle is taking place. Close the lid.
The LOW setting will give an approximate oven temperature of 310ºF to 350ºF (154ºC – 177ºC).
The grill is operational once the smoke as cleared. To check open the lid of your grill and a
flame will be visible in the burn pot area. You will be able to view this without having to touch
any hot surfaces.
Smoke
Turn the FUEL FEED to PREHEAT and allow unit to preheat for approximately 10 minutes.
Low
The SMOKE setting will give an approximate oven temperature of 200ºF to 220ºF. This setting is used
to slow roast and the increase the smoke flavour of your favourite food. Highly recommended for that
BIG BIRD at Christmas, Easter, Thanksgiving, Birthdays, and all other important holidays.
CAUTION: If excessive flame is visible i.e. FLAME DEFLECTOR is glowing bright red, turn the
FEED CONTROL down.
TIP: The temperatures listed above are all approximate and will be affected by
After the pre-heating is complete you are now ready to enjoy your grilling experience
the outside temperature, the amount of wind present, and the length and type
of pellet fuel being used.
After Cooking
One of the greatest benefits of your Louisiana Grill is the minimal clean up required. When you are
finished cooking and waiting just a little while to let the flavour set in that prime selection of meat, turn
the control know to PREHEAT for 5 minutes. Let the grill heat up, then turn the knob all the way
counter clockwise, past the OFF click and you’re DONE. A quick wipe up of the stainless steel counter
top, using a cloth and mild soap, let the unit cool and put your Louisiana Grill to bed with the optional
GRILL COVER.
CAUTION: Grease fires are caused by not properly maintaining your grill, or failing to clean your clean
out drawer on a consistent basis. In the unlikely event you experience a grease fire while cooking, keep
the lid closed. If it does not go out is a very short time, open the lid and lightly sprinkle baking soda on
the fire. Be careful not to burn yourself. If this does not work, then carefully remove the food from the
grates, turn the temperature control to OFF and shut the lid until the fire is completely out.
NOTE: Different wood pellets will produce different temperatures; as well the outside
temperature and weather conditions will also affect your cooking temperature. The markings
on the CONTROL LABEL are approximate.
NEVER add pellets by hand to a hot fire pot. This is dangerous and you may get seriously
burned. If you do run out of fuel and you lose your fire while cooking, open the lid, turn off all
controls, and let the unit completely cool. The grill will go through its SHUT DOWN cycle
automatically. Once the SHUT DOWN cycle is complete. re-fill the hopper and go through the
normal LIGHTING procedure.
NOTE: If the fire does not start, the Grill will continue to feed pellets and the fan will run for
approximately 30 minutes. The grill will then automatically shut off. If this happens, some
unburned pellets will build up in the burn grate. To restart the fire, clean the excess pellets
out of the burn grate and follow the above steps.
S
EM
KE
E
OK
DE
SM
MO
MO
OD
Manual Start Up
Remove the cast iron grills, and the “Grillmate” or “Flavor Guard”. You will also have to
remove the Stainless Steel flame deflector.
Smoking is a variation on true barbecuing and is truly the main advantage of grilling on a
wood pellet grill. There are two types of smoking: HOT smoking and COLD smoking. HOT
smoking, just another name for barbecuing, is generally done at 200 to 250ºF. COLD smoking
is where the food is located so far away from the fire that it smokes without cooking. Your
“Louisiana Grill” is classified as a HOT smoker.
Inspect the stainless steel burn pot to ensure that is clean of debris and that the ignitor air
holes are not obstructed. Also check to ensure proper placement of the burn grate.
TIP: To intensive that savory smoke flavor, switch to smoke mode
If for any reason your electric igniter fails, you can start your “Louisiana Grill” manually.
Place a small handful of pellets in the bottom of the burn grate.
Add a small amount of solid fuel fire starter, such as those made from sawdust and wax or
use wood shavings. Add a small amount of pellets over the fire starter.
CAUTION: DO NOT USE ANY FLAMMABLE LIQUIDS SUCH A GASOLINE, GASOLINE-TYPE
LATERN FUEL, KEROSENE, CHARCOAL LIGHTER FLUID, OR SIMILAR LIQUIDS TO START
OR FRESHEN-UP THE FIRE! KEEP ALL SUCH LIQUIDS WELL AWAY FROM THE GRILL
WHILE IT IS IN USE.
Light the fire starter.
Place COOKING MODE SWITCH to the COOK position.
Turn the FEED CONTROL (temperature output) to the IGNITE position.
Press the START BUTTON.
•
This initiates the start up cycle, which includes; the auger will start to turn, the ignitor
indicator will light and the combustion fan will start.
•
The grill now has 30 minutes to produce heat before it will shut down automatically.
•
The ignitor indicator will turn off automatically when you’re the temperature sensor
switch reaches 120ºF or 30 minutes.
Quickly and carefully, replace the stainless steel flame deflector, the “Grillmate” or “Flavor Enhancer”
and the cast iron cooking grills. Your grill will begin to produce smoke while the start up cycle is
taking place. Close the lid.
The grill is operational once the smoke as cleared. To check open the lid of your grill and a
flame reflection will be visible in the burn pot area. You will be able to view this without
having to touch any hot surfaces.
Turn the FUEL FEED to PREHEAT and allow unit to preheat at 500 to 600ºF for approximately
10 minutes.
CAUTION: If excessive flame is visible i.e. FLAME DEFLECTOR is glowing bright red, turn the
FEED CONTROL down.
NOTE: If the fire does not start, the Grill will continue to feed pellets and the fan will run for
approximately 30 minutes. The grill will then automatically shut off. If this happens, some
unburned pellets will build up in the burn grate. To restart the fire, clean the excess pellets
out of the burn grate and follow the above steps.
immediately after putting your food on the grill. This allows the smoke to
penetrate the meats before they have a chance to sear closed.
The smoke mode works best when a longer cooking time is required,
such as large cuts of meat, fish, or poultry, Experiment with the length of time you leave for
smoking, before cooking thoroughly. Try different combinations of both modes. Some chefs
prefer the smoke mode at the end of cooking and to keep the food warm until ready for
serving. Remember practice makes perfect.
TO ACTIVATE
Follow the standard LIGHTING
PROCEDURES.
After the start up cycle is complete, and
you have gone through the preheat cycle, activate the smoke mode by clicking the COOKING
MODE SWITCH to the SMOKE position. The SMOKE control switch will always override the
normal FEED CONTROL.
When finished using the smoking mode click the COOKING MODE SWITCH back to the COOK
mode.
S
AG
GO
RL
NA
NG
UR
AN
OU
TIIN
YO
SIIA
L
TT
LL
UT
UIIS
SH
HU
OFFFF Y
LO
OU
GR
RIIL
Your “Louisiana Grill” , “Grill Mate” and the “Flavor Guard” cooking grids will give
you many years of flavourful service with minimum cleaning. An important step is allowing
the grill and cooking grates to “Self Clean” by running the grill on high temperature for 5 – 10
minutes after each use.
Deactivate the SMOKE mode by switching the COOKING MODE SWITCH back to COOK mode.
When finished cooking on your Louisiana Grill turn the FEED CONTROL switch to the high
position. Let your grill run for 5 – 10 minutes to go through its normal cleaning method.
When complete, rotate the FEED CONTROL (temperature) switch fully counter-clockwise. You
will hear it click at the off position.
Once the FEED CONTROL is in the OFF position, your Louisiana Grill will start it’s SHUT
DOWN cycle. The AUGER will stop feeding fuel, the flame will burn itself out, and the
combustion fan will continue to run until the grill has cooled to 110ºF.
C
RC
G
ER
NG
HE
DW
TH
KIIN
LD
AT
OK
CO
OL
WE
EA
CO
OO
Just because the bright coloured leaves are gone and the golf clubs put away for another season
doesn’t mean you have to stop barbecuing. The clean crisp fresh air and the heavenly aroma of
flavoured wood pellets and food cooking may be just what the doctor ordered to cure those winter
blahs. Holiday grilling also frees up your oven space for other important menu items. Following are a
few suggestions on how to enjoy your grill throughout those cooler months.
•
•
•
•
•
•
•
•
•
•
•
ORGANIZE. – Get everything you require ready in the kitchen before you head out to the great
outdoors. Put what you need on a tray, bundle up tight, and go for it!
During the winter move your grill to an area that is out of the wind and cold. Check local bylaws
regarding the proximity of your grill in relation to your home and/or other structures.
Caution: Never grill in an unventilated area!
To help you keep track of the outside temperature, you should place an outdoor thermometer close
to your cooking area. This will help in determine how long it will take to cook your food.
You may want to keep a log or little written history on what you cooked, the temperature outside,
and the results. This will help latter down the road to help you determine what to cook and how
long it will take.
When cooking in cold weather, it is better to increase your pre-heating time by at least 20 minutes.
Avoid lifting the grill lid any more than necessary. Cold gusts of wind can completely cool your grill
temperature. Be flexible with your serving time; add about 10 – 15 minutes extra cooking time
each time you open the lid.
As always, use a meat thermometer to determine the internal temperature of your foods.
Because the nights come sooner in the colder months, it is a good ideal to work in a lighted area or
to have a light or flashlight close by.
Have a heated platter and maybe a cover ready to help keep your food warm while making the trip
back inside.
Some of your better foods for winter cooking are those that require little attention, like roasts, whole
chicken, ribs, and turkey. Make you meal preparation even easier by adding vegetables and
potatoes.
H
RC
G
ER
NG
HE
TH
KIIN
TW
AT
OK
HO
OT
WE
EA
CO
OO
Following are a few tips on hot weather cooking. As it gets hotter outside, not only will the cooking
times of your food decrease but the cooking time on you decrease. Proper dress is a must. Shorts, Tshirt, sandals, hat, apron and a generous slab of suntan lotion go without say. Don’t forget the big tall
cool drink; we don’t want the chef to become dehydrated.
•
•
•
•
•
•
ORGANIZE – You don’t have to serve a huge seven-course meal. You don’t want to be cleaning
your entire kitchen after every meal. Timing is everything to cooking outside and remember
practise does make perfect. So practise lots!!!
Adjust your cooking temperatures downward. This helps to avoid those unwanted flare-ups.
As always, use a meat thermometer to determine the internal temperature of your foods. This helps
in preventing your meat from over cooking and drying out.
Even in hot weather, it is still better to cook with the lid of your grill down.
You can keep foods hot by wrapping them in foil and placing them in an insulated cooler. Stuff
crumpled up newspaper around the foil and this will keep food hot for a good 3 to 4 hours.
Try to keep your menu on the lighter side. So you can enjoy the warm temperatures and quality
family times.
GRILL MAINTENANCE
There are two extremes when it comes to keeping the grill clean. Those that must spit and shine the
entire grill, in and out, after every use, and those whom are convinced that cleaning only takes away
from that barbeque flavour. One simple rule; everything in moderation.
TIP
Be diligent in you cleaning and maintenance program. Taking care of your
grill will add years of life to it and keeps it looking great.
Starting Out Right
A little time and effort at the beginning of the season will not only help extend the life of your
grill but will also ensure the reliability of it, and make you look like the “King or Queen of the
Grill”! Most of the cleaning techniques are above.
Stainless Steel Working Surfaces
ALWAYS clean dirt and dust off all stainless steel surfaces before you begin to cook. The dirt can cook
into the metal and discolour it. These can be easily cleaned with hot soapy water and a soft cloth. A
quick swipe of WD40 and a soft rag will also work, but you must be careful not to apply it to the painted
surfaces or interior parts. With the popularity of stainless steel appliances increasing, there are now
many commercial products made to clean and protect stainless steel surfaces.
Paint Grade Surfaces
Be sure to preheat the unit for a least 15-20 before using for the first time. This allows the paint to cure
and allows the new paint smoke and smell to burn off. Once cured it can be washed with hot soapy
water. Some barbeque faithful will then apply a light coat of vegetable oil to highlight the finish. Using
flat black stove paint can always touch up the paint. We use “Stove Bright” brand. Stove Bright also
makes many more colors in high-heat stove paint, if you ever wanted to change the look. It is sold at
most pellet stove retail outlets.
Cast Iron Grills
When new, wash thoroughly with warm soapy water, and then “Season” the grills. For more detailed
information see the section specifically on Cast Iron Grills near the beginning of this manual.
“Grill Mate” Cooking Grate
After the completion of grilling, turn the grill to high until only an occasional wisp of smoke is seen
(about 5 minutes). This will remove most of the material that builds up on the “Grillmate”. The next
time you grill allow the grill to preheat on high for 5 – 10 minutes to complete the cleaning cycle.
See the section relating to the “Grill Mate” for full cleaning instructions.
“Flavor Guard” Cooking Grate
This requires very little work, because of its construction and the type of material used. From time to
time you may need to brush off any burnt leftover. The best time to clean is when you through the
initial set-up procedures after every 5 to10 uses.
The Firebox
Because the firebox is used to channel the fan forced air into the burn grate, there is very little
maintenance to be done in this area. Occasionally you may either vacuum or brush out any build-up of
ash or burn debris that has fallen below the burn grate. You will also want to visually check the air
holes in the igniter tube. Clean any debris or blockage out of both areas to ensure a perfect start.
A VANDERWELL COMPANY
Stainless Steel Burn Grate
Periodically check the air holes found in the sides of the burn grate for any blockages or build-ups.
Using a wire brush or flat-head screwdriver, scrape off any build up or blockage. When reinstalling the
grate also confirm the proper positioning in the burn pot. The grate should be level from side to side
and from front to back as well as should have a snug but not tight fit. You may have to adjust the tab,
found under the front lip, using a pair of pliers to move the tab inward or outward.
A.
Burn Box
Combustion air brought into the
Backside and through the burn
Grate bottom, back, and front
B.
“SUPER” Grate
Stainless steel construction,
Solid bottom notched for igniter
And air holes on front and back
B
C. Adjustable Tab
Used to fine tune and
Level grate
G
C
L
Y
DW
TY
ED
NT
TE
AN
RA
MIIT
RR
WAAR
LIIM
The “Louisiana Grill” wood pellet barbecue line, manufactured by Canadian Comfort Industries (CCI),
carries a five (5) year limited warranty for from the date of sale to the original owner only, against
defects and workmanship on all steel parts, (excluding the burn grate), and two (2) years on electrical
components. There is no specific warranty on the paint, burn grate, grill cover and all gaskets or
against damage caused from corrosion.
Conditions of Limited Warranty
1.
A
2.
Ash/Grease Tray
3.
Always be sure the ash/grease pull out pan is clean and free of debris. To make cleaning a breeze you
can line the ash catcher with foil wrap. During the warmer months empty any grease build-up on a
more frequent basis to avoid it from going rancid and to avoid having any extra creatures enjoying your
grill.
4.
5.
Slowing Down . . . Not Putting Away for the Season
We recommend that at least once a month, while your grill is cold, that you should perform not only the
above maintenance procedures, but also include the following:
Using a stiff vegetable brush knock-off any built-up scale on the inside walls of your grill. Check the
inside of the lid, the smoke deflector, and the inside walls of the cooking area.
Using an old paintbrush, brush off any ash build-up found inside the firebox, grate, and flame deflector
areas.
Finally give your entire grill a good cleaning with a shop vac.
6.
During the term of the limited warranty, CCI’s obligation shall be limited to furnishing a
replacement for covered, failed components, F.O.B. point of shipment. As long as it is within
the warranty period, CCI will not charge for repair or replacement for parts returned, freight
prepaid, if the part(s) are found by CCI to be defective upon examination. CCI shall not be
liable for transportation charges, labor costs, or export duties. Except as provided in this
CONDITIONS OF WARRANTY paragraph, repair or replacement of parts in the manner and
for the period of time stipulated hereunder shall constitute the fulfillment of all direct and
derivate liabilities and obligations from CCI to you.
The warranty coverage begins on the original date of purchase and proof of date of
purchase is required to validate the warranty.
Repair or replacement of the “Louisiana Grill” part does not extend the limited warranty
beyond the five (5) years or two (2) years from date of purchase.
The pouring of liquids on your grill flame will void this warranty.
CCI takes every precaution to utilize materials that retard rust by using high-temperature
paint where advisable. Even with these safeguards, the protective coatings can be
compromised by various substances and conditions beyond CCI’s control.
High
temperatures, excessive humidity, chlorine, industrial fumes, fertilizers, lawn pesticides and
salt are some of the substances that can affect paint and metal coatings. For these reasons,
the limited warranties DO NOT COVER RUST OR ALUMINUM OXIDATION, unless there is
loss of structural integrity on the grill component. Should any of the above occur, kindly refer
to you Instruction Manual’s maintenance section for paint finish protection.
CCI
recommends that you purchase a CCI full-length protective cover, and cover your grill when
not in use.
The warranties are based on normal domestic use and service of the grill and neither limited
warranty coverage apply for a grill, which is used in commercial applications.
L
Y
DW
TY
ED
NT
TE
AN
RA
MIIT
RR
LIIM
WAAR
Exceptions to the Limited Warranty
There is no written or implied performance warranty on “Louisiana Grills” appliances, as the
manufacturer has no control over the installation, operations, cleaning, maintenance or the
type of fuel burned.
This limited warranty will not apply nor will CCI assume responsibility if your appliance has not been
installed, operated, cleaned and maintained in strict accordance with the manufacturer's instructions.
Burning other than quality wood pellets may void the warranty. The warranty does not cover damage
or breakage due to misuse, improper handling or modifications.
NEITHER THE MANUFACTURER, NOR THE SUPPLIERS TO THE PURCHASER, ACCEPTS
RESPONSIBILITY, LEGAL OR OTHERWISE, FOR THE INCIDENTAL OR CONSEQUENTIAL
DAMAGE TO THE PROPERTY OR PERSONS RESULTING FROM THE USE OF THIS PRODUCT.
ANY WARRANTY IMPLIED BY LAW, INCLUDING BUT NOT LIMITED TO IMPLIED WARRANTIES
OF MERCHANTABILITY OR FITNESS, SHALL BE LIMITED TO ONE (1) YEAR FROM THE DATE
OF ORIGINAL PURCHASE. WHETHER A CLAIM IS MADE AGAINST THE MANUFACTURER
BASED ON THE BREACH OF THIS WARRANTY OR ANY OTHER TYPE OF WARRANTY
EXPRESSED OR IMPLIED BY LAW, MANUFACTURER SHALL IN NO EVENT BE LIABLE FOR
ANY SPECIAL, INDIRECT, CONSEQUENTIAL OR OTHER DAMAGES OF ANY NATURE
WHATSOEVER IN EXCESS OF THE ORIGINAL PURCHASE PRICE OF THIS PRODUCT. ALL
WARRANTIES BY MANUFACTURER ARE SET FORTH HEREIN AND NO CLAIM SHALL BE MADE
AGAINST MANUFACTURER ON ANY ORAL WARRANTY OR REPRESENTATION.
Some states do not allow the exclusion or limitation of incidental or consequential damages, or
limitations of implied warranties, so the limitations or exclusions set forth in this limited warranty may
not apply to you. This limited warranty gives you specific legal rights and you may have other rights,
which vary from state to state
The limited warranties for 5 (five) years or 2 (two) years are in lieu of all other warranties expressed
or implied, at law or otherwise, and CCI does not authorize any person or representative to assume
for CCI any obligation or liability in connection with the sale of the wood pellet grill. This means that
no warranties, either expressed or implied, are extended to persons who purchase the product from
any one other than CCI or an authorized CCI Distributor.
Procedures for Warranty Service
Call your nearest “Louisiana Grills” dealer for repair or replacement of your “in-warranty” parts.
Be prepared to furnish the following information:
1. Purchaser’s name, model and serial number of grill and date of purchase.
2. An accurate description of the problem.
THIS LIMITED WARRANTY GIVES YOU SPECIFIC LEGAL RIGHTS AND YOU MAY HAVE
OTHER RIGHTS, WHICH VARY FROM STATE TO STATE
N
S
ES
TE
OT
NO
G
GG
NG
LIIN
LL
R
AR
GR
RIIL
GE
EA
DRESS TO PROTECT
Oven Mitts
This has to be one of the most overlooked accessories. Look for ones that are flameproof, and are
longer in the sleeve, about 16” in length, this helps protect your arm particularly when basting large cuts
of meat, or anytime you open up the cooking hood. They will also protect your bare arms from hot food
splatter or grease. Also look for ones that are soil and water repellent, to protect the mitt’s appearance
against spills and stains.
Apron
The equivalent to the handyman’s tool belt. Most good aprons will have an adjustable neck strap for
that perfect fit, and lots of pockets for bottles, a towel or two and tools. Should be machine washable.
Shoes
Always wear closed shoes, not steel toed unless your cooking skills need refinement, to protect your
feet from dripping grease or falling utensils.
THE RIGHT TOOLS FOR THE JOB
Meat Thermometer (A Must)
The outside temperature, wind conditions, pellet fuel variety and the altitude at which you live affect grill
temperatures. The hood thermometer is only an approximate temperature and should be used as a
guide only. The best way to ensure your meat has come up to the proper temperature and is ready to
eat is to use a meat thermometer. Purchase a good quality instant read meat thermometer,
remembering that these are to be left in the meat for one minute, not the entire cooking time. To use,
plunge the thermometer into the thickest part of the meat, making sure the tip is not touching a bone. A
long-handled, long-needled thermometer is useful for large cuts of meat and poultry. Instant-read
thermometers also are available in digital models, some even with a wireless, remote readout.
Tongs
Use tongs rather than a fork for turning and handling meats to avoid losing the natural juices.
Extra large ones allow you to grip a variety of delicate foods and extra long handles
Basting Brush
You may need a selection of these, because you should not use the same brush in two different
marinades. Used to apply your favourite sauces and marinades to foods on the grill. Again look for one
with a long handle, to keep you hands away from the heat. Natural bristles that are cut at a 45* angle
make it easier to baste large cuts of meat.
Spatulas / Turner
A most for turning those delicious burgers and fish filets. Again as with any grilling tools look for a long,
sturdy handle and the widest blade possible. The holes in the blade prevent the build-up of steam,
which could make your food soggy.
Timer
Using a timer will help to alert you when “well-done” is about to become “over-done”.
Aluminium Foil
Extra-strength foil is always useful for grilling. Used to make foil packages, wrap smores, or to fold up
into a flat dish to act as a drip pan to catch those flavourful juices that drip from the meat. Also used to
speed up cooking, protect bones from burning, and to keep foods warm. Can also be used to wrap a
large piece of cardboard to become a whole fish flipper.
Drip / Roast Pans
Used to prevent flare-ups, keeps food from drying out, eliminates basting, and catch those flavourful
juices that drip from the meat and used to make the most delicious gravy ever. Various juices can also
be added to the pan to impart a desired flavour, such as apple, lemon, cranberry, pineapple, any cola,
etc.
Grill Baskets
Perfect for cooking food that are difficult to handle on the grill, such as vegetables, seafood, fish and
certain cuts of meats. Usually made out of nickel-plated steel these baskets are made of two identical
halves being held together with hinges. Not only do they protect food, and make handling easier, but
also allows for different food to be combined and grilled together without piercing the food.
Griddle
One of the most used accessories for those grill enthusiasts that enjoy cooking any foods outdoor. Use
to griddle complete breakfasts, grill sandwiches, and toast fajitas. Cook all your bacon and sausages
outdoors, and they’re great for grilling vegetables, stir-frying, and searing.
Cooking Racks
Nickel-plated roast racks and rib racks are a great way to increase your cooking pleasure. Roast racks
can be used to enhance the convective cooking capabilities of your grill, by allowing the smoke
flavoured air to move around the entire roast evenly. Rib racks are a great way to increase your
capacity of your grill for those large gatherings. Can also be used for chops and chicken pieces.
Skewers (wood or metal)
Wood skewers adhere better to meat than do the metal ones. When using the wood skewers
remember to soak them in water for at least 30 minutes beforehand to prevent them from burning in the
heat of the grill. Another way to protect them would be to wrap the exposed ends with aluminium foil.
Metal skewers should be those with flat blades or dual prong. The flat skewer is designed to prevent the
food from rotating when you turn the skewer. The dual prong skewers hold all foods more securely and
are ideal way to hold delicate meats and vegetables.
Metal Brush
It is important to clean your grill thoroughly before each use. A long handled brush with metal bristles is
the best tool for the job.
Skillets and Woks
These baskets of course allow you to stir-grill vegetables, seafood, and other small pieces of
food the same way you would if you were indoors. The holes allow the smoke and flavors to
reach the food.
G
S
ES
GT
DT
UE
NG
ND
QU
AN
LIIN
NIIQ
LL
SA
HN
PS
CH
GR
RIIL
TIIP
TE
EC
F
S
ES
DT
UE
ND
QU
YT
AN
TY
NIIQ
DS
ET
SA
HN
OD
PS
CH
FO
OO
SAAFFE
TIIP
TE
EC
HELPFUL HINTS
We want you to enjoy healthy and safe grill cooking, so following are some hints for basic barbecue
hygiene:
Before preheating the grill, make sure it is safe, clean and hygienic.
Food Handling
Wipe off all stainless steel surfaces before preheating. Dirt and food stains will cook into the
surface.
Wash hands thoroughly with hot, soapy water before starting any meal preparation and after handling
fresh meat, fish and poultry.
Ensure the ash/drip pan is clean and free from any debris and fat build-up.
Always check your pellet fuel hopper for debris and to ensure that you do not run out of pellets
before finishing.
Always preheat your grill before cooking. After ignition has taken place turn your control knob
to the PREHEAT setting, be sure the lid is closed and allow the grill to heat for at least 10 – 15
minutes or until the thermometer registers over 500º F.
To prevent foods from sticking, you can brush or rub cooking oil on the cast iron grills. If using
a vegetable spray use it only before lighting the burn pot. Never spray the grill while there is fire
in the burn pot.
Use a different platter and utensils for the cooked meat than the ones you used to prepare or bring the
raw meat out to the grill. This will prevent cross contamination of bacteria.
Use a different utensil for each marinade or basting sauce to prevent cross contamination.
Keep hot foods hot (above 140ºF) and cold foods cold (below 37ºF)
Do not leave hot foods out of refrigeration for more than two hours.
Cooked foods and salads should not be left out in the heat for more than an hour. Fill a deep tray or
casserole dish with ice to keep salads cool and safe.
Sear meats and cook with the lid down for perfectly grill food every time.
All Louisiana Grills are designed to allow even fan forced heat circulation, so foods cook evenly
on all sides. Leave at least 1” of clearance between the food and the hood for proper heat flow.
Grilling times in recipes are based on 70ºF (20ºC) weather and little to no wind. Allow more time
on cold, windy days, or even for higher altitudes. Allow less time for warmer weather.
Grilling times in charts and recipes are approximate.
Do not defrost meat at room temperature or on a counter top.
Marinate meat in the refrigerator. Bacteria are living organisms that grow and multiply rapidly in warm,
moist foods.
A marinade should never be saved to use on a later day. If you are going to use it to serve with your
meat, be sure to bring it to a boil before serving.
Large or thicker pieces of meat will require more cooking time per pound than smaller or thinner
pieces.
Always use a meat thermometer to determine the internal temperature of the foods you are cooking.
Foods on a crowded cooking grate will require more cooking time than just a few foods.
It’s a good idea to put grilled food onto a heated platter, to help keep the food warm. Steaks benefit
from resting for several minutes before serving. It allows those delicious juices that were driven to the
surface by heat to ease back to the center.
Foods grilled in containers, such as baked beans, will require more time if grilled in a deep
casserole rather than a shallow baking pan.
Use long-handled tongs for turning all meats and spatulas for turning burgers and fish. Do not
use a fork for turning, as it will pierce the meat allowing the flavourful juices to escape.
Determine the doneness of meats by making a small slit near the bone and checking the colour.
For boneless cuts, make a slit near the centre. For thicker cuts or larger pieces of meat and
poultry insert an instant-read thermometer into the centre of the largest muscle of meat or in the
inner thigh or breast of poultry. Charring meat, poultry or fish is not recommended.
When grilling any meats, poultry or any food remember moisture retention is a must: sear the
outside first to lock in juices; add salt, if needed, after cooking; flip cuts of meat when bubbles
start to appear so the moisture goes back into the meat; sauces are best applied near the end of
cooking to prevent burning; and always use tongs, not a fork.
C
AC
RA
OR
FO
GF
NG
D
KIIN
WD
OK
OW
CO
OO
CR
RO
TIP
The number one rule for cooking for a crowd is PLANNING! The second
would be to use only tried and proven recipes. Grilling should be fun and
stress free leave new recipes for your everyday cooking.
Planning includes not only a menu, but also the complete party. Chairs, tables, dishes, utensils,
entertainment, and planned or unplanned weather conditions. Rented beverage coolers, extra
table and chairs, or maybe even a tent may be added conveniences to consider.
Select menu items that can be completely or partially prepared in advance – salads, condiments,
casseroles, breads, baked goods, and smoked meats. Try smoking a turkey the day before for
big event. A turkey will pick up more of the smoke flavour after setting in the refrigerator over
night and because of the convection cooking of your grill the meat will be just as juicy as if done
straight of the grill.
Grill “time proven” classics such as burgers, chicken pieces, hot dogs or sausages – all great
tasting and easy to grill.
Make a list of every food item you will be serving so that nothing will be forgotten in the rush.
Working backward from a planned serving time, decide when to start cooking each food so that
everything is ready at the right time. Make a schedule for cooking foods on the grill, plus any
indoor cooking.
Plan a serving dish and utensil for each food and have those items. Heavy-duty paper plates
come in many attractive colors and patterns and will save dishwashing later. Paper or plastic
beverage cups are a must if having any little ones, or young at heart, around.
TIP
To cut down on dishwashing and using every cup in your cupboard,
purchase plastic or styro-foam cups. Have your quests create their own
personalized decorated cup using markers, crayons and a little creativity.
Grill the meat or entrée at the specific recipe temperature, making adjustments with vegetables,
side dishes and breads if necessary.
Better yet, let everyone lend a hand, bring a favorite side dish, serve buffet, and have a great
time at your own party!