1
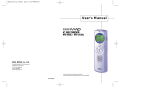
INSTRUCTION MANUAL
Digital Voice Recorder
R200
SAFA MEDIA Co., Ltd
2F, Romanson B/D, 77-1 Garak-dong,
Songpa-gu Seoul Korea
Tel. 82-2-3400-5240
Fax. 82-2-3401-4142
http://www.safa.co.kr
SF69-00602A
Thank you for purchasing this
product. Please read this manual
carefully before using the product.
Familiarizing yourself with the
instructions and functions.
explained In this manual begone
operating the product will ensure
proper use of the product. Please
fill in and keep the warranty
included in this maunal from
your product distributor.
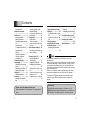
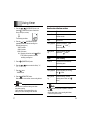
Contents
Accessories ............... 2
Name of each part
.................................. 3
Before use ................... 4
Inserting battery ......... 4
Battery indicator ......... 4
Turning the power on and
off ............................... 5
Hold function .............. 5
To adjust the volume . 5
Date and time
setting ........................ 6
Using an earphone .... 7
Using an external
microphone ................ 7
Selecting display ........ 7
Recording .................... 8
Selecting a recording
mode.......................... 8
Selecting the folder .... 9
Starting recording ...... 9
Playback ................... 11
Repeat playback ...... 12
Erasing ...................... 13
Erasing the selected
file ............................ 13
Erasing all files in the
selected folder ........... 13
Formatting (Erasing all
memories) ................. 14
Using timer .................. 15
Alarm timer ................ 15
Timer recording ......... 16
How it works at the timer
on time: ...................... 18
Other menu settings .. 19
Common procedures of
menu setting .............. 19
Connecting to PC ....... 22
Recommended PC
environment ................ 22
Supplied CD-ROM ..... 22
Installing the Software
.................................... 23
Connect the unit to your
PC................................ 26
Disconnecting the unit
from your PC ............. 28
Displaying by Explorer
.................................... 30
Please read this manual before use.
Keep the manual in a safe place for future reference
1
Copying data by using
Explorer ........................ 32
(1) Copying files to your
PC ............................ 32
(2) Copying files to the
unit ........................... 32
Playing back the
transferred files using
the Media Player ....... 33
Installing the Software
................................. 33
Playback .................. 35
Formatting the unit's data
................................. 38
Troubleshooting guide
................................. 39
Cleaning the cabinet
................................. 42
Specifications ........... 43
Note
This handling description is printed prior to product
development.
When a part of the product specification must be changed
to improve operability or other functions, priority is given
to the product specification itself. In such instances, the
instruction manual may not entirely match all the functions
of the actual product.
Therefore, the actual product and packaging, as well as
the name and illustration, may differ from the manual.
The screen/LCD display shown as an example in this
manual may be different from the actual screen/LCD
display.
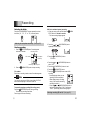
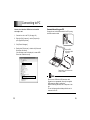
Accessories
Original USB connection cable x 1, Earphone x 1, CDROM(USB Driver & Plug-In Software) x 1, Line cable, Pin
Mic, Battery, Tel Adapter (Option), Tel cable (Option)
2
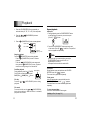
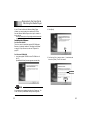
Name of each part
1
2
11
10
3
4
5
9
6
7
8
12
13
1. External microphone jack
( )
2. Built-in microphone
3. Skip/Search buttons
(
,
)(SKIP/SEARCH)
4. Power/Play button ( )
(POWER/PLAY)
5. Volume button (+, )
(VOLUME)
6. Erase button (ERASE)
7. Folder/Repeat button
(FOLDER/REPEAT)
8. Record/Pause button
(REC, ) (REC/PAUSE)
9. Menu/Stop button ( )
(MENU/STOP)
10. LCD display
11. Recording LED
12. Earphone jack (
)
13. Speaker
14. USB terminal (I/O)
15. Battery compartment lid
16. Hold switch ( HOLD)
LCD display
16
14
LP LO
VAS
SLOW FAST A 1 B
AM PM FORMAT
REMAIN
3
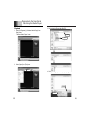
Inserting battery
AAA alkaline battery
(supplied)
When you have inserted the battery, the unit is set to the
date and time setting mode ("dAtE" blinks). To set it, see
"Date and time setting" on page 6 and follow the steps 3
- 6.
Battery indicator
Check the battery indicator on the LCD display for
remaining battery power.
: Good condition
: Weak battery
: Exhausted battery, must be replaced with new
alkaline battery. If not, after displaying "LobAtt",
the LCD display goes out.
CAUTION:
. Do not replace the battery while the power is on. It
may cause the unit malfunction.
. Remove the battery if the unit will not be used for a
month or longer.
IMPORTANT NOTE :
HQ
SP H I
15
Before use
REC TM
SPENT OR DISCHARGED BATTERIES MUST BE RECYCLED
OR DISPOSED OF PROPERLY IN COMPLIANCE WITH ALL
APPLICABLE LAWS. FOR DETAILED INFORMATION,
CONTACT YOUR LOCAL COUNTY SOLID WASTE AUTHORITY.
4
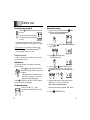
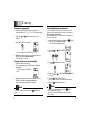
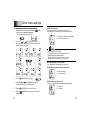
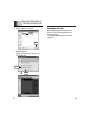
Before use
Date and time setting
Turning the power on and off
Press the
power on.
(POWER/PLAY) button to turn the
The last selected file number and
total playing time appear (Resume
function).
SP H I
. If the battery was changed, "dAtE" blinks (the date
and time setting mode). Follow the steps 3 - 6 on page
6.
To turn the power off, press and hold down the
(POWER/PLAY) button for at least 2 seconds.
. The clock display remains lit if it is set.
Auto power off function
If you do not use the unit for 15 minutes, the power will
be automatically turned off.
1. In the stop mode, press and hold down the (MENU/
STOP) button down for at least 2 seconds.
. The menu setting display appears.
SP H I
2. Press the
or
to select "dAtE".
(SKIP/SEARCH) buttonrepeatedly
3. Press the (POWER/PLAY)buton.
. The year display blinks.
Hold function
This prevents operation from stopping by accidentally
pressing a button.
HOLD switch to the left. "On HOLd"
Set the
HOLD
appears on the display, and the hold function
is engaged.
. If an operation button is pressed while the
hold function is engaged, "On HOLd" will
appear and nothing else happens.
Set the
HOLD switch to the right. "OF HOLd" appears
and the hold function is disengaged.
To adjust the volume
Press the VOLUME + or
button.
The volume level appears (VOL 00 to VOL
20).
5
4. Press the
or
(SKIP/SEARCH) button
repeatedly to select the year. Then press the
(POWER/PLAY) button. The month display blinks.
5. Repeat the same step 4 to set the month, day, hour
display ("24 H" or "12 H"), hour and minute.
Note : "Second" cannot be selected.
When the minute setting is completed, "dAtE" returns.
6. Press the
(MENU/STOP) button.
6
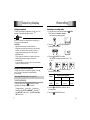
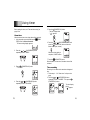
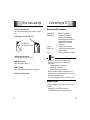
Recording
Selecting display
Selecting a recording mode
Using an earphone
Connect the earphone (supplied) to the
speaker is automatically disconnected.
jack. The
1. In the stop mode, press and hold down the
STOP) button for at least 2 seconds.
. The menu setting display appears.
Note
(MENU/
SP H I
Be sure to reduce the volume before connecting or
disconnecting the earphone.
CAUTION:
. High volume levels can create potentially
dangerous situations by drowning out surrounding
sounds. Use caution when driving, bicycling, or
jogging while operating the unit, and obey all
applicable laws.
. Do not play your earphone at a high volume level.
Hearing experts advise against continuous
extended play.
. If you experience a ringing in your ears, reduce the
volume or discontinue use.
2. Press the
or
(SKIP/SEARCH) button
repeatedly to select "REC".
3. Press the (POWER/PLAY) button.
. The selected recording mode blinks ("HQ", "SP"
or "LP").
HQ
HI
HI
SP HI
LP
Using an external microphone
Connect an external microphone (supplied) to the
jack. The built-in microphone is automatically
disconnected.
Selecting the beep sound: (See page 20)
Selecting display
(MENU/STOP) button
In the stop mode, press the
repeatedly. The display changes as follows:
Current time
Current date
Total playing time
Remaining recording time (REMAIN)
Recorded
time (REC TM, if there is file)
Recorded date (REC
TM, if there is file
7
4. Press the
or
(SKIP/SEARCH) button to
select the recording mode.
Mode
64MB
128MB
Recording time (approx.)
HQ (High-quality)
SP (Standard)
LP (Long)
4h 30 minutes
22h 30 minutes
36 hour
9 hour
45 hour
72 hour
(POWER/PLAY) button to set the
5. Press the
recording mode.
6. Press the
(MENU/STOP) button.
8
Recording
Selecting the folder
Press the FOLDER/REPEAT button repeatedly to select
the folder ( "A" , "B" , "C" or "D" ) in the stop mode.
VAS (Voice activated system) recording
1. In the stop mode, press and hold down the
STOP) button for at least 2 seconds.
The menu setting display appears.
(MENU/
SP H I
Selecting the microphone sensitivity: (See page 20.)
Starting recording
2. Press the
or
(SKIP/SEARCH) button
repeatedly to select "VAS".
1. Press the (REC/PAUSE)buton. Recording starts
with new file number.
Recording mode
File number
SP H I
M icrophone
sensitivity
Remaining recording time
2. Press the
(MENU/STOP) button to stop recording.
File number
Each time a recording is made, a new file number appears.
Note
The unit can record up to 99 files in one folder. "99 FULL"
blinks when attempting to record the 100th file.
Temporarily stopping recording (Recording pause)
(REC/PAUSE) button during recording.
Press the
. The remaining recording time blinks.
Press it again to resume recording.
9
(POWER/PLAY) button.
3. Press the
"OF" blinks.
4. Press the
or
select "On".
(SKIP/SEARCH) button to
5. Press the
(POWER/PLAY) button to set it.
6. Press the
(MENU/STOP) button.
7. Press the
(REC/PAUSE) button to start VAS
recording.
Recording begins when you are
speaking into the microphone.
When dictation stops, recording
stops. ("VAS" and the remaining
recording time blink.)
Press the
or
(SKIP/SEARCH) button to
set the VAS sensing level ("VAS 1" (minimum) "VAS 5" (maximum)) when recording begins.
SP H I
VAS
Selecting recording LED on/off: (See page 21.)
10
Playback
1. Press the FOLDER/REPEAT button repeatedly to
select the folder ("A", "B", "C" or "D") in the stop mode.
2. Press the
or
(SKIP/SEARCH) button to
select the desired file.
Repeat playback
A-B repeat:
1. During playback, press the FOLDER/REPEAT button
at the beginning of the section you want to repeat
(Point A). " A B " blinks.
A
3. Press the
B
(POWER/PLAY) button to start playback.
Folder name
File number
SP H I
Elapsed
playing time
Stopping playback
(MENU/STOP) button during playback.
Press the
. Press the
(POWER/PLAY) button to resume
playback.
. Press the
(SKIP/SEARCH) button once, and
then press the (POWER/PLAY) button. Playback
starts from the beginning of the selected file.
Fast/Slow playback
Speed display
(POWER/
During playback, press the
PLAY) button to select playback speed.
SLOW (Slow)
Normal
FAST (Fast)
FAST
File skip
Press the
playback.
or
(SKIP/SEARCH) button during
File search
Press and hold down the
or
(SKIP/SEARCH)
button during playback. When the button is released,
playback will continue.
11
2. Press the FOLDER/REPEAT button again at the end
of the section (Point B)." A B " remains lit. The specified
section is played back repeatedly.
Note
. If the end of the file is reached before pressing the
FOLDER/REPEAT button to set Point B, it is
automatically set to Point B.
. A-B repeat can be set within the selected file.
File repeat:
During playback, press and hold down the FOLDER/
REPEAT button until " 1
" appears.
The current file is played back repeatedly.
Folder repeat:
In the File repeat mode, press and hold down the
FOLDER/REPEAT button until "
" appears.
The whole files of the current folder are played back
repeatedly.
To return to normal play:
Press the FOLDER/REPEAT button again.
Dividing a file: (See page 20.)
12
Erasing
Erasing the selected file
Formatting (Erasing all memories)
1. Press the FOLDER/REPEAT button repeatedly to
select the folder ("A" , "B" , "C" or "D") in the stop mode.
If you select the format function from the menu, the
memory will be initialized and all files will be erased.
Use only when you need it!
Save a backup copy of your recorded messages on a
PC, etc. if required.
2. Press the
erased.
or
button to select the file to be
(MENU/
1. In the stop mode, press and hold down the
STOP) button for at least 2 seconds.
. The menu setting display appears.
3. Press the ERASE button once.
SP H I
. The file number and "ERASE" blink.
4. While the display is blinking, press and hold down the
ERASE button for at least 2 seconds.
The selected file is erased.
Erasing all files in the selected folder
1. Select the folder to be erased.
2. Press the
or
select " FRMt "
(SKIP/SEARCH) button to
SP H I
3. Press the (POWER/PLAY) button.
. " n " blinks.
2. Press and hold down the ERASE button for at least
2 seconds.
. The folder name and "ERASE"
blink.
SP H I
SP H I
4. Press the
" y " (Yes).
3. While the display is blinking, press and hold down the
ERASE button again for at least 2 seconds.
All the files in the selected folder are erased.
13
(SKIP/SEARCH) button to select
(POWER/PLAY) button.
5. Press the
. " OK " appears briefly and all memories are erased.
6. Press the
(MENU/STOP) button.
Note
Note
If you do not want to erase, press the
button.
or
(MENU/STOP)
. If you want to stop formatting, press the (MENU/
STOP) button before step 5.
. Only the unit can format the data. Do not use your
PC to format.
14
Using timer
Before setting the timer, see " Date and time setting" on
page 6 first.
Alarm timer
5. Press the (POWER/PLAY) button.
. The hour display blinks.
. "
" appears.
SP H I
When the alarm time arrives, beep alarm will be activated.
(MENU/
1. In the stop mode, press and hold down the
STOP) button for at least 2 seconds.
. The menu setting display appears.
2. Press the
or
(SKIP/SEARCH) button
repeatedly to select " tIMER " .
6. Press the
or
(SKIP/SEARCH) button, and
press the (POWER/PLAY) button to select the
alarm on time (hour, minute).
SP H I
When the minute setting is
completed, " tIMER" returns.
SP H I
(MENU/STOP) button.
7. Press the
When the alarm on time arrives, the alarm timer will be
activated.
(POWER/PLAY) button.
3. Press the
. " OF" blinks.
Timer recording
SP H I
4. Press the
or
(SKIP/SEARCH) button
repeatedly to select "On ALARM".
Recording of voice data can be started at a designated
time.
1. Follow steps 1 - 3 of "Alarm timer" on the previous
page.
2. Press the
or
(SKIP/SEARCH) button
repeatedly to select "On tIMER" . Then press the
(POWER/PLAY) button.
SP HI
SP HI
15
SP H I
. The hour display
blinks.
. "
" appears.
16
Using timer
3. Press the
or
(SKIP/SEARCH) button, and
(POWER/PLAY) button to select the
press the
timer on time (hour, minute).
SP H I
How it works at the timer on time:
Mode
Alarm timer
Power off
The power turns on automatically
and alarm sounds.
Stop
Alarm sounds.
During playback
Alarm
Playback is interrupted.
sounds and "
" blinks.
Continues playback.
During recording
Continue recording. ("ALARM"
appears and "
" blinks. )
The recording time blinks.
4. Press the
or
(SKIP/SEARCH) button
repeatedly to select the desired recording time.
Recording time (approx.):
30M : 30 minutes
60M : 60 minutes
120M : 120 minutes
(MENU/
ALL : Recording will continue until the
STOP) button is pressed or the end of
remaining recording time.
Mode
Timer recording
Power off
The power turns on automatically
and recording starts.
Stop
Recording starts.
7. Press the button.
. "tIMER" returns.
During playback
Continues playback (No recording)
and "
" blinks.
(MENU/STOP) button.
8. Press the
When the timer on time arrives, timer recording will start.
During recording
Continue recording. (The timer
recording does not work, and "
blinks.)
5. Press the
(POWER/PLAY) button.
6. Press the
or
button to select the folder ( " A ",
" B " , " C " or " D ").
"
Note
. Make sure there is sufficient battery power when
using timer recording.
. If there are 99 files in the selected folder or the
memory is full, timer recording will be cancelled.
17
Note
. If the
(MENU/STOP) button is pressed, it enters the
stop mode.
. After the alarm timer or timer recording has finished,
it returns to its previous mode.
18
Other menu settings
Common procedures of menu setting
1. In the stop mode, press and hold down the
STOP) button for at least 2 seconds.
. The menu setting display appears.
(MENU/
dIVIdE: Dividing a file
You can use the file dividing function to get rid of
unneeded parts or extract only those that are needed.
SP HI
y : execute file division in this position.
n : return to menu screen.
2. Press the
or
(SKIP/SEARCH) button to
select the menu. Each time the button is pressed, the
display changes as follows:
Note
. Short files cannot be divided.
. The divided parts of files will overlap for a few
seconds with files before and after.
. If there are 99 files in the selected folder or not
enough memory, the file can
be divided.
REC: Selecting the recording mode
(See "Selecting a recording mode" on page 8.)
SEnSE: Selecting the microphone sensitivity
SP HI
3. Press the
(POWER/PLAY) button.
4. Press the
or
(SKIP/SEARCH) button to
change the setting of the selected menu.
5. Press the
HI : High sensitivity
Lo : Low sensitivity
(POWER/PLAY) button to set it.
bEEP: Selecting the beep sound
Turning on and off the beep when buttons are pressed.
SP HI
On : Beep on
OF : Beep off
(MENU/STOP) button to quit the menu
6. Press the
setting mode.
19
20
Other menu settings
VAS: Voice activated system
(See " VAS (Voice activated system) recording' on page
10.)
Connecting to PC
Recommended PC environment
Supported PCs
Supported OS
LEd: Selecting recording LED on/off
SP HI
On: LED lights.
OF: LED does not light.
USB port
Sound board
Other
dAtE: Selecting date and time
(See "Date and time setting "on page 6.)
tIMER: Selecting timer
(See "Using timer" on page 15.)
FRMt: Formatting
(See "Formatting (Erasing all memories)" on page 14.)
SOFt nO: The version number
IBM PC/AT compatible
Windows XP Professional
Windows XP Home Edition
Windows Millennium Edition(Me)
Windows 2000 Professional
Windows 98 Second Edition
Windows 98
One required for connection
16-bit Windows-compatible sound
board supported
Speakers or headphones required
Note
. Operation is not guaranteed for Macintosh PCs.
. Operation is not guaranteed for the following
environments.
Upgraded Windows environments
Windows 95, Windows NT
Dual-boot Windows environments
. Standby, suspend, and other modes may not work
properly with your particular environment. If this is the
case, do not use those modes.
. This unit cannot play back "MP3" and "WMA" files.
Supplied CD-ROM
There are "USB Driver" and "Plug-In Software" in the
CD-ROM.
. Reproduction of this CD-ROM is forbidden.
. This CD-ROM shall not be copied and reprinted.
21
22
Connecting to PC
Installing the Software
3. Click [Next].
For Windows XP/Me/2000
Skip this section, and see "Connect the unit to your PC"
on page 26 first.
For Windows 98/98SE
1. Turn on your PC and Windows is started. Do not
connect the unit to the PC yet.
2. Load the supplied CD-ROM in the CD-ROM drive of
the PC.
[InstallShield Wizard] screen appears automatically.
Click
4. Confirm that [Yes, I want to restart ...] is selected, and
then click [Finish]. The PC will restart.
1) Confirm
2)Click
Note
If the screen is not displayed, double-click "Setup.exe"
file in the CD-ROM. [InstallShield Wizard] screen
appears.
Note
" USB Driver " and "Plug-In Software" are installed
automatically.
23
24
Connecting to PC
How to check whether USB driver has installed
correctly or not
Connect the unit to your PC
Connect the unit to the USB terminal of the PC by using
the USB connection cable.
1. Connect the unit to the PC (See page 26).
B
2. Right-click [My Computer] > select [Properties] >
open [System Properties].
3. Click [Device Manager].
4. Double-click [Disk drives] > double-click [Universal
Serial Bus controllers].
If the following screen is displayed, it means USB
Driver has installed correctly.
Original USB
connection cable
(supplied)
Pay attention to the direction
of the terminal
Note
. Do not use an USB hub or USB extension cable
(Operation is not guaranteed). Use only the supplied
USB connection cable for connection.
. Before connecting the cable, turn off the power of the
unit.
. The unit will operate without battery while the unit is
connected to the PC.
25
26
Connecting to PC
Selecting the action Windows is to take
After connection, the following screen will appear
(Windows XP only).
. For Windows Me/2000/98/98SE, this operation is not
needed.
The screen shots are of Windows XP.
Disconnecting the unit from your PC
Before disconnecting, make sure no data is being
transferred.
For Windows 98/98SE
Disconnect the unit from your PC.
For Windows XP/Me/2000
Follow the steps below to disconnect. (The screen shots
are of Windows XP.)
. The screen might be different for a different OS.
1. Right-click the Task tray icon at
the bottom right of the Windows
screen.
1) Select
3) Click
2. Click [Safely Remove Hardware] displayed.
2) Check
Adjust your settings to match your PC's environment.
In this manual, [Take no action] is selected, [Always do
the selected action] is checked, and [OK] is clicked. This
completes the connection to the PC.
When connected to the PC, the unit display will be as
shown below and none of the operating buttons will
work.
Connected to PC
If the icon is not displayed, refer to the Windows help.
3. Select [USB Mass Storage Device] and click [Stop].
1) Select
Note
During data transfer, the
recording LED blinks
2) Click
Before disconnecting the unit from the PC, be sure to
follow the steps on the next page. Do not disconnect
during data
27
28
Connecting to PC
4. Confirm that [SAFA IC Recorder USB Device] is in
the list, and click [OK].
1) Confirm
Displaying by Explorer
To start up Explorer
To use the same Explorer screen as the ones used in this
manual, start up the Windows XP Explorer as follows.
. The screens displayed on your PC may not exactly
correspond to those shown in this manual depending
on the OS version and manufacturer.
Click [Start], then right-click [My Computer], and select
[Explore] from the menu that appears.
1) Right-click
2) Click
5. Disconnect the unit from your PC.
2) Select
Explorer will start up.
29
30
Connecting to PC
" Removable Disk" display
An icon for a Removable Disk will appear in My Computer
in Windows when the unit is connected to your PC.
Copying data
by using Explorer
Start up Explorer (See page 30).
(1) Copying files to your PC
Select the desired ZVR files you wish to copy inside the
VOICE_IC folder on the Removable Disk and drag and
drop them into a folder of your choice on your PC.
2
1
[VOICE_IC] folder
Files recorded using the unit are stored here.
. Files recorded in the internal memory A folder are
stored in the A folder inside the VOICE_IC folder with
the name " IC_A_XXX (file number).ZVR ".
. This also applies to the B, C, and D folders.
. The A, B, C, and D folders can hold up to 99 files each.
. Only those files in the VOICE_IC folder which comply
with the file name rules set for folders A through D can
be played.
For example, file IC_B_001.ZVR in B folder cannot
be played if it is moved to A folder. Also, keep in mind
that changing a file's name will prevent that file from
being played on the unit.
31
(2) Copying files to the unit
Select the desired ZVR files to copy and drag and drop
them to the VOICE_IC folder in the Removable Disk
drive.
32
Playing back the transferred
files using the Media Player
If your PC has the Microsoft Windows Media Player
installed, you can play back the transferred ZVR files.
See the Windows Media Player online help for details on
how to do this.
. See http://www.microsoft.com/windows/windowsmedia/
to download the Windows Media Player.
2. Click [Next].
Installing the Software
For Windows 98/98SE
There is no need to install the supplied CD-ROM again.
Because it is already installed in "Installing the Software"
on page 23. Skip this section, and see "Playback" on
page 35.
For Windows XP/Me/2000
1. Load the supplied CD-ROM in the CD-ROM drive of
the PC.
[InstallShield Wizard] screen appears automatically.
Click
3. Confirm that [Yes, I want to restart ...] is selected, and
then click [Finish]. The PC will restart.
1) Confirm
2)Click
Note
If the screen is not displayed, double-click "Setup.exe" file
in the CD-ROM. [InstallShield Wizard] screen appears.
33
34
Playing back the transferred
files using the Media Player
Playback
3. Click and select [Removable Disk [E:]].
1. Select [All Programs] > [Windows Media Player] from
[Start] menu.
" Windows Media Player" starts.
1) Click
2) Select
2. Select [Open] from [File] menu.
Select
4. Click [Files of type] and select [Any File [x.x]].
1) Click
2)Select
35
36
Playing back the transferred
files using the Media Player
Formatting the unit' s data
5. Select the playback file > click [Open].
Always format data using the unit itself (See page 14).
Using your PC to do the formatting might stop the unit
from recording normally.
If you accidentally formatted using your PC, reformat it
using the unit.
1) Select
2) Click
6. Read the message first.
Click [Don't ask me again for this extension.] > click
[Yes]. Playback starts.
1) Select
2) Click
37
38
Troubleshooting guide
Symptom
Possible cause
Symptom
Possible cause
Corrective action
Battery is not
inserted properly
or is ran out.
The PC and the
unit are not connected correctly.
Connect them correctly. (See
page 26.)
Internal memory
error.
Format (initialize) the internal
memory. (See page
14.)
Sufficient power is
not being supplied
from the PC.
The volume is
turned down too
No sound. low.
There is no
recorded files.
Adjust the volume. (See page
5.)
If a USB hub is being used,
reconnect the unit directly to the
USB port on the PC. If the PC is
equipped with several different
USB ports, try another port.
The supplied CDROM is not
installed properly.
Check the installation. (See
page 23.)
A network drive
has been
assigned.
If a network drive has been
assigned, the drive
letter (the letters used as drive
names) is already
taken, so the Removable Disk
cannot be created.
Change the network drive assignments and
reconnect. Talk to your network
administrator
about reassigning network drives.
The unit
does not
start.
The hold function
is set.
Buttons do
not
The PC and the
respond.
unit are still connected.
"dAtE"± The clock is not
set.
blinks
when the
power is
turned on.
39
Corrective action
Reinsert the battery correctly
or replace with new
alkaline battery. (See page 4.)
Confirm the recorded files.
(See page 11.)
Turn off the function. (See
page 5.)
Disconnect them.
Set the date and time. (See
page 6.)
"Removab
le Disk" is
not displayed
when the
unit is
connected
to the PC.
40
Troubleshooting guide
Symptom
The unit
cannot
play back
the transferred file
from PC.
The PC
cannot
play back
the transferred files
from the
unit.
41
Possible cause
Corrective action
The file name is
wrong.
Changing file name using your
PC will render file unplayable.
Return the file name to
"IC_X(folder name)_XXX(file
number).ZVR". (See page 31.)
The file is not a
playable format.
Transfer the file by recording the
unit.
"Windows Media
Player" or "Plug-In
Software" is not
installed.
Confirm " Windows Media
Player" is installed, and
install the supplied CD-ROM.
(See page 33.)
Cleaning the cabinet
Clean the outside of the unit with a clean soft cloth,
moistened with lukewarm water. Do not use benzene,
thinner or alcohol since they will mar the finish of the
surfaces.
42
Specifications
Recorded time :
Mode
64MB
128MB
Recording time (approx.)
HQ (High-quality)
SP (Standard)
LP (Long)
4h 30 minutes
22h 30 minutes
36 hour
9 hour
45 hour
72 hour
Frequency response (over all) :
400Hz - 3.5kHz (HQ)
400Hz - 3.5kHz (SP)
400Hz - 2.5kHz (LP)
Terminals :
(Earphone)
(External microphone)
I/O (USB terminal)
Output power :
60mW (Speaker)
Power source :
DC 1.5V ( "AAA" battery)
Dimensions (W x H x D) :
Approx. 1.2" x 4.2" x 0.6"
(30 x 107.5 x 16 mm)
Weigh t:
Approx. 1 oz. (33 g) (without battery)
Important information:
Because its products are subject to continuous
improvement, SAFA reserves the right to modify product
designs and specifications without notice and without
incurring any obligation.
43