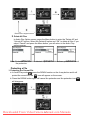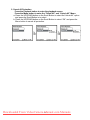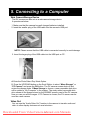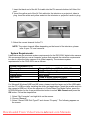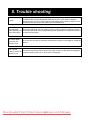
1
DXG-506V
User’s Manual
Downloaded From VideoCamera-Manual.com Manuals
Welcome
Thank you for purchasing the DXG-506V digital video camera.
This easy-to-follow manual shows you how to use your new
DXG-506V digital video camera and install the included software.
You'll find clear instructions on how to take pictures, record videos
and sound, play MP3 files, and use the 506V as a Web camera.
Instructions on using the software to transfer photos and video
segments from the camera into your computer are also provided.
Whether you want to send snapshots or short video clips via email,
create exciting photo albums, see your friends and family over the
Internet, or play MP3 files, the DXG-506V provides you with all of the
tools you’ll need.
1
Downloaded From VideoCamera-Manual.com
Manuals
Index
1. Attention .............................................................................................. 4
Safety Issues ................................................................................................................ 4
Before You Start............................................................................................................ 4
Operational Procedures................................................................................................ 4
Package Contents ........................................................................................................ 5
2. Getting to Know Your Digital Video Camera ............................. 6
Digital Video Camera Overview ................................................................................. 6
Top View.................................................................................................................... 6
Front View ................................................................................................................. 7
Back View.................................................................................................................. 8
Right View ................................................................................................................. 9
Bottom View ............................................................................................................ 10
3. How to Use Your Digital Video Camera .....................................11
Preparation................................................................................................................ 11
Using the Built-in Memory ....................................................................................... 12
Rotating the LCD Screen.......................................................................................... 13
4. Using the Digital Video Camera .................................................. 14
Power......................................................................................................................... 14
LED Indicators .......................................................................................................... 14
Camera Settings ....................................................................................................... 15
Video Mode................................................................................................................ 17
Video Mode Screen Icon Description ...................................................................... 17
Recording a Video................................................................................................... 18
Digital Zoom ............................................................................................................ 18
Play Video ............................................................................................................... 18
Deleting Videos........................................................................................................ 19
Protect Current Video .............................................................................................. 19
Cancel Protection for All .......................................................................................... 20
Photo Mode ............................................................................................................... 21
Photo Mode Screen Icon Description ...................................................................... 21
Taking Still Image .................................................................................................... 22
Digital Zoom ............................................................................................................ 22
Capturing Closeby Objects...................................................................................... 22
Playing Photos .................................................................................................... 22
Deleting Photos .................................................................................. 22
Protecting Photos ............................................................................... 23
DPOF (Digital Print Order Format)...................................................... 24
Direct Print via USB ............................................................................ 25
2
Downloaded From VideoCamera-Manual.com
Manuals
MP3 Mode.................................................................................................................. 26
MP3 Mode Screen Icon Description ........................................................................ 27
Play MP3 ................................................................................................................. 28
Repeat Play ............................................................................................................. 28
Select a File............................................................................................................. 28
Screen Display(MP3)............................................................................................... 29
Deleting Music ......................................................................................................... 29
Protecting Music ...................................................................................................... 30
How to place MP3 songs onto your Digital Video Camera....................................... 31
Audio Mode ............................................................................................................... 32
Audio Mode Screen Icon Description ...................................................................... 32
Record Audio........................................................................................................... 33
Screen Display (Audio)............................................................................................ 33
Play Audio................................................................................................................ 34
Screen Display (Play) .............................................................................................. 34
Deleting a File.......................................................................................................... 34
Protecting a File....................................................................................................... 35
5. Connecting to a Computer ........................................................... 37
Web Camera/Storage Device ..................................................................................... 37
Video Out.................................................................................................................... 37
System Requirements ................................................................................................ 38
6. Driver Installation ............................................................................ 40
Drivers......................................................................................................................... 40
Presto! Video Works 6................................................................................................. 40
Presto! Mr. Photo 3 ..................................................................................................... 41
XviD codec for PC....................................................................................................... 41
7. Digital Video Camera Specifications ......................................... 45
8. Troubleshooting .............................................................................. 46
Appendix A ............................................................................................ 47
Appendix B ............................................................................................ 49
3
Downloaded From VideoCamera-Manual.com
Manuals
1. Attention
Please read this manual carefully before using the camera. Follow the instructions in this
manual to avoid damaging the camera.
Safety Issues
To reduce the risk of fire, do not store this product under direct sunlight.
This product is a precision electronic device. Do not attempt to service this DV camera
yourself, as opening or removing covers may expose you to dangerous voltage points
or other risks.
The CD that comes with the product is designed for PC only. Playing it on a stereo or
CD player may damage the device.
Before You Start
Take some test shots prior to formal recording
Before using this camera for an important occasion, such as a wedding
ceremony or trip, first test the camera to ensure that it functions properly. DXG
is not responsible for any incidental losses (such as the costs of photography or
the loss of income from photography) incurred as the result of this product
malfunctioning, and no compensation will be provided.
Copyright information
All pictures taken with this digital camera must be in accordance with copyright
law. When "No Photography" restrictions are in place, it is illegal to record any
live performance, improvisation or exhibit, even for personal use. Any transfer
of pictures or memory card data must be conducted under the constraints of
copyright law.
Notes on the LCD (Liquid Crystal Display) monitor
Be extra careful with the LCD monitor. If it is damaged and begins to leak, do
the following:
1.
If the liquid touches the skin: wipe the skin dry with a cloth and rinse
immediately with plenty of water.
2.
If the liquid comes in contact with eyes: rinse immediately with plenty of
water for at least 15 minutes and seek medical advice as soon as
possible.
3.
If the liquid is accidentally swallowed: rinse the mouth with water, drink
plenty of water and induce vomiting. Seek medical advice as soon as
possible.
Operational Precautions:
This product consists of intricate electrical parts. To ensure the highest possible
performance, do not drop or hit the camera.
●Avoid using or storing the camera in the following locations:
1.
Damp or dusty places.
4
Downloaded From VideoCamera-Manual.com
Manuals
2.
In sealed vehicles, in direct sunlight, or in any areas with extremely high
temperatures.
3.
Turbulent or high-vibration environments.
4.
Areas with smoke, oil fumes or steam.
5.
Locations subject to strong magnetic fields.
6.
Rainy or snowy environments.
●Do not open the battery cover when the power is on.
●If water enters the camera, turn the power OFF and remove the batteries
immediately.
●How to maintain your digital video camera:
1.
If the lens, LCD monitor or viewfinder surface is dirty, use a lens brush
or soft cloth to wipe it clean. Do not touch the lens with your fingers.
2.
To avoid scratching the lens, LCD monitor or viewfinder surface, do not
use any hard or abrasive object to touch the camera.
3.
Do not use any detergents or volatile solutions to clean the camera.
This may harm the camera and/or paint. Use a soft cloth only.
Package Contents
CD disc
(including driver)
Headphones
Audio cable
Case
Wrist strap and lens cover
USB cable
4 AAA alkaline batteries
TV OUT cable
Manual
5
Downloaded From VideoCamera-Manual.com
Manuals
2 Getting to Know Your Digital Video Camera
Digital Video Camera Overview
Top View:
1. Microphone
2. Speaker
6
Downloaded From VideoCamera-Manual.com
Manuals
Front View:
1.
2.
3.
4.
5.
6.
Lens
Self-timer LED
Flash
USB Port – You can connect the camera to a computer via the USB port. You
can then transfer photos, video or audio from the camera to the computer or use
the camera as a PC camera.
TV OUT port – allows the camera to be connected to a television or VCR
AUDIO OUT port – allows the camera to be connected to headphones or to the
audio jacks on a TV
7
Downloaded From VideoCamera-Manual.com
Manuals
Back View:
1. 4-Way Multi-function Button-In all modes, this selects directions such as
Up, Down, Left, Right and other special functions.
2. Shutter Button- Press to take pictures in Capture mode, and to start & stop
recording videos or voices in Video or Voice mode.
3. Dual Color LED (Power LED/Busy LED)-When the digital video camera
is turned on, the LED will turn green. When the digital video camera is busy,
the LED will turn red.
4. Menu Button- Press the MENU button in any mode and the operation menus
of that mode will be displayed on the LCD monitor.
5. Scroll Button – In any mode, this performs the tasks of select, confirm,
forward, rewind, and OK.
6. Playback Button - In video mode, photo mode, voice mode, MP3 player
mode, press this button for “Play”.
7. Power Button- If pressed for one second, this will power the camera on/off.
8. DISP/HELP Button – while in photo mode and video mode, you can change the
screen display status through this button: normal → full screen → help menu. Other modes
include: normal → help menu.
8
Downloaded From VideoCamera-Manual.com
Manuals
Right View:
1. 1. Macro Switch-This is used for “Normal”
and “Macro” (close-up) modes. The
icon will
appear on the LCD panel if the Macro mode
is selected.
2. Mode Dial- You can select the following modes
by rotating this dial:
-Video mode
1.
2.
-Photo mode
3. MP3
-MP3 player mode
4.
5. SET
-Voice mode
-Setup mode
3. Battery cover
9
Downloaded From VideoCamera-Manual.com
Manuals
Bottom View:
1. Color LCD monitor
2. SD card slot
Battery status display:
Battery Full
Battery Half Full
Battery Low
Battery Out
10
Downloaded From VideoCamera-Manual.com
Manuals
3. How to Use Your Digital Video Camera
Preparation
●Step 1 Insert four "AAA" batteries into the battery compartment .
1. Push down the battery cover
2. Slide the cover towards the
direction shown below.
3. Install batteries correctly
4. Close the battery cover
To avoid damage, do not force the battery cover open or closed.
11
Downloaded From VideoCamera-Manual.com
Manuals
When inserting an optional SD/MMC memory card, follow the icon shown in
the compartment to orient the card. Push the memory card all the way into
the memory card slot to insert. Pushing the card in again gently, will cause it
to pop-out.
☆
After inserting the memory card under normal conditions, the
on the screen. If the
icon appears
icon (built-in memory status) appears after inserting
the memory card, please refer to the following four possible causes and solutions:
- Cannot Identify the Data Format on Memory Card
Please backup data to a computer and reformat the memory card.
- Memory Card Cannot Make Contact with the Slot due to Contamination
Please clean with a dry, clean soft cloth and then insert it again.
- The Memory Card is Defective and Cannot Execute Commands
We recommend that you contact the memory card manufacturer to repair the
memory card.
- Memory Card Slot is Defective and Cannot Read Data
Contact the manufacturer to arrange for repairs.
Using the Built-in Memory
This camera comes with 32MB of built-in flash memory (since the interface
program will take away some built-in memory, it is actually less than 32MB)
to act as temporary memory when the memory card is full.
When a memory card is inserted in the camera, all actions such as formatting,
saving, playing, and downloading/uploading pictures wil be directed toward
the memory card.
To use the built-in memory, simply remove thememory card.
1.
2.
3.
4.
This product is compatible with SD or MMC memory cards from
32MB to 2GB.
When the memory is inserted in the wrong direction, it will not go in
completely; to avoid damage do not force the memory card.
If the camera cannot read the memory card, try cleaning the metal
surface with a dry soft cloth and insert again.
Before inserting the memory card, always make sure the memory
card lock is unlocked, otherwise the
5.
icon will appear on the
screen after insertion and you will not be able to take pictures, save
or access any data.
Do not open the SD card cover while shooting to avoid damaging
data.
12
Downloaded From VideoCamera-Manual.com
Manuals
Rotating the LCD Screen
Open
Outward extension
From bottom to top 180 degree turn
Upward 90 degree turn
To avoid damaging the LCD screen, do not turn the screen in the wrong
direction or over-rotate.
13
Downloaded From VideoCamera-Manual.com
Manuals
4. Using the Digital Video Camera
Power
Slide down and quickly release the power button to turn on the camera. To turn off the
camera, slide it down and quickly release it again.
This video camera is equipped with power saving function. When idle for 2 minutes
(default setting), it automatically shuts off.
1. You can adjust the idle time with the automatic shut down option in the
camera settings.
LED Indicators
Indicators are located on the front of the camera (Self-timer LED) and at the back of
the camera (status Indicator):
Color
Red Light
Description
Flashing Busy
Status Indicator
Green Light
Self-timer LED
Red Light
On
Normal standby
Flashing Self-timer activated
14
Downloaded From VideoCamera-Manual.com
Manuals
Camera Settings
Switch the Mode switch to the SET position and you will
see all available options in the chosen mode. You can
adjust to functions like Date and Time, Audio, Format,
Default setting, Memory, Language, Video Out,
Automatic shut off, etc. For detailed operation guide,
please refer to following diagrams.
15
Downloaded From VideoCamera-Manual.com
Manuals
Formatting erases all data in the memory (card and/or built-in) and it cannot be
recovered. Please ensure that backup has been performed on important data
prior to use.
Depending on your location, you must change the visual output to NTSC or
PAL to play video footage on television (USA uses NTSC).
NOTE: When idle, the LCD screen shuts off after 1 minute. The camera shuts off after
the time that is set by you.
16
Downloaded From VideoCamera-Manual.com
Manuals
Video Mode
Switch the Mode switch to Video Mode [Movie].
Video Mode Screen Icon Description
1
2
3
4
5
Movie mode
Internal memory
Image resolution
Internal memory is half full
Image quality
Numbers of image per second
Memory status
Memory card
Memory card is half full
Internal memory (full)
6
7
8
9
Memory card exhausted
Memory card (full)
Recorded video files count
Length of the recorded video
Date/Time
EV compensation
Battery status
11
Digital zoom ratio
Memory card is protected
17
Downloaded From VideoCamera-Manual.com
Manuals
Recording a Video
Press the shutter button to start recording, press it again to stop recording.
☆ The length of the video is limited by the size of the memory.
☆ Furthermore, the size and quality of the image will also affect the length of the video.
☆ High resolution and high quality will result in larger video files and hence shorter length
of recording.
Digital Zoom
You can use the Scroll Button to zoom in
up to 4X.
or zoom out
Images can be enlarged
Play Video:
Press the Play button
, to enter the Video Play mode.
1. Scroll left or right with the 4-way Multifunction Button to locate the video, press the
shutter
button to play.
2. Press the shutter button again while playing to stop.
3. While playing, press the Scroll Button to pause the video, press it again to resume
play.
4. The UP/DOWN on the Scroll Button adjusts volume (it also adjusts the volume while
video is not playing).
Pause the video
Stop the video
Volume adjustment
Return to the original screen
automatically when the video
stops
This product provides 3 different video formats. AVI is the least compressed.
1. AVI : Install Xvid 1.03 codec (included in the product CD)
2. MOV : Install Quick Time 6X or above
3. ASF : Windows Media Player 9.0 or above is recommended
18
Downloaded From VideoCamera-Manual.com
Manuals
Deleting Videos
1. Press the Play button
, to enter the Video Play mode.
1. Press the LEFT or RIGHT button on the 4-way button to select the correct
video.
1. Once the video to be deleted is selected, press the UP button on the 4-way button
to enter the delete screen.
2. Press the up or down buttons to choose the OK option.
3. Press the shutter button to delete the file (protected files cannot be deleted).
Video return to the
original screen
2. Delete all videos
Press the Menu Button to enter the “Delete All” option. Select OK to delete all files.
Note: Protected files cannot be deleted. If you wish to delete those files, first
remove the protection.
Protect Current Video
1. Under Video Play mode
, press the DOWN button on the 4-way button and the
current video will be protected. The icon
will appear on the screen.
2. Press the DOWN button again to cancel protection and the
disappear.
icon will also
19
Downloaded From VideoCamera-Manual.com
Manuals
Cancel Protection for All
a. Press the Play button
, to enter the Video Play mode.
Press the Menu Button to enter the “Unlock All” option
Press the UP or DOWN button on the Scroll Button to select the “Unlock All”
option.
b. Press the UP or DOWN button on the Scroll Button to select “OK” and press the
Ok button to cancel protection for all files.
20
Downloaded From VideoCamera-Manual.com
Manuals
Photo Mode
Switch the Mode switch to Photo Mode [ Camera ]
Photo Mode Screen Icon Description
1
2
3
4
5
6
Internal memory is half full
Record mode
Image resolution
Image quality
Digital zoom
Digital zoom ratio
Internal memory (full)
7
8
9
Memory status
Numbers of pictures taken
Flash mode
Unsteady indicator
Date/Time
Memory card
11
EV compensation
Memory card is half full
12
Battery status
Memory card exhausted
13
Macro Mode
Memory card (full)
14
Self-timer mode
Memory card is protected
15
White balance
Internal memory
Taking Still Photos
21
Downloaded From VideoCamera-Manual.com
Manuals
While in the Photo mode, press the shutter button to take still photos in JPEG format.
Tap once
Press down
Locking exposure: Pressing the shutter button in halfway and holding it will “lock” the
exposure setting even if the camera is refocused elsewhere. This alllows you to lighten
or darken exposure settings quickly. Pushing the button all the way in will snap the
picture.
The maximum recordable number of images depends on the free space of the internal
memory/memory card. Image resolution and quality will also affect the number of the
recorded images. The higher the image resolution and quality, the more memory space
that is needed.
Digital Zoom
You can use the Scroll Button in Photo Mode to zoom in
can be enlarged up to 4X.
or zoom out
Images
Capturing Closeup Objects
Adjust the Macro/Normal toggle upward to the Macro position and the
icon will
appear on the LCD screen. You can now take pictures in the6.7 –7.5 inch range.
Switch the macro/normal
The “macro” symbol will
toggle to the macro position
appear on the LCD
Playing Photos
Under Photo Play mode
there are two ways to select photos:
1. Select Photos (two ways to select photos):
(1) Use the 4-way button – select with the left/right button.
(2) Use the Scroll Button– Select with UP/DOWN (this method allows fast access to
photos).
22
Downloaded From VideoCamera-Manual.com
Manuals
2. Select a File
Use the jog dial to select
3. Thumbnail Display
Use jog dial to move in directions
While playing back the photos you can PUSH IN the Scroll Button and then use it to
zoom in
or zoom out
of the picture. You can also use the UP/DOWN,
LEFT/RIGHT functions of the 4-way button to scroll around the enlarged picture.
4.Auto Play
Under the Photo Play mode
using the Scroll Button.
, press the Menu button and select the Slide Show
Under Slide Show, all pictures are shown with a preset time interval.
Press the Scroll Button to exit.
Deleting Photos
Under Photo Play mode
screen.
, press the MENU button to enter the Photo Play options
1. Delete Single photos:
23
Downloaded From VideoCamera-Manual.com
Manuals
Return to the original
screen
2. Delete All Photos:
Press the DOWN button to enter the “Delete All” option. Select “OK” to delete all
files. If you choose “Cancel” and press the Scroll Button, you will return to the
Photo Play options screen.
★ Note: Protected files cannot be deleted. If you wish to delete them, first cancel
the protection
Protecting Photos
Under the Photo Play mode
, press the MENU button.
1. Protect Single Photo:
a. Press the DOWN button on the 4-way button to select the protection option and
press the OK button. Pressing the DOWN button once will turn on the protection,
pressing it again will turn the protection off.
24
Downloaded From VideoCamera-Manual.com
Manuals
Removing Protection From All Photos:
Press the DOWN button to enter the “Unlock All” option. Select “OK” to unprotect all
files. If you choose “Cancel” and press the Scroll Button, you will return to the
Photo Play options screen.
DPOF (Digital Print Order Format):
DPOF allows you to store directions for printing photos onto the SD card so that
these photos can be printed directly to a printer that supports DPOF. YOU MUST
HAVE AN SD CARD INSERTED INTO THE CAMERA TO USE THIS OPTION.
POF Single Photo Setup
a. Select the “DPOF” option using the UP/DOWN button on the Scroll Button and
press OK button.
b. Press the UP/DOWN button to select Single Picture option and press the OK
button to enter the Single Picture interface.
c. The current picture appears, use the UP/DOWN button to select photos.
Pressing the OK button now will increase the printed quantity, up to a maximum
of 9.
POF All Photos Setup:
a. Select the “DPOF” option using the UP/DOWN button on the Scroll Button and
press OK button.
b. Press the UP/DOWN button to select All Pictures option and press the OK
buttton to enter the All Pictures interface.
c. In the All Pictures interface, OK and Cancel options appear. Select OK and
press the OK button to print one copy of each photo. Selecting Cancel will
cancel the printing of all photos.
Direct Print via USB (only on printers with the Direct Print function)
1. Connect the camera and the printer with USB cable.
2. Select DPS.
3. In the Print list, press the UP/DOWN button to select Print Single Photo and
press the OK button to enter the Print Single Photo interface.
4. Press the UP/DOWN button to select the number of photos to be printed.
25
Downloaded From VideoCamera-Manual.com
Manuals
MP3 Mode
Getting MP3 Files Onto Your 506V:
The DXG-506V has the ability to play MP3 files. Only song files in the MP3 file
format can be played in the MP3 function. Files on CDs are usually in the
Windows Media format (.wma) or wav format and cannot be played in their
native format; they must first be converted into MP3 files. This can be
accomplished with many types of software which are available at little or no
cost.
Once the songs are in the MP3 format, they can be transferred to the MP3 folder
in the camera’s onboard memory or onto the SD card. This can be
accomplished by one of two ways: 1.) Attach the USB cable to the camera,
select “Mass Storage” and then use your PC to find the removable hard drive
( the camera / SD card). Once located, drag and drop the MP3 files into the MP3
folder. NOTE: Two removable hard drives will be visible if the camera has an SD
card inserted. 2.) The other way is to place the SD card into a card reader,
locate the MP3 folder, and drag and drop the MP3 files into the MP3 folder. The
card can then be re-inserted into the camera.
Once the files are in the MP3 folder, they can be played by rotating the mode
dial to the MP3 mode.
26
Downloaded From VideoCamera-Manual.com
Manuals
Switch the Mode switch to the MP3 Mode [ MP3 ]
MP3 Mode Screen Icon Description
27
Downloaded From VideoCamera-Manual.com
Manuals
Play MP3:
Under MP3 mode, use the LEFT/RIGHT button on the 4-way multifunction button to
select the song. Press the shutter button to play.
Volume Adjustment:
Under Play Mode, press the UP/DOWN button on the Scroll Button to adjust the
volume.
Repeat Play
By pressing in the Scroll Button BEFORE you begin playing a song, you can choose to
repeat a single song or the entire music library.
1. Pressing it once repeats a one single song (it has the number 1 next to it).
2. Pressing it again will repeat all the music in the file library.
Select a File
Use the LEFT/RIGHT button on the 4-way Multifunction Button to select song.
28
Downloaded From VideoCamera-Manual.com
Manuals
Screen Display
Use the DISP/HELP button to change the screen display mode. This can only be
used when the songs are not playing.
Standard display
Button icons
Deleting Music:
1. Delete Current Music
a. Press the LEFT/RIGHT button on the 4-way Multifunction Button to select the single
song to be deleted.
b. Press the UP button on the 4-way Multifunction Button to delete a single song and
press the shutter button to confirm.
2. Delete All Music
In the MP3 mode, press the MENU button to enter the MP3 options screen.
a. To delete all MP3 files, press the UP/DOWN button on the Scroll Button to select
the “Delete all” option and press the OK button. (Protected files cannot be deleted)
29
Downloaded From VideoCamera-Manual.com
Manuals
Protecting Music
1. Protect Current Music
a. Befoe playing a song, press the DOWN button on the 4-way Multifunction Button to
protect the selected file. The
icon will appear on the screen.
c. Press the DOWN button again will return to no protection.
2. Unprotect All Music
Under the MP3 mode, press the MENU button to enter the MP3 options screen.
1. Press the DOWN button to select “OK” and press the OK button to unprotect all files.
There is no Play mode function
under MP3 mode
30
Downloaded From VideoCamera-Manual.com
Manuals
How to place MP3 songs onto your Digital Video Camera
● Step 1 SPace Connect the camera to your PC USB terminal with accessory cable.
● Step 2
●
Select “mass storage” on the menu screen. Refer to the attached
pictures. Indicate that you push in the Jog Button to select.
Step 3. Then Open the folder under my computer/USB Disk/MP3 .
Space Copy the MP3 files into this folder remove space add space.If the file
“MP3”file does not exist,you can create in yourself.Then add the music files to
this folder.
31
Downloaded From VideoCamera-Manual.com
Manuals
Audio Mode
Switch the Mode switch to
Audio Mode, and press the
shutter button to start recording. Press the shutter button again
to stop recording.
Audio Mode Screen Icon Description
Audio Mode
Audio Mode(Moving Picture)
Current file number
Memory status
Length of the recorded audio
Memory card
Button icons
Memory card is half full
Memory card exhausted
Memory card (full)
Memory card is protected
Internal memory
Internal memory is half full
Internal memory (full)
32
Downloaded From VideoCamera-Manual.com
Manuals
Record Audio
Start recording:
The animation on left started to play, and the total recorded time is displayed at lower right
Screen Display
You can use the DISP/HELP button to change the screen’s display mode when not
recording or playing back files.
Standard display
Button icons
33
Downloaded From VideoCamera-Manual.com
Manuals
Play Audio
1. In Audio Mode, press the Play button to enter the Play mode
2. In Play mode, press the LEFT/RIGHT button on the 4-way Multifunction Button to
select the correct audio file.
3. After selecting the audio file, press the shutter button to start playing, press the
shutter button again to stop playing
Volume adjustment: In Play Mode you can adjust the volume by adjusting the
Scroll Button UP/DOWN.
Screen Display
Standard display
Display closed
Button icons
Deleting a File
1. Press the Playback button to enter the playback screen.
1. Press the UP button on the 4-way Multifunction Button to enter the Delete screen.
2. Press UP/DOWN on the 4-way multifuncion button to select the OK option.
3. Press the shutter button to delete the selected file
(protected files cannot be deleted).
34
Downloaded From VideoCamera-Manual.com
Manuals
Return to the original screen
2. Delete All Files
In Audio Play Option screen, press the Menu button to enter the “Delete All” and
“Unlock All” options. Select the Delete All option and “OK” to delete all files. If you
select “Cancel” and press the Menu button, you will return to the Audio Play
options screen.
Note: Protected files cannot be deleted. If you wish to delete them, please first cancel
the protection.
Protecting a File
1. Protecting the Current File
a. In Audio Play mode
press the DOWN function on the 4-way button and it will
protect the current file; the
icon will appear on the screen.
b. Press the DOWN button again will cancel the protection and the protection icon
will disappear.
35
Downloaded From VideoCamera-Manual.com
Manuals
2. Cancel All Protection
Press the Playback button to enter the playback screen.
Press the Menu button to enter the “Delete All” and “Unlock All” Menu.
a. Press the UP/DOWN button on the Scroll Button to select the“Unlock All” option
and press the Scroll Button in to select.
b. Press the UP/DOWN button on the Scroll Button to select “OK” and press the
Menu button to cancel all protection.
36
Downloaded From VideoCamera-Manual.com
Manuals
5. Connecting to a Computer
Web Camera/Storage Device
The DV camera can also act as a web camera/storage device.
It operates as below:
1. Make sure that the camera has well-chraged batteries installed.
2. Insert the smaller plug of the USB cable into the camera’s USB port.
.
NOTE: Please ensure that the USB cable is connected correctly to avoid damage.
3. Insert the larger plug of the USB cable into the USB port on PC.
4. Enter the Photo/Video Play Mode Option.
5. Press the UP/DOWN button on the Scroll Button to select “Mass Storage” or
“PC Camera” and press the OK button. The DV camera screen shuts off and
enters the chosen mode. If Mass Storage is chosen, a new removable disk drive
will be added in “My Computer” in the system. The newly added removable disk
drive shows all the images stored on the SD/MMC memory card of the DV camera.
Now you can use all the images. If PC Camera is chosen, the DV camera can be
used as a web camera.
Video Out
You can use the “Audio/Video Out” function in the camera to transfer audio and
video to other display devices such as a television.
37
Downloaded From VideoCamera-Manual.com
Manuals
1. Insert the black end of the AV Out cable into the DV camera’s bottom left Video Out
port.
2. Insert the yellow end of the AV Out cable into the television or projector’s video-in
plug. Insert the white and yellow ends into the television or projector’s audio-in plug.
3. Select the correct channel for the TV.
NOTE: The output channel differs depending on the brand of the television; please
refer to your TV user’s manual.
System Requirements:
Listed below are the minimum system requirements for the DXG-506V digital video camera.
We recommend that you use a computer system that exceeds the minimum requirements
in order to utilize the video camera to its fullest capacity. The minimum system
requirements for the DXG-506V are as follows:
System Requirement (PC)
Operating System
Processor
Memory
Optical Drive
Hard Drive
Others
Microsoft Windows98SE, Me, 2000, XP
Intel Pentium 3 or higher
32 MB or higher
4x or higher
10 MB or higher remaining space
One standard USB 1.1 or USB 2.0 port
For Microsoft Windows 98SE and ME users, please insert the larger end of the USB cable
into the PC’s USB port after installing the driver and applications. Insert the smaller end into
the camera’s USB port. When the camera is in Photo/Video Play Mode Option, press the
UP/DOWN button on the 4-way multifunction button to select Web Camera and press the
OK button. Follow the steps below:
1. Select “My Computer” and right click on the mouse.
2. Choose “Manage”
3. Select “Generic IDE Disk Type47” and choose “Property”. The following appears on
the screen:
38
Downloaded From VideoCamera-Manual.com
Manuals
4. “DMA” and press OK.
★ Note: When the PC is playing the video, ensure that DirectX8.0 or higher and that a
supporting sound card is installed.
39
Downloaded From VideoCamera-Manual.com
Manuals
6. Driver Installation
6.1 Drivers
You will only need to install a driver for the camera if your operating system is Windows
98SE or Windows ME. Windows 2000 and Windows XP are plug-and-play operating
systems and do not require a driver to be manually loaded.
To load a driver:
1. Insert the supplied CD-ROM in the CD-ROM drive
2. If the CD-ROM doesn’t automatically boot, use Windows Explorer to execute the
instngr.exe file in the root directory.
3. Click the install button to install the driver.
4. Follow the on-screen instructions.
5. Connect the camera to the computer using the USB cable provided as described in
“Connecting to a computer”.
Note: When connecting the camera to a host PC running the Windows 2000 or Windows
XP operating system, connect the camera as described in step 5 above, and the PC
will install a driver automatically.
When the driver has been installed and the camera is connected, the camera
memory and any installed SD card will appear as removable disks in Windows
Explorer. Files can be dragged and dropped in the same way as with an ordinary
disk.
6.2 Presto! Video Works 6
Presto! Video Works 6 is an advanced software application for editing video.
To install Presto! Video Works 6:
1. Insert the supplied CD-ROM in the CD-ROM drive.
2. If the CD-ROM doesn’t automatically boot, use Windows Explorer to execute the
instngr.exe file in the root directory.
3. Click the install button to begin the installation process and follow the on-screen
40
Downloaded From VideoCamera-Manual.com
Manuals
instructions.
More information about Presto! Video Works 6 can be found in the help files when
the application is started.
6.3 Presto! Mr. Photo 3
Presto! Mr. Photo 3 is an advanced photo editing software application.
To install Presto! Mr. Photo 3:
1. Insert the supplied CD-ROM in the CD-ROM drive.
2. If the CD-ROM doesn’t automatically boot, use Windows Explorer to execute the
instngr.exe file in the root directory.
3. Click the install button to begin the installation process and follow the on-screen
instructions.
More information about Presto! Mr. Photo 3 can be found in the help files when the
application is started.
6.4 XviD codec for PC
Installing the XviD codec program
1. Insert the Software CD supplied into the CD-ROM drive
2. Please double click on the "My Computer" icon on the desktop. Then double click
the CD-ROM drive icon and click the setup file of Xvid in the root directory.
3. Click "XviD.exe" to start the installation. The setup screen will appear, please click
"Next" to continue.
41
Downloaded From VideoCamera-Manual.com
Manuals
4. Click "I accept the agreement" to accept the conditions of Software License
Agreement and click "Next" to continue.
5. Click "Browse" to select the folder location and click "Next" to continue.
6. Click "Browse" if you want to select a different program folder or click "Next" to
continue.
42
Downloaded From VideoCamera-Manual.com
Manuals
7. Enter the additional tasks setup screen and press "Next" to continue.
8. Enter the main program setup screen and press "Install" to start the installation.
9. During the installation, press "Cancel" if you want to stop setup.
43
Downloaded From VideoCamera-Manual.com
Manuals
10. The following screen will appear after the installation is completed. Click "Finish"
to complete the installation.
44
Downloaded From VideoCamera-Manual.com
Manuals
7. Digital Video Camera Specifications
Specifications:
●Lens: f=8.25 mm
●Image Sensor: 5.1 mega pixel CMOS sensor
●Aperture: F 3.0/8.0
●Speed: ISO 100
●White Balance Settings: Auto, Florescent, Cloudy, Sunny, Tungsten
●Shutter: Mechanical Shutter
●Shutter Speed: 1/2 Sec. ~ 1/500 Sec.
●Storage Media: Build-in 32MB, Flash Memory SD card (and similar MMC) slot (supports up to 2GB)
●File Formats: Still Images: JPEG
Video: MEPG 4 / ASF / AVI / MOV
Audio:WAV
●Image Resolution: 4000 x 3000 (Firmware Interpolation)
2592 x 1944
2048 x 1536
1280 x 960
●Digital Zoom:4x
●Normal Focus Length: 4 ft. ~
●Macro Focus Length: 6.7~ 7.5 in.
●Self-timer: Off, 10 Sec., 20 Sec. options
●PC Cam Mode: 320 x 240 /MAX30 fps.
640 x 480/ MAX30 fps.
●Flash: Auto/Off /Forced
●TV-OUT Transfer: NTSC / PAL
●PC Interface : USB2.0 High speed
●Video: Continuously shoot in 320 x 240 resolution : (with build-in 32MB memory)
Fine
Approx.
Normal
180 seconds
Approx.
286seconds
Continuously shooting in 640 x 480 resolution: (with build-in 32MB memory)
Fine
Approx.
Normal
47 seconds
Approx.
68 seconds
●Number of still images (using the built-in 32MB memory):
1280X960
2048X1536
Fine
66
27
2592X1944
17
4000X3000
9
Normal
143
64
40
15
Note: Actual number of pictures and length of video shooting vary depending on the visual complexity of
the image. The above data is for reference purposes only.
●Power: 4 AAA alkaline batteries
●Exterior Size: 3.5 x2.8 x1.5 in.
●Weight: Approximately 4.8 oz. (without batteries)
45
Downloaded From VideoCamera-Manual.com
Manuals
8. Trouble shooting
Freeze
If the camera freezes during operation and cannot be used, please check to ensure that
the batteries and in good contact and restart the camera. If you cannot restart the
camera, check to see if the camera has been damaged due to improper usage. Do not
disassemble the camera yourself, please call the manufacturer.
Error Message
Remove the USB plug from the camera, check to see if the printer is working properly,
When Entering The and whether the camera has enough battery power. Restart the camera and re-connect
Direct Print Mode the camera to the printer.
It Freezes When
Removing The
Memory Card
Do not remove the memory card while operating the camera. If this happens, restart the
camera.
The Camera
The camera may not be able to format every type of memory card. When this happens,
Cannot Format The
format the memory card to the FAT format on a computer.
Memory Card
46
Downloaded From VideoCamera-Manual.com
Manuals
Appendix A:
SD card capacities
Photos:
Card Size
Photos(pcs)
Quailty
64MB
128MB
256MB
512MB
1GB
fine
182
358
730
1464
2913
normal
386
760
1554
3102
6225
fine
75
149
307
614
1244
normal
180
353
722
1460
2888
fine
47
96
196
395
788
normal
116
226
464
931
1886
fine
29
59
123
247
503
normal
47
100
204
415
821
512MB
1GB
1MP
3MP
5MP
12MP
Video
Card Size
Times(Min)
Quailty
320x240
fine
(30 fps)
normal
640x480
fine
4Mins26Sec.
8Mins46Sec.
11Mins29Sec. 23Mins48Sec.
47Mins1Sec.
(30 fps)
normal
4Mins31Sec.
9Mins43Sec.
15Mins29Sec. 29Mins54Sec.
62Mins45Sec.
64MB
128MB
256MB
14Mins56Sec. 27Mins45Sec. 57Mins50Sec. 84Mins39Sec.
172Mins5Sec.
14Mins31Sec. 30Mins49Sec. 49Mins10Sec.
163Mins39Sec.
83Mins7Sec.
47
Downloaded From VideoCamera-Manual.com
Manuals
★Note:
1. The number of pictures you can take varies depending on the visual complexity of the
scene being photographed.
2. The minutes of music that your card can hold depends on the rate at which your
songs were recorded. The standard bit rate for MP3 recordings is 128 Kbps. The
bit rate (Kbps) is determined by the encoder software used to create your audio file.
The higher the bit rate, the better the audio quality (and the larger the file size).
3. To assure 100% SD card compatibility, we suggest using SD cards sold through
the DXG USA site. These cards have been tested and are guaranteed to be
compatible with this device. www.dxgusa.com/shop
48
Downloaded From VideoCamera-Manual.com
Manuals
Appendix B:
PictBridge errors
Type
Value
Description
Paper
256
257
258
259
260
Paper related error (default)
Paper is empty
Load Error – paper not loaded correctly
Eject Error – paper not ejected correctly
Media Error – paper not detected, paper skewed, roll paper
cannot cut or turn off
Paper jam
Paper nearly empty
Paper type / paper size combination not supported or paper
found in printer does not match the request
261
262
263
Ink
Hardware
File
512
513
514
515
768
769
770
771
772
773
774
775
776
777
1024
1025
1026
Ink related reason (default)
Ink empty
Ink low
Waste ink error (waste-ink reservoir full)
Hardware related error (default)
Fatal error
Service call
Printer unavailable (performing maintenance or otherwise
occupied)
Printer busy (processing a job from another source, e.g., a
PC)
Lever error (lever position not correct)
Cover open
No marking agent (e.g., missing print head)
Ink Cover open
No Ink Cartridge
File related error (default)
print Info error (internal protocol error)
File decode error (picture format of the specified image
cannot be decoded)
49
Downloaded From VideoCamera-Manual.com
Manuals