1
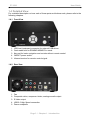
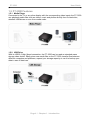
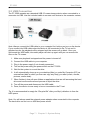
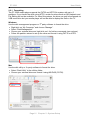
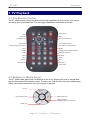
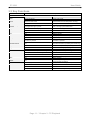
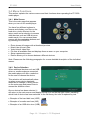
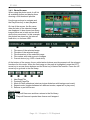
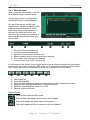
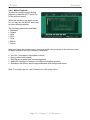
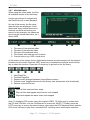
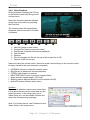
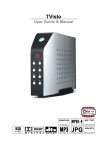
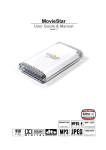
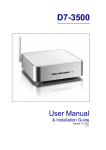
P7-3500
Digital Media Player for
3.5” SATA Hard Drives
User Manual
Firmware: 20080515_MPT_35_00
Date: May 22, 2008
Version: v1.1
The diagrams and images contained in this manual may not fully represent
the product that you are using and are there for illustration purposes only.
P7-3500
User Guide
Table of Contents
1
INTRODUCTION....................................................................................................................................... 1
1.1
PACKAGE CONTENTS .......................................................................................................................... 1
1.2
SYSTEM REQUIREMENTS .................................................................................................................... 1
1.2.1 Supported Operating Systems..................................................................................................... 1
1.2.2 Supported File Systems............................................................................................................... 1
1.2.3 Supported USB Devices .............................................................................................................. 1
1.2.4 Supported Languages.................................................................................................................. 1
1.3
SUPPORTED FORMATS ........................................................................................................................ 2
1.3.1 Video File Formats....................................................................................................................... 2
1.3.2 Video Outputs .............................................................................................................................. 2
1.3.3 Subtitles ....................................................................................................................................... 2
1.3.4 Audio File Formats....................................................................................................................... 2
1.3.5 Audio Outputs .............................................................................................................................. 2
1.3.6 Picture Formats............................................................................................................................ 2
1.3.7 Media Cards................................................................................................................................. 2
1.4
DETAILED VIEW .................................................................................................................................. 3
1.4.1 Front View .................................................................................................................................... 3
1.4.2 Rear View..................................................................................................................................... 3
1.5
P7-3500 FEATURES ........................................................................................................................... 4
1.5.1 Media Player ................................................................................................................................ 4
1.5.2 USB Drive .................................................................................................................................... 4
1.6
QUICK INSTALLATION GUIDE ................................................................................................................ 5
2
SYSTEM SETUP ...................................................................................................................................... 6
2.1
TV CONNECTION ................................................................................................................................ 6
2.2
USB CONNECTION ............................................................................................................................. 7
2.2.1 Formatting .................................................................................................................................... 8
2.2.2 Safe Removal .............................................................................................................................. 9
3
TV PLAYBACK....................................................................................................................................... 10
3.1
THE REMOTE CONTROL .................................................................................................................... 10
3.2
BUTTONS ON MEDIA PLAYER ............................................................................................................. 10
3.3
KEY FUNCTIONS ............................................................................................................................... 11
3.4
MENU FUNCTIONS ............................................................................................................................ 12
3.4.1 Main Screen............................................................................................................................... 12
3.4.2 Device Selection ........................................................................................................................ 12
3.4.3 Photo Browser ........................................................................................................................... 13
3.4.4 Photo Playback .......................................................................................................................... 14
3.4.5 Music Browser ........................................................................................................................... 15
3.4.6 Music Playback .......................................................................................................................... 16
3.4.7 Video Browser............................................................................................................................ 17
3.4.8 Video Playback .......................................................................................................................... 18
3.4.9 File Browser ............................................................................................................................... 19
3.4.10
DVD Playback........................................................................................................................ 20
3.4.11
File Editing ............................................................................................................................. 21
3.5
SETUP MENU ................................................................................................................................... 23
3.5.1 Photo Setup ............................................................................................................................... 23
3.5.2 Video Setup ............................................................................................................................... 25
3.5.3 Preferences................................................................................................................................ 26
4
APPENDIX.............................................................................................................................................. 29
4.1
4.2
4.3
4.4
4.5
4.6
SPECIFICATIONS ............................................................................................................................... 29
SAFETY INFORMATION....................................................................................................................... 30
FAQ ................................................................................................................................................ 31
TECHNICAL QUESTIONS .................................................................................................................... 32
ABOUT DATA BACKUP ....................................................................................................................... 32
ABOUT THIS MANUAL ........................................................................................................................ 32
P7-3500
User Guide
1 Introduction
The P7-3500 is the perfect all-in-one media adapter for your home theatre system. With an
internal 3.5” SATA hard drive, you can store loads of media files from your computer via
high speed USB 2.0. Plus, with an additional front USB port and 4-in-1 card reader, you
can get convenient instant playback from even more external devices! Up to 720p video
quality and compatibility with most current media formats, connect the P7-3500 to any
television and you’ve got digital entertainment without the need of a PC.
Product Dimensions:
17.5cm x 17.5cm x 5.2cm
6.9in x 6.9in x 2in
1.1 Package Contents
• P7-3500 Media Player
• Power Adapter;
Input 100-240V, Output +12V/2A
• Infrared remote control
• USB 2.0 cable
• Composite RCA AV cable and SCART adapter
• Manual
Note: Package contents may vary depending on vendor & model.
1.2 System Requirements
• Computer with USB connection for setup and file transfer
• TV set with Composite, S-Video or Component video and audio input
1.2.1 Supported Operating Systems
• PC running Win2000, WinXP or Windows Vista
• Mac running Mac OS 10.2 or above
1.2.2 Supported File Systems
• FAT32
• NTFS (read only)
• Up to 3 partitions in total
1.2.3 Supported USB Devices
• Mass storage class devices using FAT12, FAT16 or FAT32 including USB hard drives,
card readers and USB memory sticks. USB hubs are not supported!
1.2.4 Supported Languages
• English, Traditional Chinese
Page 1 / Chapter 1 - Introduction
P7-3500
User Guide
1.3 Supported Formats
1.3.1 Video File Formats
• MPEG-1 (AVI, MPG)
• MPEG-2 (AVI, VOB, IFO, ISO)
• MPEG-4 up to 720p (AVI, XviD)
1.3.2 Video Outputs
• Composite Video (NTSC/PAL, Composite RCA, S-Video Mini-Din)
• Component Video (Analogue YPbPr, progressive or interlaced, scalable up to
1280x720p)
1.3.3 Subtitles
• SRT (SubRIP format)
1.3.4 Audio File Formats
• WAV, MP3, MPEG-4 (AAC), OGG Vorbis
Note: Does not support AAC files from Apple’s media player iTunes.
1.3.5 Audio Outputs
• Dual stereo analogue audio
1.3.6 Picture Formats
• JPG baseline and progressive
• Motion JPEG (15, 30fps)
1.3.7 Media Cards
• SD
• MMC
• MS
• MS Pro
The P7-3500 is not designed or intended to, and may not be used to violate any
copyrights or other IP (Intellectual Property) rights. Each user of the P7-3500 may
only use it in connection with materials legally owned by or licensed to the user and
only extend such ownership or license rights that will permit such use.
MS-DOS, Microsoft, Windows 2000/XP/Vista are trademarks of Microsoft Corporation. Apple Macintosh and
Mac are trademarks of Apple Computer. Dolby® and Dolby® Digital are registered trademarks of Dolby
Laboratories, Inc. All other third party brands and names are the property of their respective owners.
Page 2 / Chapter 1 - Introduction
P7-3500
User Guide
1.4 Detailed View
For a detailed description on how each of these ports and buttons work, please refer to the
following chapters.
1.4.1 Front View
Z
X
1.
2.
3.
4.
5.
[ \
Y
USB host (upstream) connector for external USB drives.
Card reader slot for SD/MMC/MS/MS Pro cards.
Key pad for basic navigation and controls without remote control.
ON/OFF power switch.
Infrared receiver for remote control signal.
1.4.2 Rear View
Y
X
1.
2.
3.
4.
5.
Z [ \
Fan
Composite video, component video, analogue audio output
S-Video output
USB 2.0 High Speed connection
Power receptacle
Page 3 / Chapter 1 - Introduction
P7-3500
User Guide
1.5 P7-3500 Features
1.5.1 Media Player
Connected to the TV or any other display with the corresponding video inputs, the P7-3500
can playback media files such as videos, music and photos directly from its hard drive,
attached USB drives or even from media cards.
1.5.2 USB Drive
With its USB 2.0 High Speed connection, the P7-3500 can be used as standard mass
storage class device. Easily store new media files on the P7-3500, transfer files between
different computers and platforms, expand your storage capacity or use it to backup your
data in case of data loss.
Page 4 / Chapter 1 - Introduction
P7-3500
User Guide
1.6 Quick Installation Guide
Following is a quick installation guide to get you up and running. In a few steps, we will
show you how to set up the hard drive, fill it with media files and hook it up to your TV
system for immediate playback.
1. Connect the USB cable to your computer and the rear USB connector on the P73500, then connect the power supply to the wall socket and turn on the power using
the power switch on the media player.
2. Create up to 3 partitions (we recommend one single primary partition) and format
the drive using the FAT32 or NTFS file system. On a Mac, FAT32 is known as MSDOS file system. Depending on your Operating System, you might need a 3rd party
application to format the drive.
3. Copy your media files to the hard drive. Create subfolders according to your
requirements or simply store all files in the root directory.
4. Use the safe removal process to eject the drive, turn off the power and then
disconnect the USB cable.
5. Connect the AV cables to your TV and turn on the power.
6. Use the remote control to access your files and start playback.
Note: If you do not see anything on your TV screen, make sure you have selected the
correct TV channel but if after one minute you still only see a black screen, press the
“OUTPUT” button on your P7-3500 remote control to toggle between the different video
outputs until you see the main screen. Once you have a signal, go to the setup menu,
select the correct TV Type and exit the setup menu to save the new settings.
Page 5 / Chapter 1 - Introduction
P7-3500
User Guide
2 System Setup
2.1 TV Connection
The P7-3500 provides a choice of three different video outputs plus stereo audio output
when connected to your TV set. From best to worst in regards to the video quality and
connection, the order is Component YPbPr, S-Video, Composite video.
1. Connect the P7-3500 to your TV set (NTSC or PAL) using the included AV cable.
2. Make sure the USB cable has been disconnected.
3. Plug in the power supply.
4. Turn it on by pressing the power button on the P7-3500 or the remote control.
5. Use the remote control to access the files on your TV screen.
Following are the available audio/video outputs for the P7-3500 media player:
1.
2.
3.
4.
YPbPr = Component YPbPr video
L&R = Analogue left/right audio
AV = Composite video
S-Video = S-Video
Page 6 / Chapter 2 - System Setup
P7-3500
User Guide
2.2 USB Connection
The P7-3500 operates as a standard USB 2.0 mass storage device when connected to a
computer via USB. Use the included cable to connect your device to the computer system.
Note: Always connect the USB cable to your computer first, before you turn on the device.
If you connect the USB cable when the device is still connected to the TV set and in
playback mode, the playback will be stopped and the screen will go black. Once you
disconnect the USB cable, the media player will start up again and you can access the
files on the TV screen.
1. Make sure playback is stopped and the power is turned off.
2. Connect the USB cable to your computer.
3. Plug in the power supply if not already connected
4. Turn on the power using the power switch on the P7-3500
5. Wait for the system to mount the drive.
6. It will automatically show up on your desktop (Mac) or under My Computer (PC) as
external hard disk in which you then can copy any file(s) you want (music, movies,
pictures, and/or data).
7. When finished, close all open folders or applications that are still accessing the hard
drive and use the safe removal process to eject the drive.
8. Turn off the power and disconnect the USB cable.
9. Done, the device is now ready to be re-connected to the TV set.
Tip: It is recommended to empty the “Recycle Bin” after your file(s) deletions to free the
HDD space.
Note: You will always need the external power adapter when connected to the computer.
The hard drive can not run on USB bus-power alone!
Page 7 / Chapter 2 - System Setup
P7-3500
User Guide
2.2.1 Formatting
The P7-3500 media player supports the FAT32 and NTFS file system with up to 3
partitions. If you format the drive using NTFS, certain functions such as ISO playback and
File Editing will not be available. For other file systems, the drive can only be accessed via
USB connection but your media player will not be able to display the files on the TV.
Windows
Use the disk management program or 3rd party software to format the drive.
•
•
•
•
Right click on “My Computer” and choose “Manage”.
Select “Disk Management”.
Choose your external drive and right click on it for further commands (new volume).
Follow the partition wizard to set up the drive and format it using FAT32 or NTFS.
Mac
Use the disk utility or 3rd party software to format the drive.
• Select “Disk Utility” in the utilities folder.
• Choose your external drive and format it using MS-DOS (FAT32).
Page 8 / Chapter 2 - System Setup
P7-3500
User Guide
2.2.2 Safe Removal
In order to safely remove the P7-3500 from your
system, please follow the same procedures as
for any external Plug & Play device.
Windows
Double click on the taskbar icon to “Unplug or
Eject hardware”. The adjacent dialogue box will
appear, displaying the external Plug & Play
devices. In the current example, you can see
the P7-3500 as a USB Mass Storage Device.
In order to remove it, select the device in the list
and then press Stop.
Click OK on the next dialogue box. The
operating system will automatically stop the
device and inform you for its safe removal. If
you are using the hard drive (e.g. you are
working on a Word document or a picture
located in its disk), the operating system will
notify you that it is unable to remove the device.
If that’s the case, close all the applications
affecting or accessing the hard drive and try
again.
Mac
Drag the drive icon into the trash
bin to eject and remove the drive.
Note: Always follow the safe removal process when disconnecting the device or it might
not be recognised on the TV.
Page 9 / Chapter 2 - System Setup
P7-3500
User Guide
3 TV Playback
3.1 The Remote Control
The P7-3500 remote control has all the functional capabilities to fully control your device
and enjoy your multimedia files. The next figure describes each button’s function.
Power On/Off
Mute
Home
Play/Enter
Navigation Keys
Vol+ (increase volume)
Info (file info)
Vol- (decrease volume)
Back (return to previous screen)
Output (changes video output)
Repeat
Setup
Subtitle
Transition Effects (photo slideshow)
Angle
Slideshow with Music
Pause
Audio/EQ
Zoom
Rotate
Reverse
Stop
Previous Track
Next Track
Fast Forward
3.2 Buttons on Media Player
The P7-3500 media player has five buttons on the front, allowing the user to access and
play the files without the remote control. To make use of all the functions this media player
offers, the remote control with a full set of keys is required.
UP, Vol+
LEFT, Previous Track
RIGHT, Next Track
Play/Enter, Pause
Stop/Return (press for 2 seconds)
DOWN, Vol-
Page 10 / Chapter 3 - TV Playback
P7-3500
User Guide
3.3 Key Functions
Button
Functionality
Browser Mode
Mute
Playback Mode
Turns mute On/Off
Turns mute On/Off
Home
Returns to main screen
Stops playback and returns to main screen or
returns to title menu of DVD (ISO or IFO only)
Power
Turns power On/Off
Turns power On/Off
Navigation Keys
efcd
To navigate left, right, up, down
Use c to bring up the context menu
Play/Enter
To select, confirm or start playback
Starts or resumes playback
Vol+
Increases volume
Increases volume
Vol-
Decreases volume
Decreases volume
Info
N/A
Displays file info
Back
Returns to previous screen
Stops playback and returns to previous screen
Setup
Opens setup menu
Opens setup menu
Output
Changes to different video output mode each time
the button is pressed
Changes to different video output mode each time
the button is pressed
Transition Effects
N/A
Changes between 14 different transition effects
each time the button is pressed (photo mode only)
Repeat
N/A
To select the repeat mode (VOD only)
Angle
N/A
Selects camera angle (VOD only)
Subtitle
N/A
To turn on or change in between subtitles
Audio/EQ
Turns equalizer On/Off (music mode only)
Changes audio tracks (videos only)
Slideshow with Music
Starts picture slideshow with background music
N/A
Zoom
N/A
Zoom (2x or 4x)
Pause
N/A
Pauses or resumes playback
Stop
N/A
Stops playback
Rotate
N/A
Rotates image 90 degrees clockwise each time
when the button is pressed
Previous Track
Previous page
Plays previous track, image or chapter
Reverse
N/A
Reverse for videos or music
Fast Forward
N/A
Fast Forward for videos or music
Next Track
Next page
Plays next track, image or chapter
Page 11 / Chapter 3 - TV Playback
P7-3500
User Guide
3.4 Menu Functions
This section explains the various menus and their functions when operating the P7-3500
media player.
3.4.1 Main Screen
This is the main page that appears
when you turn on the media player.
You have four different options to
browse and display your files on the
hard drive, plus a shortcut for the
setup menu and a selection to access
other devices such as USB drives or
media cards. You can access these
menus with the navigation buttons and
by pressing PLAY/ENTER.
•
•
•
•
•
•
Photo shows all images with a thumbnail preview.
Music lists all music files.
Video lists all video files.
File lists all available files and displays them as seen on your computer.
Setup opens setup menu.
Device allows you to choose between different devices.
Note: Please see the following paragraphs for a more detailed description of the individual
menus.
3.4.2 Device Selection
When additional devices such as USB
drives or media cards are connected,
the media player will offer a selection
for the user to choose the device.
This selection will automatically show
up when a new device has been
added but to change it, select Device
on the main page and press Enter to
access the selection menu.
Once a device has been selected, it
will return to the main screen and display a small icon on the top right corner, indicating
which kind of device has been selected. In the file library, the icon is replaced by text.
• Example of the hard disk icon (HDD)
• Example of a media card icon (MS)
• Example of an USB drive icon (USB)
Page 12 / Chapter 3 - TV Playback
P7-3500
User Guide
3.4.3 Photo Browser
When using the photo mode, it will list
all available photos and display them
showing a 3x4 thumbnail preview.
Use the arrow keys to navigate and
the Play/Enter key to start playback.
On top of the screen, the file name,
date and size of the selected image
are displayed. It also shows how many
images there are in total and on which
device they are stored. In this example,
the photos are stored on the internal
hard drive, so it shows HDD.
X
1.
2.
3.
4.
5.
Y
Z
[
\
File name of the selected image
File date of the selected image
File dimensions of the selected image
File number with total amount of images
Current device (e.g. HDD = hard drive)
At the bottom of the screen, the so called action buttons provide access to all the relevant
functions for this mode. When the first image on the page is highlighted, press the LEFT
arrow key to access those buttons and the Enter key to select the function. Press the UP
arrow key to go back to the file library.
X
1.
2.
3.
4.
5.
Y
Z
[
\
Next Page/File
Previous Page/File
Music & Photo slideshow (starts a picture slideshow with background music)
Repeat mode (toggles between two different modes, repeat all or play once)
Returns to previous menu
Repeat Modes
Plays all files once and then returns to the file library
Plays all files and repeats them forever until stopped
Page 13 / Chapter 3 - TV Playback
P7-3500
User Guide
3.4.4 Photo Playback
During playback, pressing the UP key
on the remote control will bring up the
context menu.
Select the functions with the left/right
arrow keys and confirm by pressing
the Enter key. The context menu will
automatically disappear after 5
seconds if no button is pressed.
When selecting the Zoom function,
further options to zoom and pan will
appear.
X
1.
2.
3.
4.
5.
6.
7.
X
Y
Z
[
\
]
^
Next file (jumps to next image)
Previous file (jumps to previous image)
Play/Pause (to pause and resume playback)
Rotate (rotates the image 90 degrees clockwise each time this button is pressed)
Zoom mode (turns on the zoom mode)
File info (toggles the file info on top of the screen On or Off)
Returns to previous menu
Y
Z
1. Zoom (press Enter to zoom in and out of the image)
2. Pan mode (press Enter to select and then use the arrow keys to pan)
3. Returns to previous menu
Instead of using the context menu, there are certain shortcut keys on the remote control
for easy access to the most common commands.
•
•
•
•
UP/DOWN (shows or hides the context menu)
LEFT/RIGHT (shows next or previous image)
Zoom (to zoom in and out of the image)
Rotate (rotates the images 90 degrees clockwise each time this button is pressed)
Note: For further options, see Preferences and Photo Setup in the setup menu.
Page 14 / Chapter 3 - TV Playback
P7-3500
User Guide
3.4.5 Music Browser
When using the music mode, it will list
all available songs in the file library.
Use the arrow keys to navigate and
the Play/Enter key to start playback.
On top of the screen, the file type,
repeat mode, equalizer setting and the
progress time are displayed. It also
shows how many songs there are in
total and on which device they are
stored. In this example, the songs are
stored on the internal hard drive, so it
shows HDD.
X
1.
2.
3.
4.
5.
6.
Y
Z
[
\
]
File type of the selected song
Current playback/repeat mode
Equalizer mode (shows EQ when On)
Shows elapsed time for the song currently playing
File number with total amount of songs
Current device (e.g. HDD = hard drive)
At the bottom of the screen, the so called action buttons provide access to all the relevant
functions for this mode. Press the LEFT arrow key to access those buttons and the Enter
key to select the function. Press the UP arrow key to go back to the file library.
X
1.
2.
3.
4.
5.
6.
Y
Z
[
\
]
Next Page/File
Previous Page/File
Music & Photo slideshow (starts a picture slideshow with background music)
Repeat mode (changes between four different modes)
Equalizer (turns equalizer mode On or Off)
Returns to previous menu
Repeat Modes
Plays all files once and then stops
Plays all files and repeats them forever until stopped
Plays and repeats the same track until stopped
Plays and repeats all files in random order until stopped
Page 15 / Chapter 3 - TV Playback
P7-3500
User Guide
3.4.6 Music Playback
To select the action buttons during
playback, press the LEFT arrow key
on the remote control.
When the equalizer has been turned
on, you can use the RIGHT arrow key
to select different presets.
The following presets are available:
• Standard
• Classic
• Jazz
• Rock
• Pops
• Ballad
• Dance
Instead of using the context menu, there are certain shortcut keys on the remote control
for easy access to the most common commands.
•
•
•
•
•
Vol+/Vol- (increases or decreases volume)
Mute (mutes audio sound)
Play/Pause (to pause and resume playback)
Audio/EQ (changes in between the different equalizer presets)
Slideshow with Music (starts image slideshow with background music)
Note: For further options, see Preferences in the setup menu.
Page 16 / Chapter 3 - TV Playback
P7-3500
User Guide
3.4.7 Video Browser
When using the video mode, it will list
all available movies in the file library.
Use the arrow keys to navigate and
the Play/Enter key to start playback.
On top of the screen, the file name,
date and type are displayed. It also
shows how many videos there are in
total and on which device they are
stored. In this example, the videos are
stored on the internal hard drive, so it
shows HDD.
X
1.
2.
3.
4.
5.
Y
Z
[
\
File name of the selected video
File date of the selected video
File type of the selected video
File number with total amount of videos
Current device (e.g. HDD = hard drive)
At the bottom of the screen, the so called action buttons provide access to all the relevant
functions for this mode. Press the LEFT arrow key to access those buttons and the Enter
key to select the function. Press the UP arrow key to go back to the file library.
X
1.
2.
3.
4.
5.
Y
Z
[
\
Next Page/File
Previous Page/File
Repeat mode (changes between three different modes)
Preview mode (toggles between the file library view and preview with thumbnails)
Returns to previous menu
Repeat Modes
Plays all files once and then stops
Plays all files and repeats them forever until stopped
Plays and repeats the same video until stopped
Note: To playback DVD movies, keep the original VIDEO_TS folder and its content with
the IFO and VOB files. Use the File Browser to access the VIDEO_TS folder, press the
LEFT arrow key to access the action buttons, then select the DVD playback button and the
DVD movie will start to play like a standard DVD, including menu and chapter selection.
Page 17 / Chapter 3 - TV Playback
P7-3500
User Guide
3.4.8 Video Playback
During playback, pressing the UP key
on the remote control will bring up the
context menu.
Select the functions with the left/right
arrow keys and confirm by pressing
the Enter key.
The context menu will automatically
disappear after 5 seconds if no button
is pressed.
X
1.
2.
3.
4.
5.
6.
7.
Y
Z
[
\
]
^
Next file (jumps to next video)
Previous file (jumps to previous video)
Play/Pause (to pause and resume playback)
Fast Forward
Reverse
File info (toggles the file info on top of the screen On or Off)
Returns to previous menu
Instead of using the context menu, there are certain shortcut keys on the remote control
for easy access to the most common commands.
•
•
•
•
•
•
•
UP/DOWN (shows or hides the context menu)
Play/Pause (to pause and resume playback)
FF/REV (fast forward or reverse)
NEXT/PREVIOUS (next or previous chapter/video)
Angle (selects camera angle, VOD only)
Subtitle (selects different subtitle or turns subtitle On/Off)
Audio/EQ (select different audio track)
Subtitles
For external subtitles, make sure to store them
in the same directory as the video and use the
same file name. In the setup menu, go to
Video Setup, turn on the subtitle function and
select the corresponding language.
Note: For further options, see Preferences and
Video Setup in the setup menu.
Page 18 / Chapter 3 - TV Playback
P7-3500
User Guide
3.4.9 File Browser
When using the file mode, it will list all
available files in the file library.
Use the arrow keys to navigate and
the Play/Enter key to start playback.
On top of the screen, the directory, file
type and the device are displayed. It
also shows how many files there are in
the current folder and on which device
they are stored. In this example, the
files are stored on the internal hard
drive, so it shows HDD.
X
1.
2.
3.
4.
Y
Z
[
Current directory
File type of the selected file
File number with total amount of files in the current folder
Current device (e.g. HDD = hard drive)
At the bottom of the screen, the so called action buttons provide access to all the relevant
functions for this mode. Press the LEFT arrow key to access those buttons and the Enter
key to select the function. Press the UP arrow key to go back to the file library.
X
1.
2.
3.
4.
5.
Y
Z
[
\
Next Page/File
Previous Page/File
Preview mode (toggles between the standard library and preview mode)
DVD playback (requires Video_TS folder and IFO/VOB files)
Returns to previous menu
Selecting DEVICE in the root directory
will bring up the device selection. Use
this to quickly change between
different devices and then return to the
file library again.
Note: For further options, see
Preferences in the setup menu.
Page 19 / Chapter 3 - TV Playback
P7-3500
User Guide
3.4.10 DVD Playback
To play DVD movies, store the IFO and VOB files in the original VIDEO_TS folder, access
the folder and then press the DVD action button to start playback.
1. Make sure the IFO and VOB files are stored in the VIDEO_TS folder.
2. Use the file browser and access the VIDEO_TS folder.
3. Press the LEFT arrow key to access the action buttons.
4. Select the DVD button and press the Play/Enter key to start playback
Note: Do not change the VIDEO_TS folder name or DVD playback will not work.
Tip: Press the Home button during playback to return to the DVD title menu.
Page 20 / Chapter 3 - TV Playback
P7-3500
User Guide
3.4.11 File Editing
It is possible to copy and delete files
directly on the TV screen when the
drive is formatted using the FAT32 file
system.
To do so, go to the setup menu and
turn on file editing under preferences.
Once enabled, three additional action
buttons will be available but only in the
file mode.
The new functions include setting a
destination, copying and deleting files.
X
Y
Z
1. Destination (use this to set the destination before copying files)
2. Copy File (starts to copy the selected file to the destination)
3. Delete File (erases the selected file)
To delete a file, simply highlight the image, song or
video that you would like to remove and then select
Delete from the action buttons. A popup message will
ask you to confirm by selecting Yes or No.
To copy files, set a destination first and then select the file to copy:
1. Select the destination where you want to copy the file to, as an example a subfolder
or the root directory.
2. Go to the action buttons, select Destination and press the Enter key to set the new
destination.
Page 21 / Chapter 3 - TV Playback
P7-3500
User Guide
3. Initially, the on-screen message will show “Copy to <empty>” but at this step, it
should now show your selected destination instead of just empty.
As an example: “Copy to <ROOT>”.
4. Select the file you want to copy.
5. Go back to the action buttons, select Copy and press the Enter key to copy the file.
When done, it will show Copy Done.
Note: The file editing function and the 3 additional action buttons are not available, when
the hard drive is formatted using the NTFS file system.
Page 22 / Chapter 3 - TV Playback
P7-3500
User Guide
3.5 Setup Menu
The P7-3500 setup menu is extremely
important in order to correctly configure your
device and benefit from its advanced features.
Use the arrow keys to navigate and the Enter
key to select and confirm.
In the following paragraphs, there are
detailed descriptions of the various settings
and parameters.
For your reference, the current firmware
version is displayed at the bottom of the
setup menu.
Note: After changing any of the settings, always return to the main page and then
select Exit Setup to save the new settings and exit the setup menu.
3.5.1 Photo Setup
The settings found in the photo setup section will affect the playback and display of images
and how the photos are presented in the photo mode.
Thumbnail Digest
• On (slower but shows high quality preview
using original image dimensions)
• Best Fit (thumbnail size will be identical,
regardless of the original image dimension)
• Off (faster but shows low quality preview
using original image dimensions)
Photo Display Size
• Best Fit (shrinks the image slightly to
assure the full image is visible)
• Default (stretches the image to fit to the
screen)
Page 23 / Chapter 3 - TV Playback
P7-3500
User Guide
Slideshow Mode
• Manual (displays selected image and waits
for user input, images can be seen at a
slower pace and selected using the
left/right arrow keys)
• Auto (displays the selected image and
then automatically continues playback
showing all other images)
Interval Time
Select one of the presets for the display time
of images in the slideshow mode.
As an example, if you select 3 Seconds, the
image will be displayed for 3 seconds and
then it will show the next.
The available presets are 1, 3, 5 and 10
seconds.
Transition
Select one of the presets for the transition
effects to be used for image slideshows.
Choose Random if you prefer a different
transition effect every time the image
changes.
The 14 presets include following:
•
•
•
•
•
•
•
•
•
Full Screen
Top to Bottom or Bottom to Top
Top/Bottom to Center or Center to Top/Bottom
Blind: Top to Bottom or Left to Right
Left to Right or Right to Left
Left/Right to Center or Center to Left/Right
Implode
Cross Fade
Random
Page 24 / Chapter 3 - TV Playback
P7-3500
User Guide
3.5.2 Video Setup
The settings found in the video setup section will affect the playback and display of videos
and the general video output of the media player.
TV Type
• 480i/NTSC (S-Video or Composite
connection on NTSC)
• 576i/PAL (S-Video or Composite
connection on PAL)
• 480p/NTSC (Component YPbPr on NTSC)
• 576p/PAL (Component YPbPr on PAL)
• 720p (Component YPbPr)
Video Full Screen
• Wide 16:9 (select this if you are using a
16:9 wide screen TV display)
• Normal 4:3 (select this if you are using a
standard 4:3 TV display)
Subtitles
• On (enables the external text subtitles, if
they are stored in the same location with
the same file name as the video)
• Off (disables the external text subtitles)
Page 25 / Chapter 3 - TV Playback
P7-3500
User Guide
Subtitle Languages
Select the language in which your subtitles
are encoded in.
The available languages are:
• English
• Traditional Chinese
3.5.3 Preferences
The settings found in the Preferences section include all the remaining options for the P73500 media player.
OSD Language
Select your preferred menu language.
The available languages are:
• English
• Traditional Chinese
Information Row
• On (turns on the file info which is displayed
at the top of the screen during playback)
• Off (disables the file info)
Note: The file info can also be turned on or
off by using the context menu during
playback.
Page 26 / Chapter 3 - TV Playback
P7-3500
User Guide
Help Row
• On (turns on hints that are displayed at the
bottom of the screen in the browser mode)
• Off (disables the on-screen hints)
File Editing
• On (when turned on, three additional action
buttons will be available in the file mode,
allowing files to be copied or deleted)
• Off (file editing is disabled)
Note: This only works in the file mode and for
FAT32 formatted drives!
File Sorting
• A to Z (sorts the files according to the file
name starting from A)
• Z to A (sorts the files according to the file
name starting from Z)
• Recent Date (sorts the files according to
the file date starting with the most recent)
• Oldest Date (sorts the files according to
the file date starting with the oldest)
Page 27 / Chapter 3 - TV Playback
P7-3500
User Guide
Auto Start
• Off (default, auto start is disabled)
• Photo & Music (automatically starts a
photo slideshow with background music
when the media player is turned on)
• Photo & Video (automatically starts to
playback all images and video clips when
the media player is turned on)
Note: If an external device is connected, it
will wait for user input at the device selection
screen and does not start to playback automatically.
Setup Values
Select Default and press the Enter key to
reset all settings back to the original factory
setup.
This is recommended after a firmware
upgrade or if some of the functions do not
behave as expected.
Page 28 / Chapter 3 - TV Playback
P7-3500
User Guide
4 Appendix
4.1 Specifications
Supported Audio Files Formats
WAV, MP3, MPEG-4 (AAC), OGG
Supported Audio Outputs Formats
Dual stereo analogue audio
Supported Video Files Formats
MPEG-1, MPEG-2 (AVI, VOB, IFO, ISO), MPEG-4 (AVI, XviD)
Supported Subtitles
SRT (SubRIP format)
Supported Video Output Formats
NTSC/PAL composite and S-video, analogue YPbPr video
(progressive or interlaced) scalable up to 1280x720p
Supported Languages
English, Traditional Chinese
• Composite RCA, left audio RCA, right audio RCA
• S-Video Mini DIN
• Component YPbPr video 3 RCA, left audio RCA, right audio
RCA
Output Ports
USB 2.0 High Speed
USB 2.0 Full Speed for mass storage class devices using FAT12,
FAT16 or FAT32
Input Ports
SD/MMC/MS/MS Pro card reader
Storage Capacity
Single 3.5” SATA hard drive
File Systems Supported
FAT32 and NTFS (up to 3 partitions)
Power Input
AC: 100-240V, 1.2A, 50-60Hz
DC: +12V/2A
Dimensions
17.5cm x 17.5cm x 5.2cm
Operating Temperature/Humidity
0 C to 40 C / 10% to 90% non condensing
Storage Temperature/Humidity
5 C to 30 C / 10% to 90% non condensing
Page 29 / Chapter 4 - Appendix
P7-3500
User Guide
4.2 Safety Information
Before using your P7-3500, please carefully read the following paragraphs relating to the
safety issues on your device in order to extend its life.
Power on/off precautions
The P7-3500 remote control provides the power ON/OFF button that controls the power
status of your device when connected to the TV. It is highly recommended to switch the
unit off when not in use.
To re-locate the P7-3500 media player and connect it to the computer and when not in use
for a longer period of time, we strongly recommend removing the power supply from the
wall socket.
Location and placing precautions
Set the media player up in a horizontal position and DO NOT place any other objects on
top of it. Do not place the unit on an amplifier or other equipment that can become hot.
Avoid positioning your media player in the following places:
• Locations with direct sunlight, next to radiators, other sources of heat, or in vehicles that
are parked directly in the sun with the windows and doors closed.
• Locations with very high temperature (more than 38° C) or humidity (more than 90%).
• Very dusty or sandy locations.
• Locations subject to vibration, shock, or with a sloping base.
Electricity and power plug
Careful attention must be paid to the following points in order to avoid operational faults
with the equipment and to prevent electric shock, fire, and/or injury:
• When removing the power cable from the socket, always pull on the plug and never on
the cable.
• Do not connect and remove the power cable with wet hands.
• Keep the power cable away from heaters.
• Never try to repair the power cable yourself or to modify it in any way.
• Clean dust, dirt, and etc. from the power plug at regular intervals.
• If the unit is dropped or becomes damaged in any other way, unplug the power cable.
• If the unit should emit smoke, unusual smell, or noise, switch it off and unplug the power
cable. In such cases, please contact your dealer.
• If the unit is not used for extended periods of time, then the power plug should be
removed from the socket.
Cables
Use only the cables supplied or recommended by your vendor in order to avoid the risk of
malfunction, electric shock, and/or possible interference to the device.
Page 30 / Chapter 4 - Appendix
P7-3500
User Guide
4.3 FAQ
Q: Empty file library!
A: When the device is not formatted using the FAT32 file system, the media player will not
be able to access the files and the file library stays empty. Please backup your files, format
the drive using FAT32 and then try again.
Q: Scrambled file names □□□□
A: The encoding or characters are not supported. Please use the English alphabet only
and pay attention not to use any special characters in the file name.
Q: Blue Screen
A: Please confirm that your device is plugged into the correct input on your TV set. Make
sure you have selected the above input to display on the TV set and that the media player
is turned on. If this does not solve the problem, use the OUTPUT key on your media
player’s remote control to go through the different video output formats until an image
appears on the TV set.
Keep in mind that it takes about 20 seconds for the P7-3500 media player to show up on
your TV set after the power has been turned on.
Q: No subtitles
A: For external subtitles, make sure to store them in the same directory as the video and
use the same file name. In the setup menu, go to Video Setup, turn on the subtitle function
and select the corresponding language. Only SRT subtitles are supported.
Q: Playback of HD (High Definition) files
A: This device does only support playback of MPEG-4 video files up to 720p.
Q: How to get the best video quality?
A: From best to worst in regards to the video quality and connection, the order is as
follows:
• Component YPbPr
• S-Video
• Composite
The video quality will also depend on your content, whereas MPEG-2 and 4 will be
superior to MPEG-1.
Q: Why can I not create a partition larger than 32GB?
A: If a drive on Windows 2000/XP/Vista is formatted using FAT32, the partition is limited to
a size of 32GB. To work around this limitation, install a 3rd party software program to format
the drive or use a different Operating System to prepare the drive.
Q: Why does DVD playback with IFO and VOB files not work?
A: The IFO and VOB files have to be stored in the original VIDEO_TS folder, so make sure
the folder name has not been changed. Access the VIDEO_TS folder using the file
browser, access the action buttons and then press the DVD button to start playback.
Page 31 / Chapter 4 - Appendix
P7-3500
User Guide
4.4 Technical Questions
For RMA and other questions, please contact your vendor or check out their online support
area! Make sure to include as many details as possible including firmware version when
explaining the problem to your vendor.
Before you contact your vendor, read through the FAQ on the previous page and make
sure you are using the latest firmware.
4.5 About Data Backup
To protect your files and help prevent the loss of your data, we strongly recommend that
you keep two copies of your data, one copy on your P7-3500 and a second copy either on
your internal drive or another storage media such as a CD, DVD, Tape or an additional
external drive.
Any loss or corruption of data while using the P7-3500 is the sole responsibility of the user,
and under no circumstances will the manufacturer be held liable for compensation or the
recovery of this data.
4.6 About this Manual
This manual was written using the model P7-3500 and the firmware version
20080515_MPT_35_00. Images and descriptions may slightly vary between this manual
and the actual product you have.
© Copyright 2008 by Macpower & Tytech Technology Co., Ltd. all Rights Reserved
The information contained in this manual is believed to be accurate and reliable. Macpower & Tytech
Technology assumes no responsibility for any errors contained in this manual and reserves the right to make
changes in the specifications and/or design of this product without prior notice. The diagrams contained in
this manual may also not fully represent the product that you are using and are there for illustration purposes
only. Macpower & Tytech Technology assumes no responsibility for any differences between the product
mentioned in this manual and the product you may have.
Page 32 / Chapter 4 - Appendix