1
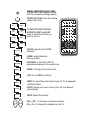
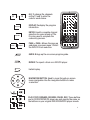
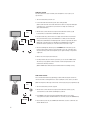
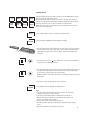
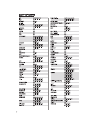
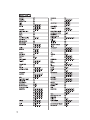
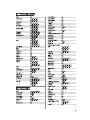
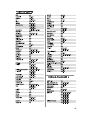
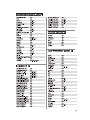
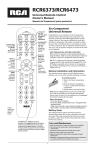
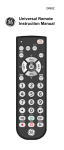
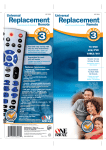
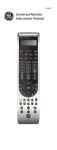
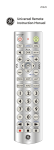
Jumbo
Touch Panel Remote
O P E R AT I O N M A N U A L
INTRODUCTION
The Jumbo Touch Panel Remote Control can operate up to five types of devices: TVs, VCRs,
DVD players, Cable/Satellite set-top boxes, DVRs and CD players.
See the diagram on Page 2 to familiarize yourself with the features of this remote control.
You may need to review the operating manuals of your original remotes to refresh yourself
on the functions of those units.
BATTERY INSTALLATION
1. Remove the cover from the battery compartment, which is located on the back of the unit.
2. Insert four “AAA” size alkaline batteries (not included) according to the diagram inside the
battery compartment and replace the battery compartment cover.
3. Press the ON/OFF
button, the LED should illuminate; if it doesn’t, replace the batteries
and try again.
Requires 4 “AAA” batteries (not included).
BATTERY WARNING:
• Do not mix alkaline, standard (carbon-zinc) and rechargeable batteries (Nickel Metal Hydride).
• Do not mix old and new batteries.
• Non-rechargeable batteries are not to be recharged.
• Rechargeable batteries are only to be charged under adult supervision (if removable).
• Exhausted batteries should be removed immediately and must be recycled or disposed of properly
according to state or local government ordinances and regulations.
• The supply terminals are not to be short-circuited.
• Only batteries of the same or equivalent type as recommended are to be used.
• Batteries are to be inserted with the correct polarity (see diagram).
• Do not dispose batteries in a fire, batteries may leak or explode.
SIGNAL INDICATOR LIGHT (LED):
The Indicator Light flashes to show
that the remote is working properly.
ON/OFF BUTTON:To turn the remote
control ON or OFF.
TV
TV
DVD
VCR
DVR
SAT
CBL
AUDIO
CD
AUX1
AUX2
MENU
QUIT
INPUT
SLEEP
1
2
3
4
5
6
TV/VCR
7
8
9
PAGE +
LEARN
DISPLAY
0
ENTER
PAGE -
SAT
CBL
AUDIO
CD
VCR
DVR
AUX1
AUX2
TV, DVD, VCR, DVR, SAT/CBL,
AUDIO/CD, AUX1 and AUX2:
used to select the device you
want to control.
+
VOL
VOL
-
GUIDE
TV/VCR
MUTE
+
CH
CH
-
REPEAT
OK
TV/VCR: Operates the TV/VCR
functions.
LEARN: Jumbo Remote’s
learning feature.
LEARN
M-POWER
2
M-POWER
DVD
M-POWER: To turn ON or OFF all
programmed devices at the same time.
MENU
MENU: To bring up the main menu.
QUIT
QUIT: To exit MENU functions.
INPUT
INPUT: To select the video input of your TV if it is equipped
with this feature.
SLEEP
SLEEP: Allows you to set a time to turn off your devices
automatically.
MUTE
MUTE: Mutes the volume.
+
VOL
+
CH
VOL
-
CH
-
VOL+, VOL-: To increase or decrease volume.
CH+, CH-: To change the channels on the TV.
...
0
9
DISPLAY
ENTER
PAGE -
PAGE +
0-9: To change the channels
on the TV and to enter the
code for each device.
DISPLAY: To display the program
information.
ENTER: Used to complete channel
selection for some brands of TVs.
It is also used to complete the
code entry process.
TV
DVD
VCR
DVR
SAT
CBL
AUDIO
CD
AUX1
AUX2
MENU
QUIT
INPUT
SLEEP
1
2
3
4
5
6
TV/VCR
7
8
9
PAGE +
LEARN
DISPLAY
0
ENTER
PAGE -
+
VOL
VOL
-
GUIDE
M-POWER
MUTE
+
CH
CH
-
REPEAT
OK
PAGE+, PAGE-: Moves the page up
and down on screen menu. Control
the DVD/CD track selection.
GUIDE: Brings up the on-screen program guide.
GUIDE
REPEAT
REPEAT: To repeat a track on a DVD/CD player.
Instant replay.
OK
NAVIGATION BUTTON: Used to move through on-screen
menu and guides. Use the navigation buttons to make
a selection.
PLAY, STOP, FORWARD, REVERSE, PAUSE, REC: These buttons
are for DVD/VCR/DVR/CD player use and operate the same as
the buttons on your original DVD/VCR/DVR/CD player remote.
3
CODE INPUT SETTING:
You will need the list of codes to manually select and input the correct codes to your
specific device.
1. Turn on the device that you want to set.
2. Look for the brand name under the specific device listing provided.
(Note: You will notice that some brands will have more than one 3-digit code. During the
code input process, you may have to try more than one 3-digit code to match your
device brand and model.)
3. Aim the remote control at the device and press and hold the device button (e.g.TV)
for at least three seconds until the red LED lights up solid red.
TV
0
...
9
4. Using the number keys, enter the first set of 3-digit codes from the list. You will notice
that each number that you press, the LED will blink once. After you have entered the
3rd digit, the red LED will turn off indicating that the code was recognized by the device.
(NOTE: If the code entered was not compatible, the red LED will flash several times.
You will then need to repeat Step 3 to 5. You have 30 seconds to enter a code).
5. After the red LED light has turned off, press the POWER button. If the device you are
trying to program powers off, then you have found the correct code. If the device does
not power off, then you will need to repeat the process again from Step 3 using another
3-digit code.
6. Make a note of the 3-digit code for future use.
7. If all the provided codes do not work for your device, you can use the “LEARN” feature.
This allows you to program the remote one button at a time using the buttons on the
remotes that come with your devices.
(NOTE: “LEARN” feature will be discussed in further detail in the following sections).
CODE SEARCH SETTING:
This is an alternative method to programming your device without using the code list. The
remote control will scroll through the list of codes to identify the correct code for your device.
(NOTE: This may take a little longer as the remote control is trying every pre-programmed code).
TV
1. Turn on the device that you want to program.
2. Aim the remote control at the device and press and hold the device button (e.g. TV)
for at least three seconds until the red LED lights up solid red.
3. Press POWER on the remote slowly and repeatedly until the device you are trying
to program shuts off. (Note: The LED will blink once each time you press the POWER button)
ENTER
4
4. Once the device powers off, press ENTER button within three seconds to confirm the code
and the LED will turn off.
LEARNING FEATURE:
TV
DVD
VCR
DVR
SAT
CBL
AUDIO
CD
AUX1
AUX2
AUX1
LEARN
1” to 2”
Fig.2
If the pre-programmed codes do not work for your device, use the LEARN feature to program
the functions using the original remote control.
We recommend using “AUX1” and “AUX2” for this feature as these two device buttons are
reserved to accommodate this feature without changing the existing device buttons that have
been set up. This remote control can be used to learn up to 57 functional keys.
(NOTE: Some specific remote control signals may not work with this feature, such as those
that do not use an infrared signal.)
1. Press the device button for which you would like to program functions.
2. Press and hold the LEARN button until the LED flashes repeatedly.
3. Place the original remote control head-to-head to the Jumbo remote control on a flat surface.
The detector/signal emitter of the original remote control should be aiming at the detector/
signal emitter of the jumbo remote control. The distance between them should be about
1 to 2 inches.
4. Press the button (e.g.“Stop”or “ ”) on the Jumbo remote control to which you would like to
assign a function. The LED will turn solid red.
5. Press and hold the button for the function that you would like the jumbo remote to learn from
the original remote until LED flashes for more than five times. This indicates the learning
process has been completed and you can release the button.
(NOTE: If the LED turns solid red after flashing 5 times, it indicates the learning process failed.
Repeat step 4).
6. If you want to continue programming other keys, repeat step 4.
LEARN
7. Press LEARN to exit the learning mode. The LED will turn off.
NOTE:
a. If you do not press any button within 30 seconds, the remote control will exit the
learning mode and go back to regular operation.
b. If you want to program different buttons for different devices, repeat step 1.
c. Within the same device, learned function is automatically replaced when a new
function is programmed on the same button.
d. Do not move the remote controls during learning process.
e. Avoid direct sunlight or strong fluorescent light. This could interfere with the learning
process.
f. Make sure fresh batteries are used in both remote controls.
5
ERASING LEARNED FUNCTION
Erasing function of a single button.
AUX1
LEARN
1. Press the device button (e.g. AUX1).
2. Press and hold the LEARN button until the LED flashes.
3. Press the device button again until the LED turns solid red.
AUX1
4. Press the programmed button, the LED will turn off for 0.5 seconds and turn back on again.
This indicates the function of this button has been erased.
5. Repeat step 4 to continue erasing other buttons.
LEARN
6. Press the LEARN button to exit.
ERASING ALL LEARNED FUNCTIONS ON A SINGLE BUTTON
AUX1
1. Press the device button (e.g. AUX1).
2. Press and hold the LEARN button until the LED flashes.
LEARN
3. Press the device button until the LED turns solid red.
AUX1
4. Press the device button (e.g. AUX1) again to erase all learned functions. The LED will
turn off for 0.5 seconds and turn back on again. This indicates the function of this
AUX1
device has been erased.
LEARN
5. Press LEARN to exit.
ERASING ALL LEARNED FUNCTIONS ON ALL BUTTONS.
AUX1
1. Press the device button (e.g. AUX1).
2. Press and hold LEARN the LED flashes.
LEARN
3. Press the device button (e.g. AUX1) until the LED turns solid red.
AUX1
LEARN
4. Press and hold LEARN for three seconds to erase all learned functions for all
devices.
5. The LED will flash twice and turn off.
6
LEARN
6. Press LEARN to exit.
SETTING UP M-POWER
M-POWER feature allows user to turn ON or OFF all programmed devices
with the press of one button!
M-POWER
MUTE
DVD
TV
1. Press and hold M-POWER and MUTE simultaneously for 3 seconds.
Release the buttons when LED turns solid red.
VCR
2. Press the device button that you want to bundle one at a time (ex. TV, DVD,
VCR, etc.). The LED will flash once each time you press the device button.
3. Press M-POWER to save the setting. The LED will turn off and go back to
normal operation mode. Setting has been completed.
M-POWER
M-POWER
4. Press M-POWER to turn on or off all devices at the same time.
Note: If the devices are in different conditions, ON device will be turned
off and OFF device will be turned on. The user can still use the regular POWER
button to turn on/off each individual device.
5. Erasing the M-POWER setting is similar to setting it up. Repeat step 1 but
only press one device button. PRESS M-POWER to save it. M-POWER will
only respond to one device as regular power button.
Note: Always refer to device’s owner’s manual. Some devices should stay ON all
the time.
ADDITIONAL INFORMATION SPECIFICATIONS
Operating distance: Approximately 25 feet
Battery: 4 x AAA batteries
PRECAUTIONS
- This is not a toy. Be sure to place this unit away from small children or pets.
- This unit is intended for indoor and household use in controlling the functions
of selected electronic devices.
- Do not drop or apply excessive mechanical shock to this unit. It may damage
the unit or cause malfunction.
- Do not place unit under direct sunlight or strong light source as it may
interfere with the normal operation.
- Do not immerse or expose to water or other liquid as it may damage the unit.
- Do not place the unit near heat sources.
TROUBLESHOOTING
Touch panel of the unit does not light up.
Replace the batteries.
The unit does not control the device, but the
red LED indicator blinks when you press a
button.
Make sure a correct device code is entered during setup.
Try all listed codes until you find a code that works properly
for your device.
Aim the remote control at your device. It should not be blocked
by other objects or be more than 25 feet from the device.
The unit does not control the device and the red
LED indicator does not blink when you press a
button.
Make sure the batteries are installed properly or replace them.
LEARN feature does not work.
Repeat the setup instructions for the LEARN feature. Make sure
both remote controls are placed head-to-head on a flat surface
within 1-2 inch distance.
M-POWER feature does not work.
The devices need to be set up before using this feature.
Repeat the setup instructions for M-Power feature.
7