1
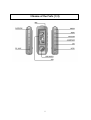
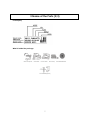
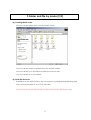
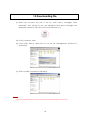
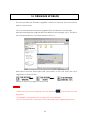
GROOVOX WAVE
English
Users Manual
Milestone International Japan Co., Ltd.
1
Contents
1.Warnings and Cautions ・・・・・・・・・・・・・・・・・・・・・・・・・・・・・・・・・・・・・・・・・・・・・・・・・・・・・・・・・・・・・ 3
2.Main Function and Features ・・・・・・・・・・・・・・・・・・・・・・・・・・・・・・・・・・・・・・・・・・・・・・・・・・・・・・・ 4
3.Name of the Parts ・・・・・・・・・・・・・・・・・・・・・・・・・・・・・・・・・・・・・・・・・・・・・・・・・・・・・・・・・・・・・・・・・・・・ 5
4.Basic Operation Guide・・・・・・・・・・・・・・・・・・・・・・・・・・・・・・・・・・・・・・・・・・・・・・・・・・・・・・・・・・・・・・ 8
5.Charging battery ・・・・・・・・・・・・・・・・・・・・・・・・・・・・・・・・・・・・・・・・・・・・・・・・・・・・・・・・・・・・・・・・・・・・11
6.Installing and uninstalling driver ・・・・・・・・・・・・・・・・・・・・・・・・・・・・・・・・・・・・・・・・・・・・・・・・・・12
7.Listening to FM radio ・・・・・・・・・・・・・・・・・・・・・・・・・・・・・・・・・・・・・・・・・・・・・・・・・・・・・・・・・・・・・・・・14
8.Recording by mode ・・・・・・・・・・・・・・・・・・・・・・・・・・・・・・・・・・・・・・・・・・・・・・・・・・・・・・・・・・・・・・・・15
9.Folder and file by mode ・・・・・・・・・・・・・・・・・・・・・・・・・・・・・・・・・・・・・・・・・・・・・・・・・・・・・・・・・・・16
10.Downloading file ・・・・・・・・・・・・・・・・・・・・・・・・・・・・・・・・・・・・・・・・・・・・・・・・・・・・・・・・・・・・・・・・・・・18
11.Deleting file ・・・・・・・・・・・・・・・・・・・・・・・・・・・・・・・・・・・・・・・・・・・・・・・・・・・・・・・・・・・・・・・・・・・・・・・・・19
12.Mode and main menu ・・・・・・・・・・・・・・・・・・・・・・・・・・・・・・・・・・・・・・・・・・・・・・・・・・・・・・・・・・・20
13.Connecting to external device ・・・・・・・・・・・・・・・・・・・・・・・・・・・・・・・・・・・・・・・・・・・・・・・・・24
14.Firmware upgrade ・・・・・・・・・・・・・・・・・・・・・・・・・・・・・・・・・・・・・・・・・・・・・・・・・・・・・・・・・・・・・・・・・25
15.Specifications・・・・・・・・・・・・・・・・・・・・・・・・・・・・・・・・・・・・・・・・・・・・・・・・・・・・・・・・・・・・・・・・・・・・・・・26
2
1. Warnings and Cautions
Warning!
1. Please avoid heat or the built-in battery may explode.
2. If overheated during recharging, disconnect the recharging cable immediately.
3. Do not apply excessive force on LCD. You may get hunt by LCD glass.
4. Do not use earphone while riding a bicycle, car or motorcycle.
Caution!
1. Do not drop the unit on the ground or give impact on the unit.
2. Do not put the unit in a hip pocket. The LCD glass may be damaged when you
seat on chair.
3. When dusting off, use a soft cloth only and do not use water or liquid detergent
(thinner or benzene).
4. Do not press the leys with hard material nor use excessive force. The key may be
broken.
5. The files in the memory may be changed or lost if the unit is misused by you or
any other person, when electrostatically or electrically damaged, or during
repairing or changing battery.
GROOVOX WAVE is not responsible for any change or loss of memory.
Be careful not to have memory changed or lost.
3
2.Main Functions and Features
• GROOVOX WAVE is a highly efficient portable digital audio player. The unit plays
MP3 and WMA (64Kbps or higher) digital music files in various modes, and can
record voice or files from other external devices.
• Stylish and luxurious miniaturized design and 180° rotating USB plug
• Built in Lithium – Ion battery (500mAh) enables recharging via PC or adapter.
• Direct encorded recoding
• Variable bit rate setting
• Speed control
• Auto recharging when connected with PC
• 7 backlight colors (Red, Green, Blue, Yellow, Magenta, Cyan and White)
• Multi language supported graphic LCD display
• Easy to connected USB interface
• 3D sound supporting SRS
• Book-Mark play
• FM Band selection
4
3.Name of the Parts (1/3)
5
3.Name of the Parts (2/3)
USB Terminal
→ Open the lid.
The USB plug rotates 180 degree.
Note
1. Plug in/out the USB plug straight.
2. Do not apply excessive force when the unit is connected with PC. The plug may
be damaged.
6
3.Name of the Parts (3/3)
LCD Display
What is inside the package
Stereo Earphone
USB Cable
Line in Cable
Neck Strap
AC ADAPTER(Option)
7
Win 98SE USB Driver
4.Basic Operation Guide (1/3)
1. Power ON/OFF
Press and hold the PLAY/PAUSE button for over a second to turn on the
power. Press and hold the PLAY/PAUSE button again to turn off the
power.
Note
If power is not on when you first use the unit, you should charge the battery.(Refer to
the battery charging guide in Page 8.)
2. Play
Press the PLAY button after turn on the power.
3. Hold switch
If the Hold switch is on the left (ON), no button is enabled.
Released
HOLD
4. Volume control
You can control volume with VOLUME + and Volume - .
Press and hold the button to volume up or down continuously.
Volume can be adjusted between Steps 0~30.
5. Changing mode
Press the MENU button to display the MODE menu. Select the desired mode with the
REW/FF button, and then, press PLAY/PAUSE button.
6. Listening to radio
Press the MENU button to display the MODE menu.
Select FM MODE with the REW/FF button, and then, press the PLAY/PAUSE button.
8
4.Basic Operation Guide (2/3)
7. Main menu
Press and hold the MENU button to display the main menu. Select the desired menu
with the REW/FF button, and then, press the PLAY/PAUSE button.
8. Intro play
Press and hold the PLAY/PAUSE button longer than a second during the play. As the
“INTRO” icon is displayed on LCD, the unit plays intro for all tracks from the current
track.
INTRO time setting: MENU button (LONG KEY) SYSTEM INTRO TIME (5, 10, 15 SECONDS)
9. Repeat
If you press the A-B button during the play, the start point A is selected and the
repeat icon (A- ) blinks on LCD. If you press the A-B button again, the end point B is
selected.
10. Play speed control
Press and hold the A-B button during the play to change speed(NORMAL, FAST1,
FAST2, SLOW).
11. Recording
Press the REC/STOP button at any mode.
12. BOOK-MARK play
If you press the SRS key when stop playing a music file in MUSIC mode, the track is
selected as the bookmark.
9
4.Basic Operation Guide (3/3)
13. RESUME ( The function is to resume the data which is off from the Pause status. )
The unit remembers the play data of the current track, and recovers the data when
power is switched off/on. (Set up RESUME ON at System menu.)
Note
If you want to use the unit while it is being recharged through PC, run “Remove
Hardware” on the PC First. If you use the unit as a portable disk, disconnect and
reconnect the USB cable.
<<RESET>>
If the unit stops operation or if you find any trouble during operation, press and hold
the RESET button for 1 second or longer.
10
5.Charging battery
The unit has a built-in Lithium- Ion battery.
1. Charging battery with the USB cable
(1) Switch on the PC, and connect the unit with the USB cable.
(2) As the unit is connected to PC,
blinks to give notice that the unit is being
charged.
2.
Charging battery with the adapter
(1) Connect the adapter to the unit.
(2) If you connect the adapter to the receptacle,
the unit is being charged if the unit power is on, or
off the power.
When charging is completed
blinks to give notice that
is displayed if you turn
is displayed.
*It takes 140 minutes to charge the battery. When fully charged, the unit plays MP3
files for about 12 hours at medium volume.
11
6. Installing and uninstalling driver (1/2)
The USB Mass Storage function enables the unit to be used as a hard driver.
The unit supports PLUG and PLAY for Windows ME, 2000 and XP without additional
software program (You need to install the driver for Windows 98SE.)
*If you clock [My Computer] on your PC, the unit is recognized as a portable disk in
[My Computer].
Note
If Windows 98SE is in your PC, please install the driver from the CD inside the
package. (Refer to CD Manual Book for installing method.)
Removing the unit from the USB port
(1) Close the files.
(2) Click the icon (
) on the bottom right of the screen. Following toolbar is
displayed.
12
6. Installing and uninstalling driver (2/2)
(3) If you click the toolbar, following message window is displayed. Follow the steps
on the window.
(4) If the following toolbar is displayed, disconnect the unit from the PC.
Note
If you fail to follow the above instructions, an error may occur in the Windows and
the program.
13
7. Listening to FM radio
・ Select FM RADIO on the MODE menu.
・ You can easily catch the FM radio channel with the AUTO SEEK function. If you
press and hold FF/REW KEY for a second or longer, the unit automatically seeks the
available channel. You should fine tune with the FF/REW KEY if the signal is weak.
・ Saving channnel
If you press the SRS button after selecting a channel, “CHANNEL” blinks in PRESET.
Select a channel number (1~20) with the REW/FF button, and then, press the SRS
button.
・ Selecting the stored channel
If you press and hold the SRS button, “CHANNEL” blinks in PRESET. Select the channel
(1~20) with the REW/FF button.
・ Recording
While listening to FM radio, press the REC button to record from the radio.
The recorded file is stored with the file name F001 on the RADIO ENC folder. INDEX is
made in the order of recording date/time.
Note
Noise may occur if you make recording inside a building or in a place where the
signal is weak. You can acquire quality sound if you move to the place with strong
signal.
The earphone line works as an antenna. Extend the earphone if possible.
14
8. Recording by mode
You can record files in 3 modes. Select a mode and press down the REC button
longer than a second.
(1) LINE IN Recording
Connect the audio cable to the line in jack. (LINE IN ENC FILE)
(2) Built-in MIC Recording
If you press the REC button without the LINE IN cable connected, the unit
records voice with the built-in MIC. (VOICE)
(3) Radio Recording
If you press the REC button while listening to radio, the unit records the radio.
(RADIO ENC)
Note
If you insert the LINE IN cable during VOICE REC, recording is stopped and the
unit switches to the LINE IN mode.
If the LINE IN cable is connected, the unit cannot switch to the FM mode. If the
cable is disconnected during LINE IN REC, REC is stopped.
15
9.Folder and file by mode (1/2)
(1) When connected with PC
LINE, RADIO and VOICE folder are displayed. The files are automatically sorted
out and stored in the concerned folder.
LINE – Files recorded through LINE IN
L001, L002, L003, ... 256
RADIO - – Files recorded from the radio
F001, F002, F003, ... 256
VOICE – Voice files
V001, V002, V003, ... 256
++Each folder can have up to 256 files. If the folder is full, a message “INDEX
FULL” is displayed.
16
9.Folder and file by mode (2/2)
(2) Creating MUSIC folder
You can create folders with “Create Folder” menu.
You can create folders in additional to the default folders.
You can create up to 999 files but within the memory size.
You can create up to 512 folders.
(3) Hard disk functions
In addition to the MP3 function, the unit supports reading/writing/deleting data
when connected with PC as if it is a hard disk.
You cannot check the data in this unit. Be careful when deleting a folder.
17
10.Downloading file
(1) When you connect the unit to the PC, wait until a, messages “New
Hardware” and “Ready to Use” are displayed. (The above messages are
displayed when the unit is first connected with the PC.)
(2) In My Computer, click.
(3) Copy music files or data from PC to the file management windows to
download.
(4) A file or folder is created as following.
Note
You can create folder to sort out the downloaded files as in the PC.
18
11.Deleting file
(1) Deleting on the PC
Select the file you wish to delete, and click the right mouse button.
In the toolbar, select “Yes”.
You can delete files from LINE, RADIO and VOICE FOLDER in the same
procedure.
(2) Deleting file on SET
Press and hold the MENU button, select
Select a mode in
.
, and select the file (or folder) you with to delete.
Note
General document file is not displayed on SET. You should connect the unit to
the PC to view the document file.
19
12. Mode and main menu (1/4)
(1) Mode menu
If you press the MENU button, the mode menu is displayed. The mode menu
consists of the following play related menus.
1. BOOK-MARK PLAY
You can designate the desired music files only.
(You can select up to 20 music files.)
2. FORDER PLAY
The unit shows the folders in FORDER PLAY.
3. MUSIC PLAY
The unit plays mp3 and wma files in MUSIC PLAY.
4. VOICE PLAY
The unit plays mp3 files in VOICE.
(The file name starts with V001.mp3.)
5. LINE IN ENC PLAY
The unit plays mp3 files in VOICE.
(The file name starts with V001.mp3.)
6. RADIO ENC PLAY
The unit plays mp3 files in VOICE.
(The file name starts with V001.mp3.)
7. FM RADIO
You can listen to the radio.
20
12. Mode and main menu (2/4)
(2)Main menu
If you press and hold the ‘MENU’ button, the following main menus are
displayed. You can select a menu with REW/FF, and activate the menu by
pressing the PLAY/PAUSE button.
1.
SYSTEM
PLAYBACK
NORMAL, REPEAT ONE, REPEAT ALL, SHUFFLE
POWER OFF TIME
1min, 3min, 5min, ALWAYS ON
SLEEP TIME
OFF, 15min, 30min, 45min, 60min, 75min, 90min, 105min, 120min
INTRO TIME
5sec, 10sec, 15sec,
ENCODE
A. SYNC
AUTO SYNC, ONE SYNC, SYNC OFF
B. BIT RATE VOICE BITRATE, MP3 BITRATE
VOICE BITRATE: LQ, HQ
MP3 BITRATE: 48Kbps 64Kbps 96Kbps 128Kbps 160Kbps 192Kbps
NOTE
The function may be disabled when playing too low sound source (Classical music).
RESUME
ON, OFF
FM BAND
WORLD, JAPAN, EUROPE
DEFAULT
YES, NO
EXIT
21
12. Mode and main menu (3/4)
2. SOUND
EQUALIZER
NORMAL, CLASSIC, POP, ROCK, JAZZ, LIVE
USER EQ
You can adjust the equalizer by frequency from –12dB to +12dB in 3dB step.
SRS USER SETTING
SRS LEVEL, TruBass LEVEL, FOCUS LEVEL
A.
SRS LEVEL: 1~10
B.
Tru Bass: 1~10
C.
FOCUS LEVEL: Low High
BEEP
ON OFF
DEFAULT VOLUME
20~29, OFF
EXIT
3. DISPLAY
FONT
KOREAN, ENGLISH, JAPANESE, CHINESE, EUROPE
BACKLIGHT COLOR
RED, GREEN, BLUE, YELLOW, MEGENTA, CYAN, WHITE, RANDOM, INTRO
ID3 Tag
ON, OFF
SCROLL SPEED
0~10
BACKLIGHT TIME
OFF, 1~9, Always on
LCD CONTRAST
0~10
EXIT
Exit from the current menu and move to the upper menu.
22
12. Mode and main menu (4/4)
4. SRS
SRS provides 3D sound effect; NORMAL, WOW EFFECT, SRS EFFECT, TrueBass
EFFECT, EXIT
is the registered trademark of SRS Labs, Inc.)
(
WOW reinforces stereo effect, and TrueBass reinforces bass
5. DELETE
DELETE ONE
DELETE FOLDER
FORMAT
EXIT
6.
EXIT
23
13. Connecting external device
1. Recording from external device
Connect the audio cable to LINE IN of this unit.
Volume down of the external device, and connect the audio cable to the
external device.
2. Recording from this unit to external device
Start recording at the external device at the same time as you start playing in
this unit.
Note
When connecting cable to an external device, switch off power on both devices.
This unit has no power for external MIC. Therefore you cannot record voice with the
external MIC connected to LINE IN.
24
14. FIRMWARE UPGRADE
This unit provides the Firmware Upgrade function to improve the unit functions
and to correct errors.
You can download the firmware upgrade file from Milestone homepage.
After downloading the upgrade file from Milestone homepage, copy the file to
the connected device, and download to the root.
After above process, disconnect USB, and switch on the unit. Then the unit is
upgraded as shown below.
Switch on the power again to use the unit.
Note
* Make sure to perform upgrade then the battery
has at least one cell
displayed.
* If upgrade is completed, the unit gets OFF automatically.
* Do not start the unit or disconnect the USB cable while upgrading firmware.
25
15. Specifications
Model
MMGV05
File type
MP3, WMA,
Signal to noise ratio
85dB
Frequency response
20Hz~20KHz
VOICE BITRATE
LP, HQ
MP3 BITRATE
48Kbps, 64Kbps, 96Kbps, 128Kbps, 160Kbps, 192Kbps
Earphone output
Max. 5mW(16ORM)
Play mode
EQ : NORMAL, ROCK, POP, CLASSIC, LIVE, JAZZ, SRS
BACK LIGHT LED
7 COLORS
Memory
NAND FLASH MEMORY(256MB, 512MB, 1GB)
AUDIO IN JACK
3.5mm STEREO JACK
FM radio
Frequency range
(Stereo)
PC Interface
WORLD
87.5~108.0MHz
JAPAN
76.0~108.0MHz
EUROPE
87.5~108.0MHz
Earphone output
5mW+5mW : 16ORM , Max. Volume
Signal to noise ratio
55dB at 1mV
Rx method
Earphone Code Antenna
Communication
USB1.1(USB Mass Strage)
Minimum system
CPU 200MHz, RAM 64MB, 20MB of free hard disk space
requirements
OS
Windows 98SE / 2000 / ME / XP
Sound card
Sound Blaster 16 or compatible model
Display
Resolution 640X480 or higher
Earphone
3.5 earphone (mini plug/stereo) IMP less than 16ORM
USB JACK
BUILT IN USB A TYPE PLUG
Environment
5°C~35°C
Battery
MP3 play
When fully charged, the unit plays MP3 files for about 12 hours
at medium volume
Recharging time
USB port
About 140 min
AC ADAPTOR (OPTION)
26