1
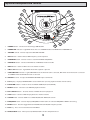
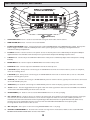
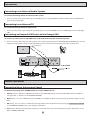
PORTABLE 5" B/W TV WITH KARAOKE PLAYER & AM/FM TUNER
INSTRUCTION MANUAL
SAFETY INSTRUCTIONS
stoves, or other appliances (including amplifiers) that
produce heat.
CAUTION
RISK OF SHOCK
CAUTION: To reduce the risk of electric
shock, do not remove cover (or back).
No user-serviceable parts inside. Only
refer servicing to qualified service
personnel.
10
Power Sources - The appliance should be connected to a
power supply only of the type described in the
operating instructions or as marked on the appliance.
11
Grounding or Polarization - Precautions should be taken
so that the grounding or polarization means of an
appliance is not defeated.
12
Power-Cord Protection - Power-supply cords should be
routed so that they are not likely to be walked on or
pinched by items placed upon or against them, paying
particular attention to cords at plugs, convenience
receptacles, and the point where they exit from the
appliance.
13
Cleaning - Unplug this unit from the wall outlet before
cleaning. Do not use liquid cleaners or aerosol cleaners.
Use a damp cloth for cleaning.
14
Power lines - An outdoor antenna should be located
away from power lines.
Explanation of Graphical Symbols
The lightning flash & arrowhead symbol,
within an equilateral triangle, is intended
to alert you to the presence of danger.
The exclamation point within an
equilateral triangle is intended to alert
you to the presence of important
operating and servicing instructions.
WARNING
To reduce the risk of fire or electric shock, do
not expose this unit to rain or moisture.
1
Read Instructions - All the safety and operating
instructions should be read before the appliance is
operated.
15
Nonuse Periods - The power cord of the appliance
should be unplugged from the outlet when left unused
for a long period of time.
2
Retain Instructions - The safety and operating
instructions should be retained for future reference.
16
3
Heed Warnings - All warnings on the appliance and
in the operating instructions should be adhered to.
Object and Liquid Entry - Care should be taken so that
objects do not fall and liquids are not spilled into the
enclosure through openings.
17
Damage Requiring Service - The appliance should be
serviced by qualified service personnel when:
4
Follow Instructions - All operating and use
instructions should be followed.
5
Attachments - Do not use attachments not
recommended by the product manufacturer as
they may cause hazards.
6
Water and Moisture - Do not use this unit near
water. For example, near a bathtub or in a wet
basement and the like.
7
Carts and Stands - The appliance should be used
only with a cart or stand that is recommended by
the manufacturer.
A. The power supply cord or plug has been damaged; or
B. Objects have fallen into the appliance; or
C. The appliance has been exposed to rain; or
D. The appliance does not appear to operate normally or
exhibits a marked change in performance; or
E. The appliance has been dropped, or the enclosure
damaged.
18
7A An appliance and cart combination
should be moved with care.
Quick stops, excessive force,
and uneven surfaces
may cause an overturn.
8
Ventilation - The appliance should be situated so
its location does not interfere with its proper
ventilation. For example, the appliance should not
be situated on a bed, sofa, rug, or similar surface
that may block the ventilation slots.
9
Heat - The appliance should be situated away from
heat sources such as radiators, heat registers,
Servicing - The user should not attempt to service the
appliance beyond that described in the operating
instructions. All other servicing should be referred to
qualified service personnel.
Note to CATV system installer's (U.S.A.):
This reminder is provided to call the CATV system installer's
attention to Article 820-40 of the NEC that provides
guidelines for proper grounding and, in particular, specifies
that the cable ground shall be connected as close to the
point of cable entry as practical.
1
WELCOME….
And thank you for purchasing the Orange-300 from VocoStar! All of our
products are designed to provide years of high-quality karaoke entertainment
to individuals and families across the world. Inherited with over a decade of
experience crafting professional karaoke equipment from our parent company
VocoPro, VocoStar products sound like no other in its class. We support all of our
products with quality customer service and technical support professionals,
who are ready to assist you with your needs. Also, don't forget to visit us online
at www.vocostar.com and www.vocopro.com. We look forward to bringing
out the rising star in you, because with VocoStar, you are always a star!
VocoStar
1728 Curtiss Court
La Verne, CA 91750
Ph: 909-593-8893
(Or if outside the U.S., call us toll-free at 888-VOCOSTAR)
Fax: 909-593-8890
Email Directory
Customer Service [email protected]
Technical Support
[email protected]
Sales Department
[email protected]
Webmaster
[email protected]
FOR YOUR RECORDS
Please record the model number and serial number below, for easy reference, in case of loss or theft. These numbers are
located on the rear panel of the unit. Space is also provided for other relevant information.
Model Number
Serial Number
Date of Purchase
Place of Purchase
2
Listening For A Lifetime
Selecting fine audio equipment such as the unit you've just purchased is only the start of your musical enjoyment. Now it's
time to consider how you can maximize the fun and excitement your equipment offers. VocoStar and the Electronic
Industries Association's Consumer Electronics Group want you to get the most out of your equipment by playing it at a safe
level. One that lets the sound come through loud and clear without annoying blaring or distortion and, most importantly,
without affecting your sensitive hearing.
Sound can be deceiving. Over time your hearing "comfort level" adapts to a higher volume of sound. So what sounds
"normal" can actually be loud and harmful to your hearing. Guard against this by setting your equipment at a safe level
BEFORE your hearing adapts.
To establish a safe level:
Start your volume control at a low setting.
Slowly increase the sound until you can hear it comfortably and clearly, and without distortion.
Once you have established a comfortable sound level:
Set the dial and leave it there.
Pay attention to the different levels in various recordings.
Taking a minute to do this now will help to prevent hearing damage or loss in the future. After all, we want you listening for
a lifetime.
Used wisely, your new sound equipment will provide a lifetime of fun and enjoyment. Since hearing damage from loud
noise is often undetectable until it is too late, this manufacturer and the Electronic Industries Association's Consumer
Electronics Group recommend you avoid prolonged exposure to excessive noise. This list of sound levels is included for
your protection.
Some common decibel ranges:
Level
30
40
50
60
70
80
Example
Quiet library, Soft whispers
Living room, Refrigerator, Bedroom away from traffic
Light traffic, Normal Conversation
Air Conditioner at 20 ft., Sewing machine
Vacuum cleaner, Hair dryer, Noisy Restaurant
Average city traffic, Garbage disposals, Alarm clock at 2 ft.
The following noises can be dangerous under constant exposure:
Level
90
100
120
140
180
Example
Subway, Motorcycle, Truck traffic, Lawn Mower
Garbage truck, Chainsaw, Pneumatics drill
Rock band concert in front of speakers
Gunshot blast, Jet plane
Rocket launching pad
-Information courtesy of the Deafness Research Foundation
3
Contents
Safety Instructions………………………..……………………………….………………………..1
Welcome……………….....…………………………….….………………………………………..2
Listening for a Lifetime.……………………………….…………………………………………....3
Features.……………………………………………………………………………………………4
Before Getting Started…..……………………………………………. ………………………..….5
Top Panel Description and Functions………………………………………………………….......7
Rear Panel Description and Functions.……………………………...………………………….......8
Remote Control Descriptions and Functions……………………………………………………...9
Connections………………………………………………………………………………………..11
Operation…………...………………………………….………….…... …………………………...11
Troubleshooting……………………………………………………….. ………………………….22
Specifications..……………………………………….……………….. …………………………...23
Features
Built-in 5" B/W TV with 4-Way Power Design So You Can Truly Take Your Party Anywhere!
Multi-Format Disc Player Supports CD+G, VCD, MP3, Audio-CD, Photo-CD and CD-R formatted disc media.
Integrated Tuner for AM/FM Stereo and VHF/UHF TV Signal Reception
15-Step Digital Key Control with Digital Echo Control for Great Sounding Karaoke Experiences
Innovative Battery Compartment Circuitry Design Allows You to Recharge Batteries Without Removing Them from the
Unit (Rechargeable Batteries Not Included)
Full-function Remote Control Places All System Features Right at Your Fingertips
Vocal Cancel and Vocal Partner MPX Audio Modes for Removing Guide Vocals from Multiplexed Media
Bass Boost Control for Extra Low-End Performance
VCD 1.0-2.0 Compatible with PBC (version 2.0 only) & Intro, Zoom, Slow and Step Playback Modes
Automated 'Score' Feature Provides a Fun and Easy Way to Gauge Your Vocal Performances
Two 1 / 4" Microphone Inputs with Individual Volume Controls
Headphones Jack for Private Listening and Practicing
RCA-style I/O's for Audio and Video System Expandability to External Devices
NTSC/PAL Switchable for Worldwide Video Compatibility
4
Before Getting Started
Unpacking
Before you start using the Orange-300, please make sure that you have all of the box contents located and ready. It is also
recommended to keep the original packaging material in the case that re-shipping is necessary. You should have received
the following accessories with your new Orange-300:
STOP
Orange-300 Unit (1)
Microphone (1)
1 / 4" Microphone Cable (1)
Remote Control (1)
AAA Batteries (2)
AC Power Adapter (1)
DC Car Adapter (1)
RCA Patch Cable (1)
75-ohm to 1 / 8" External TV Antenna Adapter (1)
PROG
MUTE
N/P
OSD
HO
EC (
-)
RNDM
E
ZOOM
)
MIC 1
PBC
CHO (+
MONITOR
OFF ON
EFFECTS
TIME
R/L
SCORE
MIC 2
AUDIO
VIDEO OUT
MIC 1
MIC 2
L
DC/BATT IN
DC 15V
V-HOLD
BRIGHTNESS CONTRAST
TV
AV
CHARGER
HEADPHONES
TV EXT.
ANT. IN
R
OUT
IN
VIDEO IN
AC Power Operation
1.
Before plugging into an AC wall outlet, please ensure that the power adapter being used is compatible
with the power specifications used in your area. Using power adapters with the wrong power
specification may damage this unit.
2.
Before powering on and operating this unit, ensure that the CHARGE/AC BATT IN toggle is set to the AC
BATT IN position. While this toggle setting does not pose a threat to the unit when a power adapter or
rechargeable batteries are being used, if standard alkaline batteries are in use and this toggle is
incorrectly set to CHARGE, the batteries may leak acid and possibly explode.
Notes:
The only time that this toggle should be set to the CHARGE position is when you are going to be recharging rechargeable
batteries seated in the battery compartment.
This unit is not disconnected from the mains unless the mains lead is unplugged from the power outlet.
CAUTION:
WHEN INSTALLING BATTERIES
To prevent battery electrolyte leakage, which may result in injury and damage to the unit or other objects, observe the
following precautions:
1.
2.
3.
4.
All batteries must be installed with the proper polarity (see diagram in the compartment lid of the unit).
Do don't mix new batteries with old batteries.
Only use batteries of the same type and brand.
Remove the batteries when they are not to be used for a long period of time.
5
Battery Power and Recharging Operations
To INSTALL standard alkaline batteries:
1.
Open the BATTERY COMPARTMENT LID by moderately pushing down in an outward angle on the OPEN/CLOSE release
tab
2.
Refer to the polarity diagram inside the battery compartment of the unit to view the (+) and (-) polarity markings
3.
Install 10 "D" size alkaline batteries (not supplied) according to the polarity diagram
4.
Replace the BATTERY COMPARTMENT LID
Open
Close
To RECHARGE Ni-Cd/Ni-MH batteries:
1. Connect the supplied POWER ADAPTER to the unit's DC input, and connect adapter to a compatible AC POWER
SOURCE.
2.
Set the CHARGE/AC BATT IN toggle to CHARGE.
3.
Charge for approximately 12 HOURS when the batteries are depleted.
NOTES:
It is important not to severely over-charge rechargeable batteries, as their ability to fully recharge and retain the
charge may be compromised. To avoid this, switch the CHARGE/AC BATT IN TOGGLE back to NORMAL or unplug the
POWER ADAPTER from the POWER SOURCE.
Never try to recharge standard alkaline batteries as they can leak acid and possibly explode.
Only recharge Ni-MH and Ni-Cd batteries.
It is recommended to only use the supplied power adapter for recharging operations, and to always avoid using a
power adapter that is not correctly matched for this unit and your power supply.
6
Top Panel Descriptions and Controls
1
20
2
19
3
18
4
17
FS ST./FM/AM
VL/VH/UHF
POWER
16
M HZ
KH Z
OP
EN
/C
LO
SE
5
108
1 71 0
ON
FM ST.
106
6
83
1 4 00
FM
AM
15
45
RADIO
7
35
4
25
3
2
14
REMOTE
SENSOR
14
VL
VH
UH
F
FUNCTION
88
53
0
DISC
F
A MM
FM
STEREO
92
60
0
TUNER
TV
VOLUME
9
96
BASS
BOOST
5
70 0
55
11
65
1 00
8 00
7
12
1 04
1 00
0
13
PORTABLE 5" B/W TV WITH KARAOKE PLAYER & AM/FM TUNER
78
STANDBY
7
STOP
5.5
PROGRAM
PREVIOUS
PLAY/PAUSE
REPEAT
NEXT
DISC
8
TV
13
RADIO
FUNCTION
12
9
11
10
1.
POWER button - Used to turn the Orange-300 ON/OFF
2.
POWER LED indicator - Light RED when unit is in STANDBY mode and GREEN when POWERED on
3.
VOLUME control - Used to adjust the MASTER VOLUME
4.
BASS button - Used to boost LOW frequency audio response
5.
PROGRAM button - Used to create a custom PLAYBACK SEQUENCE
6.
PREVIOUS button - Used to SKIP BACK to a PREVIOUS media track/file
7.
NEXT button - Used to SKIP to the next media track/file
8.
FM ST. LED indicator - Lights RED when FM reception is present
9.
FUNCTION LED indicator - Lights ORANGE when the DISC function is selected, RED when the TV function is selected
and GREEN when the RADIO function is selected
10. SENSOR receiver - Accepts the REMOTE CONTROL input commands
11. LCD display - Displays OPERATIONAL status information (track #, playback modes and functions)
12. FUNCTION buttons - Used to select the INPUT SOURCE (DISC/TV/RADIO)
13. REPEAT button - Used to access REPEAT playback modes
14. PLAY/PAUSE button - Used to initiate or PAUSE CD/CD+G playback
15. STOP button - Used to STOP the playback of a media track/file
16. TUNING knob - Used to TUNE in to a AM/FM/UHF/VHF RADIO/TV station
17. FREQUENCY band - Used to display FREQUENCY information on selected FREQUENCY BANDS for tuning
18. BAND button - Used to toggle between AM/FM/FM-ST/VHF/UHF frequency bands
19. DISC tray - Discs are inserted here for PLAYBACK
20. OPEN/CLOSE recess - When pressed, OPEN/CLOSE's the CD compartment lid
7
Rear Panel Descriptions and Controls
1
15
2
14
3
13
4
MONITOR
OFF ON
5
MIC 1
MIC 2
¥ MAX
DC/BATT IN
DC 15V
AUDIO
VIDEO OUT
MIC 1
12
MIC 2
L
¥ MAX
V-HOLD
BRIGHTNESS CONTRAST
TV
AV
CHARGER
HEADPHONES
TV EXT.
ANT. IN
11
R
6
OUT
IN
VIDEO IN
10
7
8
9
16
(On Bottom)
1.
TELESCOPIC ROD antenna - Used to receive broadcast signals from radio and TV stations
2.
MONITOR ON/OFF switch - Turns the TV screen ON/OFF
3.
DC/BATT IN-CHARGER toggle - Switches between standard POWER INPUT and CHARGER modes. NOTE: The only time
that this toggle should be set to the CHARGE position is when you are going to be recharging rechargeable batteries
seated in the battery compartment
4.
DC INPUT terminal - Used to connect a DC power cord to an AC/DC power source. NOTE: Only the DC power adapters
supplied with this unit should be connected to prevent system failure and possible damage to power source
5.
V-HOLD knob - Used to adjust the VERTICAL HOLD of the video picture. NOTE: Only adjust if the video picture is rolling
vertically
6.
BRIGHTNESS knob - Used to adjust the BRIGHTNESS level of the video picture
7.
CONTRAST knob - Used to adjust the CONTRAST level of the video picture
8.
L/R AUDIO output - RCA jacks for connecting to an AUDIO INPUT channel of an external device, such as an amplifier,
mixer or recording device
9.
L/R AUDIO input - RCA jacks for connecting to an AUDIO OUTPUT channel of an external device, such as a VCR, DVD
player or console game system
10. VIDEO IN jack - Used for connecting to a VIDEO OUTPUT jack of an external device, typically the same device connected
to the L/R AUDIO input jacks
11. VIDEO OUT jack - Used for connecting to a VIDEO INPUT jack of an external display, typically a telivision or moitor.
12. TV/AV selector - Used to toggle between TV signal video and video signals from either the DISC PLAYER or A/V DEVICE
connected to the VIDEO INPUT jack when A/V is selected
13. HEADPHONES jack - Used to connect stereo HEADPHONES with an 1/8" mini-jack plug
14. EXT. TV ANT. IN jack - Used to connect an external TV antenna for TV reception instead of using the built-in telescopic
rod antenna. Use the included 75-ohm to 1/8" TV antenna adapter to make the connection. NOTE: If you have an
external TV antenna connected to the TV EXT. IN jack and get video bleed from the TV signal and VocoStar spalsh screen,
you have to reset the FUNCTION selector to TV. Select TV on the FUNCTION SELECTOR for a TV reception signal,
ensuring that the TV/AV selector is also set to TV
15. MIC 1&2 jacks - These jacks are for connecting MICROPHONES with 1 / 4" plugs
16. BATTERY COMPARTMENT lid - Used to house and/or recharge 10 "D" size batteries NOTE: See the section 'BATTERY
POWER AND RECHARGE OPERATIONS' for more information.
8
Remote Control Descriptions and Functions
DIGITAL KEY CONTROL/EQ buttons - These buttons are
used to adjust the natural key of disc audio so that singers
can raise or lower the musical key to a comfortable range for
their vocal range. The 'b' button is used to lower the key a 1/2
step each time it is pressed. The '#' button is used to increase
the key a 1/2 step each time it is pressed. The middle key
is a dual-function key, used to 1) reset the musical key back
to its original key and 2) enter the EQ mode for setting a
custom EQ setting.
3.
4.
5.
STOP button - Used to STOP the playback of a media
track/file
NUMBER PAD buttons - Used to enter NUMERIC values for
tracks, menu options and settings. For double-digit numbers,
use the +10 and another number. For example, for 42, press
+10 four times and then press 2.
PBC button - This button enables PBC (playback control) for
VCD 2.0 and video playback settings. If PBC is not enabled,
you will not be able to access screen menus, do track
searches and advanced video options.
29
STOP
28
2
TIME
PBC
PROG
MUTE
STEP
GOTO
RETURN
REPT
FREEZE
T.REM
INTRO
VIEW
SLOW
3
4
5
RNDM
VOL+
7
26
25
E
-)
6
27
N/P
OSD
HO
EC (
2.
33
1
ZOOM
)
POWER button - Used to turn the Orange-300 ON/OFF
CHO (+
1.
R/L
24
SCORE
23
VOL-
8
22
9
21
10
30
20
32
31
19
11
18
12
6.
PROGRAM button - Used to create a custom PLAYBACK SEQUENCE
7.
MUTE button - Used to MUTE audio playback
8.
FREEZE button - Pauses the VIDEO playback without affecting the VIDEO signal.
9.
REPEAT button - Used to enter REPEAT TRACK or REPEAT ALL playback modes
13
14
15
16
17
10. LANGUAGE button - Used to select an AUDIO language from a media title (if available)
11. SLOW button - Used to enter a SLOW playback mode for VCD viewing. Each time it is pressed, the playback will
become slower until it reverts back to standard playback mode
12. INTRO button - Used to enter an INTRO playback mode where only the first 10 seconds of each track is played for
reviewing
13. N/P button - Used to toggle between NTSC and PAL video mode settings. Select NTSC for North American-based video
environments and PAL for European-based video environments
14. ECHO INCREASE/MIC ON button - This dual function button 1) moves the SELECT bar LEFT when navigating menus
windows and 2) increases the ECHO effect when microphones are enabled and in use
15. L/R AUDIO button - This button is used to select between L/L, R/R and L/R audio playback modes. This is used to
remove guide vocals from MULTIPLEXED karaoke media
16. FAST REVERSE button - Used to FAST REVERSE through a media track/file/scene
17. PAUSE button - Use to temporarily PAUSE playback. Press again to return to playback
18. FAST FORWARD button - Used to FAST FORWARD through a media track/file/scene
19. PLAY button - Use to initiate PLAYBACK of a DISC in the CD tray
9
20. NEXT button - Used to SKIP to the next media track/file/scene
21. PREVIOUS button - Used to SKIP to the previous media track/file/scene
22. SURROUND button - Used to enhance audio with DSP audio enhancement
23. VOL +/- buttons - Used to INCREASE/DECREASE the VOLUME of all OUTPUT
24. SCORE button - Used to have the Orange-300 score your vocal performance for practice and accuracy assessment
25. ECHO DECREASE/MIC OFF button - This dual function button 1) moves the SELECT bar RIGHT when navigating menus
and windows and 2) decreases the ECHO effect when microphones are enabled and in use
26. RANDOM button - Used to enter RANDOM playback mode. Press again to disable
27. OSD button - Used to ENABLE/DISABLE the ON-SCREEN DISPLAY
28. VIEW button - Used to toggle between VIEW ANGLES of media playback when available
29. REMAIN button - Selects TIME REMAINING mode for the OSD's track/disc time
30. GOTO button - Used to go directly to a user-set play point or track for playback
31. STEP button - Used to enter STEP playback mode where the playback speed is one frame at a time
32. RETURN button - Used to RETURN to either the VCD menu screen or PLAYBACK if in progress
33. TIME button - Used to display and toggle between TIME ELAPSED and TIME REMAINING for either TRACK or DISC mode
Remote Control Battery Replacement
1.
Remove the BATTERY COMPARTMENT LID by using
gently pushing out with a downward motion.
2.
Remove BATTERIES and replace with new batteries
of the same type (AAA) ensuring correct polarity.
3.
Close BATTERY COMPARTMENT LID by sliding it
back in until a "click" is heard.
Open
Close
10
Connections
Connecting to an External Audio System
To connect the Orange-300 to an external audio system:
1. Connect an RCA-style audio cable from the AUDIO IN jacks on your EXTERNAL AUDIO SYSTEM to the L/R AUDIO OUT
jacks on the Orange-300
Connecting to an External TV
To connect the Orange-300 to an external TV:
2. Connect an RCA-style video cable from the VIDEO IN jack on your EXTERNAL TV to the VIDEO OUT jack on the Orange300
Connecting an External A/V Device to the Orange-300
To connect an external device (DVD/MD/Camcorder/VCR/Game Console) to the Orange-300:
3. Connect an RCA-style A/V patch cable (yellow, red and white plugs) from the L/R AUDIO OUT/VIDEO OUT jacks on your
VCR/Camcorder/Game Console to the AUX INPUT jacks located on the front bottom panel of the VSCTV-3513
to video in
TV
2
ORANGE-300
AUDIO
VIDEO OUT
L
TV
AV
TV EXT.
ANT. IN
R
OUT
IN
VIDEO IN
OR
3
1
DVD PLAYER
audio out
audio out
AMPLIFIER
General Operations
Controlling Music Volume and Sound
To ADJUST the Orange-300's SOUND OUTPUT, use up to FOUR features:
1. Volume control - Adjust the VOLUME control for overall VOLUME level by turning the VOLUME knob on the UNIT or
using the VOL +/- buttons on the REMOTE CONTROL
2. BASS button - For extra LOW-END response ENABLE or DISABLE the BASS feature by pressing the BASS button on the
UNIT.
3. EQ setting - You can create a custom EQ setting for detailed sound adjustment by pressing the MIDDLE DKC BUTTON
on the REMOTE CONTROL twice, and setting the EQ sliders
4. SRS control - Widen the audio output signal for a simulated enhanced stereo field by pressing the SRS button on the
UNIT or REMOTE CONTROL
11
Regarding Disc Compatibility and Handling
Supported Disc Formats
(VCD Logo)
Video CDs
(8 cm disc/12 cm disc)
(CD Logo)
Audio CD's
(8 cm disc/12 cm disc)
(CD+G Logo)
Karaoke CD's
(8 cm disc/12 cm disc)
(MP3 Logo)
MP3 Audio CD's
(8 cm disc/12 cm disc)
(Photo-CD Logo)
Photo-CD's
(8 cm disc/12 cm disc)
(SVCD Logo)
Super Audio CD's
(8 cm disc/12 cm disc)
(HDCD Logo)
High Density CD's
(8 cm disc/12 cm disc)
Disc Care and Handling Tips
Both 3" and 5" discs can be played with this unit
Place only one disc at a time in the CD tray
Only discs bearing the logos below should be played in this unit
Always insert a CD with the label facing up
Fingerprints and dust should be carefully removed from a disc surface prior to playing it
Always return discs back to their cases after playback
Do not expose a disc to direct sunlight, high heat or humidity
Do not apply paper or write anything on the surface of the disc
Do not use cleaners or anti-static sprays on discs
CD+G formatted discs only support MPEG1 and a sampling frequency of 32KHz to 44.1KHz
12
Disc Player Operations
Disc Function LCD Display Indicators
1.
TRACK number - CD/CD+G track number is indicated
2.
PLAY indicator - Lights when playback is initiated
3.
REPEAT indicator - Displays the REPEAT TRACK symbol when REPEAT TRACK mode is initiated and displays the
REPEAT ALL symbol when REPEAT ALL mode is initiated
NOTE: When no disc is loaded, "00" is displayed
Loading a Disc, Pausing and Stopping Playback
To INITIATE the DISC PLAYER for playback:
1.
Lift CD tray open, insert the DISC label-side up and close the CD tray
2.
For AUDIO CD and CD+G type discs, playback will start automatically. For MP3, Photo-CD and VCD discs, a
main menu may display for manual selection depending on the PBC setting
3.
Press the PLAY/PAUSE button during playback. Playback will temporarily stop, and the PAUSE indicator will display blinking
4.
Press the PLAY/PAUSE button again to resume play. Pause indicator will go off
5.
Press STOP to cease playback
Track Skip/Search
To SKIP and SEARCH DISC tracks, files or scenes:
1.
Press and release the
beginning of a track
or
SKIP buttons repeatedly during play to quickly locate the
2.
The CD/CD+G track number display will show the number of the selected track. Playback
will continue from the beginning of the new track
3.
To search through a track hold the
and
buttons on the REMOTE CONTROL
Repeat Play
To INITIATE a REPEAT playmode:
1.
Press REPEAT once to enter REPEAT TRACK mode (REPEAT indicator will start blinking)
2.
Press REPEAT again to enter REPEAT ALL mode (REPEAT indicator will light steady)
3.
To CANCEL a REPEAT play mode, press REPEAT a third time (REPEAT indicator goes out)
13
Programmed Playback
To INITIATE a custom PROGRAM track/file/scene sequence:
1. Press PROGRAM to bring up the program window
2. Use the
number buttons to select a track
3. Once selected, press PROGRAM to enter it into the program
4. Repeat this procedure till you are complete with your program
NOTE: You can select up to 99 tracks to program. The program is maintained until the STOP button is pressed twice, the disc is
removed or the unit is turned off
To START/CANCEL PLAYBACK:
1. Press PLAY once to START and STOP twice to CANCEL a PROGRAM set
Radio Operations
To use the AM/FM stereo tuner to listen to broadcast RADIO:
1. Turn on POWER
2. Ensure that the ANTENNA is extended to its outermost position with sufficient room for
adjustment
3. Switch the FUNCTION SELECTOR to RADIO
4. Select a BAND from the BAND SELECTOR (AM, FM, FM-ST)
5. Find a STATION on the selected FREQUENCY BAND using the TUNING knob and re-adjust the ANTENNA if
necessary to improve reception
TV Operations
To use the TV tuner to watch broadcast TV:
1. Turn on POWER
2. Ensure that the ANTENNA is extended to its outermost position with sufficient room for adjustment
3. Switch the FUNCTION SELECTOR to TV
4. Ensure that the TV/AV button on the rear panel is set to TV. If video appears overlaid, reset the TV/AV button to
TV
5. Choose a BAND from the BAND SELECTOR (UHF, VHF)
6. Find a STATION on the selected FREQUENCY BAND using the TUNING KNOB and re- adjust the ANTENNA if
necessary to improve reception
NOTES:
-For the best signal, connect the unit to an aerial antenna using the external antenna jack or use the telescopic antenna
on the back of the unit
-Adjust the BRIGHTNESS, CONTRAST etc, via the controls on the rear panel if necessary
14
Microphone Operations
Connecting Microphones
Most standard dynamic microphones with a ¼" plug can be connected to the Orange-300. If you have a condenser
microphone that requires external phantom power, it should not be connected to the Orange-300 because the Mic jacks
do not have a 48V feed. If your condenser microphone uses a battery-powered pre-amplifier, it should have no problems.
To CONNECT a MICROPHONE to a microphone input:
1. Carefully insert a 1/4" microphone plug into one of the microphone channels
2. Ensure the cable is completely inserted in both the 1/4" jack and the microphone itself (if detachable)
Balancing a Microphone Channel
To BALANCE a MICROPHONE channel:
1. First adjust the MIC VOLUME control to approximately 50%
2. Then if necessary, use the EQ's LOW, MID and HIGH controls to fine-tuning
3. Start background music with the MUSIC VOLUME set at approximately 50%
4. Fine-tune each MIC CHANNEL as necessary till you get a clean balanced mix
5. Remember to compensate if the background music has striking volume changes. To do this, set the microphone
volume to a level that gives the singer latitude to increase their vocal velocity without sounding over-modulated
15
Karaoke Operations
Notes on Karaoke Media
There are various types of Karaoke media available for playback with the Orange-300. You can perform Karaoke with
standard CD, CDG, and VCD formats. The thing to remember is how each type differs as far as audio channels and video
support.
Standard CD
While standard CD's are not designed for Karaoke applications, it is still possible to practice Karaoke with them. There will
be no graphics (lyrics) to view on a TV since there is no video coding, however because the vocals are audible, you can
follow along and practice your accuracy.
CDG
CDG has been the most commonly used format of Karaoke media for the last 7 years. It is very similar to a standard CD,
except it has video graphics that are decoded by your Karaoke player and displayed onscreen. In addition, many CDG's are
specially 'multiplex' formatted with background music on the left channel and vocals on the right channel, so vocal
cancellation can be done by simply adjusting the balance control.
VCD
While the VCD format is not as popular in North America as it is in other countries, it remains an excellent format to be used
for Karaoke. Because video is not limited to 16 colors (as with CDG), VCD's tend to have motion video behind the lyrics
instead of a monotone screen, making them a bit more attractive to party atmospheres. Most VCD's also have multiplexed
coded audio for easy vocal cancellation.
Performing Karaoke
To perform KARAOKE:
1.
Refer to and follow the instructions for 'Loading a Disc' in the 'Disc Operations' section
2.
Refer to and follow the instructions for connecting microphones in the 'Microphone Operation' section
3.
When playback is commenced, your voice will be mixed with the playback output and heard
through the speakers, and the lyrics will be displayed on the TV screen
Removing Guide Vocals
To REMOVE guide VOCALS from MULTIPLEXED karaoke media:
1.
Press the L/R button at any time during disc playback to enable VOCAL CANCEL mode. In
this mode, the guide vocals are removed from the source music. Press again to bring the
vocals back
2.
Press the L/R button while singing into the microphone to enable VOCAL PARTNER mode.
In this mode, the guide vocals are removed temporarily only when you are singing. When you
stop singing for a minimum of 2 seconds, the guide vocals are reintroduced. Press again to bring the vocals back
NOTE: Disc must be multiplexed formatted for this feature to work
16
Using the Digital Key Controller
To CHANGE the natural KEY of source audio using the DIGITAL KEY CONTROLLER:
Use the DIGITAL KEY CONTROLLER to obtain the desired musical key. To STEP UP, press the button marked "b". To STEP
DOWN, press the button marked "#". To revert to the original key, press the middle button.
NOTE: Digital key control is not applied to mic channels
To get a good BALANCE between the MIC CHANNELS and SOURCE MUSIC:
If you find that music and microphone output is not balanced for a good sound, simply adjust the VOLUME and MIC 1&2
VOLUME controls. It is recommended to first set the music volume and then adjust the microphone volume(s) to a good
balance. Also, keep in mind that HIGH, MID and LOW frequency levels affect the overall "sound" of both music and vocals,
so using custom EQ settings is also helpful in getting a good overall balanced sound.
NOTE: Excessive high frequencies can lead to feedback, so be careful when adjusting them
MP3 Basics
Tips on MP3 Discs
An MP3 file stores audio data that has been compressed using the MPEG1 encoding scheme
Track order may differ from MP3 player to MP3 player
The maximum allowable # of tracks and folders on an MP3 disc is 900
The maximum allowable depth of a nested folder is 127
Discs containing data files and MP3 tracks (mixed-mode), it may not play in the Orange-300
Multi-session discs are limited to a total of 20 sessions
MP3 playback is optimal with MP3s encoded with a sampling rate of 44.1 kHz and a fixed bit rate of 128 kbps
The unit may not play MP3 tracks recorded using a packet writing utility
The unit can only play back MP3 tracks having a file extension of ".mp3"
It may take 30 seconds or more before the unit can start playback of MP3's. This time depends on the number of
recorded tracks and the complexity of the album tree
If you play a non-MP3 track that has the ".mp3" file extension, the unit will skip to the next valid track automatically
Digital recordings with this unit cannot be done while playing back MP3 discs
Tips On MP3 Menu and Display Text/Indications
Up to 8 characters are displayed for the name of an album or track
Characters other than uppercase letters ("A" to "Z"), numerals ("0" to "9") and underscore ("_") may not be displayed, or
may be displayed in capitalized or different characters.
The elapsed playing time may not be displayed correctly for MP3 tracks, depending on the MP3 encoding software used
Depending on the condition of the disc recording equipment or the CD-R/RW disc itself, a false album or track which
cannot by played on the unit may be displayed on an MP3 menu
Tips on Creating MP3 Discs
When converting audio data to MP3, create MP3 files with a sampling frequency of 44.1 kHz and a fixed bit rate of 128
kbps
When creating MP3 discs, do not store more than 900 albums and/or tracks in a disc
To play tracks in the order they were recorded, ensure your encoding software is set up to auto arrange by name, or use
only one album (if they are already alphabetized) or place a three digit number in front of each track to set an order
manually
Recommended = 001-Song.mp3, 002-Song.mp3, 003-Song.mp3…
Not Recommended = 1-Song.mp3, 5-Song.mp3, 10-Song.mp3. . .
17
To activate REP MODE to repeat all files within a selected folder infinitely:
1. From the main MP3 window press the
2. Press the
and
3. Press the
till the PLAY MODE window is selected
buttons to highlight the FOLDER REP mode
buttons to navigate back to the MP3 file in the folder you would like to start playback with
4. Press ENTER to begin playback
To activate DISC SCAN MODE to play the first 10 seconds of all files on the disc:
1. From the main MP3 window press the
2. Press the
and
3. Press the
till the PLAY MODE window is selected
buttons to highlight the DISC SCAN mode
buttons to navigate back to the MP3 file you would like to start playback with
4. Press ENTER to begin playback.
NOTE: Press STOP to cancel Disc Scan Mode.
To activate DISC MODE to play all files on the disc sequentially:
1. From the main MP3 window press the
2. Press the
and
3. Press the
till the PLAY MODE window is selected
buttons to highlight the DISC mode
buttons to navigate back to the MP3 file you would like to start playback with
4. Press ENTER to begin playback
NOTE: Playback will stop after all files have been played once.
To activate DISC REP MODE to repeat all files on the disc infinitely:
1. From the main MP3 window press the
2. Press the
and
3. Press the
till the PLAY MODE window is selected
buttons to highlight the DISC REP mode
buttons to navigate back to the MP3 file you would like to start playback with
4. Press ENTER to begin playback
To activate RANDOM MODE to play all files on a disc in a random order:
1. From the main MP3 window press the
2. Press the
3. Press the
and
till the PLAY MODE window is selected
buttons to highlight the RANDOM mode
buttons to navigate back to the MP3 file you would like to start playback with
4. Press ENTER to begin playback
NOTE: Playback will stop after all files have been played once
19
To activate SHUFFLE ON MODE to play files from a selected folder in a random order:
1. From the main MP3 window press the
2. Press the
and
till the PLAY MODE window is selected
buttons to highlight the SHUFFLE ON mode
3. Press the
buttons to navigate to the MP3 file you would like to start playback with
4. Press ENTER to begin playback
NOTE: Playback is limited to one folder and will stop after all files have been played once
To activate PROGRAM MODE for programmed playlists from files in a selected folder:
1. From the main MP3 window press the
2. Press the
3. Use the
and
till the PLAY MODE window is selected
buttons to highlight the PROGRAM mode
buttons to navigate back to the MP3 folders and files
4. Use the
buttons to find the files to program. When you want to program a file, press ENTER
5. Repeat process till program is complete
6. Press the STOP button to end file program selection mode
7. Press ENTER to begin playback.
NOTE: Program mode is limited to 20 files and will auto-stop after the program is complete
Viewing Photo-CDs
To LOAD a PHOTO-CD:
1. Insert a PHOTO-CD to automatically load and display the Photo selection window
To view PHOTO-CD images on-screen:
1. Press PLAY if the PHOTO-CD did not auto-play
2. Press the PAUSE button to PAUSE on an image. You can use the
maneuver through the Photo's in PAUSE mode
or
buttons to
3. Press STOP to cancel viewing the Photo-CD
Zooming
To enter ZOOM MODE:
1. Press the ZOOM button. The picture is enlarged each time the ZOOM button is pressed
To move the ZOOM area:
1. Use the
buttons to move the zoom area
To cancel the ZOOM function:
1. Press ZOOM until it cycles back to a normal view
NOTE:The zoom function may not work with some discs and when used in conjunction with the SLOW or ANGLE functions
20
Frame Advance
To ENTER STEP MODE during playback:
1. Press the STEP button. Each press, the program advances one frame. There is no audio during STEP playback.
To RETURN to normal playback:
1. Press PLAY
Slow Playback
To enter SLOW MODE during playback:
1. Press SLOW. Each time SLOW is pressed, the play speed changes
NOTE:There is no audio during SLOW playback. Available SLOW playback speeds differ from DVD to VCD
To return to normal playback:
1. Press PLAY
Maintenance
Cleaning the unit
Clean the outside of the unit with a clean soft cloth moistened with lukewarm water. Do not use solvents such as benzene
or thinner. These will permanently damage the units finish.
Cleaning the CD lens
The lens should never be touched. If dust is on the lens, blow it off using a camera lens blower.
If trouble occurs...
To avoid the hazard of electric shock and damage to the unit, have the unit bench tested by an authorized VOCOSTAR
service center. Do not remove the unit from its cabinet to attempt repairs yourself.
Warning
- Do not block the ventilation hole.
- Do not expose to rain or moisture
22
Specifications
TV System:
M
Ch. Range VHF-Lo / VHF-Hi / UHF:
2-6 / 7-13 / 14-83
Radio AM / FM:
530-1710 kHz / 88-108 MHz
Antenna Input Impedance:
75-ohm/300-ohm
Disc Formats:
CD, CD+G, VCD 1.0/2.0, MP3, CD-R, CD-RW
CRT:
5.5 Inches, Diag./70 Def.
Resolution:
+280 Lines
Sound Output:
2.5W, 1kHz, 0dB (CD)
Power Source:
DC 15V 1.8A AC Adapter, 10x"D" Alkaline/Rechargeable Batteries,
Car Adapter
Power Consumption:
27W@DC 15V Input (average)
Dimensions:
12" (W) x 10.8" (D) x 7.5" (H)
Net Weight:
7.5 lbs.
Gross Weight:
8.2 lbs.
Avg. Battery Life (77°F):
12-14 Hours (Alkaline), 2.5-3.5 Hours (Rechargeable)
Accessories Included:
Car Adapter, AC Adapter, Antenna Adapter, RCA A/V Cable,
Remote Control, Microphone and Microphone Cable
-Specifications subject to change without notice
23