1
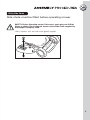
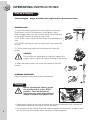
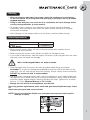
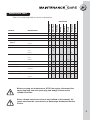
Bushranger
46TBU6
Lawnmower
Assembly and
Owner’s Manual
www.poweruplawncare.com.au
WARNING! Read this manual before operating your BUSHRANGER Lawnmower.
IMPORTANT INFORMATION
Labels
The following warning labels are attached to your mower on purchase. Please
read before discarding.
Stroke Label
Briggs & Stratton Engine
Engine must have 600ml off S.A.E. 30 Oil placed in the Sump Before Starting
BUSHRANGER
BUSHRANGER
Dust Cap
Bushranger 4 Stroke Briggs & Stratton Mowers Only)
Removal of Blue Dust Cap
Dispose of dust cap from under fuel cap before initial filling (if fitted)
DO NOT REPLACE
Table of Contents
Important Notes
Unit Details
Safety & Handling
1
Safety Instructions
Hazards
Personal Safety Equipment
Assembly Procedures
4
Mastercut Side Chute
Mastercut Handle
Operation
6
Starting & stoping
Maintenance & Care
7
Cleaning
Blade Replacement
Remote Air Filter Maintenance
Replacing Air Filters
Maintenance Chart
Questions & Answers
10
Troubleshooting
Warranty
11
IMPORTANT NOTES
Congratulations on your purchase of a top quality Bushranger lawnmower. This instruction
manual will aid in the assembly, operation and maintenance of your new lawnmower.
Please read carefully to ensure safety and the long life of your product.
Do not operate the unit before reading this manual.
Do not operate before reading the ‘Engine Manual’.
Keep this instruction manual in a safe place for future reference or if service is required on
your unit.
Please read the ‘Warranty’ section carefully
Unit Details
When unpacking the unit, ensure that all component parts listed below have been provided.
Should there be a problem, notify the place of purchase.
You should find the following enclosed:
• 1 Bushranger lawnmower
• 1 Engine manual
• 1 Fitment pack
• 1 Mower manual
Note: Side chute must be fitted before operating
mower (refer to page 5)
Safety Instructions
Transporting the mower
• Turn the engine off, by moving the throttle lever to the 'STOP' position and switching the
fuel tap off (where fitted).
• Disconnect the spark plug lead and wedge it between the cylinder head fins.
• Do not transport the mower in a vehicle if there is fuel in the fuel tank.
Before using the mower
• Do not start the mower until you have studied the instruction manuals.
• Know the mower controls. Learn how to stop the engine quickly in an emergency by
moving the throttle to the 'STOP' position.
• Before using the mower, ensure that the blade assembly is not worn or damaged.
Always replace worn or damaged blades and bolts in sets to preserve correct balance.
Damaged or worn blades and bolts are major hazards. Use genuine Bushranger spare
parts only.
• Please note blades are tucked under blade disc for safety and transport reasons
before use. Once the engine is started they will relocate themselves for cutting.
• Check all fasteners regularly. Always ensure the mower is in a safe operating condition.
• Check for grass build up around the engine and muffler which may cause overheating
and/or a fire hazard.
• Do not start the engine unless the side chute and bumper bars are securely in position.
Operating the mower
• Do not mow while people or pets are in the vicinity of the mower or within the mowing
area. Ensure that bystanders are a minimum of 15 metres away.
• Do not mow in bare feet or open shoes. Wear long trousers and heavy footwear.
• Make sure the lawn is clear of sticks, stones, bones, wire and debris before mowing.
These could be thrown by the blades and cause injury or damage.
• Start the engine carefully with feet well clear of blades. Do not tilt the mower when
starting the engine.
• Stop the engine whenever you leave the mower, even for a moment.
• Mow only in good daylight.
• Keep hands and feet away from rotating parts beneath mower when engine is running.
• Do not over speed the engine or alter the governor settings. Excessive engine speed is
dangerous and shortens mower life.
1
Safety Instructions
(cont.)
• Never lift, carry or tilt the mower when the engine is running.
• Stop the engine before pushing the mower across gravel, paths or roads. Stop the
engine before the mower leaves the lawn.
• Stop the engine before adjusting the cutting height.
• Mow across the face of a slope, never up or down. Use extreme caution when changing
direction on a slope. Do not mow on excessively steep slopes.
• Never mow by pulling the mower towards you. You may slip and pull the mower on top
of your feet.
• Walk with the mower, never run.
• The safety distance determined by the guiding handles must be maintained at all times.
• At the conclusion of mowing, always turn the mower off using the throttle lever then turn
fuel tap off (where fitted).
Maintaining the mower
• If the mower begins to vibrate abnormally, or if it strikes a foreign object - STOP the
engine, disconnect the spark plug lead from the spark plug and carefully wedge it
between the cylinder fins. Inspect the mower and blades for any damage.
• Replace worn or faulty mufflers as they adversely affect engine performance and increase
emissions.
• Bushranger recommends that all maintenance, repair and inspection work be carried out
by a Bushranger Authorised Service Centre.
• Store the mower in a well ventilated area, away from any naked flames such as those
found in hot water heaters.
Refuelling the mower
• Refuel the mower outdoors only.
• Do not smoke when refuelling the engine. Never add fuel or remove the fuel cap while
the engine is running or hot. If fuel is spilt, do not start the engine. Move the mower
away from the area of the spill. Do not create any source of ignition until fuel vapours
have dissipated.
• Store fuel in a cool place and in a container specifically designed for the purpose. Plastic
containers are unsuitable, except those specifically designed to hold fuel.
2
Hazards
The following safety precautions must be strictly observed to avoid the risk of damage or
personal injury.
• Do not smoke while operating or refuelling the mower. Never add fuel or remove the fuel cap
while the engine is running or hot. If the fuel is spilt, do not start the engine. Move the mower
away from the area of the spill. Do not create any source of ignition until the fuel vapours have
dissipated.
• Check all fasteners regularly. Always ensure that the mower is in safe operating condition.
Use genuine spare parts only.
• Do not operate the mower in confined spaces where exhaust fumes (carbon monoxide) can
collect.
• Stop the engine whenever you leave the mower, even if only for a moment.
• Stop the engine when emptying the grasscatcher. Never try to clear grass from inside the
mower while the engine is running.
• Never lift, carry or tilt the mower when the engine is running.
• Bystanders must be at least 15 metres away during operation of the mower, as rocks and
other materials may be thrown at high velocities. Switch the unit off immediately if approached.
• Never use the mower unless the side chute and bumper bars are correctly assembled and
fitted.
Personal Safety Equipment
Recommended safety equipment to wear when working with your lawnmower:
A set of ear muffs.
A pair of protective gloves.
A pair of safety boots.
Eye Protection.
3
Utility Side Chute
Side chute must be fitted before operating mower
SAFETY: Before Operating mower: Disconnect spark plug and fit Side
Chute as shown. Do not operate mower unless Side Chute supplied by
Bushranger is properly fitted.
* Bolts, washers, nuts and side chute (guard) supplied
5
OPERATING INSTRUCTIONS
Starting & Stopping
4 Stroke Engine - Briggs & stratton, See engine manual & procedure below.
S TA R T I N G
I
HOT
CHOKE
CHOKE
RUN
RUN
STOP
STOP
STOP
RUN
COLD
CHO KE
STARTING COLD
1. Move the throttle control lever to the choke/start position.
Starting hot: Use the RUN position if the Engine is warm
Note: If engine does not have a choke. Move the throttle lever
to the START position & primer 3 times slowly
COLD START: press the primer bulb three times pausing each
time.
HOT START: priming may only be necessary if the mower fails
to start.
2. Pull the starter grip lightly until resistances felt, then pull
briskly.
CAUTION!
Do not allow the starter grip to snap back against the
engine. Return it gently to prevent damage to the starter.
CHOKE
3. When the engine warms up, move the throttle to the RUN
position.
STOP
E
CH OK
RUN
RUN
STOP
RUN
STO
P
CHOKE
CHOKE
RUN
STOPPING THE ENGINE
Move the throttle control lever to the stop position.
STOP
Cleaning
Before cleaning the mower, ensure
the throttle lever is in the 'STOP'
position. Turn the fuel tap off,
disconnect the spark plug lead and
wedge it between the cylinder fins.
Spark
Plug
• Remove grass build up from the air intakes on the top of the mower cowl, around the
engine and carburettor, and around the air filter body.
• The underside of the mower should be cleaned regularly to remove dirt and grass build
up, any build up will adversely affect corrosion of steel baseplate.
6
Cleaning
• When cleaning the underside of the mower, always tilt handle back to ground level
so the front wheels are off the ground and spark plug is pointing to the sky (4 stroke
engined mowers).
• Tilting in other directions can cause the oil to contaminate the fuel & damage airfilter
causing starting difficulties (4 stroke models).
• To prevent chassis corrosion, the underside of your mower should be cleaned
immediately after mowing an area which has been recently dressed with sulphate
of ammonia or fertiliser.
• After cleaning, run the engine briefly to dry off excess moisture before storing.
Blade Replacement
Model
46TBU6
Blade & Bolt Set
CA09351S
For Your Safety
• Never use the mower unless the side chute and bumper bars supplied by the
manufacturer are in position.
• Before starting the mower check blades and bolts for damage or wear.
• If you strike an obstruction, stop the engine, disconnect spark plug lead from the spark
plug and check the blades for damage.
Worn and damaged blades are major hazards.
• Stop the engine and disconnect the spark plug lead before fitting new blades.
Assembly: Fit as per the drawing remembering to push the head of the bolt into the
blade disc. (this will stop the bolt head from turning). Ensure correct order of assembly.
DO NOT lay mower on side 4 stroke models.
• We recommend changing blades, bolts, nuts and washers as a set. Metal fatigue and
damage may occur which may not be visible to the operator. Always replace all blades
to ensure correct engine balance, reducing vibration and wear. Tighten nuts on blade
bolts to 14-19 Nm (Newton Metres) or 10-14 ft lbs.
• Always turn the nut to check tightness, not the bolt.
Use only genuine replacement parts made and guaranteed by Bushranger. Insist
on
them from your parts and service dealer.
NOTE: Use of non-genuine blades may void your warranty,and could result in
damage or injury.
7
Blade Replacement
• Always turn the nut to check tightness, not the bolt.
Use only genuine replacement parts made and guaranteed by Bushranger.
Insist on them from your parts and service dealer. Detailed fitting
instructions are printed on genuine Bushranger blade packs. Use of
non-genuine blades may void your warranty, and could result in
damage or injury.
Remote Air Filter Maintenance
For correct engine performance and to guard against dust entering the engine, causing
rapid wear, the air filter assembly must be clean and maintained in good condition.
Bushranger recommends that the air filter element and seal ring are replaced annually,
or more often in dusty conditions. Always replace with genuine Bushranger spare parts.
Use of non-genuine spare parts may damage your mower engine, and void the product
warranty.
Replacing Air Filters
Fig. 1
STOP ENGINE.
(Fig. 1) 4 stroke models, twist filter cap
anti-clockwise and remove cap from filter
housing.
To stop loose material falling into filter body,
tilt upper handle so that filter body is up-side
down. Remove filter element and seal ring.
(Fig. 2) Clean filter element “A” by tapping it
on palm of hand. Do not use compressed air
or wash with any liquid. Examine element for
holes, splits or permanent clogging. Replace
if necessary.
Fig. 2
A
Dust-off seal ring “B” and examine. Replace
if damaged or permanently crushed.
(Fig. 3) Fit or refit seal ring and filter element.
Tilt upper handle back to normal position.
Push filter cap on, ensuring teeth engage in
slots on filter housing.
Fig. 3
8
B
Maintenance Chart
Refer to the following table for routine maintenance.
Throttle lever
Check operation
Remote Air filter hose
Check
Cutting System
(Blades)
Inspect and check assembly
•
Inspect and check assembly
Chassis
Check for buildup of grass
•
•
•
•
•
•
•
•
•
Clean
•
Replace
Air filter
Check
Clean
•
•
•
Replace
Engine Cylinder fins
Clean
Spark plug
Replace
All accessible fasteners
Check
As required
Monthly
Weekly
•
•
Replace
Ejector shute
If damaged
Visual inspection (leaks)
If faulty
Lawnmower
Refuelling
Requirements
After finish
Features
Before start
Time Period
•
•
•
•
•
•
•
Retighten
Engine mounting bolts
Check & retighten
Muffler
Inspect
Replace
•
•
•
•
•
•
Before carrying out maintenance, STOP the engine, disconnect the
spark plug lead from the spark plug and wedge it between the
cylinder head fins.
Never attempt maintenance that is not outlined in this manual. All
repair work must be carried out by a Bushranger Authorised Service
Centre.
9
Troubleshooting
In small engines generally, difficult starting and erratic running is most often caused by a
dirty spark plug. If a new spark plug of the correct type does not restore the engine to
proper operating condition, the problem may be solved by reference to the chart below.
Problem
Does not start
Loss of Power
Poor cutting
Excessive vibrations
Engine stops
frequently
Possible cause
Correction
Out of fuel
Refill tank with correct fuel
Throttle lever in incorrect position
Refer to 'Starting Procedures'
Spark plug lead not connected
Press terminal cover fully onto
the spark plug
Engine flooded
Turn fuel tap 'OFF'. Pull starter cord
until engine starts, then turn fuel
tap 'ON'
Dirty spark plug
Replace spark plug
Stale fuel in tank from last season
Empty and refill with clean fuel, if it does not
work contact Service Centre.
Water in fuel tank
Empty and refill with clean fuel, if it does not
work contact Service Centre.
Service required
Contact Service Centre
Engine worn
Contact Service Centre
Low or no oil (4 stroke)
Check
Incorrect throttle setting
Set throttle lever in the 'RUN' position
Dirty air filter element
Clean or replace
Too low height adjustment
Raise cutting height
Low or no oil (4 stroke)
Check
Blades worn or damaged
Replace
Blade disc loose
Contact Service Centre
Slow running
Refer to 'Loss of Power' above
Blades restricted by grass and dirt
accumulated under the baseplate
Remove spark plug lead and clean
under the baseplate
Build up of grass and dirt on upper
surface of blade disc
Remove spark plug lead & clean blade disc
Blades out of balance
Replace both blades
Bent or damaged disc or blade
Replace disc or both blades
Looseness of assembly
Check all nuts for tightness
Low or no oil (4 stroke)
Check
Fuel supply blocked
Check fuel line
Engine worn or seized
Contact Service Centre
Fuel cap not venting
Check / Loosen cap slightly
Low or no oil (4 stroke)
Check
If running difficulties continue, contact your closest Bushranger Authorised Service Centre
as listed in the back of this manual.
10
WARRANTY
Warranty
Consumer Rights
The buyer should be aware that in relation to goods which are of a kind ordinarily
acquired for personal, domestic or household use or consumption, certain provisions
such as the Trade Practices Act, 1974 (Aust) and the Consumer Guarantees Act, 1993
(NZ) apply. The terms set out below do not exclude rights and remedies implied by a
statute which are non-excludable and which may be more extensive than those provided
by this warranty.
Warranty Service
Warranty Service under both the Express Warranty and the warranties implied by law is
available at any Bushranger Authorised Service Centre. These centres are staffed and
equipped to provide expert service.
Warranty Period - 46TBU6
Model
46TBU6
Domestic Use
Commercial Use
1 Year
6 months
Under Express Warranty the 'Lawnmower' is warranted from the date of purchase
against mechanical defects and faulty workmanship or material. Express Warranty
covers only the replacement, repair or adjustment of parts which fail due to a fault in
manufacture. Defective parts will be replaced or serviced by an Authorised Bushranger
representative without charge for labour or materials, subject to conditions. Repairs or
adjustments required by normal use or by failure to follow the manufacturer's instructions
are chargeable to the owner.
Bushranger Service Representatives or agents are authorised to determine whether a
claim will be covered under warranty, or payable by the owner on completion.
11
WARRANTY
Warranty
(cont.)
Conditions (cont.)
You should seek independent legal advice to determine whether a claim not covered by
the Express Warranty is covered by any warranties implied by law.
• Express Warranty applies to the original purchaser only. Proof of purchase date must
be provided prior to Express Warranty work.
• Use of parts other than genuine Bushranger Spare Parts cancels the Express
Warranty.
• Repairs other than by a Bushranger Authorised Service Centre cancels the Express
Warranty.
• Altering the product (including governed speed) cancels the Express Warranty..
• A 'lawnmower' run with incorrect fuel, oil or oil level, is not covered by
the Express Warranty.
• Failure to properly service cooling or air filtration systems cancels the Express
Warranty.
• Failure to follow the instruction manual or labels attached cancels the Express
Warranty.
• Fair and reasonable wear is not covered by the Express Warranty.
• Damage from an accident, misuse or neglect is not covered by the Express Warranty.
• Costs of transportation of the 'lawnmower' are to be paid by the owner.
• Blades and spark plugs are not covered by the Express Warranty.
Limitations of Warranty
Nothing in these terms shall exclude, restrict or modify any term, condition, warranty
or liability implied into this contract by statute, where to do so would be unlawful or
would render any provision of this contract void. Subject to that, all warranties implied
by statute in respect of the goods are hereby expressly negated and Power Lawncare
Product's liability for the goods is limited to any warranties issued in writing by Powerup
Lawncare Products and Powerup Lawncare Products is excluded from any liability
whether under this contract or otherwise to the buyer of any third party for any loss,
injury, cost or damage (direct, indirect, special, consequential, or otherwise and whether
or not arising from a negligent act or omission of Bushranger), incurred or suffered by
reason for the goods, their use, their design or any failure to deliver or delay in delivering
them. Where it is legal to do so, any remaining liability implied by statute or resulting
from breach of any term, condition or warranty implied by statute is limited to, at
Powerup Lawncare Product's sole option:
• the replacement of the goods or the supply of equivalent goods;
• the repair of goods;
• the payment of the cost of replacing the goods or of acquiring equivalent goods; or
• the payment of having the cost of the goods repaired.
In particular, your rights and remedies under the Trade Practices Act (Aust) and the
Consumer Guarantees Act (NZ) are not excluded.
12
NOTES
NOTES
NOTES
©2010 Powerup Lawncare Products Pty Ltd
Bushranger is a trademark of Powerup Lawncare Products Ltd.
All rights reserved. No part of this booklet may be reproduced by any means
without prior written permission. All information herein is subject to change without notice.
www.poweruplawncare.com.au
LR00812A-A3
A3
AT
DT
Revised
21/07/09
A2
AT
DT
Revised
23/04/10
Rev
Own
Chk
Release
Date