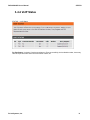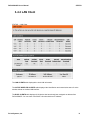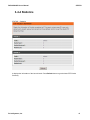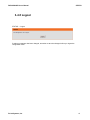
1
DVG-N5402SP
VoIP Wireless Router
User’s Manual
Version 1.4
(30 March 2011)
© 2010 D-Link Corporation. All rights reserved.
Reproduction in any manner whatsoever without the written permission of D-Link Corporation is strictly forbidden.
Trademarks used in this text: D-Link and the D-Link logo are trademarks of D-Link Corporation/D-Link Systems
Inc.; Other trademarks and trade names may be used in this document to refer to either the entities claiming the
marks and names or their products. D-Link Corporation disclaims any proprietary interest in trademarks and trade
names other than its own.
Warranty: please contact your D-Link Authorized Reseller or the D-Link Branch Office nearest your place of
purchase for information about the warranty offered on your D-Link product.
Information in this document is subject to change without notice.
FCC Warning
This equipment has been tested and found to comply with the limits for a Class B digital device, pursuant to Part 15
of the FCC Rules. These limits are designed to provide reasonable protection against harmful interference in a
residential installation. This equipment generates, uses, and can radiate radio frequency energy and, if not installed
and used in accordance with the instructions, may cause harmful interference to radio communication. However,
there is no guarantee that interference will not occur in a particular installation. If this equipment does cause harmful
interference to radio or television reception, which can be determined by turning the equipment off and on, the user
is encouraged to try to correct the interference by one or more of the following measures:
Reorient or relocate the receiving antenna.
Increase the separation between the equipment and receiver.
Connect the equipment into an outlet on a circuit different from that to which the receiver is connected.
Consult the dealer or an experienced radio/TV technician for help.
CE Mark Warning
This is a Class B product. In a domestic environment, this product may cause radio interference in which case the
user may be required to take adequate measures.
Warnung!
Dies ist ein Produkt der Klasse B. Im Wohnbereich kann dieses Produkt Funkstoerungen verursachen. In diesem
Fall kann vom Benutzer verlangt werden, angemessene Massnahmen zu ergreifen.
Precaución!
Este es un producto de Clase B. En un entorno doméstico, puede causar interferencias de radio, en cuyo case, puede
requerirse al usuario para que adopte las medidas adecuadas.
Attention!
Ceci est un produit de classe B. Dans un environnement domestique, ce produit pourrait causer des interférences
radio, auquel cas l`utilisateur devrait prendre les mesures adéquates.
Attenzione!
Il presente prodotto appartiene alla classe B. Se utilizzato in ambiente domestico il prodotto può causare interferenze
radio, nel cui caso è possibile che l`utente debba assumere provvedimenti adeguati.
Contents
1. Introduction .......................................................................................................................................................... 1
1-1 Product Overview ....................................................................................................................................... 1
1-2 Hardware Description ................................................................................................................................. 2
2. Getting Started ..................................................................................................................................................... 4
3. VoIP Router Web Configuration (continued) ....................................................................................................... 5
3-1 SETUP ........................................................................................................................................................ 5
3-1-1 Wireless Setup ................................................................................................................................. 5
3-1-2 LAN Setup ...................................................................................................................................... 12
3-2 ADVANCED .............................................................................................................................................. 14
3-2-1 Parental Control ............................................................................................................................. 14
3-2-2 Firewall and DMZ ........................................................................................................................... 19
3-2-3 Advanced Wireless ......................................................................................................................... 22
3-2-4 Advanced Network ......................................................................................................................... 24
3-2-5 Schedule ........................................................................................................................................ 28
3-3 MAINTENANCE........................................................................................................................................ 29
3-3-1 Device Management ...................................................................................................................... 29
3-3-2 Backup and Restore ....................................................................................................................... 30
3-3-3 Dynamic DNS ................................................................................................................................. 32
3-3-4 USB File Sharing over FTP ............................................................................................................ 33
3-3-5 Diagnostics ..................................................................................................................................... 34
3-4 STATUS .................................................................................................................................................... 36
3-4-1 Device Info ..................................................................................................................................... 36
3-4-2 VoIP Status ..................................................................................................................................... 38
3-4-3 LAN Client ...................................................................................................................................... 39
3-4-4 Statistics ......................................................................................................................................... 40
3-4-5 Logout ............................................................................................................................................ 41
Appendix ................................................................................................................................................................ 42
Product Features ............................................................................................................................................ 42
D-Link Systems, Inc.
DVG-N5402SP User’s Manual
Product Overview
1. Introduction
1-1 Product Overview
The DVG-N5402SP is designed to carry both voice and facsimile over the IP network and wirelessly share
Internet access. It uses the industry standard SIP call control protocol so as to be compatible with free registration
services or VoIP service providers’ systems. As a standard user agent, it is compatible with all common Soft
Switches and SIP proxy servers. While running optional server software, the VoIP Router can be configured to
establish a private VoIP network over the Internet without a third-party SIP Proxy Server.
The DVG-N5402SP can be seamlessly integrated into an existing network by connecting to a phone set and fax
machine. With only a broadband connection such as an ADSL bridge/router, a Cable Modem or a leased-line
router, the VoIP Router allows you to use voice and fax services over IP in order to reduce the cost of all long
distance calls.
The DVG-N5402SP is also an 802.11b/g/n wireless access point. Allow wireless clients to connect to it and share
your broadband Internet connection. A built-in 4-port switch makes it possible to connect up to 4 Ethernet-enabled
computers or devices to also share your Internet connection.
D-Link Systems, Inc.
1
DVG-N5402SP User’s Manual
Hardware Description
1-2 Hardware Description
Front Panel
Power: A steady green light
indicates a proper connection
to a power source. A red light
indicates the power-on self test
fails or the device is
malfunction.
Prov/Alm: A blinking light
indicates the VoIP Router can
not register with SIP Server or
can not get the IP address. A
blinking light also indicates the
VoIP Router is attempting to
connect with the Provisioning
server. Once the service
connects, the LED will turn off.
The LED will light solid red if
the self-test or boot-up fails.
Register: The Register LED
will turn on and continuously
working when the VoIP Router
is connected to a VoIP service
provider. The LED will flash if
not connected to a service
provider.
WLAN: A steady light indicates a wireless connection. A blinking light indicates that the VoIP Router is
receiving or transmitting from or to the wireless network.
WAN: When a connection is established the LED will light up solid. The LED will blink to indicate the activity.
If the LED does not light up when a cable is connected, verify the cable connections and ensure that your
devices are powered on.
LAN: When a connection is established the LED will light up solid on the appropriate port. The LEDs will
blink to indicate the activity. If the LED does not light up when a cable is connected, verify the cable
connections and ensure that your devices are powered on.
USB: When a connection is established the LED will light up solid. The LED will blink to indicate the activity.
If the LED does not light up when a USB device is connected, verify the USB connection and ensure that
the devices are powered on.
Phone: This LED displays the VoIP status and hook or ringing activity on the phone port that is used to
connect your normal telephone(s). If a phone connected to a phone port is off the hook or in use, this LED
will light solid. When a phone is ringing, the indicator will blink.
Line: Light on means the line is in use (off-hook), and vice versa.
WPS: When a WPS negotiation is established the LED will light up solid. The LED will blink to indicate the
activity. If the LED does not light up when the WPS negotiation is failed or is not established.
D-Link Systems, Inc.
2
DVG-N5402SP User’s Manual
Hardware Description
Rear Panel
1.
Antenna: Connect to a
wireless network.
2.
LINE: Connect to the
telephone line on the wall jack
through a telephone cable.
3.
PHONE2/PHONE1:
Connect to your phones through
a standard telephone cable.
4.
USB: USB host 2.0 port,
for connecting to another USB
device to supply some
value-added application.
5.
LAN4/LAN3/LAN2/LAN1:
RJ-45 port, for connecting to the
Ethernet port of a PC or the
Ethernet devices through an
Ethernet cable.
6.
WAN: Connect to your
ONT through an Ethernet cable.
7.
POWER: Power adapter, for connecting to the power adapter of 12V, 2A.
8.
RESET: Restore to factory defaults. To restore factory defaults, keep the VoIP Router powered on, push a
paper clip into the hole to press the button for over 5 seconds and then release.
9.
WPS: Button to enable or disable WPS.
10. ON/OFF: Power switch, power on or power off the VoIP Router.
WARNING: DO NOT (1) connect the phone ports to each other (FXS to FXS) or (2) connect any
phone port directly to a PSTN line (FXS to PSTN) or to an internal PBX line (FXS to PBX extension).
(3) Stacking is forbidden. Doing so may damage your VoIP Router.
Use the Reset Button to restore factory default settings:
1.
2.
3.
Power on.
Press and hold the Reset button for over 5 seconds.
Release the Reset button. Factory settings are restored.
D-Link Systems, Inc.
3
DVG-N5402SP User’s Manual
SETUP
2. Getting Started
To access the Web-based configuration utility, open a Web browser such as IE (Internet Explorer) and enter the
IP address of the DVG-N5402SP from LAN port.
Open your Web browser and enter
http://192.168.0.1 into the URL address
bar. Click Enter.
Click Login to enter Web site.
The default username and password of user account: admin/password .
D-Link Systems, Inc.
4
DVG-N5402SP User’s Manual
SETUP
3. VoIP Router Web Configuration (continued)
3-1 SETUP
3-1-1 Wireless Setup
This section instructs you how to setup your wireless network on the VoIP Router device.
Setup Hint:
1.
2.
3.
Every device in the same wireless network must use the same SSID.
To avoid wireless network overlap, a specific and different channel is needed.
Make sure security used by every device in the same wireless network is compatible with the wireless
AP.
3-1-1-1 Wireless Basic
SETUP → Wireless Setup → Wireless Basic
Enable Wireless LAN Interface: Enable wireless basic settings on LAN interface.
D-Link Systems, Inc.
5
DVG-N5402SP User’s Manual
SETUP
Wireless Network Name (SSID): SSID is the name of your wireless network. All wireless-equipped
devices share the same SSID to communicate with each other. It must be unique to identify separated
wireless network. For security, you should change the default SSID to a special ID. By default the SSID will
be name “DVG-N5402SP-XXXXXX” and “XXXXXX” will be the last 6 numbers of your WAN connection
“TR069” MAC Address.
Visibility Status: Select the visibility status.
Visible indicates that the device broadcasts the SSID.
Invisible indicates that the device does not broadcast the SSID.
Country: Select the country where you are located from the drop-down menu.
802.11 Mode: The VoIP Router can operate in 2.4GHz ISM band with different speed of wireless
connection, Select the wireless band of your network.
802.11b only - Allow all 802.11B compliant wireless devices to associate with the wireless AP.
802.11g only - Allow all 802.11G compliant wireless devices to associate with the wireless AP.
802.11n only - Allow all 802.11N compliant wireless devices to associate with the wireless AP.
Mixed 802.11b/g – Allow a mix of both 802.11B and 802.11G compliant wireless devices to associate
with the wireless AP.
Mixed 802.11n/g - Allow a mix of both 802.11N and 802.11G compliant wireless devices to associate
with the wireless AP.
Mixed 802.11b/g/n - Allow a mix of 802.11B, 802.11G, and 802.11N compliant wireless devices to
associate with the wireless AP.
Bandwidth: Select the bandwidth from the drop-down list. You can select 20M, 40M Plus, or 40M Minus.
Wireless Channel: Select a clear and appropriate channel for your wireless network. A device on your
wireless network must use a specific channel to transmit and receive data. If wireless network has overlap,
change a different channel number.
User Isolation: The isolation among all the stations that are connected with the same VAP (Virtual Access
Point). You can select Off or On.
D-Link Systems, Inc.
6
DVG-N5402SP User’s Manual
SETUP
3-1-1-2 Wireless Security
This section introduces you different ways of wireless security you can set up. It is important to enable
secure algorithm to protect your data from eavesdropping by unauthorized wireless users.
SETUP → Wireless Setup → Wireless Security
Wireless Security Mode: Select the encryption/authentication type: None, WEP, WPA only, WPA2 only,
or WPA/WP2 Mixed.
D-Link Systems, Inc.
7
DVG-N5402SP User’s Manual
SETUP
SETUP → Wireless Setup → Wireless Security (WEP)
WEP Key Length: Select 64-bit or 128-bit data encryption.
Default Tx Key: You can select one of the keys as active key at a time.
WEP Key Format: Select the preferred WEP Key Format according to which WEP encryption you choose.
When WEP 64bits is enabled, you can select ASCII (5 characters) and Hex (10 characters). When WEP
128bits is enabled, you can select ASCII (13 characters) and Hex (26 characters).
WEP Key 1 – 4: You can manually enter key value from Key1 to Key4. Type a character sting and apply
changes.
For a 64-bit WEP key - Enter 5 characters (ASCII sting) or 10 hexadecimal characters (“0-9”, “A-F”).
For a 128-bit WEP key - Enter 13 characters (ASCII sting) or 26 hexadecimal characters (“0-9”, “A-F”).
D-Link Systems, Inc.
8
DVG-N5402SP User’s Manual
SETUP
WPA Authentication Mode
The wireless network can use WPA Authentication to verify whether a wireless device is allowed to access
your Access Point or not. You can choose to use Enterprise (RADIUS) method or Personal (Pre-Shared
Key). The encryption mechanism used for RADIUS and WPA-PSK is the same. The difference between the
two is that WPA-PSK uses a specific characters sting like password instead of a user-authentication.
SETUP → Wireless Setup → Wireless Security (WPA-PSK)
If WPA Security Mode is set to WPA (WPA only, WPA2 only, or WPA/WP2 Mixed), you can set WPA
Mode to WPA-Personal or WPA-Enterprise, select the security mode according to your wireless network.
Encryption Mode: Encryption mode is used for the configuration of WPA or WPA2 Mixed.
TKIP - TKIP is the security protocol used in WPA. The length of TKIP encryption is longer than WEP
encryption that increases the complexity of decoding for crackers.
AES - The most powerful encryption algorithm that is commonly used in WPA.
Group Key Update Interval: Set the update interval of the group key.
Pre-Shared Key: Enter a key of 8-64 characters long in the Pre-Shared Key filed. Make sure this key is
exactly the same on all other wireless stations. By default, the Pre-Shared Key will be the serial number
located below your device. Use that to access your wireless network.
D-Link Systems, Inc.
9
DVG-N5402SP User’s Manual
SETUP
SETUP → Wireless Settings → Wireless Security (WPA-Enterprise)
If WPA Security Mode is set to WPA (WPA only, WPA2 only, or WPA2 Mixed), you can set WPA Mode
to WPA-Enterprise (WPA- Enterprise, WPA2- Enterprise, WPA2 Mixed- Enterprise), select the security
mode according to your wireless network.
WPA Mode: Select WPA-Enterprise.
WPA Cipher Suite: WPA Cipher Suite is used for the configuration of WPA or WPA2 Mixed.
TKIP - TKIP is the security protocol used in WPA. The length of TKIP encryption is longer than WEP
encryption that increases the complexity of decoding for crackers.
AES - The most powerful encryption algorithm that is commonly used in WPA.
RADIUS Server:
RADIUS server IP Address - Enter the IP address of the authentication RADIUS server.
RADIUS server Port - Enter the port number of the authentication RADIUS server. Keep the default
value: 2801 unless the server required change to another number.
RADIUS server Shared Secret - Enter the password such as a security Key.
D-Link Systems, Inc.
10
DVG-N5402SP User’s Manual
SETUP
3-1-1-3 WPS
SETUP → Wireless Setup → WPS
Wireless SSID: Select the VAP (Virtual Access Point) of which the WPS function is enabled.
Note: There is only one VAP of which the WPS function is enabled each time. If the WPS function of the
VAP has been enabled, the WPS function would be disabled before you enable the WPS function of
another VAP.
Enable: Enable or disable the WPS function. The WPS function of the VoIP Router only supports the
following three authentication methods: WPA2-PSK, WPA2-PSK, or WPA2-Mixed. If the page is in gray,
you need to enable WPA2-PSK, WPA2-PSK, or WPA2-Mixed.
PBC Button: Click the PBC button to trigger WPS negotiation session through PBC.
Input Station PIN: Enter the PIN code (Personal Identification Number) of the station.
WPS Session Status: It shows the. There are four WPS negotiation status: INPROCESS, ERROR,
SUCCESS, or OVERLAP.
D-Link Systems, Inc.
11
DVG-N5402SP User’s Manual
SETUP
3-1-2 LAN Setup
SETUP → LAN Setup
Router IP Address: Enter the LAN IP address of the VoIP Router. It is also the default gateway for DHCP
clients.
Subnet Mask: Enter the subnet mask for DHCP clients.
D-Link Systems, Inc.
12
DVG-N5402SP User’s Manual
SETUP
SETUP → LAN Setup
Enable DHCP Server: This variable is to assign the IP address for the devices connected to LAN port of
the VoIP Router.
IP Pool Starting Address: Enter the starting IP address for the DHCP server's IP assignment.
IP Pool Ending Address: Enter the ending IP address for the DHCP server's IP assignment.
DHCP Lease Time: Enter the length of time for the IP lease.
Domain Name Server Assignment: Select Auto or Manual to get the IP address of DNS (Domain Name
Server) assigned by ISP or manually.
Domain Name Server IP: Enter the primary and secondary IP address of DNS (Domain Name Server) if
Domain Name Server Assignment is Manual. Otherwise, the VoIP Router will not be able to access hosts
using hostnames instead of IPs.
D-Link Systems, Inc.
13
DVG-N5402SP User’s Manual
MAINTENANCE
3-2 ADVANCED
3-2-1 Parental Control
3-2-1-1 MAC Filtering
Use MAC Filters to deny computers within the local area network from accessing the Internet. You can
either manually add a MAC address that are connected to the VoIP Router.
ADVANCED → Parental Control → MAC Filtering
Configure Block MAC Address:
Disable Block MAC Address – Unable the MAC Filtering
Enable Block MAC, allow following PC to access network – MAC Address that include in the list will be able to connect to the
network.
Enable Block MAC, deny following PC to access network – MAC Address that include in the list will not be able to connect to
the network.
MAC Address: Enter the MAC of the computer in the LAN (Local Area Network) to be used in the MAC
filtering list.
DHCP client list: Get the MAC address from computer that’s listed in the LAN client list.
Schedule: Select a rule in the drop down list. Rules in the list can be configured in Advanced -> Schedules.
Click the Schedules button to go to the page.
D-Link Systems, Inc.
14
DVG-N5402SP User’s Manual
MAINTENANCE
3-2-1-2 IP Filtering
Use IP Filters to deny particular LAN IP addresses from accessing the Internet. You can deny specific port
numbers or all ports for a specific IP address. The screen will display well-known ports that are defined. To
use them, click the edit icon. You will only need to enter the LAN IP address (es) of the computer (s) that will
be denied Internet access.
ADVANCED → Parental Control → IP Filtering
Enable IP Filtering: Check the box to deny particular LAN IP addresses from accessing the Internet.
IP: Enter the IP address that you want to deny in this filed.
TCP/UDP: Select TCP, UDP or Both that will be used with the IP address that will be blocked.
Remark: Enter comments.
D-Link Systems, Inc.
15
DVG-N5402SP User’s Manual
MAINTENANCE
3-2-1-3 Port Filtering
Port filtering enables you to control all data that can be transmitted over routers. When the port used at the
source end is within the defined scope, it will be filtered without transmission.
ADVANCED → Parental Control → Port Filtering
Enable Port Filtering: This variable is to restrict certain types of data packets by port.
Port Range: Enter the port range that will be denied access to the Internet.
TCP/UDP: Select TCP, UDP or Both that will be used with the port that will be blocked.
Remark: Enter comments.
D-Link Systems, Inc.
16
DVG-N5402SP User’s Manual
MAINTENANCE
3-2-1-4 URL Filtering
URL Filtering is used to block websites (for example, www.yahoo.com).
ADVANCED → Parental Control → URL Filtering
Enable URL Filtering: Enable or disable the URL function.
URL Black Filtering: Users unable to access the website that are listed in the URL Filtering List.
URL White Filtering: Users can only access the website that are listed in the URL Filtering List.
URL: URL (Uniform Resource Locator) is a mark method for describing the Websites on the Internet and
other resource locations.
Comment: Enter the comments.
Schedule: Select a rule in the drop down list. Rules in the list can be configured in Advanced -> Schedules.
Click the Schedules button to go to the page.
D-Link Systems, Inc.
17
DVG-N5402SP User’s Manual
MAINTENANCE
3-2-1-5 DHCP Filtering
DHCP Filtering is used to control network access based on the IP address of the network device. It is used
to deny network or Internet access.
ADVANCED → Parental Control → DHCP Filtering
Enable DHCP Filter: Enable or disable the DHCP filtering function.
ADVANCED → Firewall and DMZ → DHCP Filtering
WHITE LIST: Bind the static IP address with the specified MAC address. If the MAC address of the device
on the LAN consists with the specified MAC address, the VoIP Router assigns the binding IP address.
IP: Enter the binding IP address.
MAC: Enter the binding MAC address.
D-Link Systems, Inc.
18
DVG-N5402SP User’s Manual
MAINTENANCE
ADVANCED → Firewall and DMZ → DHCP Filtering
BLACK LIST: If the MAC address of the device on the LAN, the VoIP Router does not assign the IP
address.
MAC: Enter the MAC address of the device on the LAN.
3-2-2 Firewall and DMZ
3-2-2-1 DMZ
DMZ (Demilitarized Zone) allows the server on the LAN site to be directly exposed to the Internet for
accessing data and to forward all incoming ports to the DMZ Host. Adding a client to the DMZ may expose
that computer to a variety of security risks; so only use this option as a last resort.
ADVANCED → Firewall and DMZ → DMZ
D-Link Systems, Inc.
19
DVG-N5402SP User’s Manual
MAINTENANCE
Enable DMZ: Check the box to enable DMZ feature.
WAN Connection: Select the WAN port that enables DMZ from the drop-down list. Users can access the
DMZ host that is provided by this WAN connection through Internet access.
DMZ Host IP Address: Enter the IP address of that computer as a DMZ Host with unrestricted Internet
access.
Note: Either this function or virtual server can be selected for use in accessing external services.
3-2-2-2 Dos Protection
ADVANCED → Firewall and DMZ → Dos Protection
Enable Attack Prevent: Check the box to prevent DoS attacks from WAN or LAN. There are various types
of DoS attacking. Leave settings in this field to the default if you are not familiar with it.
D-Link Systems, Inc.
20
DVG-N5402SP User’s Manual
MAINTENANCE
3-2-2-3 Virtual Server
Enable users on Internet to access the WWW, FTP and other services from your NAT. It is also known as
port forwarding. When remote users are accessing Web or FTP servers through WAN IP address, it will be
routed to the server with LAN IP address.
ADVANCED → Firewall and DMZ → Virtual Server
WAN Connection (s): Select the WAN interface for the Internet connection. Users can access the virtual
server through the WAN connection.
WAN Port Range: Enter the port range for the WAN side.
TCP/UDP: Select the communication protocols used by the server, TCP, UDP or Both.
LAN Host IP Address: Enter the IP address of the device that provides various services.
Server Port Range: Enter comments.
Remark: Enter comments.
D-Link Systems, Inc.
21
DVG-N5402SP User’s Manual
MAINTENANCE
3-2-3 Advanced Wireless
3-2-3-1 Advanced
This section introduces advanced configuration of the wireless access point. If you are not familiar with the
following functions, keep the default parameters. In some cases, incorrect settings may reduce wireless
performance.
ADVANCED → Advanced Wireless → Advanced
Transmission Rate: You can select it from the drop-down list. Auto rate changes automatically to get
better throughput depending on the range and environment of the wireless network.
Transmit Power: You can adjust the percentage of power 100, 80, 60, 40, 20 of your VoIP Router to
change the coverage of wireless network. Keep the default value, 100% to reach full range.
Beacon Period: It indicates the frequency interval of target beacon transmission time which can be found
in a packet body. The VoIP Router transmits the beacon packet to help a wireless client to identify the
existence of nearby AP (Access Point). If the beacon intervals are too long, it would be hard to access the
network. If the beacon intervals are too short, the resources would be wasted. The default value is 100.
RTS Threshold: It is a mechanism to implement in collision avoidance. In a large wireless network, two
stations do not hear each other but can hear wireless access point. When the two send data to AP (Access
Point) at the same time, it may result in data collision and a loss of messages for both wireless stations. In
most case, it is recommended to keep the default value:2347.
Fragmentation Threshold: A packet can be fragmented into small units to pass over a network medium
that can not support the original packet size. If you encounter a busy network, a lower value of fragment
threshold could improve performance. If the traffic flows are not very busy, a higher fragment threshold
D-Link Systems, Inc.
22
DVG-N5402SP User’s Manual
MAINTENANCE
provides good network performance. In most case, it is recommended to keep the default value: 2346.
Preamble Type: It defines the length of the preamble which sends out with a packet format. Specify an
appropriate preamble type for your network. If you do not know which one to select, it is recommended to
keep the default setting.
3-2-3-2 Access Control
The Access Control setting provides a service that you can control different access rights for different
wireless clients connected to your VoIP Router. The local and remote stations are limited to access the
Internet through your AP (Access Point) using MAC address of wireless client. Choose the appropriate
Access Control Services from the option of Access Control Mode.
ADVANCED → Advanced Wireless → Access Control
Access Control Mode:
Disable: The VoIP Router does not response to any access rules. You are not allowed to modify the
configuration in this page.
Allow: If you select Allow, only those wireless clients whose MAC addresses are in the WLAN
FILTER LIST are allowed to connect to your AP (Access Point).
Deny: If you select Deny, only those wireless clients whose MAC addresses are in the WLAN FILTER
LIST are restricted and denied to connect to your AP (Access Point).
MAC: Specify the MAC address for permitting or blocking the access to your AP (Access Point).
Comment: Enter the comments.
D-Link Systems, Inc.
23
DVG-N5402SP User’s Manual
MAINTENANCE
3-2-4 Advanced Network
3-2-4-1 ALG
ALG (Application Layer Gateway) is also named the third generation firewall. When the user on the trusted
network wants to connect to the untrusted network (Internet), the application will be guided to the proxy
server of the firewall. The proxy server disguises the actual server on the Internet. It can estimate the
request, and decides the permission or deny of the request according to the rule in a suit of unit network
service.
ADVANCED → Advanced Network → ALG
D-Link Systems, Inc.
24
DVG-N5402SP User’s Manual
MAINTENANCE
3-2-4-2 QoS
LAN QoS
ADVANCED → Advanced Network → QoS
Enable LAN QoS: Check the box to enable LAN QoS by Hardware.
Priority: Use the drop-down menu to select Low or HIGH for the VoIP Router to deliver the packets from
LAN interface when the packets arrive at the same time.
Flow Control: Check the box to limit incoming and outgoing rate.
Incoming Rate Limit: Select the proper rate limit for the specific LAN port from the drop-down menu. The
flow is from LAN to WAN, and the rate limit can not exceed the real upstream bandwidth.
Outgoing Rate Limit: Select the proper rate limit for the specific LAN port from the drop-down menu. The
flow is from WAN to LAN, and the rate limit can not exceed the real downstream bandwidth.
D-Link Systems, Inc.
25
DVG-N5402SP User’s Manual
MAINTENANCE
3-2-4-3 Static Routing
Build static routes within an internal network. These routes will not apply to the Internet.
ADVANCED → Advanced Network → Static Routing
Destination Network Address: The destination IP address of the router.
Subnet Mask: The subnet mask of the destination IP address.
Use Gateway IP Address: The gateway IP address of the router.
Use Interface: The interface name of the router output port.
You can only choose Use Gateway IP Address or Use Interface.
Click Apply to save the settings.
D-Link Systems, Inc.
26
DVG-N5402SP User’s Manual
MAINTENANCE
3-2-4-4 UPNP
ADVANCED → Advanced Network → UPNP
Enable UPNP: Check the box to enable the IP traffic of the VOIP Router to pass through an Internet
sharing device.
D-Link Systems, Inc.
27
DVG-N5402SP User’s Manual
MAINTENANCE
3-2-5 Schedule
To access the Schedules window, click the schedules button in the Advanced directory.
You can add schedules in this page and then apply them to Parental Control.
Name: Enter a Name for the schedule.
Day(s): Use the radio buttons to click the desired Day(s), either All Week or Select Day(s) (in which case
you must tick the checkboxes for the desired individual days of the week),
All Day – 24 hrs: Tick to apply the rules for whole day.
Start Time: Start time in hour and minute (24 Hour Time)
End Time: End Time in hour and minute (24 Hour Time)
Click Apply to see the entry in the Schedule Rule table. To remove an entry in the table, select the entry,
and click the Delete button. To modify an entry in the table, select the entry, click the Edit button, make the
desired changes, and then click the Apply button.
D-Link Systems, Inc.
28
DVG-N5402SP User’s Manual
MAINTENANCE
3-3 MAINTENANCE
3-3-1 Device Management
MAINTENANCE → Device Management
Note: Logging in as user, you can only access to some specific settings of the VoIP Router.
Current Password: Enter the password for accessing the VoIP Router.
New Password: Modify the password for accessing the VoIP Router.
It is highly recommended that you modify the password for securing your VoIP Router.
Confirm Password: Enter the modified password again.
MAINTENANCE → Device Management
You can manage the router through the following function with the selected WAN connection.
PING: When you select the check box, you can ping the router with the WAN connection.
WWW: When you select the check box, you can access the Web server of the router to manage the router.
USB over FTP: When you select the check box, you can access your external storage through the internet
side by acting the router as a FTP Server.
D-Link Systems, Inc.
29
DVG-N5402SP User’s Manual
MAINTENANCE
3-3-2 Backup and Restore
Reboot
MAINTENANCE → Backup and Restore →Reboot
Reboot: Click the Reboot button to reboot the system.
Backup Setting
The current system settings can be saved as a file onto the local hard drive.
MAINTENANCE → Backup and Restore → Backup Setting
Backup Setting: Click the Backup Settings button to save all current settings to a file on your PC.
D-Link Systems, Inc.
30
DVG-N5402SP User’s Manual
MAINTENANCE
Update Setting
MAINTENANCE → Backup and Restore → Update Setting
To restore the system settings file, click the Browse button to search the local hard drive for the file to be
used. Once you locate the file, click the Upload Setting button to overwrite the current settings with the
settings saved to the file.
Restore Default Setting
MAINTENANCE → Backup and Restore → Restore Default Setting
Click Restore Default Setting to reset the settings of the VoIP Router to the factory default settings.
D-Link Systems, Inc.
31
DVG-N5402SP User’s Manual
MAINTENANCE
3-3-3 Dynamic DNS
ADVANCED → Dynamic DNS
Enable Dynamic DNS: Check the box to enable DDNS (Dynamic Domain Name Server) function. It is only
necessary when the VoIP Router is set up behind an Internet sharing device that uses a dynamic IP
address and does not support DDNS.
Wan Connection: Select the WAN connection that you want to configure DDNS.
Server Address: Select a DDNS service from the drop-down menu.
Hostname: Enter the URL of the system (or NAT) – applied from domain name registration providers (e.g.
www.dyndns.org).
Username or Key: Enter the user name for logging into the DDNS server.
D-Link Systems, Inc.
32
DVG-N5402SP User’s Manual
MAINTENANCE
Password or Key: Enter the password for logging into the DDNS server.
Verify Password or Key: Enter the password again for confirmation.
3-3-4 USB File Sharing over FTP
MAINTENANCE → USB File Sharing over FTP
Enabled FTP Server: Select the check box to enable the FTP server.
FTP Server Status: The current status of FTP server.
User Name: Enter the user name that accesses the FTP server.
Password: Enter the password that accesses the FTP server.
Purview: You can select View, Upload, Download for the user.
D-Link Systems, Inc.
33
DVG-N5402SP User’s Manual
MAINTENANCE
3-3-5 Diagnostics
3-3-5-1 Ping
In this page, you can use ping to verify whether a remote peer is reachable.
MAINTENANCE → Diagnostics → Ping
Ping Destination: Enter the IP address or domain name for ping.
Number of Ping: Enter the number of ping. Its range is in 1 to 100.
Ping Packet Size: Set the packet size for ping. Its range is in 1 to 5600.
D-Link Systems, Inc.
34
DVG-N5402SP User’s Manual
MAINTENANCE
3-3-5-2 Traceroute
MAINTENANCE → Diagnostics → Traceroute
Host: Enter the IP address or domain name for testing.
Max TTL: Set the survival time of the data packets during testing. Its range is in 1 to 128.
Wait times: Set the waiting time during testing. Its range is in 2 to 60.
D-Link Systems, Inc.
35
DVG-N5402SP User’s Manual
STATUS
3-4 STATUS
3-4-1 Device Info
STATUS → Device Info
For WAN Port Information, it shows IP address, subnet mask, default gateway and Domain name server. If
you use PPPoE to obtain IP, you will know if the IP is obtained through this method. If IP address, subnet
mask, default gateway is blank, it means that the VoIP Router does not obtain IP.
D-Link Systems, Inc.
36
DVG-N5402SP User’s Manual
STATUS
For LAN Port Information, it shows LAN port IP, subnet mask, and the MAC address.
For Hardware, it shows the hardware platform and driver version.
D-Link Systems, Inc.
37
DVG-N5402SP User’s Manual
STATUS
3-4-2 VoIP Status
STATUS → VoIP Status
For Port Status, it includes if each port registers to Proxy successfully, the last dialed number, how many
calls each port has made since the VoIP Router is start, etc.
D-Link Systems, Inc.
38
DVG-N5402SP User’s Manual
STATUS
3-4-3 LAN Client
STATUS → LAN Client
The LAN CLIENTS table displayed the local LAN information.
The ACTIVE WIRELESS CLIENTS table displayed the identification and transmission status of active
wireless clients on wireless LAN interface.
The DHCP CLIENTS table displayed LAN device that has already been assigned an address from
DVG-N5402SP. You can check if the DHCP client has obtain an IP address.
D-Link Systems, Inc.
39
DVG-N5402SP User’s Manual
STATUS
3-4-4 Statistics
STATUS → Statistics
It displays the information of the last call made. Press Refresh button to get the latest RTP Packet
Summary.
D-Link Systems, Inc.
40
DVG-N5402SP User’s Manual
STATUS
3-4-5 Logout
STATUS → Logout
If setting or parameter has been changed, remember to save the changes before you logout the
configuration menu.
D-Link Systems, Inc.
41
DVG-N5402SP User’s Manual
Appendix
Appendix
Product Features
WAN
• One 10/100/1000Mbps auto-negotiation, auto-crossover RJ-45 Ethernet port
• Support Static IP, DHCP, PPPoE, PPTP, L2TP, 3G USB Adapter, and Bridge.
• QoS: IP TOS (Type of Services) and DiffServ (Differentiated Services) for both SIP
signaling and RTP
• NAT Traversal : Port Forwarding, STUN and Outbound Proxy
• NTP: (Network Time Protocol RFC 1305), Accepts up to 3 Time Server
• Time Zone Support
• MAC Address Clone
• RTP Packet Summary : packet sent, packet received, packet loss for voice quality
analysis
LAN
• Four 10/100/1000Mbps auto-negotiation, auto-crossover RJ 45 Ethernet ports
• Support router and bridge mode (NAT mode and Non-NAT mode)
• DHCP server
Voice Features
• SIP (RFC3261) compatible
• Voice codecs : G.711 a /ulaw, G.726, G.729A, G.723.1, G722, iLBC
• CNG (Comfort Noise Generation)
• VAD (Voice Activity Detection)
• G.165/G.168 echo cancellation
• Adjustable Jitter Buffer and programmable Gain Control
• In-Band DTMF, Out-Of-Band DTMF relay (RFC2833, SIP INFO)
• Multiple SIP Proxy server entries with failover mechanism
• Polarity reversal generation (FXS)
• T.30 (G.III) / Real time T.38 / Secured T.38 FAX relay
• DTMF, FSK (Bellcore & ETSI) Caller ID generation.
• Support Caller ID Restriction (CLIR)
• Digit Map for dial plan
• Speed Dial
• Local phone book for peer-to-peer calling
• E.164 Numbering & ENUM support
• Hot-Line, Warm-Line support
• Single Number / Account (reprehensive number) for multiple ports
• Call features:
o Call Hold, Call Waiting, Call Pickup
o Call Forward - Unconditional, Busy, No Answer
o Call Transfer - Unattended, Attended
o Three Way Calling (Media Server required)
• Analogue interface
o Connector : RJ-11
o Signaling protocol : Loop Start
Configuration & Maintenance
• Configuration methods:
o Web
D-Link Systems, Inc.
42
DVG-N5402SP User’s Manual
•
•
•
•
Appendix
o IVR
o Telnet
Status reports:
o Port status
o Registration status
o Ping tests
o Hardware / software information
Firmware Upgrade through LOCAL, TFTP, FTP, HTTP, HTTPS server
Configuration Backup/Restore
Reset button (with restore factory default function)
D-Link Systems, Inc.
43